C-150S - Uncategorized Pearl Sports - Free user manual and instructions
Find the device manual for free C-150S Pearl Sports in PDF.

| Product Type | Digital Stopwatch / Timer |
| Brand | Pearl Sports |
| Model | C-150S |
| Display Type | LCD |
| Battery Type | CR2032 (replaceable) |
| Battery Life | Approximately 2 years under normal use |
| Water Resistance | IPX4 (splash proof) |
| Operating Temperature | 0°C to 50°C |
| Material | ABS plastic housing |
| Weight | Approximately 200 g |
| Dimensions | 7.0 cm x 5.0 cm x 2.0 cm |
| Key Functions | Stopwatch, countdown timer, alarm, date/time display |
| Memory | Stores up to 100 lap times |
| Connectivity | None |
| Maintenance | Clean with a soft dry cloth; avoid solvents |
| Safety | Do not immerse in water; keep away from extreme heat |
| Spare Parts | Battery CR2032 available separately |
| Repairability | Battery can be replaced by user; other repairs by qualified service only |
| Compliance | CE, RoHS |
Frequently Asked Questions - C-150S Pearl Sports
User questions about C-150S Pearl Sports
0 question about this device. Answer the ones you know or ask your own.
Ask a new question about this device
Download the instructions for your Uncategorized in PDF format for free! Find your manual C-150S - Pearl Sports and take your electronic device back in hand. On this page are published all the documents necessary for the use of your device. C-150S by Pearl Sports.
USER MANUAL C-150S Pearl Sports
PEARL CLOSED HI-HAT HOLDER
CLH-930
Instruction Manual
Congratulations on your purchase!
To get optimum performance of your CLH-930 Closed Hi-Hat Holder, please read this Instruction Manual before playing.
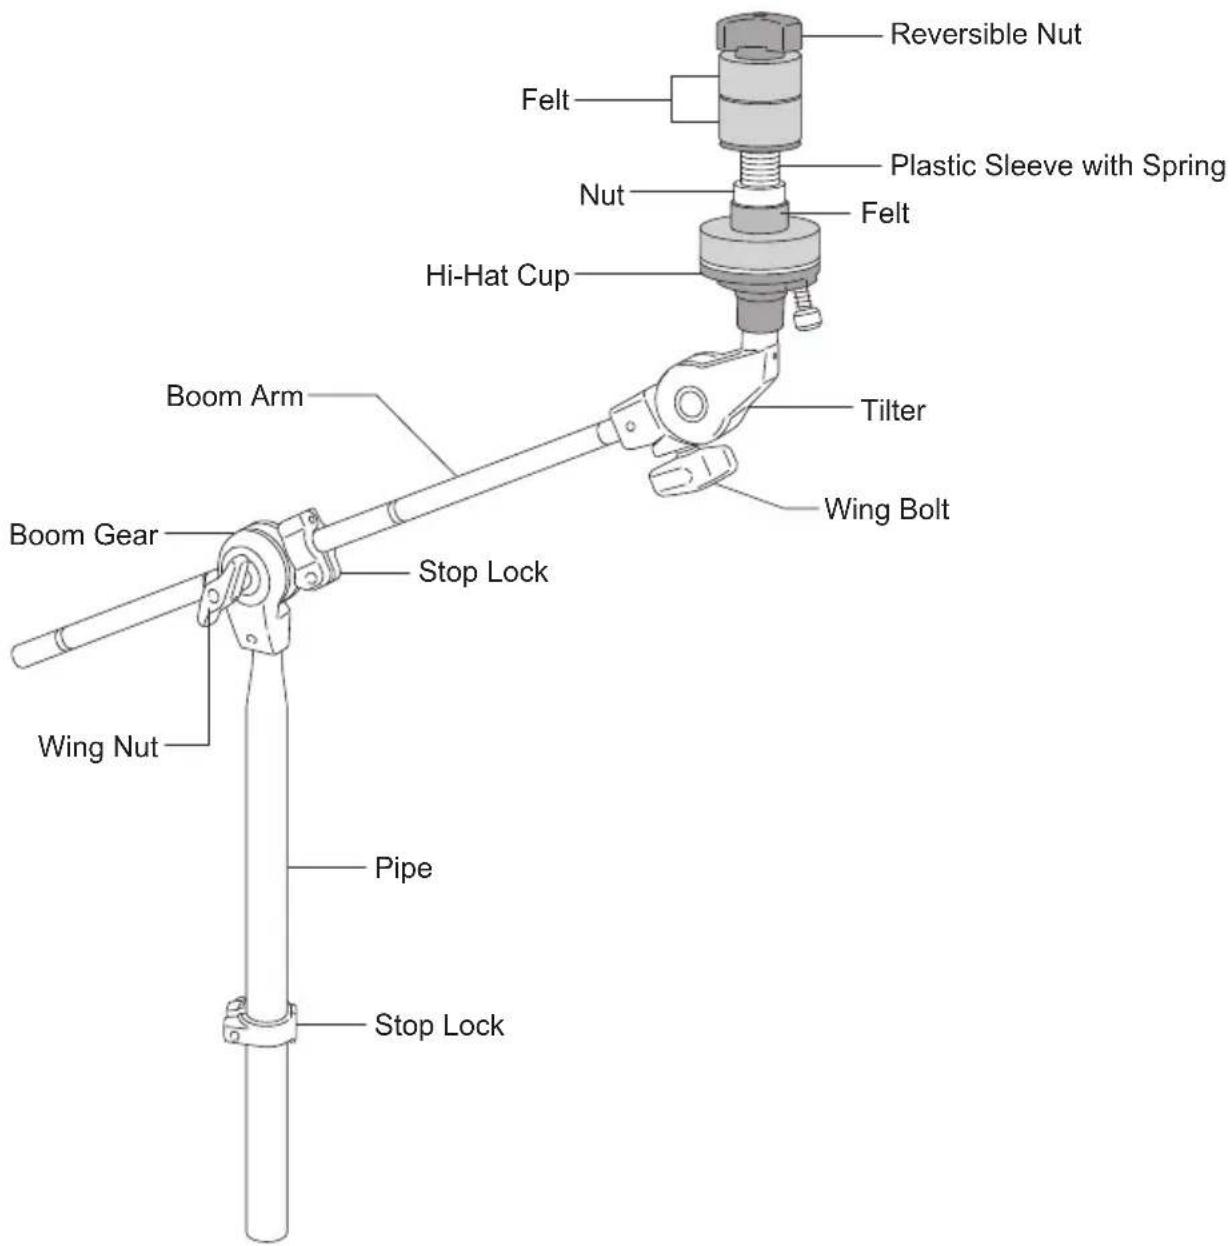
Attaching the CLH-930 to Adaptor/Pipe Clamps
Loosen the Key Bolt on the Stop Lock on the Pipe with a Tuning Key to allow the Stop Lock to slide but don't remove it. Insert the Pipe into an Adaptor or Pipe Clamp that accommodates 22.2 mm (7/8") diameter pipes. Adjust the height and tighten the Adaptor / Pipe Clamp. Slide the Stop Lock against the Adaptor / Pipe Clamp and tighten the Key Bolt with a Tuning Key. The Boom Arm is housed inside the Pipe. Loosen the Wing Nut on the Boom Gear and adjust the length and angle of the Boom Arm. Tighten the Wing Nut to secure the position. The Boom Arm is equipped with a Stop Lock that prevents the Boom Arm from slipping or rotating. Loosen the Key Bolt on the Stop Lock and position the tab on the Stop Lock into the slot in the Boom Gear. Tighten the Key Bolt to secure. Loosen the Wing Bolt on the Tilter to change the tilt of the Cymbals. Retighten the Wing Bolt to secure the setting.
Attaching the Hi-Hat Cymbals
Remove the Reversible Nut, Felts, Plastic Sleeve with Spring, Nut, and Felt in the order shown (Fig. 1).
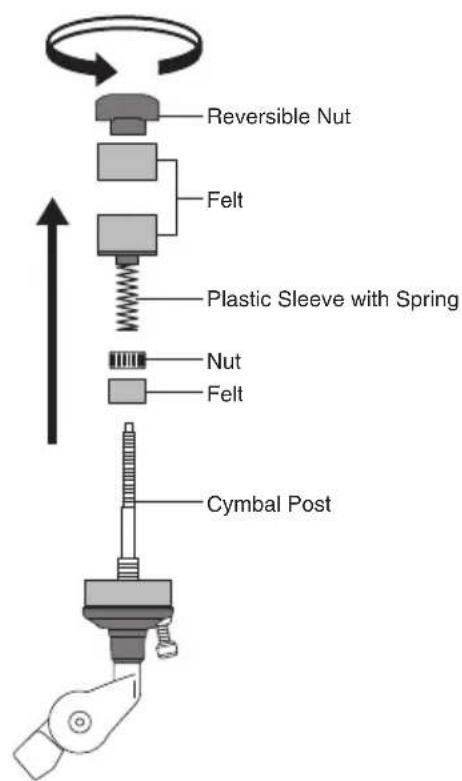
Fig. 1
Note
If the Spring comes off from the Plastic Sleeve, reattach it securely to the post at the bottom of the Plastic Sleeve before proceeding.
Place the Bottom Cymbal on the lower Felt as shown. Thread the upper Felt and Nut on the Cymbal Post and tighten the Nut to secure (Fig.2).
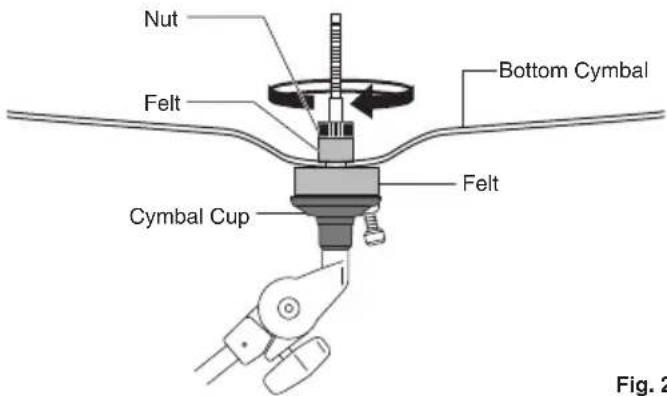
Fig. 2
Place the Plastic Sleeve with Spring over the Cymbal Post followed by the lower Felt and the Top Cymbal as shown. Press the Top Cymbal downward and attach the upper Felt and Reversible Nut as shown. Adjust the tightness of the Reversible Nut to control the amount of tightness or looseness of the Cymbals (Fig.3).
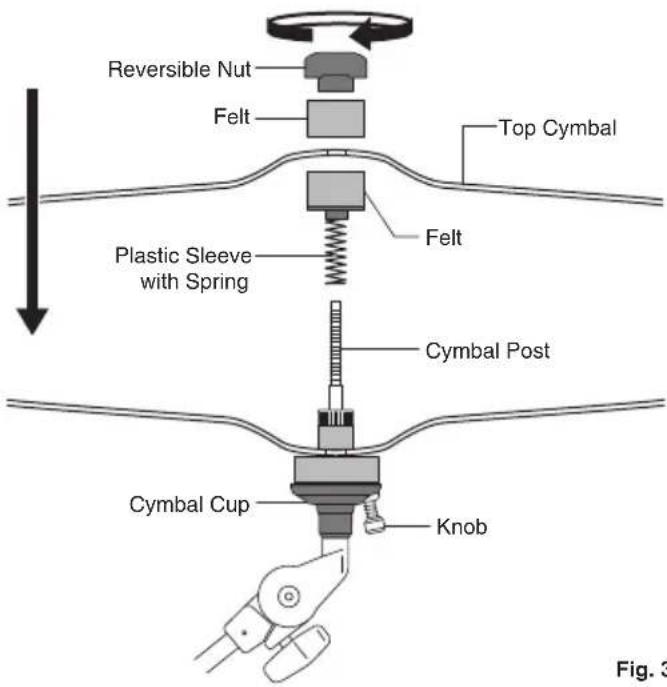
Fig. 3
CAUTION
Test the stability of the Holder before using. If necessary, readjust the length of the boom and / or the direction of the boom until the Holder is sufficiently stable.