
BC-2030 - Uncategorized Pearl Sports - Free user manual and instructions
Find the device manual for free BC-2030 Pearl Sports in PDF.


User questions about BC-2030 Pearl Sports
0 question about this device. Answer the ones you know or ask your own.
Ask a new question about this device
Download the instructions for your Uncategorized in PDF format for free! Find your manual BC-2030 - Pearl Sports and take your electronic device back in hand. On this page are published all the documents necessary for the use of your device. BC-2030 by Pearl Sports.
USER MANUAL BC-2030 Pearl Sports
Congratulations on your purchase!
To get optimum performance of your
BC-2030 Cymbal Boom Stand, please read
this Instruction Manual before playing.

natural_image
A row of evenly spaced black rectangular blocks on white background (no text or symbols)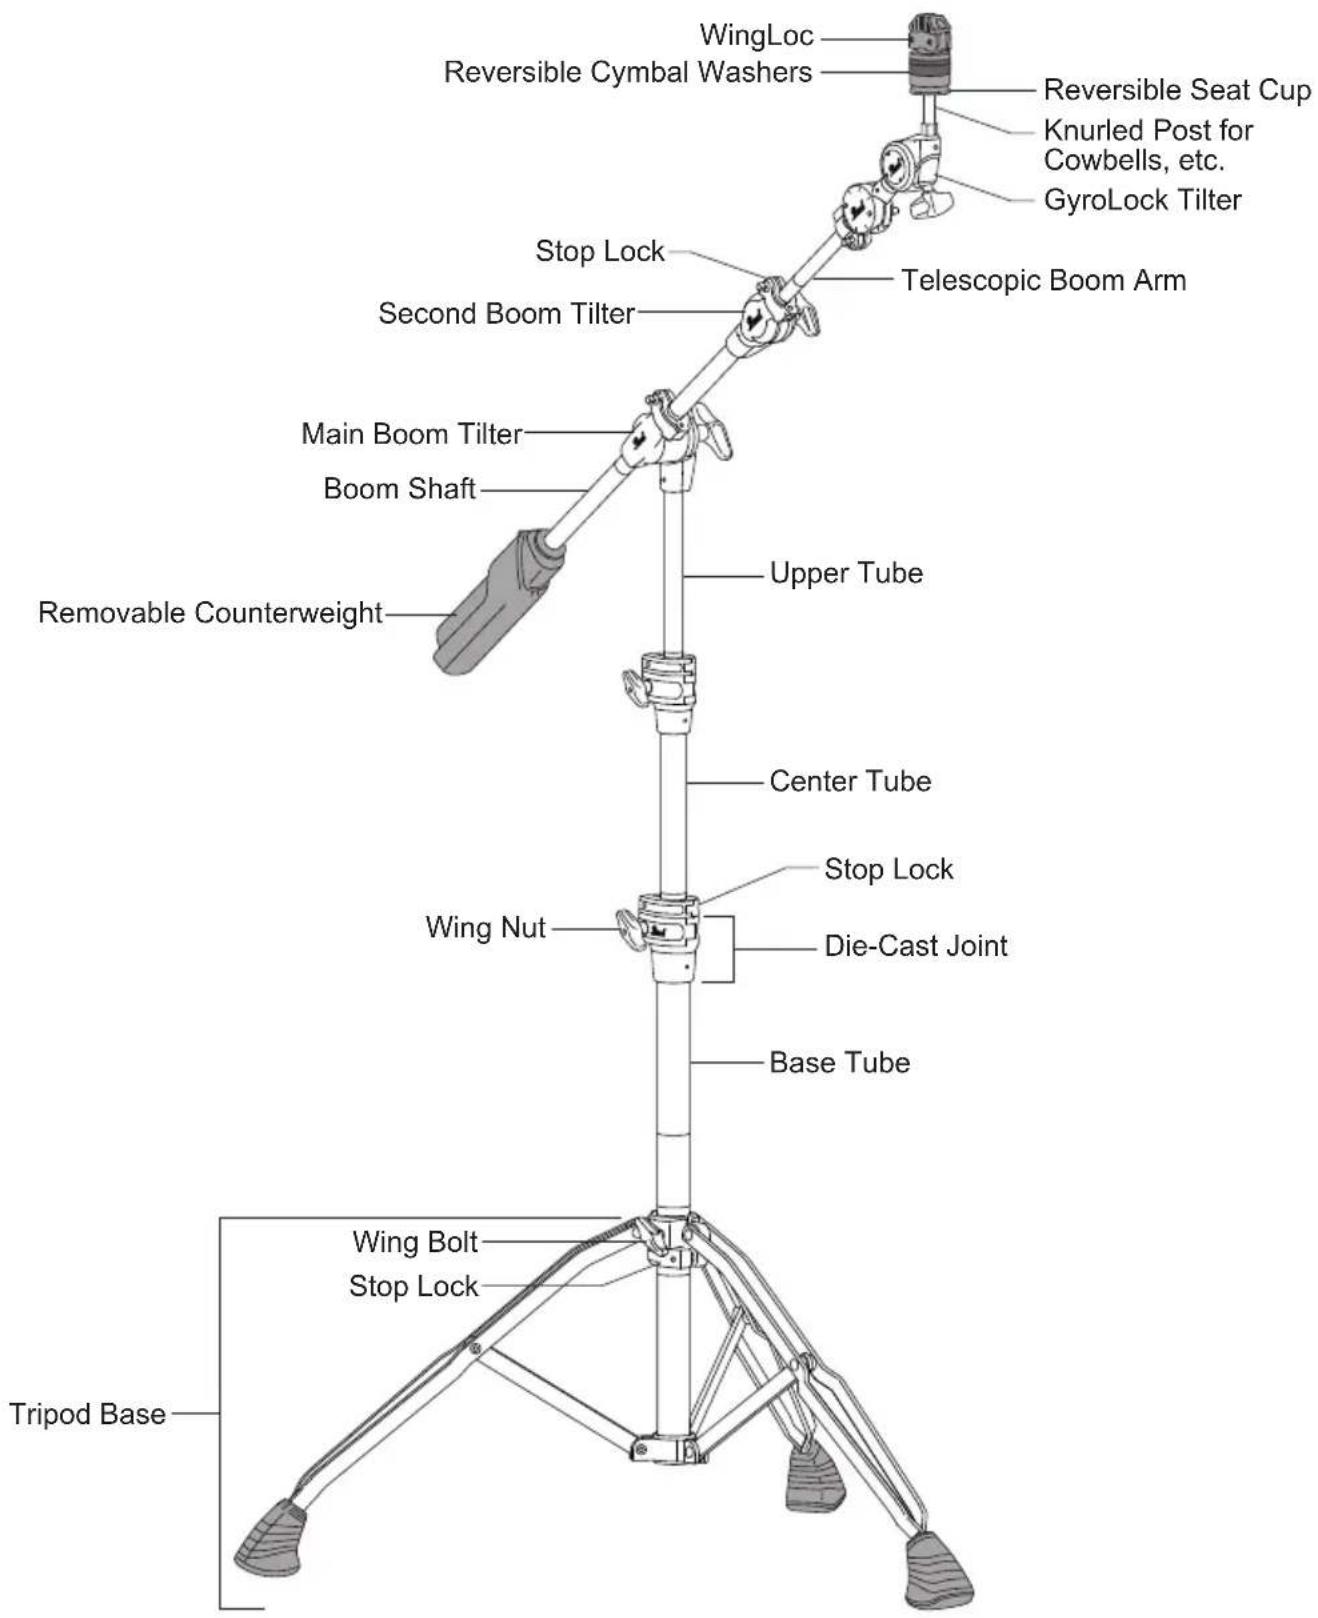
text_image
WingLoc Reversible Cymbal Washers Reversible Seat Cup Knurled Post for Cowbells, etc. GyroLock Tilter Stop Lock Telescopic Boom Arm Second Boom Tilter Main Boom Tilter Boom Shaft Removable Counterweight Upper Tube Center Tube Stop Lock Die-Cast Joint Wing Nut Base Tube Wing Bolt Stop Lock Tripod BaseWingLoc
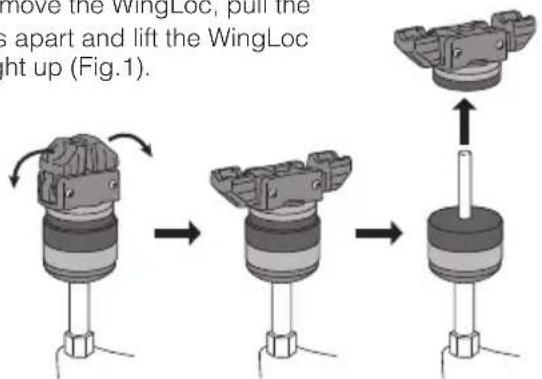
Pearl's patented WingLoc's quick release design makes attaching and removing cymbals quick and easy.
To remove the WingLoc, pull the wings apart and lift the WingLoc straight up (Fig.1).
text_image
move the WingLoc, pull the is apart and lift the WingLoc ight up (Fig.1).Fig. 1
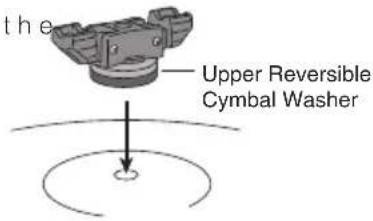
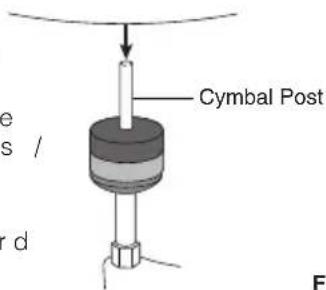
To attach, keep wings open and place the WingLoc and the Top Reversible Cymbal Washer over the Cymbal Post as shown (Fig.2).
text_image
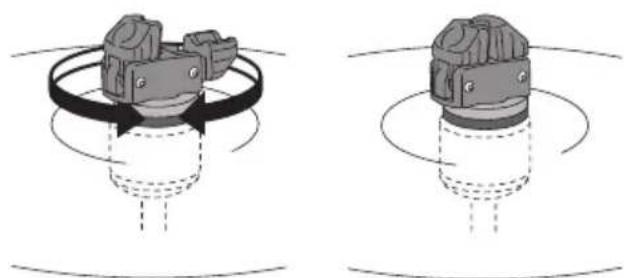
the Upper Reversible Cymbal WasherTo adjust, snap either one of the wings upward as shown in (Fig.3) and rotate the WingLoc until the desired tightness / looseness of the cymbal is achieved. Snap the other wing upward (Fig.4) to lock the Wing-Loc in place.
text_image
e s / r d Cymbal Post FFig. 2
natural_image
Two identical diagrams showing a mechanical component with rotational arrows, no text or symbols present.Fig. 3 Fig. 4
NOTE
- Do not force the wings closed. If you feel resistance, rotate the WingLoc slightly to align the threads and try closing the wings again.
- Do not tighten the WingLoc when both wings are in the locked position to prevent wear to the threads.
- Keep WingLocs in the locked position when transporting to avoid breakage or loss.
Reversible Seat Cup
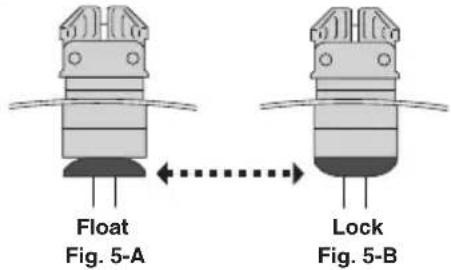
The Seat Cup is reversible and can be set to Float, to allow cymbals to move freely, when set in the position shown in (Fig.5-A) or it can Lock, to prevent rattle in recording situations, when set in the position shown in (Fig.5-B).
text_image
Float Fig. 5-A Lock Fig. 5-BReversible Cymbal Washer
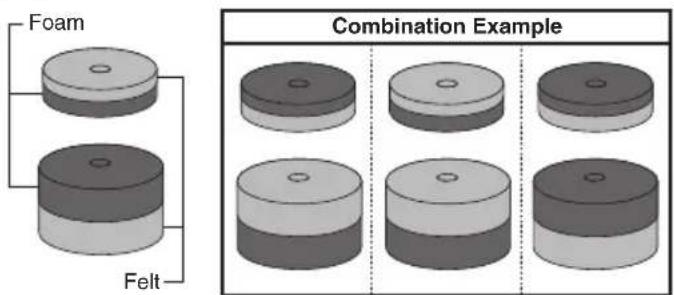
The BC-2030 stands are equipped with Reversible Cymbal Washers with a Felt side and Foam side. With the Foam side against the cymbal, a bright, clear sound with long sustain is achieved. The Felt side gives a warmer and softer sound. Mix and match the top and bottom Reversible Cymbal Washers to find the sound you like best (Fig.6).
text_image
Foam Felt Combination ExampleFig. 6
GyroLock Tilter
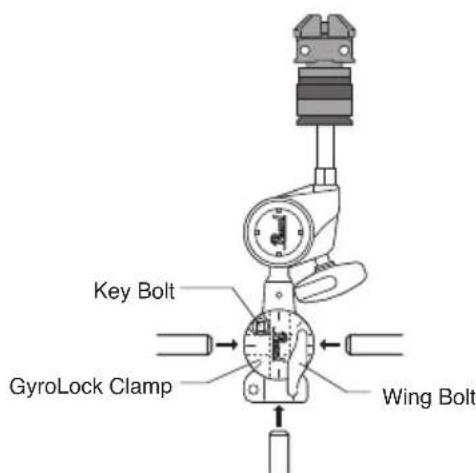
The GyroLock Tilter is removable and can be attached at the end or through the middle of the GyroLock Clamp as shown in (Fig.7). For best grip, keep the two halves of the GyroLock Clamp parallel by adjusting the Key Bolt and Wing Bolt accordingly.
text_image
Key Bolt GyroLock Clamp Wing BoltFig. 7
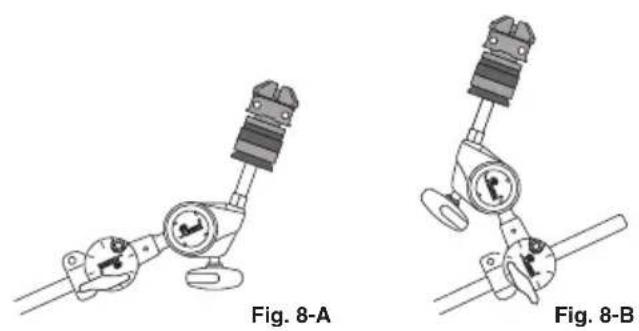
A Stop Lock is provided to keep the GyroLock Tilter secure while playing. To set the Stop Lock, loosen the Key Bolt and slide the Stop Lock against the GyroLock clamp with the prong of the Stop Lock fitted to the groove of the GyroLock clamp, then tighten the Key Bolt securely (Fig.8-A and Fig.8-B).
Adding GyroLock Tilters
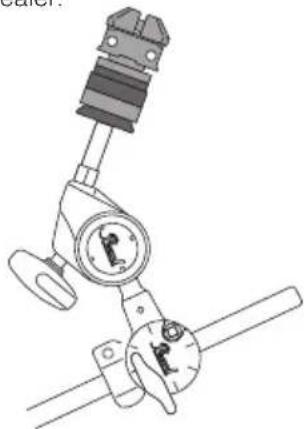
The BC-2030 will accept two or more GyroLock Tilters for added versatility (Fig.9). Additional GyroLock Tilters, part number TL-2030, can be purchased separately from an authorized Pearl dealer.
natural_image
Technical line drawing of a mechanical device with no visible text or symbolsFig. 9
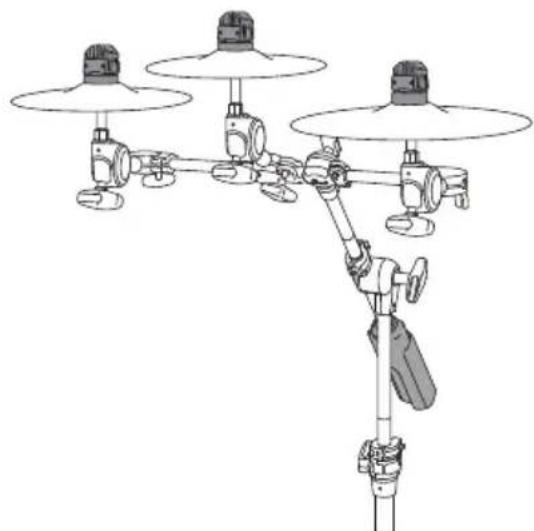
The Telescopic Boom Arm can be swiveled horizontally and two or more GyroLock Tilters can be attached as shown in (Fig.10).
natural_image
Diagram of a three-tiered DMR (Drain Rate) system with no visible text or symbolsFig. 10
Dual Boom Tilters
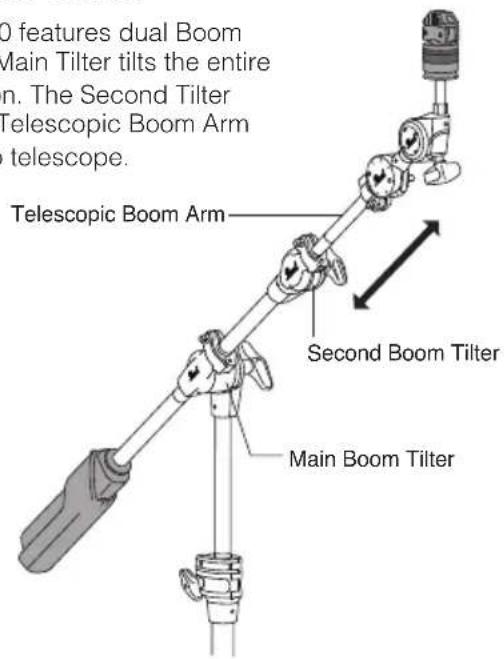
The BC-2030 features dual Boom Tilters. The Main Tilter tilts the entire boom section. The Second Tilter permits the Telescopic Boom Arm to pivot or to telescope.
text_image
D features dual Boom Main Tilter tilts the entire in. The Second Tilter Telescopic Boom Arm telescope. Telescopic Boom Arm Second Boom Tilter Main Boom TilterSingle Boom Tilter
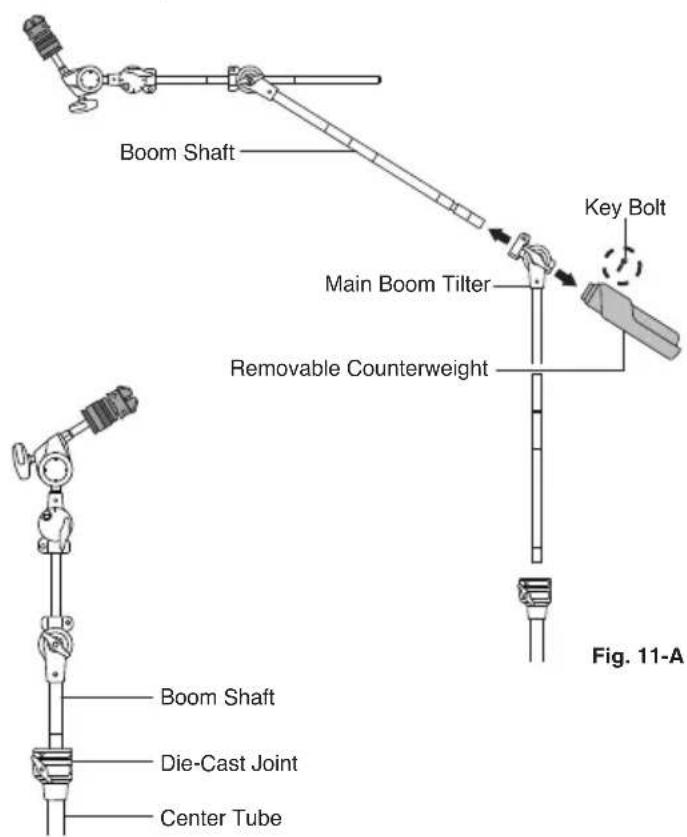
If you wish, the BC-2030 can be converted to a boom / cymbal stand with a single boom tilter. To make this conversion, loosen the Key Bolt on the Counterweight and pull the Counterweight off the Boom Shaft then remove the Boom Shaft from the Main Boom Tilter as shown in (Fig.11-A). Insert the Boom Shaft into the Die-Cast Joint of the Center Tube as shown in (Fig.11-B). Set the height to your preference and tighten the Wing Nut on the Die Cast Joint securely.
text_image
Boom Shaft Key Bolt Main Boom Tilter Removable Counterweight Boom Shaft Die-Cast Joint Center Tube Fig. 11-AFig. 11-B
Nodal Point Markings
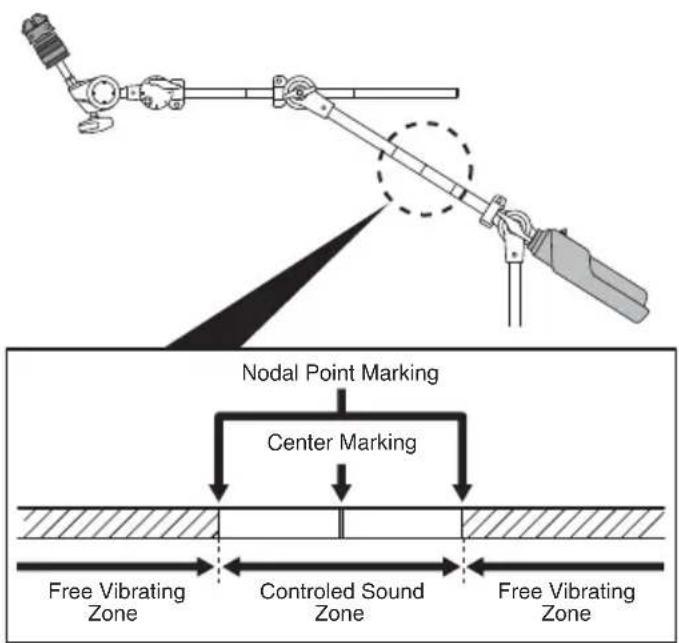
The BC-2030's Main Boom Shaft, Upper Tube, Center Tube and Base Tube are marked in the center and at the two Nodal Points as shown in (Fig.12). Clamping the Main Boom Shaft, Upper Tube, Center Tube and Base Tube outside the two Nodal Point Marks allows the cymbal to vibrate freely (Fig.12). Clamping the Main Boom Shaft, Upper Tube, Center Tube and Base Tube between the two Nodal Point marks achieves a more controlled cymbal sound (Fig.12).
text_image
Nodal Point Marking Center Marking Free Vibrating Zone Controlled Sound Zone Free Vibrating ZoneFig. 12

CAUTION
- When making height adjustments, use one hand to support the tube while using your other hand to control the tension of the wing nut/wing bolt to prevent the tube from slipping and pinching fingers that may be in the way.
- When folding the tripod legs, be careful not to pinch your fingers between the legs and the stand.
- When handling tubular hardware do not put your fingers into the tubes to prevent injury to your fingers.
- For optimal stability, orient one leg in the same direction as the boom.
Test the stability of the stand before using. If necessary, readjust the length of the boom, the direction of the boom, or weight of the load until the stand is sufficiently stable.