
Mimic Pro - Drum counter Pearl Sports - Free user manual and instructions
Find the device manual for free Mimic Pro Pearl Sports in PDF.


| Product Type | Electronic Drum Sound Module |
| Brand | Pearl Sports |
| Model | Mimic Pro |
| Dimensions (approx.) | Width: 330 mm, Depth: 200 mm, Height: 70 mm (estimated) |
| Weight (approx.) | 3.5 kg (7.7 lbs) (estimated) |
| Power Supply | DC 12 V, 3 A (AC/DC adapter included, input 90-230 V AC) |
| Display | 7-inch IPS touchscreen |
| Trigger Inputs | 16 (compatible with most pads and cymbals, dual/triple zone, choke) |
| Audio Outputs | 16 balanced line outputs (6 TRS, 8 via DB25, plus stereo headphone) |
| Internal Storage | 120 GB Solid State Drive (SSD) |
| Sample Library | Steven Slate Drums 5 (SSD5) + SSD4, 24-bit multi-channel, up to 28 velocity layers, 12 round robin |
| Number of Instruments | More than 120 instruments, over 60 preloaded kits |
| Effects | EQ (5-band), Compressor, Reverb per instrument; global effects |
| Mixers | Two independent mixers: Phones Mix and Master Mix |
| Connectivity | MIDI In/Out (5-pin), USB Host for flash drive, AUX In, Ext RJ45 (future) |
| Metronome | Built-in with adjustable tempo and time signature |
| Playback & Recording | Play backing tracks from USB or AUX; record performances to USB |
| User Sample Import | Import custom WAV files (16/24-bit, 44.1 kHz, max 20 sec) via USB |
| Maintenance & Cleaning | Use a dry soft cloth only; no chemicals; protective film recommended for screen |
| Safety Precautions | Avoid moisture, extreme temperatures, vibration; use dedicated power outlet; turn off before connections |
| Spare Parts / Repairability | Power supply and cables replaceable; internal SSD not user-serviceable; contact Pearl for service |
Frequently Asked Questions - Mimic Pro Pearl Sports
User questions about Mimic Pro Pearl Sports
0 question about this device. Answer the ones you know or ask your own.
Ask a new question about this device
Download the instructions for your Drum counter in PDF format for free! Find your manual Mimic Pro - Pearl Sports and take your electronic device back in hand. On this page are published all the documents necessary for the use of your device. Mimic Pro by Pearl Sports.
USER MANUAL Mimic Pro Pearl Sports
• A powerful, modern drum module designed for incredible sound and performance.
- Steven Slate Drums 5 sample library - 24 bit multi channel samples. Each instrument supports adjustment of Attack, Sustain, Release, Tune, Pan, Volume (including separate volume for close, overhead and room mics), Dynamics Response and Velocity Curve. Separate velocity and volume adjustment for each articulation inside instruments (cross stick, etc.), easily customizable articulations for each zone on connected pads.
- More than 120 instruments with several velocities and round-robin hits. More than 60 easily customizable drum kits. Create new instruments with kick and snare layering. Individual effects for each instrument (Eq/Compressor). Use the USB flash drive to import custom samples and songs.
• 16 trigger inputs - compatible with Pearl Tru-Trac Pads and most other pads. All cymbal and aux inputs have Choke function. Supports dual and triple zone cymbals as well as dual zone Hi-Hat.
• 16 balanced line outputs and stereo headphones mixed independently - Two separate mixers for headphone and line outs - the drummer gets a personal mix that does not affect master out or direct outputs.
• 120GB Solid State Drive for instrument storage plus USB flash drive for removable storage.
• MIDI in and out for external triggering and midi recording.
- 7" IPS Touchscreen.
• Built-in metronome. Play backing tracks using USB flash drive or AUX input. Record and store performances to Flash drive.
FROM THE DESIGN TEAM
Pearl Mimic Pro is a revolutionary new breed of electronic drum sound module. For the first time in electronic drums the module has full resolution, multi microphone, and 24 bit samples. Adjustable routing to the 16 outputs allows for incredible flexibility. For quick and easy operation, Mimic Pro has an IPS LCD touchscreen and a push button Data Wheel (encoder). Mimic Pro has two mixers – headphones and main mix - for perfect monitoring and perfect sound at FOH. Mimic Pro has more than 120 instruments in the factory library and a 120GB SSD drive to expand your sound with new sample packs. Mimic Pro even allows you to import custom samples!
FROM THE SSD TEAM
The sounds inside Mimic Pro are the best drum samples ever created. They are called Steven Slate Drums or SSD. Mimic Pro's factory sound library has the newest SSD-5 drum samples library and as a bonus it also has components from the SSD-4 drum sample library. These are all full resolution multi mic 24 bit samples with velocity layers. They have alternative hits per each velocity layer which is also called round-robin. Another feature of Mimic Pro is articulations, the area on a drum where the drummer strikes it or characteristics of a certain playing technique. Mimic Pro's factory library has up to 28 velocity layers with up to 12 round robin hits per each velocity layer. These hits in combination with the amount of channels in the samples plus the amount of articulations, gives the user up to 3000 samples per instrument. With a powerful physical modeling engine Mimic Pro supports up to 4096 velocities, so even if an instrument has 28 velocities, it will still have 4096 levels of dynamics, or volume. This gives users thousands of sound nuances on each instrument, something never possible in electronic drums before Pearl's Mimic Pro.
WARNINGS AND IMPORTANT NOTES
• Mimic Pro and all accessories need careful handling.
- Make sure that Data Wheel (encoder knob) is protected while Mimic Pro is being transported.
• Do not apply undue pressure on the Data Wheel (encoder knob)
• Make sure that the LCD screen is protected during transportation.
• Make sure nothing abrasive contacts Mimic Pro's LCD screen during transportation.
- Do not twist or stretch power supply cable. Handle with care.
- Do not connect Mimic Pro to an outlet that's being used with an air conditioner, refrigerator, welder, washing machine, microwave oven – anything that has a motor or inverter. This may cause noise, improper function, or even hardware damage.
- Try to avoid using the unit near strong electromagnetic emitting devices (big transformers, satellite transmitters, etc) as well as high power wireless hardware.
• Make sure to turn off the power before making any connections.
- Never switch off Mimic Pro immediately after an operation is finished, such as copying to or from a USB stick. Always wait at least 5-10 seconds.
• Use only a dry soft cloth to clean Mimic Pro. Never use any chemicals to clean Mimic Pro.
- You can use a protective film (like used on smart phones) to prolong the LCD screen life and protect it from possible damage.
- If there is a malfunction, all data on Mimic Pro's internal storage (solid state drive) may be lost, or damaged. Please backup your data.
• Do not expose Mimic Pro to high vibration levels.
• Do not bend and drop Mimic Pro.
• Do not expose Mimic Pro to high humidity.
• Do not use Mimic Pro in temperatures below 0° Celsius, 32° Fahrenheit.
• Do not keep Mimic Pro and its accessories under direct sunlight.
- Do not disassemble Mimic Pro and do not touch the contact points on connectors (especially USB).
- Keep Mimic Pro away from dust and liquids.
TABLE OF CONTENTS
| 2 | Overview |
| 3 | Warnings & Notes |
| 4 | Table of Contents |
| 5 - 6 | Connections |
| 7 | Home Screen |
| 8 | Setting Up |
| 9 | Operation / Touch Screen |
| 10 | Data Wheel |
| 11 | Setup |
| 12 | Quick Start |
| 13 - 14 | Home Screen |
| 15 - 17 | Calibrating the Hi-Hat |
| 18 | Hi-Hat Control Curve |
| 19 | Dynamics |
| 20 | Trigger Settings Threshold |
| 21 | Trigger Settings Rimshot Threshold |
| 22 - 23 | Advanced Triggered Settings |
| 24 | Triggering Settings Kit Instrument Assign |
| 25 | Triggering Settings Zone Volume |
| 26 | Triggering Settings Curves |
| 26 | MIDI |
| 27 | Triggering Settings Crosstalk Suppression and Ride Split |
| 28 | Setting Up a Pad with the Mimic Pro Preset Trigger List |
| 29 | Steps to Setup a New Pad without It Being Listed |
| 30 - 32 | Edit Kit |
| 33 - 34 | Mixer |
| 35 | Phones Mix and Master Mix |
| 35 - 42 | Mic, Mod, FX Adjustments Working in Kit Presets |
| 43 | Metronome |
| 44 | Setlist |
| 45 | Player |
| 46 | Recorder |
| 47 - 51 | Settings |
| 52 | Instruments List |
| 53 | Specs / Credits |
| 54 | Declarations of Conformity |
| 55 - 70 | ADDENDUM - CHANGES AND NEW FEATURES IN 1.0.3 UPDATE |
CONNECTIONS

Rear Panel (where all Mimic PRO connections are made)
- TRIGGER INPUTS – Connect the triggers of your drum pads and cymbals to the appropriate inputs. Use only standard 1/4" TRS cables for multi zone or TS cables for single zone connectors and high quality, shielded cables to connect to Mimic Pro.
- EXT & USB - Use a standard USB cable or thumb drive to connect to the module and add additional sounds. The EXT RJ45 connection is of future expansion.
- MIDI IN/OUT - Use a standard five-pin MIDI cable to transfer MIDI data to and from an external MIDI source.
- LINE OUT 1 - 6 - Six balanced TRS outputs.
- HEADPHONE JACK - Connection for a pair of stereo headphones or in ears device.
- POWER IN - Connect the DC power supply to this terminal. Secure the power cable to the cable clip to prevent accidental unplugging.
- AUX IN - Use a standard TRS cable to connect Mimic Pro to an external analog signal source.
- LINE OUT 7-14 -Use a DB25 cable to access channels 7-14.
CONNECTIONS
![graph LR A["Local AC Voltage 90-230v"] --> B["AC Voltage DC Voltage"] B --> C["AC/DC Converter M12030 0B911"] C --> D["Electronic Drum Module "Mimic PRO""] D --> E["Analog Audio Signal Outputs (16x)"] E --> F["Audio Interface, PA system, audio mixer or headphones"] G["Trigger Pads or elect…](/content/2026/05/886166/images/cd19743b634549b01023572899dbf741e4acdd1465f9188a904d44ee8fb93da1.jpg)

Pic 1: Side Panel
- POWER - Press to turn power ON and OFF.
- BOOT - For use with software updates.
- SD CARD SLOT – Future expansion.
HOME SCREEN
![78 910 HEADPHONES [U] AUX INPUT CLICK TRACK PLAYER SETLIST: Main Kit List PLAYLIST TEMPO 60 BPM 4/4 KICKS SNARES TOMS OVERHEAD ROOM METRONOME ON 12 13 14 718](/content/2026/05/886166/images/359a7f96017421ee59204f7f7dae8706506e87ee6a2f08798661a713d740a29f.jpg)
The volume control adjustments on the Home screen only affect the headphone levels. Windows that contain two squares in the upper right corner require a double tap to enter.
- HEADPHONES - Adjust the volume level of the headphones output by dragging your finger to the desired setting. The Data Wheel default function controls headphone volume.
- AUX INPUT - Adjust the volume level of an external sound source by dragging your finger to the desired setting or double tap the Aux Input window to activate the Data Wheel. Press the Data Wheel to lock in your setting.
- CLICK TRACK - Adjust the volume level of the click track by dragging your finger to the desired setting or double tap the Click Track window to activate the Data Wheel. Press the Data Wheel to lock in your setting.
- PLAYER - Adjust the volume level of your playback by dragging your finger to the desired setting or double tap the Player window to activate the Data Wheel. Press the Data Wheel to lock in your setting.
- PLAY/FAST FORWARD/REWIND - Navigate your playback with these touchscreen buttons.
- PLAYLIST - Double tap to access the Playlist window.
- KIT DISPLAY SCREEN – This window displays the name of the kit that is currently selected.
- KIT SCROLL WINDOW – Navigate forward and backward through Mimic Pro's kits.
- SETLIST: MAIN KIT LIST – Build a setlist of kits in performance sequence with assigned tempo settings for each kit. Double tap to access the Setlist window.
- TEMPO - Adjust the metronome time signature and BPM. Double tap to access the Tempo window.
- HOME – Press the Home icon in any screen to return to the Home menu.
- VOLUME FADERS - Independently adjust the volume for the Kicks, Snares, Toms, Overhead, Room and Metronome in the headphone mix.
- METRONOME ON - Turns the metronome on and off.
- MIXER - Access the Mixer menu through this window.
- TRIGGERS – Access the Trigger settings menu through this window.
- LIBRARY – Access the instrument library through this window.
- SETTINGS – Access the Settings menu through this window.
- RECORD – Access the Record menu through this window.
SETTING UP
• CAREFULLY UNPACK THE MODULE
- If mounting the module on the Pearl RDMM Module Mount, follow the steps below. If using without a module mount, move to "Plug in your pads".
i. Carefully turn the module upside down.
ii. Be sure to protect the screen and Data Wheel/encoder from damage.
iii. Install the mount ONLY with the included 10-32 screws.
iv. Screws that are too long will damage the unit.
- PLUG IN YOUR PADS
i. Using the diagram in the "Connections" section, plug appropriate pads into each 1/4" jack.
ii. Dress cables neatly and away from AC sources to avoid crosstalk.
iii. Do not use unshielded cables.
iv. Additional information on editing and tweaking your pads is included in the Trigger section.
v. The default settings are for Pearl Tru-Trac pads.
i. Plug in headphones to the 1/4" headphone jack on the back of the unit.
The volume is controlled digitally via the encoder & touchscreen.
ii. Be sure to lower the volume before you start playing, and slowly raise to a comfortable level.
iii. The headphone output has it's own mixer,
where each instrument can be adjusted independently.
• CONNECT TO OTHER AUDIO EQUIPMENT
i. Line Out 1-2 carry the Main Mix.
ii. Line Out 3-14 are assignable inside Mimic Pro.
1. Typical use would be a direct-out for individual instruments to feed a mixer or audio interface.
iii. The AUX IN can be used to input pre-recorded music, a monitor mix, or other reference source.
• CONNECTING THE POWER SUPPLY
i. Select an AC outlet that is safe from foot traffic, dry, and has at least 3 amps of current to spare. This specifically pertains to live stage performance environments where voltages could vary.
ii. Ensure that this outlet is closely related electrically to any other equipment that Mimic Pro will be connected to.
iii. Connect the AC cable to the power supply and then your local mains AC.
iv. Connect the DC cable to the Mimic Pro.
v. Turn the power switch located on the left side to the "I" (ON) position.
OPERATION
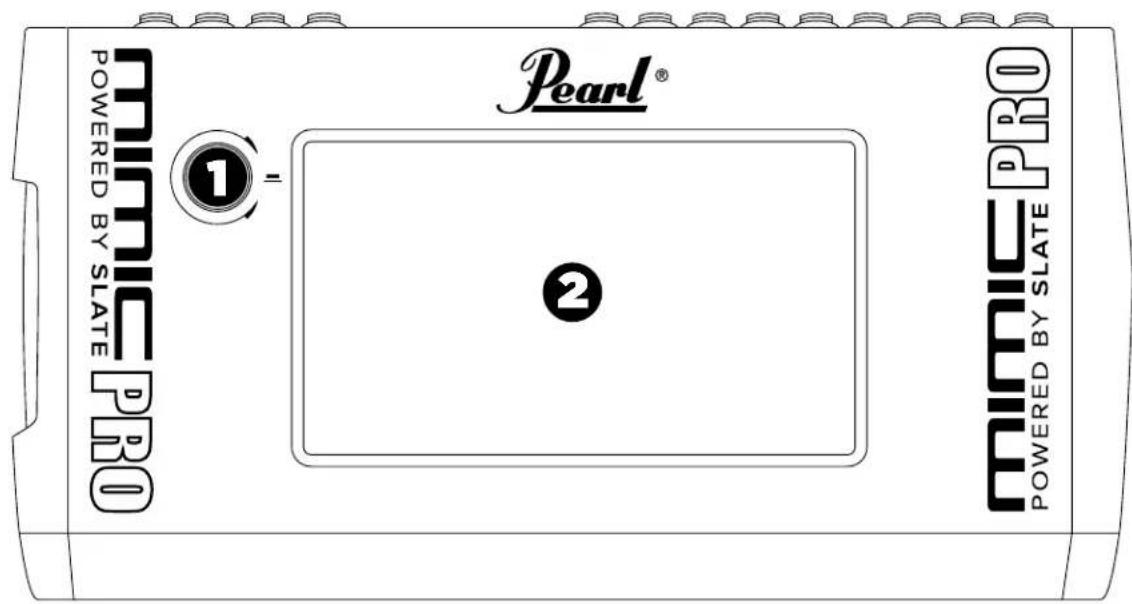
Front Panel
Mimic Pro is operated primarily through a touch screen interface. Most operations are done by tapping the screen, double tapping and dragging.
Tap on the screen to press buttons, open menus and choose positions in menus. Tap and drag to adjust faders and other continuous controls.
There are also areas on Mimic Pro's user interface that accept a double tap. On the Home Screen, double tap on the Kit Display Window, the grey bar (see Pic 3) between the headphones fader and Home button will open the Load Kit menu.
Note: You don't have to tap in the exact point on the fader. You can tap at any place inside fader frame and make adjustments. This is especially useful if your fader becomes hidden outside of the screen's visible area.
HEADPHONES
Pic 3: Home Screen, Kit Display Window.

#
Double tap the grey bar to open the Load Kit menu
DATA WHEEL
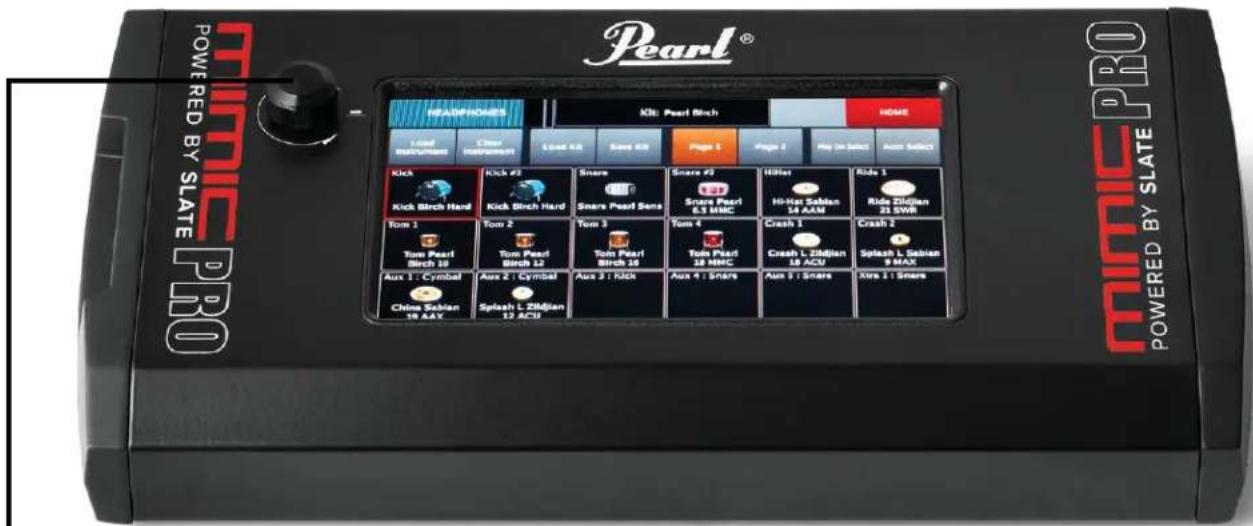
Pic 4: Mimic Pro
Mimic Pro also has a Data Wheel (encoder) which can be rotated as well as pressed to input values during some operations.
By default, rotating the Data Wheel adjusts the headphone volume fader. If controls in Edit Mode are selected, or if menus are not opened, then rotating the Data Wheel will adjust the selected fader.
When on the Home Screen, pressing the Data Wheel will open the Load Kit menu. By rotating the Data Wheel, you can scroll through the presets selections and press the Data Wheel to load the chosen kit preset.
If you double tap on a fader, a red blinking frame around the fader will appear, (see Pic 5). This means that the fader is in Edit Mode and can be adjusted using the Data Wheel. To exit Edit Mode, push the Data Wheel, or tap on any free space on the screen.

Pic 5: Fader in Edit Mode
When you open any menu, you can navigate in that menu by rotating the Data Wheel and then select the menu item by pressing the Data Wheel.
Double tapping any window with two squares in the right top corner of the box (see Pic 6) will open the corresponding menu.

Double tap on any fader to activate the Data Wheel Edit Mode.
SETUP
• MOUNTING MIMIC ON THE STAND
Carefully turn Mimic upside down, ensuring that Mimic Pro's display and Data Wheel are protected. Once turned over, screw the mounting plate to Mimic Pro's base. Do not overtighten, use gentle force only. If the screw is not threading properly, then there may be a problem with the screw (too long, or too big). Use ONLY the screws that come with the mount to prevent damage to internal components. Use only Pearl's RDMM Module Mount. After the mount is attached to Mimic Pro you can attach the module to a stand using a suitable all-purpose clamp.
• CONNECTING THE PADS
Mimic Pro supports all popular electronic drum pads and cymbals from different manufacturers. In most cases, pads must be connected to Mimic using 1/4" (6.3 mm) TRS (Tip Ring Sleeve), balanced/stereo cables. There are also unbalanced/mono cables which are the same size, called TR (Tip Ring) - these are not recommended for use with Mimic Pro. It is recommended to always use balanced/stereo connectors for pads that you are connecting to Mimic Pro.

Pic 7: Connectors Example
Most drum pads and cymbals connect via a single TRS cable except Hi-Hat and many Ride cymbals (there are some ride cymbals on the market that use single cable connection). Hi-Hat uses two cables, because it has a pad jack and controller (device which reads Hi-Hat pedal movement) jack. Ride cymbals use two cables to send to Mimic Pro signals from Bow/Edge zone and from bell zone separately.
Connect pads to corresponding Mimic Pro input jacks. The names of each input is printed on the back panel. MAKE SURE MIMIC PRO IS TURNED OFF BEFORE CONNECTING COMPONENTS. After all components are connected, turn Mimic Pro ON. Make sure you have headphones plugged into the HP output, or a PA system plugged into outputs 1 and 2 to be able to hear sound when testing.
Since Mimic Pro is designed to work with many different brands of pads, it is recommended that when you first turn it on you should choose between pad presets and set the triggering sensitivity. This is the most important step in getting the best triggering and dynamic response.
Visit the next sections, "Example Setups" and "Getting Started" for Quick Start instructions.
Visit the "Detailed Instructions" section for more information on how to tweak the advanced triggering and mixing options featured inside Mimic Pro.
QUICK START
GETTING STARTED - "QUICK START"
"Quick Start" guide - fastest way to get playing. Does NOT include advanced pad setup.

Pic 8: Quick Start 1

Pic 9: Quick Start 2

https://youtu.be/7wLHPdlwkRs
HOME SCREEN

Pic 10: Home Screen
When you power up the Mimic Pro for the first time you will see the Home Screen, see (Pic 10).
To begin triggering, you will need to address 3 things on the Home Screen.
- Make sure you turn the headphones fader down to protect your ears and headphones. You can do this on the touch screen with your finger, or simply by turning the Data Wheel.
- Double tap on the top bar to open the Kit Loading menu and load the first Kit Preset in the list by selecting it and pressing the Load button.
- Press the Trigger window (drum, sticks and gear icon) to open the Trigger Settings menu.
Step 3 will take you to the Triggers Setting screen (Pic 11).
HOME SCREEN
![1 2 HEADPHONES [U] KICK Tru Trac TTPB Bass Settings Reset To Default Auto Select Trigger Kit Instr Assign Zone Vol Curves Midi Center-Piezo](/content/2026/05/886166/images/cc7b4fa50731a2375954028e3a60889a943c6fed6517a6cb6fbbd9c483509425.jpg)
Pic 11: Triggering Settings
Understanding this screen is the most important part of getting Mimic Pro to trigger drums correctly with your playing style. On the picture, there are two menus (numbered 1 and 2 in Pic 11).
- This is the Trigger Input Channel that is currently being adjusted. Tap on the menu and choose the desired input channel to adjust. You can choose it by tapping on any position in the menu, or by turning the Data Wheel and pushing it to select.
- This is the Trigger Pad Preset Selector for the selected Trigger Input Channel, which contains presets for most pad models by major manufacturers.
To start setting up the triggering, choose your Trigger Input Channel and see if the pad connected to that trigger input is in the Trigger Pad Preset Selector list. If it's not in the preset list, select the closest pad to your pad (judging by the used technology and materials). If your pads are in the list and they are all in good condition, then you're almost set after selecting the right pad presets. The only things left to do after setting the pad presets are calibrating the Hi-Hat pad, and adjusting dynamics to your taste.

Pic 12: Trigger Input Channel
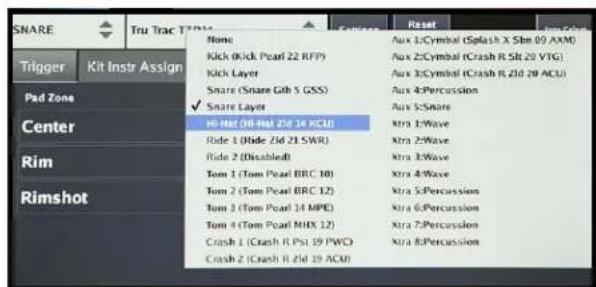
Pic 13: Trigger Pad Preset
Note: If your pad is not in the preset list (or if your pad is in the preset list, but dynamic response is off and can't be adjusted with Top Velocity as described below) go to the section Advanced Triggering Settings.
Note: The trigger input meter should never go red as seen here (Pic 14). If it's going red during normal playing, then you need to lower sensitivity and/or amplification settings. Read about that below in the section Advanced Triggering Settings.

Pic 14: Trigger Input Overload
CALIBRATING THE HI-HAT
![HEADPHONES [U] HI-HAT R-VH-11 Settings Reset To Default Auto Select Trigger Kit Instr Assign Zone Vol Curves Midi Bow-Piezo Edge-Switch HatControl-HH Pos Settings Red 1 Yellow Blue HH Control Curve Max Open: 745 Close/Open Border Threshold: 430 Max Close: 40](/content/2026/05/886166/images/f6a72282a6669a3ed8012894f7467e4ae074e1eaca42ac37f1dcfd81272a4b86.jpg)
Pic 15: Triggering Setting, Hi-Hat Controller Tab
Install the Hi-Hat pad onto a stand according to your Hi-Hat pad's manual. Hi-Hats may be single zone or dual/multi zone and they always have a controller of some type. It can be a device inside the bottom, or top hat, or a pedal with a built-in controller. The controller reads the pedal movement and translates the data into Mimic Pro. First of all, make sure that the correct controller output cable goes into the Hi-Hat controller input in Mimic Pro. Reminder - the cables must be 1/4" TRS and not a 1/4" mono connection. Next select the Hi-Hat from your trigger instrument window shown in Pic 11. Then select the correct Hi-Hat preset in the Mimic Pro's triggering settings window (Pic 13). Then proceed to TRIGGER-HH Control-HH Pos tab to calibrate your Hi-Hat (Pic 15).
Make sure that your Hi-Hat is in the fully open position. If a controller is built into the pedal, fully open means not applying any pressure on it. If the controller is on a Hi-Hat stand, the top hat must barely touch the controller's contact point without applying any pressure on it (Pic 16).
On the left side of the HH Control-HH Pos window there is a grey meter with three strips on it (number 1 on Pic 15). Strips are red, yellow and blue. Make sure that the Hi-Hat controller cable is connected to the correct input by applying pressure to the pedal. If the grey meter moves then the connections are correct.
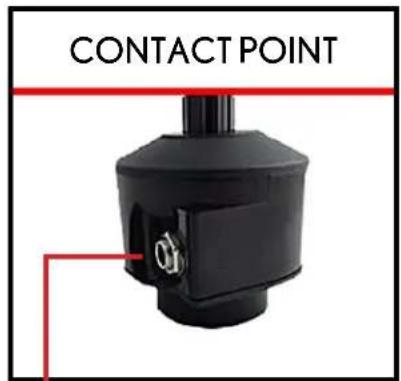
Pic 16: Hi-Hat Controller Contact Point
Like all other cables for Mimic Pro, the Hi-Hat control cable must be a TRS cable. Do not assume an existing wiring harness from another e-kit uses a TRS cable for Hi-Hat control. Many do not! Without a TRS cable from the Mimic Pro to your controller, your Hi-Hat will not calibrate or function properly.
CALIBRATING THE HI-HAT (continued)
Here are steps to calibrate the Hi-Hat:
- With the Hi-Hat wide open set the Max Open fader right on top of the grey bar as shown in Pic 15 to the red strip. You can adjust the fader using your finger or the Data Wheel. To adjust with the Data Wheel, double tap on the fader and the wheel will go into "edit mode." In edit mode the fader will have a blinking red frame, (Pic 17). To exit edit mode, push the Data Wheel, or tap on any empty space on the screen.

Pic 17: Fader in Edit Mode
- Close the Hi-Hat applying your typical maximum pressure to the pedal. Typical means – do not stand on pedal with all your weight, just close the pedal like you would playing a tight Hi-Hat. With a fully closed Hi-Hat adjust the Max Close fader so it would be right on top of grey bar. It is the blue strip in Pic 18.

Pic 18: Hi-Hat Max Close Level Setup
- Step three is very important! If the Max Open and Max Close levels are set correctly then the Hi-Hat pedal playability will depend on setting the correct value for the Close/Open Border Threshold. It is the yellow strip on the controller meter. To adjust it, imagine you are closing an acoustic Hi-Hat and the top hat barely touches the bottom hat, but the sound of the Hi-Hat is not really closed yet.
- Set the Close/Open Border Threshold fader right on top of grey meter in its current position (Pic 19). If you are not satisfied with pedal playability, try to experiment with that fader until you get the desired results.

Pic 19: Hi-Hat Close/Open Border Threshold Level Setup
CALIBRATING THE HI-HAT (continued)
To adjust the controller behavior to your taste, it is possible to adjust the Hi-Hat Control Curve (Pic 20). It has a fixed point on Max Closed, Max Open and Close/Open Border levels, but it is possible to adjust controller behavior in-between these points.

Pic 20: Hi-Hat Control Curve
Note: Some Hi-Hats, for instance, Pearl E-Pro EHH 2 may work better if you apply just a little bit of pressure on the controller contact point to pre-load the spring. To do that, loosen the clamp, put a small amount of pressure on the top hat, it will press down the spring a little, then tighten the clutch back. Make sure that grey meter moved down just a little bit. If it went down too much, then there is too much pressure.
If the Mimic Pro contains the presets for all your pads and you're finished calibrating the Hi-Hat, the next step would be adjusting the dynamics.
HI-HAT CONTROL CURVE
The Hi-Hat trigger input has a Settings Tab.
![HEADPHONES [U] HI-HAT R-VH-11 Settings Reset To Default Auto Select Trigger Kit Instr Assign Zone Vol Curves Midi Bow-Piezo Edge-Switch HatControl-HH Pos Settings Footsplash Sensitivity: 24 Close To Open: max delay: 26 Close To Open: pedal travel: 80 Hat Move Denoise: 4](/content/2026/05/886166/images/250842328817b10fdfba4208c8099f615d024c615d1a5b50a6e4cbe3c7f7bee8.jpg)
Pic 21: Hi-Hat Control Curve
Please be careful when adjusting these settings.
There are four faders:
- Foot Splash Sensitivity adjusts how the Mimic Pro reacts to the foot splash articulation. The higher values make the foot splash easier but it could increase the possibility of a foot splash sound occurring during a normal pedal chik.
- Close to Open Max Delay adjusts the speed of opening the pedal. If you are playing fast, then the lower values will be your best option and the feel would be natural. On the High settings, it will be easier to play but the natural feel will decrease.
- Close to Open Pedal Travel adjusts the release of the pedal to achieve a fully open Hi Hat sound. The Higher values achieve a stable performance but may be harder to play. Lower settings on a closed hat may trigger random open sounds. To avoid random notes, you need to apply to full pressure on the closed pedal. Values lower than 65 to 70 are not recommended.
- Hat Move Denoise is included to filter unwanted noise from the Hi-Hat stand or trigger pad. Higher values may affect the actual top hi-hat pad signal, so it is recommended to use values from 0 to 10.
DYNAMICS
ADJUSTING THE DYNAMICS WITH TOP VELOCITY FADER
Why adjust dynamics at all? The answer is simple. Most pads are using piezo sensors to pick up an audio signal, which is going into the Mimic Pro trigger inputs. All piezo sensors have different characteristics. Even the same piezo model made in one batch in the same day could have different characteristics. The difference is not huge, but it may be enough to feel. In this case you can adjust the triggering dynamics and playability in a quick and convenient way.
To quickly adjust dynamic response from the pad use Top Velocity fader, see number 1 on Pic 22.
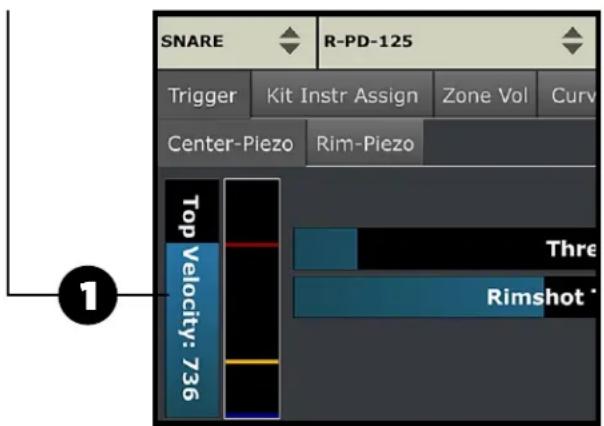
Pic 22: Top Velocity Fader
Note: Why is the pad condition important? Old, worn pads tend to have different piezo sensor characteristics. Worn pads may have low output levels from the piezo sensors. If you are using some well worn pads, you may need to make big changes to the existing preset (even if the preset in Mimic Pro matches your pad model) to be able to play the pad with the correct triggering and dynamics.
Note: Setting Top Velocity even to low values does not affect dynamic range in any way. It just makes it easier for the drummer to play or makes a more natural dynamic response.
It's important to understand how this parameter works to be able to adjust dynamic response from the pads. Basically it makes it harder, or easier to reach top velocity on the loaded drum sample instruments. The higher you set the Top Velocity value, the harder it is to reach the top velocity, you have to hit really hard to get the top velocity. The lower Top Velocity, the easier it is to reach the top velocity. You don't need to hit it hard at all and you reach the highest velocity. When are you adjusting the Top Velocity fader the red strip in the meter on the right side from that fader moves along with the top edge of Top Velocity fader.
Top Velocity adjustment is available for each zone of the connected drum pad. If you have great response on the Center zone of your snare drum pad, but you have to hit the Rim zone really hard to get the needed dynamic response, try adjusting it for the Rim zone. Same will work vice versa – if you are not hitting really hard and getting the loudest velocity then setting the Top Velocity fader to a higher value should help.
It is helpful when you need to even out the dynamic response of different zones on big pads such as crash and ride cymbals. Usually they have one piezo in the Bow zone and switches in the Edge and Bell zones. These zones are usually played with different playing techniques like hitting with tip of the stick, or with shank of the stick. This makes the dynamic response very uneven. Use Top Velocity to adjust the dynamic response of different zones on your drum pad for an even playing feel.
TRIGGER SETTINGS THRESHOLD
The Threshold parameter (see Pic 23) sets the border that controls the flow of audio being sent to the trigger. It's very important to understand how it works and how to use it.
Threshold: 10
Pic 23: Triggering Settings Threshold Fader
When you adjust the Threshold there is a corresponding blue strip moving along with the fader in the Trigger input meter, see Pic 22.
If the Mimic Pro is connected to a bad power source it can cause a hum in Mimic Pro's trigger inputs. Also if there is something vibrating, or very noisy located near your electronic drumkit, for instance, a loud bass guitar cabinet, this may create noise in your pad sensors. All this hum and noise may cause misfires. For instance, if you hear random ghost notes triggering on the snare, tom, or any other drum input, this means that there is some audio signal (hum, noise) going to that trigger input. You can filter this out by increasing the Threshold value.
Note: In some very rare conditions you may need to set Threshold parameter to very high values - 100, or even more. This may happen if, for instance, your drum kit is located on a big subwoofer. This seems extreme, but sometimes drummers have to work in these conditions.
Apart from noise described above, there is one more kind of noise that may cause false triggering – It's when you are hitting one of the pads on your drum kit and it triggers one of the other pads. This is called Crosstalk. You would have to have a separate stand for every drum to avoid this. But conditions are almost never perfect. Usually crosstalk happens when pads are mounted on the same stand, so when you hit one pad, the energy from the hit goes to the stand and reaches other pads causing false triggers. Mimic Pro has the Advanced Crosstalk Elimination System, you can read about this below in the Crosstalk Elimination section. Even though Mimic Pro has the Crosstalk Elimination System, in some cases, you can just use the Threshold fader instead. Especially if crosstalk is very minor and you don't have to increase 30-45 value.
Note: It's very important to understand that Threshold doesn't filter useless signals and only allows the actual signal from your drum pads. Threshold filters everything that comes into Mimic Pro's trigger input. So the higher Threshold value the less soft hits can be triggered by Mimic Pro. If you set Threshold to 50 on your snare drum you probably won't be able to play ghost notes, because they will be filtered by Threshold. Always use Threshold carefully and increase it in small steps checking triggering with soft hits.
TRIGGER SETTINGS RIMSHOT THRESHOLD
Unlike Threshold fader this parameter has nothing to do with filtering unwanted audio signal. Using Rimshot Threshold allows you to adjust how hard, or how easy it is to play a rimshot articulation. If your pad has a piezo in center and a switch on the rim like Pearl TruTrac pads, the Rimshot Threshold must be set on the Center zone tab only. If your pad has two piezo sensors (center and rim) like a typical mesh head electronic drum pad, it must be set on both - Center zone tab and rim zone tab.
When you adjusting the Rimshot Threshold the corresponding yellow strip on trigger input meter (see Pic 22) will move along with the fader.
Rimshot Threshold: 402
Pic 24: Triggering Settings Rimshot Threshold Fader
If you use a drum pad with two piezo sensors – one on the center and one on the rim, like typical mesh head pads then both zone tabs have a Rimshot Threshold fader – Center and Rim. This makes setting the Rimshot Threshold more complicated, but if set up correctly, you can have full dynamic range of rim articulation (rim click, or sidestick) with the ability to play rimshots. There are a few steps to setup the Rimshot Threshold on such drum pads:
- While on the Center-Piezo tab, hit the rim zone with your typical hardest hit, but don't hit it harder than you would normally play the hardest hits. Set the Center Rimshot Threshold value (yellow line on meter) just above the meter grey bar, see Pic 25.

Pic 25: Dual Piezo Pad, Center Piezo Rimshot Threshold
- While on the Rim-Piezo tab, hit the center zone with your typical hardest hit, but don't hit it harder than you would normally play the hardest hits. Set the Rim Rimshot Threshold value (yellow line on meter) just above the meter grey bar, see Pic 26.

Pic 26: Dual Piezo Pad, Rim Piezo Rimshot Threshold
After these two steps are completed you should have full dynamic range of rim articulation available for playing as well as being able to play rimshots. If rimshots are very easy to play, you may need to increase Rimshot Threshold for Rim Piezo, or for both piezos. If rimshots are too hard to play, you may need to lower the Rimshot Threshold on some of the piezos, or both piezos.
ADVANCED TRIGGERING SETTINGS

Pic 27: Advanced Settings
ADVANCED SETTINGS include parameters that allow the user to setup or adjust a pad, which is not currently in pad preset list. It is also possible that you might need to adjust these settings when a pad is worn or outdated. The characteristics of the piezo are changing with age and its performance could diminish.
When you press the Advanced Settings button, you will see more parameters than just a Threshold. There is also an Input Settings button. By pressing it you can setup the actual trigger input amplification and sensitivity. Let's take a closer look at these parameters.
DETECT TIME fader sets the amount of time that the triggering engine may have to analyze the signal. By default it's 3 ms. By setting it lower on all pads you can make latency lower, but it actually won't be noticeable. While the quality of triggering may become worse if you set it really low, the triggering engine won't have enough time to analyze the signal. But all this doesn't mean that setting it to higher values it will produce better triggering. First of all, you will make latency higher by setting it to higher values. Rarely are any useful info is sent to the triggering engine after 3-4 ms. So 3 ms works fine on most pads.
RETRIGGER CANCEL adjusts the triggering engine's ability to avoid misleading parts of the signal and not trigger them. It usually happens on acoustic drum triggering when the drums have real heads. They may perform in an unpredictable manner producing spikes and other flaws in the soundwaves after you hit the drum. Experimenting with this parameter may help in this situation.
ADVANCED TRIGGERING SETTINGS (continued)
MASK TIME sets the minimum amount of time between two hits. By default it's 10 ms which is usually enough for fast rolls and swells. 10 ms means that if you make a hit and then after 15-20 ms, for example, your next hit - it will be triggered. But if you make the next hit in less than 10 ms (which is not typical) like 5-6 ms then this next hit won't be triggered. If you set the mask time to really low values, you can get some false triggers because in some situations the triggering engine may think that one hit is actually multiple hits and may trigger multiple hits. So generally it's recommended in most cases to keep the Mask time around 6-10 ms.
HEAD-RIM BALANCE setting doesn't appear on every pad. Only on pads with two piezos, like mesh head pads. With this setting you can adjust the balance in triggering between the head and rim zones.

Pic 28: Input Settings
INPUT SETTINGS AMPLIFY (press Input Settings button to see this) adjusts the actual amplification of the trigger input. Be very careful working with this setting and try to avoid trigger input overload (meter near Top Velocity becomes red). The setting itself is pretty straight forward. There is a button with the amplification multiplier, like Normal is x1 and x2 is two times higher.
INPUT SETTINGS SENSITIVITY (press Input Settings button to see this) adjusts the sensitivity of the trigger input. It varies from 1 to 6 and typically the settings used here are from 4 to 6. Just as with Amplify settings, be careful using this to avoid trigger input overload.
TRIGGERING SETTINGS KIT INSTRUMENT ASSIGN
This part of the triggering settings is very important, because it is saved with the kit preset. So it can be unique for every kit. Here you can assign different articulations for different zones on the drum pad. There are many brands of pads available and they all differ in the type and amount of zones. Like bow, or bell on cymbals and head, or rim on shells.
On the kick and snare drum there are two layers to assign articulations to the zones. This feature gives you many possibilities. You can just mix two snare drums to get a unique sound, or you can turn off the sidestick on rim zone in Layer 1 and turn off all articulations except sidestick in Layer 2. This way you can get unique sidestick sounds just by switching drums in Snare Layer cell. You can do the same adjustment for any other articulation.

Pic 29: Kick Drum Layer 1

Pic 30: Kick Drum Layer 2
On all other trigger inputs there are no layers, so there are many options for creating unique hybrid kits. For instance you can put any sounds you want (clap, tambourine, cowbell) on tom rims. Since this settings saves with the kit preset, it can be different for each kit.
TRIGGERING SETTINGS ZONE VOLUME
Under this tab you can further adjust dynamics. It is recommended to make changes here after you're sure that the pad has been properly set up and you just need to adjust nuances to your taste. On the left side of the screen there is a Velocity Amp adjustment per each zone. On the right side there is a Volume Amp adjustment for each zone.
Velocity Amp adjusts the actual velocity triggering of the zone. Typical example of using this adjustment is when the head of the pad has a piezo and the rim is a switch. It doesn't have separate sensitivity and amp adjustment in Advanced Triggering Settings. The only way to adjust the dynamics before Velocity Amp is using the Top Velocity fader. Adjust the Top Velocity fader down but don't move it all the way down. You need to keep a fair amount of dynamic range untouched. You need to amplify the whole velocity range. That's when Velocity Amp comes into play. Go to this tab and adjust the Velocity Amp to your taste (consider making the fader value higher).

Pic 31: Velocity Amp
Volume Amp is just a volume adjustment for the zone. Typical example - You want the rimshot on the snare to be quieter or louder. Another example would be the chick on the Hi-Hat. When you don't want to adjust velocities and you want to adjust only volume - use the Volume Amp.
TRIGGERING SETTINGS CURVES
This tab contains two amazing tools to adjust dynamics to your playing style. Make sure your pad has been properly set up and then go to this tab.
Dynamics fader adjusts the dynamics of samples, but unlike Volume Amp, which adjust the volume of the whole zone the Dynamics fader adjusts the volume of the different velocities. If you set this fader to low values, then you will have less dynamic range. This means that soft hits will still be soft hits in terms of velocity layer playing, but they will sound louder. If you set this fader to higher values, the soft hits will also be soft hits in terms of velocity layer, but they will sound quieter.
Velocity Curve adjusts velocities (velocity layers) to your playing style. If you drag the dot in left bottom corner up, this will make soft hits on the pad trigger medium velocity layers in instrument. So unlike Dynamics faders this curve changes actual sample velocities according to curve that was drawn. And you basically can draw with your finger thousands of variations of the curve. To reset Velocity Curve to default settings press Reset Velocity Curve button.
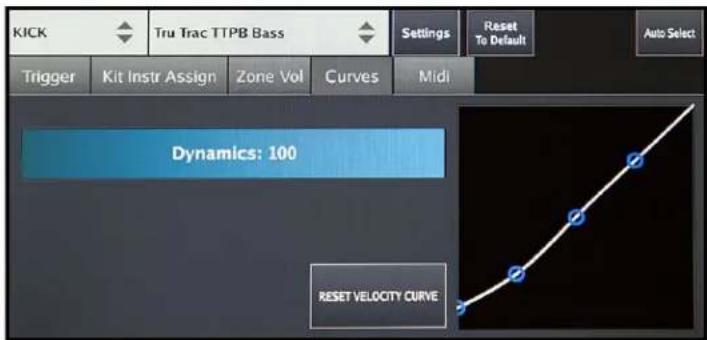
Pic 32: Dynamics

Pic 33: Velocity Curve
MIDI
In this tab you can setup MIDI notes and channels for your pad zones. You can edit MIDI Input and MIDI Output notes and channels independently from each other, or together by pressing the Link Edit button in the bottom left corner of the screen.
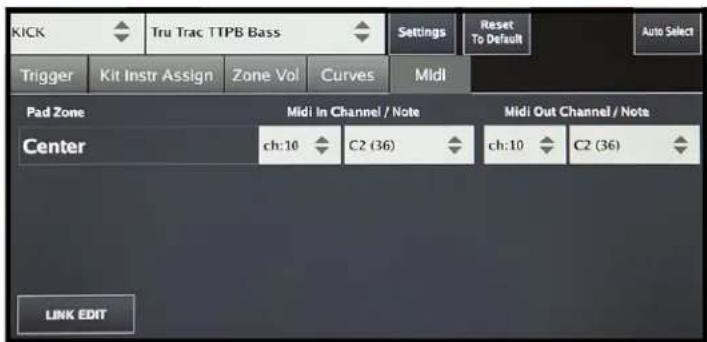
Pic 34: MIDI
TRIGGERING SETTINGS CROSSTALK SUPPRESSION AND RIDE SPLIT
In Triggering Settings main screen there is a button near the Pad Preset menu called Settings. After you press it you'll see the menu that offers to Split Ride Input and Capture Crosstalk.
Since most ride cymbals use two inputs the Mimic Pro has two inputs for 3-zone ride cymbal pads, but there are also ride cymbals on the market that have 3 zones using only one input. If you turn on the Split mode for ride input you can connect two ride cymbals, which use one input per cymbal.


Pic 35: Capture Crosstalk Pic 36: XTalk Support
Crosstalk capture allows you to eliminate crosstalk that's happening inside the kit. For instance, if you use a drum rack that hosts the entire drumkit, there will be a lot of crosstalk. When you hit one pad the vibration and energy goes through the whole drum rack to all the other pads. So when you hit a tom pad you can get the crash cymbal triggering as well. It will be almost inaudible, because it will be triggered with fairly low velocity, but it will be triggered. All electronic drums have crosstalk inside the kit and you may have some false triggers that make the playing experience far from perfect. For instance, you want to hit a tom and crash at the same time. You hit them at the same time, but the tom hit was 1 ms earlier than the crash hit and the tom hit triggered the cymbal (crosstalk), this means that your actual hit on cymbal may not be triggered. Remember, it just was triggered 1 ms before and even of it was triggered on a very low velocity it still was triggered. Considering that Mask Time is 10 ms. The two hits with less than 10 ms between them may not be triggered correctly. That's why crosstalk elimination is important.
If you have to play in conditions when all your drums are on the same drum stand and you have a lot of crosstalk you can still rely on Mimic smart Crosstalk (XTalk) Suppression.
To use the XTalk Suppression function, press the Capture Crosstalk button in the Settings menu within the Triggering Settings screen. Once you're in the XTalk Suppression screen, press the Enable XTalk Suppression
button. Now you need to go through the XTalk Learn
Procedure. Select a pad and follow the instructions on the screen. For instance, you need to capture Head and Bow (Rim) signal for the Snare drum. Press the Start Capture Head button, hit the snare head with 5 high velocity strokes, and then press the Store button. Repeat the process for the Snare Bow (Rim) and the remaining pads before pressing Exit. Make it a habit to apply the XTalk Suppression function to all your pads before a performance.
![graph TD A["Enable XTalk Suppression"] --> B["KICK"] B --> C["TOM 3"] B --> D["AUX 3"] B --> E["Start Capture: HeadBow"] E --> F["Store"] F --> G["Exit"] G --> H["Pads"] H --> I["TOM 2"] H --> J["AUX 2"]](/content/2026/05/886166/images/af4fd5b4d9d1714840a11457148707ddc0c7b2dbe128402515f832ead0a7e9c8.jpg)
Pic 37: XTalk Stunt Capture
SETTING UP A PAD WITH THE MIMIC PRO PRESET TRIGGER LIST:

Pic 38: Preset Trigger List
- Choose the correct preset for your pad.
- Adjust the Top Velocity fader for each zone.
- Adjust Threshold if needed.
- Adjust Rimshot Threshold if needed.
- Adjust Velocity Amp if needed.
- If you feel like the setting is way off (too much adjustment needed in Top Velocity or Velocity Amp and the performance is lacking) then go to section called "Steps to Set Up a New Pad, not on the Trigger List". If everything is working to your satisfaction, go to step 7.
- Try using a few different kits and adjust the Dynamics and Velocity Curve to your taste and playing style.
STEPS TO SETUP A NEW PAD WITHOUT IT BEING LISTED:
- Choose the preset, which is closest to your pad in terms of technology used. For instance, if you have a mesh head pad with two piezos, then chose something like R-PD-125 as a starting point. You can learn about technology used in your pad in your pad manual, or online.
- Set Top Velocity somewhere around 800 for each zone.
- Set Threshold close to zero.
- Go to Advanced Settings > Input Settings. Set Amplify to x1 and Sensitivity to 4. Do this for each zone, if your pad has more than 1 piezo.
- Test the drum. If you feel like you are almost there but the top velocity is too easy to peak, then try to make the Sensitivity higher. Move it to 3 and play the drum. If it is still too easy to get top velocity, try to move it to 2, or you can leave it to 3 and try to lower Amplify to x0.9, or x0.7.
- If you feel like there is not enough sensitivity and you need to hit really hard to get the desired velocity, then probably you need higher Sensitivity and Amplify settings. Try to increase the Sensitivity to 5 and, if it's not enough, to 6. If it's still not enough, then move Sensitivity to 3, or 4 and increase Amplify to x2. It's very rare when you may need to increase Amplify to x5 (like rim piezos on some mesh head pads). So try to not make it higher than x2. If x2 and Sensitivity 3 is not enough then increase the Sensitivity to 4, then to 5, then to 6. Then try lowering the Top Velocity fader. Only then, when you feel like Amplify x2 is really not enough you can try Amplify x5.
- Set the Threshold. If you set it close to zero before, then set it to 10, or 20. Try playing the drum with occasional ghost notes and adjust Threshold to the value where the ghost notes are still there.
- Adjust the Top Velocity fader.
- Set the Rimshot Threshold.
- Set Head-Rim balance if needed.
- Set Velocity Amp if needed.
EDIT KIT
The Edit Kit screen has two pages with cells to load instruments in them. It is easy to load, modify, and create new kits.
Each cell represents a Mimic Pro trigger input (e.g. Kick, Snare, etc). There are also Xtra type of cells (e.g. Xtra 1). These cells can be used with an external MIDI controller, keyboard, multi-pad to trigger instruments from the device. Use Xtra cells to create unique hybrid kits by loading various instruments and assigning them to different pad zones in the Triggering Settings Kit Instruments Assign tab. For instance, you can load claps, tambourines, or even small parts of your tracks and assign them to the tom's rims.
It is important to remember that any changes made to the User Kit preset will be automatically saved to the module. If you want to experiment with a User Kit preset that you love and you don't want to lose it by changing anything in the kit, don't make changes in that preset, because it will alter the kit. If you want to experiment with settings in the kit preset, clone it first (check New Kit section below).
Edit Kit screen controls:

Pic 39: Edit Kit
EDIT KIT (continued)

Pic 40: Edit Kit Controls
AUTO SELECT
Auto Select button is located in the right bottom corner. When it's turned on, you can select a cell by hitting the corresponding pad.
PLAY ON SELECT
Play on Select button is located next to Auto Select. When it's turned on, you can audition already loaded instruments by tapping on the cell on the screen.
PAGES
Page I and Page II button switch pages. There are two pages with cells.
NEW KIT
New Kit button lets you create new kit presets. When you press this button, you'll see a dialog asking "Clone Current Kit?". If you press YES, then the currently loaded kit preset will be duplicated and you can save it under different name, experiment with settings, or change any instrument. If you press NO, then a new empty kit will be created. All cells will be empty, FXs and mix balance will be reset. This is the correct way to create kits from the beginning.
LOAD KIT
Load Kit button takes you to the Load Kit menu. You can select a kit by tapping on the name and load a kit by pressing the Load Kit button in that menu. You can also delete kit presets by pressing the Delete Kit button. To exit from that menu to the Edit Kit screen, press the Exit button in the bottom right corner.
CLEAR INSTRUMENT
Clear Inst button lets you clear the selected cell. The loaded instrument will be removed and the cell will be empty. Use this if you want to remove an instrument from the cell.
EDIT KIT (continued)

Pic 40: Edit Kit Controls
LOAD INSTRUMENT
Load Inst button let's you load instruments in a selected cell. When you press this button, it takes you to the Instrument Loading menu.
Depending on how many instruments you have, there may multiple pages. In the Instrument Loading menu, you can see cells with instrument pictures, names, and library names. Factory Instruments consist of two libraries; the Steven Slate SSD5 and SSD4. SSD4 was recorded earlier than SSD5 and may have more noise. Since both libraries were recorded on tape using vintage consoles, preamps and mics, some of the samples may have audible noise on softer velocities if you have Dynamics fader in Triggering Settings Curves tab set to low values. The noise is not considered a problem. It's typical of samples recorded on tape because of the nature of the process. It's part of the analog vibe and warmth in an instrument's sound.
To load an instrument, you'll need to tap on the instrument cell. An instrument will load when you tap the cell for the first time. Instruments that contain multiple samples like Hi-Hats may take 1-2 seconds to load. Tap the cell again to audition the loaded instrument. This makes it easy to decide which instrument to load in your kit preset. Make note that cells have to be populated with corresponding types of instruments, like kicks in kick cell and snares in snare cell. There are also AUX trigger input and Xtra cells. In these cells, choose the type of instrument you want to load and browse through the instruments before loading them. When the AUX or Xtra cells are selected, the INSTR TYPE button will appear in the bottom left corner. Press it to select the type of instrument you want to load in that cell.
Mimic Pro supports one-shot (single sample) WAV files to use as instruments. You can import WAV files in the Mimic Pro (read about this in the Settings section) and load them into the AUX or Xtra Cell after choosing Wave as the INSTR TYPE for the cell. WAV files should be 16-bit or 24-bit and have 44100 Hz sample rate. The max length is 20 seconds but the end of a 20 second WAV will be shaped by the ASR's Release parameter (read about this in the Mod and Working on Kit Preset section).
To exit from the Instrument loading menu, press the Exit button in the bottom right corner.
MIXER
The Mimic Pro Mixer is a key feature of the module and offers powerful sound editing capabilities. Regardless of the depth and complexity of the given parameters, it's simple to understand and easy to customize and create unique sounds.

To access the Mixer menu, start from the Home Screen then press on the tab located at the bottom left of the touch screen.
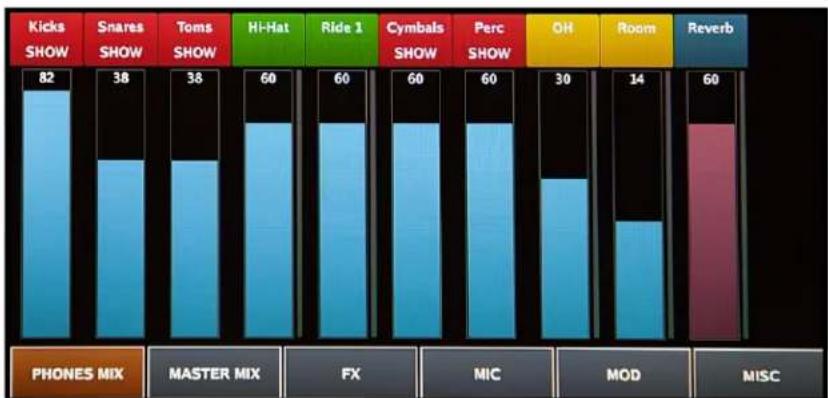
Pic 42: Phones Mix
Once at the Mixer menu there are five sub groups of editing functions located at the bottom of the Mixer screen.
- PHONES MIX (Headphone only mix)
- MASTER MIX (Master outputs)
- FX (Effects for kit presets)
- MIC (Specific microphone volume adjustments for instrument balance within kit presets)
- MOD (Modification of instruments within the kit presets)
- MISC (contains various settings related to mixing)
To activate your choice, simply touch the desired tab to see the respective menu. Once the tab is activated it will light up. Example: PHONES MIX.
MIXER (continued)
The Mimic Pro Mixer offers similar functionality and control to that found in the professional studio recording world. Unlike other electronic drum modules, Mimic Pro allows you to edit your sound by adjusting the actual microphones used during the recording session. You can independently adjust the volume of the direct, room and overhead mics used to record the drum kit.
To add to the realism of this feature, the crash and splash cymbal gains are controlled by the overhead and room microphone channels of the mixer in the same way they are in a professional recording/mixing session for acoustic drums. They are also channeled through the overhead and room outputs on the module and may be routed to the output of your choice.
EXCEPTION: The ride and Hi-Hat cymbals use direct microphones and may also be individually routed to the output of your choice. For more information on routing, check the routing section of the manual.
COLOR CODING
The Instrument name header strips on the mixer screen are color coded for easy reference.
- Red indicates a subgroup of instruments with a "SHOW" or "HIDE" guide. Example: The red "Toms" group may contain four tom strips inside the group. Each strip represents an individual tom. To access the subgroup, you will notice the word "SHOW" under "TOMS," tap on the red header to expand the group. To retract, tap on the red header that now reads "TOMS HIDE." You can adjust the fader (volume) of the whole group in addition to each instrument separately.
• Green indicates the direct microphone(s) on the instrument. - Yellow indicates the ambient microphones used on the instruments. These are the Overheads (OH) and Room mics not located close to the instrument. Because of this they capture the sound of the room and are considered ambient mics. Most of the cymbal sounds are in the OH and Room mixer channels.
• Dark Blue indicates the Reverb and Master channels.
The vertical strip faders for Phones Mix and Master Mix are also color coded for easy identification.

Pic 43: Color Coding Phones mix section has blue faders

Pic 44: Master Mix Master mix section has green faders. Reverb and Master faders have dark rose color in both mixers.
The Mimic Pro has two separate independent mixers; PHONES MIX and MASTER MIX. Their function allows you to adjust the instrument volume for the respective outputs. This is a global setting and is not programmable for the individual kit presets. The PHONES MIX and MASTER MIX do not save to one unique kit preset VS another. Any changes made affect all kit presets and automatically save/remain. This provides consistent output levels regardless of the Kit Preset in use and is perfect for performances that require multiple kit changes.
For example, during a live performance if the front house sound engineer needs your kick drum volume lower, you simply lower the "Kicks" fader, now regardless of the Kit preset used the level you send him is constant.
To adjust the volume fader of any channel simply use your finger to move the fader up or down. For finer incremental adjustments the Data Wheel works best. To use this method simply double tap on the fader column and it will go into edit mode with the fader column highlighted in red. Next adjust it with Data Wheel, turn clockwise to increase and counterclockwise to decrease, once set push the Data Wheel in (should click) to exit edit mode and save changes.
MIC, MOD, FX ADJUSTMENTS WORKING IN KIT PRESETS
As noted the PHONES MIX and MASTER MIX are global volume controls and do not affect the individual kit presets.
From the MIXER Screen individual Kit Presets can be adjusted from the three main menus below that allow you to tweak each Kit to make it unique.
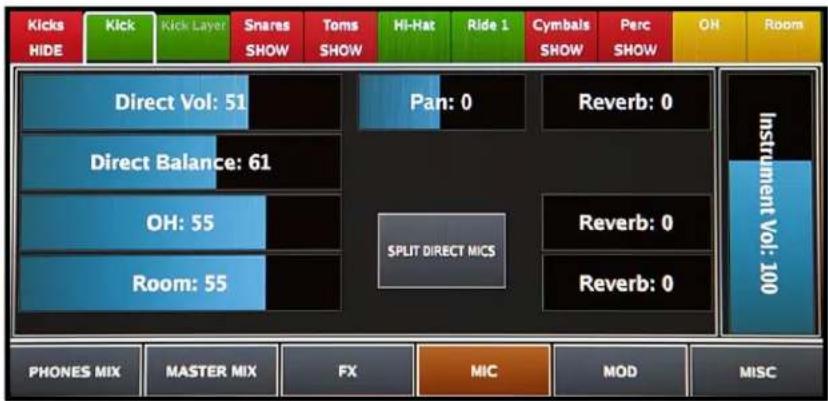
Pic 45: Master Mix / Mic Volume


- FX
- MIC
- MOD
In this section, we'll explain each of these tools and the options they provide.
MIC, MOD, FX ADJUSTMENTS WORKING IN KIT PRESETS (continued)
MIC ADJUSTMENTS WITHIN KIT PRESETS
After you have assembled a virtual drum kit in the Edit Kit screen, the first thing to do is to create the right volume balance between different drum kit pieces and different channels (OH, Room, etc.) To do this you must access the MIC tools. From the Home screen tap on the MIXER menu, choose the desired MIX you wish to edit (PHONES or MASTER) then tap on MIC VOL to access the available options.
From the MIC VOL menu, on the right side of the screen you can see the Instrument Volume fader. This fader adjusts the volume of the whole instrument after it was processed and mics inside that instrument were balanced in a desired way. If you only want to change the volume of the instrument this is the desired fader.
Note: Some mixer channels such as OH, Room, Reverb have only this fader and nothing more. This is because their sounds are from a lot of different sources. Kicks, snares, cymbals - they all have overheads and room mics, so when you're playing drums, they all sound in these channels if they have corresponding mics. This means that you still can adjust OH, Room and Reverb for each drum separately for the Kit Preset, but those changes must be done in that drum mixer channel. Changes made to the OH, Room and Reverb volume from the PHONES or MIX menu affect the whole channel regardless of Kit Preset.
On the left side depending on instruments you may see different sets of parameters. Usually there are Direct mic faders, Overhead mic fader and Room mic fader.
If the instrument has two direct mics such as a Snare Top and Snare Bottom, or Kick In and Kick Out, then there are two methods of working with them:
-
COMBINED MODE. This mode is set by default. In this mode, you will see Volume fader and Balance fader. Volume adjusts the volume of combined direct mics. Balance adjusts balance between two direct mics before they are mixed together. The benefit of combined mode is to be able to process the direct mic with the effects (compressor, EQ) as one piece. This is an easy and effective method.
-
SPLIT MODE. (recommended for advanced users) Press Split button in the middle of the screen to activate this mode. The direct mics are separated and you will see faders for them respectively. For example it may be Snare Top and Snare Bottom, or Kick In and Kick Out. In split mode each direct mic is processed separately with effects, so you can apply FX on, for instance, Snare Top and Snare Bottom mics individually.
Below the direct mic faders there are OH and Room faders. If the instruments show the direct mics then OH and Room faders will be the only faders on the left side of the screen.
The Pan fader(s) allow you to change the pan of each mic to the left, or right side of a stereo field.
The Reverb Send faders (read more about Reverb effect in the Reverb section). Reverb is an additional ambient mic channel, but unlike the recorded OH and Room channels, it is a virtual mic. This Reverb effect can be sent to your choice of mics for each instrument. It is also possible to modify the sound of the Reverb effect by changing the settings in the FX menu. This combination offers a lot of creative possibilities. In addition, the sound of Reverb will also vary depending on the mics it is applied to. For example, the snare drum has a Direct, OH and Room mics and each of these have their own unique sound. You can then apply Reverb to each of these mics individually and in various proportions to create literally thousands of variations.
MIC, MOD, FX ADJUSTMENTS WORKING IN KIT PRESETS (continued)
MOD ADJUSTMENTS WORKING IN KIT PRESETS
Mod section in the Mimic Pro Mixer screen is another important part of working on a kit preset. It gives user the possibility to tune and shape instruments as well as take some velocity layers out of the instrument.
On the left side of the Mod section locate the ASR curve faders. ASR stands for Attack, Sustain, Release. Pay attention that ASR is presented for each mic for the respective instrument. If you want to shape all the mics used for an instrument, then set the ASR for your desired mics.

Pic 46: MOD

Attack: is the initial part of the sample. Basically, it's a fade-in for the sample. When you increase attack, it smooths out the beginning (transient) end of the sample and provides options for sound design purposes. For example, adding attack to the ride cymbal provides smoothness to the sound, this is applicable to many other instruments.
Sustain is the middle part of the sample. The phase of sustain starts right after the Attack. The amount of sustain defines how much time the sample will sound unchanged.
Release is the end of the sample. Basically, it's a fade-out for the sample. The longer release the longer the fade-out will be. It works great for taming the tails of samples. If you want to make a short pop, or funk snare, you can shorten the Sustain to 150-200 ms, and set release to a range of 150-200. You'll get a short snare drum, which most likely will sound different from the original instrument because of the shaping.
Tune and Range parameters are located on the right side of the Mod screen
Tune allows you to pitch the instrument higher or lower. Please note: increasing and decreasing tune to extreme values may produce some artifacts of sound. That is the natures of tuning an audio signal.
Range allows you to remove some of the velocity layers. If the user wants to create a soft sounding kit, then using the Range parameter may help.
When decreasing the Range, it virtually removes the top velocity layer (those punchy hard hits) making the instrument sound softer and more mellow. However, decreasing the Range doesn't affect the dynamic range. You still have full dynamic range. When top velocities are taken out by decreasing the Range fader, the other velocities are getting virtually remapped across the entire dynamic range.
MIC, MOD, FX ADJUSTMENTS WORKING IN KIT PRESETS (continued)
FX ADJUSTMENTS WORKING IN KIT PRESETS
The FX tools of the Mimic Pro are very powerful and provide many sound possibilities and variations that allow you to create unique sounding drum kits. In this section, we will identify the FX tools and explain how to use them.
The three FX (effects) menus are:
- COMPRESSOR
- EQ (SOUND FREQUENCY EQUALIZER)
- REVERB

Pic 47: Compressor Screen
COMPRESSOR
A Compressor is an effect that typically reduces the volume of loud sounds or amplifies quiet sounds by narrowing or compressing an audio signal's dynamic range. Compression is commonly used in recording and for live sound. The effect compression has on the sound of instruments varies greatly depending on the control settings used; it could range from being hardly noticeable, to drastically changing the tonal character. It's truly a powerful tool for sound shape and design. The Compressor tool on Mimic Pro is referred to as "COMP" and is only available for the individual instruments (direct mics) and on the main OH and Room channels. In addition, the "COMP" feature is also available for the entire headphones output. To properly setup the compressor or "COMP" we need to review the controls available and what they should offer:
Threshold controls how loud a signal must be before any compression is applied. The "COMP" reduces the level of an audio signal if its amplitude exceeds a certain threshold. It is commonly set in decibels dB, where a lower threshold, for instance -30 dB means a larger portion of the signal is treated compared to a higher threshold of, for instance -10 dB.
Ratio is the amount of gain reduction. For example, a ratio of 4:1 means that if the input level is 4 dB over the threshold, the output signal level is 1 dB over the threshold. The gain, or signal level has been reduced by 3 dB. It is important to understand, that when the compressor is lowering the signal to the desired ratio that it is lowering the entire signal, so that the compressor is still working even after the input signal has fallen below the threshold, for an amount of time determined by the release.
Attack is the period when the "COMP" is decreasing gain to reach the level that is determined by the ratio.
Release is the period when the "COMP is increasing gain to the level determined by the ratio, or to zero dB once the level has fallen below the threshold.
Output is the volume of the whole signal after the compressor. Because the compressor is reducing the gain, or level of the signal, the ability to add a fixed amount of output gain is provided in Mimic Pro "COMP" so that an optimum volume level can be used.
MIC, MOD, FX ADJUSTMENTS WORKING IN KIT PRESETS (continued)
FX ADJUSTMENTS WORKING IN KIT PRESETS (continued)
SC HPF is a high pass filter. When you are compressing the signal the "COMP" reacts more to low frequencies, because they are usually louder. SC HPF lets you ignore some part of the low frequencies. It's easy to hear this effect when the compression is applied to the whole mix. The kick drum there will have slightly more compression than the snare drum. To even things out try to set SC HPF to 40 Hz, or 60 Hz.
Clip is a clipper after the output gain. Usually when you compress the signal, it gets quieter, so you even it out with Output fader, but depending on Attack setting some of the peaks are not getting any gain reduction, so they also get louder by the amount of dB set on the Output fader. This may lead to clipping, or overload (the meter becomes red). To avoid the overload (clipping) use the Clip button. Clipper may distort the signal slightly or a lot depending on how much overloaded signal is going into it.
There are presets available for the "COMP" categorized by the type of signal they were created for. Presets are a good starting point to make changes.
Everything described above may be difficult to understand if you have never used a Compressor. To help with understanding below are some typical steps to setup "COMP":

Pic 48: Comp Preset List

Pic 49: Compressor Parameters
- Turn ON the "COMP."
- Set Threshold to 0 dB, Ratio to 2:1, Attack to 8-15 ms, Release to 60-120 ms, Output to 0 dB, SC HPF to 40 Hz, turn on the Clip.
- Start to decrease Threshold until you see the green meter on the left side (gain reduction meter, or GR meter) moving a little. When it's moving the gain reduction, or GR is happening. The lower Threshold the higher Gain Reduction. You probably will hear the sound changing. The only way to setup effects is by using your ears. Try to experiment and listen to the sound.
- After you confirm that Gain Reduction is happening try to experiment with Ratio, Attack, and Release values.
- Usually the audio signal gets quieter after compression, so try to compensate for it by increasing the Output fader.
- Experiment with SC HPF, if you think that the effect on the instrument(s) is not needed, then simply turn it off. Again, use your ears to shape the sound you like.
- Try to turn Clip off and see if there is signal overload on hard hits. If there is no signal overload then it's safe to leave the Clip turned off.
MIC, MOD, FX ADJUSTMENTS WORKING IN KIT PRESETS (continued)
FX ADJUSTMENTS WORKING IN KIT PRESETS (continued)
EQ
EQ (Equalization) is the process of adjusting the balance between frequency components within an electronic signal. EQ is a very useful tool in sound design. You can change the spectrum of audio signal by adjusting frequencies (boosting, or cutting them). This gives you thousands of sound variations of the same instrument. The EQ on Mimic Pro has five bands. This means that you have five EQ filters that can work at the same time. To adjust the band, tap on the band point and drag it on the EQ display. To reset the band, tap and hold on the Hold to Reset button on the top of EQ display.
![Kicks SHOW Snares HIDE Snare Snare Layer Snare Aux 5 Toms SHOW Hi-Hat Ride 1 Cymbals SHOW Perc SHOW OH Direct OH Room [1] 0.0dB at 100Hz HOLD TO RESET [5] 0.0dB at 5700Hz On COMP On EQ [2] 0.0dB at 400Hz [3] 0.0dB at 999Hz [4] 0.0dB at 1999Hz PHONES MIX MASTER MIX FX MIC MOD MISC](/content/2026/05/886166/images/b8ce99b54357f07ce34a7ce6a810942d8835d5bf0b95f6723a78274a860c39be.jpg)
Pic 50: FX Adjustment
Bands 1 and 5 are shelf filter types. This means that it can be used to reduce or increase signal above or below a set frequency.
Other bands are bells, each with a bit different Q (bandwidth). Bell means that it can be used to reduce or increase the signal around a set frequency.
Steps to setup EQ:
- Turn it ON.
- Adjust the bands.
The only way to setup EQ is to use your ears.
Sculpt the sound until you get your desired result. Have fun and experiment!
MIC, MOD, FX ADJUSTMENTS WORKING IN KIT PRESETS (continued)
FX ADJUSTMENTS WORKING IN KIT PRESETS (continued)
REVERB
REVERB emulates how musical instruments sound when played in a specific place/room/location. For example; a medium sized Room, Concert Hall, Chamber, Church, Cave, literally any place that comes to mind. In Mimic Pro REVERB is a virtual mic in a third ambiance channel. The sound produced in this channel is a result of sending a signal from different mics of different instruments into the Reverb effect simulator. Reverb is also a powerful tool for sound design and offer countless variations of sound.
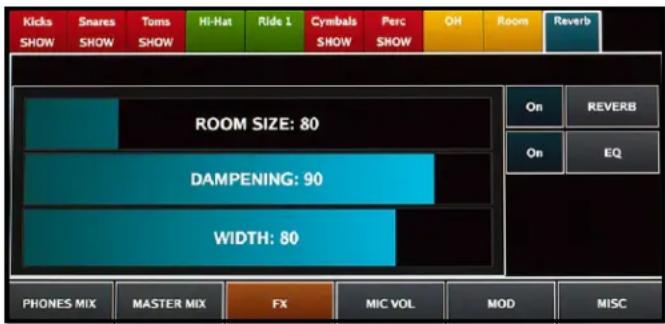
Pic 51: FX Reverb
To access Reverb when in the FX section of the Mixer screen, tap on Reverb mixer strip header and you'll see a Reverb effect and EQ after the Reverb. EQ may also be used to further sculpt the Reverb sound if needed.
Reverb has three variable controls/faders and is very easy to setup. You only need to listen and experiment.
- ROOM SIZE
- DAMPENING
- WIDTH
Room Size is the size of a virtual room.
Dampening is how fast high frequencies fade out. Simply put, lowering the Dampening values means that the room has nothing inside and it's only a room with bare stone walls and the sound is ringing, resonant and harsh. Higher Dampening values means that room is not empty. The higher the Dampening the more things in that virtual room that absorb the sound making it softer and more mellow.
Width is how far apart the virtual mics are located/placed in that virtual room in relation to the instrument placement in that virtual room.
How to setup Reverb:
- From the MIX screen tap the Reverb tab. Then Tap FX then Turn the Reverb on by taping the "On" button. (you have the option to turn on/off)
- Next tap the MIC VOL tab and choose an instrument. For example: snare, kick, or any other instrument on the mixer strip in your kit preset. Next increase the Reverb fader to send the mic, or combination of mics of desired instruments to the Reverb. The reverb fader corresponds directly to the adjacent mic channel.
- Now you should have instruments sent to Reverb. Play them to check to ensure you can hear reverb applied. Be sure to also check that the Reverb fader of the Mixer is up and not turned off or set to low.
- If needed go back to the FX section and try to adjust the Reverb settings.
- Apply and adjust the EQ after the Reverb if needed.
- Try to experiment with how much signal you send from different instruments to the Reverb channel. Different combinations of mics sent into Reverb with different levels will greatly vary the sound of the instrument. When used in just this way it will produce countless sound variations without even changing the Reverb effect settings (size etc.)
MIC, MOD, FX ADJUSTMENTS WORKING IN KIT PRESETS (continued)
MIXER MISC

Pic 52: Misc Headphones FX
The Misc section of Mimic Pro's Mixer screen has two tabs; Headphones FX and Misc Sound Src Aux Vol.
The Headphones FX tab controls compression and EQ (Comp and EQ) which are a global effects for the headphones output.
EQ is useful for headphones frequency correction as some headphones have harsh high frequencies and hyped low frequencies.
The Comp (compression) is useful for making slight (or significant depending on settings) changes to the dynamics of the sound coming out of the headphones output. We do not recommend using extreme settings on this Comp as it may distort the perception of the drums dynamics.

Pic 53: Misc Sound Src Aux Vol
The Misc Sound Src Aux Volume tab controls the master volume output for the Metronome Aux, Song Player Aux, and Click Track Aux. Double tap each fader to activate the Data Wheel for fine adjustments.
METRONOME

Pic 54: Metronome Tempo
The Metronome settings are controlled through the Tempo menu. Double tap the Tempo window to access the menu.
Press Start to begin and again to end the click track. The Metronome ON button on the Home Screen will also perform this function.
To change the tempo/BPM, press or press and hold the +/- to increase or decrease the beats per minute. To change the time signature, press or press and hold the +/- to increase or decrease the top and bottom numbers in the time signature.
At the bottom of the Metronome menu you can choose from four sound effects; Square, Click, Sticks, or Cowbell. Tap the window to choose the desired sound.
SETLIST

Pic 55: Setlist
The Setlist functionality in Mimic Pro is an amazing new feature. The Setlist is like a playlist of kits and you can assign a specific tempo to each kit. A Setlist can be created for any performance situation, for example, if you have a show where you are supposed to play 12 songs using only one kit, but in 12 different tempos, you can build this in the Setlist.
The Setlist menu contains 8 windows per screen where you load the kit and tempo. Each Setlist can contain up to 128 kits.
- Begin by selecting the New Setlist box.
- You will be given an option to Clone Current Setlist, select Yes or No.
- Select No to create a new Setlist then name and enter your list.
- Choose your new Setlist from the Load Setlist menu then Exit.
- You are ready to load kits. Select window #1 which will take you to the Tempo screen, then choose Select Kit.
- Choose from the library of kits then select Load Kit.
- Next you will set the time signature and BPM then choose Exit.
- The name of the kit chosen and the tempo will appear in window #1.
- Repeat this process for all the kits in your Setlist.
- Use the Prev Page and Next Page buttons to navigate through long Setlists.
The Use Kit Tempo button will activate or deactivate the tempo.
PLAYER

Pic 56: Playlist
The player in Mimic Pro allows you to play audio backing tracks, create playlists with the tracks and assign a custom click track to each of your backing tracks.
The format of your audio files should be mono or stereo 16 bit, or 24 bit WAVs with 44100 Hz sample rate. All files must be on a USB flash drive.
To begin working with your tracks, turn Mimic Pro OFF. Insert a USB stick with WAV files and turn Mimic ON. On the Home Screen double tap the Playlist window to open the Playlist menu.
The Playlist menu features the Play/pause, Previous and Next controls for your tracks.
- Press Add Song to add a song to the Playlist.
- Use the Move The Song Up or Move The Song Down buttons to change the location of a song in the Playlist.
- Use the Remove Song button to delete a song from the Playlist.
After songs have been added to the Playlist, select CT to assign a custom click track to any of your songs. This may be useful for backing tracks with changing tempos.
RECORDER
![graph TD A["Loop"] --> B["Grid Snap"] B --> C["Return To Start"] C --> D["Follow"] D --> E["Metr"] F["Rec Src: Drums"] --> G["Play To: Headphones"] H["Rec Src: Aux In"] --> I["Play To: Master"] J["Rec Src: Drums + Aux In"] --> K["Play To: Headphones + Master"] L["REC"] --> M["PLAY"] M --> N["EXPORT…](/content/2026/05/886166/images/ced85f3e1e74e79911722bf546206ed03649853e5c7f7b18ad898fc4051daafc.jpg)
Pic 57: Recorder
The Recorder in Mimic Pro allows to record your performance along with other audio sources and play it back looped and in different speeds.
Record source is selected in Setup. It is possible to:
- Record some music from external source (using Mimic Pro AUX IN) and jam with it.
- Record drums only.
- Record external source plus Mimic Pro Drums.
Maximum length of the recording in the current version of Mimic Pro software is 10 minutes.
Recorder Control Buttons:
• LOOP enables the loop mode.
• GRID SNAP enables the snap to grid mode (for play position cursor movement, left and right loop locator movements).
• RETURN TO START makes the play position cursor return to the playback start position after stopping.
• FOLLOW makes the wave follow the play position cursor movement.
• METR turns on the Metronome.
Other controls include Record, Play, and Setup.
Buttons on the right side are a bit different from
others. Their functions are enabled by holding the button down and turning the data wheel while holding:
• LOOP START sets the position of the loop start locator (red vertical line).
- LOOP END same for the loop end locator (blue vertical line).
• ZOOM zooms the wave in/out.
• MOVE moves the wave start position. Use it for aligning the wave to the tempo grid.
• BPM is current metronome tempo value adjustment.
- SPEED is playback speed adjustment, which is great for practice (slowing down the records).
• VOL is playback volume.
You can save your recording to a USB flash drive.
To start a new recording first save your current one, then go to the start of the playback and record over the existing recording.
SETTINGS
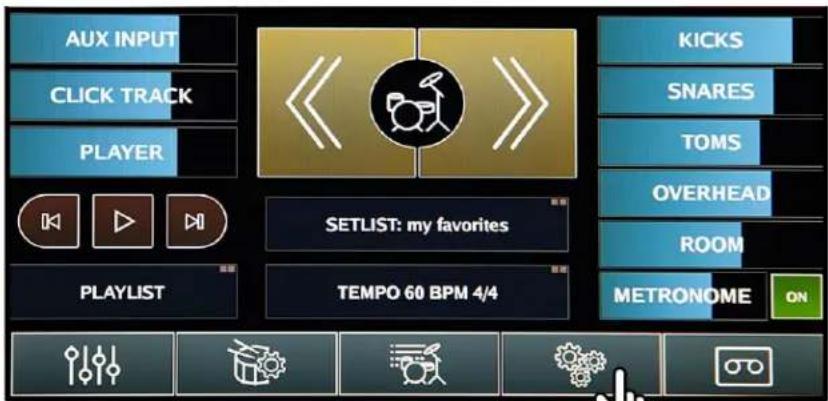
Pic 58: Settings

Settings screen in the Mimic Pro has many tabs, buttons, and functions. See the descriptions below:
FILES
This tab shows the buttons to work with files:
![graph TD A["Files"] --> B["IMPORT INTRUMENTS FROM USB STICK"] C["Routing"] --> D["IMPORT ONE SHOT WAVE FILES FROM USB STICK"] E["Sys"] --> F["CHECK INSTRUMENT LIBRARY INTEGRITY"] B --> G["EXPORT MIMIC CONFIG TO USB STICK"] D --> H["IMPORT MIMIC CONFIG FROM USB STICK"] F --> I["EXPORT USER DRUM KITS…](/content/2026/05/886166/images/2590f02a728d5d4b658b5677ea8a37d1758815f7f511a13d8f43ab0ee0bfc74a.jpg)
Pic 59: File Screen
- Import Instruments from USB Stick lets you import instruments from a USB stick into Mimic Pro. They are supposed to come in folders ending with ".lib". Inside the folder should be two folders named "instruments" and "kits"
- Import One Shot Wave Files from USB Stick lets you import your WAV files and use them as instruments. WAVs must be 16 bit, or 24 bit and have 44100 Hz sample rate.
- Export Mimic Config to USB Stick saves the Mimic Pro's settings to USB stick.
- Import Mimic Config from USB Stick imports previously saved Mimic Pro's config from a USB stick.
• Export User Drum Kits to USB Stick saves user kit presets to a USB stick. - Import User Drum Kits from USB Stick imports user kit presets from USB stick.
- Check Instrument Library Integrity checks if the Mimic Pro's factory library is OK.
SETTINGS (continued)
ROUTING

Pic 60: Routing
On this tab you can change the audio routing in Mimic Pro. Routing is the path of an audio signal. If you want your kick drum to go out through Output 6, you can do this as well as change it to any other output. Mimic Pro is the only electronic drum module that has this capability.
On the left side of the Routing tab you will see Instruments Type and Trigger Input name. Instrument Type is there because, for instance AUX can be kick, tom, or cymbals, so you don't have to memorize it when you are setting up routing.
On the right side you can select the Output. It can be mono, or stereo. If you are routing a signal, that is panned, like toms, or ride, you will lose the pan if you route the instrument to the mono out (it's obvious, because the signal before mono can't be panned to the right and keep sounding on the right, because mono is a single channel). So if you choose, for instance, 4 toms to keep their panning then route all of them into stereo out.
To see live view of the Routing Screen, click the link below

https://youtu.be/mkV3nD8dEVY
SETTINGS (continued)
ROUTING - FULL VIEW

Pic 61: Full view of Complete Routing Screen
SETTINGS (continued)
ROUTING - FULL VIEW
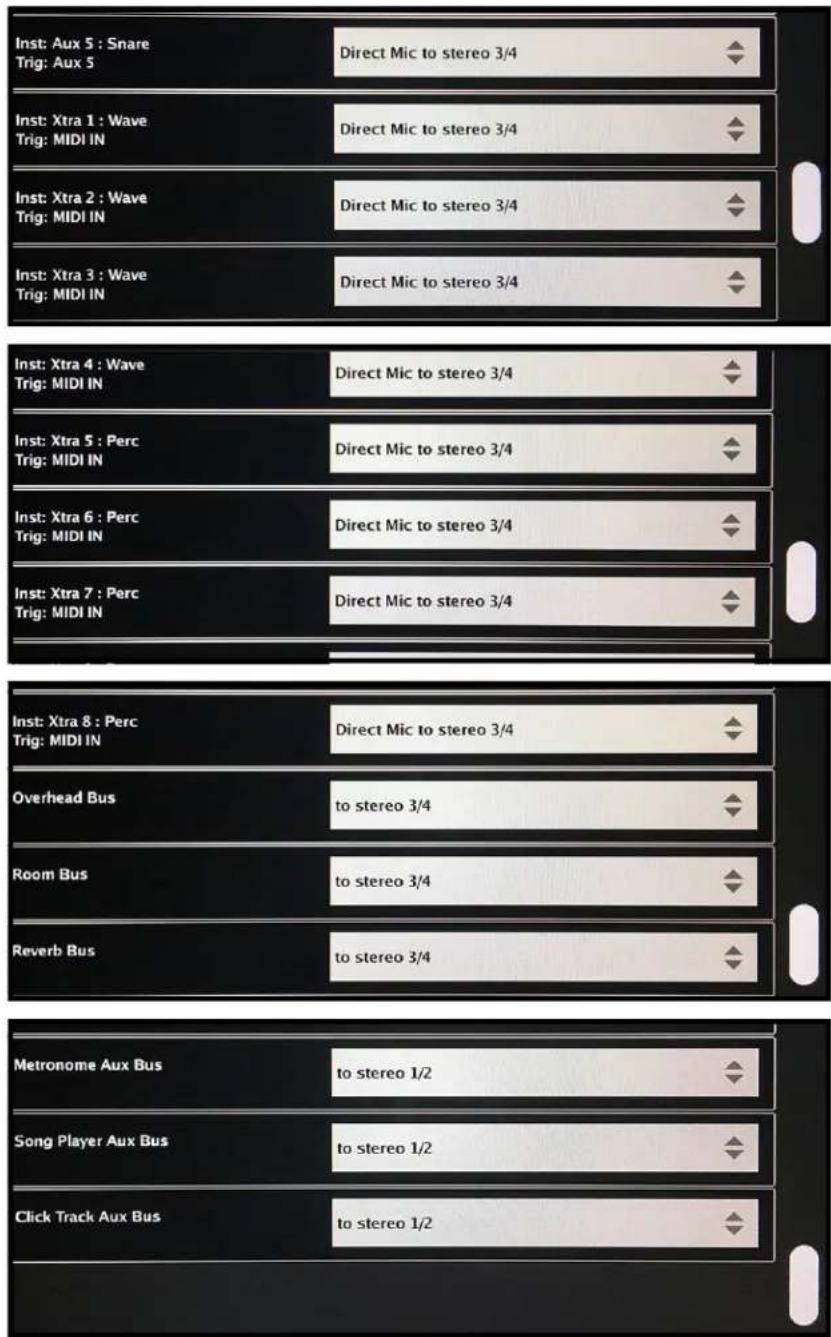
Pic 61: Full view of Complete Routing Screen (continued)
SETTINGS (continued)
SYS
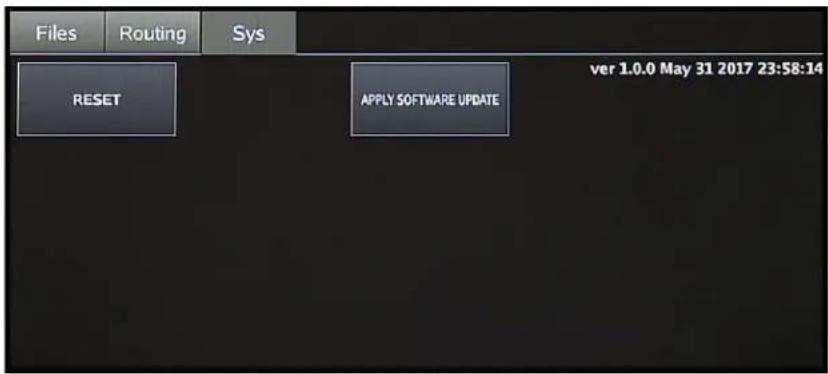
Pic 62: Sys
On this tab you can reset Mimic Pro to the factory settings and apply software updates.
The button labeled Apply Software Update lets you update Mimic Pro's software. Detailed instructions about how to apply software update will come with every software update individually.
If you press the Reset button it will reset Mimic Pro. You will need to reboot Mimic Pro after resetting.
INSTRUMENTS LIST
Mimic Pro ver 1.0 contains instruments listed below. With future updates, additional instruments will be provided.
China R Sbn 19 AXT
China R Slt 22 CST
China R Slt 22 VTG
Crash L Pst 18 PWC
Crash L Pst 19 PWC
Crash L Slt 16 EXR
Crash L Slt 17 EXR
Crash L Slt 17 VTG
Crash L Slt 18 EXR
Crash L Slt 18 VTG
Crash L Slt 20 CST
Crash L Slt 20 VTG
Crash L ZId 18 ACU
Crash L ZId 19 ACU
Crash R Pst 18 PWC
Crash R Pst 19 PWC
Crash R Slt 16 EXR
Crash R Slt 17 EXR
Crash R Slt 17 VTG
Crash R Slt 18 EXR
Crash R Slt 18 VTG
Crash R Slt 20 CST
Crash R Slt 20 VTG
Crash R Zld 18 ACU
Crash R Zld 19 ACU
Crash R Zld 20 ACU
Crash X Zld 19 ACU
Crash X Zld 20 ACU
Hi-Hat Sbn 14 AAM
Hi-Hat Sbn 14 HHV
Hi-Hat Slt 14 VOS
Hi-Hat Slt 14 VTG
Hi-Hat Zld 13 KCU
Hi-Hat Zld 14 KCU
Kick Drw 22 CLH
Kick Drw 22 CLS
Kick Drw 22 MPL
Kick Gth 18 CAT
Kick Gth 18 JZY
Kick Gth 20 BYN
Kick Lwg 20 KEY
Kick Lwg 22 VSL
Kick Lwg 24 HRD
Kick Lwg 24 SFT
Kick Lwg 26 LGC
Kick Pearl 22 BRH
Kick Pearl 22 BRS
Kick Pearl 22 HRD
Kick Pearl 22 MHX
Kick Pearl 22 RFP
Kick Pearl 22 SFT
Kick Pearl 22 WRH
Kick Pearl 22 WRS
Kick Snr 22 PLS
Kick Snr 22 SQB
Kick Tma 24 SCM
Kick Yha 22 HRD
Kick Yha 22 SFT
Ride Pst 22 PWR
Ride Sbn 20 AAE
Ride Sbn 21 PTR
Ride Slt 21 CST
Ride Slt 22 VTG
Ride ZId 21 SWR
Snare Brd 6.5 SLK
Snare Brush 6 JZY
Snare Dnt 6.5 STL
Snare Dnt 6.5 STT
Snare Gth 5 GSS
Snare Hur 7 CSL
Snare Hur 7 CST
Snare Lwg 5 BLA
Snare Lwg 5 LBR
Snare Lwg 6.5 BLB
Snare Lwg 6.5 BLD
Snare Nac 6 ALD
Snare Nac 6 ALO
Snare Pearl 5 CSM
Snare Pearl 6.5 MHX
Snare Pearl 6.5 RBD
Snare Pearl 6.5 RBR
Snare Pearl 6.5 SEN
Snare Pmr 6 VTG
Snare Pmr 6 VTT
Snare Snr 6 ART
Snare Snr 6 PLS
Snare Tma 6 BBD
Snare Tma 6 BBR
Snare Tma 6.5 SCM
Snare Yha 6 JZY
Splash L Sbn 09 AXM
Splash L Slt 08 CST
Splash L Slt 10 CST
Splash L Zld 12 ACU
Splash X Sbn 09 AXM
Splash X Zld 12 ACU
Tom Brush JZY 08
Tom Brush JZY 10
Tom Brush JZY 14
Tom Drw MPL 10
Tom Drw MPL 12
Tom Drw MPL 14
Tom Drw MPL 16
Tom Gth JZY 08
Tom Gth JZY 10
Tom Gth JZY 14
Tom Lwg MAP 13
Tom Lwg MAP 16
Tom Lwg VSL 10
Tom Lwg VSL 12
Tom Lwg VSL 14
Tom Lwg VSL 16
Tom Pearl BRC 10
Tom Pearl BRC 12
Tom Pearl BRC 16
Tom Pearl MHX 10
Tom Pearl MHX 12
Tom Pearl MHX 16
Tom Pearl MHX 18
Tom Pearl MPE 10
Tom Pearl MPE 12
Tom Pearl MPE 14
Tom Pearl MPE 16
SPECS
i. System
• 1. I/O Complement
a. 14 Balanced Analog Outputs
i. 6 Line Level 1/4" TRS balanced
ii. 8 Line Level DB25
iii. Stereo headphone out 1/4" TRS
b. Stereo Line Input
i. 1/4" TRS stereo
c. 32 Pad Inputs on 16 TRS connectors
i. Designed to use with Dual-Zone Pads
d. SD Card Slot
i. For system installation
e. USB 2.0 Slot
i. For library and sample installation
f. RJ45 (Ethernet) Port
i. For future functionality extension
g. MIDI I/O
i. Standard 5-pin DIN MIDI connector
ii. In and out
-
Power
-
AC Input Voltage to supplied AC/DC converter 100V - 240V AC, 50 - 60 Hz
- DC Requirements
a. 12 VDC
b. 3A
c. 2.1mm Center-Positive Coaxial DC plug
• ii. Mechanical Dimensions & Weight
- Width 12.5"
- Height 6.5"
- Depth, Chassis Only 2.75"
- Depth, Including Knob & Jack Protrusions 3.0"
- Shipping Box (Width x Depth x Height) 19" x 10.25" x 4.125"
- Shipping Weight (with box & accessories) 8.55 lbs
- Weight (bare unit) 5.5 lbs
CREDITS
• Andrey Shetov System Software Engineer
• Alex Arbuzov System Software Engineer
• Alex Semichev UI Design / Sound Design
• Sergey Danilov DSP Code / Software Engineer
• Oleg Pikhotskiy Electronic Design
• Bob Sabellico Pearl Product Manager Electronic Percussion
• Erika Earl Hardware Director
- Jesse Honig Hardware Engineer
• Rich Spindel Industrial Designer
DECLARATIONS OF CONFORMITY
FCC Compliance Federal Communications Commission United States Class B Manual Statement This equipment has been tested and found to comply with the limits for a Class B digital device, pursuant to part 15 Section 15.107 & 15.109 of the FCC Rules.
These limits are designed to provide reasonable protection against harmful interference in a residential installation. This equipment generates, uses and can radiate radio frequency energy and, if not installed and used in accordance with the instructions, may cause harmful interference to radio communications. However, there is no guarantee that interference will not occur in a particular installation. If this equipment does cause harmful interference to radio or television reception, which can be determined by turning the equipment off and on, the user is encouraged to try to correct the interference by one or more of the following measures:
- Reorient or relocate the receiving antenna.
- Increase the separation between the equipment and receiver.
- Connect the equipment into an outlet on a circuit different from that to which the receiver is connected.
- Consult the dealer or an experienced radio/TV technician for help.
European Commission Compliance
We hereby declare under our sole responsibility that the product herein identified, to which this declaration relates, is in conformity with the essential requirements and other relevant requirements of the European Parliament, European Council, and meets all requirements of the Canadian Interference-Causing Equipment Regulations. (Cet appareil numérique de la classe B respecte toutes lecs exigences du Règlement sur le matériel brouilleur du Canada), : EN 55032(2012)+AC1, EN 61000-3-2 (2014), EN 61000-3-3 (2013) and EN 55103-2 (2009) KN 32 (2015) and KN 35 (2015) In accordance with RRA Notice 2016-24(2016. 12. 07) RRA Notice 2016-26(2016. 12. 19) RRA Notice 2016-79(2016. 12. 19) VCCI CISPR 32 (2016)
KC & PSE certifications are pending
Trade Name: PEARL Corporation
Model: Mimic Pro
Description: Electronic Drum Module
Information is contained in a report by: CKC Laboratories, Inc
Dated: May 3, 2017
CHANGES AND NEW FEATURES IN PEARL MIMIC PRO 1.0.3 UPDATE
SETTINGS
The 1.0.3 update allows you to export and import the Mimic Pro's configuration with users defined file names.
![HEADPHONES SL.0:[U] AUX INPUT CLICK TRACK PLAYER SETLIST: 01 PLAYLIST TEMPO 100 BPM 4/4 KICKS SNARES TOMS OVERHEAD ROOM METRONOME ON](/content/2026/05/886166/images/a8e8a078e1f86b5cde147b9965cd2f60f08d0390b0288a127b56c72fbaa23113.jpg)
There are two buttons on the Files tab: "Export Mimic Config to a USB Stick" and "Import Mimic Config from a USB Stick".
![HEADPHONES SL.0:[U] Files Routing Sys DEV IMPORT INSTRUMENTS FROM USB STICK IMPORT ONE SHOT WAVE FILES FROM USB STICK CHECK INSTRUMENT LIBRARY INTEGRITY EXPORT MIMIC CONFIG TO USB STICK IMPORT MIMIC CONFIG FROM USB STICK EXPORT USER DRUM KITS TO USB STICK IMPORT USER DRUM KIT ARCHIVE FROM USB STICK…](/content/2026/05/886166/images/d601ade36169403bbbb04569edec8e10c74fd52eb7f6502034ed2599b1cc9b7c.jpg)
CHANGES AND NEW FEATURES IN PEARL MIMIC PRO 1.0.3 UPDATE
SETTINGS (continued)
To export the Mimic Pro config to a USB stick, press "Export Mimic Config to USB Stick" button. It will ask if you want to export config. Press Yes. Then type the name for your config and press Enter. The config will be saved as "*.mca" file.
To import a config from a USB stick, press "Import Mimic Config from USB Stick". It will ask "Do you want to import config". Press Yes. Select the desired *.mca file on the USB flash drive. "Press Select Mimic Config" button. After you complete the process, you will get a splash screen saying "Import Complete. Please Restart Now". Turn your Mimic Pro Off and then restart it.
The 1.0.3 update allows you to export and import user kit archives with user defined files names.
On the Home Screen press Settings. On the Files tab, there are three buttons on the right side of the screen: "Export User Drum Kits to USB Stick", "Import User Drum Kit Archive from USB Stick" and "Import User Single Drum Kit from USB Stick".
![HEADPHONES SL.0:[U] Files Routing Sys DEV IMPORT INSTRUMENTS FROM USB STICK IMPORT ONE SHOT WAVE FILES FROM USB STICK CHECK INSTRUMENT LIBRARY INTEGRITY EXPORT MIMIC CONFIG TO USB STICK IMPORT MIMIC CONFIG FROM USB STICK EXPORT USER DRUM KITS TO USB STICK IMPORT USER DRUM KIT ARCHIVE FROM USB STICK…](/content/2026/05/886166/images/1f481f11c83304e0dc64735346499257ae89836efb9b50ca01d8ab311c297329.jpg)
To Export user drum kits to USB stick, press "Export User Drum Kits to USB Stick" button. It will ask if you want to export kits. Press Yes. Then type the name for your user kits archive and press Enter. The config will be saved as "*.mdp" file.
To import a user drum kit archive from a USB stick, press "Import User Drum Kit Archive from USB Stick". It will ask if you want to import kit archive? Press Yes. Select the desired *.mdp file on the USB flash drive. Press "Select Drumkit Archive" button. When the process is complete, you will get a splash screen saying "Import Complete". Press OK.
CHANGES AND NEW FEATURES IN PEARL MIMIC PRO 1.0.3 UPDATE
SETTINGS (continued)
To Import a single user drum kit from USB stick, press "Import User Single Drum Kit from USB Stick". Select the desired kit file on the USB flash drive. Press the "Select Drumkit Preset" button.
Another new feature in Settings is located on the Sys tab. There is new button called "Delete User Kit Presets".
![HEADPHONES SL.0:[U] Files Routing Sys DEV RESET DELETE USER KIT PRESETS APPLY SOFTWARE UPDATE ver 1.0.1S Jul 11 2017 02:58:49](/content/2026/05/886166/images/69ce09e7a642336b1c20637bac94b3cf678aa3e6161573d6537d975245869d6d.jpg)
It deletes ALL of the user kits. Be cautious when using this feature. When you press this button the splash screen will appear saying "Delete All User Drumkit Presets".
If you press Yes then all user kits will be deleted and there is no undo function.
CHANGES AND NEW FEATURES IN PEARL MIMIC PRO 1.0.3 UPDATE
TRIGGERING SETTINGS
Mimic Pro's 1.0.3 update adds new features to the Triggering Settings screen.
![HEADPHONES SL.0:[U] AUX INPUT CLICK TRACK PLAYER SETLIST: 01 PLAYLIST TEMPO 100 BPM 4/4 KICKS SNARES TOMS OVERHEAD ROOM METRONOME ON](/content/2026/05/886166/images/dad1e0f72cc79ce4a201e5d5b6a5b8ad3fd01d106e66f327295cbba09169484f.jpg)
The Input menu in 1.0.3 update has changed the name of the Xtra Pads to Midi Pads. This gives you an accurate description of the trigger input. The Midi pads allow you to trigger sounds from the Mimic Pro using an external Midi controller or keyboard.
![HEADPHONES SL.0:[U] KICK SNARE HI-HAT RIDE 1 RIDE 2 (Disabled) TOM 1 TOM 2 AUX 2 AUX 3 AUX 4 AUX 5 MIDI PAD 1 MIDI PAD 2 MIDI PAD 3 Auto Select Default Top Velocity: 776](/content/2026/05/886166/images/8ac2d12d55cce48803f187f1dc7405864be835107377d84d66f10d6cfcfc32ae.jpg)
CHANGES AND NEW FEATURES IN PEARL MIMIC PRO 1.0.3 UPDATE
TRIGGERING SETTINGS (continued)
On the Midi tab we have now included a Midi Learn feature. On the Midi tab in the Triggering Settings screen, press Midi Learn and hit the note on connected midi keyboard.
![HEADPHONES SL.0:[U] SNARE R-PD-125 Settings Reset To Default Auto Select Trigger Kit Instr Assign Zone Vol Curves Midi Pad Zone Center Midi Learn ch:10 D1 (38) ch:10 D1 (38) Rim Midi Learn ch:10 C#1 (37) ch:10 C#1 (37) Rimshot Midi Learn ch:10 E1 (40) ch:10 E1 (40) LINK EDIT](/content/2026/05/886166/images/df2ed455c4b08fdc0bbc6907f3462a3740b5112ac30e819a951b1694bc23eb3a.jpg)
The update also allows you to change the Midi "Root" Note to increase flexibility. DAWs from various developers often display dissimilar names for the same note numbers. For instance, Cubase shows C2 for note number 36, while Pro Tools displays C1 for the same note. To setup midi note root number in the Mimic Pro, press the Settings button on Triggering Settings screen. Then Press "Show Middle C (60) Note As:". This will open up the menu, where you can select C3, C4 or C5 as root note. If you select C3, the Mimic will show C1 as the note name for number 36.
![HEADPHONES SL.0:[U] Split 2-Wire Ride Input to Two 1-Wire Ride Inputs Save KICK Pad Settings As Preset Capture Crosstalk Manage Trigger Pad Presets Show Middle C(60) Note As: C3 Exit](/content/2026/05/886166/images/3a0e56baebbe0b8a071fd7379c3848bc4cbba060b4d62e6fc1a225f7aa94d9f7.jpg)
CHANGES AND NEW FEATURES IN PEARL MIMIC PRO 1.0.3 UPDATE
TRIGGERING SETTINGS (continued)
The 1.0.3 update gives you the ability to save User Pad Presets and manage them by exporting and importing them from a USB stick. Another new option lets you Delete the User Trigger Pad Presets.
To save a pad preset, press the Settings button in the Triggering Settings screen. Then press "Save [selected input] Pad Settings as Preset". The [selected input] will indicate your selection when you are ready to save a pad preset. For instance, if it's Kick Input, it will display KICK.
![HEADPHONES SL.0:[U] Split 2-Wire Ride Input to Two 1-Wire Ride Inputs Save KICK Pad Settings As Preset Capture Crosstalk Manage Trigger Pad Presets Show Middle C(60) Note As: C3 Exit](/content/2026/05/886166/images/05a8913a9aa6e950043ee80215ba24e8645eba6044b6c6664ae86a84cb28d600.jpg)
After you press this button, the menu will appear saying "Select Kit Preset Group". There are four options: drum, crash, ride, hat. Select the correct option for your pad. Then type the name for the preset and press Enter. The preset will be saved in the Mimic Pro internal storage as *.mpp file.
To manage pads presets, go to the Triggering Settings screen and press the Settings button. Then press "Manage Trigger Pad Presets" button.

CHANGES AND NEW FEATURES IN PEARL MIMIC PRO 1.0.3 UPDATE
TRIGGERING SETTINGS (continued)
You will see a browser with two tabs. On the left tab the USB flash drive is shown. The right tab shows the Mimic Pro Internal Storage.

To import a preset from USB stick, select an *.mpp file on left tab and press the Import button.
To export a preset from the internal storage to a USB stick, select an *.mpp file and press Export button.
To delete a preset from the internal storage, select the preset and press the Delete button. When splash screen appears asking for confirmation, confirm you want to delete it.
CHANGES AND NEW FEATURES IN PEARL MIMIC PRO 1.0.3 UPDATE
EDIT KIT
Mimic Pro 1.0.3 update adds new features to the Edit Kit screen.
![HEADPHONES SL.0:[U] AUX INPUT CLICK TRACK PLAYER SETLIST: 01 PLAYLIST TEMPO 100 BPM 4/4 KICKS SNARES TOMS OVERHEAD ROOM METRONOME ON](/content/2026/05/886166/images/2a8aea26548316a54e98f3a4e0961a25430c5e136f8783ebe71c311ad4bd86f9.jpg)
Now you can rename a user kit preset in Load Kit menu. Select the Edit Kit screen and press the Load Kit button. You will see the new "Rename Kit" button.
![064 Golden 065 Movie [U] Custom Kit Load Kit Up Down Delete Kit Rename Kit Exit](/content/2026/05/886166/images/4c1425d66830713cf31f44197d907dd6beda017aaa8a52d668e42e08bdfa94ab.jpg)
To Rename a kit, select any user kit preset and press Rename Kit.
CHANGES AND NEW FEATURES IN PEARL MIMIC PRO 1.0.3 UPDATE
EDIT KIT (continued)
All cells have a great new feature. When you select a cell there is an "Assign to Pad" button in the right bottom corner. Pressing this button allows you to easily assign any articulation in the loaded instrument to any zone on any pad.
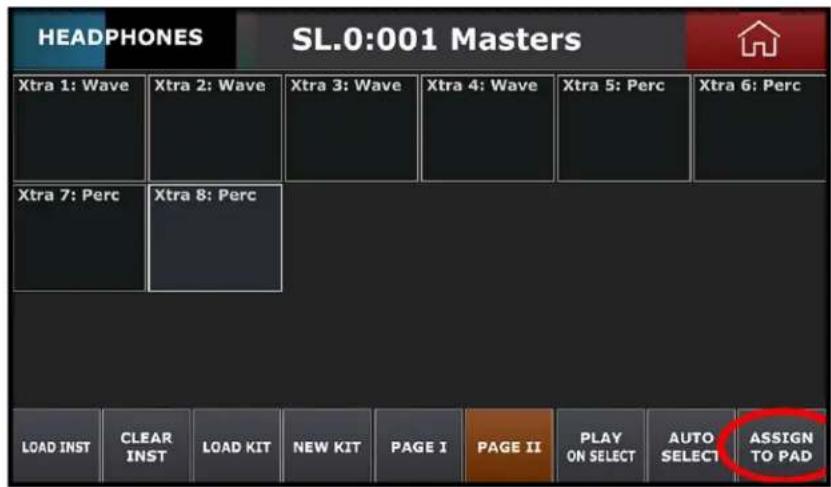
Press "Leave Previous Assignment" button if you want to assign one articulation to many zones on any drum pad.
![HEADPHONES SL.0:[U] 001 Master Instrument Sound Assigned to Trigger Pad Zone Center TOM 1 PAD.Rim, TOM 2 PAD.Rim Side Rim Click Side Stick Rim Shot Rim Shot Side LEAVE PREVIOUS ASSIGNMENT EXIT](/content/2026/05/886166/images/1c9b706c030e7874955a752d1e52821cfcd092e8bce9b504b32bdeac185d9c6e.jpg)
Another feature of the 1.0.3 update lets you change the Instrument Type for kick and snare layer. This is really useful when you want to mix your snare with your wave file, or some kind of percussion, or any other instrument. To do this, select the Kick Layer cell, or Snare Layer cell. Press Load Inst and press the "INSTR TYPE:" button in the left bottom corner. Then select the instrument type in the menu.
CHANGES AND NEW FEATURES IN PEARL MIMIC PRO 1.0.3 UPDATE
HOME SCREEN
The Mimic Pro 1.0.3 software adds new features to the Setlist functionality on the Home Screen.
![HEADPHONES SL.0:[U] AUX INPUT CLICK TRACK PLAYER SETLIST: 01 KICKS SNARES TOMS OVERHEAD PLAYLIST TEMPO 100 BPM 4/4 DOUBLE TAP METRONOME ON](/content/2026/05/886166/images/a539d903dc16600bafcede18ea01506acf8c10d1a9f42bdc465fc5f706db6f8d.jpg)
When you open the Setlist screen, it shows a new button called "Move Cell With Wheel". When you press this button, you can move and arrange cells in Setlist using the Data Wheel.

Another addition is the "SL.N" symbols added to the kit name on the top of the Home Screen when you're using Setlist. "N" stands for cell number in the Setlist.
LIST OF ALL CHANGES
Here is list of the 1.0.3 update changes:
- NEW: Settings - module settings import and export with user defined file names
- NEW: Settings - drumkit presets import and export with user defined file names for drumkit archives. Single drumkit preset import added
- NEW: Settings - "Delete User Kit Presets" added to Settings/Sys
- NEW: Triggering Settings - MIDI middle C note selection dialog added (Trigger Setup / Settings) - better compatibility with various DAWs
- NEW: Triggering Settings - Midi Learn function added to Trigger Settings / Midi tab. It is now possible to assign midi in notes automatically
- NEW: Triggering Settings - User Pad Preset support added. It is now possible to save edited trigger pad preset with user defined name
- NEW: Triggering Settings - Trigger pad preset sharing added (it is possible to import/export user pad presets using usb stick)
- NEW: Edit Kit - "Rename Kit" added to kit load dialog
- NEW: Edit Kit - "Assign to Pad" function for all cells added. It is now possible to assign loaded instruments to drum pads strait from Edit Kit screen
- NEW: Edit Kit - it is now possible to change instrument type for Snare Layer and Kick Layer instrument slots. Greatly simplifies layering
- NEW: Home Screen - Set List "Move Cell With Wheel" added
- NEW: Home Screen - "SL.N" (where N is current cell number in set list) is now added to a kit preset name on the top of the screen if SET LIST is selected as current source of kit presets
- NEW: Edit Kit - Confirmation dialog added for "Clear Inst" function
• UPDATE: Round Robin algo update
• UPDATE: Percussion instrument articulations changed
• UPDATE: Instrument Library Check function updated to trace missed files - UPDATE: Edit Kit - Instrument type selection dialog in "Load Inst" updated
• UPDATE: Settings - Additional confirmation added during Instrument Library deletion - UPDATE: Trigger Settings - "Xtra 1..8" pad name changed to "Midi Pad 1..8" to eliminate confusion with Xtra instrument slots
• UPDATE: Trigger Settings - Pad Preset is now not editable for Midi Pads to eliminate user confusion - UPDATE: Settings - Routing menu updated. Room Bus, Overhead Bus, Reverb Bus text changed to Room Mic, Overhead Mic, Digital Reverb text
• FIX: Trigger Settings - Kit Instrument Assign tab is now updated automatically after instrument slot type change
• FIX: Tip ring meter for 3 zone mesh snare algo does not overload constantly anymore
• FIX: No more erroneous crash/ride choke after hits
• FIX: Hi-hat skips chick sound in some cases
• FIX: Data Wheel works seamlessly in menus
• FIX: Menu selection roll-over disabled
• FIX: Xtra instruments now triggered by Midi Input
• FIX: Phantom user kit is not created after module reset anymore
• FIX: Setlist function fixed
HOW TO SETUP A NEW PAD ON THE PEARL MIMIC PRO
The Mimic Pro supports e Pads from various manufacturers. However there might be a time when you are not able to locate your specific pad in the presets. Here are a few simple steps to setup a new pad not listed in the Mimic Pro library.
- Turn the Mimic Pro off and connect the pad to the desired input.
- Try to find some similarities in your pad's technology with an existing preset in the Mimic Pro's list. You can review the manual for your pad or contact the manufacturer's technical support for assistance. There are forums on the internet that focus on e-drums and you might find your solution in one of the posts. In a few steps this information will be needed to select a pad preset as a starting point.
- Turn the Mimic Pro on and go to Triggering Setting.
- Select the Input, where the pad is connected.
- Select the pad preset that is suitable as a starting point.
- Set the Threshold to minimum value. Value 0, or 1 would work great.
- Press the Advanced Settings button and then press the Input Settings button. There will be two parameters on the screen: Amplify and Sensitivity. They can be considered as two gain stages for the trigger input. Amplify sets the general gain. Sensitivity allows you to fine tune the gain.
- Set Amplify to x1 and Sensitivity to 1 and start playing some ghost notes. If the ghost notes are not triggering accurately, start to increase the Sensitivity to 2, then 3 and up to 6 until you achieve consistent ghost note triggering. If the missing ghost note issue persists, then set the Amplify to x2 and start from sensitivity 1 again.
- Now that the pad is set up and is accurately triggering ghost notes, the next step would be setting up the desired response for hard hits. Play a few hard hits and set the "Top Velocity" to the highest meter reading. If you feel that it is hard to get a crack from your drum, try lowering the "Top Velocity" value. Please note that it is not a problem to set "Top Velocity" to 200 or 300 if your input meter allows you to do so. There will be no loss of detail if your ghost notes are triggered properly.
- After the setup is complete, there is some fine tuning of velocity response available on the Zone Vol tab in Triggering Settings. There are faders on the left side of the screen called Pad Zone / Velocity Amp. These are velocity amplification fine tune faders. Use them very carefully to further tune the dynamic response from the pad.
- To complete the pad setup, you need to switch to the Curves tab in Triggering Settings and tweak the Velocity Curve and Dynamics fader. The Dynamics fader make ghost notes louder when you decrease its value and it makes ghost notes quieter when you increase its value. The Velocity curve does not adjust the volume of velocity layers like the Dynamics faders. In reality it adjusts the actual velocity layers that correspond with the hit force.
HOW TO INSTALL SOFTWARE UPDATE TO PEARL MIMIC PRO
- Start with an empty USB 2.0 flash drive.
- The ZIP with update should be named similar to "Mimic_Software_Update_1.0.3.zip". UnZIP update file to the flash drive.

- When the ZIP is unZIPped on the flash drive, there should be file the called similar to "Mimic_Software_Update_1.0.3.mup". Obviously, the version will change with each new update. If you don't see the file on the flash drive, it is possible that the file was unZIPped to different location. Please examine your computer to locate it.

HOW TO INSTALL SOFTWARE UPDATE TO PEARL MIMIC PRO
- Turn the Mimic Pro Off and insert USB flash drive into the Mimic Pro USB port.
- Turn the Mimic Pro On. Go to Setting >> Sys tab and press the "Apply Software Update" button.

- When you open that screen, select the "Mimic_Software_Update_1.0.3.mup" file. Press "Select Software Update File" button in the left bottom corner, wait until the splash screen saying "Please Restart Now" appears.

- Turn the Mimic Pro Off and eject the USB flash drive from the Mimic Pro.
- Turn the Mimic Pro On. Go to Settings >> Sys and check that software version is the same to update file version. Now you are ready to explore the new update.
HOW TO INSTALL LIBRARY AND KITS UPDATE TO THE PEARL MIMIC PRO
-
First start with an empty USB 2.0 flash drive. For these updates the smaller sized USB flash drive can be used. When loading a Full Sound library, the size of USB flash drive must be at least 16 GB or more.
-
UnZIP update file to the flash drive. Usually the name will be similar to "Mimic_Lib_Update_July10_2017.zip" except the date will change with each new update.
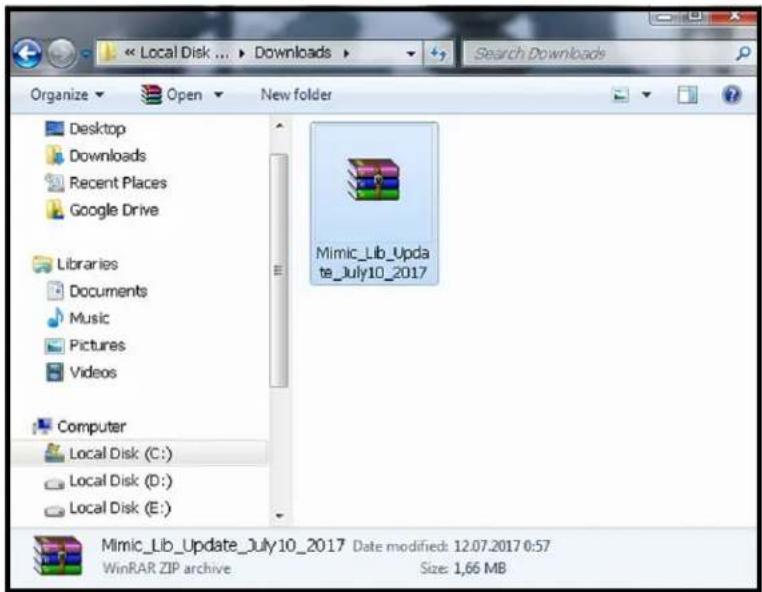
- After it is complete the folder named "Mimic_Factory.lib" should be on a flash drive. If that folder is not on the flash drive, then the folder was unZIPped to different location. You must locate the folder on your computer and put it on the flash drive.

HOW TO INSTALL LIBRARY AND KITS UPDATE TO THE PEARL MIMIC PRO
- Turn the Mimic Pro Off and insert USB flash drive into the Mimic Pro USB port.
- Turn the Mimic Pro On. Go to Settings and press the "Import Instruments from USB Stick" button.

- Select the "Mimic_Factory.lib" on the left tab, press the "Import" button in the left bottom corner and wait 3-5 seconds after the process is complete.

- Press the Home button.
- Turn the Mimic Pro Off and eject the USB flash drive from the Mimic Pro.
- Turn the Mimic Pro On and explore your new update.

- FROM THE DESIGN TEAM
- FROM THE SSD TEAM
- WARNINGS AND IMPORTANT NOTES
- CONNECTIONS
- SETTING UP
- CAREFULLY UNPACK THE MODULE
- PLUG IN YOUR PADS
- CONNECT TO OTHER AUDIO EQUIPMENT
- CONNECTING THE POWER SUPPLY
- OPERATION
- DATA WHEEL
- SETUP
- MOUNTING MIMIC ON THE STAND
- CONNECTING THE PADS
- QUICK START
- GETTING STARTED - "QUICK START
- HOME SCREEN
- CALIBRATING THE HI-HAT
- CALIBRATING THE HI-HAT (CONTINUED)
- HI-HAT CONTROL CURVE
- THERE ARE FOUR FADERS
- DYNAMICS
- ADJUSTING THE DYNAMICS WITH TOP VELOCITY FADER
- TRIGGER SETTINGS THRESHOLD
- THRESHOLD: 10
- TRIGGER SETTINGS RIMSHOT THRESHOLD
- RIMSHOT THRESHOLD: 402
- ADVANCED TRIGGERING SETTINGS
- ADVANCED TRIGGERING SETTINGS (CONTINUED)
- TRIGGERING SETTINGS KIT INSTRUMENT ASSIGN
- TRIGGERING SETTINGS ZONE VOLUME
- TRIGGERING SETTINGS CURVES
- MIDI
- TRIGGERING SETTINGS CROSSTALK SUPPRESSION AND RIDE SPLIT
- SETTING UP A PAD WITH THE MIMIC PRO PRESET TRIGGER LIST
- STEPS TO SETUP A NEW PAD WITHOUT IT BEING LISTED
- EDIT KIT
- EDIT KIT (CONTINUED)
- AUTO SELECT
- PLAY ON SELECT
- PAGES
- NEW KIT
- LOAD KIT
- CLEAR INSTRUMENT
- LOAD INSTRUMENT
- MIXER
- MIXER (CONTINUED)
- COLOR CODING
- MIC, MOD, FX ADJUSTMENTS WORKING IN KIT PRESETS
- MIC, MOD, FX ADJUSTMENTS WORKING IN KIT PRESETS (CONTINUED)
- MIC ADJUSTMENTS WITHIN KIT PRESETS
- MOD ADJUSTMENTS WORKING IN KIT PRESETS
- FX ADJUSTMENTS WORKING IN KIT PRESETS
- COMPRESSOR
- FX ADJUSTMENTS WORKING IN KIT PRESETS (CONTINUED)
- EQ
- REVERB
- HOW TO SETUP REVERB
- MIXER MISC
- METRONOME
- SETLIST
- PLAYER
- RECORDER
- SETTINGS
- FILES
- SETTINGS (CONTINUED)
- ROUTING
- ROUTING - FULL VIEW
- INSTRUMENTS LIST
- SPECS
- CREDITS
- DECLARATIONS OF CONFORMITY
- EUROPEAN COMMISSION COMPLIANCE
- CHANGES AND NEW FEATURES IN PEARL MIMIC PRO 1.0.3 UPDATE
- TRIGGERING SETTINGS
- TRIGGERING SETTINGS (CONTINUED)
- LIST OF ALL CHANGES
- HOW TO SETUP A NEW PAD ON THE PEARL MIMIC PRO
- HOW TO INSTALL SOFTWARE UPDATE TO PEARL MIMIC PRO
- HOW TO INSTALL LIBRARY AND KITS UPDATE TO THE PEARL MIMIC PRO
Brand : Pearl Sports
Model : Mimic Pro
Category : Drum counter