VB 8760 - Food processor GRUNDIG - Free user manual and instructions
Find the device manual for free VB 8760 GRUNDIG in PDF.

User questions about VB 8760 GRUNDIG
0 question about this device. Answer the ones you know or ask your own.
Ask a new question about this device
Download the instructions for your Food processor in PDF format for free! Find your manual VB 8760 - GRUNDIG and take your electronic device back in hand. On this page are published all the documents necessary for the use of your device. VB 8760 by GRUNDIG.
USER MANUAL VB 8760 GRUNDIG
natural_image
Black silicone blender with handle and control knob (no visible text or symbols)
natural_image
Abstract grayscale curved shape on white background (no text or symbols)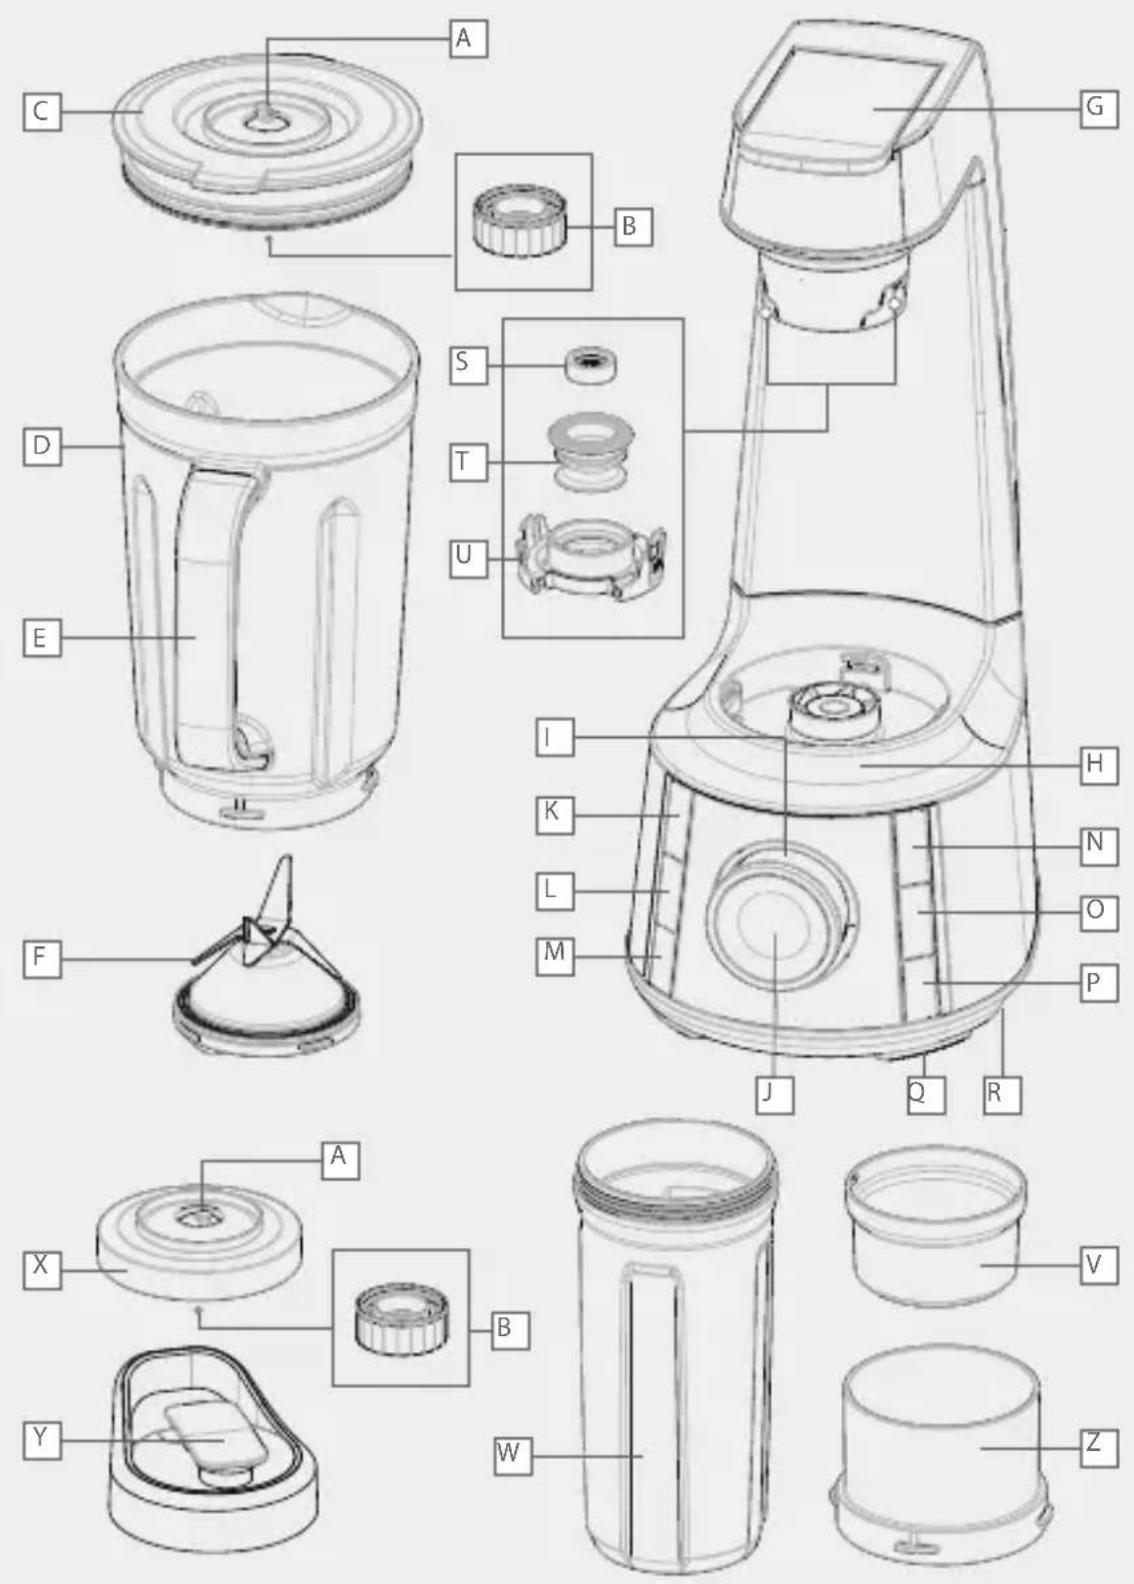
ENGLISH 05-22
TÜRKÇE 23-43
DEUTSCH 44-62
04-19 عربی
This section contains safety instructions that will help protect from risk of personal injury or material damage.
Failure to follow these instructions voids any grant-ed warranty.
General safety
- Read all instructions.
- This appliance may be used by people whose physical, perceptive or mental skills are impaired or who are inexperienced or not knowledgeable about the appliance as long as they are supervised or informed and made aware of the safe use of the appliance and the encountered dangers. Children should not play with the appliance.
- Do not operate any appliance with a damaged cord or plug or after the appliance malfunctions, or is dropped or damaged in any manner. Contact the manufacturer at their customer service telephone number for information on examination, repair, or adjustment.
■ The use of attachments, including canning jars, not recommended by the manufacturer may cause a risk of injury to persons.
- Do not attempt to dismantle the appliance.
- Do not operate or place any part of this appliance or its parts on or near hot surfaces.
■ Do not use the device for hot food.
- Your mains power supply should comply with the information supplied on the rating plate of the appliance.
- Do not use the appliance with an extension cable.
- Do not touch the plug of the appliance with damp or wet hands.
■ Unplug from outlet when not in use, before putting on or taking off parts, and before cleaning.
- Hold the blending shaft of the appliance carefully during transportation and cleaning.
■ Never touch blades while using the appliance. There is the possibility of injury due to incorrect usage.
■ Avoid contacting moving parts.
■ Do not use outdoors.
- Do not let cord hang over edge of table or counter.
- Keep hands and utensils out of container while blending to reduce the risk of severe injury to persons or damage to the blender. A scraper may be used but must be used only when the blender is not running.
■ Blades are sharp. Handle carefully.
■ Always operate blender with cover in place.
■ Do not blend hot liquids.
- To reduce the risk of electric shock, the plug should only be connected to a proper outlet. If the plug does not fit fully in the outlet, contact a qualified electrician.Do not modify the plug in any way.
■ After cleaning, dry the appliance and all parts before connecting it to mains supply and before attaching the parts.
- Do not immerse the appliance, the power cable, or the power plug in water or any other liquid.
■ If you keep the packaging materials, store them out of the reach of children.
■ Children shall not use the appliance. Keep the appliance out of the reach of children.
■ Always disconnect the blender from the supply if it is left unattended and before assembling, disassembling.
■ Switch of the appliance and disconnect from supply before changing accessories or approaching parts that move in use.
- CAUTION: In order to avoid a hazard due to inadvertent resetting of the thermal cut-out, this appliance must not be supplied through an external switching device, such as a timer, or connected to a circuit that is regularly switched on and o_ by the utility.
- SAVE THESE INSTRUCTIONS
Dear customer,
Congratulations on the purchase of your new GRUNDIG Vacuum Blender VB 8760.
Read the following user notes carefully to ensure full enjoyment of your quality Grundig product for many years to come.
A responsible approach!

natural_image
Stylized grayscale illustration of a tree with leaves and roots, enclosed in a circular frame (no text or symbols)GRUNDIG focuses on contractually agreed social working conditions with fair wages for both internal employees and suppliers. We also attach great importance to the efficient use of raw materials with continuous waste reduction of several tonnes of plastic every year.
Furthermore, all our accessories are available for at least 5 years.
For a future worth living.
Grundig.
Controls and parts
See the figure on page 3.
A Vacuum valve
B Backflow prevention cap
C Lid
D Tritan jug
E Jug handle
F Blade unit
G Lever
H Motor housing
☐ On-Off / Speed adjustment knob
J Pulse button
K Smoothie button
Ice button
M Sauce button
N Vacuum button
Vacuum+Blend button
P Auto-Clean button
Non-slip feet
R Cable storage compartment
S Filter
T Vacuum seal
U Suction head cover
V Measuring cup / Anti-insect cap
w Portable bottle
X Vacuum lid
Y Portable bottle lid
Z Bottle stand
Intended Use
This appliance is intended only for household use; it is not suitable for professional use. It is designed to chop small amounts of solid foods (onions, potatoes, carrots, etc.) and fruit (strawberries, bananas, etc.).
Initial Use
Clean the parts of the appliance prior to initial use (see page 17).
Removing the Chopping Blade
Warning
- Do not touch the blades with your bare hands.
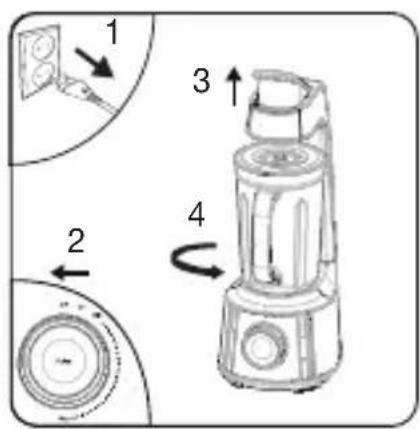
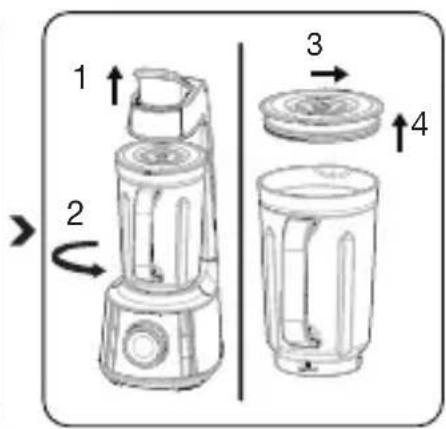
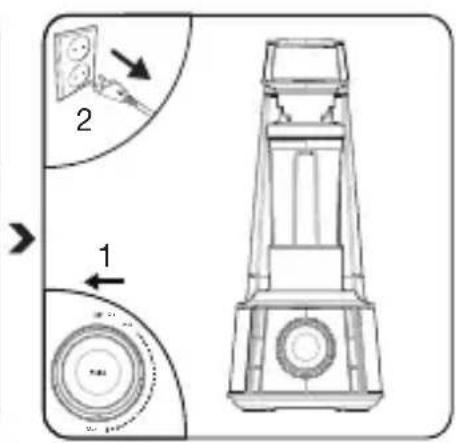
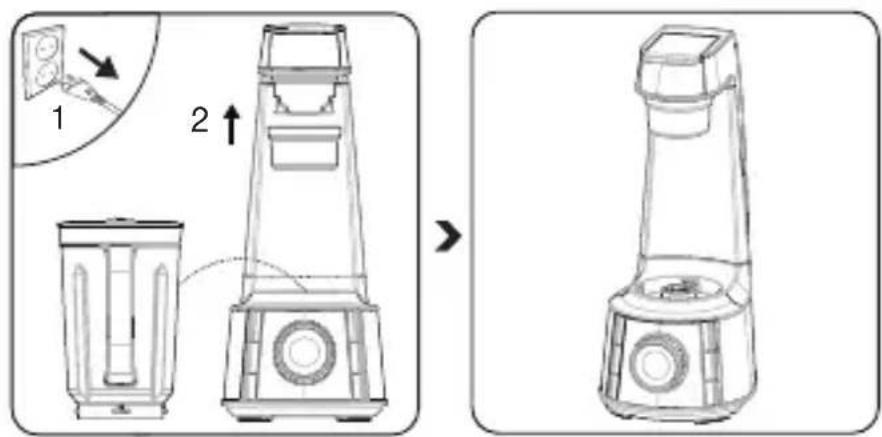
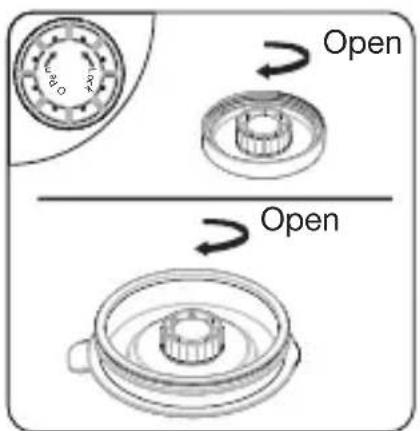
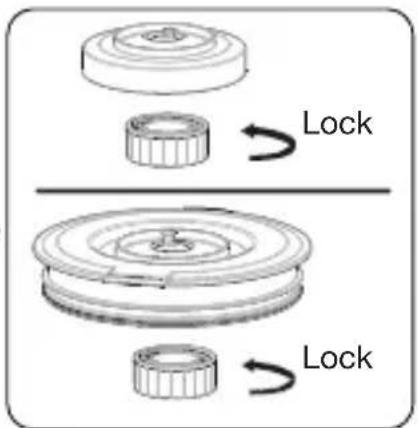
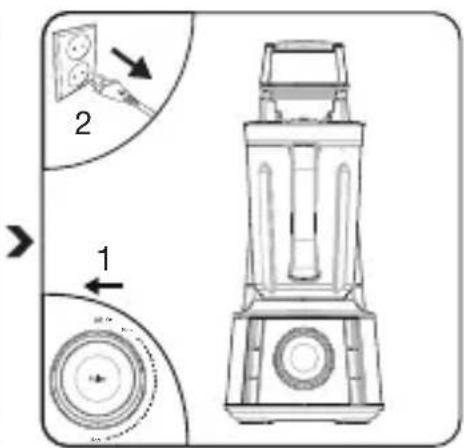
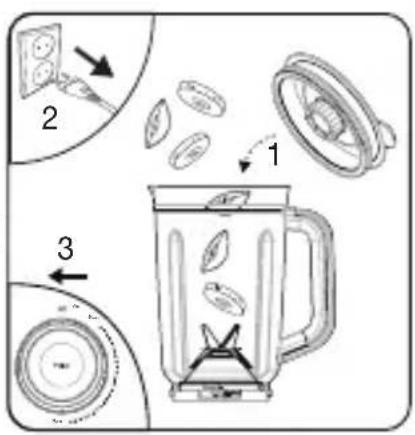
Unplug the appliance and move the speed adjustment knob I to "OFF" position. Pull up the lever G and unlock the jug D anti-clockwise according the "Open" arrow on the motor unit H.
Open the vacuum valve by rotating it and remove the vacuum from D the valve. Remove the lid from the jug and turn the jug over C D.
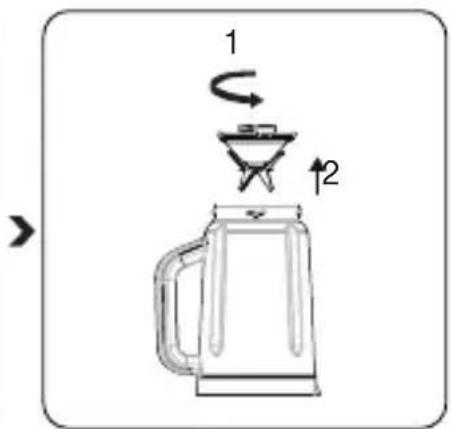
Remove chopping blade unit F by turning clockwise.
Installing the Chopping Blade
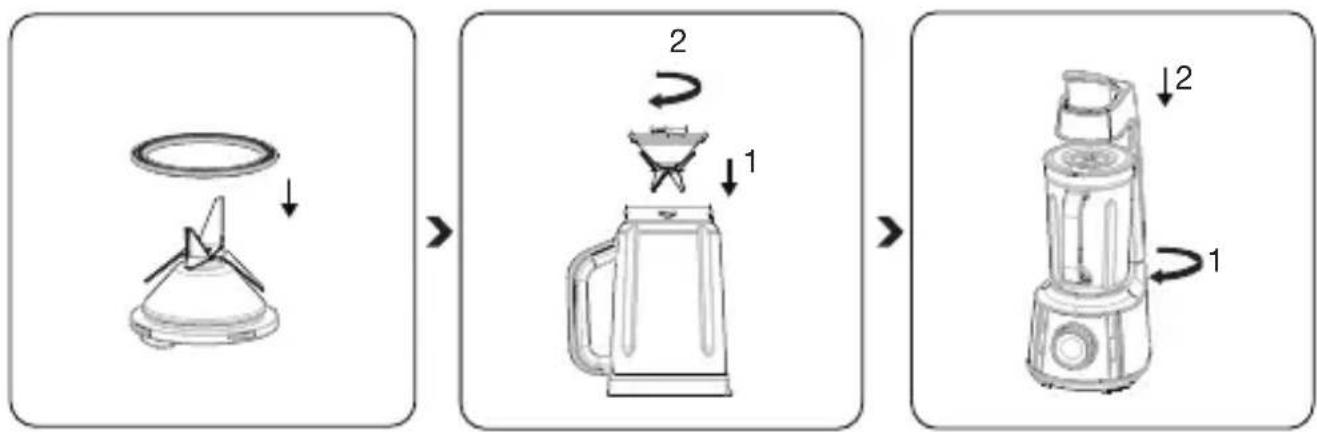
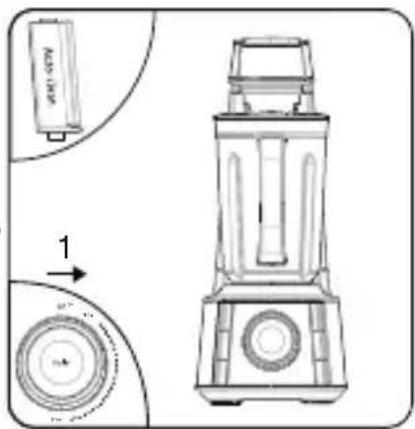
Put the silicone ring in its place on the chopping blade F and place the chopping blade under the jug D.
Place it back in the jug by turning anti-clockwise.
Place the jug onto the motor housing H.
Operation
Warning
■ Do not operate the appliance when empty.
Notes
■ The maximum temperature of the liquid to be prepared inside the appliance must not exceed 40 C degrees.
- Put soft foods or liquids before adding hard foods or ice.
■ Adding some water into the appliance will allow it run smoothly (e.g. 40ml water for 60gr solid food). Add the water before the ingredients.
natural_image
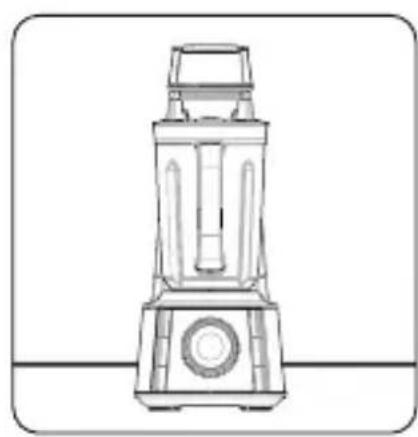
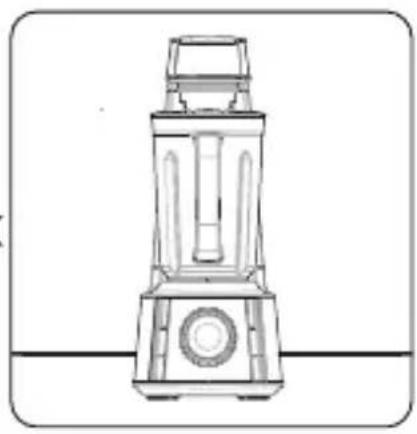
Line drawing of a blender with handle and control panel (no text or symbols)Place your appliance on a solid and flat surface.
natural_image
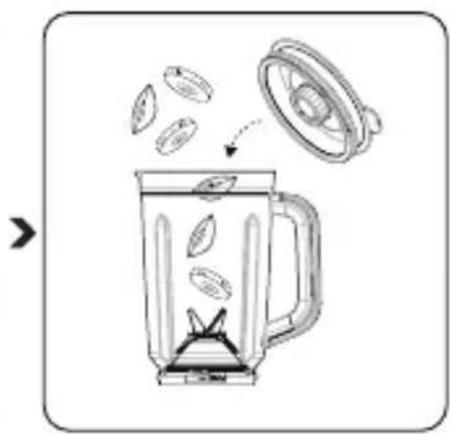
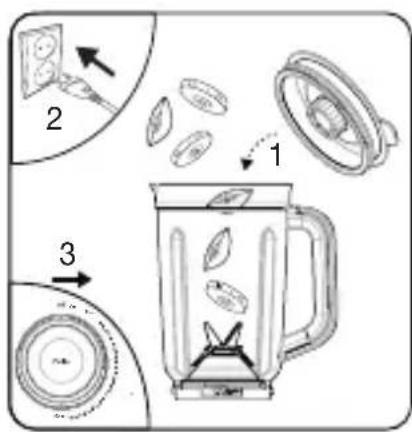
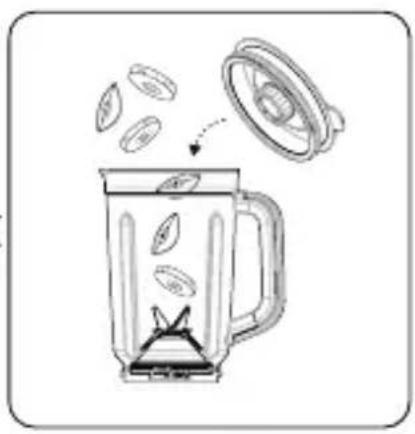
Illustration of a blender with leaves inside, showing a lid and fan (no text or symbols)Put the ingredient you want to process into the jug and place the lid on it.

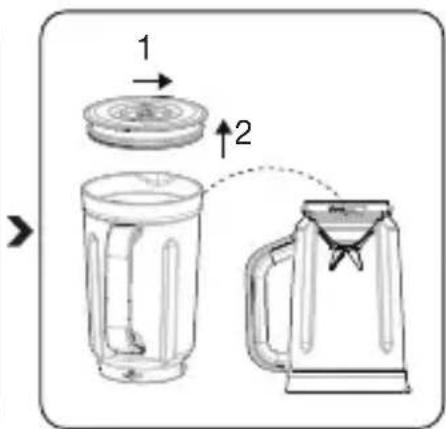
Place the jug onto the motor housing H so that the tab on it seats on the slots of the motor housing H, turn it to the "Lock" position and secure.
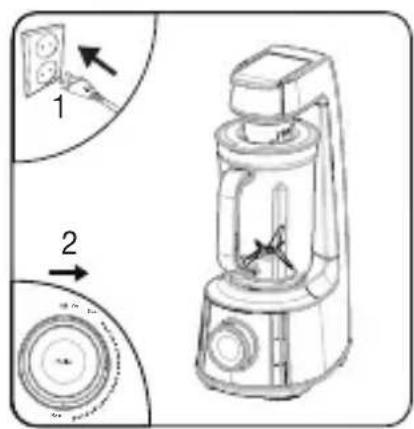
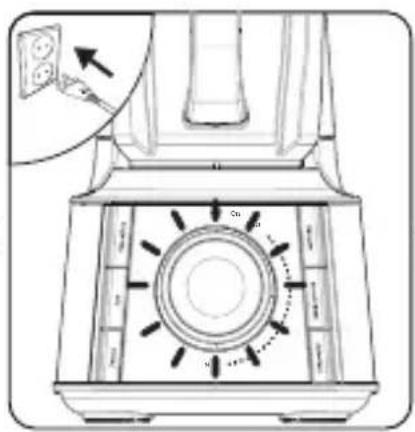
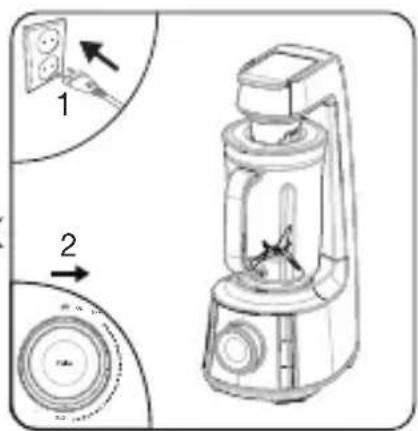
Plug in the appliance and move the speed adjustment knob ☐ to "ON" position.

Process the ingredients at the desired speed using the speed adjustment knob 1. When the process is complete, move the speed adjustment knob 1 to "OFF" position and unplug the appliance.
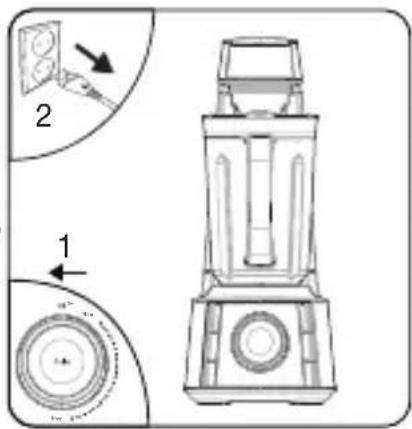
Remove the jug from the motor unit by rotating it counterclockwise D H. Open the lid C and take out the food.
Warnings
■ Gradually increase the speed of the appliance. Do not operate it at the highest speed suddenly. Otherwise the motor may overheat.
- Do not run the appliance continuously for more than 2 minutes. Let it cool for 5 minute before operating it again.
- Do not insert any foreign objects into the jugD when the appliance is in use.
- Do not remove ingredients from the jug D before chopping blade F has completely stopped.
- Do not use carbonated beverage, crop, frozen food, or sticky food (boiled bean, yam, etc.).
Note
■ After each use, the container lid (C, V) must be washed and remove moisture for next use. Dry it well before use.
Warning
The backflow prevention cap must be assembled on the container lid. Blender may malfunction if there is water or food gets backflow into the vacuum valve.
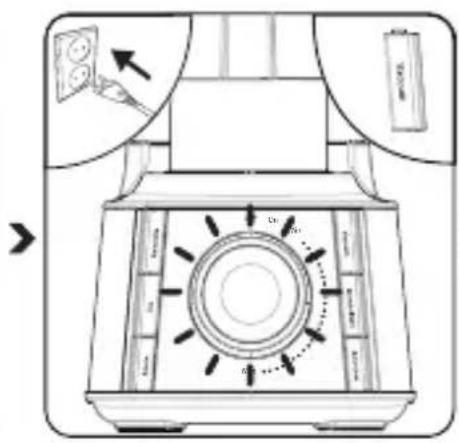
Automatic programs with the jug
The appliance is equipped with six automatic programs that you can use: Smoothie K, Ice L, Sauce M, Vacuum N, Vacuum+Blend O, and Auto Clean P.

Put the ingredients in the jug D and close the lid C. Plug in the appliance and move the speed adjustment knob I to "ON" position.
Select the desired automatic program. The program that you have chosen will turn on and start functioning at various speed settings. If you choose the vacuum program, it will start vacuuming and will stop after 1 minute. If you choose Vacuum+Mixing program, the program will keep on functioning at various speeds after the vacuum has stopped and the program will stop 2 minutes afterwards. The light will flash.
When the process is complete, move the speed adjustment knob 1 to "OFF" position and unplug the appliance.
"Pulse" position
For mixing with high speed short pulses, turn speed adjustment knob to "ON" position and press "pulse". The appliance will stop when you release the button.
Vacuum program with the bottle
You can use Vacuum program with the storage bottle by assembled it and the bottle stand accessory onto the appliance.

flowchart
graph TD
    A["Raw Material Input"] --> B["Step 1: Cover and Shrimp"]
    B --> C["Step 2: Shrimp Shavings"]
    C --> D["Step 3: Shrimp Shavings"]
    D --> E["Step 4: Shrimp Shavings"]
    E --> F["Final Packaging"]
Put the ingredients in the portable bottle W and close the vacuum lid X. Place it into the bottle stand Z and lock it by turning clockwise on the motor unit H. Plug in the appliance and move the speed adjustment knob I to "ON" position.
Select the Vacuum program. program. The pump will turn on and stop until the sensoris automatic off or about 1 minute later. The light will blink.
When the process is complete, move the speed adjustment knob ☐ to "OFF" position and unplug the appliance.
You can keep blended juice or other foods in vacuum using the storage bottle to keep them fresh for a long time.
Note
■ Vacuum delays oxidation but does not sterilize the contents. Keep them refrigerated and have them as soon as possible
If you want to stop the appliance at any time during the operation, move the speed adjustment knob ☐ to "OFF" position.
Warnings
- When you store food in the smoothie bottle by means of vacuum storage, store such in a refrigerator. Do not store this in a freezer.
- When you store food in the smoothie bottle by means of vacuum storage, store such in a refrigerator. Do not store this in a freezer.
Do not use any jug or part other than those meant for the purpose intended.
Maximum quantities
Maintain the maximum or the minimum volume for each type of material by the scale on the container D.
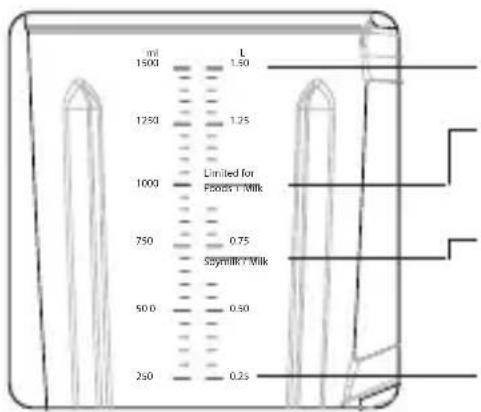
Maximum level for materials to blend (1,500ml)
Maximum level for materials including milk products such as milk and soymilk to vacuum (1,000ml)
Maximum level for milk products such as milk and soymilk to vacuum (700ml)
Minimum level for materials to blend (250ml)
Warnings
- Do not exceed the maximum level for each food material indicated by the scale on the container D. Air bubbles or food materials getting into the pump can cause trouble.
If there are ingredients stuck between the chopping blades F, please dismount it from the jug D and remove the stuck matter using a long slender utensil, etc.
Anti-insect prevention for vacuum passage
The measuring cup √ accessory can be used as an anti-insect cap to prevent insects or bacteria breeding in the vaccum passage.
Take out the jug D from the motor housing H and pull down the lever G. Place and secure the measuring cup V onto the vacuum suction head U.
If you want to operate the appliance again, remove the measuring cup V from the vacuum suction head U first before intend to pull upthe lever G
Warning
Take cautions to make sure the food material does not go into the safety device. Never directly push the safety switch pin with your finger or a rod, etc.
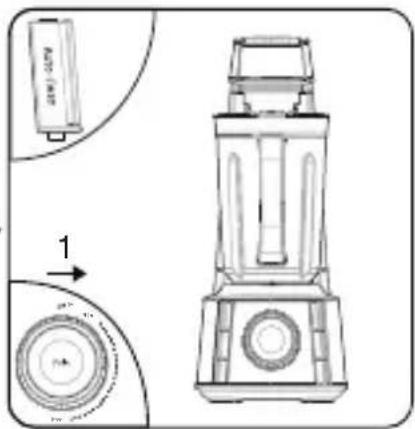
Motor Protection
Automatic motor protection will get activated and stop the appliance when the appliance overheats. In this case;
1 Move the speed adjustment knob ☐ to "OFF" position.
2 Unplug the appliance.
3 Let it cool for 15-20 minutes.
Cleaning
natural_image
Illustration of a blender with three plastic bottles and a lid, showing liquid being poured into it (no text or symbols)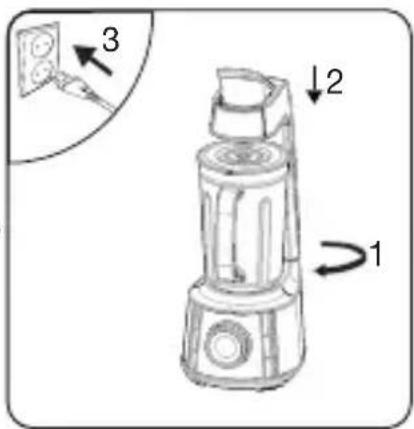
natural_image
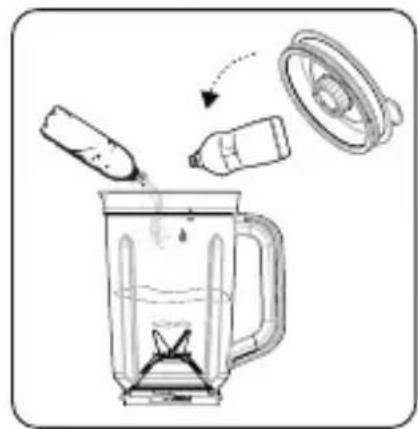
Line drawing of a blender with a side view showing internal components and a close-up of the lid (no text or symbols)Add 1 or 1 12 cups of luke warm water and some drops of dish-washing liquid into the jug D and close the lid C.
Place the jug D into the motor unit H. Lock the jug D clockwise according to the "Lock" arrow on the motor unit H and press down the lever G Plug in the appliance.
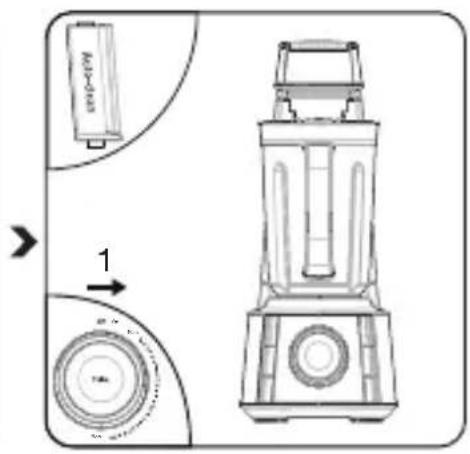
Use Auto Clean program to operate it for 26 seconds.
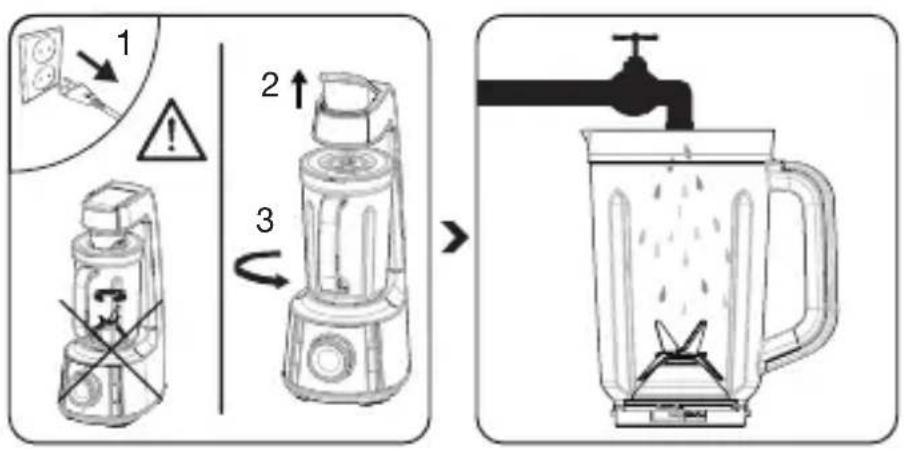
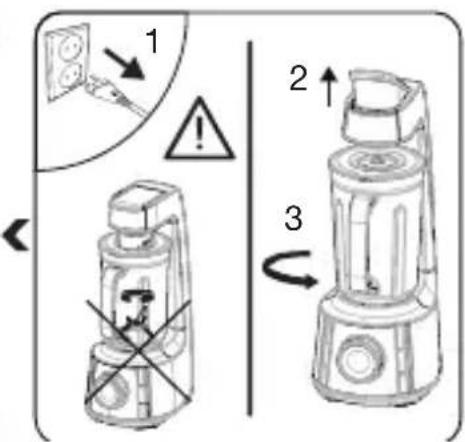
Unplug the appliance before cleaning. Wait for the accessories used to stop completely. Pull up the lever G and unlock the jug D anticlockwise according to the "Open" arrow on the motor unit H Pull up the jug D to remove it from the motor unit H.
Then rinse it.
Note
- You can wash the jug D, portable bottle W and the caps/lids, portable bottle lid ( C, V, X, Y ) in your dish-washer. It is recommended to clean the appliance immediately after using.
Warnings
■ Do not immerse the motor uniH in water. You can wipe it with a damp cloth.
- Chopping blade F is sharp. Do not hold the sharp edge or immerse in water while cleaning.
Washing or replacing the filter
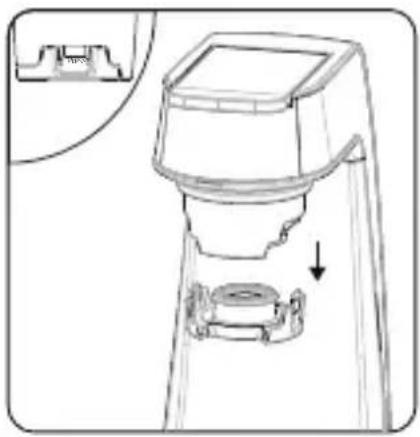
The vacuum suction head ☐ on the appliance is assembled with a washable permanent filter to avoid trouble in case the container lid ☐ is spattered with food, as this can block the vacuum passage and cause trouble.
natural_image
Technical line drawing of a mechanical device with a base and top component, showing a downward arrow indicating motion (no text or symbols present)Press the latches of suction head cover U at both sides to remove it downward.
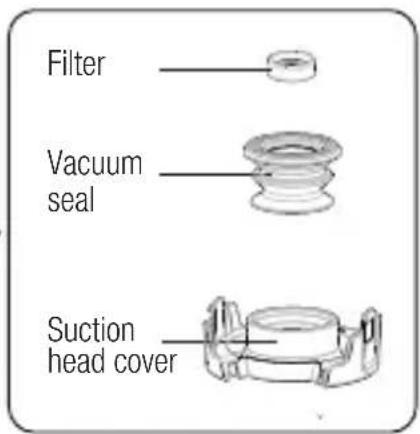
Take out the filter S from the vacuum seal T to wash or rinse it, or replace a new one.
natural_image
Line drawing of a mechanical component with a square top and flanged base (no text or symbols)Place and secure the suction head cover back before use.
The container lid C is also assembled with a washable permanent filter.
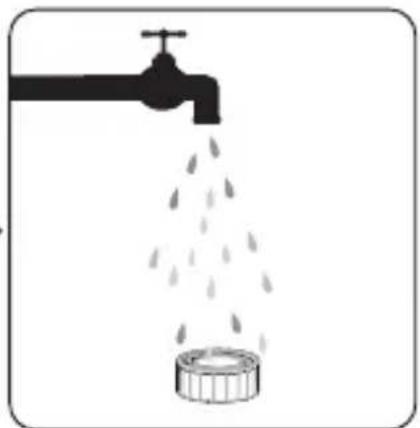
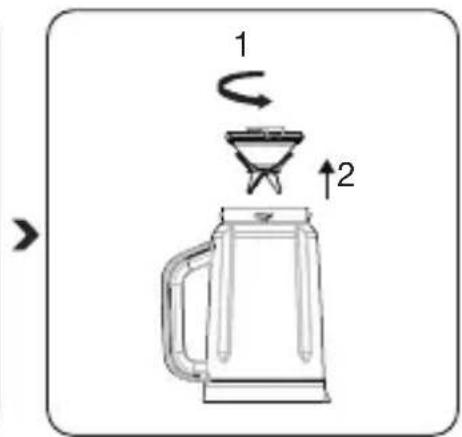
Turn over the lid and open the backflow prevention cap by turning it anti-clockwise to remove it from the lid
natural_image
Illustration of a faucet releasing water from a cylindrical container (no text or symbols)Take out the backflow prevention cap to wash or rinse then to dry it. Make sure there is no water or foods blocked venting holes.
Place and secure the backflow prevention cap back by turning it clockwise before use.
Storage
If you do not intend to use the appliance for a long time, store it carefully.
■ Unplug the appliance and wait for it to cool completely before storing it.
- Keep the appliance and its accessories in their original packages.
- Do not wrap the power cord around the appliance.
■ Store it in a cool, dry place.
■ Always keep the appliance out of the reach of children.
Handling and transportation
■ During handling and transportation, carry the appliance in its original packaging. The packaging of the appliance protects it against physical damages.
- Do not place heavy loads on the appliance or on the packaging. The appliance may get damaged.
■ Dropping the appliance may render it non-operational or cause permanent damage.
Compliance with the WEEE Directive and Disposing of the Waste Product:
This product complies with EU WEEE Directive (2012/19/EU). This product bears a classification symbol for waste electrical and electronic equipment (WEEE).
natural_image
Pure electrical circuit lines without any symbolsThis product has been ma- nufactured with high quality parts and materials which can be reused and are sui- table for recycling. Do not dispose of the waste product with normal domestic and other wastes at the end of its service life. Take it to the collection center for the recycling of electrical and electronic equipment. Please consult your local authorities to learn about these collection centers.
Compliance with RoHS Directive
The product you have purchased complies with EU RoHS Directive (2011/65/EU). It does not contain harmful and prohibited materials specified in the Directive.
Package information

Packaging materials of the product are manufactured from recyclable materials in accordance with our
National Environment Regulations. Do not dispose of the packaging materials together with the domestic or other wastes. Take them to the packaging material collection points designated by the local authorities.
Technical data
Voltage: 220-240V \~ 50-60 Hz
Power consumption: 1000 W
Rights to make technical and design changes are reserved.
natural_image
Stylized grayscale illustration of a tree with leaves and roots, enclosed in a circular frame (no text or symbols)flowchart
graph LR
    A["1: Cooker with lid"] --> B["2: Stirrer with lid"]
    B --> C["3: Cooker with blender"]
    C --> D["4: Stirer with lid"]
    D --> E["5: Cooker with blender"]
    E --> F["6: Cooker with blender"]
    F --> G["7: Cooker with blender"]
    G --> H["8: Cooker with blender"]
    H --> I["9: Cooker with blender"]
natural_image
Simple line drawing of a mechanical component with a circular top and a downward arrow indicating motion (no text or symbols)natural_image
Line drawing of a blender with a circular base and top handle (no text or symbols)natural_image
Illustration of a blender with leafy contents being poured into it (no text or symbols)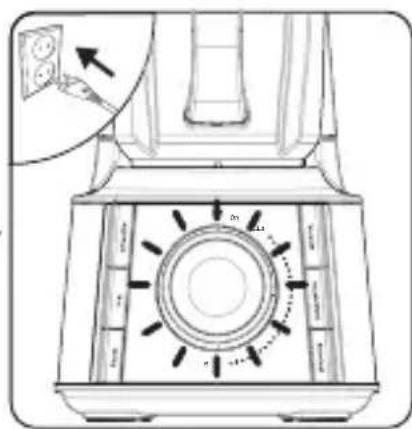
natural_image
Technical line drawing of a mechanical device with internal components and directional arrows (no text or symbols)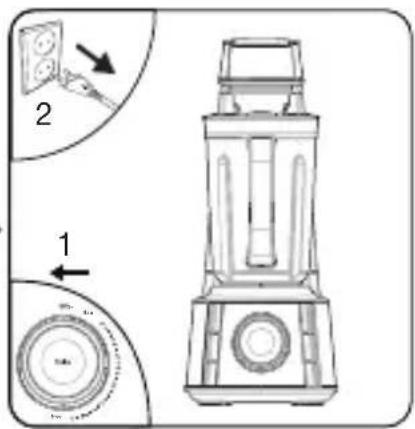
natural_image
Illustration of a blender with liquid being poured into it, showing a lid and plastic bottle (no text or symbols)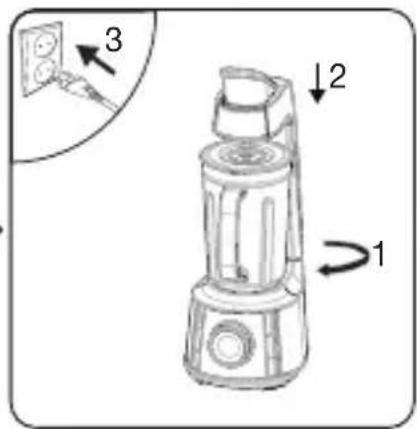
natural_image
Technical line drawing of a blender with labeled components and an arrow indicating transformation (no text or symbols present)flowchart
graph LR
    A["1: Cooker with food, warning sign"] --> B["2: Stover, heat exchanger"]
    B --> C["3: Stirrer, cooling down"]
    C --> D["4: Water displacement, drop in buffer"]
natural_image
Technical line drawing of a mechanical device with a base and top component, showing a downward arrow indicating motion (no text or symbols present)natural_image
Line drawing of a mechanical component with a square top and cylindrical base (no text or symbols)natural_image
Diagram showing a faucet releasing water into a container with droplets falling (no text or symbols)natural_image
Symbol of a waste bin crossed out by a diagonal line, with no text or numbers present.natural_image
Stylized grayscale illustration of a tree with leaves and roots, enclosed in a circular frame (no text or symbols)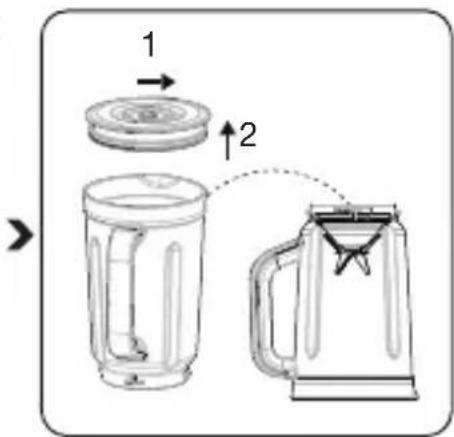
flowchart
graph LR
    A["Top Pan"] --> B["Step 1: Cooking with lid"]
    B --> C["Step 2: Roast and fan with side panel"]
    C --> D["Step 3: Cooker with blender, side panel with side panel"]
    D --> E["Step 4: Stopping with side panel, side panel with side panel"]
natural_image
Line drawing of a blender with a circular vent and handle (no text or symbols)natural_image
Illustration of a blender with leaves being poured into it, showing the lid and handle (no text or symbols)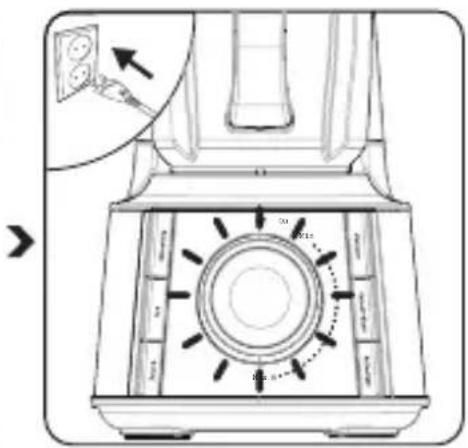
natural_image
Illustration of a blender with liquid being poured into it, showing a lid and plastic bottle (no text or symbols)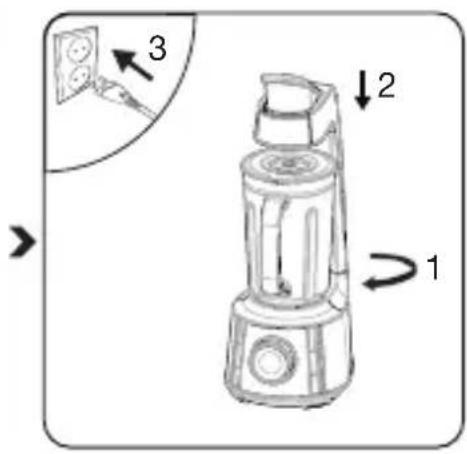
natural_image
Technical illustration of a blender with labeled parts and an arrow indicating direction (no text or symbols present)natural_image
Technical line drawing of a mechanical device with an inset showing a close-up view of the component (no text or symbols present)natural_image
Line drawing of a mechanical component with a square top and support structure (no text or symbols)natural_image
Diagram showing a faucet releasing water into a cylindrical container (no text or symbols)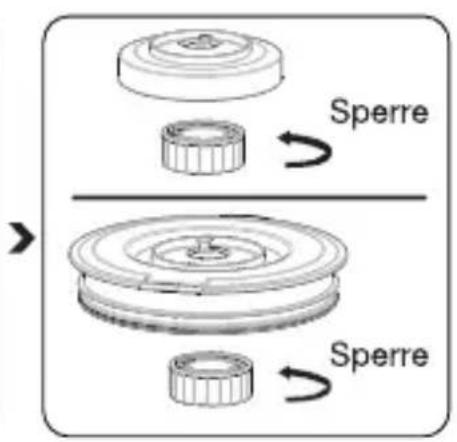
natural_image
Symbol of a fuel pump crossed with a diagonal line, no text or numbers presentnatural_image
Symbol of a trash bin crossed out by a diagonal line, with no text or numbers present.
natural_image
Diagram showing a faucet releasing water into a container with droplets (no text or symbols)natural_image
Line drawing of a mechanical component with a square top and flanged base (no text or symbols)natural_image
Technical line drawing of a mechanical device with a downward arrow indicating a component (no text or symbols present)natural_image
Illustration of a blender with liquid being poured into it, showing a lid and plastic wrap (no text or symbols)natural_image
Illustration of a blender with water being poured into it, using a faucet (no text or symbols)ثُم اشطفه.
natural_image
Line drawing of a handheld device with a cylindrical top and circular base (no text or symbols)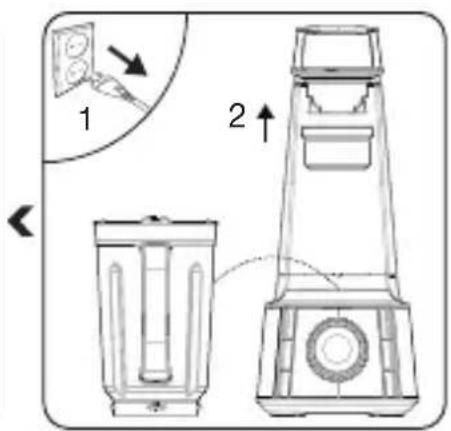
flowchart
graph TD
    A["Raw Material Input"] --> B["Step 1: Cover and Shrimp"]
    B --> C["Step 2: Shrimp in a pan with leaves"]
    C --> D["Step 3: Shrimp being added"]
    D --> E["Step 4: Shrimp in a bowl with leaf"]
    E --> F["Final Product Packaging"]
<
<
<
natural_image
Illustration of a blender with liquid and leaves being poured into it (no text or symbols)<
natural_image
Line drawing of a blender with handle and control panel (no text or symbols)<
natural_image
Simple line drawing of a mechanical component with a circular top and downward arrow, no text or symbols present.04-19 عربى
GRUNDIG
natural_image
Black and white photo of a GRUDIC blender with handle and control knob (no visible text or symbols)AR