
MPM-4034 - Mp3 player DENVER - Free user manual and instructions
Find the device manual for free MPM-4034 DENVER in PDF.

| Product type | MP3 player with 4.3" TFT touch screen |
| Display | 4.3 inch TFT, resolution 480×272 |
| Internal memory | 4GB or 8GB (model dependent) |
| External memory | TF card up to 16GB |
| Battery capacity | 1200mAh Li-ion |
| Video playback time | Approximately 3.5 hours (earphone output) |
| Audio playback time | Approximately 16 hours (black screen, earphone output) |
| USB interface | USB 2.0 (full speed) |
| AV output | Yes (RCA cable, PAL/NTSC) |
| Supported audio formats | MP3, WMA, APE, FLAC, OGG, WAV |
| Supported video formats | MPEG-4 (AVI), MKV, RM, RMVB, FLV, WMV, MOV, VOB, DAT; max resolution 1280×720 |
| Supported image formats | JPEG (up to 6000×6000), BMP (up to 1000×1000), GIF |
| E-book format | TXT with bookmark support |
| FM radio | Yes, with auto search and channel saving |
| Recording | Built-in microphone, long time recording |
| Games | Tetris, Sokoban |
| Remote control | Included (IR) |
| Languages | English, Italian, Simplified Chinese, Traditional Chinese |
| Operating system support | Windows XP, Vista, 7 |
| Charging time (first use) | 8 hours for first two charges to activate battery fully |
| Touch screen calibration | Available in settings |
| Power on/off | Long press power key for 4 seconds |
Frequently Asked Questions - MPM-4034 DENVER
User questions about MPM-4034 DENVER
0 question about this device. Answer the ones you know or ask your own.
Ask a new question about this device
Download the instructions for your Mp3 player in PDF format for free! Find your manual MPM-4034 - DENVER and take your electronic device back in hand. On this page are published all the documents necessary for the use of your device. MPM-4034 by DENVER.
USER MANUAL MPM-4034 DENVER
Read USB and charge 1
Use TF card 1
Trouble shooting 1
Technical specification 18
Main function
- 4.3" TFT touch screen, Resolution 480*272
● Support MP3, WMA, APE, FLAC, OGG, WAV etc. music play. - Support MPEG-4 (AVI), MKV, RM, RMVB, FLV, WMV, MOV, VOB, DAT, etc. video play
● Support TF card, capacity support 128MB\~16GB - Support photo view of JPEG, BMP, GIF format, auto view, rotate, photo can be set as background
● Support E-book reading, bookmark function - Support calendar, clock display
- Inside MIC, long time recording
● Support multitask function, can read E-book while listening music
- Support AV out
● High-speed USB2.0 transmission
● Support windows XP, Vista, win7
Attention :
This manual include the important safety measure and using products information, please read this manual before using it.
- Don't use the player in the environment of special hot, cold, more dust and humidity.
- Avoid fall or heavy hit, don't make the TFT screen heavy shake, or else the TFT screen maybe be damaged or deviant display, user will be responsible for the fall or hit problem.
- The life of battery may be have some different owing to the using condition and environment.
- Please charge : A、no power ; B、system auto power-off ; C、no respond when operate the key.
- Don't cut the connection when the player is formatting or upload and download, or else maybe cause the problem.
- Owing to the player damage, repair and other reason caused the memory losing, our company will not be responsible; user should operate according to the manual, and copy the important data in time. Please contact the dealer if have any query, don't knock down the player by yourself, or else it will lose all warranty from our company.
- The firmware system and file maybe be damaged owing to many computer virus, please enhance the virus prevent. If the player have been infected and can't work, user can upgrade the firmware by non-virus computer and then make format.
- The temperature will have a little high when charge, this is normal.
- The performance and function will have some difference owing to the different software and hardware version, hereby caused change will not other notice. We hold the improving products right.
Note: This player have no waterproof function
Know the player

- Power key: Long press POWER for about 3 seconds to turn on/off unit
- : Earphone jack
- AV-OUT
- USB slot
- Hold key : Lock/unlock touch key or screen.
- IR : For remote control
- MIC
- TF : TF slot
Touch screen key function
Under the main menu, you can touch to select the function, and enter the submenu.
Note:
- Don't touch too heavy, otherwise will cause the touch function is not sensitive or display broken.
- When find touch is not sensitive, you can adjust the screen under Setting menu
- When the unit is dead due operate is not correctly, press power key to ON position for 5-10 seconds to power off. The unit will be rest. You can restart the unit to use at that time.
Power on / Power off
Power on:
Push the power key to ON position for around 4 seconds to power on.
Power off:
Under any interface, push the power key to ON position for around 4 seconds to power off.
Note: When operations are not proper, it will cause the unit dead, at that time, press the power key for 5-10 seconds to power off, then restart.
Under main interface as below, you can slide to left or right, up or down side to select one of the options.

Return: Under any menu, click to return to main menu.
Battery logo: Battery level indicator
Submenu: Under submenu, click ☐ to enter submenu setting
Brightness: Show the brightness grade: 0-10 grade
Volume: Show the current volume grade, there 0-30 grade, under submenu, click 1 to adjust the volume directly.
Return: Under submenu, click to return to last menu.
Click User change the direction for main menu display.
You can slide to left or right, up or down side to select one of the options. Then, click to
enter.
Under main interface, click to open or hide the shortcut menu.
Click to display the clock.
Click to enter music playing interface
Volume: Click to enter volume adjusting interface
Brightness: Click to enter brightness adjust interface
Remote control introduction:

. POWER/OFF: Short press to power off
. 2 :mute
. 5 ESC: exit from a function.
. ⒺET: Enter menu
.7 V O L -:Decrease volume
.8 V O L : + I n c r e a s e v o l u m e
1. Movie
Under main interface, click to enter, select the disk to enter play list, select the file you want to play, and click to pop up the menu, you can copy, paste, delete files.


Key instruction :
Click 📄 to select the previous file, click 🔗 to select the next file. Click 1 to play /pause, click · to return to last menu. When playing movie, you can click 1 and slide the bar —— — to adjust the volume. Click to return to the main menu.
Fast forward, fast backward:
Slide progress bar to adjust the playing point.
Video Zoom: Under movie playing interface, click 1 to switch among picture adjustment modes.
Settings:
Click 1 to select the related settings, include last menu, track, brightness, zoom, play mode, sound channel, subtitle size and color.

Click to return to last menu
Click I to set sound track (note: the file must contain more than one)
Click to display Subtitles.
Click to set brightness
Click 1 to Switch the screen display among picture adjustment modes.
Click :There are only once, rotate one, rotate all, sequence, random for selection.
Click : There are Stereo, left channel, right channel for selection.
Click ☐ :There are normal, big, huge subtitle size for selection.
Click : There are default, red, blue for subtitles color.
Support format :
MKV/WMV/AVI/MP4/MOV/VOB/DAT/RM/RMVB/FLV
AVI format video support resolution within 1280×720 with CODEC Coder Decode: XviD, H.264, DivX
RMVB format video support resolution within 1280×720 with CODEC Coder Decode: RV40
FLV format video support resolution within 1280×720 with CODEC Coder Decode: H.263
DAT format video support resolution within 1280×720 with CODEC Coder Decode: MPEG1
MPG format video support resolution within 528×288 with CODEC Coder Decode: MPEG1
VOB format video support resolution within 1280×720 with CODEC Coder Decode: MPEG2
MPG format video support resolution within 1280×720 with CODEC Coder Decode: MPEG2
MP4 format video support resolution within 1280×720 with CODEC Coder Decode: H.264
MKV format video support resolution within 1280×720 with CODEC Coder Decode: H.264
MOV format video support resolution within1280×720 with CODEC Coder Decode: H.263, H.264
WMV format video support resolution within 1280×720 with CODEC Coder Decode: WMV1, WMV3.
Note: Above supported range only for reference due video format have to take code rate, coder decode, resolution into consideration. When can't play the file fluently or indicate format error, please use the convert tool to convert.
Video convert tool
Some of video format with high resolution, may cause some of video files can't play. At that time, you can use the convert tool to convert. This tool can convert MP4, MPG, MPEG, WMV, RM, ASF, RMVB, AVI, VOB, MKV, DAT, ASF video formats into MPEG4 (AVI) format which is compatible with the player.
- Run the disk, and launch "AVIConverter_320X240_22FPS_EN Setup.exe", by double clicking to install. Run the "AVI Converter" after finish the installation.

- Click "Add", will show the dialog box as below:

- Select the original file you need to convert and output place for the converted video file. Then select and set the Parameter you want and click "Save". As follow:

- Click "Convert Now" after saved the file, as follow:

- After finished the conversion, will show as below :

- The files that converted can be direct played in the player.
2. Music
Under main interface, click 📁 and select disk to enter the play list, select the file and click to play. Click 🔔, to pop up the menu, you can copy, paste, delete files.


Medialib
Click 🖼 to order songs as per artist, click 📞 to order songs as per album, click
to order songs as per genre, click to order songs as per star. Click to
order songs as per year, click to check all songs in the list.

Key instruction :
Click 📄 to select previous song, click 📋 to next song. Click in the middle of song/artist name to play or pause. Click · to last menu. When playing the song, click
I ,to slide — — to adjust the volume. Click ↓ to return to the main interface directly.
Fast forward or Fast backward: Slide to adjust the playing point.
EQ Setting : Under playing status, click 1 at the right corner to switch the sound effect among nature, DBB, pop, rock, classic, jazz, vocal, dance, and soft.
Settings : Click 1 to enter setting menu, include last menu, playing mode, EQ, Lyric display, brightness, stars and Lyric colors.


Click to last menu.
Click to enter: only once, rotate one, rotate all, sequence, random option.
Click to select EQ selection.
Click to display Lyric or not.
Click I o adjust the brightness.
Click I to set star grade.
Click to set the font color.

Synchronous Lyric Display
The player supports lyric files with *.LRC suffix, and displays synchronously. How to use lyric files?
Please make sure the lyric has the same name to the music
For example:
Music file: My heart will go on.mp3
Lyric file: My heart will go on. lrc
When playing the songs with lyric, click 1 to select the lyric and it will show. It will show spectrum if there is no lyric files.
Note : 1、【Only a little MP3/WMA file with very special code maybe can't be played, please transfer it through exchange tool then copy it to player and play.】
2、【APE only support : NORMAL of 3.95、3.97、3.98、3.99 version and FAST compress version !】
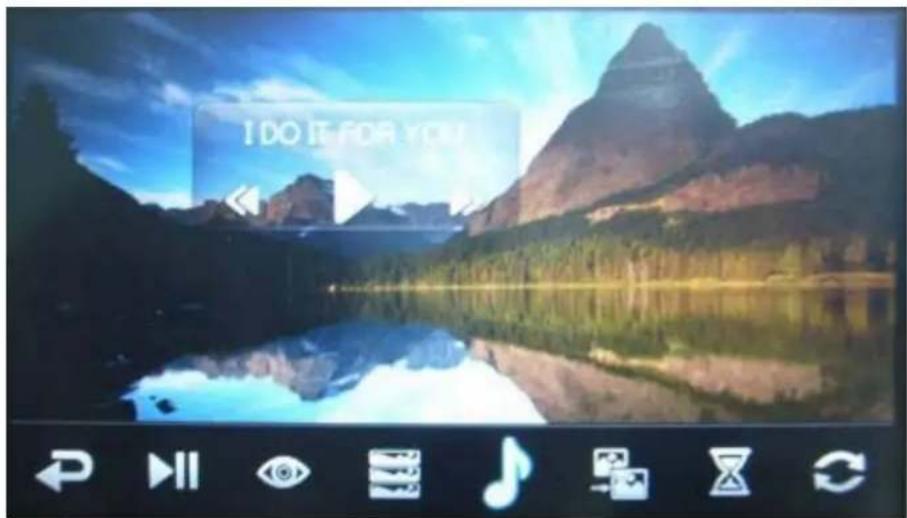
3. Photo
Under main interface, click ! to enter and select the disk to the list, click the photo to display. Click ! to pop up the menu, you can copy, paste, delete files.

When browsing the photos, click the left side of screen to select the previous photo, click right side to select the next photo. Click the middle of screen to pop up the setting menu.
Click to last menu, when browsing the photo, you can click to slide
to adjust the volume (only for the background music status). Click to return the main menu directly.
Settings :
Click the middle of screen to pop up the setting menu, included: last menu play/pause, zoom, rotation, thumbnail, background music, switch effect, auto playing time, playing sequence, brightness and wallpaper.

natural_image
Scenic mountain lake with reflection in water, captured by a photo viewer interface (no text or symbols on the landscape itself)Click to return to the last menu.
Click to Play/pause
Click ' to zoom in, zoom out ,rotate. Click "+"to zoom in, click "-"to zoom out, click the direction arrow to move the photos, click ' / ' to rotate by clockwise or counterclockwise, and click "X" to exit.

natural_image
Blank white image with faint grid lines and corner markers (no readable text or symbols)Click to open the thumbnail photos
Click to play music
Click to enter the switch mode.
Click to set the play time.
Click 1 to set the play sequence
Click I to set the brightness.
Click to set the current photo as wallpaper
Note:
JPEG pixel max support among 6000*6000; BMP max support among 1000*1000.
4. Ebook
Under main menu, click and select the disk to enter list, and select the file (TXT) you want to read, click will pop up the menu, you can copy, paste, delete the file.

Key instruction:
When reading ,click the top side of screen to previous page, click the down side of screen to next page, click the middle of screen to pop up the setting menu.
Click return to last menu, click to slide — — to adjust the volume
(Only for the background music status), click return to main menu..
Setting:
click the middle of screen to pop up the setting menu

Click to return to last menu.
Click to play/ pause
Click to enter rotate mode.
Click to save mark.
Click to load mark.
Click 1 to set the font size
Click ! to set the font color.
Click I to set background photo.
Click I to adjust the brightness.
Click to play music.
Click to set the play time
Click to set the font width.
Click to replace currently displayed text encoding.
Click to set the page switch mode.
5. FM Radio
Under main menu, select FM radio and pres to enter as the following picture.

Key instruction:
1) Under FM interface, click / to adjust frequency; click to auto search.
2) Click to return to last menu; Under FM interface, click to slide to adjust the volume. Click to return to the main interface directly.
Function instruction:
Settings :
Click the 1 to pop up the setting menu, included: Return to last menu, Channel list, auto search, Save channel, brightness.

1) Click to return to last menu.
2)Click 1 to open the saved channel list and listening to the radio what you want
3) Click to auto search, a after finished search, it will auto save the channels.
4) Click to save channel what you want.
5) Click to adjust the brightness.
6. Calendar
Under the main menu, click to enter calendar mode


Click 1 to preview / next year or month. Click 1 to set the year, month, day, hour, minute and second.
Click to last menu.
Click 1 to slide — — to adjust the volume (only for background music status)
Settings : click ☐ to enter the setting menu
Click Return to last menu
Click to set the year, month, day, hour, minute and second, click direction arrows to set.
7.Record
Under main interface, click to enter record interface:

Under the record interface, click ☐ to start or pause the record, click ☐ to save record.
click to return to the previous file, click to return to the main interface directly.
Record quality setting :
Under record interface, click 1 to pop up record quality setting:
Good quality, Normal quality, Poor quality.
Menu settings : click ☐ to pop up function setting options, include return to the previous menu, delete menu, record quality

Click to previous menu
Click ▪ to delete the current record file
Click to set record quality
8. Setting
Under main menu, click to enter

System set :
a) Output:
There are LCD, PAL, NTSC for option.
Notes: PAL, NTSC modes, need connect the unit to an external screen through the audio/video cable.
b) Language:
There are: English, Simplified Chinese and Traditional Chinese for option.
c) Autooff:
There are 5 minutes, 10 minutes, 30 minutes, 1 hour, always on for option.
Note: once the auto off time is set, the item will turn off automatically no matter which function you are doing; once you will turn on the unit again the timer will set to "always on".
d) Close screen:
There are 5 seconds, 10 seconds, 15 seconds, 30 seconds, 1 minute, 5 minutes, always on for option.
e) Keytone:
You can set key tone be On or Off.
f) Bright:
There are level 1, level 2, level 3, level 4, level 5, level 6, level 7, level 8, level 9, level 10,
for option
g) Disk Info
You can see the information for this player: local disk memory and TF card memory.
Power
You can check the battery status.
Adjust
Click five “+” to finish the touch calibration and exit only calibrate ok.
System info
You can see the information for this player: Software version, size etc.
Restore
You can select if resume the unit to be the default setting or not.
9.Shortcuts for music
Click 📄 on main screen display into music playing mode directly, operation same as playing music.
10. Calculator
Click on main screen display into Calculator, as follow:

11.Games
.1 Tetris
Click on main screen display into Tetris as follow:

Menu instruction :
Next: Show the shape of next tetris
Score: Show the score
Grade: Show the grade; optional use.
Time: Show the using time
Operation instruction:
1 :Quick Drop
2 .Rotate
3 | : Move Left
4 | : Move Right
5 :Down
6 | Return to main menu.
. 2 Sobkoban
Click on main screen display into Sobkoban as below

Menu instruction:
Undo button-- to undo the last move
Puzzle button-- to select a puzzle from a choice of 20 puzzles
Restart button—to redisplay the Sobkoban puzzle in its current state.
Operation instruction:
Connect the unit with the assorted AV (RCA) cable to TV, and set the TV as the current AV IN output status.

Under main interface, click to enter setting mode. select output and select PAL/NTSC, it will show on TV. At that time, the screen will be black, you need operate by the remote control.
Note: After connected the unit to TV, it's better don't put the unit to the right front side of the TV screen, the TV display may cause some disturbing for the remote control using.
13. TF card operation
Insert and take out the TF card
Insert the TF card into the card slot and wait few seconds so that the system can recognize it.
Press it again to remove it.
Read the TF card
After insert the TF card, select "TF card" under main interface.
Note: don't remove the memory card during writing operations (ex. File copy) otherwise all the data contained can be corrupted irreparably.
14. USB and charge
USB display mode
This product is blessed with high-speed USB2.0 (full speed) interface, the standard mobile disk functions. Can support WindowsXP/Vista/Wind7 system, (no need install the driver). After connect to PC (wait several seconds), the player will show online mode. Then you can read the mobile disk by click "My computer" on the computer.

Charge
You can charge the player through connect to the PC by USB cable.
During the charging, the battery icon is impulsed. After finished, the battery is shown fully, at that's time, you need charge more one hour. The battery can't be charged fully until continuously charge for 4 hours. (The first two times need charge for 8 hours as fully activate the battery)
Note: during battery charging the PC must be ON!
Troubleshooting
- The player can't power on
Check if the battery have enough power
When operations are not proper, it will cause the unit dead, at that time, push the power key for 5-10 seconds to power off, then restart.
- No sound
Make sure volume is not on 0 position and the connection to earphone is correct.
- Noise
Please check if the earphone head is clean.
Please check if the music file is destroyed, try to play other music to confirm. Damaged
MP3 files may have noise and even cannot be played
- Strange characters on display
Make sure you have chose correct language.
- Cannot Download Music
Make sure the player is properly connected to the PC
Check if there is still blank memory
Check if the USB cable in good condition
- Can't play video, music, pictures
Please check if the format is correct.
- Touch function is not sensitive
Please check the screen if broken, if not, please calibrate the screen.
• Auto off during using
Check if have enough power
Check if set the "Auto off" time as "always on" under setting menu.
Technical Specifications
Display screen 4.3 inch TFT, resolution:480*272
Connect to PC USB2.0 Full speed
Memory 4GB/8GB
1200mA Li-battery
Power supply Video play about 3.5 hours(earphone output)
Playback time Audio play about 16 hours(black screen, earphone output)
Language English, Italian, Chinese simple and traditional
Operation system Windows XP/Vista/win7
Note: The specification is subject to change for product improvement without further notice.

Electric and electronic equipment and included batteries contains materials, components and substances that can be hazardous to your health and the environment, if the waste material (discarded electric and electronic equipment and batteries) is not handled correctly.

Electric and electronic equipment and batteries is marked with the crossed out trash can symbol, seen below. This symbol signifies that electric and electronic equipment and batteries should not be disposed of with other household waste, but should be disposed of separately.
As the end user it is important that you submit your used batteries to the appropriate and designated facility. In this manner you make sure that the batteries are recycled in accordance with legislature and will not harm the environment.
All cities have established collection points, where electric and electronic equipment and batteries can either be submitted free of charge at recycling stations and other collection sites, or be collected from the households. Additional information is available at the technical department of your city.
ALL RIGHTS RESERVED DENVER ELECTRONICS A/S

WWW.DENVER-ELECTRONICS.COM
Imported by:
Inter Sales A/S
Stavneagervej 22
DK-8250 Egaa
Denmark


- Main function
- Attention :
- Know the player
- Touch screen key function
- Power on / Power off
- Power on:
- Power off:
- Remote control introduction:
- Movie
- Key instruction :
- Fast forward, fast backward:
- Settings:
- Support format :
- MKV/WMV/AVI/MP4/MOV/VOB/DAT/RM/RMVB/FLV
- Video convert tool
- Music
- Medialib
- Synchronous Lyric Display
- Photo
- Settings :
- Note:
- Ebook
- Key instruction:
- Setting:
- FM Radio
- Function instruction:
- Calendar
- 7.Record
- Record quality setting :
- Setting
- System set :
- Power
- Adjust
- System info
- Restore
- 9.Shortcuts for music
- Calculator
- 11.Games
- Menu instruction:
- Operation instruction:
- TF card operation
- Insert and take out the TF card
- Read the TF card
- USB and charge
- USB display mode
- Charge
- Troubleshooting
- Technical Specifications
- ALL RIGHTS RESERVED DENVER ELECTRONICS A/S
Brand : DENVER
Model : MPM-4034
Category : Mp3 player