CAPTURE 3.5 - Image Processing Software NIKON - Free user manual and instructions
Find the device manual for free CAPTURE 3.5 NIKON in PDF.

User questions about CAPTURE 3.5 NIKON
0 question about this device. Answer the ones you know or ask your own.
Ask a new question about this device
Download the instructions for your Image Processing Software in PDF format for free! Find your manual CAPTURE 3.5 - NIKON and take your electronic device back in hand. On this page are published all the documents necessary for the use of your device. CAPTURE 3.5 by NIKON.
USER MANUAL CAPTURE 3.5 NIKON
This document describes the features that have been added with the release of Nikon Capture 3 version 3.5. Page numbers refer to the Nikon Capture 3 User's Manual, Third Edition.
Vignette Control for RAW Images (pg. 136)
Vignette Control has been added to the image adjustment tool palettes. The Vignette Control palette is used to correct for loss of marginal lumination, a phenomenon associated with camera lenses that causes a drop in brightness at the edges of a photograph. Vignette Control is most effective when performed on images taken at maximum aperture. If the picture in the active image window is a RAW image taken with a lens equipped to transmit distance information (i.e., a type G or D lens) mounted on a camera that can record this information, Nikon Capture 3 will use the lens information recorded with the image to automatically select an optimal value for Vignette Control. Where lens information is not available, Vignette Control will be based on default lens characteristics. To determine whether a given combination of lens and camera will record distance information, see the table below.
| Camera | Type G or D lens | Other lens |
| D100 | Recorded | Not recorded |
| D1x/D1H (firmware version 1.10 or later) | Recorded | Not recorded |
| D1x/D1H (firmware version 1.01 or earlier) | Not recorded | Not recorded |
| D1 | Not recorded | Not recorded |
To use Vignette Control:
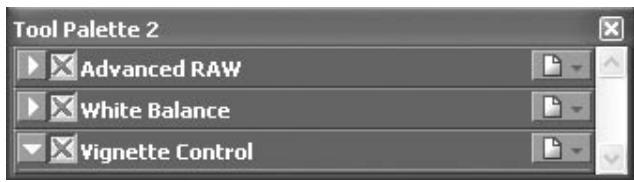
1 Display the Vignette Control palette
From the View menu, choose the tool palette containing Vignette Control (by default, Tool Palette 1) and open the Vignette Control palette by clicking the button.

Adjust settings
If the Apply button is off (×), turn it on (√).
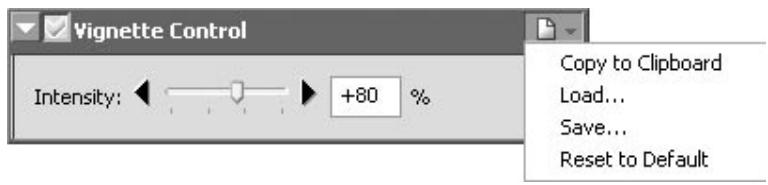
Intensity
Vignette control can be performed manually by dragging the Intensity slider or entering a value in the text box to its right. Choose a value between -100 and +200 according to the drop in marginal lumination exhibited by the lens in use. The default value is 80; if 0 is selected, no vignette control will be performed.
Vignette Control
The controls in the Vignette Control palette are only available if the image in the active window is a RAW (NEF) photograph taken with a D1-series or D100 camera. If the image in the active window is JPEG or TIFF, the Apply button in the Vignette Control palette will be grayed out and inactive. Vignette control can not be used to correct vignetting caused by PC Nikkor lenses or Speedlight photography.
Where Distance Information Is Not Available
If the photograph in the active window is a RAW image taken with a lens that does not transmit distance information to the camera or with a D1-series camera not equipped to record distance information, Vignette Control will be based on default lens characteristics. Care may be required to prevent over-correction.
Neutral.set
At factory defaults (the default settings stored in the file "Neutral.set"), the Apply button is off (X) and Intensity is set to 80.
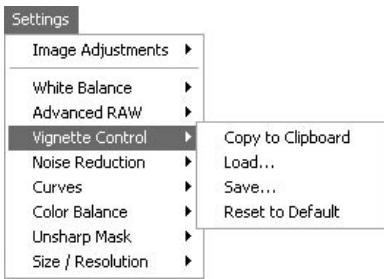
The Vignette Control Settings Menu
Clicking the icon in the Vignette Control palette displays the Vignette Control Settings menu.
| Option | Description |
| Copy to Clipboard | Copy current Vignette Control settings to the clipboard. |
| Load... | Select this item to restore settings saved using the Save… option. A dialog will be displayed where you can navigate to the drive (volume) and directory containing the desired settings file (only files with the extension“.nvc” will be displayed). The settings in the Vignette Control palette will instantly revert to the saved settings. |
| Save... | Select this item to save current settings for the Vignette Control palette to a named file. These settings can later be recalled using the Load… option. Choosing Save… displays a dialog where you can choose a destination and file name for the current Vignette Control settings. Vignette Control settings are saved with the extension“.nvc”. |
| Reset to Default | Restores default settings. Intensity will be set to 80. |

Neutral.set
The Vignette Control Settings menu can also be displayed by selecting Vignette Control from the Settings menu.
Camera Control for D100 Cameras Connected to Macintosh Computers (pg. 188)
Camera control is now available when a D100 digital camera (firmware version 2.00 or later) is connected to a Macintosh computer. Before connecting the camera to your computer and starting Nikon Capture 3 Camera Control, set the USB option in the camera setup menu to PTP.
Ten-Megapixel Output for D1x RAW Images Large Previews for NEF Files (pg. 179)
The General tab of the Nikon Capture 3 Editor Preferences dialog now contains options for options for opening D1x RAW files and for creating large previews when files are saved in NEF.
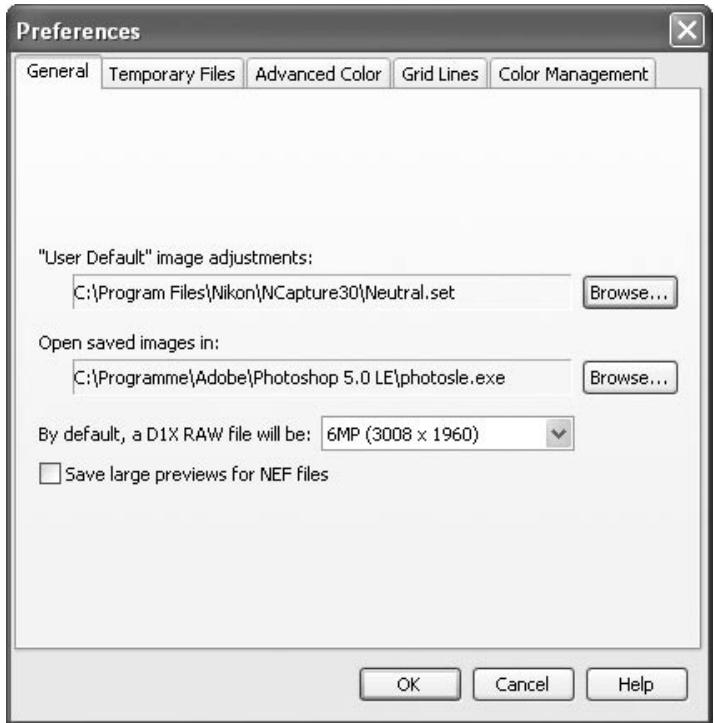
By default, a D1X RAW file will be
This option controls the default size for RAW images taken with the D1x. Choose 10MP (4016 × 2616) or 6MP (3008 × 1960).
Save large previews for NEF files
Image files normally include an embedded preview 570 pixels on its longest size. If this option is checked, images saved in NEF will include a preview 1,600 pixels on its longest side, allowing NEF images over 1,600 pixels long to display more quickly in Nikon Viewer.
RAW Images Created with the D1x
To ensure maximum image quality, the D1x uses 4,016 pixels on the horizontal axis of the CCD when recording RAW images. In Nikon Capture 3 Editor, RAW images taken with the D1x can be displayed at 3,008 × 1,960 pixels (six megapixels) or 4,016 × 2,616 pixels (ten megapixels). The size of the image when opened depends on the option selected for By default, a D1x RAW file will be in the General tab of the Preferences dialog. After opening, you can resize the image by selecting Reset to D1X 6MP or Reset to 100% from the Size/Resolution palette Settings menu (166).
When displayed at a scale of 100% in Nikon Capture 3 Editor, D1x RAW images have a size of 4,016 × 2,616 pixels (ten megapixels). All the pixels in the original image are preserved, permitting a higher level of image quality than if the images were first reduced to 3,008 × 1,960 pixels and then enlarged. At default settings, Nikon Capture 3 Editor automatically scales RAW images taken with the D1x to approximately 74.9% and displays them at a size of 3,008 × 1,960 pixels, thus ensuring compatibility with earlier versions of Nikon Capture 3. Image quality unchanged from earlier versions of Nikon Capture 3.
10MP (4016× 2616)
The D1x is designed to record RAW images at a size of 3,008 × 1,960 pixels (six megapixels). Image quality can not be guaranteed at a size of 4,016 × 2,616 .
Large Previews for NEF Files
Selecting the Save large previews for NEF files option increases file size by about 1 MB, slightly increasing the time needed to save images.
Support for Mac OS X Version 10.2 (pg. 6)
Support for Mac OS X version 10.2 is provided from Nikon Capture 3 version 3.5.
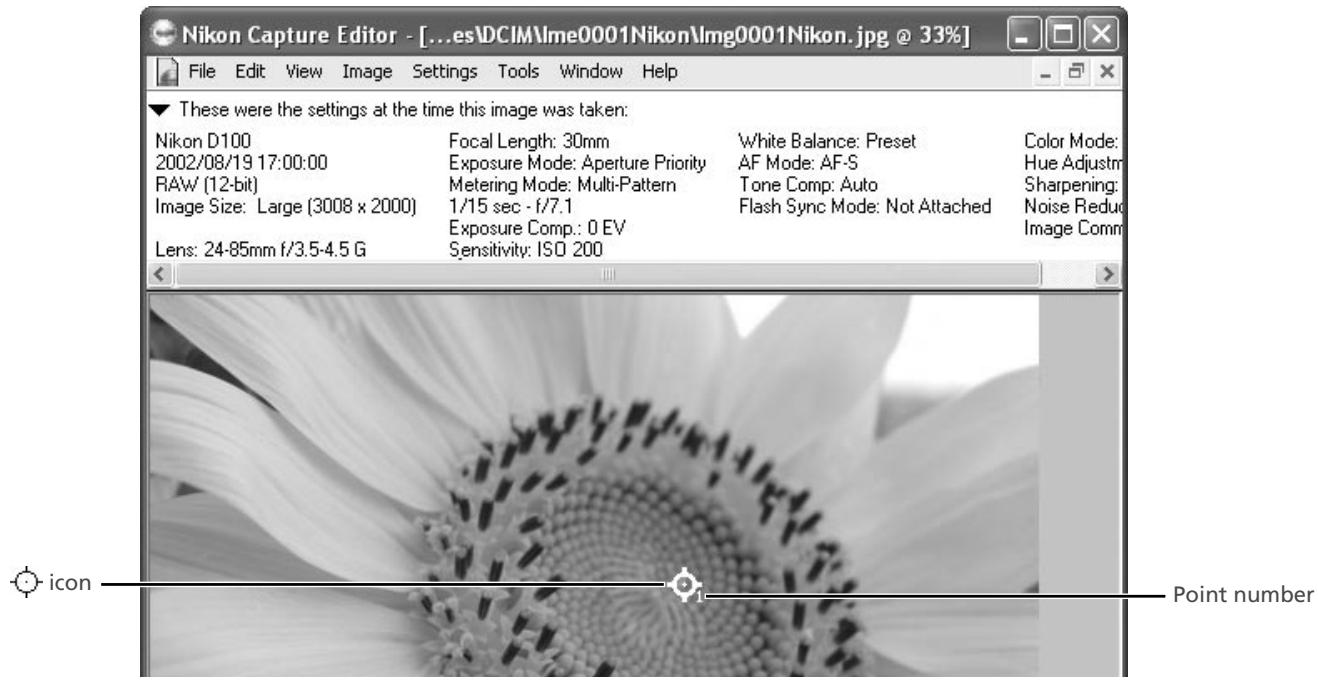
Monitoring Watch Points (pg. 132)
The Information palette can now be used to continually monitor the red, green, blue, and average values (R, G, B, Avg) for up to four selected pixels. The "before" (input) and "after" (output) values for each of these pixels will be displayed in the Information palette, allowing you to determine the effects of any changes to settings.
Selecting Watch Points
To select a pixel to monitor, click the button. The cursor will change to Move the mouse over the desired pixel and click. The selected pixel will be added to the list of watch points in the Information palette.
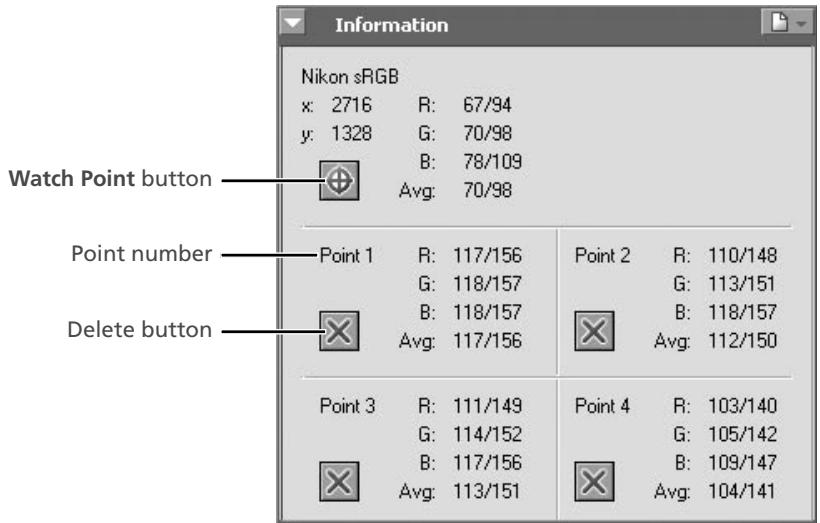
The pixels currently being monitored in the Information palette are shown by a icon in the image window. Each point is identified by a number corresponding to the point number listed in the Information palette. You can monitor up to four pixels at a time.
The Color Noise Reduction Slider (pg. 162)
Color noise reduction is now adjusted using a slider.
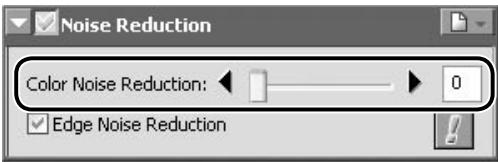
Earlier versions of Nikon Capture 3 offered a choice of three levels for color noise reduction: low, normal, and high. The actual amount of noise reduction performed varied with the model of camera used and the sensitivity (ISO equivalency) at which the photograph was taken. These levels correspond to the following numeric values for color noise reduction:
| D1x/COOLPIX-series cameras | ||||||
| Level | Sensitivity (ISO equivalency) | |||||
| <200 | 200–320 | 400–640 | 800 | 1600 | 3200 | |
| Low | 1 | 1 | 3 | 4 | 4 | 5 |
| Normal | 3 | 3 | 4 | 5 | 5 | 8 |
| High | 5 | 5 | 5 | 8 | 9 | 10 |
| D1/D1H/D100 cameras | ||||||
| Level | Sensitivity (ISO equivalency) | |||||
| <400 | 400–640 | 800–1250 | 1600 | 3200 | 6400 | |
| Low | 1 | 1 | 3 | 4 | 4 | 5 |
| Normal | 3 | 3 | 4 | 5 | 5 | 8 |
| High | 5 | 5 | 5 | 8 | 9 | 10 |
Choose 0 to turn color noise reduction off. When you open NEF images saved in earlier versions of Nikon Capture 3 with noise reduction active, the Apply button will be on and Color Noise Reduction will be set to 8. Select a new value as appropriate.
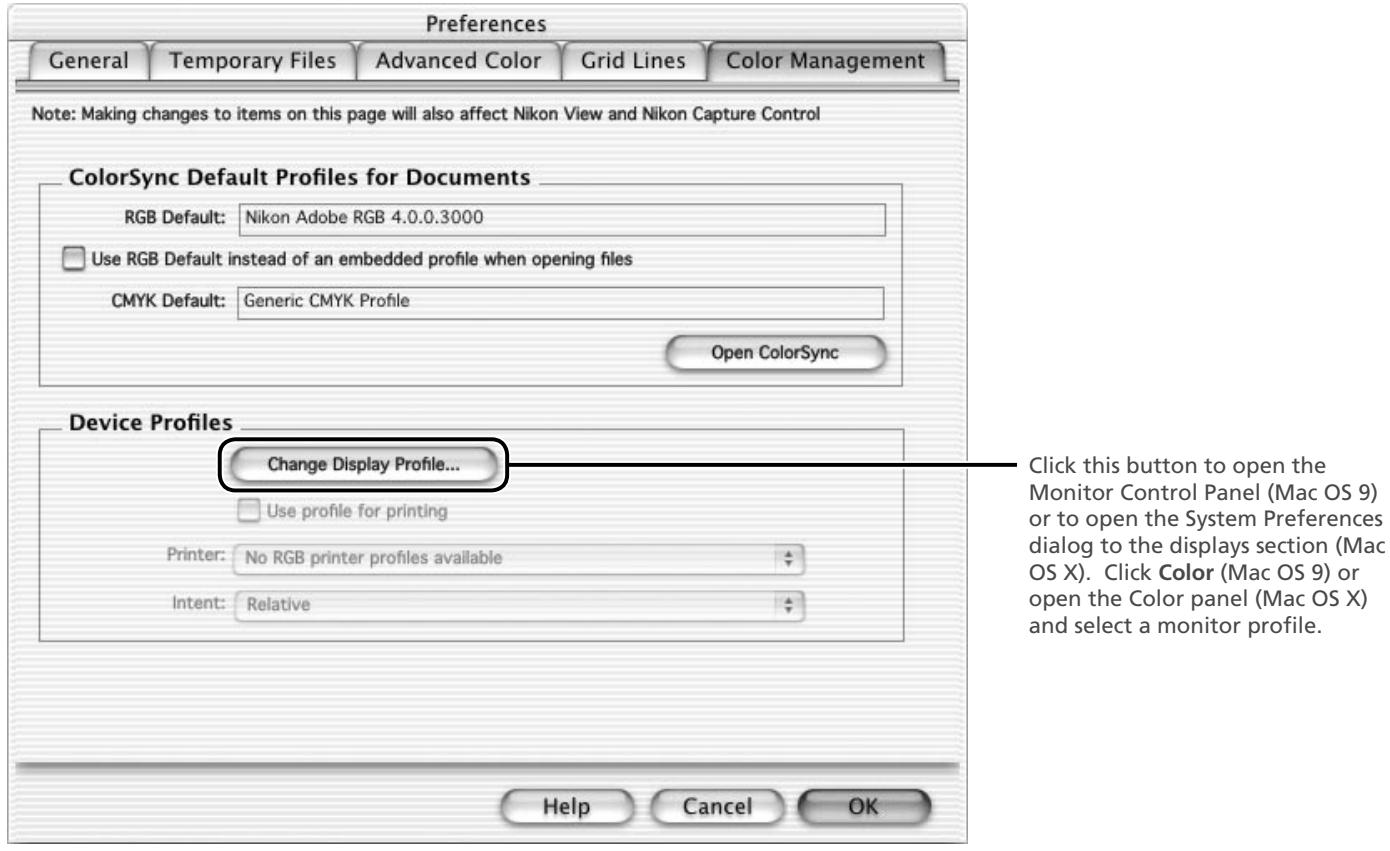
Choosing a Monitor Profile (Macintosh) (pg. 183)
The monitor profile listed in the Color Management tab of the Nikon Capture 3 Preferences dialog now reflects the profile selected in the Displays section of the System Preferences dialog (Mac OS X) or the Monitor Control Panel (Mac OS 9).
Monitor Profiles for Multiple Displays (pp. 182, 184)
Windows
When using multiple displays, use the Color Management tab in the Preferences dialog to choose a monitor profile suited to the display that will be most used to display images.
Macintosh
Nikon Capture 3 will identify and list the profiles for all monitors in an extended desktop display, allowing you to choose a separate profile for each monitor.