
EB-MPI5 - Compact computer Mach Power - Free user manual and instructions
Find the device manual for free EB-MPI5 Mach Power in PDF.

| Product Type | Portable Multimedia Monitor |
| Model | EB-MPI5 |
| Screen Size | 15.6 inches |
| Resolution | 1920 x 1080 pixels (Full HD) |
| Display Technology | IPS LCD |
| Dimensions | 360 x 230 x 10 mm (14.2 x 9.1 x 0.4 in) |
| Weight | 1.5 kg (3.3 lbs) |
| Power Supply | DC 12V, 2A (adapter included) |
| Input Ports | HDMI, USB-C, USB-A |
| Audio Output | Built-in speakers, 3.5 mm headphone jack |
| Functions | Display mirroring, touch screen (capacitive), OSD menu |
| Maintenance | Clean with soft dry cloth; avoid liquid contact |
| Safety Precautions | Do not disassemble; keep away from water and heat sources |
| Spare Parts | Screen replacements, cables, power adapters available from manufacturer |
| Repairability | Moderate; components can be replaced by qualified technician |
| General Information | Compatible with Windows, macOS, Android; plug-and-play |
Frequently Asked Questions - EB-MPI5 Mach Power
User questions about EB-MPI5 Mach Power
0 question about this device. Answer the ones you know or ask your own.
Ask a new question about this device
Download the instructions for your Compact computer in PDF format for free! Find your manual EB-MPI5 - Mach Power and take your electronic device back in hand. On this page are published all the documents necessary for the use of your device. EB-MPI5 by Mach Power.
USER MANUAL EB-MPI5 Mach Power
natural_image
Black wireless router device with a black tower and ports, no visible text or symbols on the main body.User manual
Mini PC
EB-MPI5 / EB-MP2940
INDEX
Product Description ..... 5
Installation ..... 6
Installation with VESA support ..... 6
Vertical installation ..... 7
Trouble shooting ..... 8
Thank you for purchasing one of our products.
Before using the Mini Pc, it is advisable to read this manual carefully.
Our company believes in the sustainable development strategy. The manual can be updated aperiodically without notice. The user's manual is for reference only, there is no commitment or statement for it.
Back up all important data saved on this device. Data may be lost during use, repair, or battery replacement. We take no responsibility for any data lost while using the device. Except for the mini pc hardware, we have no express or implied representations or warranties. Including (but not limited to) ownership of the software's operating system, marking, suitability for specific use and not being accused of infringement of any third party's proprietary, patent, trademark or warranty rights for other rights.
Without the written permission of our company, any copying, transmission or storage of any content of the manual is not permitted.
Safety
Before using your mini pc, please read these safety instructions and keep them for reference.
Note:
- To ensure safety, please use the recommended power adapter.
- When the mini pc is running, do not unplug the power supply to avoid damage caused by sudden shutdown.
- Keep the device away from high temperatures or direct sunlight and avoid dusty and mechanical vibration environments. This device is not waterproof to use in dry and ventilated environments.
- Do not drop, hit or shake the device, please do not disassemble the device without any guidance and only rely on experienced personnel, improper use can damage the product.
- Do not overload the sockets, it may result in fire or short circuit.
- Do not insert anything into the device, it may cause short circuit, fire or electric shock.
- Do not use harsh chemicals or detergents to clean the device.
- Remove the power adapter if the mini PC is not used for a long time, and to avoid damage caused by electric shock during thunderstorm or abnormal voltage.
- Electrostatic disturbance is a normal phenomenon if the device is used in a dry place in autumn and winter and it is advisable not to touch the device during use.
- Please connect the power plug to the nearest power outlet.
PRODUCT DESCRIPTION
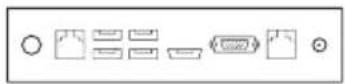
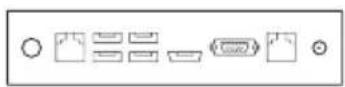
Model: EB-MP2940

| 1 LAN 5 USB 3.0 | ||
| 2 LED indicator 6 HDMI | ||
| 3 DC 7 VGA | ||
| 4 ON / OFF 8 Reset |
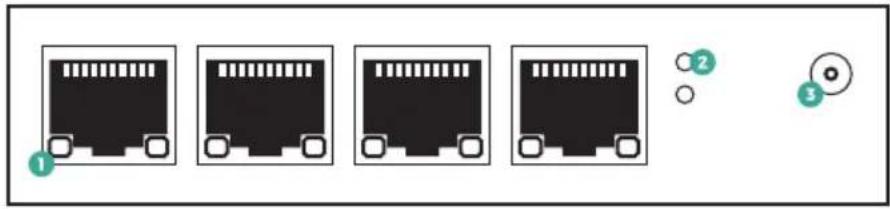
Model: EB-MPI5


natural_image
Blank white rectangle with a small circular icon containing a power button and a green dollar sign (no text or symbols)| 1 Mouse Port 6 VGA | ||
| 2 COM 7 LAN | ||
| 3 USB 3.0 8 DC | ||
| 4 USB 2.0 9 ON / OFF | ||
| 5 HDMI |
INSTALLATION
1. Monitor
Connect the mini PC via cable to the monitor using the HDMI or VGA port. For example if you are using an HD monitor connect via the HDMI port.
2. Internet
Connect one end of the Lan cable to the mini pc, via the Lan port, the other end to the switch or router.
3. Mouse and Keyboard
Connect the mouse and keyboard to the mini pc via the USB ports.
4. Audio
Connect audio devices (headphones or speakers) to the mini pc via the Audio In / Out ports. Note: Green for the audio output, red for the input (microphone).
5. Power supply
Connect the device to the power supply, green indicator, you can use the mini pc. Notes: use standard power adapters, ask your dealer for any spare parts.
INSTALLATION WITH VESA SUPPORT
(Make sure your monitor has standard VESA mounts)

natural_image
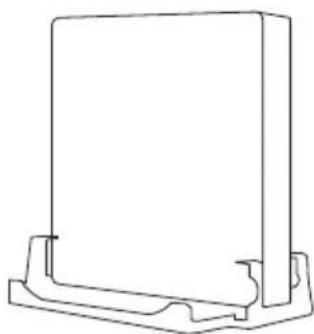
Simple line drawing of a monitor with a stand and two rectangular buttons (no text or symbols)Monitor Mini PC

natural_image
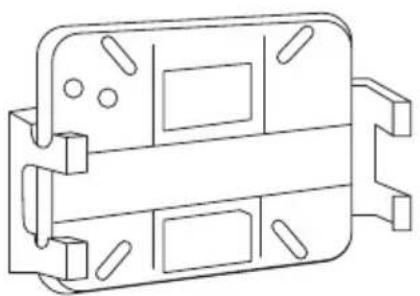
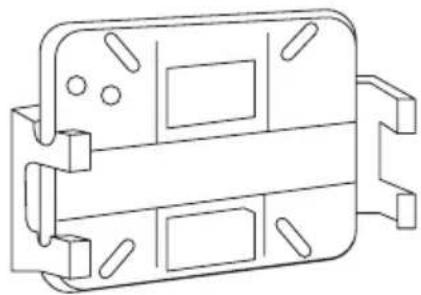
Technical line drawing of a mechanical component with mounting holes and internal slots (no text or symbols)VESA mounth bracket
Step 1: Use the screws to fix the Vesa holder to the back of the Monitor.

natural_image
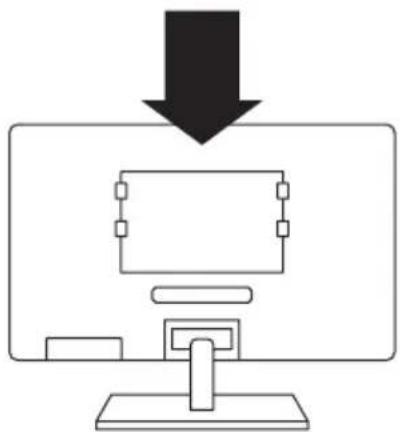
Diagram showing a computer monitor with an icon of a device and a downward arrow, no text or symbols present.Step 2: As shown, insert the mini pc from above and fix it with the screws.
natural_image
Simple line drawing of a computer monitor with a downward arrow pointing to it (no text or symbols)Step 3: Complete the installation of the VESA support
VERTICAL INSTALLATION
natural_image
Technical line drawing of a mechanical housing or bracket component (no text or symbols)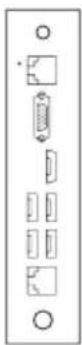
Step 1: Attach the Vesa holder to the table with screws
natural_image
Technical line drawing of a rectangular component with a base and mounting bracket (no text or symbols)Step 2: Insert the device and fix it with screws
TROUBLE SHOOTING
| Sound Alarm Resolution | |
| One short beep Start normally | |
| Two short beeps | Common mistake, go into CMOS and change settings |
| One long beep + one short beep Memory or motherboard error | |
| One short beep + one long beep Keyboard error | |
| One short beep + 3 long beeps Monitor or video error | |
| Long beep + 9 short beeps Damage to the motherboard BIOS | |
| Constant long beep Memory error | |
| Constant short beep (bee - bee - bee - bee...) | Power / Monitor / Video disconnected |
| Regular short beep (bee bee bee - bee bee bee...) | Power supply error |
Problem description
Keyboard error or keyboard not present, it is shown on the screen after startup, the Mini PC cannot access the operating system.
Resolution
keyboard error or keyboard not present. Connect the keyboard again. If it doesn't fix, re-start the Mini pc and press (Delete) to enter the BIOS, go to HALT ON in the SETUP BIOS STANDARD and set ALL BUT KEYBOARD.
Problem description
After startup, the low CMOS battery level appears on the display.
Resolution
CMOS low battery level. Replace the CMOS battery.
Problem description
Nothing is displayed on the screen and with constant audio beep (bee-bee-bee). When the mini PC is started after a long period of inactivity.
Resolution
Check if the memory is disconnected or not connected well. If yes but still not solved, check if the capacitor is not bad. If it is not faulty, change the CMOS battery.
Problem description
when the mini PC suddenly shuts down due to a loss of power, it will automatically turn on again when the power supply is reconnected.
Resolution
Enter the BIOS, go to (Advanced Power Management), set RESTORE ON AC POWER LOSS as POWER OFF.
Problem description
during a long period of operation the mini pc has problems with crashes, blue screen or other malfunctions.
Resolution
Reinstall the operating system. If after reinstalling the operating system the problems are not solved, there may be too much dust on the surface of the motherboard which can cause short circuits. Remove the dust with a blower or brush.
Problem description
the mini pc turns off automatically during use, and does not turn on again by pressing the power button, black screen but light indicator on.
Resolution
Try reinserting the memory. If the problem persists download CMOS and restart the mini pc.
Problem description
The mini pc does not start and there is a constant beep.
Resolution
Reinsert the memory.
INDICE
| 1 LAN 5 USB 3.0 | ||
| 2 Indicatori LED 6 HDMI | ||
| 3 DC 7 VGA | ||
| 4 ON / OFF 8 Reset |
Modello: EB-MPI5


natural_image
Blank white rectangle with a small circular icon containing a power button and a green dollar sign (no text or symbols)| 1 Porta Mouse 6 VGA | ||
| 2 COM 7 LAN | ||
| 3 USB 3.0 8 DC | ||
| 4 USB 2.0 9 ON / OFF | ||
| 5 HDMI |
INSTALLAZIONE
1. Monitor
natural_image
Simple line drawing of a monitor with a stand and two rectangular buttons (no text or symbols)Monitor Mini PC
natural_image
Technical line drawing of a mechanical housing or bracket component (no text or symbols)natural_image
Diagram showing a computer monitor with an icon of a device and a downward arrow, no text or symbols present.natural_image
Simple line drawing of a computer monitor with a downward arrow pointing to it (no text or symbols)natural_image
Technical line drawing of a mechanical housing or bracket component (no text or symbols)
natural_image
Technical line drawing of a rectangular component with a base and mounting bracket (no text or symbols)| 1 LAN 5 USB 3.0 | ||
| 2 Indicadores LED 6 HDMI | ||
| 3 DC 7 VGA | ||
| 4 ON / OFF 8 Reiniciar |
Modelo: EB-MPI5


natural_image
Blank white rectangle with a small circular icon containing a power button and a green dollar sign (no text or symbols)| 1 Porta Ratón 6 VGA | ||
| 2 COM 7 LAN | ||
| 3 USB 3.0 8 DC | ||
| 4 USB 2.0 9 ON / OFF | ||
| 5 HDMI |
INSTALACIÓN
1. Supervisar
natural_image
Simple line drawing of a monitor with a stand (no text or symbols)Supervisar Mini PC

natural_image
Technical line drawing of a mechanical housing or bracket component (no text or symbols)VESA Soporte de mont
natural_image
Diagram showing a computer monitor with an icon of a device and a downward arrow, no text or symbols present.natural_image
Simple line drawing of a computer monitor with a downward arrow pointing to it (no text or symbols)natural_image
Technical line drawing of a mechanical housing or bracket component (no text or symbols)
natural_image
Technical line drawing of a rectangular component with a base and mounting bracket (no text or symbols)Step 2: Inserte el dispositivo y fijelo con tornillos.
- User manual
- Mini PC
- INDEX
- Thank you for purchasing one of our products.
- Safety
- Note:
- PRODUCT DESCRIPTION
- INSTALLATION
- Monitor
- Internet
- Mouse and Keyboard
- Audio
- Power supply
- INSTALLATION WITH VESA SUPPORT
- VERTICAL INSTALLATION
- TROUBLE SHOOTING
- Problem description
- Resolution
- INDICE
- INSTALLAZIONE
- INSTALACIÓN
- Supervisar
Brand : Mach Power
Model : EB-MPI5
Category : Compact computer