BU9230 - Watch Burberry - Free user manual and instructions
Find the device manual for free BU9230 Burberry in PDF.

| Product type | Wristwatch |
| Brand | Burberry |
| Model | BU9230 |
| Movement | Quartz |
| Display | Analog |
| Case diameter | 42 mm |
| Case thickness | 10 mm |
| Case material | Stainless steel |
| Strap material | Leather |
| Crystal type | Sapphire |
| Water resistance | 5 ATM (50 m) |
| Calendar | Date |
| Power | Button cell SR626SW |
| Weight | 85 g |
| Strap length | 18 to 22 cm |
| Strap width | 20 mm |
| Clasp | Deployant buckle |
| Care and cleaning | Clean with a soft, dry cloth. Avoid water contact for non-water-resistant parts. |
| Safety | Do not expose to strong impacts or magnetic fields. |
| Spare parts and repairability | Battery and strap replacement by an authorized watchmaker. |
| General information | 2-year warranty. Made in Switzerland. |
Frequently Asked Questions - BU9230 Burberry
User questions about BU9230 Burberry
0 question about this device. Answer the ones you know or ask your own.
Ask a new question about this device
Download the instructions for your Watch in PDF format for free! Find your manual BU9230 - Burberry and take your electronic device back in hand. On this page are published all the documents necessary for the use of your device. BU9230 by Burberry.
USER MANUAL BU9230 Burberry
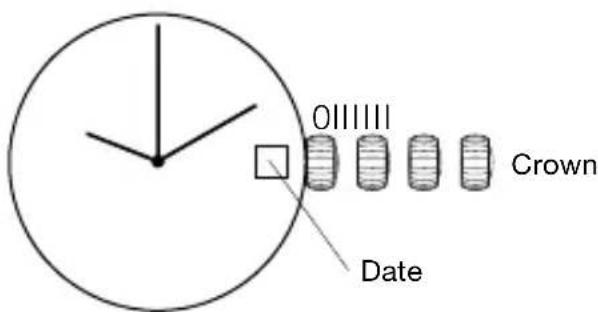
SETTING THE TIME
- Pull crown out to position II (the watch stops).
- Tum crown (clockwise direction) until you reach the correct time.
- Push crown back to position I.
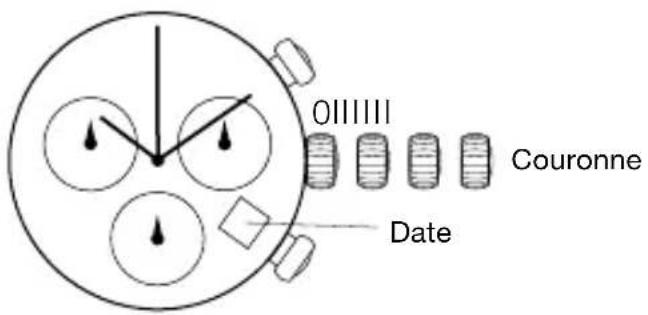
3 HANDS DATE MOVEMENT / SUB-SECOND
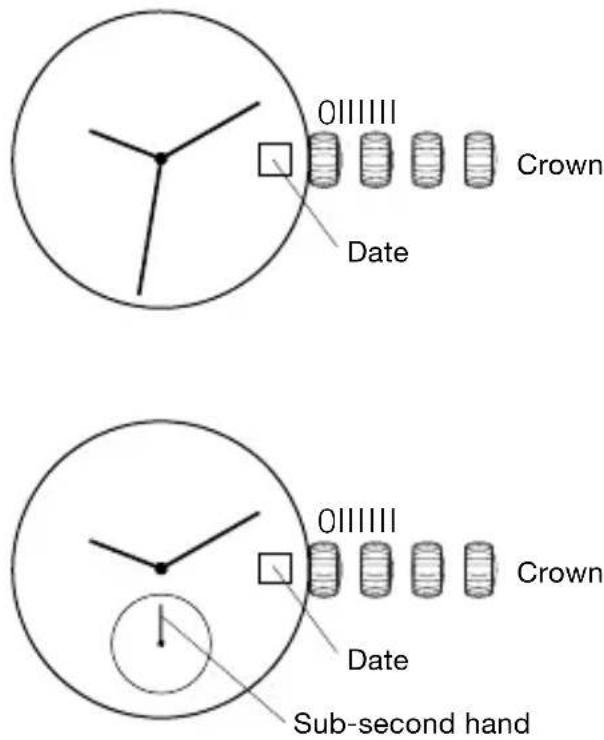
SETTING THE TIME
- If crown is screwed down, unscrew crown to position I.
- Pull crown out to position III, the watch stops.
- Turn crown clockwise (or anti-clockwise for models with sub-second dial) until you reach the correct time.
- Push crown back to position I and, if necessary, screw crown until it stops moving (position 0).
SETTING THE DATE
- Unscrew crown to position I.
- Pull crown out to position II, the watch continues to run.
- Turn crown clockwise until you reach the correct date.
- Push crown back to position I and screw crown until it stops moving (position 0).
Do not change the date between 10pm and 2am. This is when the movement is in position to carry out the automatic date change, any interference may cause damage to the movement.
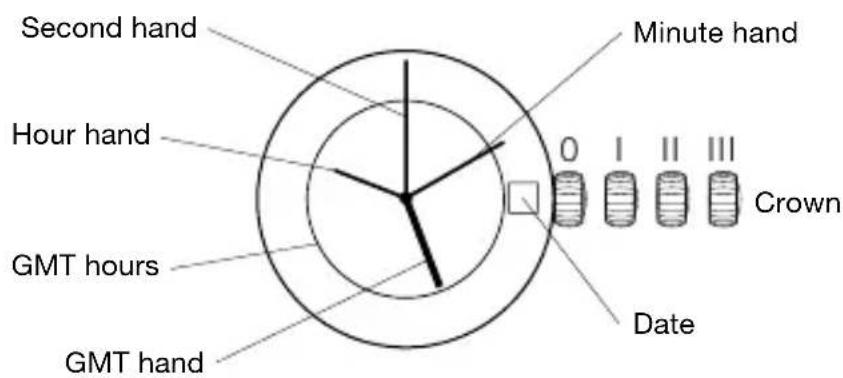
GMT MOVEMENT
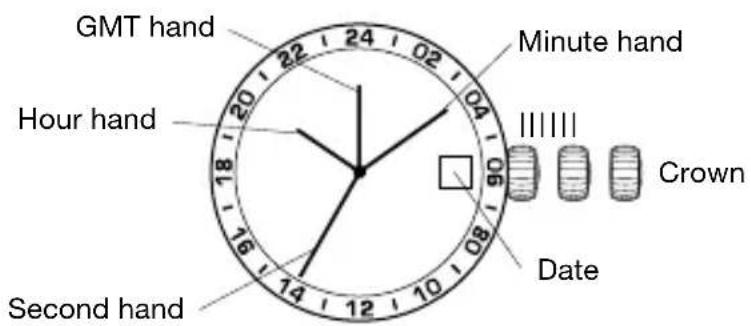
SETTING THE TIME
- Pull crown out to position III (the watch stops).
- Turn crown until you reach the correct time.
- Push crown back to position I.
SETTING THE DATE
- Pull crown out to position II (the watch continues to run).
- Turn crown (clockwise direction) until you reach the correct date.
- Push crown back to position I.
Do not change the date between 10pm and 2am. This is when the movement is in position to carry out the automatic date change, any interference may cause damage to the movement.
SETTING GMT
- Pull crown out to position II (the watch continues to run).
- Turn crown (anti-clockwise direction) until you reach the GMT time.
- Push crown back to position I.
PLEASE NOTE: The GMT hand is read in military time, indicated in the 24-hour time window. The GMT hand can be set to indicate Greenwich Mean Time or can be set to a second time zone.
AUTOMATIC 3 HANDS DATE MOVEMENT
WINDING
- If crown is screwed down, unscrew crown to position I.
- Turn crown clockwise approximately 30 times.
- If necessary, screw crown in until it stops moving (position 0).
This will power the mainspring of your watch. The mainspring will be automatically wound by your natural arm movements while you wear it on your wrist. The watch has a power reserve of approximately 38 hours.
SETTING THE TIME
- If crown is screwed down, unscrew crown to position I.
- Pull crown out to position III, the watch stops.
- Turn crown clockwise until you reach the correct time.
- Push crown back to position I and, if necessary, screw crown until it stops moving (position 0).
SETTING THE DATE
- If crown is screwed down, unscrew crown to position I.
- Pull crown out to position II, the watch continues to run.
- Turn crown clockwise until you reach the correct date.
- Push crown back to position I and, if necessary, screw crown until it stops moving (position 0).
Do not change the date between 10pm and 2am. This is when the movement is in position to carry out the automatic date change, any interference may cause damage to the movement.
AUTOMATIC GMT MOVEMENT
WINDING
- Unscrew crown to position I.
- Turn crown clockwise approximately 30 times.
- Screw crown in until it stops moving (position 0).
This will power the mainspring of your watch. The mainspring will be automatically wound by your natural arm movements while you wear it on your wrist. The watch has a power reserve of approximately 38 hours.
SETTING THE TIME
- Unscrew crown to position I.
- Pull crown out to position III, the watch stops.
- Turn crown until you reach the correct time.
- Push crown back to position I and screw crown until it stops moving (position 0).
SETTING THE DATE
- Unscrew crown to position I.
- Pull crown out to position II, the watch continues to run.
- Turn crown anti-clockwise until you reach the correct date.
- Push crown back to position I and screw crown until it stops moving (position 0).
Do not change the date between 10pm and 2am. This is when the movement is in position to carry out the automatic date change, any interference may cause damage to the movement.
SETTING GMT
- Unscrew crown to position I.
- Pull crown out to position II, the watch continues to run.
- Turn crown clockwise until you reach the GMT time.
- Push crown back to position I and screw crown until it stops moving (position 0).
PLEASE NOTE: The time for the GMT hand is indicated on the 24 hour display on the dial. The GMT hand can be set to indicate Greenwich Mean Time or can be set to a second time zone.
AUTOMATIC WITH POWER RESERVE MOVEMENT

POWER RESERVE FUNCTION
The power reserve indicator shows how much the watch is wound, allowing you to see how much longer the watch will run at a glance. The time pointed to by the power reserve hand is the remaining time. This product has an automatic-winding system which comes with a power reserve indicator function. The mainspring will be automatically wound by your natural arm movements while you wear it on your wrist. The power reserve hand is pointing to the fully-wound position (40H). The amount the watch is wound will change with the frequency of your arm movements and the length of time you wear the watch, so the hand will not always point to the fully wound position. If you remove the watch from your arm and do not wind manually, the power reserve hand will move toward zero as time passes.
POWER RESERVE WINDING
- Unscrew crown to position I.
- Turn crown clockwise until the power reserve hand at 6 o'clock reaches the number 40.
This will power the mainspring of your watch and the power reserve will be at the maximum. The rotor will continue to wind the watch as you wear it. The watch has a power reserve of approximately 40 hours.
SETTING THE TIME
- Unscrew crown to position I.
- Pull crown out to position III, the watch stops.
- Turn crown clockwise until you reach the correct time.
- Push crown back to position I and screw crown until it stops moving (position 0).
SETTING THE DATE
- Unscrew crown to position I.
- Pull crown out to position II, the watch continues to run.
- Turn crown clockwise until you reach the correct date.
- Push crown back to position I and screw crown until it stops moving (position 0).
Do not change the date between 10pm and 2am. This is when the movement is in position to carry out the automatic date change, any interference may cause damage to the movement.
CHRONOGRAPH MODELS
5030.D
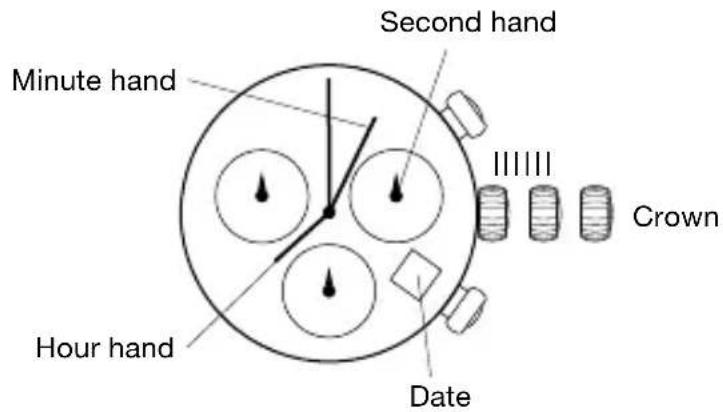
SETTING THE TIME
- Pull crown out to position III (the watch stops).
- Turn crown (clockwise direction) until you reach the correct time.
- Push crown back to position I.
SETTING THE DATE
- Pull crown out to position II (the watch continues to run).
- Turn crown (clockwise direction) until you reach yesterday's date.
- Pull crown out to position III (the watch stops).
- Turn crown (clockwise direction) until you reach the correct date.
- Continue to turn crown (clockwise direction) until the correct time appears.
- Push crown back to position I.
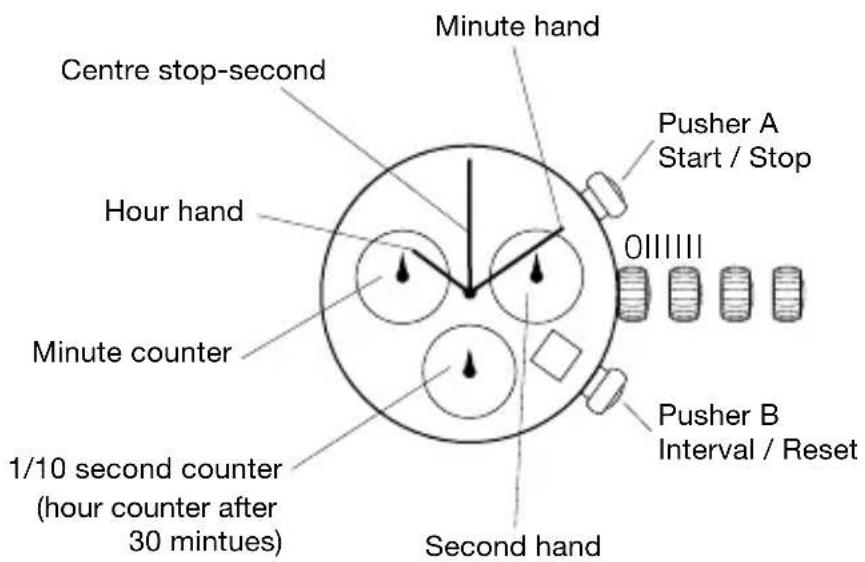
CHRONOGRAPH
- The chronograph's hour counter measures times up to 12 hours.
- The minute counter measures 30 minutes per rotation.
• The centre stop-second measures 60 seconds per rotation.
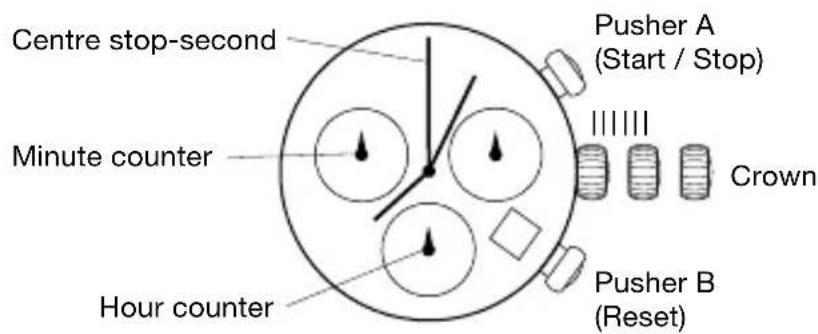
PLEASE NOTE:
Before using the chronograph functions, please ensure that:
• Crown is in position I.
- The three chronograph hands are precisely at zero position following activation of pusher B. Should this not be the case, the positions of the hands must be adjusted. See the chapter entitled “Adjusting the chronograph hands to zero position.”
CHRONOGRAPH: BASIC FUNCTION (START / STOP / RESET)
- Press pusher A to start the centre stop-second hand.
- Press pusher A again to stop the timing.
- Press pusher B to reset the three chronograph hands to zero positioning.
CHRONOGRAPH: INTERMEDIATE OR INTERVAL TIMING
- Press pusher A to start the centre stop-second hand.
- Press pusher B to stop the chronograph.
NOTE: Although the chronograph hands have stopped, the movement continues to record the current timing.
- Make up the measured time: Press pusher B again and the 3 chronograph hands are quickly advanced to the ongoing measured time. To continue to record intervals, continue to press pusher B.
- Press pusher A to stop, the final time is displayed.
- Press pusher B to reset the three chronograph hands to zero positioning.
ADJUSTING THE CHRONOGRAPH HANDS TO ZERO POSITION
- Pull out crown to position III (all three chronograph hands are in their correct or incorrect zero position).
- Keep pushers A and B depressed simultaneously for at least 2 seconds (the centre stop-second rotates by 360^ - corrective mode is activated).
- Press pusher A to single step the centre stop-second hand. Press and hold pusher A to advance the centre stop-second hand quickly. Press pusher B to advance to the next hand.
- Press pusher A to single step the hour counter hand. Press and hold pusher A to advance the hour counter hand quickly. Press pusher B to advance to the next hand.
- Press pusher A to single step the minute counter hand. Press and hold pusher A to advance the minute counter hand quickly.
- Return crown to position I.
CHRONOGRAPH MODELS
5040.D
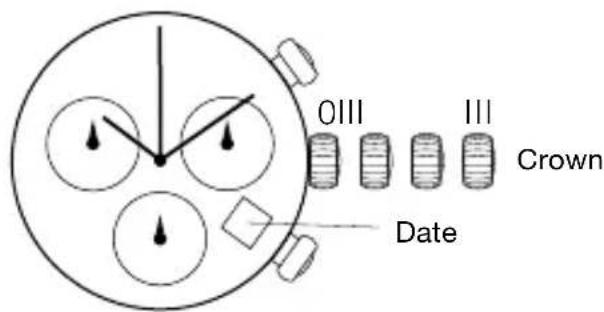
SETTING THE TIME
- Unscrew crown to position I.
- Pull crown out to position III, the watch stops.
- Turn crown clockwise until you reach the correct time.
- Push crown back to position I and screw crown until it stops moving (position 0).
SETTING THE DATE
- Unscrew crown to position I.
- Pull crown out to position II, the watch continues to run.
- Turn crown clockwise until you reach the correct date.
- Push crown back to position I and screw crown until it stops moving (position 0).
CHRONOGRAPH
- The chronograph's counter (at 6 o'clock) measures 1/10 seconds, and then measures hours after 30 minutes.
- The chronograph's minute counter (at 10 o'clock) measures 30 minutes.
- The centre stop-second measures 60 seconds per rotation.
PLEASE NOTE:
Before using the chronograph functions, please ensure that:
- Crown is in position 0 with crown screwed in.
- The three chronograph hands are precisely at zero position following activation of pusher B. Should this not be the case, the positions of the hands must be adjusted. See the section entitled “Adjusting the chronograph hands to zero position.”
CHRONOGRAPH: BASIC FUNCTION (START / STOP / RESET)
- Press pusher A to start the centre stop-second hand.
- Press pusher A again to stop the timing.
- Press pusher B to reset the three chronograph hands to zero positioning.
CHRONOGRAPH: INTERMEDIATE OR INTERVAL TIMING
- Press pusher A to start the centre stop-second hand.
- Press pusher B to stop the chronograph.
NOTE: Although the chronograph hands have stopped, the movement continues to record the current timing.
- Make up the measured time: Press pusher B again and the 3 chronograph hands are quickly advanced to the ongoing measured time. To continue to record intervals, continue to press pusher B.
- Press pusher A to stop and the final time is displayed.
- Press pusher B to reset the three chronograph hands to zero positioning.
ADJUSTING THE CHRONOGRAPH HANDS TO ZERO POSITION
- Unscrew crown to position I.
- Pull out crown to position III, all three chronograph hands are in their correct or incorrect zero position.
- Keep pushers A and B depressed simultaneously for at least 2 seconds, the centre stop-second rotates by 360^ - corrective mode is activated.
- Press pusher A to single step the centre stop-second hand. Press and hold pusher A to advance the centre stop-second hand quickly. Press pusher B to advance to the next hand.
- Press pusher A to single step the hour counter hand. Press and hold pusher A to advance the hour counter hand quickly. Press pusher B to advance to the next hand.
- Press pusher A to single step the minute counter hand. Press and hold pusher A to advance the minute counter hand quickly.
- Push crown back to position I and screw crown until it stops moving (position 0).
Do not change the date between 10pm and 2am. This is when the movement is in position to carry out the automatic date change, any interference may cause damage to the movement.
WATER RESISTANCE
All Burberry watches are designed with a minimum water resistance rating of 3ATM (100ft/30m).
The water resistance of a watch protects the movement from dust, moisture, and risk of damage should it be immersed in water.
Please see chart guidelines for recommended exposure of various water ratings.
It is important not to adjust the position of the crown while the watch is in contact with water. Water can enter the case and cause damage.
For watches with screw crowns, ensure the crown is completely locked in its correct position before contact with water.
For watches with chronograph functions, do not engage the chronograph under water, as water may leak in the case and cause damage.
USE PRECAUTIONS
| Water Resistance Water | -Related Use | ||||
| Case back marking | Depth |  Washing hands Washing hands |  Showering, bathing Showering, bathing |  Swimming, snorkeling Swimming, snorkeling |  Scuba diving Scuba diving |
| 3 ATM | 3 Bar, 30 Meters | √ | × | × | × |
| 5 ATM | 5 Bar, 50 Meters | √ | √ | × | × |
| 10 ATM | 10 Bar, 100 Meters | √ | √ | √ | × |
| 20 ATM | 20 Bar, 200 Meters | √ | √ | √ | √ |
| Always set crown in the normal position. Screw crown until it stops moving completely. | |||||
CARE AND PRECAUTIONS
Each Burberry watch is designed and manufactured to the highest of standards. Unlike most other mechanical objects, a watch operates non-stop. In order to ensure optimal performance and longevity, please read the simple guidelines for care and precautions of your Burberry watch.
CARE
Clean your watch with a soft cloth and water only. Do not submerge it. After contact with saltwater, rinse your watch clean and dry with a soft cloth. In order to maintain metal bracelets, we recommend cleaning periodically. Dip a soft brush in warm soapy water and gently rub the bracelet clean. We advise having your watch serviced every 18-24 months to ensure longevity and seamless operation.
PRECAUTIONS
It is important to avoid the following conditions: extreme heat or cold, prolonged periods of exposure to direct sunlight, exposure to wet conditions that exceed your watch's water rating (see case back and chart). Never operate any of the function buttons or adjust the position of the crown when the watch is in contact with water.
Your watch should not be affected by magnetic fields generated by household items such as televisions. Avoidance of other strong electric fields or static electricity is advised. It is also important to avoid extreme shock or impact as your watch is designed to withstand impact under normal use.
DEUTSCH
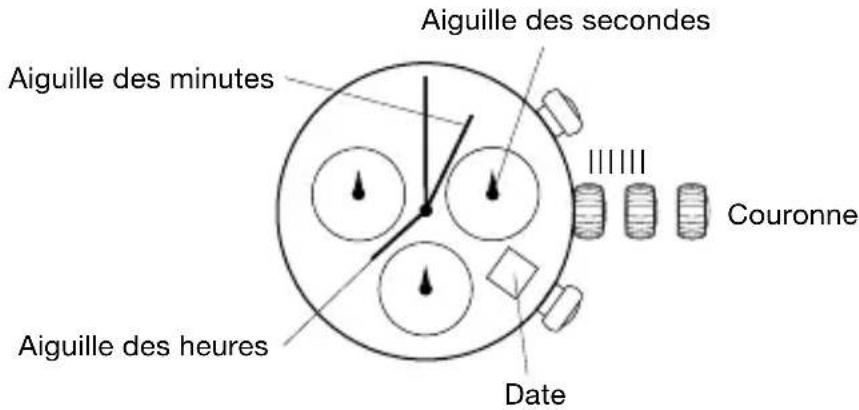
MODÈLES CHRONOGRAPHES
5030.D
MODÈLES CHRONOGRAPHES
5040.D