EDS7051 - Tumble drier ELECTROLUX - Free user manual and instructions
Find the device manual for free EDS7051 ELECTROLUX in PDF.

| Product Type | Condenser Tumble Dryer |
| Brand | Electrolux |
| Model | EDS7051 |
| Capacity | 7 kg |
| Dimensions (HxWxD) | 850 x 600 x 600 mm |
| Weight | 45 kg |
| Energy Efficiency Class | B |
| Annual Energy Consumption | 560 kWh |
| Drying Programs | Cotton, Synthetics, Delicates, Mix, Timed Drying |
| Control Type | Electronic dial with LED display |
| Noise Level | 65 dB(A) |
| Power Supply | 230V ~ 50Hz |
| Heat Source | Electric |
| Drum Material | Stainless steel |
| Lint Filter | Yes, with hinged flap |
| Condenser Cleaning | Manual cleaning required |
| Functions | Delay start, Anti-crease, Child lock, Quick dry |
| Door Hinge | Left (reversible) |
| Installation Type | Freestanding |
| Color | White |
| Year of Manufacture | 2010 (typical) |
Frequently Asked Questions - EDS7051 ELECTROLUX
User questions about EDS7051 ELECTROLUX
0 question about this device. Answer the ones you know or ask your own.
Ask a new question about this device
Download the instructions for your Tumble drier in PDF format for free! Find your manual EDS7051 - ELECTROLUX and take your electronic device back in hand. On this page are published all the documents necessary for the use of your device. EDS7051 by ELECTROLUX.
USER MANUAL EDS7051 ELECTROLUX
Conditions of Use ...... Page 2
Important Safety Instructions
- Dryer Safety ...... Page 2
- Fire Hazards ...... Page 2
- Cleaning the Lint Filter ...... Page 3
- Drying Guide Page 3
Installation Instructions ...... Page 4
Use
- The Control Panel Page 6
- Operating Sequence ...... Page 7
Care And Cleaning Page...9.....
Hints.Page.10....
Troubleshooting & Accessories Page.1.1......
Conditions of Use
This appliance is intended to be used in household and similar applications such as:
- Farm Houses.
- By clients in serviced apartments, holiday apartments and other residential type environments.
It must not be used for purposes other than those for which it was designed.
Important Safety Instructions
DRYER SAFETY
Failure to follow these safety instructions could damage the dryer or your clothes.
You may then not be covered by warranty for this damage.
Only plug this appliance directly into an AC power supply, which is properly earthed and has the correct voltage.
See the serial number sticker located on the bottom of the door opening for voltage information.
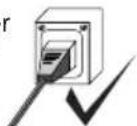
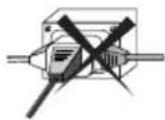
CAUTION: If this appliance is supplied from a cord extension set or electrical portable outlet device, the cord extension set or electrical portable outlet device must be positioned so that it is not subject to splashing or ingress of moisture. For safety reasons we strongly advise against the use of double adaptors, extension cords or power boards.


This tumble dryer is not intended for use by young children or infirm persons without supervision. Young children should be supervised to ensure that they do not play with the appliance.
IMPORTANT: If the electrical cord of this appliance is damaged, it must be replaced by the Manufacturer, Authorised Service Centre or similarly qualified person in order to avoid a hazard.
These dryers are for drying clothes, towels and linen. Do not use them for any other purpose.
FIRE HAZARDS
Some fabrics are not suitable for tumble drying. The following MUST NOT be placed in your dryer due to the risk of a fire or an explosion:
- Items that have been spotted or soaked with vegetable oil, cooking oil, suntan oil, linseed oil, salad oil, lubrication oil or grease. Oil affected items can ignite spontaneously, especially when exposed to heat sources such as in a tumble dryer. The items become warm, causing an oxidation reaction in the oil. Oxidation creates heat. If heat cannot escape, the items can become hot enough to ignite. Piling, stacking, or storing oil-affected items can prevent heat from escaping and create a fire hazard. If it is unavoidable that fabrics that contain vegetable or cooking oil, or have been contaminated by hair care products be placed in a tumble dryer, they should first be washed in hot water with extra detergent - this will reduce, but not eliminate the hazard.
The final part of a tumble dryer cycle occurs without heat (cooling cycle) to ensure that the items are left at the temperature that ensures that the items will not be damaged.
- Items that have previously been cleaned in, washed in, or spotted with petrol/gasoline, industrial chemicals used only for cleaning, dry-cleaning solvents or other flammable or explosive substances are highly flammable. Highly flammable or explosive commonly found around the house include acetone, (nail polish remover) denatured alcohol, petrol/gasoline, kerosene, some spot removers, turpentine, waxes and wax removers should not be put in the dryer. Items containing foam rubber (also known as latex foam) or similarly textured rubber-like materials. Foam rubber materials can produce fire by spontaneous combustion when heated.
- Rubber-backed articles, clothes fitted with foam rubber pads, pillows, rubber boots and rubber-coated sports shoes.
For your safety, and to reduce the risk of fire or an explosion, DO NOT store or use petrol or other inflammable vapours and liquids near your dryer.
Important Safety Instructions
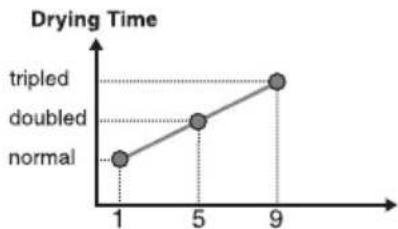
CLEANING THE LINT FILTER
LINT BUILD-UP IS A FIRE HAZARD
A clean lint filter reduces drying time, saves energy and avoids overheating. Overheating may also damage your clothes.
What happens if I forget to clean the lint filter?
line
Drying Time | Drying Time | Value | | :--- | :--- | | 1 | tripled | | 5 | doubled | | 9 | normal |Number of usages with an unclean lint filter (based on laboratory tests using a load of new towels)

text_image
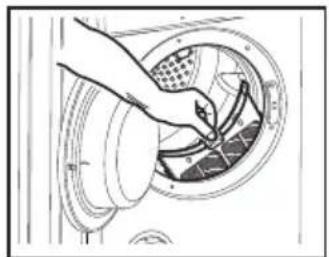
Nozzle Lint Filter The lint filter is located at the front of your dryer at the bottom of the door opening. Rating PlateYou must clean this lint filter after every load.
natural_image
Diagram of a hand cleaning a circular object with a mesh pattern (no text or symbols)Open apart the lint filter and wipe or peel off the lint.
To remove the lint filter open the door and press the two pads together. Pull the lint filter out of the pocket.

natural_image
Diagram of a folded solar panel with heat dissipation indicated by rotation arrow (no text or symbols)Ensure the lint filter "clicks" when replacing. It can be inserted into the pocket either way.
• Never operate your dryer without the lint filter.
- Do not allow lint to build up around your dryer.
- A torn or damaged lint filter must be replaced immediately.
• Overloading can increase lint build-up because the airflow is reduced.
To avoid potential fire hazards, we recommend that you pay a qualified service technician to periodically clean your dryer.
DRYING GUIDE
Your load, when dry must not exceed the rated capacity.
- kg for the EDS70517 dryer (See page 10 for a table of average weights of laundry items)
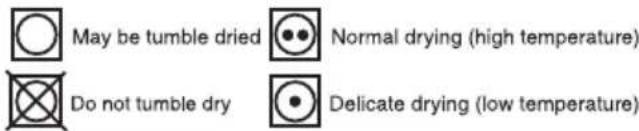
Always check your labels for the drying symbols which the International Care Labelling Code now uses.
text_image
May be tumble dried Normal drying (high temperature) Do not tumble dry Delicate drying (low temperature)- Permanent press and synthetics - take out as soon as the dryer stops to reduce wrinkles.
- Woollen articles - not recommended. Pull them to their original shape, then dry them flat.
- Woven and loop knit materials - may shrink, by varying amounts, depending on their quality. Do not use the "Normal" setting for these fabrics. Always stretch them out immediately after drying.
- Fibre or leather materials - always check the manufacturer's instructions.
- Baby clothes and night gowns - acrylic clothing or sleepwear use only on the "Delicates" setting.
- Rubber and plastics - Do not dry any items made from or containing rubber or plastics, such as aprons, bibs, babies' waterproof napkins, curtains, tablecloths, shower caps, clothes fitted with foam rubber pads, pillows, galoshes, or rubber coated tennis shoes.
- Fibreglass - not recommended. Glass particles left in the dryer could be picked up by your clothes the next time you use the dryer, and irritate your skin.
Fabric softeners or similar products should not be used in a tumble dryer to eliminate the effects of static electricity unless this practice is specifically recommended by the manufacturer of the fabric softener or product.
Note: We strongly advise against the use of fabric conditioners of the sheet type that are added to the clothes in the drum. These products may lead to rapid blockage of the lint filter and inefficient operation of your dryer.
Installation Instructions
You can choose to put your dryer:
- on the floor.
• on a work bench.
The appliance must not be installed behind a lockable door, a sliding door or a door with a hinge on the opposite side to that of the tumble dryer in such away that a full opening of the tumble dryer door is restricted.
text_image
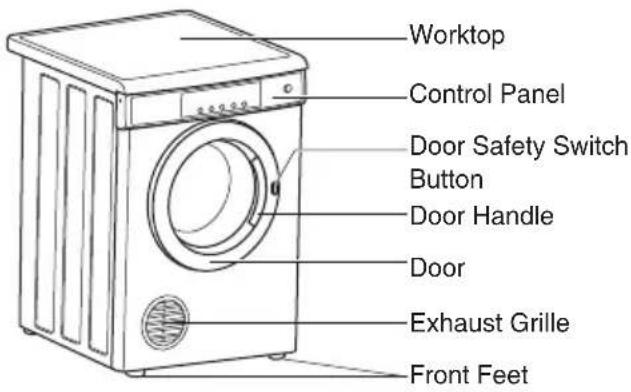
Worktop Control Panel Door Safety Switch Button Door Handle Door Exhaust Grille Front FeetThe exhaust grille has a range of positions, which allows you to select the optimum exhaust air angle. Simply hold the grille and rotate it until it hits the built-in stop.

text_image
Removable Exhaust GrilleDo not install your dryer in a cupboard or small un-vented laundry unless you are using a venting kit.
There are 2 VENTING OPTIONS
- front
• rear-using a included kit
Important: Use only kits approved by Electrolux with your dryer.
The exhaust duct must not exceed 2 metres in length at 100mm diameter.
If connecting the dryer to a common ducting system, safety advice should be requested from the manufacturer.
If you choose to use included kit, the exhaust grille at the front of the dryer will need to be replaced with the outlet cover from the back of the dryer. Gently prise open the grille, using a thin bladed tool. Next, remove the cover from the back and clip it into the grille space at the front. The exhaust grille is not required when using a vent kit.
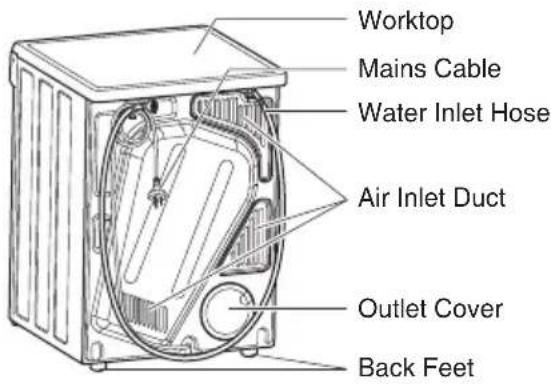
text_image
Worktop Mains Cable Water Inlet Hose Air Inlet Duct Outlet Cover Back FeetYou can position the vent kit at the back of the dryer to remove air sideways.

text_image
air flowInlet and outlet points need clear airflow to prevent overheating, so ensure there is adequate ventilation. (i.e. open window or external door.)
If a venting kit is used and the exhaust is discharged out of the room, there must be adequate ventilation to avoid the back flow of gases in to the room from appliances burning other fuels, including open fires, when operating the tumble dryer. This is not applicable where a venting hose is directed to an open window. The exhaust air must not be discharged into a flue which is used for exhausting fumes from appliances burning gas or other fuels.
Water Connection
Water tap must be installed within 110 cm of your dryer's water inlet and the tap must be 3/4 inch BSP thread for laundry hose connection. Water pressure must be between 200kpa to 800kpa.
Use the hose supplied with the dryer. DO NOT USE OLD HOSES.
To connect the water inlet to dryer:
- Turn off water supply to washer.

text_image
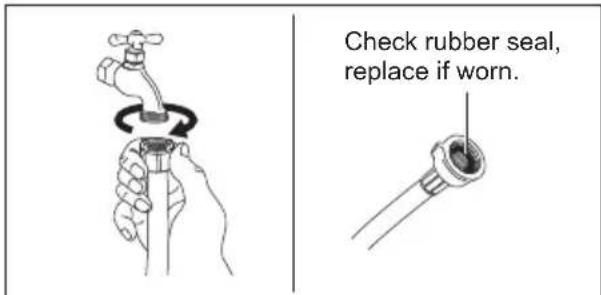
water tap- Remove inlet hose from water supply.
text_image
Check rubber seal, replace if worn.-
Turn on water supply for a short time to run some water into a bucket or container to clear any contaminants in the line.
-
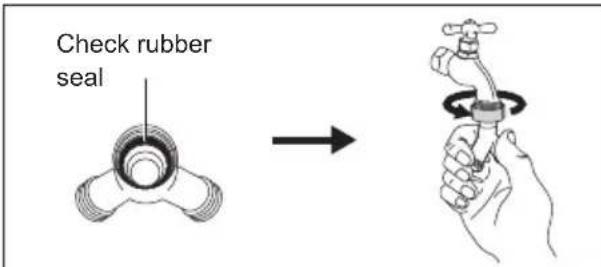
Connect the Y-Connector to the water tap.
text_image
Check rubber seal- Connect the inlet hose for the washer and the dryer to the Y-Connector and tighten them.

text_image
Water Tap To Washing Machine- Turn on the water tap and check for leaks at all connection.
Use
THE CONTROL PANEL
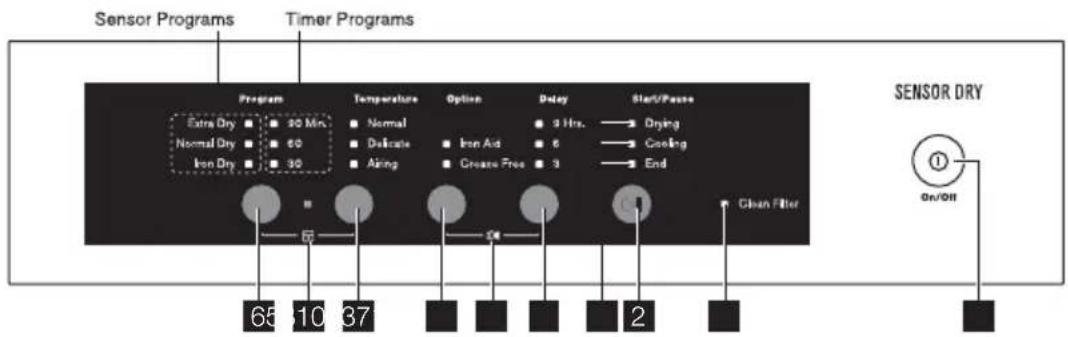
text_image
Sensor Programs Timer Programs Program Temperature Option Delay Start/Passer Extra Dry 30 Min. Normal Dry 60 Iron Dry 30 3 Hrs. Drying Defective Iron Aid 6 Cooling Alking Create Free 3 End 65 10 37 2 Clean Filter SENSOR DRY On/Off1 On/Off Button
This button switches the dryer on. At the end of the program, press the button again to switch the dryer off.
2 Start/Pause Button
This button allows you to start or pause the dryer to check the contents of the load or perhaps add more clothes to the load.
NOTE: The dryer will not start unless the door safety button is pressed in.
If the safety button is not pressed in a door switch fault will be indicated ("beeps" 6 times).
3 Delay Button
This button is a feature that permits you to start the dryer after a defined number of hours, ranging from 3, 6, or 9 hours.
To abort the Delayed Start, press the Start/Pause button, which puts the machine into paused mode, allowing you to change the delay time.
NOTE: Make sure you have set the desired program before setting the delay.
4 Option Button
This button allows you to select 2 options.
Crease Free:
The Crease Free feature is designed to help prevent creases forming in the clothes after the normal drying cycle has finished. The drum will rotate about 5 seconds every minute and will continue for 3 hours. This is useful if you are unable to unload the dryer straight away.
Iron Aid:
This option will help in reducing wrinkles on your clean and dry clothes by using a combination of moisture and warm air function. Maximum load should not exceed 1 kg when this option is selected. This option cannot be combined with any other programs.

This option should only be used to reduce wrinkles for clothes which are clean and dry.
When this option is selected, all other programs will be suppressed.
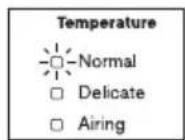
5 Temperature Button
Is used to select one of the three settings, Normal, Delicates or Airing. The Delicates setting will cause the heater to cycle on for less time than the Normal setting.
The heater on/off cycling time will vary on both settings depending on the program selected, ambient temperature etc.
On the Airing setting the heater is not used at all. A new setting can be selected when the dryer is running, the drying process will continue using the new setting.
NOTE: Airing cannot be selected when one of the Sensor programs has been selected.
6 Program Button
Is used to select the desired program. Programs available are:
Sensor Programs:
Extra Dry, Normal Dry and Iron Dry.
Timer Programs:
When a new program is selected while the dryer is already running, the drying process will continue using the settings from the new program.
NOTE: When the temperature setting is on Airing the Sensor programs cannot be selected.
7 Reminder Clean Filter LED
The LED is illuminated at the end of the program.
The LED is designed as a reminder to clean the lint filter at the end of each load.
8 Child Lock (☐)
The child lock option is used to stop the settings from being changed once a program has been started.
It does not affect the On/Off switch.
To select this option press and hold the Program and Temperature button together (while the dryer is running) until a beep is heard and the Child Lock LED illuminates for approx 2 seconds. To turn the child lock off press and hold the same buttons (while the dryer is running) until a beep is heard and the LED goes off.

text_image
Program Extra Dry ○ 90 Min. Normal Dry ○ 60 Iron Dry ○ 30 Temperature □ Normal □ Definite □ AkingNOTE: If the door is opened during the program the Child Lock option will be de-activated and will have to be reset once the dryer has been restarted.
9 Progress indicator lights
These indicators show at which part of the cycle your machine is, the Drying or Cooling cycle or the End.
10 Buzzer ( speaker )
The Buzzer feature is designed to remind you when the program ends with a "beeps" sound.
To activate this option press and hold the "Option" and "Delay" buttons simultaneously until a long beep is heard.
To deactivate press and hold the same buttons until a short beep is heard.
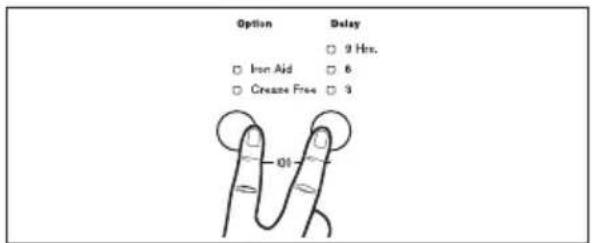
text_image
Option Delay ○ 9 Hrs. □ Iron Aid ○ 6 □ Creamy Free ○ 3 01OPERATING SEQUENCE
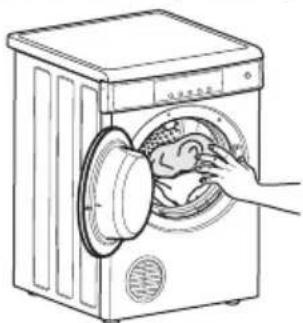
1. Load your dryer loosely until it is no more than TWO THIRDS FULL. Clothes must tumble freely in a dryer. Don't cram them in. Wet clothes fluff up when dry.
Overloading will:
- Reduce efficiency
- Increase drying time
- Increase the risk of creasing
natural_image
Line drawing of a washing machine with hand adjusting the inner ear (no text or symbols)Do not load clothes or other articles which are dripping wet or have sand and grit on them into your dryer.
Switch On
- The dryer will not operate unless the door safety switch button is fully pressed in.
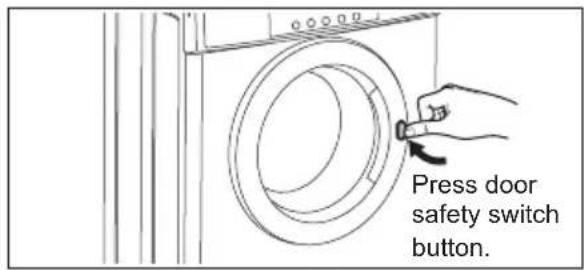
text_image
Press door safety switch button.3. Press then release the On/Off button on the sensor control panel. You are now ready to select your drying Program.
You can use your dryer 2 ways
- Sensor Program
- Timer Program
3.1 Sensor Program
This mode gives you the option of selecting different drying levels from the Sensor Program.
- Press the Program button to select either Extra Dry, Normal Dry or Iron Dry from the Sensor Program.
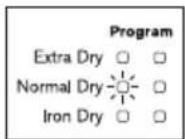
The indicator light will come on to your choice.
Do not select the Extra Dry option for delicates fabric such as polyester as shrinking may occur.
To obtain the best drying results with small loads it is recommended to use Extra Dry program.
- Press the Temperature button to select either Normal, or Delicates from the Temperature program.
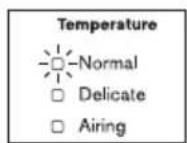
Airing is not available in Sensor Program.
The indicator light will come on to your choice. Refer to the table below for recommendations.
| Temperature | Definition |
| Normal | For drying most fabrics. |
| Delicates | For drying delicates and synthetics at lower heat for maximum care of the fabrics.The Delicate setting will cause the heater to cycle on for shorter time than the Normal setting. |
| Airing | This setting does not heat.Only circulate the air as the dryer to shake out the dust and refresh the clothes. |
Now press the Start/Pause button to start the dryer.
3.2 Timer Program
Using this mode gives you the option of selecting a number of features from the Timer Program including the Temperature you require.
- Press the Program button to select either 90, 60 or 30 Minutes from the Timer Program.

The indicator light will come on to your choice.
- Press the Temperature button to select either Normal, Delicates or Airing.
The indicator light will come on to your choice.
Now press the Start/Pause button to start the dryer.
WARNING: Never stop a tumble dryer before the end of the drying cycle unless all items are quickly removed and spread out so that the heat is dissipated.
Switch Off
- When you have finished using the dryer, press the On/Off button, to turn off the power, then switch off at the power point. It is not recommended that the power be left on to the dryer.
5 Clean Lint Filter
- After every load clean the lint filter to reduce drying times and avoid overheating.
Checking the Load
To check the dryness or add clothes during the cycle, simply open the door. The dryer will beep several times indicating the door is open. If further drying is required, close the door and push in the door safety switch button, then press the Start/Pause button to continue.
For the best drying performance, only add or remove clothes at the beginning of the drying cycle.
Cooling
Your dryer will automatically switch off the heater at the end of every drying cycle. The cooling light will come on. This is important as it removes stored heat from the clothes and helps prevent creasing.
At the end of cooling the buzzer will sound to indicate your clothes are dry (unless you have de-selected this function). It will sound again after about fifteen minutes. The Clean Filter Reminder light will remain on.
The progress indicator lights let you know what the dryer is doing, either drying, cooling or finished.
Last Memory Setting
Next time you turn your dryer on it will be ready to go as it remembers the last Program, Temperature and Option setting used. You can change the settings if you wish.
Reversing Action
The drum is designed to rotate in both direction, clockwise and anti-clockwise. This reduces tangling and gives more even drying in a shorter time.
Care And Cleaning

Warning!
You must DISCONNECT the appliance from the electricity supply, before you can carry out any cleaning or maintenance work.
External Cleaning
Clean the appliance only with soap and warm water. Fully dry all the surfaces.

Caution!
Do not use alcohol, solvents or chemical products.
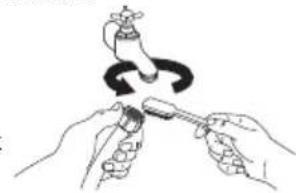
Cleaning The Water Inlet Filter
If your water is very hard or contains traces of lime deposit, the water inlet filter may become clogged. It is therefore a good idea to clean it from time to time.
To clean the water inlet filters:
-
Close the water tap.
-
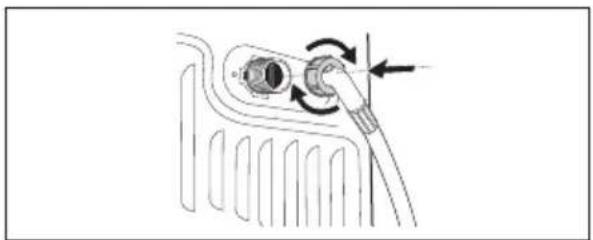
Remove the water inlet hose from the water tap.
-
Clean the filter in the inlet hose with a stiff brush.
-
Remove the inlet hose behind the appliance.
natural_image
Illustration of hands using a tool to lift a faucet with a curved arrow indicating rotation (no text or symbols)- Clean the filter in the valve with a stiff brush or a towel.

text_image
Diagram illustrating the internal components of a refrigerator with airflow and mechanical assembly, including a close-up view of the internal structure.- Re-install the inlet hose. Make sure that the couplings are tight to prevent leakages.
natural_image
Diagram of a car hood with a pipe and valve mechanism, no text or symbols present- Open the water tap.
Hints
- Never tumble dry the following: Delicate items such as net curtains, woollen, silk, fabric with metal trim, nylon tights, bulky materials such as anoraks, blankets, eiderdown, sleeping bags, feather quilts and any item containing rubber foam or materials similar to foam rubber.
- Do not place in your dryer undergarments such as bras and corsets that contain metal reinforcements. Your dryer may be damaged if metal parts were to come loose from the garment. Place such items in a bag designed for this purpose.
- Check and empty pockets. Clips, pens, nails and pins can damage both the dryer and your clothes. Other items such as matches or cigarette lighters will cause a fire.
- Close all press studs, hooks, eyes and zips that may catch on something else. Tie all belts and apron strings to prevent tangling.
- Drying time will depend on fabric type and construction, load size and wetness. Save time and money and always spin the load as dry as possible in your washing machine.
- Drying time will also be affected by voltage fluctuations, room temperature and humidity. Clothes will dry more slowly on a cool or humid day.
- For best results, sort the load according to fabric types. Such as heavy items which may take longer to dry, eg towels, flannelette sheets etc, than ones which dry quickly, eg poly/cotton shirts and sheets.
- Avoid drying dark clothes with light coloured items such as towels as lint will show on the dark clothes.
Note: Some fabrics will collect lint from other clothes and items. Separate the lint "givers" and the lint "collectors" to minimise this problem.
Clothes that give lint include towels, nappies, chenille. Clothes that collect lint include corduroy, synthetics and permanent press garments.
- If individual items are still damp after drying, set a 30 minute post drying time. This will be necessary particularly for multilayered items (eg collars, pockets, etc).
- Always clean the lint filter-this will reduce drying time and save you money.
-
The laundry must be thoroughly spun before tumble drying.
-
Easy-care items eg shirts, should be briefly pre-spun before drying (depending on the crease resistance approximately 30 seconds)
- To avoid static charge when drying is completed, use either a fabric softener when you are washing the laundry or a fabric conditioner specifically for tumble dryers.
- Remove the laundry when the dryer has finished drying.
- Do not over-dry laundry, this avoids creasing and saves energy.
• Clothes or towels containing sand or grit should be washed first.
To help you, here is a list of the average weights of some common laundry items.
| Sheet | 700 - 1000g |
| Tablecloth | 400 - 500g |
| Kitchen towel | 70 - 120g |
| Table napkin | 50 - 100g |
| Towelling hand towel | 150 - 250g |
| Bathrobe | 1000 - 1500g |
| Men's shirt | 200 - 300g |
| Pillowcase | 100 - 200g |
| Men's pyjamas | 400 - 500g |
| Ladies nightdress | 200 - 250g |
| Bath towel | 300 - 400g |
Troubleshooting & Accessories
TROUBLESHOOTING
Check the points listed here before you call for help, and make sure that you have followed the Important Safety Instructions on pages 2 & 3.
| Problem | Possible causes |
| The dryer will not start: | Plug is not firmly in socket, or power not turned on.You have blown a fuse. Check the power point with another appliance.You have not closed the dryer door or pushed in the door safety switch button. |
| Clothes are still wet: | The selected drying time was insufficient. Select a longer time setting.Longer time may be needed when the room temperature is 10 °C or less.Check that the lint filter is not blocked.Check to see that you have read all the instructions carefully.You have used wet clothes with “Iron Aid” option.The "Iron Aid" program reduces wrinkle on dry laundry only. It is not a drying program.Contact the Service Centre if you are still having problems. Write down the model and serial numbers and the date of purchase before you ring.The Service Centre will need this information. |
| Isolated wet spots on fabrics after “Iron Aid” cycle completed. | Water pressure too low - please check that the water pressure is between 200 kPa and 800 kPa. |
| No water goes out from Nozzle, when “Iron Aid” cycle is selected. | The water tap is closed, please open the water tap.The inlet hose is squashed or kinked, please check inlet hose connection.The filter in the inlet hose is blocked, please clean the inlet hose filter.Refer to relevant paragraph in “Care And Cleaning” section.The Nozzle is clogged, please contact the Service Centre.Contact the Service Centre if you are still having problems. |
| Clothes are slightly damp after using “Iron Aid” cycle. | This is Normal. Iron Aid uses moisture to reduce the wrinkle on fabrics. It is recommended to hang clothes after using this cycle.If your laundry feels wet rather than slightly damp, then the household water pressure is too high. You may need to reduce pressure by installing a pressure reducing valve at Mains water connection to the household.This must be done by qualified plumber.Note: High water pressure is harmful to all appliances in your household that are connected to the water supply ie: washing machine,dishwasher... etc. |
IMPORTANT
To operate efficiently the clothes dryer must have an unrestricted air supply and exhaust ventilation.
Service calls resulting from installation where ventilation is restricted are not covered by warranty.
THE COST OF THIS TYPE OF CALL WILL BE CHARGED TO THE CUSTOMER
Should you require further instructions in the use and care of your clothes dryer please contact the CUSTOMER CARE CENTRE on the phone number listed below:
Thailand
Electrolux Customer Care
Tel : (+66 2) 725 9000
Electrolux Thailand Co., Ltd.
Electrolux Building
14th Floor 1910 New Petchburi Road,
Bangkapi, Huay Kwang, Bangkok 10310
Email: customercare@electrolux.co.th
Indonesia
Tel : (+62 21) 522 7180
Plaza Kuningan - Menara Utara 2 ^nd Fl. Suite 201
JI. HR. Rasuna Said
Kav. C11-14, Jakarta 12940
Office Tel : (+62 21) 522 7099
Office Fax : (+62 21) 522 7099
Email : customercare@electrolux.co.id
Vietnam
Domestic Toll Free : 1800-58-88-99
76 Le Lai Street, Ben Thanh Ward, District 1,
Ho Chi Minh City.
Office Tel: (+84 8) 3910 5465
Office Fax: (+84 8) 3910 5470
Email: vncare@electrolux.com
Malaysia
Domestic Toll Free : 1300-88-11-22
Electrolux Home Appliances Sdn. Bhd.
7th Floor, Tower 2, Jaya33,
No. 3, Jalan Semangat, Seksyen 13,
46100 Petaling Jaya, Selangor
Office Tel : (+60 3) 7843 5999
Office Fax : (+60 3) 7955 5511
Email: Malaysia.customercare@electrolux.com
Philippines
Domestic Toll Free : 1-800-10-845-care 2273
Customer Care Hotline : (+63 2) 845 care 2273
Electrolux Phils Inc.
25th Floor, Equitable Bank Tower 8751
Paseo De Roxas, Makati City,
1226 Philippines
Office Tel : (+63 2) 845 4510
Office TeleFax : (+63 2) 845 4543
Office Fax : (+63 2) 845 4548
Email : wecare@electrolux.com
Singapore
Tel : (+65) 6507 8699
Electrolux S.E.A. Pte Ltd.
11 Lorong 3 Toa Payoh
Jackson Square, Block B, #01-13/14/15
Singapore 319579
Office Tel : (+65) 6507 8900
Office Fax : (+65) 6356 5489
Email: customer-care.sin@electrolux.com
Kandungan
natural_image
Simple line drawing of a device with a screw and a checkmark (no text or symbols)
natural_image
Pure electrical circuit lines without any symbolstext_image
Diagram showing three electrical circuit symbols: plug, plug with switch, and plug with power outlet, all marked with 'X' indicating prohibition.natural_image
Hand placing a component into a circular device with a mesh pattern (no text or symbols visible)natural_image
Diagram of a folded device with grid panels and an arrow indicating rotation (no text or symbols)natural_image
Technical line drawing of an open refrigerator internal structure (no text or labels)Permukaan Kerja
Kabel Utama
Hos Saliran Air
Masuk
Saluran Masuk
Udara
Penutup Saluran
Keluar
Kaki Belakang
text_image
Program Temperature Option Delay Start/Pause Extra Dry 90 Min Normal Dry 60 Iron Dry 30 Normal Delicate Iron Aid 6 Airing Crease Free 3 9 Hrs. Drying Cooling End Clean Filter SENSOR DRY On/Off 6 8 1 4 3 9 21 Butang Hidup/Padam (On/Off)
3 Butang Tangguh (Delay)
Extra Dry, Normal Dry dan Iron Dry
natural_image
Line drawing of a washing machine with a hand opening the door (no text or symbols)natural_image
Illustration of hands using a tool to interact with a mechanical component (no text or symbols)text_image
Diagram illustrating a mechanical assembly with labeled components and directional arrows indicating motion or movement.natural_image
Diagram of a car interior showing a valve mechanism with directional arrows (no text or labels)- Pasangkan bekalan air.
Petua Penggunaan
14th Floor 1910 New Petchburi Road,
Bangkapi,Huay Kwang, Bangkok 10310
Email: customercare@electrolux.co.th
Indonesia
Tel : (+62 21) 522 7180
Plaza Kuningan - Menara Utara 2 ^nd Fl. Suite 201
JI. HR. Rasuna Said
Kav. C11-14, Jakarta 12940
Office Tel : (+62 21) 522 7099
Office Fax : (+62 21) 522 7099
Email: customercare@electrolux.co.id
Vietnam
Domestic Toll Free : 1800-58-88-99
76 Le Lai Street, Ben Thanh Ward, District 1,
Ho Chi Minh City.
Office Tel: (+84 8) 3910 5465
Office Fax: (+84 8) 3910 5470
Email: vncare@electrolux.com
Malaysia
Domestic Toll Free : 1300-88-11-22
Electrolux Home Appliances Sdn. Bhd.
7th Floor, Tower 2, Jaya33,
No. 3, Jalan Semangat, Seksyen 13,
46100 Petaling Jaya, Selangor
Office Tel : (+60 3) 7843 5999
Office Fax : (+60 3) 7955 5511
Email: Malaysia.customercare@electrolux.com
Philippines
Domestic Toll Free : 1-800-10-845-care 2273
Customer Care Hotline : (+63 2) 845 care 2273
Electrolux Phils Inc.
25th Floor, Equitable Bank Tower 8751
Paseo De Roxas, Makati City,
1226 Philippines
Office Tel : (+63 2) 845 4510
Office TeleFax : (+63 2) 845 4543
Office Fax : (+63 2) 845 4548
Email: wecare@electrolux.com
Singapore
Tel : (+65) 6507 8699
Electrolux S.E.A. Pte Ltd.
11 Lorong 3 Toa Payoh
Jackson Square, Block B, #01-13/14/15
Singapore 319579
Office Tel : (+65) 6507 8900
Office Fax : (+65) 6356 5489
Email: customer-care.sin@electrolux.com
目录
使用条件……第 24页
重要安全指南
干衣安全……第 24页
火险……第 24页
清洁线屑滤网……第 25页
干衣指南……第 25页
安装指南……第 26页
操作指南
控制面板……第 28页
快速5步操作指南……第 30页
保养和清洁……第 32页
使用提示……第 33页
故障诊断……第 34页
产品规格……第 36页
装箱单……第 36页
维修服务指南……第 37页
产品保修卡……第 38页
使用条件
本机适合在家庭及类似场合使用,例如:
natural_image
Two technical diagrams showing a plug socket with a checkmark and a cross-shaped component, both without any text or symbols.natural_image
Three black-and-white illustrations showing electrical plug, cable, and power plug symbols (no text or labels)natural_image
Hand inserting a component into a washing machine (no text or symbols visible)打开并清洁线屑滤网。
natural_image
Diagram of a folded solar panel with grid layout and rotation arrow (no text or symbols)5 温度按钮 (Temperature)
natural_image
Line drawing of a washing machine with hands cleaning the door (no text or symbols)text_image
Diagram illustrating a mechanical assembly with labeled components and directional arrows indicating motion or movement.natural_image
Diagram of a car hood with a valve and directional arrow indicating rotation (no text or symbols)- 打开水龙头。
使用提示
14th Floor 1910 New Petchburi Road,
Bangkapi, Huay Kwang, Bangkok 10310
电子邮件:customercare@electrolux.co.th
Indonesia (印尼)
电话:(+62 21) 522 7180
Plaza Kuningan - Menara Utara 2 ^nd Fl. Suite 201
JI. HR. Rasuna Said
Kav. C11-14, Jakarta 12940
办公室电话:(+62 21) 522 7099
76 Le Lai Street, Ben Thanh Ward, District 1,
Ho Chi Minh City.
办公室电话:(+84 8) 3910 5465
7th Floor, Tower 2, Jaya33,
No. 3, Jalan Semangat, Seksyen 13,
46100 Petaling Jaya, Selangor
Electrolux Phils Inc.
25th Floor, Equitable Bank Tower 8751
Paseo De Roxas, Makati City,
1226 Philippines
办公室电话:(+63 2) 845 4510
办公传真:(+63 2) 845 4543
11 Lorong 3 Toa Payoh
Jackson Square, Block B, #01-13/14/15
Singapore 319579
办公室电话:(+65) 6507 8900
Thinking of you Electrolux
由伊莱克斯(中国)电器有限公司进口
伊莱克斯(中国)电器有限公司