QWALL-HD - Uncategorized Smart-AVI - Free user manual and instructions
Find the device manual for free QWALL-HD Smart-AVI in PDF.

| Product Type | HDMI Wall Plate Extender |
| Brand | Smart-AVI |
| Model | QWALL-HD |
| Dimensions (W x H x D) | 4.5 in x 3.0 in x 1.2 in |
| Weight | 0.5 lbs |
| Material | Metal housing with plastic faceplate |
| Power Supply | 5V DC 1A (via included power injector or PoE option) |
| Video Input | HDMI Type A female |
| Video Output | BNC (coax) for transmission |
| Max Resolution | 1920x1080p @ 60Hz |
| Max Transmission Distance | Up to 100 meters (328 feet) over RG-6 coax |
| HDMI Version | HDMI 1.3 |
| Supported Audio | Stereo audio up to 48kHz |
| Operating Temperature | 32°F to 104°F (0°C to 40°C) |
| Storage Temperature | -4°F to 140°F (-20°C to 60°C) |
| Humidity | 10% to 90% non-condensing |
| Installation | Single gang wall plate, easy screw terminals |
| Main Features | Extends HDMI over existing coax cables; supports IR pass-through; no external power at receiver needed |
| Included Accessories | Power adapter, mounting screws, IR blaster cable |
| Compliance | CE, FCC, RoHS |
| Warranty | 2 years limited |
| Cleaning | Wipe with dry cloth; avoid liquids and abrasives |
| Repair and Spare Parts | Contact Smart-AVI support; no user-serviceable parts |
Frequently Asked Questions - QWALL-HD Smart-AVI
User questions about QWALL-HD Smart-AVI
0 question about this device. Answer the ones you know or ask your own.
Ask a new question about this device
Download the instructions for your Uncategorized in PDF format for free! Find your manual QWALL-HD - Smart-AVI and take your electronic device back in hand. On this page are published all the documents necessary for the use of your device. QWALL-HD by Smart-AVI.
USER MANUAL QWALL-HD Smart-AVI
APPLICATION DIAGRAM 5
| VIDEO | |
| Video Bandwidth | Single-link 340MHz [10.2Gbps] |
| Resolution HDTV Up to 1080p | |
| PC Resolution Up to 1920 x 1080 | |
| Input Video Signal 1.2 volts | |
| Input DDC Signal 5 volts | |
| Single Link Range 1080p | |
| Format HDMI 1.4 | |
| DVI Compliance | Single-link DVI-D 2.0 |
| Output Cable Length Up to 20 ft. | |
| HDCP Compliance 1.0/2.0 | |
| Input Interface (4) HDMI | |
| Output Interface | (4) HDMI |
| Connector | Type A [19-pin female] |
| AUDIO | |
| Format | HDMI Digital Audio |
| Output Interface | 3.5 mm Stereo Audio |
| Frequency Response | 20Hz ~ 20KHz |
| CONTROL | |
| Front Panel | Push Buttons with LED Indicators |
| RS-232 | DB9 (female) Via Control @ 9600 bps |
| Hot Keys | Via Keyboard |
| Remote | IR |
| Web | Web Interface |
| OTHER | |
| Power | Internal 100-240 VAC |
| Dimensions | 17.0" W x 2.0" H x 10.75" D |
| Weight | 4.4 lbs |
| Approvals | UL, CE, ROHS Compliant |
| Operating Temp. | +32 to +104°F (0 to +40°C) |
| Storage Temp. | -4 to 140°F (-20 to +60°C) |
| Humidity | Up to 80% (No Condensation) |
WHAT'S IN THE BOX?
| PART NO. | QTY | DESCRIPTION |
| QWALL-HD | 1 | 4x4 HDMI Matrix & WALL System. |
| PS12VD3A-WLLMNT | 1 | 12V DC, 3A (minimum) power adapter with center-pin positive polarity. |
| SAVI-RMT | 1 | IR Remote Control |
| User Manual |
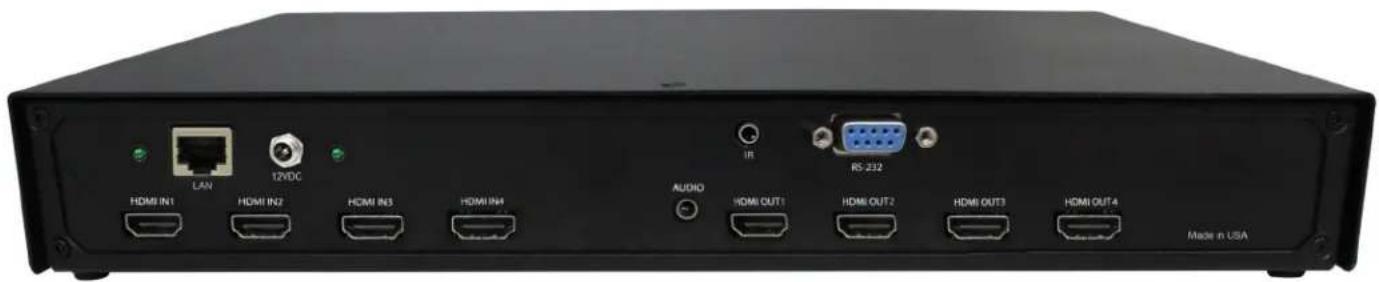
QWALL-HD REAR
text_image
LAN 12VDC HDMI IN1 HDMI IN2 HDMI IN3 HDMI IN4 AUDIO HDMI OUT1 HDMI OUT2 HDMI OUT3 HDMI OUT4 RS-232 Made in USAQWALL-HD FRONT

text_image
Smart-AM QWALL HD 1 2 3 4 Full Wall Macro 1 Macro 2 Input/Output Select Mode 4x4 Matrix/ Wall SystemINSTALLATION
- Make sure QWALL-HD is turned off.
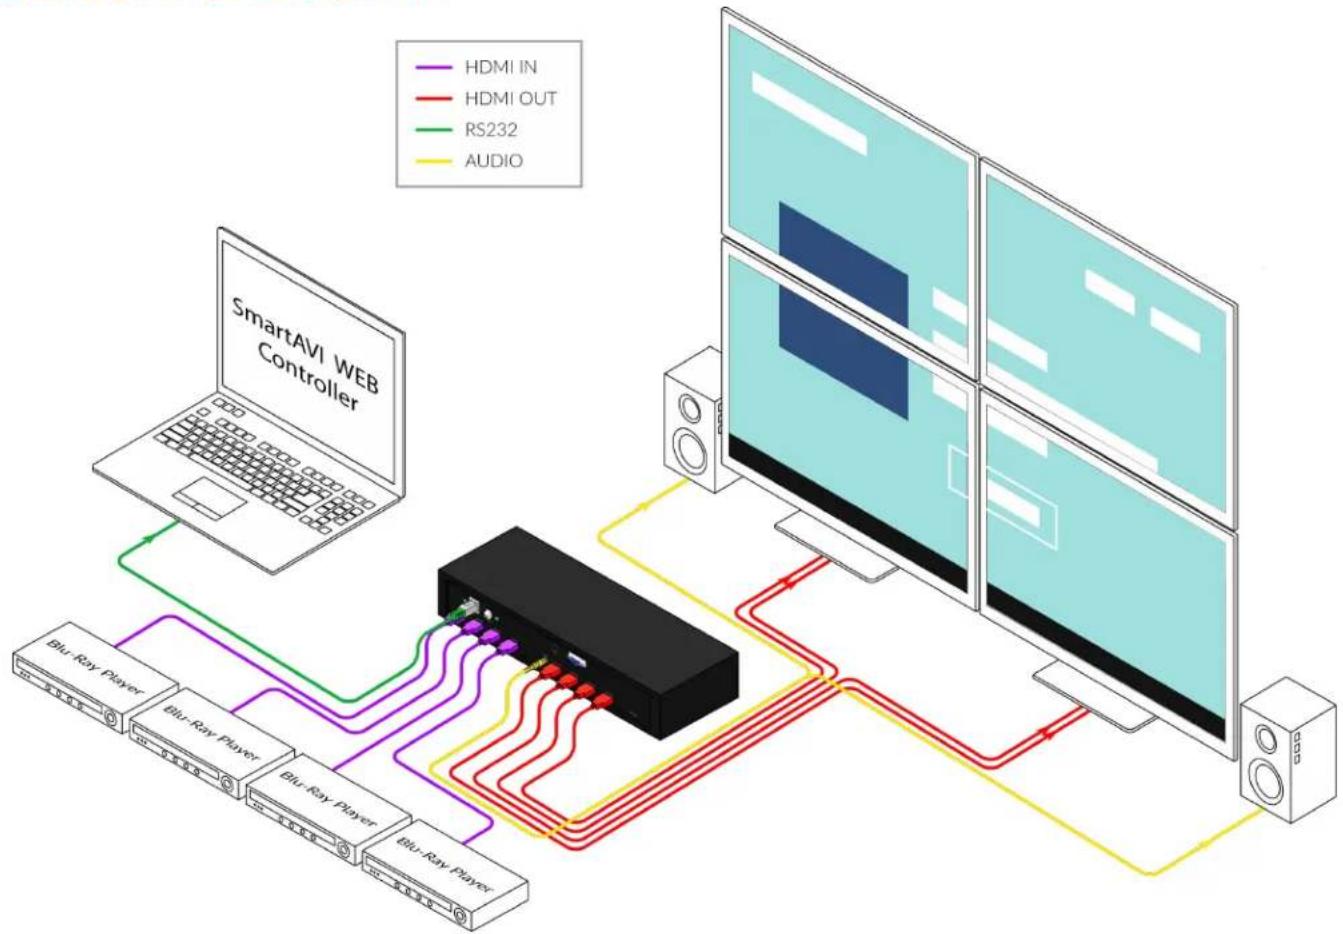
- Connect up to 4 HDMI inputs (i.e. PC, Blu-Ray Player, Digital Signage, etc.) to the HDMI INPUT ports of QWALL-HD using HDMI cables.
- Connect up to 4 HDTVs to the HDMI OUTPUT ports of QWALL-HD using HDMI cables or HDMI-to-DVI adapters for DVI displays.
- Connect a CAT5/CAT6 cable to the RJ45 connector.
- Optionally connect an RS232 cable from PC to the RS-232 port of the unit for additional control.
- Turn on QWALL-HD
- Wait for the unit to initialize. This should take less than a minute.
APPLICATION DIAGRAM
flowchart
graph TD
    A["SmartAVI WEB Controller"] -->|HDMI IN| B["Blu-Ray Player"]
    A -->|HDMI OUT| C["Blu-Ray Player"]
    A -->|RS232| D["Blu-Ray Player"]
    A -->|AUDIO| E["Blu-Ray Player"]
    B --> F["Switch"]
    C --> F
    D --> F
    E --> F
    F --> G["Monitor 1"]
    F --> H["Monitor 2"]
    F --> I["Monitor 3"]
Video Wall Mode: User can select any of the four HD inputs and project the image across four HD screens (2x2 configuration).

text_image
1Clone Mode: User can select any of the four HD inputs and project the image individually on all four HD screens, with supported resolution up to 1920x1080 on each screen.
| 1 | 1 |
| 1 | 1 |
Matrix Mode: User can quickly assign inputs to their desired output.
| 1 | 2 |
| 3 | 4 |
| 3 | 4 |
| 1 | 2 |
Splicing Mode: User can splice the input to do different matrix arrays (i.e. 1x2, 2x1, 1x3, 3x1, 1x4, 4x1).
There are a total of 8 buttons used for the front panel of QWALL-HD.
| BUTTON DESCRIPTION | |
| 1 Input 1 | |
| 2 Input 2 | |
| 3 Input 3 | |
| 4 Input 4 | |
| 5 Matrix Mode | |
| 6 Wall Mode | |
| 7 Macro 1 | |
| 8 Macro 2 |
The front panel supports changing between several modes, Matrix, Wall, and the preset saved onto Macro 1 and Macro 2.
To use Matrix Mode, select this mode and then select the desired Output and Input respectively. For example to set Input 1 on Output 3, the user must press Button 5 -> Button 3 (Output) -> Button 1 (Input).
To use Wall Mode, select this mode and the select the desired Input.
To use the Macro buttons, user must access the web page of QWALL-HD and set each button to a specific preset. Once the user saves the Macro button from the web, QWALL-HD will always change to the specific preset with the selected input until the user updates QWALL-HD to perform a new macro.
CONTROL USING IR REMOTE CONTROL
| COMMAND FUNCTION | |
| IN -> # -> WALL -> OK | Set Input ‘#’ to Wall Mode |
| IN -> # -> CLONE -> OK | Set Input ‘#’ to Clone Mode |
| IN -> # -> QUAD -> OK | Set Input ‘#’ to quickly set up matrix array of all 4 inputs, with ‘X’ on Output 1 |
| IN -> # -> OUT -> 1 -> OK | Set Input ‘#’ to Output 1 |
| IN -> # -> OUT -> 2 -> OK | Set Input ‘#’ to Output 2 |
| IN -> # -> OUT -> 3 -> OK | Set Input ‘#’ to Output 3 |
| IN -> # -> OUT -> 4 -> OK | Set Input ‘#’ to Output 4 |
| IN -> # -> F1 -> OK | Set Input ‘#’ to do 1x2 splicing on Output 1 + 2 |
| IN -> # -> F1 -> F1 -> OK | Set Input ‘#’ to do 1x2 splicing on Output 3 + 4 |
| IN -> # -> F2 -> OK | Set Input ‘#’ to do 2x1 splicing on Output 1 + 3 |
| IN -> # -> F2 -> F2 -> OK | Set Input ‘#’ to do 2x1 splicing on Output 2 + 4 |
| IN -> # -> F3 -> OK | Set Input ‘#’ to do 1x4 splicing |
| IN -> # -> F4 -> OK | Set Input ‘#’ to do 4x1 splicing |
Note: # will only use 1, 2, 3, or 4

text_image
E ESC WILL CLONE EVID QUID F1 F2 F3 F4 IN OUT CH+ OK CH- M1 M2 1 2 3 4 5 6 7 8 9 SOURCE 0 USB Smart-AM SMARTCONTROL USING RS-232
The QWALL-HD may also be controlled via RS-232 commands. This feature requires an RS-232 card installed on your computer or a USB to RS-232 adapter. Below are instructions on how to properly create an RS-232 connection between a PC the QWALL-HD.
Establish a connection to QWALL-HD:
- Connect a straight- through male-to-female RS-232 cable to the RS-232 connector on the PC.
- Connect the other end of the cable to the RS-232 port of the QWALL-HD.
- Power on the device.
If you are using a USB to COM port adapter and need to identify the COM port used do the following:
- Click on the start button.
- Click on Control Panel.
- Click on Device Manager.
- Click on the arrow next to Ports (COM & LPT).
You should see the name of your adapter and the COM port number in use.
Setting up the Terminal Application:
Run the terminal client of your choice such as HyperTerminal or PuTTY. Select the correct COM port on the PC. Use the following connection settings: 9600, N, 8, 1, no flow control. Once the connection is established type? And hit enter. The QWALL-HD should respond with a version number and a list of commands.

text_image
PuTTY Configuration Category: Session Logging Terminal Keyboard Bell Features Window Appearance Behaviour Translation Selection Colours Connection Data Proxy Telnet Rlogin SSH Serial Basic options for your PuTTY session Specify the destination you want to connect to Serial line Speed COM12 9600 Connection type: Raw Telnet Rlogin SSH Serial Load, save or delete a stored session Saved Sessions Default Settings Load Save Delete Close window on exit: Always Never Only on clean exit About Help Open Cancel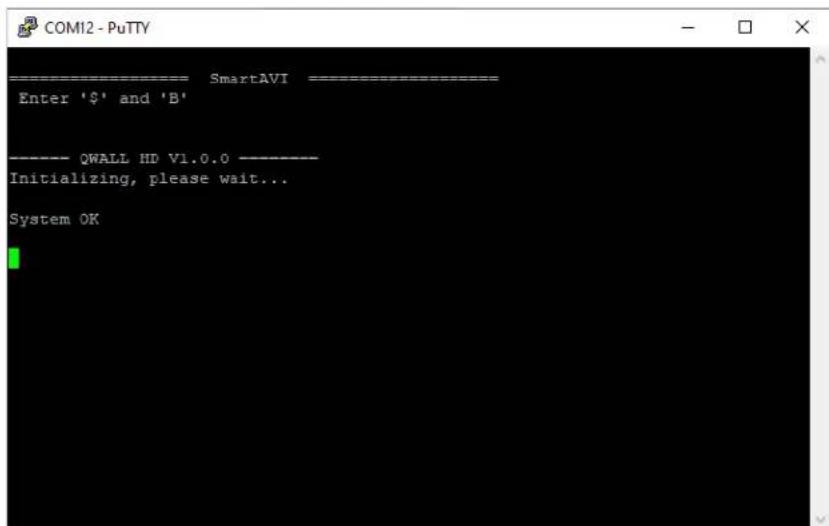
text_image
COM12 - PuTTY -------------------------SmartAVI ----------------------------------- Enter '$' and 'B' -------------------------QWALL HD V1.0.0 ----------------------- Initializing, please wait... System OKWhen you connect to the QWALL-HD to a computer via an RS-232 connection, you will see an opening screen on startup. Below are some examples of RS-232 commands.
CONTROL USING RS-232 (CONTINUED)
COM Port Settings:
| Baud Rate 9600 | |
| Start Bits N | |
| Data Bits 8 | |
| Parity 1 | |
| Stop Bits No Flow |
| Command RS-232 | |
| Set Input ‘#’ to Wall Mode | //I#W |
| Set Input ‘#’ to Clone Mode | //I#C |
| Set Input ‘#’ to quickly set up matrix array of all 4 inputs, with ‘X’ on Output 1 | //I#M |
| Set Input ‘#’ to Output 1 | //I#O1 |
| Set Input ‘#’ to Output 2 | //I#O2 |
| Set Input ‘#’ to Output 3 | //I#O3 |
| Set Input ‘#’ to Output 4 | //I#O4 |
| Set Input ‘#’ to do 1x2 splicing on Output 1 + 2 | //I#S1212 |
| Set Input ‘#’ to do 1x2 splicing on Output 3 + 4 | //I#S1234 |
| Set Input ‘#’ to do 2x1 splicing on Output 1 + 3 | //I#S2113 |
| Set Input ‘#’ to do 2x1 splicing on Output 2 + 4 | //I#S2124 |
| Set Input ‘#’ to do 1x4 splicing | //I#S13 |
| Set Input ‘#’ to do 4x1 splicing | //I#S31 |
CONTROL USING TCP/IP
To find the IP address of QWALL-HD, please use the SmartFinderPro application.

text_image
SmartFinderPro Port: 1901 Find Device at 192.168.50.161 MAC: a6:4c:5e:e3:72:77 Device at 192.168.50.49 MAC: a6:4c:5e:e4:3b:8e Device at 192.168.50.149 MAC: a6:4c:5e:e3:72:7aAfter clicking "Find", QWALL-HD will appear in the list showing its IP address and MAC address. Users may double click the IP address on the list and it will open on the default web browser of the computer. The user will then be prompted to log in. The default credentials will be the following:
Username: admin
Password: admin
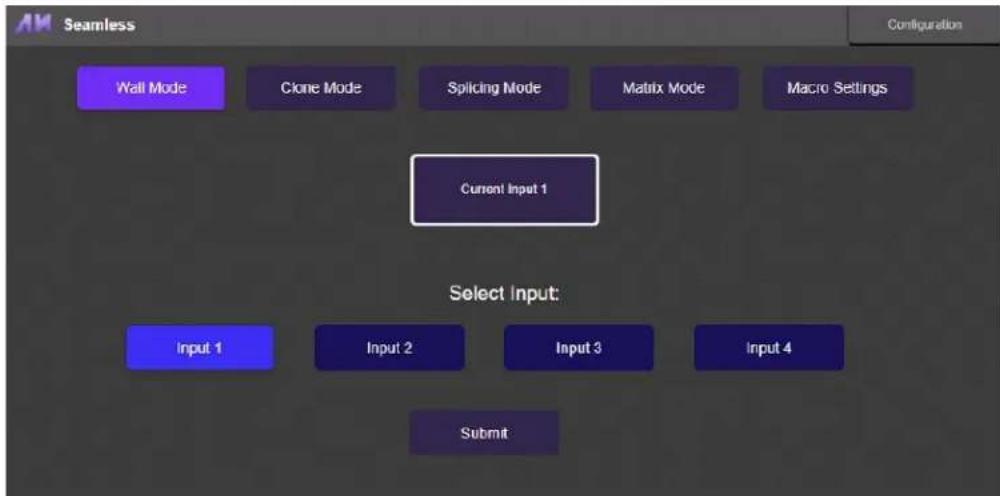
Once logged in, the user will be presented the four different modes QWALL-HD uses. Click into the mode and select the Input and/or Output when prompted, clicking Submit to send the data to QWALL-HD to change accordingly.
Wall Mode: Select the desired input and click Submit. This will set QWALL-HD to use all four monitors to set into video wall mode of the selected input.
flowchart
graph TD
    A["Input 1"] --> B["Input 2"]
    B --> C["Input 3"]
    C --> D["Input 4"]
    E["Current Input 1"] --> F["Macro Settings"]
    G["Wall Mode"] --> H["Clone Mode"]
    I["Splicing Mode"] --> J["Matrix Mode"]
    K["Submit"] --> L["Select Input:"]
CONTROL USING TCP/IP (CONTINUED)
Clone Mode: Select the desired input and click Submit. This will set QWALL-HD to use the selected input on all outputs.

flowchart
graph TD
    A["Input 1"] --> B["Current Input 2"]
    C["Input 2"] --> B
    D["Input 3"] --> B
    E["Input 4"] --> B
    F["Submit"] --> B
    G["Wall Mode"] --> H["Clone Mode"]
    I["Splicing Mode"] --> J["Matrix Mode"]
    K["Macro Settings"] --> L["Configuration"]
Splicing Mode: Select the desired input and preset and then click Submit. This will set QWALL-HD to “splice” the monitors to the selected input and present. For example, if the user selects Input 1 and selects preset 1x2 (1+2), this will display Input 1 over Output 1 and 2. The user can then select Input 2 and select preset 1x2 (3+4) to display Input 2 over Output 3 and 4. There are many options available to use, and can even be used in conjunction with Matrix Mode.

flowchart
graph TD
    A["Wall Mode"] --> B["Clone Mode"]
    B --> C["Splicing Mode"]
    C --> D["Matrix Mode"]
    D --> E["Macro Settings"]
    F["Current Input 2 Preset"] --> G["Select Input:"]
    G --> H["Input 1"]
    G --> I["Input 2"]
    G --> J["Input 3"]
    G --> K["Input 4"]
    L["Select Preset:"] --> M["1x2 (1+2)"]
    L --> N["1x2 (3+4)"]
    L --> O["2x1 (1+3)"]
    L --> P["2x1 (2+4)"]
    Q["1x3 (1+2+3)"] --> R["3x1 (1+2+3)"]
    Q --> S["1x4 (1+2+3+4)"]
    Q --> T["4x1 (1+2+3+4)"]
    U["Submit"] --> V["End"]
CONTROL USING TCP/IP (CONTINUED)
Matrix Mode: Select the desired input and output and then click Submit. This will set QWALL-HD to individually change each monitor, allowing the user to create a matrix array of all the Inputs over all of the Outputs.

flowchart
graph TD
    A["Wall Mode"] --> B["Clone Mode"]
    B --> C["Splicing Mode"]
    C --> D["Matrix Mode"]
    D --> E["Macro Settings"]
    F["Current Input 1\nCurrent Output"] --> G["Select Input:"]
    G --> H["Input 1"]
    G --> I["Input 2"]
    G --> J["Input 3"]
    G --> K["Input 4"]
    L["Output 1"] --> M["Output 2"]
    M --> N["Output 3"]
    N --> O["Output 4"]
    P["Submit"] --> Q["End"]
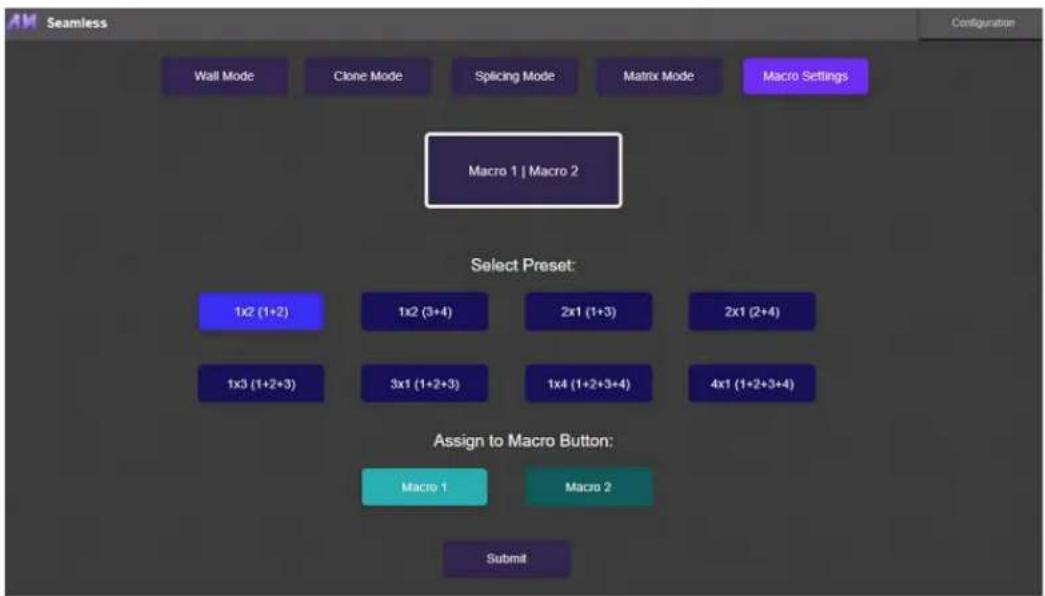
Macro Settings: This page allows the user to actively select and save presets onto the macro buttons found on the front panel. Button 7 is assigned by Macro 1 and button 8 is assigned by Macro 2. Simply select a desired preset, assign it to a macro button, and click Submit. This will allow the user to quickly use any “splicing” preset. Please note that the preset will also use the latest Input sent to QWALL-HD. Simply use button 1-4 to switch into any Input after using the macro button.
text_image
Seamless Wall Mode Clone Mode Splicing Mode Matrix Mode Macro Settings Macro 1 | Macro 2 Select Preset: 1x2 (1+2) 1x2 (3+4) 2x1 (1+3) 2x1 (2+4) 1x3 (1+2+3) 3x1 (1+2+3) 1x4 (1+2+3+4) 4x1 (1+2+3+4) Assign to Macro Button: Macro 1 Macro 2 Submit ConfigurationWEB CONFIGURATION
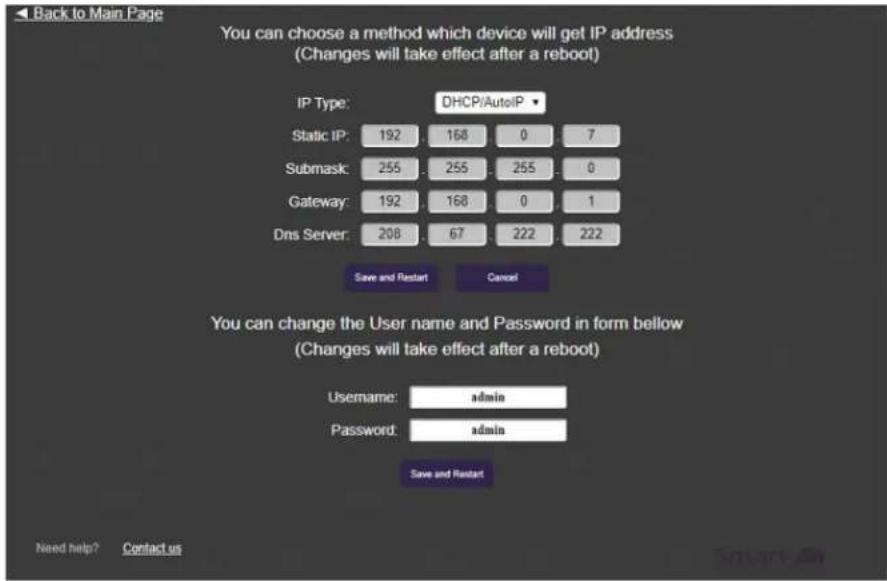
By default, QWALL-HD is configured to DHCP/AutoIP. The user may update the IP address to do static. The user may also update the login credentials within this page. Both options will require QWALL-HD to perform a reboot before continuing operation.
text_image
Back to Main Page You can choose a method which device will get IP address (Changes will take effect after a reboot) IP Type: DHCP/AutoIP Static IP: 192 168 0 7 Submask: 255 255 255 0 Gateway: 192 168 0 1 Dns Server: 208 67 222 222 Save and Restart Cancel You can change the User name and Password in form bellow (Changes will take effect after a reboot) Username: admin Password: admin Save and Restart Need help? Contact usFIRMWARE UPDATE
Identify the COM port on your PC and connect to the DB9 serial connection of QWALL-HD
- Open a serial console and use Baudrate 9600 (in our example we use Hyperterminal).
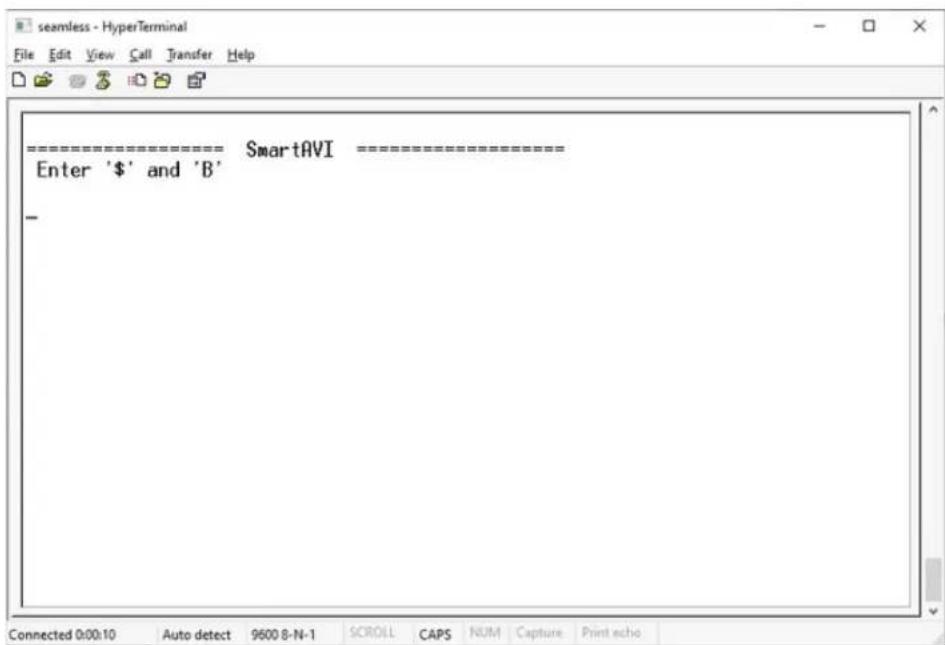
- Power on QWALL-HD and press ENTER until a message appears, prompting the command to send '\$' and 'B' symbols.
text_image
================---------SmartAVI =================---------------------------- Enter '$' and 'B' -- QWALL-HD will now prompt the user to send the updated firmware. Transfer via YMODEM and send the latest update.
• After the download is complete, QWALL-HD will reinitialize and be ready to use again.
TROUBLESHOOTING
No Power
- Make sure that the power adapter is securely connected to the power connector of the unit.
- Check the output voltage of the power supply and make sure that the voltage value is around 12VDC.
- Replace the power supply.
No Video
- Check if all the video cables are connected properly.
- Connect the computer directly to the monitor to verify that your monitor and computer are functioning properly.
- Restart the computers
Keyboard is not working
- Check if the keyboard is properly connected to the unit.
- Check if the USB cables connecting the unit and the computers are properly connected.
- Try connecting the USB on the computer to a different port.
- Make sure that the keyboard works when directly connected to the computer.
- Replace the keyboard.
Mouse is not working
- Check if the mouse is properly connected to the unit.
- Try connecting the USB on the computer to a different port.
- Make sure that the mouse works when directly connected to the computer.
- Replace the mouse.
No Audio
- Check if all the audio cables are connected properly.
- Connect the speakers directly to the computer to verify that the speakers and the computer audio are functioning properly.
- Check the audio settings of the computer and verify that the audio output is through the speakers.
TECHNICAL SUPPORT
For product inquiries, warranty questions, or technical questions, please contact info@smartavi.com.
LIMITED WARRANTY STATEMENT
A. Extent of limited warranty
SmartAVI, Inc. warrants to the end-user customers that the SmartAVI product specified above will be free from defects in materials and workmanship for the duration of 1 year, which duration begins on the date of purchase by the customer. Customer is responsible for maintaining proof of date of purchase.
SmartAVI limited warranty covers only those defects which arise as a result of normal use of the product, and do not apply to any:
a. Improper or inadequate maintenance or modifications
b. Operations outside product specifications
c. Mechanical abuse and exposure to severe conditions
If SmartAVI receives, during applicable warranty period, a notice of defect, SmartAVI will at its discretion replace or repair defective product. If SmartAVI is unable to replace or repair defective product covered by the SmartAVI warranty within reasonable period of time, SmartAVI shall refund the cost of the product.
SmartAVI shall have no obligation to repair, replace or refund unit until customer returns defective product to SmartAVI.
Any replacement product could be new or like new, provided that it has functionality at least equal to that of the product being replaced.
SmartAVI limited warranty is valid in any country where the covered product is distributed by SmartAVI.
B. Limitations of warranty
To the extant allowed by local law, neither SmartAVI nor its third party suppliers make any other warranty or condition of any kind whether expressed or implied with respect to the SmartAVI product, and specifically disclaim implied warranties or conditions of merchantability, satisfactory quality, and fitness for a particular purpose.
C. Limitations of liability
To the extent allowed by local law the remedies provided in this warranty statement are the customers sole and exclusive remedies.
To the extant allowed by local law, except for the obligations specifically set forth in this warranty statement, in no event will SmartAVI or its third party suppliers be liable for direct, indirect, special, incidental, or consequential damages whether based on contract, tort or any other legal theory and whether advised of the possibility of such damages.
D. Local law
To the extent that this warranty statement is inconsistent with local law, this warranty statement shall be considered modified to be consistent with such law.
Smart-AM
SMART AUDIO VIDEO INNOVATION
NOTICE
The information contained in this document is subject to change without notice. SmartAVI makes no warranty of any kind with regard to this material, including but not limited to, implied warranties of merchantability and fitness for particular purpose. SmartAVI will not be liable for errors contained herein or for incidental or consequential damages in connection with the furnishing, performance or use of this material. No part of this document may be photocopied, reproduced, or translated into another language without prior written consent from SmartAVI, Inc.
20180109

Designed and Manufactured in the USA
Tel: (800) AVI-2131 • (702) 800-0005
2455 W Cheyenne Ave, Suite 112
North Las Vegas, NV 89032
www.smartavi.com