Kasa Smart KL400L10 - Lighting TP-LINK - Free user manual and instructions
Find the device manual for free Kasa Smart KL400L10 TP-LINK in PDF.

User questions about Kasa Smart KL400L10 TP-LINK
0 question about this device. Answer the ones you know or ask your own.
Ask a new question about this device
Download the instructions for your Lighting in PDF format for free! Find your manual Kasa Smart KL400L10 - TP-LINK and take your electronic device back in hand. On this page are published all the documents necessary for the use of your device. Kasa Smart KL400L10 by TP-LINK.
USER MANUAL Kasa Smart KL400L10 TP-LINK
Main Device Control 8
Configure Your Smart Light Strip 9
Create Scenes 15
Schedule A Scene 17
Auto-Off Timer 18
Reset Your Smart Light Strip 19
Works with Kasa 20
Authentication 21
About This Guide
This guide provides a brief introduction to Kasa Smart Light Strip and the Kasa Smart app, as well as regulatory information.
Features available in Kasa may vary by model and software version. Kasa availability may also vary by region. All images, steps, and descriptions in this guide are only examples and may not reflect your actual Kasa experience.
Conventions
In this guide, the following convention is used:
| Convention | Description |
| Teal | Key information appears in teal, including management page text such as menus, items, buttons and so on. |
| Underline | Hyperlinks are in teal and underlined. You can click to redirect to a website. |
| Note: | Ignoring this type of note might result in a malfunction or damage to the device. |
Support
- Specific product information can be found on the product page at https://www.tp-link.com/.
• A Technical Community is provided for you to discuss our products at https://community.tp-link.com/. - Our Technical Support contact information can be found at the Help center of the Kasa Smart app and the Contact Technical Support page at https://www.tp-link.com/support/.
- Videos about how to configure the Smart Light Strip features can be found on the Setup Videos page at https://www.tp-link.com/support/setup-video/#smart-bulbs.
Introduction
The Light Strip is part of the Kasa smart home family of products, including plugs, switches, cameras and more. You can simply download the Kasa Smart app, connect to Wi-Fi and enjoy. No special hardware is needed. 16 color zones and millions of colors are available for you to pick from and create your own scenes.
You can also control multiple smart home devices with the Kasa Smart app or use your voice for added convenience. With Kasa, your home is never more than a few taps away.
- Multicolor - Offers endless lighting possibilities with 16 million colors and dimming capabilities.
- Voice Control - Turn on or off, and change colors with simple voice commands.
- Set Schedules - Run your Light Strip automatically to fit any event with the Kasa Smart app.
- Flexible and Easy Install - The flexibility to bend and cut* allows you to stick it or place it in the exact spot you desire.
*Once cut, it cannot be reattached. Prevent accidental shocks by removing its power and then cutting along the strip's indicator lines.
• Group and Scenes - Combine your strip with other Kasa devices for seamless control with a single tap.
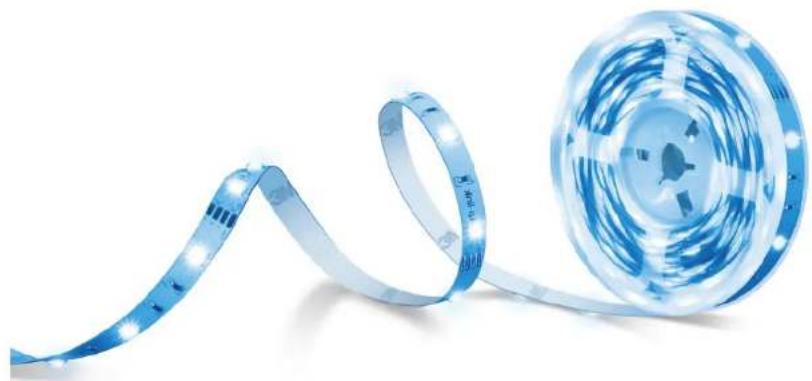
natural_image
Blue film strip with illuminated ends and a circular inset showing internal structure (no text or symbols)Set Up Your Smart Light Strip
Follow the steps below to set up your Light Strip via the Kasa Smart app.
Step 1. Download Kasa Smart App
Go to Google Play or the App Store or scan the QR code below to download and install the Kasa Smart app.
Step 2. Log In to Kasa Smart App
Open the app and use your TP-Link ID to log in. If you don't have a TP-Link ID, tap Create Account and the app will guide you through the rest.
Step 3. Add Your Devices
Tap the button in the app and select Device to add your new Light Strip. Follow app instructions to complete the setup.

text_image
Download on the App Store GET IT ON Google Play OR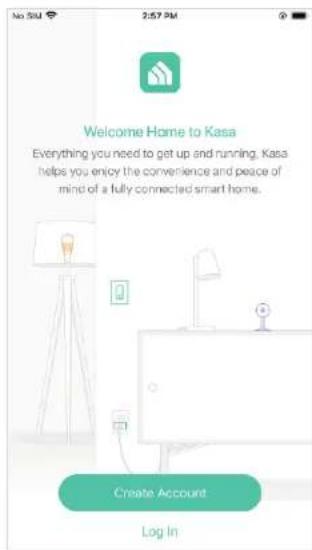
text_image
Welcome Home to Kasa Everything you need to get up and running. Kasa helps you enjoy the convenience and peace of mind of a fully connected smart home. Create Account Log In
text_image
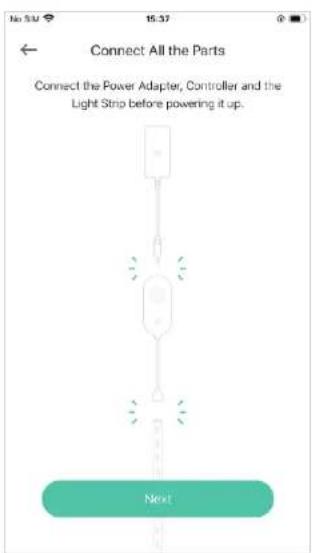
Devices No devices yet! Add your devices by tapping the button on the top right. Your saved devices yet be listed here. What would you like to add? Device Add a new Kana smart home device Group Custom multiple devices simultaneously ×Step 4. Connect All the Parts
Connect the Power Adapter, Controller and the Light Strip before powering it up.
Step 5. Power Up Light Strip
Plug in the power adapter and wait until the Light Strip animates orange and green.
Note: Do not roll up when using. Spread out the Light Strip before connect the power supply.
Step 6. Join Your Light Strip's Wi-Fi
Join your Light Strip's Wi-Fi to continue the setup.
text_image
Connect All the Parts Connect the Power Adapter, Controller and the Light Strip before powering it up. Next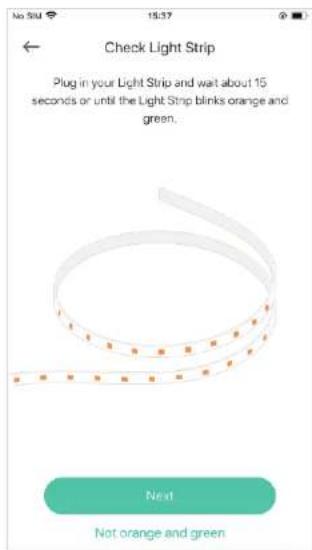
text_image
No 5M 15:37 ← Check Light Strip Plug in your Light Strip and wait about 15 seconds or until the Light Strip blinks orange and green. Next Not orange and green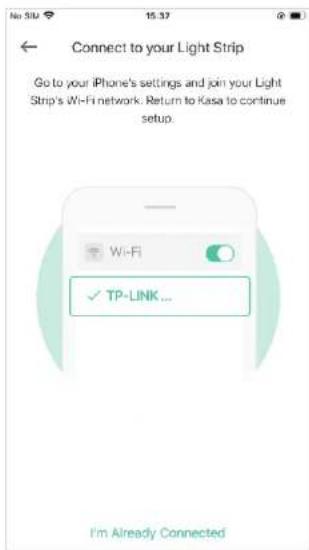
text_image
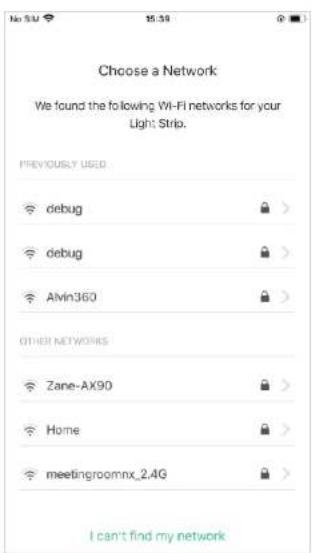
Connect to your Light Strip Go to your iPhone's settings and join your Light Strip's Wi-Fi network. Return to Kasa to continue setup. Wi-Fi ✓ TP-LINK ... I'm Already ConnectedStep 7. Join Your Home's Wi-Fi
Select your home Wi-Fi to connect.
Step 8. Setup Complete
Now you can start using your Light Strip.
text_image
Choose a Network We found the following Wi-Fi networks for your Light Strip. PREVIOUSLY USED debug debug Alvin360 OTHER NETWORKS Zane-AX90 Home meetingroomnx_2.4G I can't find my network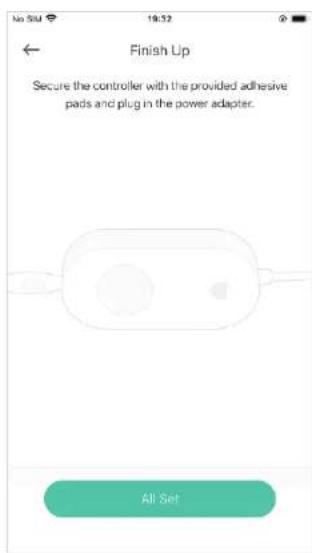
text_image
No SIM 19:32 Finish Up Secure the controller with the provided adhesive pads and plug in the power adapter. All SetInstall Your Smart Light Strip
After you have set up the Light Strip via the Kasa Smart app, you can cut it to length-fit and attach it to any surface with the 3M adhesive. To avoid damaging your Light Strip, please note the following Installation Tips before installing the Light Strip.
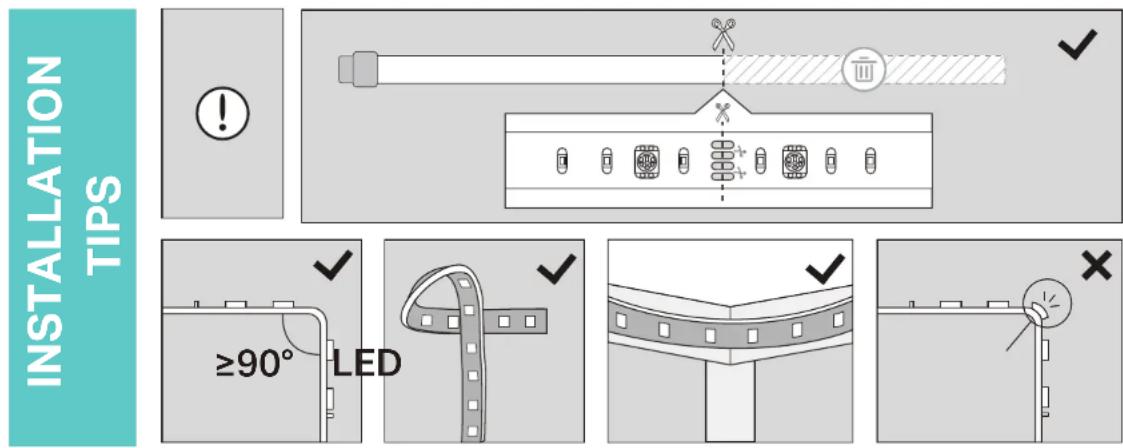
Cut Only On Specific Areas of Light Strip
You can custom tailor the length of your Light Strip with scissors. Unplug the Light Strip and cut only on these specific areas or your Light Strip will no longer function.
Avoid Bending on LED Beads
The bend should be avoided just in the position of the LED components, so as not to damage the product and affect the life of the product.
Avoid Sharp Turns
Carefully roll the Light Strip into a clover or use a gentle hill when making 90° turns like those need behind a TV. Sharp bends can damage your Light Strip.
Avoid Sharp Corners
Use gentle weeps when bending Light Strip around corners and avoid creases as they may cause damage.
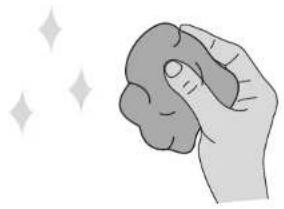
Step 1. Choose Location
Choose a dry, clean, and smooth surface. Wipe off the dust. Otherwise, the Light Strip will be easily fall off.
Note: Choose a location that avoids static and stays away from water splashing.
natural_image
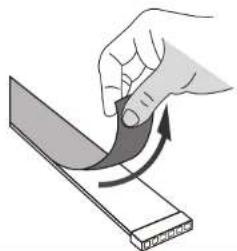
Illustration of a hand holding a crumpled object with sparkles in the background (no text or symbols)Step 3. Stick Light Strip
Stick the Light Strip and press over it about 10-15 seconds. Secure the controller with the adhesive pads. Do not move it to other place after it is attached.
natural_image
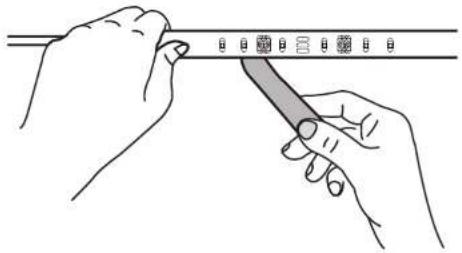
Illustration of hands using a tool to adjust or install a ruler or ruler (no text or symbols visible)INSTALL LIGHT STRIP
Step 2. Remove Adhesive Tape
Unplug the Light Strip first. Peel away the 3M adhesive backing bit by bit and stick your Light Strip to the surface.
Note: Do not peel off the tape under the 3M adhesive backing.
natural_image
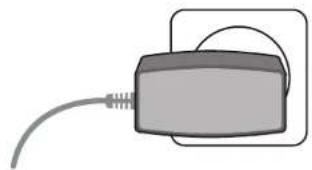
Illustration of a hand holding a curved object with an arrow indicating rotation (no text or symbols)Step 4. Power Up Light Strip
Plug in the power adapter to power on your Light Strip.
natural_image
Simple line drawing of a rectangular device with a coiled cable and looped top (no text or symbols)Main Device Control
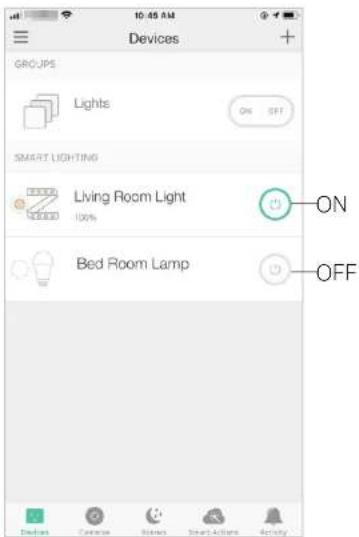
After you successfully set up your Light Strip, you will see the Devices page on the Kasa Smart app. You can add new devices, control multiple devices simultaneously in a group, configure account settings, and more.
Devices Page
On the Devices page, you can instantly turn on/off the Light Strip, adjust brightness or change colors.
Add a Group
Tap + and select Group to add a group for controlling multiple devices simultaneously.
Configure Kasa Settings
Swipe right and you can configure settings for your Kasa account or get more information about Kasa.
text_image
10:45 AM Devices GROUPS Lights ON OFF SMART LIGHTING Living Room Light 100% ON Bed Room Lamp OFF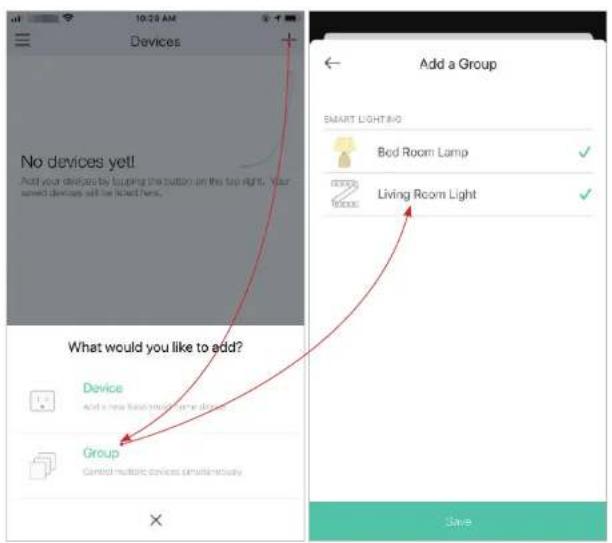
text_image
10:28 AM Devices No devices yet! Add your devices by loading the button on this top right. Your saved device will be listed here. What would you like to add? Device Add a new floor in home room Group Control multiple devices simultaneously Add a Group SMART LIGHT NO Bod Room Lamp Living Room Light Save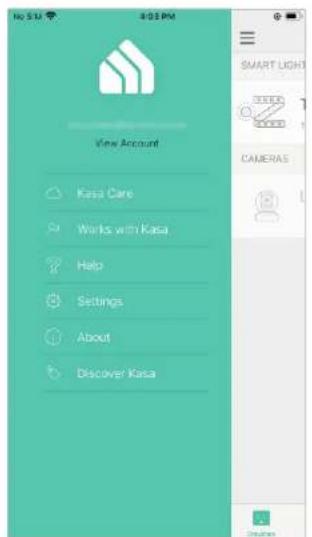
text_image
View Account Kasa Care Works with Kasa Help Settings About Discover KasaConfigure Your Smart Light Strip
On the Devices page, tap a Light Strip and you can adjust the light brightness or color, set schedules, save a shortcut for a light effect, track energy consumption and configure the Light Strip settings.
Power On/Off At One Tap
Quickly power on or off your Light Strip with a single button.
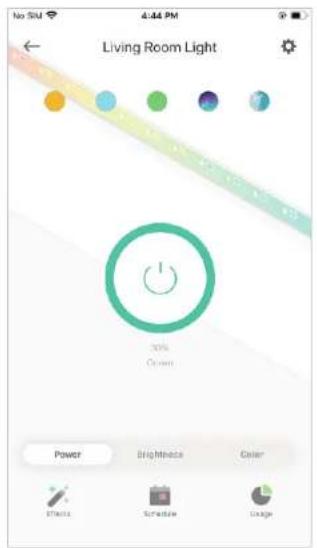
text_image
No SN 4:44 PM Living Room Light 50% Green Power Brightness Color Effects Scratch ImageAdjust Brightness
Dim your Light Strip with a range from 1% to 100%.
text_image
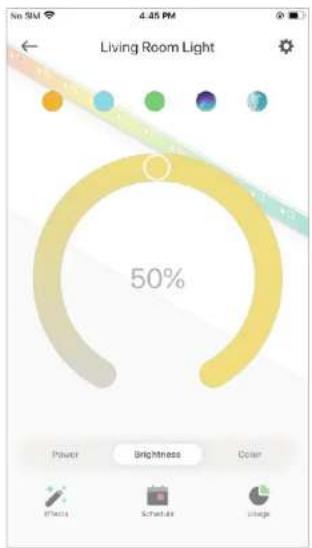
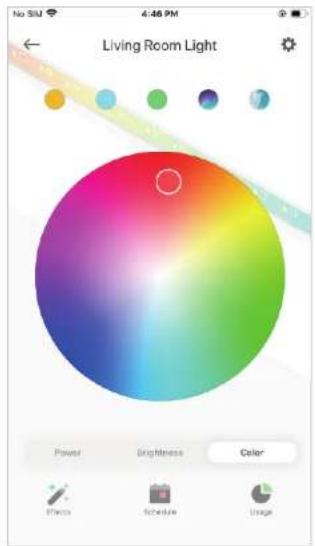
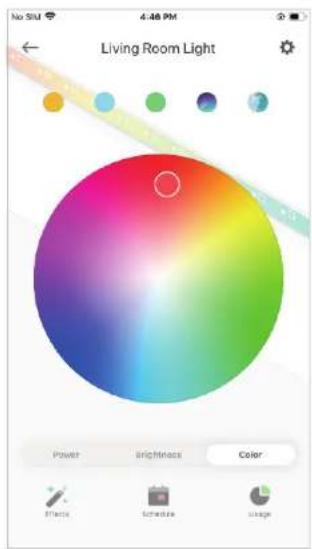
No SIM 4:45 PM Living Room Light 50% Power Brightness Color Effects Schematic ImageAdjust Color
Choose a preferred color for your Light Strip.

text_image
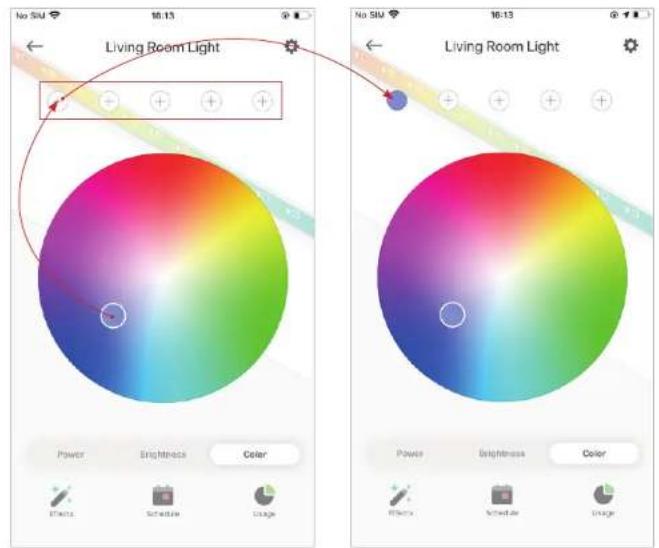
No 5M 4:46 PM Living Room Light Power Brightness Color Preview Schedule ImageAdd One-Tap Presets
To save a shortcut for a color effect, choose a color and brightness you want, then tap + and the current effect will be saved for quick access.
text_image
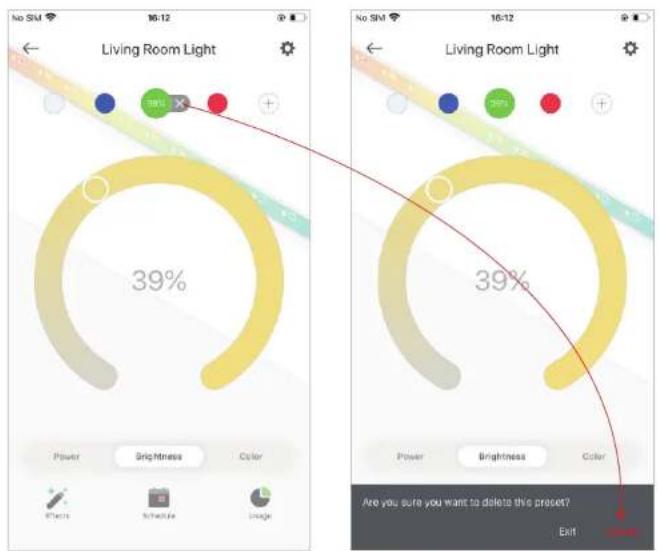
Living Room Light Power Brightness Color Effects Schedule Image Living Room Light No SIM 10:13 10:13 Power Brightness Color Effects Schedule ImageDelete Presets
To delete a preset, just select one and tap ×, and then tap Delete.
text_image
Living Room Light 39% Living Room Light 39% Are you sure you want to delete this preset? ExitAdd Effects
Tap Z and tap any color effect, then your Light Strip will go to the certain light effect instantly. You can also customize the color effect and apply it to your Light Strip in Customized Effects.

text_image
No SIM 4:46 PM Living Room Light Power Brightness Color Effects Schedule Usage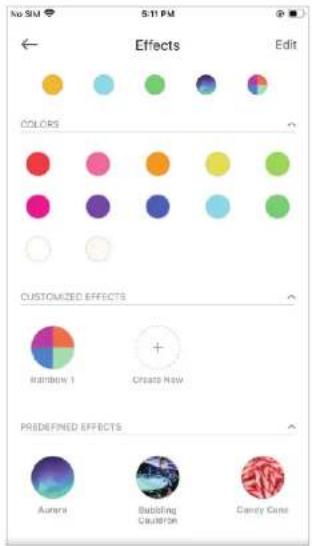
text_image
No SM 5:11 PM Effects Edit COLORS CUSTOMIZED EFFECTS Rainbow 1 Create Now PRADEFINED EFFECTS Aurora Babbling Caution Canny Cure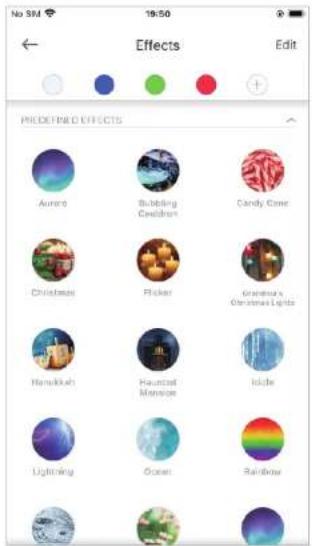
text_image
No SM 19:50 Effects Edit PREDENED EFFECTS Aurora Bulbling Celloths Candy Come Christmas Chicken Christmas, Christmas Lights Hamukkah Haunted Mansiona Islide Lightning Ocean Rainbow- Customized Effects
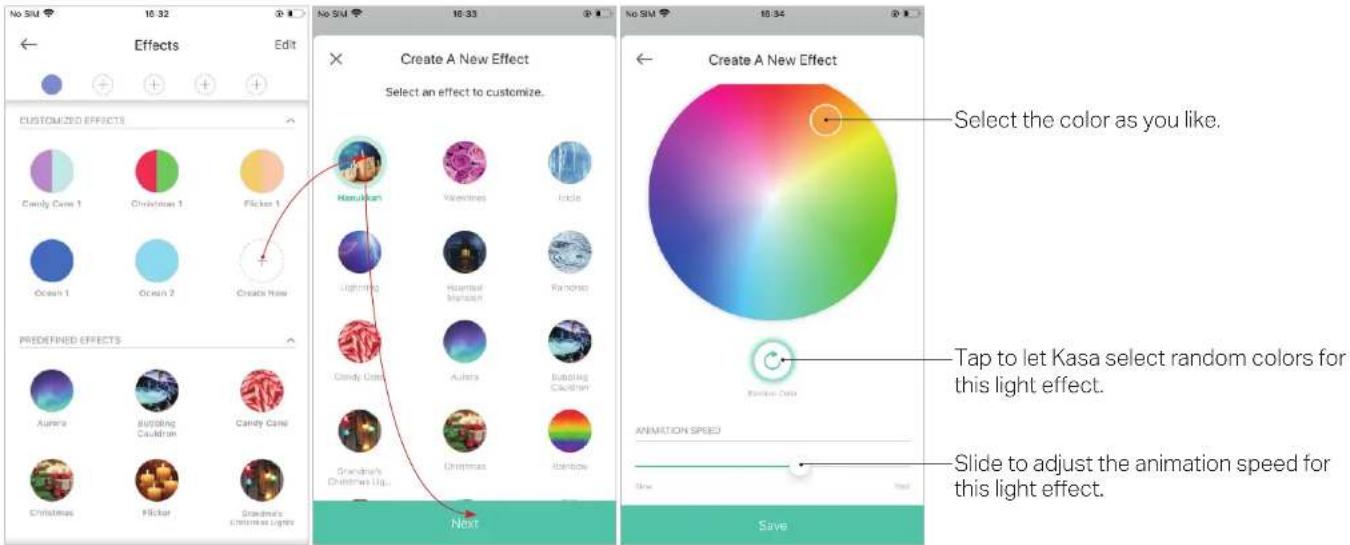
Your Light Strip provides you with multiple default lighting effects. You can select any of them and customize it as you want. Follow the steps below to customize a lighting effect.
- Tap Create New.
- Select an effect to customize, then tap Next.
- Customize the effect name, color effect and the animation speed as you want, then tap Save.
text_image
No SIM 10:32 Effects Edit CUSTOMIZED EFFECTS Candy Cave 1 Christmas 1 Flicker 1 Ocean 1 Ocean 2 Create Now PREFERRED EFFECTS Aurora Budding Caudron Caney Cave Christmas Flicker Grandma's Christmas Lights Next Create A New Effect Select an effect to customize. Kanukan Valestines Icicle Lightning Harmful Mariah Ranchas Candy Cave Aulota Budding Caudron Grandma's Christmas Ugu. Create A New Effect Select the color as you like. Tap to let Kasa select random colors for this light effect. Animation Speed Slide to adjust the animation speed for this light effect. SaveAdd Schedules
Tap to add schedules to simplify your daily routine by creating automatic On/Off actions.
text_image
No 51J 4:46 PM Living Room Light Power Brightness Color Effects Schedule Usage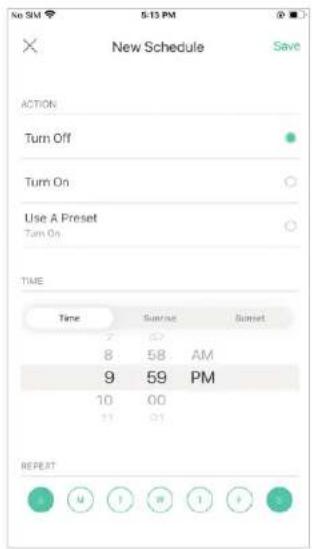
text_image
No SIM 5:13 PM X New Schedule Save ACTION Turn Off Turn On Use A Preset Turn On TIME Time 2 67 8 58 AM 9 59 PM 10 00 11 01 Sursue Sunset REPEATTrack Energy Usage
Tap to view and track energy consumption of your Light Strip.
text_image
No SIM 4:46 PM Living Room Light Power Brightness Color Effects Schedule Usage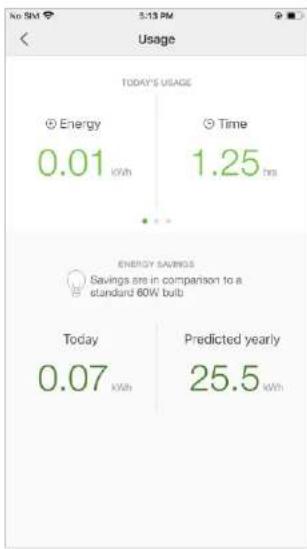
text_image
Usage TODAY'S USAGE Energy 0.01 kWh Time 1.25 hrs ENERGY SAVINGS Savings are in comparison to a standard 60W bulb Today 0.07 kWh Predicted yearly 25.5 kWhConfigure Device Settings
Tap to configure device settings and check device information.

text_image
No SiU 4:46 PM Living Room Light Power Brightness Color Effects Actions Images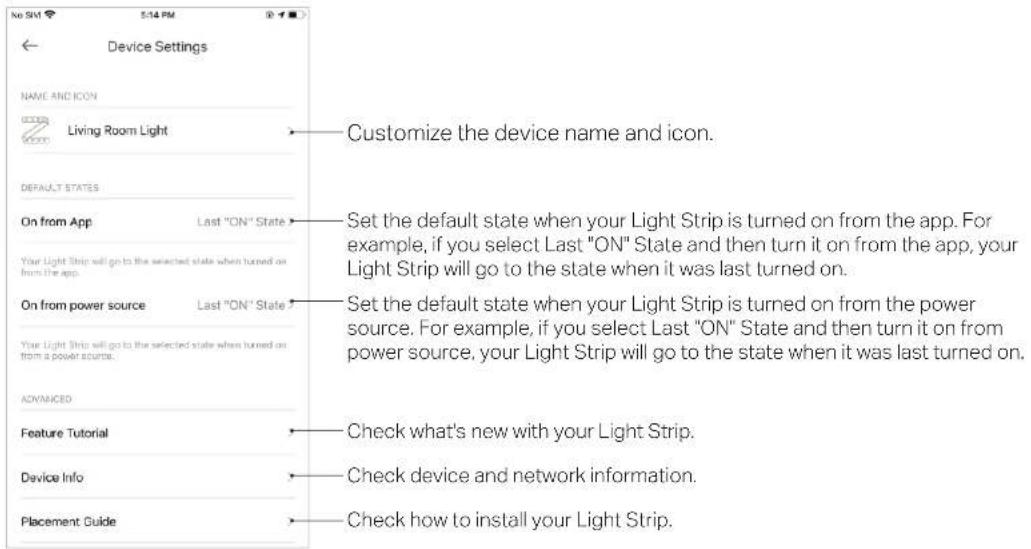
text_image
Device Settings NAME AND ICON Living Room Light DEFAULT STATES On from App Last "ON" State Set the default state when your Light Strip is turned on from the app. For example, if you select Last "ON" State and then turn it on from the app, your Light Strip will go to the state when it was last turned on. Your Light Strip will go to the selected state when turned on from the app. On from power source Last "ON" State Set the default state when your Light Strip is turned on from the power source. For example, if you select Last "ON" State and then turn it on from power source, your Light Strip will go to the state when it was last turned on. Your Light Strip will go to the selected state when turned on from a power source. ADVANCED Feature Tutorial Check what's new with your Light Strip. Device Info Check device and network information. Placement Guide Check how to install your Light Strip.Create Scenes
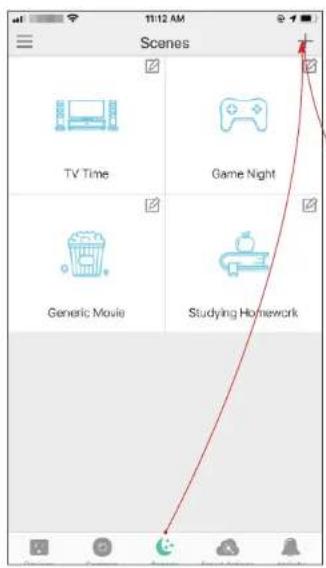
A scene is a preset group of smart devices that can be customized and activated simultaneously at the touch of a button from your smartphone or tablet, allowing you to easily set your mood, activity or fit any special occasion. This page allows you to preset how your smart home devices should act automatically at special occasions.
-
On the Scenes page, tap + .
-
Choose a default one or customize a new scene.
-
Tap the Light Strip and set what would you like it to do when the scene is run.
text_image
11:12 AM Scenes TV Time Game Night Generic Movie Studying Homework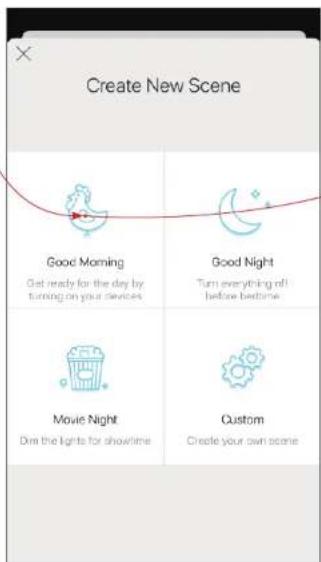
text_image
Create New Scene Good Morning Get ready for the day by Turning on your devices Good Night Turn everything off before bedtime Movie Night Burn the lights for showtime Custom Create your own scene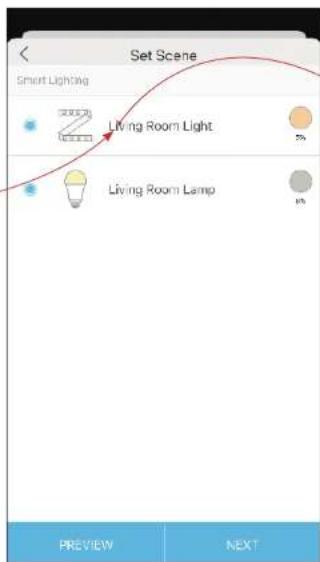
text_image
Set Scene Smart Lighting Living Room Light Living Room Lamp PREVIEW NEXT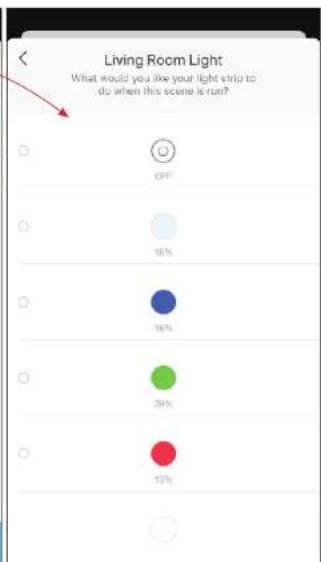
text_image
Living Room Light What would you like your light strip to do when this scene is run?-
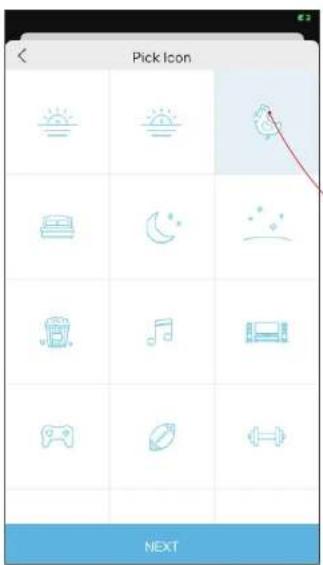
Pick an icon for your Light Strip.
-
Set a name for the scene. 6. After created the new scene, tap the scene to apply it.
text_image
Pick Icon NEXT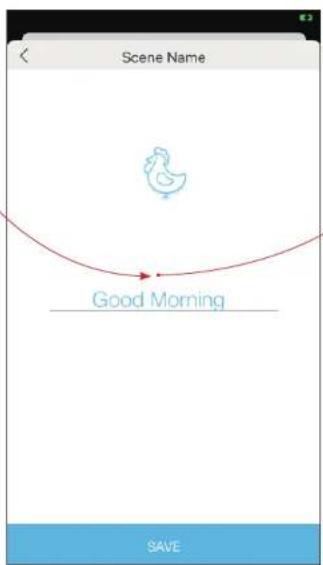
text_image
Scene Name Good Morning SAVE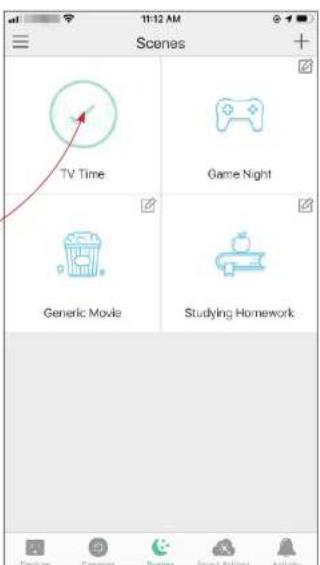
text_image
11/12 AM Scenes TV Time Game Night Generic Movie Studying HomeworkSchedule A Scene
After you created a scene, you can schedule it to be applied automatically at the time specified. For example, if you want to automatically apply your scene "TV Time" at 7:33 PM every weekday, follow the steps below.
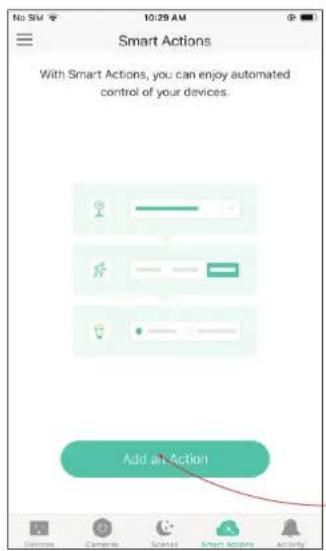
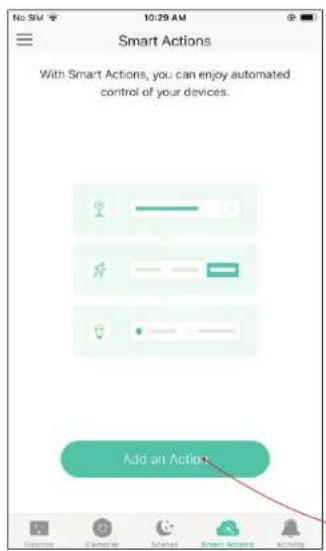
- Go to Smart Actions page and tap Add an Action.
text_image
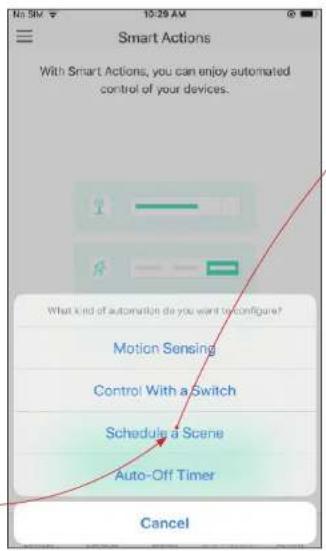
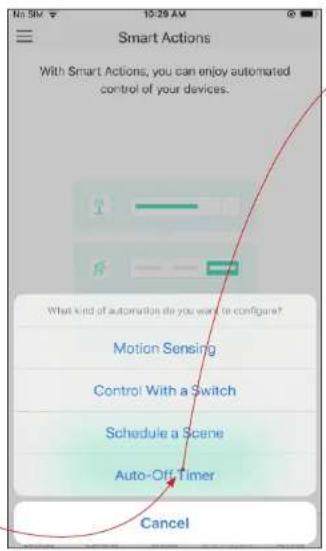
No 5M 10:29 AM Smart Actions With Smart Actions, you can enjoy automated control of your devices. Add all Action- Select Schedule a Scene. 3. Select a scene and set a time schedule for the scene.
text_image
Smart Actions With Smart Actions, you can enjoy automated control of your devices. What kind of automation do you want to configure? Motion Sensing Control With a Switch Schedule a Scene Auto-Off Timer Cancel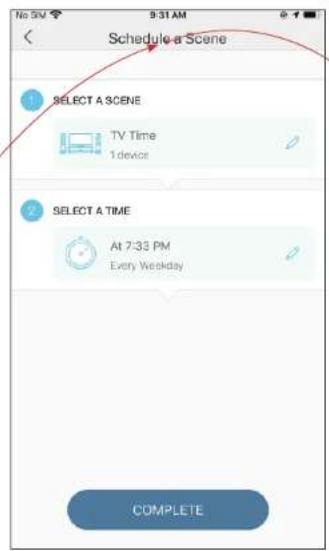
text_image
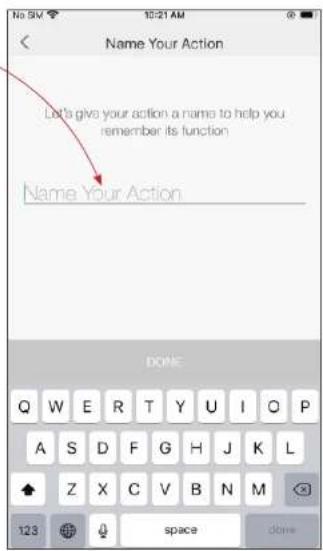
Schedule a Scene SELECT A SCENE TV Time 1 device SELECT A TIME At 7:33 PM Every Weekday COMPLETE- Give this schedule a name to help you remember.

text_image
No SN 9:31 AM < Name Your Action Let's give your action a name to help you remember its function Name Your Action DONE Q W E R T Y U I Q P A S D F G H J K L Z X C V B N M 123 space doneAuto-Off Timer
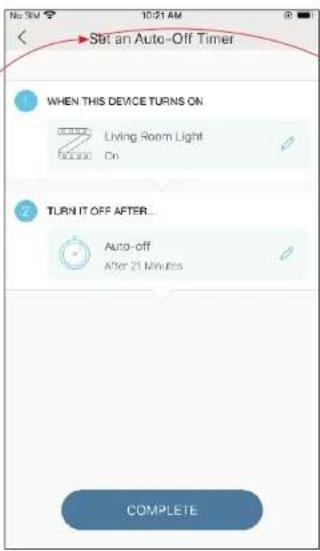
Whenever your smart bulb is turned on, you can turn it off after the designated amount of time by setting an auto-off timer for the device. For example, if you want your Light Strip to turn off automatically after being turned on for 21 minutes, follow the steps below:
- Go to Smart Actions page and tap Add an Action.
text_image
No 5M 10:29 AM Smart Actions With Smart Actions, you can enjoy automated control of your devices. Add an Action- Select Auto-Off Timer.
text_image
Smart Actions With Smart Actions, you can enjoy automated control of your devices. What kind of automation do you want to configure? Motion Sensing Control With a Switch Schedule a Scene Auto-Off Timer Cancel- Select a device and set the auto-off timer for the device.
text_image
No 5M 10:21 AM Start an Auto-Off Timer 1 WHEN THIS DEVICE TURNS ON Living Room Light On 2 TURN IT OFF AFTER... Auto-off After 21 Minutes COMPLETE- Give this timer a name to help you remember.
text_image
Name Your Action Let's give your action a name to help you remember its function Name Your Action DONE Q W E R T Y U I Q P A S D F G H J K L Z X C V B N M 123 space doneReset Your Smart Light Strip
There are two types of reset available: a soft reset which resets the Wi-Fi settings only, and a factory reset that erases all of your custom settings and restore them to factory defaults.
Soft Reset
Press and hold the light switch controller for more than 5 seconds but no more than 10 seconds and release. The Light Strip animating orange and green after that indicates a successful soft reset.
Factory Reset
Method 1:
Press and hold the light switch controller for 10 seconds or more and then release. The Light Strip animating orange and green after that indicates a successful factory reset.
Method 2:
On the Devices page on Kasa Smart app, swipe left the Light Strip and tap Delete.
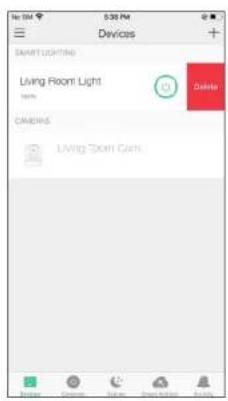
text_image
Smart LIGHTING Living Room Light 90% Delete CAMERA Living Room CamOR
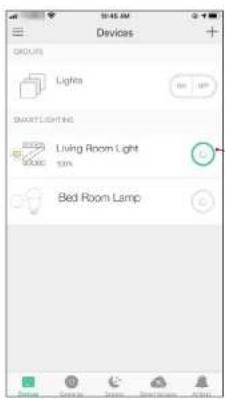
On the Devices page on Kasa Smart app, tap the Light Strip and tap ⚙ > Remove Device.
text_image
Devices GROUPS Lights STARTLIGHTING Living Room Light Bed Room Lamp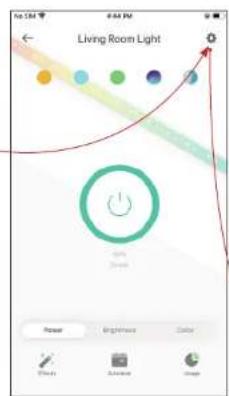
text_image
Living Room Light Power Brightness Color Street Smartphone Image
text_image
Device Settings GENERAL STATES On from App Last "On" State > Prior Light Strip not gets the selected state when turns on from the app. On from power source Last "On" State > Prior Light Strip will get the selected state when turns on from a power source. ADVANCED Feature Tutorial Device Info Placement Guide Remove DeviceWorks with Kasa
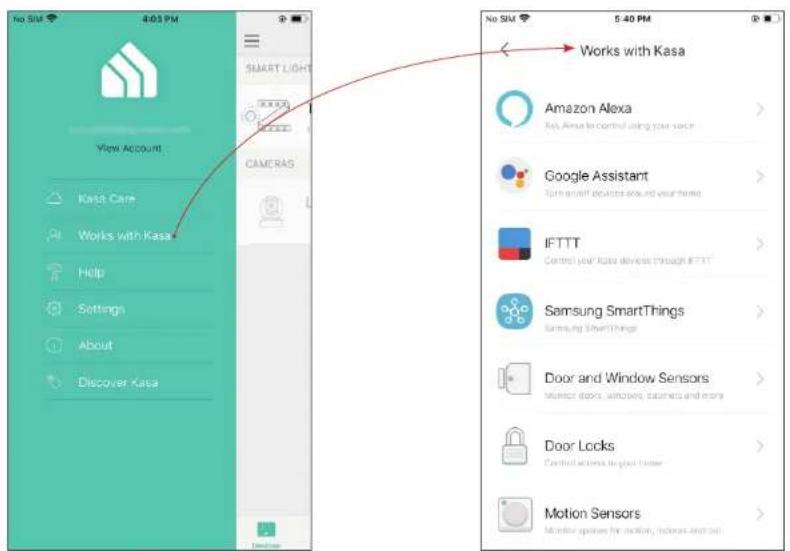
Use the Kasa app to pair your Light Strip with Amazon Alexa, Google Home Assistant, Samsung SmartThings, and other third-party services to enjoy a full hands-free experience. Kasa helps manage the rest of your smart home too, working with Nest to trigger changes when you arrive home or leave for the day.
Launch the Kasa Smart app, swipe right and you can go to Works with Kasa for detailed instructions.
text_image
No SIM 4:03 PM View Account Kasa Care Works with Kasa Help Settings About Discover Kasa CAMERAS No SIM 5:40 PM Works with Kasa Amazon Alexa Rev Alexa to control using your voice Google Assistant Turn smart devices around your handred IFTTT Control your Kasa devices through IFTTT Samsung SmartThings Samsung SmartThings Door and Window Sensors Monitor doors, windows, buttons and more Door Locks Control active to your home Motion Sensors Monitor spokes for motion, locks and outAuthentication
FCC Compliance Information Statement

Product Name: Kasa Smart Light Strip, Multicolor
Model Number: KL400L5 / KL400L10
| Component Name Model FCC ID | ||
| Kasa Smart Light Strip, Multicolor KL400L5 / KL400L10 2AXJ4KL400 | ||
| I.T.E. Power T120100-2B1 / T120150-2B1 N/A |
Responsible party:
TP-Link USA Corporation
Address: 10 Mauchly, Irvine, CA 92618
Website: https://www.tp-link.com/us/
Tel: +1 626 333 0234
This equipment has been tested and found to comply with the limits for a Class B digital device, pursuant to part 15 of the FCC Rules. These limits are designed to provide reasonable protection against harmful interference in a residential installation. This equipment generates, uses and can radiate radio frequency energy and, if not installed and used in accordance with the instructions, may cause harmful interference to radio communications. However, there is no guarantee that interference will not occur in a particular installation. If this equipment does cause harmful interference to radio or television reception, which can be determined by turning the equipment off and on, the user is encouraged to try to correct the interference by one or more of the following measures:
- Reorient or relocate the receiving antenna.
- Increase the separation between the equipment and receiver.
- Connect the equipment into an outlet on a circuit different from that to which the receiver is connected.
- Consult the dealer or an experienced radio/ TV technician for help.
This device complies with part 15 of the FCC Rules. Operation is subject to the following two conditions:
-
This device may not cause harmful interference.
-
This device must accept any interference received, including interference that may cause undesired operation.
Any changes or modifications not expressly approved by the party responsible for compliance could void the user's authority to operate the equipment.
Note: The manufacturer is not responsible for any radio or TV interference caused by unauthorized modifications to this equipment. Such modifications could void the user's authority to operate the equipment.
FCC RF Radiation Exposure Statement
This equipment complies with FCC RF radiation exposure limits set forth for an uncontrolled environment. This device and its antenna must not be co-located or operating in conjunction with any other antenna or transmitter.
"To comply with FCC RF exposure compliance requirements, this grant is applicable to only Mobile Configurations. The antennas used for this transmitter must be installed to provide a separation distance of at least 20 cm from all persons and must not be co-located or operating in conjunction with any other antenna or transmitter."
We, TP-Link USA Corporation, has determined that the equipment shown as above has been shown to comply with the applicable technical standards, FCC part 15. There is no unauthorized change is made in the equipment and the equipment is properly maintained and operated.
Issue Date: 2021.09.02
FCC compliance information statement

Product Name: I.T.E POWER SUPPLY
Model Number: T120100-2B1 / T120150-2B1
Responsible party:
TP-Link USA Corporation
Address: 10 Mauchly, Irvine, CA 92618
Website: http://www.tp-link.com/us/
Tel: +1 626 333 0234
This equipment has been tested and found to comply with the limits for a Class B digital device, pursuant to part 15 of the FCC Rules. These limits are designed to provide reasonable protection against harmful interference in a residential installation. This equipment generates, uses and can radiate radio frequency energy and, if not installed and used in accordance with the instructions, may cause harmful interference to radio communications. However, there is no guarantee that interference will not occur in a particular installation. If this equipment does cause harmful interference to radio or television reception, which can be determined by turning the equipment off and on, the user is encouraged to try to correct the interference by one or more of the following measures:
- Reorient or relocate the receiving antenna.
- Increase the separation between the equipment and receiver.
- Connect the equipment into an outlet on a circuit different from that to which the receiver is connected.
- Consult the dealer or an experienced radio/ TV technician for help.
This device complies with part 15 of the FCC Rules. Operation is subject to the following two conditions:
- This device may not cause harmful interference.
- This device must accept any interference received, including interference that may cause undesired operation.
Any changes or modifications not expressly approved by the party responsible for compliance could void the user's authority to operate the
equipment.
We, TP-Link USA Corporation, has determined that the equipment shown as above has been shown to comply with the applicable technical standards,
FCC part 15. There is no unauthorized change is made in the equipment and the equipment is properly maintained and operated.
Issue Date: 2021.09.02
Canadian Compliance Statement
This device contains licence-exempt transmitter(s)/receiver(s) that comply with Innovation, Science and Economic Development Canada's licence-exempt RSS(s). Operation is subject to the following two conditions:
Radiation Exposure Statement:
This equipment complies with IC radiation exposure limits set forth for an uncontrolled environment. This equipment should be installed and operated with minimum distance 20cm between the radiator & your body.
Industry Canada Statement
CAN ICES-3 (B)/NMB-3(B)
CAN ICES-005(B)/NMB-005(B)
Safety Information
CAUTION: To reduce the risk of fire, electric shock, or injury to persons:
- For indoor use only.
- Do not place in reach of children.
• NOT FOR EMERGENCY LIGHTING.
• Light strips only connect to adjacent units. - Suitable for surface and cabinet mounting.
- Operating Temperature: -20^ 40^ (-4 °F \~104 °F)
- Operating Humidity: 10%\~90%RH, Non-condensing
- Use only insulated staples or plastic ties to secure cords.
- Not intended for recessed installation in ceilings, or soffit.
- Do not use the device where wireless devices are not allowed.
- Keep the device away from water, fire, wet or hot environments.
- Adapter shall be installed near the equipment and shall be easily accessible.
- The maximum distance to the receptacle is determined by the length of adapter cord.
- Only use the control provided with or specified by these instructions to control this device.
- Switch off the power supply to the device and allow sufficient time for it to cool before handling it.
- Suitable for dry and damp locations, keep the device away from water, fire, wet or hot environments.
- Route and secure cords so that they will not be pinched or damaged when the cabinet is pushed to the wall.
- Do not use damaged charger to charge the device. Do not use any other charger than those recommended.
- Avoid placing controller box in areas surrounded by mental or near other devices designed to receive or transmit radio signals.
- Position the portable cabinet light with respect to the cabinet so the lamp replacement markings are able to be read during replacing;
- Please disconnect this strip from AC outlet before cleaning. Do not use liquid or detergent to clean the product. Only use a dry cloth. Drop or fall could cause injury.
- Use only power supplies which are provided by manufacture and in the original packing of this product, if you have any questions, please don't hesitate to contact us.
- The National Electrical Code (NEC) does not permit cords to be concealed where damage to insulation may go unnoticed. To prevent fire danger, do not run cord behind walls, ceilings, soffits, or cabinets where it may be inaccessible for examination. Cords should be visually examined periodically and immediately replaced when any damage is noted.
Please read and follow the above safety information when operating the device. We cannot guarantee that no accidents or damage will occur due to improper use of the device. Please use this product with care and operate at your own risk.
Explanation of the symbols on the product label
| SymbolExplanation | |
| AC voltage | |
 | DC voltage |
| For indoor use only | |
 | RECYCLINGThis product bears the selective sorting symbol for Waste electrical and electronic equipment (WEEE). This means that this product must be handled pursuant to European directive 2012/19/EU in order to be recycled or dismantled to minimize its impact on the environment.User has the choice to give his product to a competent recycling organization or to the retailer when he buys a new electrical or electronic equipment. |
