
Cybershot DSC-WX170 - Camera SONY - Free user manual and instructions
Find the device manual for free Cybershot DSC-WX170 SONY in PDF.


| Product Type | Compact Digital Camera |
| Model | Cybershot DSC-WX170 |
| Brand | Sony |
| Effective Megapixels | 18.2 MP |
| Optical Zoom | 10x (25-250mm equivalent) |
| Digital Zoom | 20x |
| Display | 3.0-inch TFT LCD (921,600 dots) |
| Image Sensor | 1/2.3-inch Exmor R CMOS |
| Video Recording | Full HD 1920x1080 (60i/30p) |
| Dimensions (W x H x D) | 94.2 x 56.2 x 22.5 mm (3.7 x 2.2 x 0.9 in) |
| Weight (with battery and memory card) | Approx. 161 g (5.7 oz) |
| Power Source | Rechargeable battery NP-BN1 (3.6V, 2.3Wh) |
| Battery Life | Approx. 230 shots (CIPA standard) |
| Storage Media | Memory Stick Duo, SD/SDHC/SDXC, microSD (via adapter) |
| Main Functions | Optical SteadyShot stabilization, Intelligent Sweep Panorama, 3D Sweep Multi-Angle, iAuto mode, Face Detection, Smile Shutter |
| Maintenance & Cleaning | Wipe exterior with dry soft cloth; clean lens with blower and lens tissue; store in cool, dry place. |
| Safety | Do not disassemble; avoid water, extreme heat, and magnetic fields; use only specified battery and charger. |
| Spare Parts & Repairability | Battery NP-BN1, charger AC-UB10C, USB cable, wrist strap; contact Sony service for repairs. |
| General Information | Released in 2012; supports Wi-Fi via Eye-Fi (optional); compatible with Sony PlayMemories Home software. |
Frequently Asked Questions - Cybershot DSC-WX170 SONY
User questions about Cybershot DSC-WX170 SONY
0 question about this device. Answer the ones you know or ask your own.
Ask a new question about this device
Download the instructions for your Camera in PDF format for free! Find your manual Cybershot DSC-WX170 - SONY and take your electronic device back in hand. On this page are published all the documents necessary for the use of your device. Cybershot DSC-WX170 by SONY.
USER MANUAL Cybershot DSC-WX170 SONY
©2012 Sony Corporation Printed in China

4433389910
Cyber-shot

AVCHD HOMI
DSC-WX170
Learning more about the camera (“Cyber-shot User Guide”)

“Cyber-shot User Guide” is an on-line manual. Refer to it for in-depth instructions on the many functions of the camera.
①Access the Sony support page.
http://www.sony.net/SonyInfo/Support/
②Select your country or region.
③Search for the model name of your camera within the support page.
- Check the model name on the bottom of your camera.
Checking the supplied items
The number in parentheses indicates the number of pieces.
- Camera (1)
- Rechargeable battery pack NP-BN (1)
(This rechargeable battery pack cannot be used with Cyber-shot that are supplied with the NP-BN1 battery pack.) - Micro USB cable (1)
- A C Adaptor (1)
- Power cord (mains lead) (not supplied in the USA and Canada) (1)
- Paint pen (1)
- Wrist strap (1)
- Instruction Manual (this manual) (1)
WARNING
To reduce fire or shock hazard, do not expose the unit to rain or moisture.
IMPORTANT SAFETY INSTRUCTIONS -SAVE THESE INSTRUCTIONS DANGER
TO REDUCE THE RISK OF FIRE OR ELECTRIC SHOCK, CAREFULLY FOLLOW THESE INSTRUCTIONS
If the shape of the plug does not fit the power outlet, use an attachment plug adaptor of the proper configuration for the power outlet.
GB
CAUTION
Battery pack
If the battery pack is mishandled, the battery pack can burst, cause a fire or even chemical burns. Observe the following cautions.
- Do not disassemble.
- Do not crush and do not expose the battery pack to any shock or force such as hammering, dropping or stepping on it.
- Do not short circuit and do not allow metal objects to come into contact with the battery terminals.
- Do not expose to high temperature above 60°C (140°F) such as in direct sunlight or in a car parked in the sun.
- Do not incinerate or dispose of in fire.
- Do not handle damaged or leaking lithium ion batteries.
- Be sure to charge the battery pack using a genuine Sony battery charger or a device that can charge the battery pack.
- Keep the battery pack out of the reach of small children.
- Keep the battery pack dry.
- Replace only with the same or equivalent type recommended by Sony.
- Dispose of used battery packs promptly as described in the instructions.
IAC Adaptor
Connect the AC Adaptor to the nearest wall outlet (wall socket).
If some trouble occurs while using the AC Adaptor, immediately shut off the power by disconnecting the plug from the wall outlet (wall socket).
The power cord (mains lead), if supplied, is designed specifically for use with this camera only, and should not be used with other electrical equipment.
For Customers in Europe
Notice for the customers in the countries applying EU Directives
The manufacturer of this product is Sony Corporation, 1-7-1 Konan Minato-ku Tokyo, 108-0075 Japan. The Authorized Representative for EMC and product safety is Sony Deutschland GmbH, Hedelfinger Strasse 61, 70327 Stuttgart, Germany. For any service or guarantee matters please refer to the addresses given in separate service or guarantee documents.
This product has been tested and found compliant with the limits set out in the EMC Directive for using connection cables shorter than 3 meters (9.8 feet).
Attention
The electromagnetic fields at the specific frequencies may influence the picture and sound of this unit.
Notice
If static electricity or electromagnetism causes data transfer to discontinue midway (fail), restart the application or disconnect and connect the communication cable (USB, etc.) again.
Disposal of Old Electrical & Electronic Equipment (Applicable in the European Union and other European countries with separate collection systems)

This symbol on the product or on its packaging indicates that this product shall not be treated as household waste. Instead it shall be handed over to the applicable collection point for the recycling of electrical and electronic equipment. By ensuring this product is disposed of correctly, you will help prevent potential negative consequences for the environment and human health, which could otherwise be caused by inappropriate waste handling of this product. The recycling of materials will help to conserve natural resources. For more detailed information about recycling of this product, please contact your local Civic Office, your household waste disposal service or the shop where you purchased the product.
Disposal of waste batteries (applicable in the European Union and other European countries with separate collection systems)

This symbol on the battery or on the packaging indicates that the battery provided with this product shall not be treated as household waste. On certain batteries this symbol might be used in combination with a chemical symbol. The chemical symbols for mercury (Hg) or lead (Pb) are added if the battery contains more than 0.0005% mercury or 0.004% lead. By ensuring these batteries are disposed of correctly, you will help prevent potentially negative consequences for the environment and human health which could otherwise be caused by inappropriate waste handling of the battery. The recycling of the materials will help to conserve natural resources.
In case of products that for safety, performance or data integrity reasons require a permanent connection with an incorporated battery, this battery should be replaced by qualified service staff only. To ensure that the battery will be treated properly, hand over the product at end-of-life to the applicable collection point for the recycling of electrical and electronic equipment.
For all other batteries, please view the section on how to remove the battery from the product safely.
Hand the battery over to the applicable collection point for the recycling of waste batteries. For more detailed information about recycling of this product or battery, please contact your local Civic Office, your household waste disposal service or the shop where you purchased the product.
Notice for customers in the United Kingdom
A moulded plug complying with BS 1363 is fitted to this equipment for your safety and convenience.
Should the fuse in the plug supplied need to be replaced, a fuse of the same rating as the supplied one and approved by ASTA or BSI to BS 1362, (i.e., marked with an or mark) must be used.
If the plug supplied with this equipment has a detachable fuse cover, be sure to attach the fuse cover after you change the fuse. Never use the plug without the fuse cover. If you should lose the fuse cover, please contact your nearest Sony service station.
Identifying parts

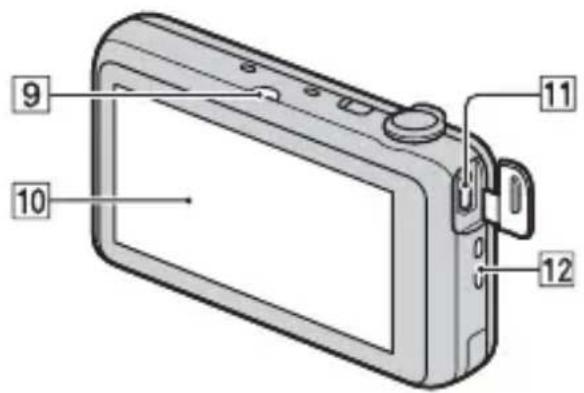

1 ON/OFF (Power) button
2 Shutter button
3 W/T (zoom) lever
4Flash
5 Power/Charge lamp
6 Microphone
7 Self-timer lamp/Smile Shutter lamp/AF illuminator
8 Lens
9 (Playback) button
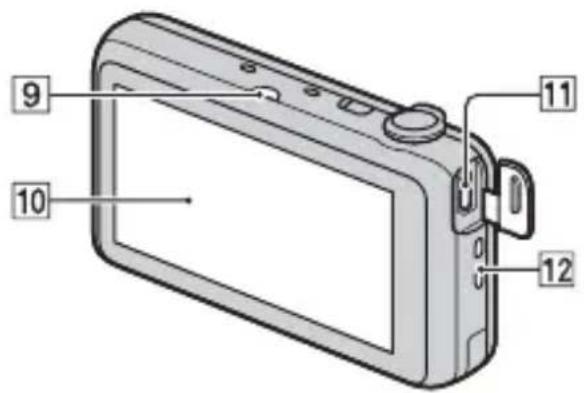
10LCD screen/Touch panel
11HDMI mini jack
12 Hook for wrist strap
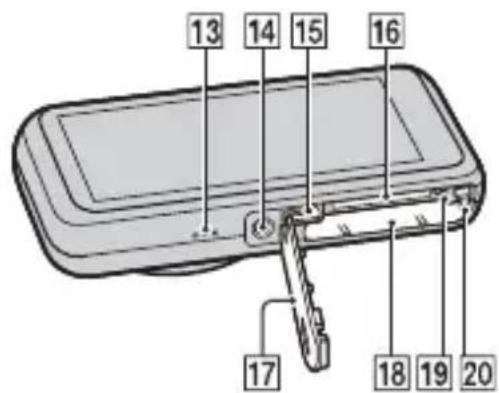
13Speaker
14Tripod socket hole
- Use a tripod with a screw less than 5.5 mm (7/32 inches) long. Otherwise, you cannot firmly secure the camera, and damage to the camera may occur.
15 Micro USB connector
16 Memory card slot
17Battery/Memory card cover
18Battery insertion slot
19 Access lamp
20Battery eject lever
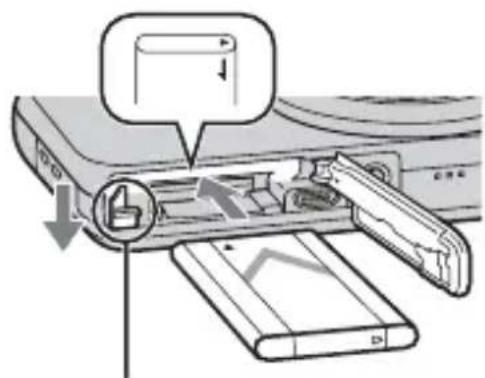
Inserting the battery pack


Battery eject lever
GB
1 Open the cover.
2 Insert the battery pack.
- While pressing down the battery eject lever, insert the battery pack as illustrated. Make sure that the battery eject lever locks after insertion.
- Closing the cover with the battery inserted incorrectly may damage the camera.
Charging the battery pack
For customers in the USA and Canada
![graph TD A["Canada Power cord (Mains lead)"] --> B["Charging Device"] A --> C["Charging Device with cable"] D["Power/Charge lamp"] --> E["Charging lit: Charging"] D --> F["Charging off: Charging finished"]](/content/2026/06/1148387/images/abef38dfae348c958448e175afbe6e26e82c450980eea9ac6edbdf5af9856b4f.jpg)
For customers in countries/regions other than the USA and Canada

Power/Charge lamp
Lit: Charging
Off: Charging finished
Flashing:
Charging error or charging paused temporarily because the camera is not within the proper temperature range
1 Connect the camera to the AC Adaptor (supplied), using the micro USB cable (supplied).
2 Connect the AC Adaptor to the wall outlet (wall socket).
The Power/Charge lamp lights orange, and charging starts.
- Turn off the camera while charging the battery.
- You can charge the battery pack even when it is partially charged.
- When the Power/Charge lamp flashes and charging is not finished, remove and re-insert the battery pack.
Notes
- If the Power/Charge lamp on the camera flashes when the AC Adaptor is connected to the wall outlet (wall socket), this indicates that charging is temporarily stopped because the temperature is outside the recommended range. When the temperature gets back within the appropriate range, the charging resumes. We recommend charging the battery pack in an ambient temperature of between 10°C to 30°C ( 50°F to 86°F ).
- The battery pack may not be effectively charged if the terminal section of the battery is dirty. In this case, wipe any dust off lightly using a soft cloth or a cotton swab to clean the terminal section of the battery.
- Connect the AC Adaptor (supplied) to the nearest wall outlet (wall socket). If malfunctions occur while using the AC Adaptor, disconnect the plug from the wall outlet (wall socket) immediately to disconnect from the power source.
- When charging is finished, disconnect the AC Adaptor from the wall outlet (wall socket).
- Be sure to use only genuine Sony brand battery packs, micro USB cable (supplied) and AC Adaptor (supplied).
- BC-TRN2 battery charger (sold separately) is able to quick-charge the NP-BN rechargeable battery pack supplied with this model. BC-TRN battery charger (sold separately) is not able to quick-charge the NP-BN rechargeable battery pack supplied with this model.
Charging time (Full charge)
The charging time is approximately 115 min. using the AC Adaptor (supplied).
Notes
- The above charging time applies when charging a fully depleted battery pack at a temperature of 25°C (77°F). Charging may take longer depending on conditions of use and circumstances.
Charging by connecting to a computer
The battery pack can be charged by connecting the camera to a computer using a micro USB cable.

Notes
- Note the following points when charging via a computer:
- If the camera is connected to a laptop computer that is not connected to a power source, the laptop battery level decreases. Do not charge for an extended period of time.
- Do not turn on/off or restart the computer, or wake the computer to resume from sleep mode when a USB connection has been established between the computer and the camera. The camera may cause a malfunction. Before turning on/off, or restarting the computer or waking the computer from sleep mode, disconnect the camera and the computer.
- No guarantees are made for charging using a custom-built computer or a modified computer.
Battery life and number of images that can be recorded and played back
| Battery life Number of images | |
| Shooting (still images) Approx. 120 min. Approx. 240 images | |
| Viewing (still images) Approx. 180 min. Approx. 3600 images | |
| Shooting (movies) Approx. 60 min. — | |
Notes
GB
- The above number of images applies when the battery pack is fully charged. The number of images may decrease depending on the conditions of use.
-
The number of images that can be recorded is for shooting under the following conditions:
-
Using Sony “Memory Stick PRO Duo” (Mark2) media (sold separately)
- The battery pack is used at an ambient temperature of 25°C (77°F).
- [Disp. Resolution] is set to [Standard].
- The number for “Shooting (still images)” is based on the CIPA standard, and is for shooting under the following conditions:
(CIPA: Camera & Imaging Products Association)
- [Panel Brightness] is set to [3(Normal)].
- Shooting once every 30 seconds.
- The zoom is switched alternately between the W and T ends.
- The flash strobes once every two times.
- The power turns on and off once every ten times.
- The battery life for movies applies shooting under the following conditions:
– Movie quality: AVC HD HQ
- When continuous shooting ends because of set limits (29 minutes), touch

(Movie button) again to continue shooting. Shooting functions such as m will not operate.
Supplying power
The camera can be supplied with power from the wall outlet (wall socket) by connecting to the AC Adaptor (supplied), using the micro USB cable (supplied).
You can import images to a computer without worrying about draining the battery pack by connecting the camera to a computer using the micro USB cable.
In addition, you can use the AC Adaptor AC-UD10 (sold separately) or AC-UD11 (sold separately) to supply power when shooting.
Notes
- Power cannot be supplied when the battery pack is not inserted in the camera.
- When the camera is connected directly to a computer or to a power outlet using the supplied AC Adaptor, power supply is available only in playback mode. If the camera is in shooting mode or while you are changing the settings of the camera, power is not supplied even if you make a USB connection using the micro USB cable.
- If you connect the camera and a computer using the micro USB cable while the camera is in playback mode, the display on the camera will change from the playback screen to the USB connection screen. Press (Playback) button to switch to the playback screen.
- The AC Adaptor AC-UD11 (sold separately) may not be available in some countries/regions.
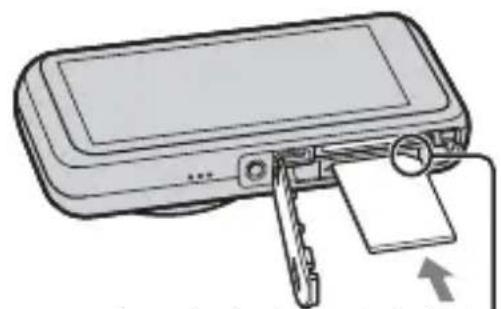
Inserting a memory card (sold separately)
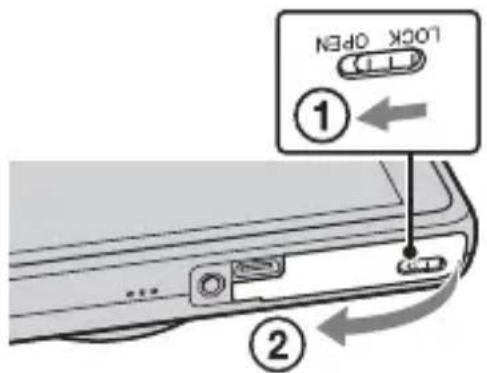

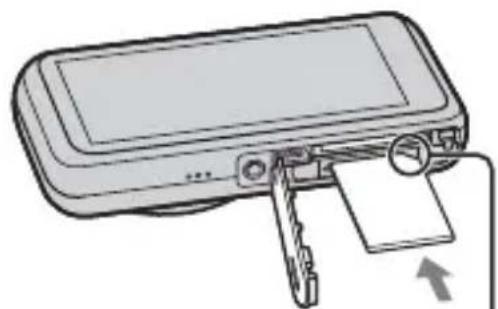
Ensure the notched corner faces correctly.
1 Open the cover.
2 Insert the memory card (sold separately).
- With the notched corner facing as illustrated, insert the memory card until it clicks into place.
3 Close the cover.
■ Memory cards that can be used
| Memory card For still images For movies | |||
| A | Memory Stick PRO Duo (Mark2 only) | √ | √ |
| Memory Stick PRO-HG Duo | √ | √ | |
| Memory Stick Duo — | √ | ||
| B | Memory Stick Micro (M2) (Mark2 only) | √ | √ |
| C | SD memory card (Class 4 or faster) | √ | √ |
| SDHC memory card (Class 4 or faster) | √ | √ | |
| SDXC memory card (Class 4 or faster) | √ | √ | |
| D | microSD memory card (Class 4 or faster) | √ | |
| microSDHC memory card (Class 4 or faster) | √ | ||
- In this manual, the products in the table are collectively referred to as follows:
A: "Memory Stick Duo" media
B: "Memory Stick Micro" media
C: SD card
D: microSD memory card
Notes
- When using “Memory Stick Micro” media or microSD memory cards with this camera, make sure to use with the appropriate adaptor.
To remove the memory card/battery pack
Memory card: Push the memory card in once to eject the memory card.
Battery pack: Slide the battery eject lever. Be sure not to drop the battery pack.
Notes
- Never remove the memory card/battery pack when the access lamp (page 6) is lit. This may cause damage to data in the memory card/internal memory.
Setting the clock
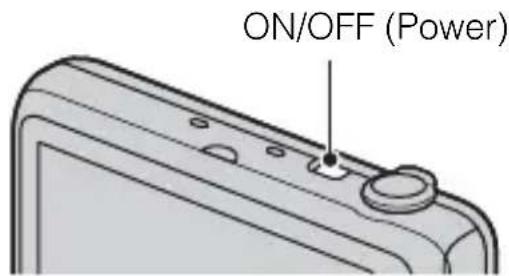
1 Press the ON/OFF (Power) button.
Date & Time setting is displayed when you turn on the camera for the first time.
- It may take time for the power to turn on and allow operation.
2 Select a desired language.
3 Select a desired geographic location by following the on-screen instructions, then touch [Next].
4 Set [Daylight Savings] or [Summer Time], [Date & Time Format] and [Date & Time], then touch [Next].
• Midnight is indicated as 12:00 AM, and noon as 12:00 PM.
5 Touch [OK].
6 Follow the instructions on the screen.
- If you set [Disp. Resolution] to [High], the battery charge may be depleted faster.
Shooting still images/movies

GB
Shooting still images
1 Press the shutter button halfway down to focus.
When the image is in focus, a beep sounds and the ● indicator lights.
2 Press the shutter button fully down to shoot an image.
Shooting movies
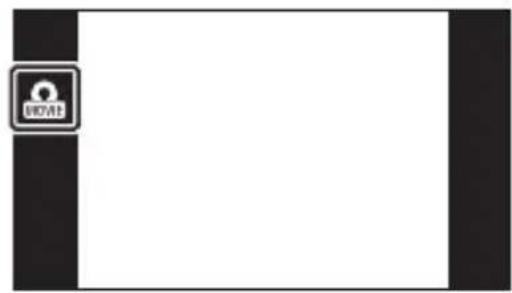
1 Touch 📄 (Movie button) to start recording.
- Use the W/T (zoom) lever to change the zoom scale.
- Press the shutter button to shoot still images while continuing to record the movie.
2 Touch 📂 (Movie button) to stop recording.
Notes
- When using the zoom function while shooting a movie, the sound of the lens and lever operating will be recorded.
- Continuous shooting is possible for approximately 29 minutes at one time at the camera's default settings and when the temperature is approximately 25°C (77°F). When movie recording is finished, you can restart recording by touching

(Movie button) again. Recording may stop to protect the camera depending on the ambient temperature.
Viewing images

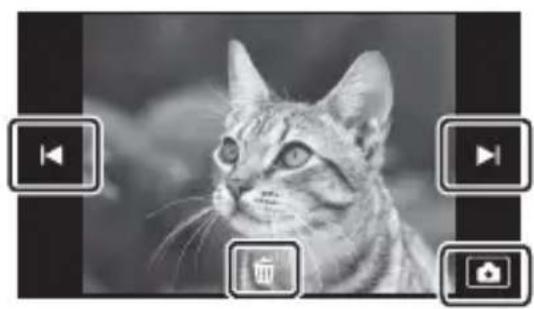
1 Press the ▶(Playback) button.
- When images on a memory card recorded with other cameras are played back on this camera, the registration screen for the data file appears.
■ Selecting next/previous image
Touch ▶(Next)/ (Previous) on the screen.
• To play back movies, touch (Playback) in the center of the screen.
• To zoom in, move the W/T (zoom) lever to the T side.
■ Deleting an image
Touch ☐ (Delete) → [This Image].
■ Returning to shooting images
Touch on the screen.
- You can also return to shooting mode by pressing the shutter button halfway down.
In-Camera Guide
This camera is equipped with built-in instruction guide. This allows you to search the camera's functions according to your needs.

![MENU EASY 4:3 18M OFF EV 0 iSCN 😊 [●] AUTO HQ: 16:3 13M](/content/2026/06/1148387/images/f38ad103da1875c5692866a215a7d5c685ddc5e543df24355a25a9386d75c70a.jpg)
GB
1 Touch MENU.
2 Touch ?(In-Camera Guide), then select the desired MENU item.
The operation guide for the selected item is displayed.
- If you touch ? (In-Camera Guide) when the MENU screen is not displayed, you can search the guide using keywords or icons.
Introduction of other functions
Other functions used when shooting or playing back can be operated touching the MENU on the screen. This camera is equipped with a Function Guide that allows you to easily select from the functions. While displaying the guide, you can use various functions.
![MENU MOVE MODE OFF ? MENU EASY 4:3 18M Off EV 0 iSCN + [●] 2.5(0) HQ 16:9 13M MENU](/content/2026/06/1148387/images/ced5e67b5ea97794b95d416f83b72e628be1ab9cf16dfc6a1d049c2806f61c7f.jpg)
Menu Items
Shooting
| Movie shooting scene | Select movie recording mode. |
| Easy Mode Shoot still | images using minimal functions. |
| Movie button | Shoot movies quickly from a shooting mode other than [Movie Mode]. |
| Flash Sets the flash settings. | |
| Self-Timer Sets the self-timer settings. | |
| Defocus Effect | Set the level of background defocus effect when shooting in Background Defocus mode. |
| Still Image Size(Dual Rec) | Sets the still image size shot when recording a movie. |
| Still Image Size/ Panorama Image Size/Movie Size/ Movie Quality | Select the image size and the quality for still images, panoramic images or movie files. |
| Cont. Shooting Settings | Sets the burst shooting settings. |
| HDR Painting effect | When [HDR Painting] is selected in Picture Effect, sets the effect level. |
| Area of emphasis | When [Miniature] is selected in Picture Effect, sets the part to focus on. |
| Color hue | When [Toy camera] is selected in Picture Effect, sets the color hue. |
| Extracted Color | When [Partial Color] is selected in Picture Effect, selects the color to extract. |
| Watercolor Effect | When [Watercolor] is selected in Picture Effect, sets the effect level. |
| Illustration Effect | When [Illustration] is selected in Picture Effect, sets the effect level. |
| EV Adjust the exposure manually. | |
| ISO Adjust the luminous sensitivity. | |
| White Balance Adjust color tones of an image. | |
| Focus Select the focus | method. |
| Metering Mode | Select the metering mode that sets which part of the subject to measure to determine the exposure. |
| Scene Recognition Set | to automatically detect shooting conditions. |
| Soft Skin Effect Set | the Soft Skin Effect and the effect level. |
| Smile Shutter | Set to automatically release the shutter when a smile is detected. |
| Smile Detection Sensitivity | Set the Smile Shutter function sensitivity for detecting smiles. |
| Face Detection | Select to detect faces and adjust various settings automatically. |
| Anti Blink | Set to automatically shoot two images and select image in which the eyes are not blinking. |
| Movie SteadyShot | Sets the strength of SteadyShot in movie mode. If you change this setting, the angle of view will change. |
| In-Camera Guide Search | Search the camera's functions according to your needs. |
GB
Viewing
| Easy Mode Increase the text size on the screen for ease of use. | |
| Date Select Selects the desired image to view by date. | |
| Calendar | Selects the date to be played back on Calendar. |
| Image Index Displays multiple images at the same time. | |
| Slideshow Select a method of continuous playback. | |
| Delete Delete an image. | |
| Retouch Retouch an image using various effects. | |
| Picture Effect Add various textures to images. | |
| Paint Paints on a still image and saves it as a new file. | |
| 3D Viewing Set to play back images shot in 3D mode on a 3D TV. | |
| View Mode | Select the display format for images. |
| Display Cont. Shooting Group | Select to display burst images in groups or display all images during playback. |
| Protect Protect the images. | |
| Print (DPOF) Add a print order mark to a still image. | |
| Rotate Rotate a still image to the left or right. | |
| Volume Adjusts the volume. | |
| Exposure data | Sets whether or not to display the shooting data (Exif data) of the currently displayed file on the screen. |
| Number of images in index | Sets the number of images displayed in the index screen. |
| In-Camera Guide Search the camera's functions according to your needs. | |

Setting items
If you touch the MENU while shooting or during playback, (settings) is provided as a final selection. You can change the default settings on the

(Settings) screen.
 Shooting Settings Shooting Settings | Movie format/AF Illuminator/Grid Line/Clear Image Zoom/Digital Zoom/Wind Noise Reduct./Scene Recog. Guide/Red Eye Reduction/Blink Alert/Write Date/Disp. Resolution |
 Main Settings Main Settings | Beep/Histogram Setting/Panel Brightness/Language Setting/Display color/Demo Mode/Initialize/CTRL FOR HDMI/Power Save/Calibration/USB Connect Setting/ USB Power Supply/LUN Setting/Download Music/ Empty Music/Eye-Fi*1/Version |
 Memory Card Tool*2 Memory Card Tool*2 | Format/Create REC.Folder/Change REC.Folder/Delete REC.Folder/Copy/File Number |
 Clock Settings Clock Settings | Area Setting/Date & Time Setting |
*1 [Eye-Fi] is displayed only when a compatible memory card is inserted to the camera.
*2 If a memory card is not inserted, (Internal Memory Tool) will be displayed and only [Format] can be selected.
Install PC application (Windows)
The built-in software “PlayMemories Home” allows you to import still images and movies to your computer and use them.
You can shoot or play back images on this camera even if you do not install “PlayMemories Home”, however, “PlayMemories Home” is required to import AVCHD movies to your computer.
1 Connect the camera to a computer.
2 Windows 7: [Computer] → camera icon → media icon → Double-click [PMHOME.EXE]
Windows XP/Vista: [Computer] (in Windows XP, [My Computer]) → [PMHOME] → Double-click [PMHOME.EXE]
3 Follow the instructions on the screen to complete the installation.
Notes
- “PlayMemories Home” is not compatible to Mac OS. If you play back images on a Mac, use the applications that are installed on your Mac.
For details, visit the following URL.
Features of "PlayMemories Home"
Below are examples of the functions available when you use “PlayMemories Home”. To take advantage of the various “PlayMemories Home” functions, connect to the Internet and install the “Expanded Feature”.
- You can import images shot with the camera to a computer and display them.
- You can display images stored on a computer by shooting date in a calendar display.
- You can correct (Red Eye Correction, etc.) still images, print the images, send images by e-mail, and change the shooting date and time.
- You can save and print images with the date.
- You can create a disc from AVCHD movies imported to a computer. (Expanded Feature)
Number of still images and recordable time of movies
The number of still images and recordable time may vary depending on the shooting conditions and the memory card.
Still images
(Units: Images)
| Size\Capacity | Internal memory Memory card | |
| Approx. 19 MB 2 GB | ||
| 18M 3 295 | ||
| VGA 65 6400 | ||
| 16:9(13M) 3 330 | ||
Movies
The table below shows the approximate maximum recording times. These are the total times for all movie files. Continuous shooting is possible for approximately 29 minutes. The maximum size of an MP4-format movie file is up to approximately 2 GB.
(h (hour), m (minute))
| Size\Capacity | Internal memory Memory card | |
| Approx. 19 MB 2 GB | ||
| AVC HD 24M (FX) — 10 m | (10 m) | |
| AVC HD 9M (HQ) — 20 m | (15 m) | |
| MP4 12M — 15 m | ||
| MP4 3M — | 1 h 5 m | |
The number in ( ) is the minimum recordable time.
- The recordable time of movies varies because the camera is equipped with VBR (Variable Bit Rate), which automatically adjusts image quality depending on the shooting scene. When you record a fast-moving subject, the image is clearer but the recordable time is shorter because more memory is required for recording. The recordable time also varies depending on the shooting conditions, the subject or the image quality/size settings.
Notes on using the camera
Functions built into this camera
- This manual describes each of the functions of 1080 60i-compatible devices and 1080 50i-compatible devices.
To check whether your camera is a 1080 60i-compatible device or a 1080 50i-compatible device, check for the following marks on the bottom of the camera.
1080 60i-compatible device: 60i
1080 50i-compatible device: 50i
- Do not watch 3D images shot with this camera for extended periods of time on 3D-compatible monitors.
- When you view 3D images shot with this camera on a 3D-compatible monitor, you may experience discomfort in the form of eye strain, fatigue, or nausea. To prevent these symptoms, we recommend that you take regular breaks. However, you need to determine for yourself the length and frequency of breaks you require, as they vary according to the individual. If you experience any type of discomfort, stop viewing the 3D images until you feel better, and consult a physician as necessary. Also refer to the operating instructions supplied with the device or software you have connected or are using with this camera. Note that a child's eyesight is still at the development stage (particularly children below the age of 6). Consult a pediatrician or ophthalmologist before letting your child view 3D images, and make sure he/she observes the above precautions when viewing such images.
On use and care
Avoid rough handling, disassembling, modifying, physical shock, or impact such as hammering, dropping, or stepping on the product. Be particularly careful of the lens.
Notes on recording/playback
- Before you start recording, make a trial recording to make sure that the camera is working correctly.
- The camera is neither dust-proof, nor splash-proof, nor water-proof.
- Avoid exposing the camera to water. If water enters inside the camera, a malfunction may occur. In some cases, the camera cannot be repaired.
- Do not aim the camera at the sun or other bright light. It may cause the malfunction of the camera.
- If moisture condensation occurs, remove it before using the camera.
- Do not shake or strike the camera. It may cause a malfunction and you may not be able to record images. Furthermore, the recording media may become unusable or image data may be damaged.
Do not use/store the camera in the following places
• In an extremely hot, cold or humid place
In places such as in a car parked in the sun, the camera body may become deformed and this may cause a malfunction.
- Storing under direct sunlight or near a heater
The camera body may become discolored or deformed, and this may cause a malfunction.
- In a location subject to rocking vibration
- Near a location that generates strong radio waves, emits radiation or is strongly magnetic place. Otherwise, the camera may not properly record or play back images.
• In sandy or dusty places
Be careful not to let sand or dust get into the camera. This may cause the camera to malfunction, and in some cases this malfunction cannot be repaired.
On carrying
Do not sit down in a chair or other place with the camera in the back pocket of your trousers or skirt, as this may cause malfunction or damage the camera.
Note on the screen
The screen is manufactured using extremely high-precision technology so over 99.99% of the pixels are operational for effective use. However, some tiny black and/or bright dots (white, red, blue or green) may appear on the screen. These dots are a normal result of the manufacturing process, and do not affect the recording.
On camera's temperature
Your camera and battery may get hot due to continuous use, but it is not a malfunction.
On the overheat protection
Depending on the camera and battery temperature, you may be unable to record movies or the power may turn off automatically to protect the camera.
A message will be displayed on the screen before the power turns off or you can no longer record movies. In this case, leave the power off and wait until the camera and battery temperature goes down. If you turn on the power without letting the camera and battery cool enough, the power may turn off again or you may be unable to record movies.
On charging the battery
If you charge a battery that has not been used for a long time, you may be unable to charge it to the proper capacity.
This is due to the battery characteristics, and is not a malfunction. Charge the battery again.
Warning on copyright
Television programs, films, videotapes, and other materials may be copyrighted. Unauthorized recording of such materials may be contrary to the provisions of the copyright laws.
No compensation for damaged content or recording failure
Sony cannot compensate for failure to record or loss or damage of recorded content due to a malfunction of the camera or recording media, etc.
Cleaning the camera surface
Clean the camera surface with a soft cloth slightly moistened with water, then wipe the surface with a dry cloth. To prevent damage to the finish or casing:
- Do not expose the camera to chemical products such as thinner, benzine, alcohol, disposable cloths, insect repellent, sunscreen or insecticide.
GB
Specifications
Camera
[System]
Image device: 7.76 mm (1/2.3 type) Exmor R CMOS sensor
Total pixel number of camera: Approx. 18.9 Megapixels
Effective pixel number of camera: Approx. 18.2 Megapixels
Lens: Sony G 10× zoom lens f = 4.45 mm - 44.5 mm (25 mm - 250 mm (35 mm film equivalent)) F3.3 (W) - F5.9 (T)
While shooting movies (16:9):
27.5 mm - 275 mm*
While shooting movies (4:3): 33.5 mm – 335 mm*
* When [Movie SteadyShot] is set to [Standard]
SteadyShot: Optical
Exposure control: Automatic exposure, Scene Selection (14 modes)
White balance: Automatic, Daylight, Cloudy, Fluorescent 1/2/3, Incandescent, Flash, One Push
Signal format:
For 1080 50i: PAL color, CCIR standards HDTV 1080/50i
specification
For 1080 60i: NTSC color, EIA
standards HDTV 1080/60i
specification
File format:
Still images: JPEG (DCF, Exif, MPF Baseline) compliant, DPOF compatible
3D still images: MPO (MPF
Extended (Disparity Image)) compliant
Movies (AVCHD format):
AVCHD format Ver. 2.0 compatible
Video: MPEG-4 AVC/H.264
Audio: Dolby Digital 2ch, equipped with Dolby Digital Stereo Creator
• Manufactured under license from Dolby Laboratories.
Movies (MP4 format):
Video: MPEG-4 AVC/H.264
Audio: MPEG-4 AAC-LC 2ch
Recording media: Internal Memory (Approx. 19 MB), “Memory Stick Duo” media, “Memory Stick Micro” media, SD cards, microSD memory cards
Flash: Flash range (ISO sensitivity (Recommended Exposure Index) set to Auto):
Approx. 0.2 m to 3.7 m (7 7/8 inches to 12 ft. 1 3/4 inches) (W)
Approx. 1.5 m to 2.2 m
(4 ft. 11 1/8 inches to 7 ft. 2 5/8 inches) (T)
[Input and Output connectors]
Micro USB connector: USB communication
USB communication: Hi-Speed USB (USB 2.0)
[Screen]
LCD screen:
Wide (16:9), 7.5 cm (3.0 type) TFT drive
Total number of dots: 921 600 dots
[Power, general]
Power: Rechargeable battery pack NP-BN, 3.6 V AC Adaptor, 5 V
Power consumption (during shooting): 1.0 W
Operating temperature: 0 °C to 40 °C (32 °F to 104 °F)
Storage temperature: -20\ °C to +60\ °C (-4\ °F\ to\ +140\ °F)
Dimensions (CIPA compliant): 92.3 mm × 52.4 mm × 21.5 mm (3 3/4 inches × 2 1/8 inches × 7/8 inches) (W/H/D)
Mass (CIPA compliant) (including NP-BN battery pack, “Memory Stick Duo” media): Approx. 119 g (4.2 oz)
Microphone: Stereo
Speaker: Monaural
Exif Print: Compatible
PRINT Image Matching III: Compatible
AC Adaptor
Power requirements: AC 100 V to 240 V, 50 Hz/60 Hz, 70 mA
Output voltage: DC 5 V, 0.5 A
Operating temperature: 0° C to 40° C
( 32° F to 104° F)
Storage temperature: -20°C to +60°C (-4°F to +140°F)
Dimensions:
Approx. 50 mm × 22 mm × 54 mm (2 inches × 7/8 inches × 2 1/4 inches) (W/H/D)
Mass:
For the USA and Canada:
Approx. 48 g (1.7 oz)
For countries or regions other than the USA and Canada:
Approx. 43 g (1.5 oz)
GB
Rechargeable battery pack NP-BN
Used battery: Lithium-ion battery
Maximum voltage: DC 4.2 V
Nominal voltage: DC 3.6 V
Maximum charge voltage: DC 4.2 V
Maximum charge current: 0.9 A
Capacity:
typical: 2.3 Wh (630 mAh)
minimum: 2.2 Wh (600 mAh)
Design and specifications are subject to change without notice.
Trademarks
• The following marks are trademarks of Sony Corporation.
Cyber-shot, "Cyber-shot," "Memory Stick PRO Duo,"
"Memory Stick PRO-HG Duo," "Memory Stick Duo," "Memory Stick Micro"
- “AVCHD” and “AVCHD” logotype are trademarks of Panasonic Corporation and Sony Corporation.
• Windows is registered trademark of Microsoft Corporation in the United States and/or other countries.
• Mac and Mac OS are registered trademarks of Apple Inc.
- SDXC logo is a trademark of SD-3C, LLC.
- “” and “PlayStation” are registered trademarks of Sony Computer Entertainment Inc.
- In addition, system and product names used in this manual are, in general, trademarks or registered trademarks of their respective developers or manufacturers. However, the TM or ® marks are not used in all cases in this manual.

Works with PlayStation®3
- Add further enjoyment with your PlayStation 3 by downloading the application for PlayStation 3 from PlayStation Store (where available.)
- The application for PlayStation 3 requires PlayStation Network account and application download. Accessible in areas where the PlayStation Store is available.
Additional information on this product and answers to frequently asked questions can be found at our Customer Support Website.
http://www.sony.net/
Printed on 70% or more recycled paper using VOC (Volatile Organic Compound)-free vegetable oil based ink.
GB



Notas
(CIPA: Camera & Imaging Products Association)
Works with PlayStation®3


PT
Notas
(CIPA: Camera & Imaging Products Association)
Aprox. 50 mm × 22 mm × 54 mm (L/A/P)
Peso:
Cyber-shot, "Cyber-shot", "Memory Stick PRO Duo", "Memory Stick PRO-HG Duo", "Memory Stick Duo", "Memory Stick Micro"
- “AVCHD” e o logotipo “AVCHD” são marcas registradas da Panasonic Corporation e Sony Corporation.
Works with PlayStation®3


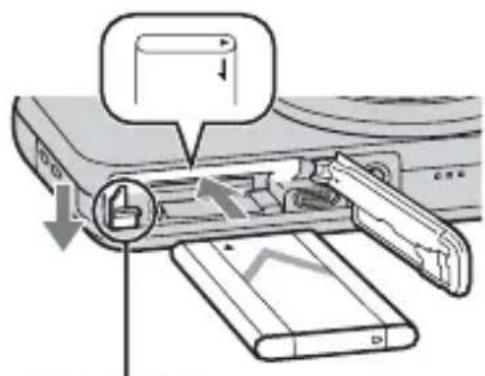
電池退出桿
1 打開蓋子。
2 插入電池。
附註
•經由電腦充電時,請注意下列幾點:
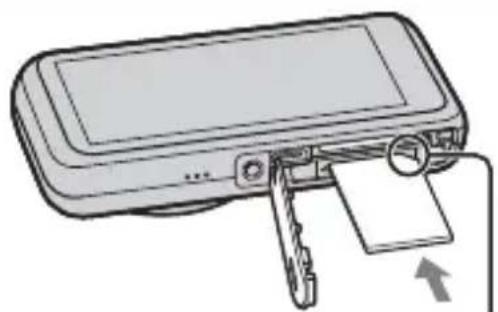
確認缺角那頭朝向正確的方向。
Cyber-shot, "Cyber-shot", "Memory Stick PRO Duo", "Memory Stick PRO-HG Duo", "Memory Stick Duo", "Memory Stick Micro"
- “AVCHD”與“AVCHD”標誌是Panasonic Corporation與Sony Corporation的商標。
Works with PlayStation®3


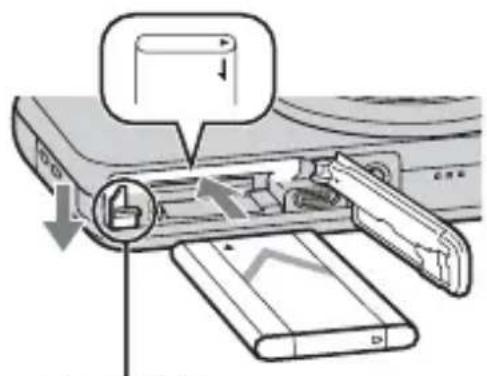
电池退出杆
1 打开盖子。
2 插入电池。
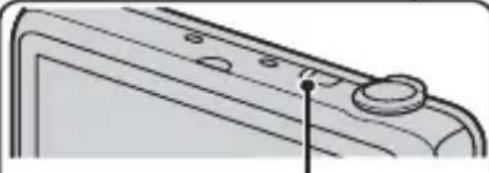
注意
- 通过电脑充电时,请注意下列各项:

确保让缺口角朝向正确的方向。
*当 [动画 SteadyShot] 设定为 [标准] 时
SteadyShot: 光学
Cyber-shot, "Cyber-shot", "Memory Stick PRO Duo", "Memory Stick PRO-HG Duo", "Memory Stick Duo", "Memory Stick Micro"
Works with PlayStation®3

①ON/OFF (전원) 버튼
2셔터 버튼
③W/T(줌)레버
4플래시
5전원/충전 랄프
6마이크
배터리 꺼냄 레버
1 커버를 열어 주십시오.
2배터리 팩을 삽입하여 주십시오.
주의
Works with PlayStation3
- CYBER-SHOT
- LEARNING MORE ABOUT THE CAMERA (“CYBER-SHOT USER GUIDE”)
- CHECKING THE SUPPLIED ITEMS
- WARNING
- IMPORTANT SAFETY INSTRUCTIONS -SAVE THESE INSTRUCTIONS DANGER
- TO REDUCE THE RISK OF FIRE OR ELECTRIC SHOCK, CAREFULLY FOLLOW THESE INSTRUCTIONS
- CAUTION
- BATTERY PACK
- IAC ADAPTOR
- FOR CUSTOMERS IN EUROPE
- NOTICE FOR THE CUSTOMERS IN THE COUNTRIES APPLYING EU DIRECTIVES
- ATTENTION
- NOTICE
- DISPOSAL OF OLD ELECTRICAL & ELECTRONIC EQUIPMENT (APPLICABLE IN THE EUROPEAN UNION AND OTHER EUROPEAN COUNTRIES WITH SEPARATE COLLECTION SYSTEMS)
- DISPOSAL OF WASTE BATTERIES (APPLICABLE IN THE EUROPEAN UNION AND OTHER EUROPEAN COUNTRIES WITH SEPARATE COLLECTION SYSTEMS)
- NOTICE FOR CUSTOMERS IN THE UNITED KINGDOM
- IDENTIFYING PARTS
- INSERTING THE BATTERY PACK
- 1 OPEN THE COVER
- 2 INSERT THE BATTERY PACK
- CHARGING THE BATTERY PACK
- NOTES
- CHARGING TIME (FULL CHARGE)
- CHARGING BY CONNECTING TO A COMPUTER
- BATTERY LIFE AND NUMBER OF IMAGES THAT CAN BE RECORDED AND PLAYED BACK
- SUPPLYING POWER
- INSERTING A MEMORY CARD (SOLD SEPARATELY)
- MEMORY CARDS THAT CAN BE USED
- TO REMOVE THE MEMORY CARD/BATTERY PACK
- SETTING THE CLOCK
- SHOOTING STILL IMAGES/MOVIES
- SHOOTING STILL IMAGES
- SHOOTING MOVIES
- VIEWING IMAGES
- 1 PRESS THE ▶(PLAYBACK) BUTTON
- SELECTING NEXT/PREVIOUS IMAGE
- DELETING AN IMAGE
- RETURNING TO SHOOTING IMAGES
- IN-CAMERA GUIDE
- INTRODUCTION OF OTHER FUNCTIONS
- MENU ITEMS
- SHOOTING
- SETTING ITEMS
- INSTALL PC APPLICATION (WINDOWS)
- FEATURES OF "PLAYMEMORIES HOME
- NUMBER OF STILL IMAGES AND RECORDABLE TIME OF MOVIES
- STILL IMAGES
- MOVIES
- NOTES ON USING THE CAMERA
- FUNCTIONS BUILT INTO THIS CAMERA
- ON USE AND CARE
- NOTES ON RECORDING/PLAYBACK
- DO NOT USE/STORE THE CAMERA IN THE FOLLOWING PLACES
- ON CARRYING
- NOTE ON THE SCREEN
- ON CAMERA'S TEMPERATURE
- ON THE OVERHEAT PROTECTION
- ON CHARGING THE BATTERY
- WARNING ON COPYRIGHT
- NO COMPENSATION FOR DAMAGED CONTENT OR RECORDING FAILURE
- CLEANING THE CAMERA SURFACE
- SPECIFICATIONS
- CAMERA
- [SYSTEM]
- [INPUT AND OUTPUT CONNECTORS]
- [SCREEN]
- [POWER, GENERAL]
- AC ADAPTOR
- RECHARGEABLE BATTERY PACK NP-BN
- TRADEMARKS
- HTTP://WWW.SONY.NET
- NOTAS
- 1 打開蓋子。
- 2 插入電池。
- 附註
- 1 打开盖子。
- 2 插入电池。
- 注意
- 1 커버를 열어 주십시오
- 2배터리 팩을 삽입하여 주십시오
- 주의
Brand : SONY
Model : Cybershot DSC-WX170
Category : Camera