CHT5202 - Pan VOX - Free user manual and instructions
Find the device manual for free CHT5202 VOX in PDF.

User questions about CHT5202 VOX
0 question about this device. Answer the ones you know or ask your own.
Ask a new question about this device
Download the instructions for your Pan in PDF format for free! Find your manual CHT5202 - VOX and take your electronic device back in hand. On this page are published all the documents necessary for the use of your device. CHT5202 by VOX.
USER MANUAL CHT5202 VOX
GBR
SRB
MKD
BIH
MNE
SVN
CHT5001
CHT6001
CHT6001IX
CHT6002IX
CHT6002BL
CHT6003IXG
CHT6202IX
CHT5202
CHT6202
CHT6005
OPERATING INSTRUCTIONS ELECTRIC FREESTANDING OVEN UPUTSTVO ZA UPOTREBU SAMOSTALNA ELEKTRIČNA RERNA УПАТСТВА ЗА РАКУВАНЬЕ ЕЛЕКТРИЧНА РЕРНА UPUTSTVO ZA UPOTREBU SAMOSTOJEĆA ELEKTRIČNA RERNA NAVODILA ZA UPORABO SAMOSTOJEČA ELEKTRIČNA PEČICA

CHT5001
CHT6003IXG
CHT6001
CHT6202IX
CHT6001IX
CHT5202
CHT6002IX
CHT6202
CHT6002BL
CHT6005
ELECTRICAL FREESTANDING OVEN
USER'S MANUAL
Our Esteemed Customer,
We take offering quality products more than your expectation as a goal, offers you the products produced in modern facilities carefully and particularly tested for quality.
Your manual is prepared in order to help you to use your apparatus that is manufactured by the most recent technology, with confidence and maximum efficiency.
Before use of your apparatus, carefully read this guide that includes the basic information for right and safe installation, maintenance and use and contact to the nearest Authorized Service for mounting of your product.
CONTENTS :
- PRESENTATION AND SIZES OF PRODUCT
- WARNINGS
- INSTALLATION AND PREPARATIONS FOR USE
- USE OF YOUR OVEN
- CLEANING AND MAINTENANCE
- SERVICE AND TRANSPORT
PART 1 : PRESENTATION AND SIZES OF PRODUCT
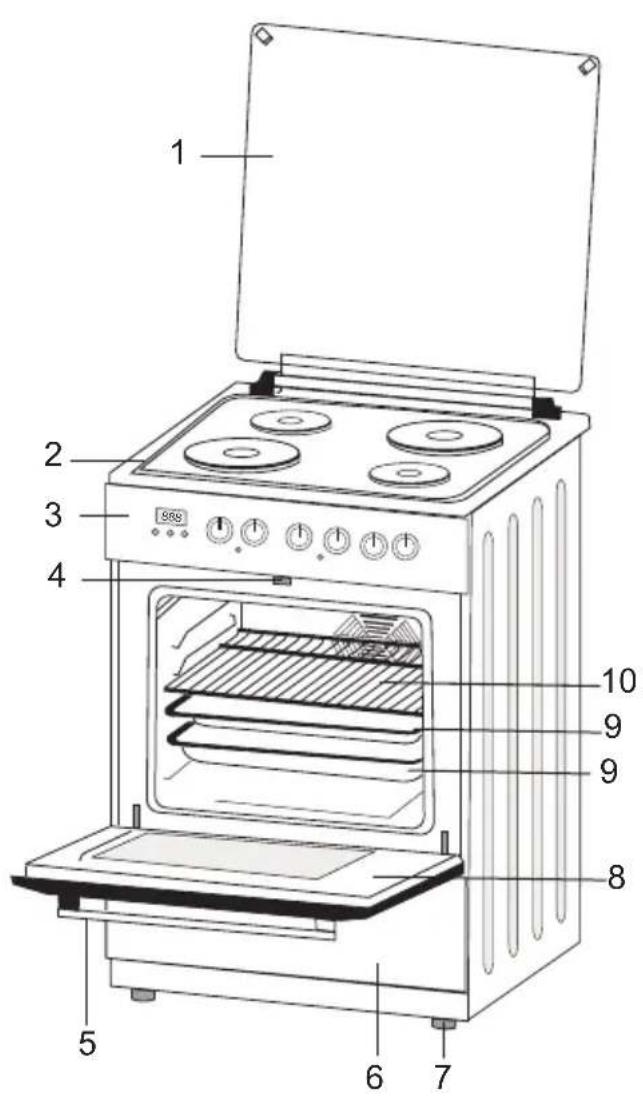
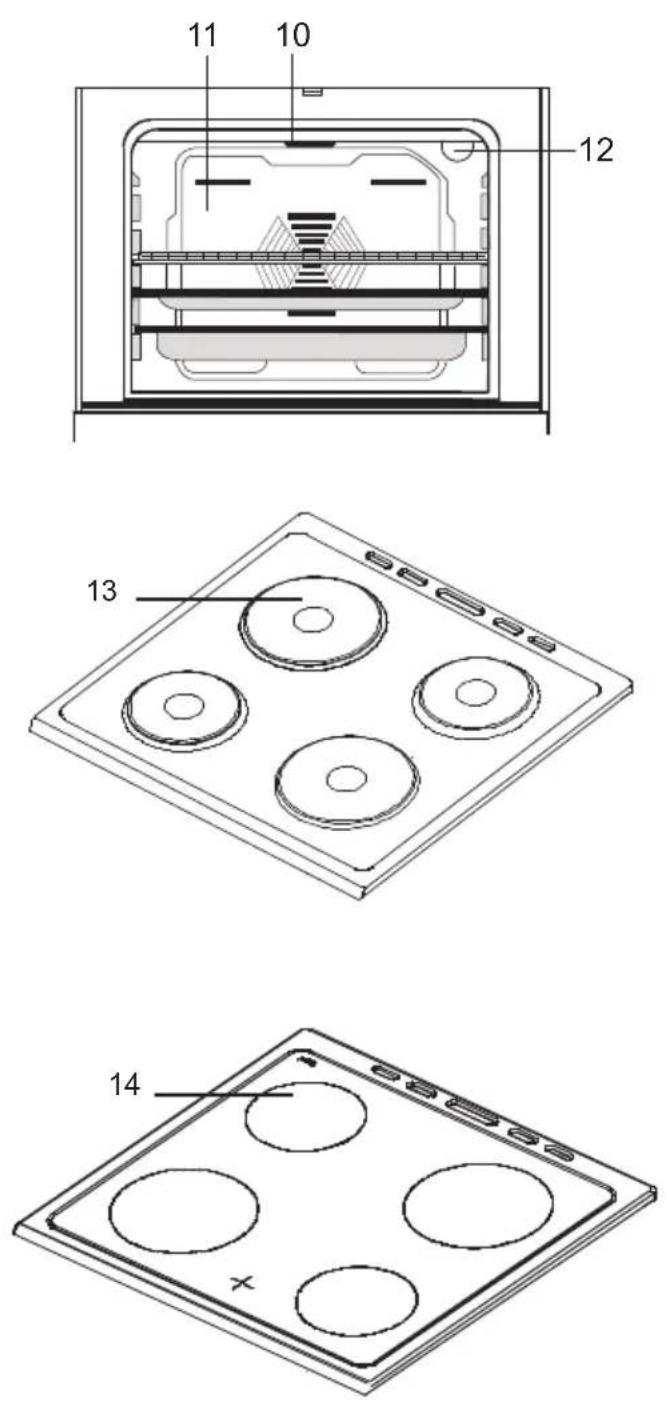
Part of List :
1- Cooktop Cover
2- Cooktop
3- Control Panel
4- Child Lock
5- Oven Door Handle
6- Drawer Cover
7- Supply Leg
8- Oven Door
9- Oven Tray
10- Wire Grid
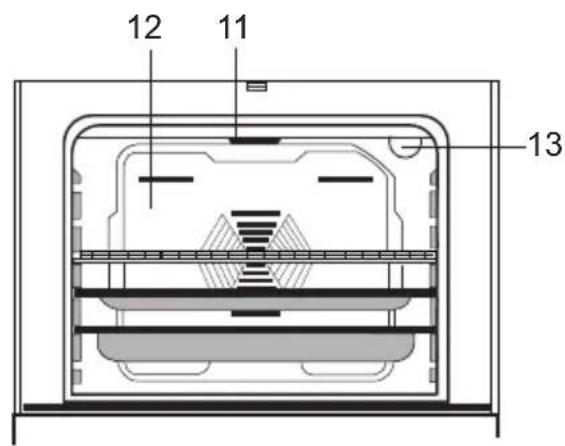
11- Front Resistance
12- Fan Store
13- Oven Lamp
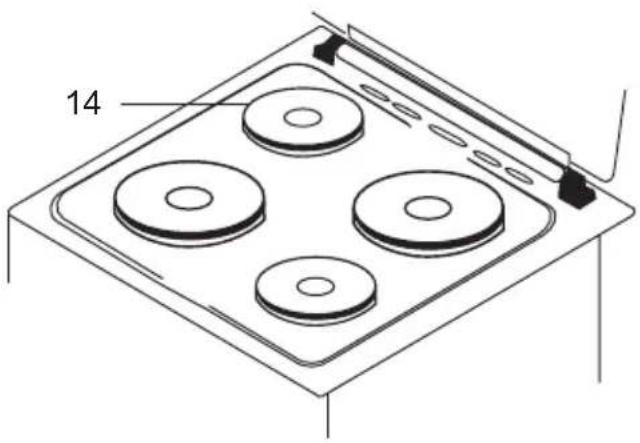
14- Hotplate
15- Highlite element
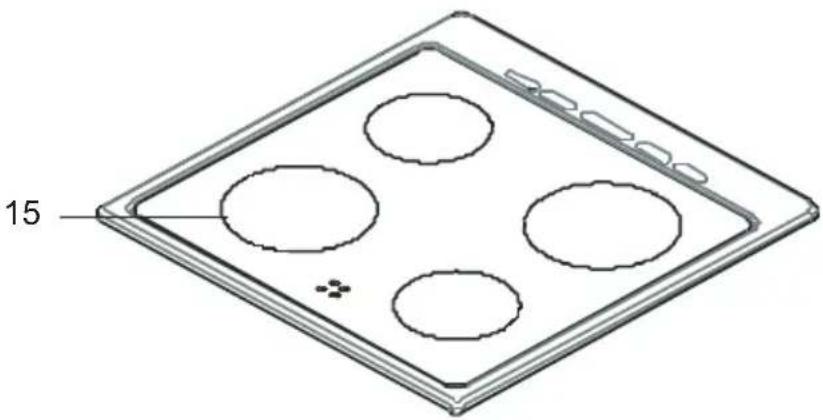
natural_image
Technical line drawing of a four-cylinder appliance with a labeled component (15), no text or symbols present.| MODEL | SIZE(cm) |
| YE66 | 60*60*85/60*60*90 |
| YE56 | 50*60*85/50*60*90 |
PART 2 SAFETY WARNINGS
READ THESE INSTRUCTIONS CAREFULLY AND COMPLETELY BEFORE USING YOUR APPLIANCE, AND KEEP IT IN A CONVENIENT PLACE FOR REFERENCE WHEN NECESSARY.
THIS MANUAL IS PREPARED FOR MORE THAN ONE MODEL IN COMMON. YOUR APPLIANCE MAY NOT HAVE SOME OF THE FEATURES THAT ARE EXPLAINED IN THIS MANUAL. PAY ATTENTION TO THE EXPRESSIONS THAT HAVE FIGURES, WHILE YOU ARE READING THE OPERATING MANUAL.
General Safety Warnings
- This appliance can be used by children aged from 8 years and above and persons with reduced physical, sensory or mental capabilities or lack of experience and knowledge if they have been given supervision or instruction concerning use of the appliance in a safe way and understand the hazards involved. Children shall not play with the appliance. Cleaning and user maintenance shall not be made by children without supervision.
- WARNING: The appliance and its accessible parts become hot during use. Care should be taken to avoid touching heating elements.
Children less than 8 years of age shall be kept away unless continuously supervised.
- WARNING: Unattended cooking on a hob with fat or oil can be dangerous and may result in fire. NEVER try to extinguish a fire with water, but switch off the appliance and then cover flame e.g. with a lid or a fire blanket.
- WARNING: Danger of fire: do not store items on the cooking surfaces.
- WARNING: If the surface is cracked, switch off the appliance to avoid the possibility of electric shock.
- For hobs incorporating a lid, any spillage should be removed from the lid before opening. And also the hob surface should be allowed to cool before closing the lid.
- The appliance is not intended to be operated by means of an external timer or separate remote-control system.
- WARNING: In order to prevent tipping of the appliance, the stabilizing brackets must be installed. (For detail information please read the anti-tilting kit set guide.)
- During use, the appliance becomes hot. Care should be taken to avoid touching heating elements inside the oven.
- During use, handles held for short periods in normal use can get hot.
- Do not use harsh abrasive cleaners or sharp metal scrapers to clean the oven door glass and other surface since they can scratch the surface, which may result in shattering of the glass or damage to the surface.
- Do not use steam cleaners for cleaning the appliance.
- WARNING: Ensure that the appliance is switched off before replacing the lamp to avoid the possibility of electric shock.
- CAUTION: Accessible parts may be hot when the cooking or grilling is in use. Young children should be kept away.
- Your appliance is produced in accordance with all applicable local and international standards and regulations.
- Maintenance and repair work must be made only by authorized service technicians. Installation and repair work that is carried out by unauthorized technicians may endanger you. It is dangerous to alter or modify the specifications of the appliance in any way.
- Prior to installation, ensure that the local distribution conditions (nature of the gas and gas pressure or electricity voltage and frequency) and the requirements of the appliance are compatible. The requirements for this appliance are stated on the label.
- CAUTION: This appliance is designed only for cooking food and is intended for indoor domestic household use only and should not be used for any other purpose or in any other application, such as for non-domestic use or in a commercial environment or room heating.
- Do not try to lift or move the appliance by pulling the door handle.
- All possible security measures have been taken to ensure your safety. Since the glass may break, you should be careful while cleaning to avoid scratching. Avoid hitting or knocking on the glass with accessories.
- Ensure that the supply cord is not wedged during the installation. If the supply cord is damaged, it must be replaced by the manufacturer, its service agent or similarly qualified persons in order to prevent a hazard.
- While the oven door is open, do not let children climb on the door or sit on it.
Installation Warnings
- Do not operate the appliance before it is fully installed.
- The appliance must be installed by an authorized technician and put into use. The producer is not responsible for any damage that might be caused by defective placement and installation by unauthorized people.
- When you unpack the appliance, make sure that it is not damaged during transportation. In case of any defect; do not use the appliance and contact a qualified service agent immediately. As the materials used for packaging (nylon, staplers, styrofoam...etc) may cause harmful effects to children, they should be collected and removed immediately.
- Protect your appliance against atmospheric effects. Do not expose it to effects such as sun, rain, snow etc.
- The surrounding materials of the appliance (cabinet) must be able to withstand a temperature of min 100°C.
During usage
- When you first run your oven a certain smell will emanate from the insulation materials and the heater elements. For this reason, before using your oven, run it empty at maximum temperature for 45 minutes. At the same time you need to properly ventilate the environment in which the product is installed.
- During usage, the outer and inner surfaces of the oven get hot. While opening the oven door, step back to avoid the hot steam coming out of the oven. There may be a risk of burns.
- Do not put flammable or combustible materials, in or near the appliance when it is operating.
• Always use oven gloves to remove and replace food in the oven. - Do not leave the cooker while cooking with solid or liquid oils. They may catch fire on condition of extreme heating. Never pour water on to flames that are caused by oil. Cover the saucepan or frypan with its cover in order to choke the flame that has occurred in this case and turn the cooker off.
• Always position pans over the centre of the cooking zone, and turn the handles to a safe position so they cannot be knocked or grabbed. - If you will not use the appliance for a long time, plug it off. Keep the main control switch off. Also when you do not use the appliance, keep the gas valve off.
- Make sure the appliance control knobs are always in the "0" (stop) position when it is not used.
• The trays incline when pulled out. Be careful not to let hot liquid spill over. - When the door or drawer of the oven is open, do not leave anything on it. You may unbalance your appliance or break the cover.
- Do not put heavy things or flammable or ignitable goods (nylon, plastic bag, paper, cloth...etc) into the drawer. This includes cookware with plastic accessories (e.g. handles).
- Do not hang towels, dishcloths or clothes from the appliance or its handles.
During cleaning and maintenance
• Always turn the appliance off before operations such as cleaning or maintenance. You can do it after plugging the appliance off or turning the main switches off.
- Do not remove the control knobs to clean the control panel.
TO MAINTAIN THE EFFICIENCY AND SAFETY OF YOUR APPLIANCE, WE RECOMMEND YOU ALWAYS USE ORIGINAL SPARE PARTS AND TO CALL ONLY OUR AUTHORIZED SERVICE AGENTS IN CASE OF NEED.
PART3 : INSTALLATION AND PREPARATION FOR USE
This modern, functional and practical oven, that was manufactured with the most quality parts and materials, will meet your needs in every respect. You must surely read this manual in order not to have any problem in future and to be able to have successful results. The following information are the required rules for right installation and service processes. It must be read especially by the technician who will install the apparatus.
Contact to Authorized Service for mounting of your oven.
3.1 INSTALLATION OF OVEN
There are some factors that must be paid attention to while installing your oven. Surely pay attention to our below suggestions in order to be able to prevent any problems and/or dangerous situations that may occur later.
It can be placed close to other furniture on condition that in the area where the oven is set up, the furniture's height must not exceed the height of the cooker panel.
Pay attention not to place it near the refrigerator, there must be no flammable or in flammable materials such as curtain, waterproof cloth, ... etc. that will begin to burn quickly, while selecting place for oven.
It is required there must be at least 2 cm blank space between the back cover of oven and wall for air circulation.
The furniture close to oven must be manufactured resistant to heat more than 50 C° of the room temperature.
If the kitchen furniture are higher than the pan which the oven's cookers are on, it must be at least 11 cm away from the oven's side.
The minimum heights from the oven's pan and wall cupboards and paddle boxes with fan over the oven, are shown as below. Thus, the paddle box must be at minimum 650 mm height from the cooker pan.
If there is no paddle box, this height must not be less than 700 mm.
- This appliance is not intended for use by persons (including children) with reduced physical, sensory or mental capabilities, or lack of experience and knowledge, unless they have been given supervision or instruction concerning use of the appliance by a person responsible for their safety
· Children should be supervised to ensure that they do not play with the appliance. - Do not use harsh abrasive cleaners or sharp metal scrapers to clean the oven door glass since they can scratch the surface, which may result in shattering of the glass.
- For hobs, the appliance is not intended to be operated by means of an external timer or separate remote-control system.
3.2 ADJUSTMENT OF FEET
Your oven stands on 4 adjustable feet. As the feet are adjusted in low location, it is required to control whether it is balanced before installing the oven. You can make this adjustment as turning the feet clockwise if required. It is possible to raise the apparatus maximum 15 mm via the feet.
If the feet are adjusted appropriately, it is required not to move the apparatus by dragging, otherwise it is required to place it by lifting it up. It is required to bring the oven's drawer out to adjust the apparatus's feet. The feet can be adjusted from inside via the small change.
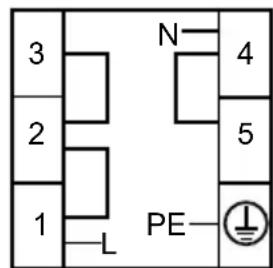
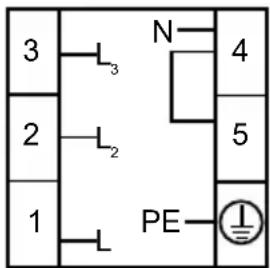
3.3 ELECTRIC CONNECTION AND SECURITY
During the electric connection, surely follow the instructions below.
The earthing cable must be connected to the terminal. You have to ensure the cable with insulation to be connected to the power source during the connection of cable. If there is not any appropriate earthed electric outlet in accordance with regulations in the place where the apparatus will be installed, immediately contact to our authorized service.
The earthed electric outlet must be close to the apparatus. Surely do not use the extension cord.
The feeding cable must not touch to the hot surface of the product.
In case the feeding cable is damaged, surely contact to Qualified Service. The cable must be changed by the authorized service.
The wrong electric connection may damage your apparatus. Such damage is not in guarantee extent.
The apparatus is adjusted as appropriate for 220-240 Volts and 400V 3N Volts of electricity. If the network electricity is different than this informed value, immediately contact to our authorized service.
The electric cable must not touch to the hot parts of apparatus. The electric cable must not touch the back part of the apparatus. Otherwise the electric cable of apparatus may be damaged. And this situation may cause short circuit.
The producer firm declares that it has no responsibility against any kind of damages and losses that emanate from the following security norms.
There is to install an all pole disconnector inside the supply circuit with a contact opening of at least 3.0mm rated 32A and delay functioning type.
The appliance is provided for fixed connection to the power supply. The connection of the appliance to an electrical source must be done by authorized technician.
3.4 GENERAL WARNINGS AND MEASURES
Your apparatus is produced in accordance with the related security instructions connected with electrical apparatus. The maintenance and repair works must be made just by the authorized service technician who is trained by the producer firm. The installation and repair works whitout following rules may endanger you.
Its outside surfaces heat while your apparatus operates. The interior surfaces of oven, components that ensures the heat and steam that goes out are quite hot. Even if the apparatus is turned off, these parts hold its heat for a specific time. Do not touch onto the hot surfaces. Keep children away.
Do not leave the cooker while cooking with solid or liquid oils. There may be flaming up on condition of extreme heating. Never pour water to the flames occurring from oil. Cover the saucepan or frypan with its cover in order to choke the flame that was occurred in this case and turn the cooker off.
The oven and heat adjustment switches must be adjusted and oven's clock must be programmed for cooking in your oven. Otherwise the oven does not operate.
Do not leave anything on it when the door or drawer of oven is open. You may unbalance your apparatus or break the cover.
Do not put heavy things or flammable, burnable goods (nylon, plastic bag, paper, cloth . . . etc) into the lower drawer.
Plug it off when you do not use the apparatus and keep the gas valve off.
Protect your apparatus against atmospheric effects. Do not leave it to effects such as sun, rain, snow, powder. . etc.
3 x 2.5 mm 220 V \~
3 x 2.5 mm 230 V \~
3 x 2.5 mm 240 V \~
5x1.5 mm 380 V .3N \~
5x1.5 mm 400 V ,3N \~
5x1.5 mm 415 V ,3N \~
4.1 GENERAL APPEARENCE AND TECHNICAL FEATURES OF YOUR OVEN
| YE 56 | |
| LOWER HEATER | 1000 WATT |
| UPPER HEATER | 1000 WATT |
| GRILL | 1600 WATT |
| TURBO HEATER | 2000 WATT |
| YE 66 | |
| LOWER HEATER | 1100 WATT |
| UPPER HEATER | 1200 WATT |
| GRILL | 2000 WATT |
| TURBO HEATER | 2000 WATT |
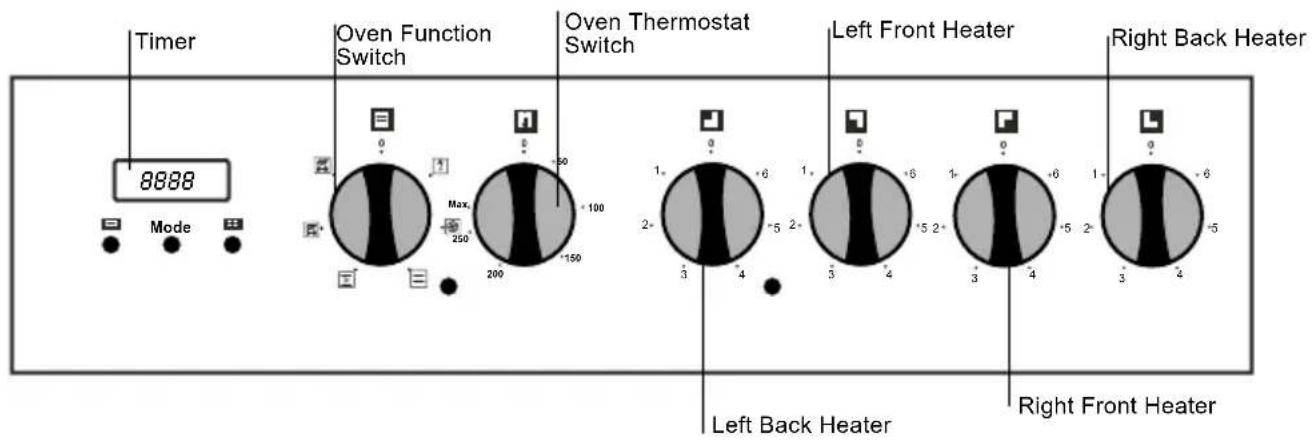
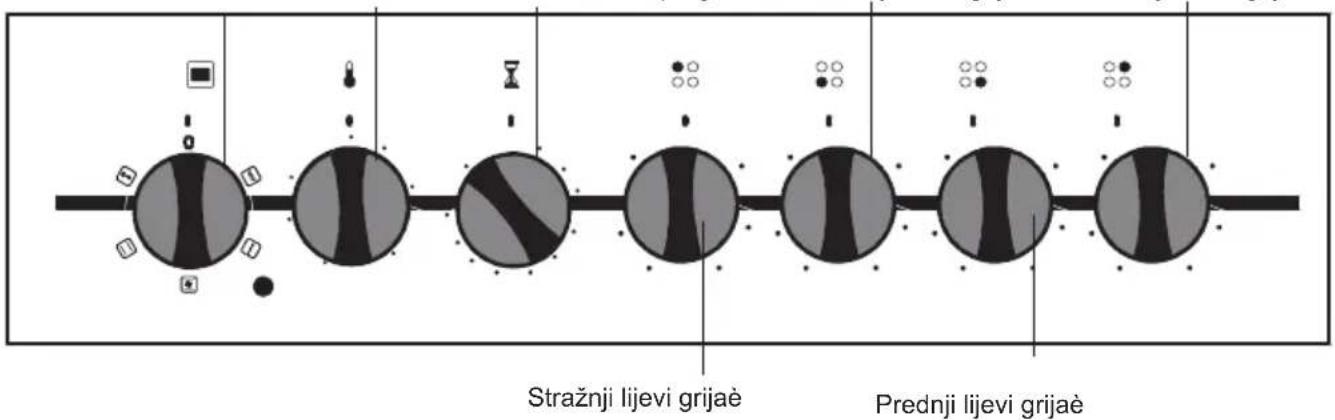
4.2 PRESENTATION AND FEATURES OF THE CONTROL PANELS
TE 56/66
4. 3 USE OF HOTPLATES AND VITROCERAN COOKERS
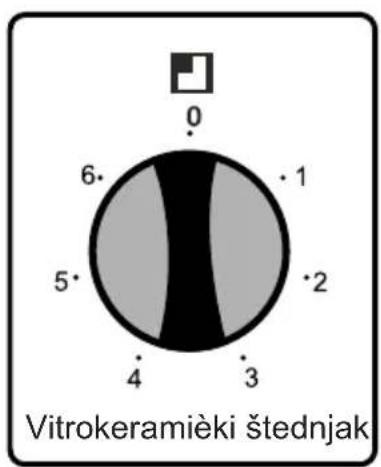
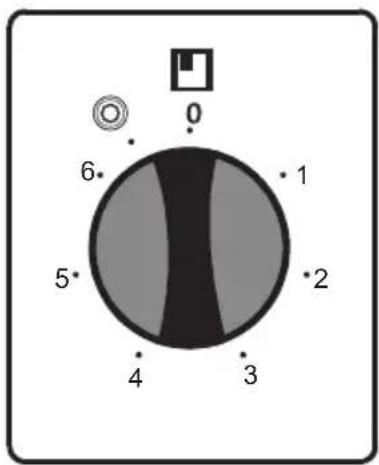
The electrical cooker is commanded by 7 graded switches. "0" of the grades is off location. The use fields in response to other 6 grades are below.
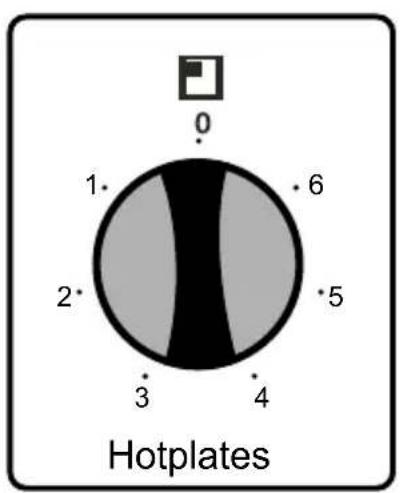
1......Keeping hot location
2-3.....Heating locations at low heat
4-5-6..Cooking - roasting and boiling locations
The upper part of hotplates is covered by a protective material resistant to heat. Turn the switch of the electrical cooker to “3” and then operate the cooker for 5 minutes in order to burn and so to toughen the protective layer at first use. During use of electrical cookers, it is required to pay attention to the used saucepans to have smooth bases. If appropriate sized and smooth based saucepans are used, you can get the most efficiency from your cooker. It is not suggested to use the little size saucepans on the big size cooker, because this will cause heat loss and so energy will be wasted.

Surely control that your cooker is off, the control switch is at "0" location after cooking. Also never touch it as the cooker will be hot for a specific time after it was turned off. Do not let children to come close to it.
Clean the electrical cooker with a wet cloth after using the electrical cooker. If there is excessively getting dirty situation, you can clean it with water with detergent rather well.
Heat for a few minutes for the upper part to dry after cleaning. If you will not use its upper part for a while, ensure to occur a thin oil layer as oiling with machine oil.
Dual or Oval Vitroceramic Cooker
Dual or vitroceramic cookers can heat in two different position. For operating the big diameter of dual cooker turn the switch to “☐”. Both big and small diameter of the cooker will operate. For operating the oval part of the oval cooker, turn the switch to “☐”. Both oval and round parts will operate.
4.4 USE OF OVEN PART
4. 4. 1 Use of Electronical Programming Clock Adjustment of Day Hour
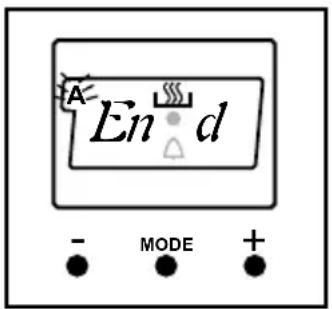
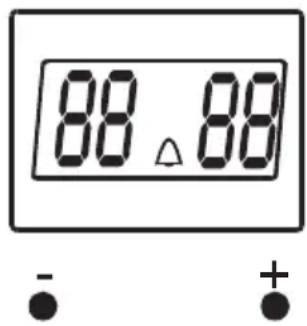
“A” symbol will start to flash after it is connected to the electrical resource Press (+) and (-) keys at the same time. It is also possible to adjust (to increase or to reduce) the time by pressing to these keys.
Alarm / Time Setup
This function can be used as time set up and alarm when wished. “Mode” key must be pressed until “△” led indicator lamp will start to light. The wished period interval is adjusted via “+” and “-” keys. The wished time remains on screen after it was adjusted and “△” sign that flashed in the past remains fixed. It is possible to make time set up between 0-23.59 hours. At the end of cooking period an alarm is heard and “△” symbol flashes. You can press any key to stop the alarm.
Programming as Determining the Cooking Period
This function is used to adjust to cook at wished period interval.
To adjust the cooking period, “Mode” key is pressed until “Dur” indicator lamp will start to flash. The wished cooking period is adjusted by using “+” and “-” keys. Once the time is adjusted, it is registered automatically in 5 seconds following the adjustment and “A” and “###” symbols start to light continuously. The screen returns to the current time. An alarm (sound) is heard when the cooking period ended and “A” and “###” symbols start to flash. Press onto any switch stops the signal and the lamp to flash.
It is possible to adjust cooking period between 0-10 hours.
Programming as determining the Finish Time
This function is used to adjust finishtime of the cooking period. To adjust the finish time of cooking “Mode” key is pressed until “End” indicator lamp will start to flash. The wished finish time is adjusted by using “+” and “-” keys. When the finish time is reached an alarm is heard and you can press any kay to stop the alarm.
Programming as determining the Cooking Period and Finish Time
This function is used to adjust the cooking period by using of automatically cooking function.
Both cooking period and ending time have to be adjusted to adjust the ending cooking period. The cooking period is adjusted as determined above. "Mode" key was pressed until "End" indicator lamp will flash in order to adjust the ending time. "+" and "-" keys must be used at the end of wished cooking period. Once the time is adjusted, it is registered automatically in 5 seconds following the adjustment and "A" and "###" symbols starts to light continuously. The screen returns to the current time. An alarm sound is heard at the end of the time and "A" symbol starts to flash. Pressing any switch stops the signal and lamp to flash.
4.4.2 Use of Mechanical Timer
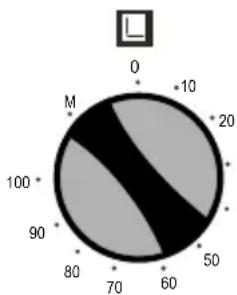
radar
| Position | Value | |---|---| | 0 | 10 | | 10 | 20 | | 20 | 50 | | 30 | 60 | | 40 | 70 | | 50 | 80 | | 60 | 90 | | 70 | 100 | | 80 | 90 | | 90 | 80 | | M | 100 |Manual Operation
When you set the timer knob to "M" position as seen in the illustration on left side, the ove can be operated continuously. The oven can never be operated, when the timer knob is in "0" position.
Operation with time set
Turn the timer knob in clockwise direction in order to set time between 0-100 minutes as seen ^9 in figure on right side. When the adjusted time ends, oven is turned off and a single warning sound is heard.
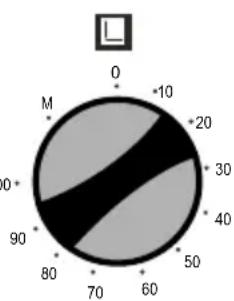
radar
| Position | Value | |---|---| | 0 | 10 | | 10 | 20 | | 20 | 30 | | 30 | 40 | | 40 | 50 | | 50 | 60 | | 60 | 70 | | 70 | 80 | | 80 | 90 | | 90 | 10 | The chart displays a single data point at position 90, with the label 'L' in the top-left corner. The values are estimated based on the radial scale from 0 to 90.4. 4. 3 Use of Oven Function Switches
This switch allows you to select the oven functions. The functions and their grades are shown at the following table. Also, the detailed instructions and their uses will also be explained in details in the next pages.

Your oven's lamp starts to operating.
Your oven's lamp, red warning lamp and fan start to operating. It performs the function of defrosting your frozen food.
Your oven's thermostat and warning lamps and lower and upper heaters start operating.
Your oven's thermostat and warning lamps and turbo heater, fan are put into use.
Your oven's thermostat and warning lamps and fan, upper and lower heaters start operating.
Your oven's thermostat and warning lamps and grill heater and chicken turning function start operating.
Your oven's thermostat and warning lamps and upper heater, grill heater and chicken turning functions start operating.
Your oven's thermostat and warning lamps and upper heater, grill heater and chicken turning and fan functions start operating.
Your oven's thermostat and lamps, lower heater operate
Your oven's thermostat and warning lamps, turbo heater, lower heater and fan start operating.
Your oven's thermostat and warning lamps, lower heater and start operating.

Ice Melter Function (Defrost)
You can start the defrosting process by placing the frozen food into your oven and turning the switch onto the determined sign. This is a program that does not cook the food, just helps to defrost them in a very short time. Place the food that will be defrosted on the third shelf support from the bottom, on a wire shelf. Place a tray into the bottom of the oven in order to collect the water that occurs because of defrosting.

Lower - Upper Heater Function (Static Cooking)
At this cooking that is defined as the traditional method, the heat that is spreaded from the lower and upper heating elements into your oven equally, ensures the food's bottom and top to be cooked equally.
It is recommended to make pre heating for 10 minutes. Leave the food that was put into the available cooking dish to be cooked in recommended period case. The Lower-Upper Heater location is the function that is preferred to cook cake, sponge cake, flan, spaghetti in oven, lasagna, pizza.
At the end of cooking process, turn the oven's switch and heat set up switch off and cancel the time program. Take the cooked food from the oven, put onto a safe place and open the oven's door and ensure the oven is cool completely. As the oven will be hot at that moment, stay away from the oven and keep your children away from the oven.

Fan and Lower - Upper Heater Function (Static Cooking with Fan)
The location where the air comes from lower and upper heating elements is distributed into the oven via the fan motor and fanner.
The heat adjustment switch is adjusted to the degree that is recommended at the cooking table. Turn the oven's switch as it will show the symbol of this function and the oven's time is adjusted to the recommended time for cooking, the oven is pre heated for 10 minutes. The food that had been put into the available cooking dish is placed into the oven and then cooked. In general, this location is a location where a very nice results are taken for cooking of pastries. Every part of the food will be cooked equally at this location. It is appropriate for cooking of single tray.
At the end of cooking, turn off the oven's switch and heat adjustment switch. Cancel the oven's time program and take the cooked food from oven and leave it on a safe place. Open your oven's lid and leave it to cool. Do not come close to it until it cools and keep children away.

Turbo Fan Function
Turbo fan function spreads the oven's heat equally. The food on all shelves will be cooked equally during the use of this function.
Top of the oven will not be hotter than the bottom of it. Adjust the heat adjustment switch of your oven to the wished degree, also turn the function switch as it will show Turbo function symbol. Place your food that had been put into the available cooking dishes into the oven after pre heating of 10 minutes. This function is appropriate for cooking more than one dish.
If you have two trays of food that you will cook in your oven; you must use that heat for your oven, heat of which of the heats that are appropriate for your food while adjusting the cooking heat. Cooking two trays of food requires additional cooking period according to the single tray cooking. In general, food in two trays are not cooked at the same time. So, take the tray that you observed that is cooked, from the oven, go on cooking for the other tray of food. As there will be heat transfer between two trays during the cooking of two trays of food, the cooking quality will be lower than the single tray. While cooking double trays, you can get a better cooking result by changing theplaces and ways of trays if needed. The processes that will be applied at the end of cooking, are same for all the functions. Open your oven's cover and leave it to cool after you put your trays in oven onto a safe place.

Turbo Fan and Lower heater Function
Turbo fan and lower heater function is an ideal function to cook pizza. The lower heater ensures the pizza paste to be cooked while Turbo fan spreads the heat of oven equally. Adjust the heat adjustment switch of your oven to the wished degree, also turn the function switch as it will show this function's sign and adjust the oven's time to the offered time for cooking and pre heat the oven for 10 minutes. This function is appropriate for cooking of one dish.
At the end of cooking process, turn off the oven's switch and heat set up switch. Cancel the oven's time program and take the cooked food from oven and leave onto a safe place. Open your oven's door and leave it to cool. Do not come close to the oven until it cools and keep children away.
Warning: Max. set of thermostat 190°C

Grill and chicken Turning Function
This function is used to grill and to turn chicken, cooked food on a skewer. To make turning, use the “turning skewer”. To grill, place the food onto the grill, also the grill onto the shelf at toppest level. You can start to grill after placing the oven tray onto the 3rd Shelf. The tray that is placed onto the 3rd Shelf will ensure the collection of oils that drop from food.
Turn your oven's heat set up switch as it will show the sign of this function. Place your food into the oven after pre heating of 5 minutes.
At the end of cooking, as in all other cooking processes; turn off the oven's switch and heat set up switch. Cancel the oven's time program and take the cooked food from oven and leave onto a safe place. Do not come close to the oven until it will cool and keep children away.
Warning: Max. set of thermostat 190°C

Upper heater, Grill and Roast Chicken Function
This function is used to grill rapidly and to roast chicken, cooked food on a skewer. To make roasting, use the “roasting skewer”. To grill, place the food onto the grill, also the grill onto the shelf at toppest level. You can start to grill after placing the oven tray onto the 3rd Shelf. The tray that is placed onto the 3rd Shelf will ensure collection of oils that drop from food.
Turn your oven's heat set up switch as it will show the sign of this function. Place your food into the oven after pre heating of 5 minutes.
At the end of cooking process, as in all other cooking processes; turn off the oven's switch and heat set up switch. Cancel the oven's time program and take the cooked food from oven and leave onto a safe place. Do not come close to the oven until it cools and keep children away.
Warning: Max. set of thermostat 190°C

Grill, Chicken Roasting and Fan Function
In this function, grill and upper heater and the fan that ensures to roast perfectly, operate together and cook. It is also used to grill, to roast chicken and cooked food on a skewer.
To make roasting; use the “roasting skewer”. To grill, place the food onto the grill, also the grill onto the shelf at the toppest level. You can start to grill after placing the oven tray onto the 3rd Shelf. The tray that is placed onto the 3rd Shelf will ensure collection of oils that drop from food.
Turn your oven's heat set up switch as it will show the sign of this function. Place your food into the oven after pre heating of 5 minutes.
At the end of cooking process, as in all other cooking processes; turn off the oven's switch and heat set up switch. Cancel the oven's time program and take the cooked food from oven and leave onto a safe place. Do not come close to the oven until it cools and keep children away.
Warning: Max. set of thermostat 190°C

natural_image
Empty rectangular frame with no text, numbers, or symbols inside
Lower Heater Function
At this cooking the best is spreaded from the lower heating element. Lower heating function is appropriate for heating the food instead of cooking.

Lower Heater and Fan Function
At this cooking, the heat is spreaded from the lower heating element and fan motor. This function can be used to heat the food equally in a short time.
4.4.4 Accessories Used in Oven
You can use glass dishes, cake molds, special oven trays that are appropriate for use in oven, that you are able to assure in market, apart from the oven trays and grill wire chicken roasting skewer that are given together with your oven. Pay attention to the information related to the subject that were given by the manufacturer firm.
In case small size dishes are used, place the dish onto the grill wire, as it will completely be on the middle part of the wire. The following information must also be followed for the enameled dishes.
If the food that will be cooked does not cover the oven tray completely, if the food is taken from the deep freezer or the tray is being used for collection of food's juices that flow during grilling, the form changes can be observed in tray because of the high heat that occur during cooking or roasting.
The tray will return to its old form only when the tray cooled after cooking. This is a normal physical event that occurs during heat transfer.
Do not leave this tray or dish in cold environment right away after cooking in glass tray or dish. Do not put onto the cold and wet grounds. Place on a dry kitchen cloth or dish cross, ensure it to cools slowly. Otherwise the glass tray or dish may be broken.
If you will grill in your oven; we recommend you to use the grill that was given in tray together with product. ( If your product includes this material ) So, the oils that spatter and flow, will not dirty the inside of oven. If you will use the big wire grill; put a tray onto one of the lower shelves for oils not to be collected. Also put some water into it for cleaning easiness.
Use 4th and 5th shelves while grilling and oil the grill for the ingredients that you will grill not to stick to the grill.
WARNING- Fit the grid correctly into any card responding oven cavity and push it to the end.
natural_image
Technical line drawing of a mechanical or electrical component with internal channels and a directional arrow (no text or symbols)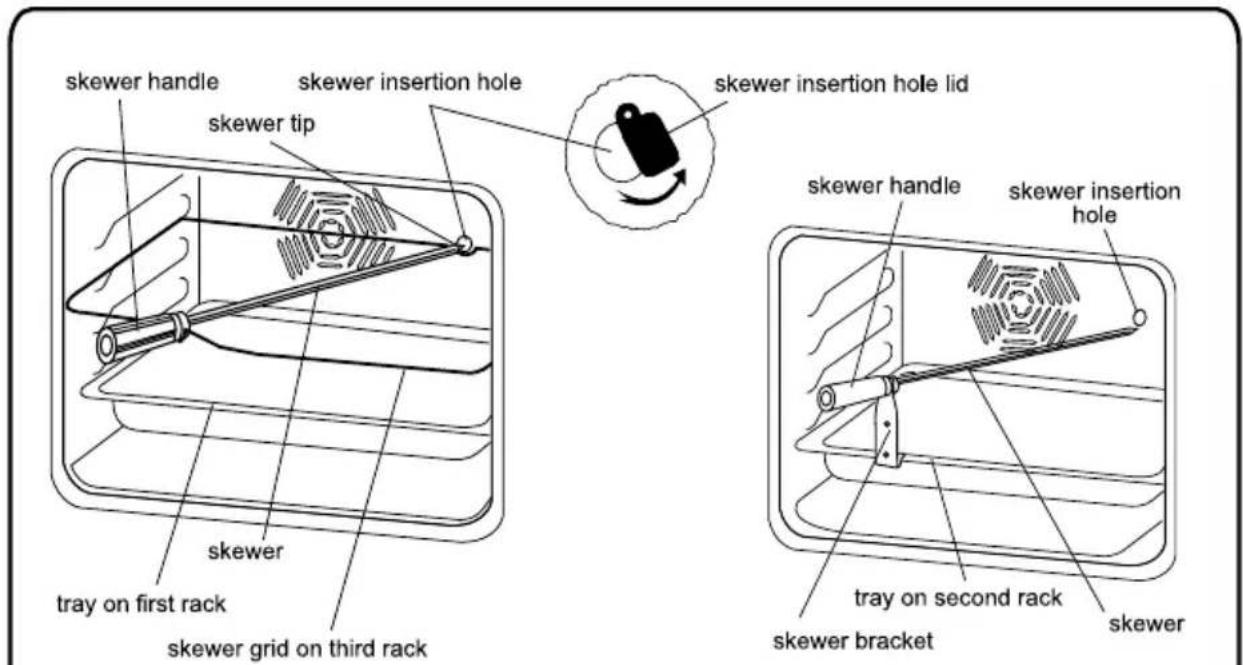
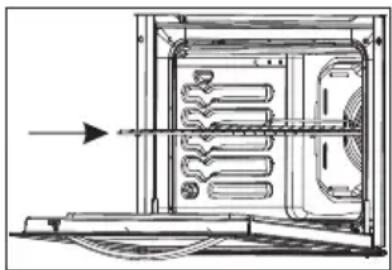
Use of rotisserie accessories
Pass the skewer through the chicken and lock the clamps, insert the tip of the skewer into the hole found at the rear panel of cavity and make sure that it completely leans on the frame and fits in motor shaft. To do this, first you have to turn the lid to the side, which is found in front of the skewer insertion hole, as shown in the figures. After that, fit the skewer onto the skewer grid (placed on the third rack) or skewer bracket (placed on the holes of tray). Remove the handle from screwer, if it is installed and close the oven door. The handle must be attached only for removing the food after grilling.
Make sure that the oven is not operating while performing these operations.
PART 5 : CLEANING AND MAINTENANCE OF YOUR OVEN
5.1 CLEANING
Be sure that all control switches are off and your apparatus cooled before cleaning your oven. Plug off the apparatus.
Control whether they are appropriate and recommended by the manufacturer before using the cleaning materials on your oven. As they may damage the surfaces, do not use caustic creams, abrasive cleaning powders, thick wire wool or hard tools. In case the liquids that overflows around your oven burn, the enameled place may be damaged. Immediately clean the overflow liquids.
Cleaning of Inside of Your Oven
Surely plug off the oven before starting cleaning.
The inside of enameled oven is cleaned in the best way when the oven is warm. Wipe the oven with a soft cloth that had been hemmed in soapy water after each use. Later wipe it with a wet cloth once more and then dry it. It may be required to use a liquid cleaning material from time to time and make a complete cleaning. Do not clean with dry and powder cleansers.
Cleaning of Your Oven's Cover
In order to be able to clean the cover of your oven from inside and outside, use a glass cleaner. Then rinse, dry it with a dry cloth. The cover can be pulled out for cleaning as shown in the following figure.
* Open the cover completely.
* Pass the metal pin through the holes as shown on picture
* Do this process for both hinges.
* Lift up the cover slightly, pull towards the outside smoothly. The cover will completely come out.
* Again place it into hinge holes while pinning the cover to its place.
Do not clean the oven's cover while the glass panels are hot. In case this measurement is not taken, the glass panel may brake down. Contact to Authorized Service when any problem occurred.
Cleaning Vitroceramic Cooker
Before starting cleaning wait for Vitroceramic cooker completely cool down. Be sure that cleaning material does not contain any particles which may cause to scratch glass. Use cream or liquid detergent. Vitroceramic surface must be cleaned with cold water and dried with soft cloth in a way that no cleaning material may be left. Use pallet provided with your product for cleaning food or residues. Sweet type food must be cleaned right after they are spilled before glass cools down. Steel cleaning material may damage Vitroceramic glass. Dust on the surface must be cleaned with wet cloth. Color change on ceramic surfaces does not effect functional structure and durability of Vitroceramic.
Color change is caused by not cleaning the residues, erosion due to casseroles and using not appropriate cleaning materials and is not due to material change. Cleaning pallet must always be used before applying chemicals. With this pallet you can clean even the smallest dirt on the surface. Materials that are hard to clean like liquified plastic, oil and sweety materials can be cleaned with pallet easily. Your pallet is dangerous because it is equipped with razor therefore it must be kept away from children. Be careful not to scratch silicon adhesive placed on the edges of the glass while using pallet.
5.2 MAINTENENCE
Change of Oven Lamp
The change of oven lamp must be done by authorized technician. The rating the ampoule should be 230V, 25Watt, Type E14 before changing the lamp, the oven should be plugged off and it should be cool.
PART 6 : SERVICE AND TRANSPORT
6,1 Requirements Before Contacting to Service
If the oven does not operate;
The oven may be plugged off, there has been a blow-out. On models fitted with a timer, time may not be regulated.
If the oven does not heat;
The heat may be not adjusted with oven's heater control switch.
If the interior lighting lamp does not light;
The electricity must be controlled.
It must be controlled whether the lamps are defective. If they are defective, you can change them as following the guide.
Cooking ( if lower-upper part does not cook equally ) ;
Control the shelf locations, cooking period and heat values according to the manual.
Except these, if you still have any problem with your product, please call to the "Authorized Service".
6,2 Information Related to Transport
If you need any transport;
Keep the original case of product and carry it with its original case when needed to be carried. Follow the transport signs on case.
Tape the cooker on upper parts, hats and heads and saucepan carriers to the cooking panels.
Place a paper between the upper cover and cooking panel, cover the upper cover, then tape it to the side surfaces of oven.
Tape cardboard or paper onto the front cover on interior glass of oven as it will be suitable to the trays, for the wire grill and trays in your oven not to damage to the oven's cover during transport.
Also tape the oven's covers to the side walls.
If it does not have the original case;
Take measure for the external surfaces (glass and painted surfaces) of oven against possible blows.

CHT5001
CHT6003IXG
CHT6001
CHT6202IX
CHT6001IX
CHT5202
CHT6002IX
CHT6202
CHT6002BL
CHT6005
UPUTSTVO ZA UPOTREBU SAMOSTALNI ELEKTRIČNI ŠPORET
Poštovani kupče,
Naš cilj je da Vam ponudimo visok kvalitet proizvoda, koji su proizvedeni u savremenim fabrikama i čiji je kvalitet proveren.
natural_image
Technical line drawing of a four-cylinder appliance with a diamond-shaped base and labeled component '15' (no text or symbols beyond label)| MODEL | DIMENZIJE(cm) |
| YE66 | 60*60*85/60*60*90 |
| YE56 | 50*60*85/50*60*90 |
DEO 2 UPOZORENJA
MOLIMO PAZLJIVO I U CELOSTI PROČITATI OVA UPUTSTVA PRE KORIŠĆENJA UREĐAJA. ČUVAJTE OVA UPUTSTVA NA SIGURNOM MESTU ZBOG KONSULTACIJE KADA BUDE POTREBNO.
OVAJ PRIRUČNIK JE PRIPREMLJEN ZA VIŠE OD JEDNOG MODELA. VAŠ UREĐAJ MOŽDA NEMA NEKE OD ODLIKA OBJAŠNJENIH U OVOM PRIRUČNIKU. DOK ČITATE PRIRUČNIK OBRATITE PAŽNJU NA IZRAZE KOJI SADRŽE FIGURE
radar
| Angle (°) | Value | |---|---| | 0 | -10 | | +10 | -20 | | +20 | -30 | | +30 | -40 | | +40 | -50 | | +50 | -60 | | +60 | -70 | | +70 | -80 | | +80 | -90 | | +90 | -100 | The chart displays a single data series with two distinct shaded regions. The values are estimated based on the radial distance from the center. There is no explicit numerical labels but likely represent a normalized or scaled metric for the plotted data points.L
4. 4. 3 Upotreba funkcijskih tastera za rernu
Ovaj prekidač vam omogućava da birate funkcije rerne. Funkcije i stepeni njihove jačine su prikazane u sledećoj tabeli. Takođe, u daljem tekstu ćete naći njihov detaljan opis i uputstvo za korišćenje.

Pali se svetiljka u rerni.
Pale se svetiljka rerne, crvena signalna lampica i ventilator. Vrši funkciju odmrzavanja zamrznute hrane.
Uključuju se termostat rerne, signalne lampice, donji i gornji grejač.
Uključuju se termostat rerne i signalne lampice, brzi grejač i ventilator.
Uključuju se termostat rerne, signalne lampice, ventilator, donji i gornji grejač.
Uključuju se termostat rerne, signalne lampice, grejač roštilja i ražanj za piletinu.
Uključuju se termostat rerne, signalne lampice, gornji grejač, grejač roštilja i ražanj za piletinu.
Uključuju se termostat rerne, signalne lampice, gornji grejač, grejač roštilja, ražanj za piletinu i ventilator.
Uključuju se termostat rerne, signalne lampice i donji grejač.
Uključuju se termostat rerne, signalne lampice, brzi grejač, donji grejač i ventilator.
Uključuju se termostat rerne, signalne lampice i donji grejač.

Funkcija odmrzavanja ( otapanje )
natural_image
Technical line drawing of a mechanical or electrical component with internal channels and a directional arrow (no text or symbols)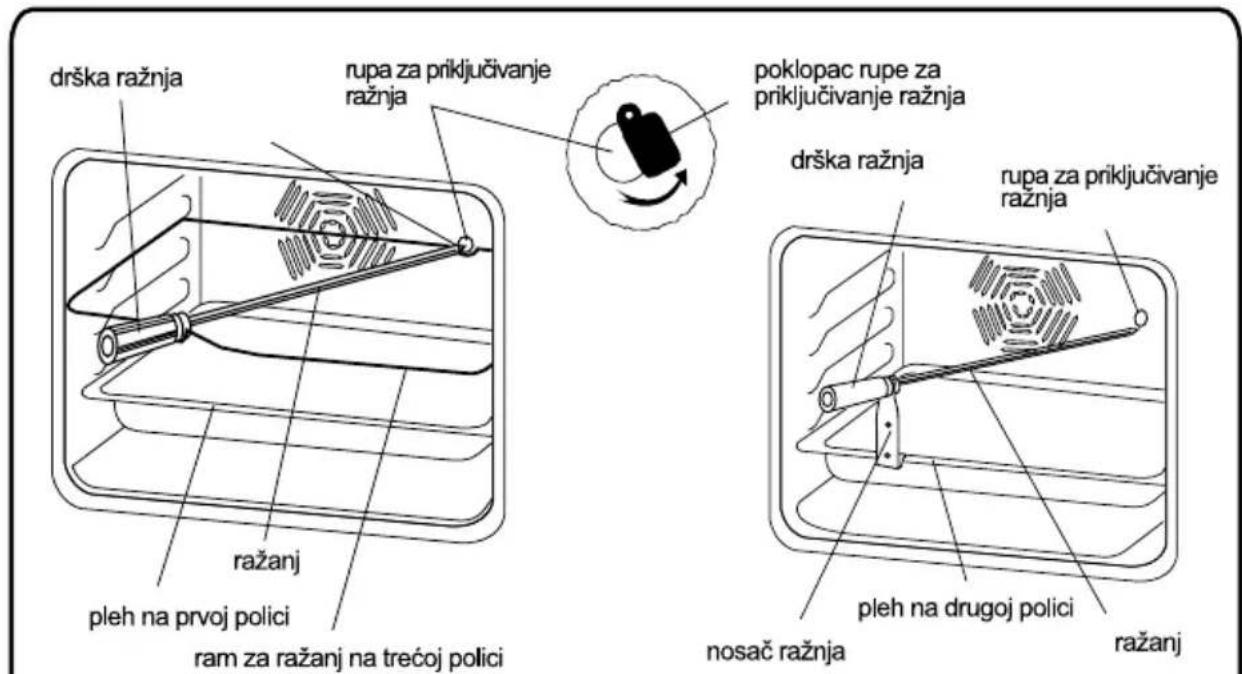
natural_image
Technical line drawing of a four-cylinder electrical heating element with mounting bracket (no text or symbols)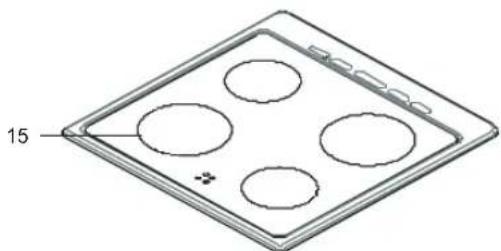
natural_image
Isometric diagram of a four-cell appliance with circular cutouts and a labeled dimension (15), no text or symbols present.| МОДЕЛ | ДИМЕНЗИИ (цм) |
| YE 66 | 60X60X85 / 60X60X90 |
- The appliance is not intended to be operated by means of an external timer or separate remote-control system.
- ПРЕДУПРЕДУВАЊЕ: In order to prevent tipping of the appliance, the stabilizing brackets must be installed. (For detail information please read the anti-tilting kit set guide.)
ВНИМАНИЕ: This appliance is designed only for cooking food and is intended for indoor domestic household use only and should not be used for any other purpose or in any other application, such as for non-domestic use or in a commercial environment or room heating.
natural_image
Technical line drawing of a mechanical or electrical component with internal channels and a directional arrow (no text or symbols)Dio popisa :
1- Poklopac površine za kuhanje
2- Površina za kuhanje
3- Upravljaèka ploèa
4- Ruèka vrata peænice
5- Poklopac ladice
6- Potporna noga
7- Vrata peænice
8- Pladanj peænice
9- Žièana rešetka
10- Prednji otpor
11- Prostor ventilatora
12- Lampica peænice
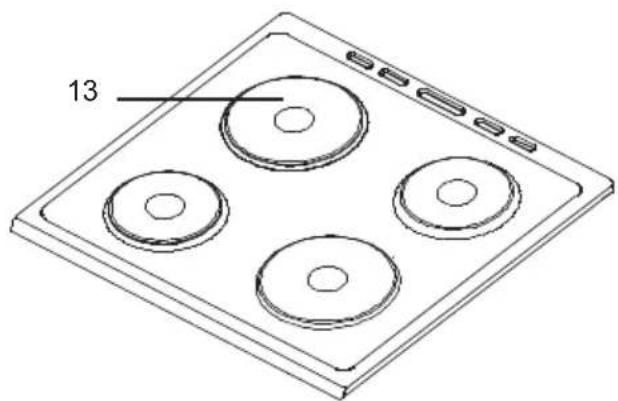
13- Zona kuhanja
14- Istaknuti element
| MODEL | VELIČINA (ćm) |
| YE 66 | 60*60*85/ 60*60*90 |
| YE 56 | 50*60*85/ 50*60*90 |
DIO 2: SIGURNOSNA UPOZORENJA
PROÈITAJTE OVE UPUTE PAŽLJIVO I U POTPUNOSTI PRIJE KORIŠTENJA VAŠEG APARATA I DRŽITE IH NA PRIKLADNOM MJESTU KAO PODSJETNIK KADA BUDE POTREBNO.
OVAJ PRIRUÈNIK JE PRIPREMLJEN ZA VIŠE OD JEDNOG MODELA KOJI SU SLIÈNI. VAŠ UREĐAJ MOŽDA NEMA ISTE KARAKTERISTIKE KOJE SU OBJAŠNJENE U OVOM PRIRUÈNIKU. OBRATITE PAŽNJU NA IZRAZE KOJI SADRŽE CIFRE, DOK ÈITATE OVAJ PRIRUÈNIK ZA RUKOVANJE.
5x1.5 mm² 380V 3N\~
5x1.5 mm² 400V 3N\~
5x1.5 mm² 415V 3N\~
| YE 56 | |
| DONJI GRIJAC | 1000 WATT |
| GORNJI GRIJAÈ | 1000 WATT |
| ROŠTILJ | 1600 WATT |
| TURBO GRIJAÈ | 2000 WATT |
| YE 66 | |
| DONJI GRIJAC | 1100 WATT |
| GORNJI GRIJAÈ | 1200 WATT |
| ROŠTILJ | 1400 WATT |
| TURBO GRIJAÈ | 2000 WATT |
4.2 PREZENTAČIJA I KARAKTERISTIKE KONTROLNE PLOČE
YE 56/66
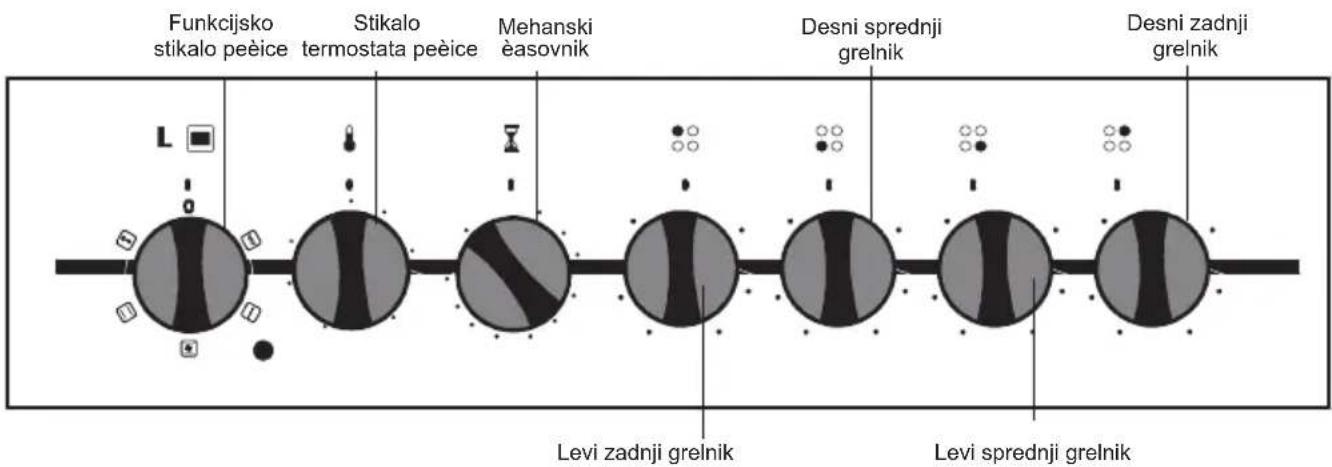
Prekidac
Prekidaè
funkcije pecnice termostata peaenice Mehanički programator Prednji desni grijaė Stražnji desni grijaė
1..... .....Održavanje lokacije toplom
2-3.....Grijne lokacije na niskoj toploti
4-5-6.. Lokacije za kuhanje – peèenje i vrijenje
Gornji dio zona kuhanja je prekriven zaštitnim materijalom otpornim na vruaeinu. Okrenite prekidae elektriènog šporeta na "3" i ostavite šporet da radi 5 minuta da gori i tako da oèvrsne zaštitni sloj pri prvoj upotrebi.
Tokom upotrebe elektriènih štednjaka, zahtijeva se obraaeaenje pažnje na to da korišteno posuče imaju glatku osnovu. Ako se koristi posuče prikladne veliène i glatke osnove, možete dobiti najveaeu efikasnost od svog štednjaka. Ne preporuèuje se koristiti male šerpe na velikim štednjacima, zato što aee ovo prouzroèiti gubitak toplote, a tako aee i energija biti uzalud potrošena.

Surely control that your cooker is off, the control switch is at "0" location after cooking. Sa sigurnošaeu se uvjerite da je vaš štednjak iskljuèen, kontrolni prekidae je na lokaciji "0" nakon kuhanja. Takođe, nikad ih ne dirajte jer aee štednjak biti vruaeodređeno vrijeme nakon što je iskljuèen. Ne dopustite djeci da prilaze blizu. Ėistite elektriėni štednjak vlažnom krpom nakon upotrebe elektriėnog štednjaka. Ako dođe do ekstremnog zaprljanja, možete ga oėistiti vodom s deterdžentom priliėno dobro. Zagrijte gornji dio na nekoliko minuta da se osuši nakon èišæenja. Ako neæete koristiti gornji dio određeno vrijeme , zaštite ga tankim slojem ulja kao kad podmazujete mašinskim uljem.
Dupli ili ovalni vitrokeramièki štednjak.
Dupli ili vitrokeramièki štednjaci mogu grijati na dvije razlièite pozicije. Za rad sa velikim preènikom duplog štednjaka okrenite prekidaè na "☐". I veliki i mali preènik štednjaka aeu raditi. Za rad ovalnog dijela ovalnog štednjaka okrenite prekidaè na to "☐". Both oval and round parts will operate.
Korištenje digitalnog podsjetnika za minute.
Istovremeno pritisnite (+) i (-) tipke na digitalnom podsjetniku za minute. Displej će početi bljeskati, i onda možete podesiti vremenske postavke upotrebom tipki (+) i (-). Kada pritisnete (+) i (-) tipke nakon podešavanja vremenai (△) simbol će se pojaviti na displeju, i željeno vrijeme je podešeno. Na kraju ovog vremenskog perioda, čut će se zvučni signal, ali pećnica nastavlja sa radom. Da biste isključili pećnicu, morate dovesti prekidač i termostat pećnice u položaj zatvoreno.
Podešavanje zvuka
Dok programator prikazuje vrijeme dana; ako je (-) tipka pritisnuta na 1-2 sekunde, oglasit će se zvučni signal. Nakon toga svaki put kada se pritisne tipka (-), dati će vam tri različite vrste zvučnog signala. Ne pritišćite dalje tipke i tako ćete sačuvat zadnji izabrani tip signala.
Podesite željeno vrijeme kuhanja okrećući tipku programatora u smijeru kazaljki na satu. Na kraju ovog vremenskog perioda, čut će se zvučni signal, ali pećnica nastavlja sa radom. Da biste isključili pećnicu, morate isključiti kontrolu pećnice.
4. 4. Upotreba funkćijskih prekidača pećniće
* Funkcija vaše pećnice može biti različita zavisno od modela vašeg proizvoda.

Lampica pećnice
Samo će lampica pećnice biti uključena i ostaje uključena u svim funkcijama kuhanja.

Statička funkcija kuhanja
natural_image
Pure 3D wireframe diagram of a rectangular grid structure with no text or symbolsnatural_image
Technical line drawing of a mechanical or electrical enclosure with internal components and an arrow indicating direction (no text or symbols present)Plitki pladanj
natural_image
Simple line drawing of a square frame with no text or symbolsPlitki pladanj se koristi za pečenje peciva kao što je flan i sl.
natural_image
Isometric line drawing of a square frame structure (no text or symbols)Duboki pladanj se koristi za pravljenje variva.
natural_image
Simple line drawing of a rectangular tray or container with no text or symbolsZa efikasnu upotrebu molimo stavite pladanj na 3. policu.
UPOZORENJE: Pladanj 80 mm ne bi trebao biti korišten na 1. (najnižoj) polici.
DIO 6: SERVIS I TRANSPORT
6,1 Šta je potrebno uraditi prije pozivanja servisa
Ako peaenica ne radi:
Seznam delov:
1 - Pokrov kuhalne površine
2- Kuhalna površina
3- Nadzorna plošèa
4- Roèaj na vratih peèice
5- Pokrov predala
6- Noga
7- Vrata peèice
8- Pladenj peèice
9- Žièna mreža
10-Sprednji upor
11-Ventilator
12- Luè peèice
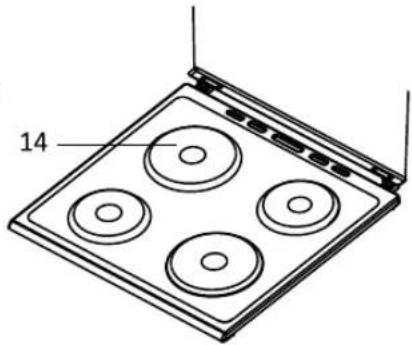
13-Kuhalna plošèa
14- Oznaèen element
natural_image
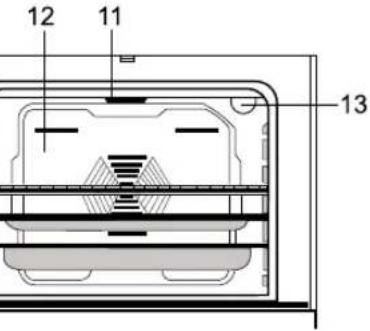
Line drawing of a four-circular kitchen appliance with a labeled component (13), no text or symbols present.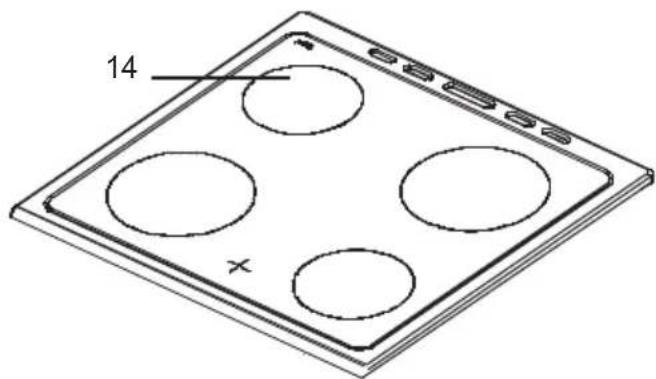
| MODEL | VELIKOST (cm) |
| YE 66 | 60*60*85/ 60*60*90 |
| YE 56 | 50*60*85/ 50*60*90 |
2. DEL: VARNOSTNA OPOZORILA
PRED UPORABO NAPRAVE POZORNO IN V CELOTI PREBERITE TA NAVODILA IN JIH HRANITE NA PRIROËNEM MESTU ZA MOREBITNO KASNEJŠO UPORABO.
TA PRIROÈNIK JE PRIPRAVLJEN ZA RAZLIÈNE MODELE. VAŠA NAPRAVA MORDA NIMA NEKATERIH FUNKCIJ, KI SO RAZLOŽENE V TEH NAVODILIH. MED BRANJEM NAVODIL ZA UPORABO BODITE POZORNI NA IZRAZE, KI IMAJO ŠTEVILKE.
5x1.5 mm² 380V 3N\~
5x1.5 mm² 400V 3N\~
5x1.5 mm² 415V 3N\~
4. UPORABA VAŠE PEČICE
4.1 SPLOŠNI VIDEZ IN TEHNIČNE ZNAČILNOSTI
| YE 56 | |
| SPODNJI GRELNIK | 1000 WATT |
| ZGORNJI GRELNIK | 1000 WATT |
| ŽAR | 1600 WATT |
| TURBO GRELNIK | 2000 WATT |
| YE 66 | |
| SPODNJI GRELNIK | 1100 WATT |
| ZGORNJI GRELNIK | 1200 WATT |
| ŽAR | 1400 WATT |
| TURBO GRELNIK | 2000 WATT |
4.2 PREDSTAVITEV IN FUNKCIJE NADZORNE PLOŠČE YE 56/66
flowchart
graph LR
    A["Funkcijsko stikalo peèice"] --> B["Stikalo termostata peèice"]
    B --> C["Mehanski èasovnik"]
    C --> D["Desni sprednji grelnik"]
    D --> E["Desni zadnji grelnik"]
    style A fill:#f9f,stroke:#333
    style B fill:#ccf,stroke:#333
    style C fill:#cfc,stroke:#333
    style D fill:#fcc,stroke:#333
    style E fill:#ffc,stroke:#333
4.3 UPORABA KUHALNIH PLOŠČ
Nastavitev časa:
Èas morate nastaviti pred zaèetkom uporabe peèice. Ko boste peèico priklopili na napajanje, bo na zaslonu zaèel utripati simbol (A) in tri »0«. Istoèasno pritisnite tipki (+) in (-). Na zaslonu se bo prikazal simbol Pika v sredini zaslona bo zaèela utripati. Z uporabo gumbov (+) in (-) prilagodite èas, medtem ko pika utripa. Ko je nastavitev konèana, pika neprekinjeno sveti.
Nastavite želen èas peèenja z obraèanjem gumba èasovnika v smeri urinega kazalca. Ko se ta èas izteèe, zaslišite piskajoèi zvok, peèica pa nadaljuje z delovanjem. Èe želite izklopiti peèico, morate izklopiti nadzor peèice.
natural_image
Pure 3D wireframe diagram of a rectangular grid structure with no text or symbolsnatural_image
Technical line drawing of an internal combustion chamber with cooling fins and exhaust pipe (no text or symbols)Plitki pladenj
natural_image
Simple line drawing of a square frame with no text or symbolsnatural_image
Isometric line drawing of a square frame structure (no text or symbols)natural_image
Simple line drawing of a rectangular tray or container with no text or symbolsZa uèinkovito uporabo postavite pladenj na 3. polico.