
DDX9707XR - Gps KENWOOD - Free user manual and instructions
Find the device manual for free DDX9707XR KENWOOD in PDF.


| Product type | GPS multimedia car radio with DVD player |
| Brand | Kenwood |
| Model | DDX9707XR |
| Dimensions (W x H x D) | 178 x 100 x 160 mm |
| Weight | Approximately 1.8 kg |
| Power supply | 12 V DC (car battery) |
| Main functions | GPS navigation, DVD/VCD player, USB, iPod/iPhone, hands-free Bluetooth, AM/FM radio, HD Radio (depending on region) |
| Screen | Touch screen with angle and brightness adjustment |
| Connectivity | Bluetooth, USB (front and rear), front/rear camera inputs, AV input |
| Supported audio formats | CD, DVD, MP3/WMA/AAC/FLAC files via USB |
| Navigation | GPS + GLONASS, map updates via smartphone |
| Maintenance and cleaning | Wipe with a soft, dry cloth. Do not use solvents or alcohol. |
| Safety | Parking brake detection, screen deactivation while driving, professional installation recommended |
| Spare parts and repairability | Consult your Kenwood dealer for parts and repairs. Do not disassemble yourself. |
| General information | User manual available for download on Kenwood's website. First GPS acquisition may take a few minutes. |
Frequently Asked Questions - DDX9707XR KENWOOD
User questions about DDX9707XR KENWOOD
0 question about this device. Answer the ones you know or ask your own.
Ask a new question about this device
Download the instructions for your Gps in PDF format for free! Find your manual DDX9707XR - KENWOOD and take your electronic device back in hand. On this page are published all the documents necessary for the use of your device. DDX9707XR by KENWOOD.
USER MANUAL DDX9707XR KENWOOD
MONITOR WITH DVD RECEIVER
MONITEUR AVEC RÉCEPTEUR DVD
MONITOR CON RECEPTOR DVD
DDX9907XR
DDX9707S
MONITOR WITH RECEIVER
MONITEUR AVEC RÉCEPTEUR
MONITOR CON RECEPTOR
DMX957XR
DMX907S
DMX9707S
Quick Start Guide
Take the time to read through this instruction manual.
Familiarity with installation and operation procedures will help you obtain the best performance from your new receiver.
For your records
Record the serial number, found on the top of the unit, in the spaces designated on the warranty card, and in the space provided below. Refer to the model and serial numbers whenever you call upon your KENWOOD dealer for information or service on the product.
Model DDX9907XR / DDX9707S / DMX957XR / DMX907S / DMX9707S Serial number
US Residence Only
Register Online
Register your KENWOOD product at www.kenwood.com/usa/
Important Notice on Software

Software License on This
Product
The software embedded in this product comprises a number of independent software components, each of which is copyrighted by JVCKENWOOD Corporation or by a third party. This product uses software components that are based on an End-User License Agreement (hereinafter called "EULA") stipulated by JVCKENWOOD Corporation and by third parties.
The EULA dictates the availability of the source codes of free-software components as a prerequisite to distributing them in executable form under the terms of the GNU General Public License or the Lesser General Public License (hereinafter called "GPL/LGPL"). To get information about the software components that are subject to the terms of the GPL/LGPL, please visit the following Website:
Website URL https://www2.jvckenwood.com/gpl/
Queries concerning the contents of the source code or the like will not be accepted.
Please note that software components based on a EULA that is not subject to the terms of the GPL/LGPL or those that have been developed or created by JVCKENWOOD Corporation will be excluded from the scope of source code disclosure.
Because licenses to use software components distributed under the GPL/LGPL are offered to the customers for free of charge, no warranty is granted to the customers, whether explicitly or implicitly, to the extent of the applicable laws. Unless otherwise stipulated by the applicable laws or agreed upon in writing, the copyright holders or those who are entitled to modify and redistribute the software components are not held responsible for any and all damages resulting from their use or from inability to use them. For more information about the terms of use of the software components, required items of compliance and so on, please refer to the GPL/LGPL.
Customers wishing themselves to use a software component that is subject to the GPL/LGPL embedded in this product are encouraged to read the terms of the corresponding license before use. Because each individual license is prescribed by a third party other than
JVCKENWOOD Corporation, the original (English) of the license is presented.
EULA

Software License Agreement
JVCKENWOOD Corporation (hereinafter called "Licensor") holds either the copyright to the embedded software or the right to sublicense it. This agreement establishes the conditions under which the customer uses this "Licensed Software."
The customer shall agree to the terms of this license agreement before proceeding to use Licensed Software.
This agreement is deemed to have taken effect when the customer (hereinafter called "User") has used a product implementation of Licensed Software.
The Licensed Software may contain software Licensor has been licensed to use by third parties directly or indirectly. Some third parties may have terms of use prescribed for their customers, apart from this Software License Agreement. This agreement does not apply to such software. Be sure to consult "Important Notice on Software" as presented separately.
Article 1 (General)
Licensor grants to User a non-exclusive, non-assignable right of use Licensed Software within the country where the User purchases the Product (hereinafter the "Country") (except for the exception provided for in Paragraph 1, Article 3).
Article 2 (Right of Use)
- The rise of use granted under this agreement is the right to use Licensed Software in this product.
- User may not duplicate, copy, modify, add to, translate or otherwise alter, or loan licensed Software and the associated literature in whole or in part.
- Use of Licensed Software is limited to a private extent, and Licensed Software may not be distributed, licensed or sublicensed for any purposes whatsoever, including commercial use.
- User shall use Licensed Software as per the instruction manual or instructions given in the help file and may not use or duplicate data in violations of the regulations of the Copyright Law or other governing laws by using Licensed Software in whole or in part.
Article 3 (Terms of License)
- In assigning this product, User may not retain the original copy of the embedded Licensed Software (including associated literature, updates and upgrades) and any duplicates and associated literature with regard to the license to use Licensed Software. User may transfer Licensed Software only to the condition of binding the assignee to abide by the terms of this Software License Agreement.
- User may not reverse-engineer, disassemble, decompile or otherwise analyze the source code of Licensed Software.
Article 4 (Rights to Licensed Software)
All rights to Licensed Software and the associated literature, including copyrights, shall reside with Licensor or the original right holder who has granted the Right of Use and right to sublicense to Licensor (hereinafter referred to as "Original Right Holder"), and User does not have any rights other than Right of Use granted hereunder with regard to Licensed Software and the associated literature.
Article 5 (Exemption Granted to Licensor)
- Licensor and Original Right Holder do not assume any responsibility for damages caused to User or third parties resulting from the exercise by User of the license granted hereunder, unless otherwise provided by any law to the contrary.
- Licensor does not warrant Licensed Software to be merchantable, compatible and fit for specific purposes.
Article 6 (Responsibility for Third Parties)
If disputes over the infringement of third parties' intellectual property rights, such as copyrights and patent rights, arise out of the use of Licensed Software by User, User shall resolve these disputes at User's own expenses while keep Licensor and Original Right Holder harmless.
Article 7 (Secrecy Obligation)
User shall keep confidential Licensed Software provided hereunder, information contained in the associated literature or the like and those provisions of this agreement not yet in public knowledge and may not disclose or leak these to third parties without prior written consent from Licensor.
Article 8 (Cancellation of the Agreement)
Licensor reserves the right to cancel this agreement forthwith and claim compensation from User for the damages caused by such cancellation when User:
(1) Breaches any of the provisions of this agreement, or
(2) Has received a petition for seizure, provisional seizure, provisional disposition or any other kind of compulsory execution.
Article 9 (Destruction of Licensed Software)
If this agreement is terminated under the provision of the foregoing paragraph, User shall destroy Licensed Software, along with all associated literature and its duplicates, within two (2) weeks from the date of termination.
Article 10 (Copyright Protection)
- Copyrights and all other intellectual property rights relating to Licensed Software shall reside with Licensor and Original Right Holder and in no circumstances with User.
- User shall abide by the laws relating to copyrights and intellectual property rights in using Licensed Software.
Article 11 (Export Control)
- Licensed Software and the associated literature or the like may not be exported to places outside the Country (including transmission outside the Country over the Internet or the like).
- User agrees that Licensed Software is subject to export controls imposed by the Country and the United States of America.
- User agrees to comply with all the international and domestic laws that apply to this software (U.S. Export Administration Regulations and regulations established by the U.S., the Country and their governmental agencies regarding usage by end users and export destinations).
Article 12 (Miscellaneous)
- Even if this agreement is invalidated in part by law, all other provisions shall remain in effect.
- Licensor and User shall consult each other in good faith to resolve any matters not provided for in this agreement or questions arising from the interpretation of this agreement.
- Licensor and User agree that this agreement is governed by the law of Japan and that all disputes involving claims and obligations that may arise out of this agreement will be settled by arbitration at the Tokyo District Court as the court of first instance.
Contents
Contents 4
Before Use 4
About the Quick start guide 4
How to read this manual .... 4
Precautions 4
Basic Operations ......6
Functions of the Buttons on the Front Panel ..6
Turning on the Unit 7
Initial Settings 8
Adjusting the volume 9
Display Adjustment ....10
Viewing Angle 10
Touch screen operations ....11
HOME screen descriptions ....11
Popup menu 12
Source selection screen description .....12
Source control screen descriptions ....14
List screen ....14
Disc 15
DVD/VCD Basic Operation ....15
DVD Disc Menu Operation ....16
USB/iPod......17
Connecting a USB device ....17
Connect iPod/iPhone ....17
USB/iPod Basic Operation ....18
HD Radio™ Tuner/Radio ......19
HD Radio Tuner Basic Operation ....19
Radio Basic Operation ....20
Memory Operation 20
Bluetooth Control ......21
Register the Bluetooth device ....21
Using the Hands-Free Unit ......22
Controlling Audio ......24
Connection/Installation ......25
Before Installation 25
Installing the unit....27
Appendix 35
Note for specifications ....35
Before Use
About the Quick start guide
- This Quick Start Guide describes basic functions of this unit. For functions not described in this Guide, refer to the Instruction Manual on the following website: http://manual.kenwood.com/edition/im404/
- The Instruction manual is subject to change for modification of specifications and so forth. Be sure to download the latest edition of the Instruction manual for reference.
How to read this manual
- The screens and panels shown in this manual are examples used to provide a clear explanation of operations.
For this reason, they may be different from the actual screens or panels, or some display patterns may be different from the actual ones. - Display language: English is used for the purpose of explanation. You can select a display language from the [SETUP] menu. See User Interface Setup (P.82) in the Instruction Manual.
Precautions
⚠️ WARNINGS
To prevent injury or fire, take the following precautions:
- To prevent a short circuit, never put or leave any metallic objects (such as coins or metallic tools) inside the unit.
- Do not watch or fix your eyes on the unit's display when you are driving for any extended period.
- If you experience problems during installation, consult your KENWOOD dealer.
Precautions on using this unit
- When you purchase optional accessories, check with your KENWOOD dealer to make sure that they work with your model and in your area.
- You can select a language to display menus, audio file tags, etc. See User Interface Setup (P.82) in the Instruction Manual.
- The Radio Data System or Radio Broadcast Data System feature won't work in areas where the service is not supported by any broadcasting station.
Protecting the monitor
- To protect the monitor from damage, do not operate the monitor using a ball point pen or similar tool with a sharp tip.
Cleaning the unit
- If the faceplate of this unit is stained, wipe it with a dry soft cloth such as a silicon cloth. If the faceplate is stained badly, wipe it with a cloth moistened with neutral cleaner, then wipe it again with a clean soft dry cloth.
NOTE
- Applying spray cleaner directly to the unit may damage its mechanical parts. Wiping the faceplate with a hard cloth or using a volatile liquid such as thinner or alcohol may scratch the surface or erase the screened print.
Lens fogging
When you turn on the car heater in cold weather, dew may form on the lens in the disc player of the unit due to condensation. This condensation on the lens (also called lens fogging) may not allow discs to play. In such a situation, remove the disc and wait for the dew to evaporate. If the unit still does not operate normally after a while, consult your KENWOOD dealer.
Precautions on handling discs
- Do not touch the recording surface of the disc.
- Do not stick tape etc. on the disc, or use a disc with tape stuck on it.
- Do not use disc type accessories.
- Clean the disc from the center toward the outside rim.
- When removing a disc from this unit, pull it out horizontally.
- If the disc center hole or outside rim has burrs, use the disc only after removing the burrs with a ballpoint pen etc.
• Discs that are not round cannot be used.


- 8-cm (3 inch) discs cannot be used.
• Discs with coloring on the recording surface or discs that are dirty cannot be used.
• This unit can only play the following types of CDs.

- This unit may not correctly play discs which do not have the mark.
- You cannot play a disc that has not been finalized. (For the finalization process, see your writing software and your recorder's instruction manual.)
Acquiring GPS signal
The first time you turn on this unit, you must wait while the system acquires satellite signals for the first time. This process could take up to several minutes. Make sure your vehicle is outdoors in an open area away from tall buildings and trees for fastest acquisition.
After the system acquires satellites for the first time, it will acquire satellites quickly each time thereafter.
About GLONASS
This unit uses Global Navigation Satellite System (GLONASS) in addition to GPS.
Combining GPS and GLONASS can refine positioning accuracy than using GPS only.
Caution for Smartphone Users
Simultaneously running multiple applications on your smartphone while screen sharing places heavy demand on the microprocessor of the phone, potentially affecting communication and performance.
For best results while pairing with your Kenwood receiver, please be sure to close any unused applications.
Basic Operations
Functions of the Buttons on the Front Panel
DMX957XR / DMX907S / DMX9707S
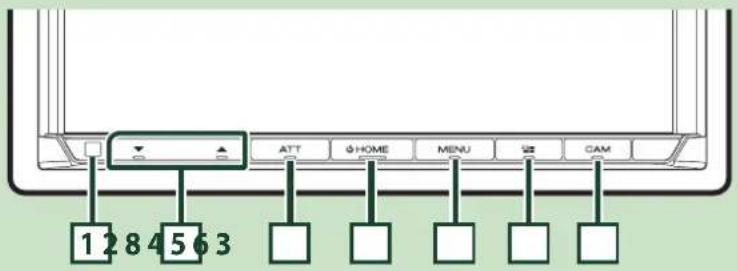
NOTE
- The panels shown in this manual are examples used to provide a clear explanation of operations. For this reason, they may be different from the actual panels.
| Number Name Motion | ||
| 1 | Remote Sensor | • Receives the remote control signal. |
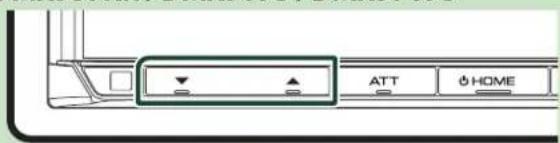
| 2 | ▼,▲ (Volume) | • Adjusts the volume.The volume will go up to 15 when you keep pressing ▲.(P.9) |
| 3 | CAM | • Switches view camera display on/off.The camera whose view is displayed first changes according to the "Camera Setup" setting and the shift lever position in the shift gate. The camera whose view was displayed last is kept and the same camera view will be displayed the next time. If its assignment setting is changed, the rear camera view is displayed.Pressing and holding turns the screen off. (DDX9907XR / DDX9707S)Pressing and holding displays the Angle Adjust screen. (DMX957XR only) |
| 4 | HOME | • Displays the HOME screen (P.11).Pressing for 1 second turns the power off.When the power is off, turns the power on. |
| 5 | MENU • Displays the popup menu screen. • Pressing for 1 second switches attenuation of the volume on/off. (DDX9907XR / DDX9707S) • Pressing for 1 second turns the screen off. (DMX957XR / DMX907S / DMX9707S) | |
| 6 | • Displays the APP (Apple CarPlay/Android Auto/Wireless Mirroring) screen. • Pressing and holding displays the Voice Recognition screen. • When neither Apple CarPlay, Android Auto, nor a Bluetooth Hands-Free phone is connected, pressing and holding displays Bluetooth pairing waiting dialog. | |
| 7 | ▲ | • Displays the Angle Adjust screen. - [DISC EJECT]: Ejects the disc. • When the panel is opened, closes the panel. • To forcibly eject the disc, press it for 2 seconds and then touch [DISC EJECT] after the message is displayed. |
| 8 | ATT • Switches | attenuation of the volume on/off. |
| 9 | Disc insert slot | • A slot to insert a disc media. (DDX9907XR / DDX9707S only) |
Turning on the Unit
The method of turning on is different depending on the model.
1 Press the [HOME] button.
DMX957XR / DMX907S / DMX9707S

The unit is turned on.
●To turn off the unit:
1 Press the [HOME] button for 1 second.
NOTE
- If it is your first time to turn the unit on after installation, it will be necessary to perform Initial SETUP (P.8).
Initial Settings
Initial SETUP
Perform this setup when you use this unit first time.
1 Set each item as follows.

[Language]
Select the language used for the control screen and setting items. Default is "American English(en)".
① Touch [Language].
② Touch [Language Select].
③ Select the desired language.
④ Touch [←].
For details, see User Interface Setup (P.82) in the Instruction Manual.
[Clock]
Sets the synchronization of the clock and adjusts it.
For details, see Calendar/clock settings (P.9).
[Display]
Set the key illumination color.
If it is hard to see the image on the screen even, adjust the viewing angle.
① Touch [Display].
② Touch [Key Color].
③ Select the desired color.
④ Touch [←].
(DDX9907XR / DDX9707S / DMX957XR only)
⑤ Touch [Display Adjustment].
⑥ Adjust a viewing angle and a tilt position.
⑦ Touch [←].
For details, see Display Adjustment (P.10).
(DMX907S /DMX9707S only)
⑤ Touch [Viewing Angle].
⑥ Select a viewing angle.
⑦ Touch [←].
For details, see Viewing Angle (P.10).
For details, see Display Setup (P.82) in the Instruction Manual.
[Camera]
Set the parameters for the camera.
① Touch [Camera].
② Set each item and touch [←].
For details, see Camera Setup (P.74) in the Instruction Manual.
[OEM SETUP]
This function requires a commercial adaptor.
Consult your KENWOOD dealer for details.
[DEMO]
Set the demonstration mode. Default is "ON".
2 Touch [Finish].

NOTE
• These settings can be made from the SETUP menu. See Setup (P.79) in the Instruction Manual.
Calendar/clock settings
1 Press the [MENU] button.
▶ Popup menu appears.
2 Touch [SETUP].
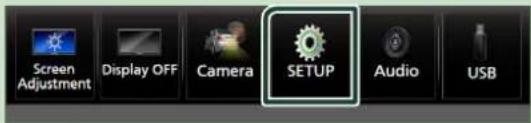
▶ SETUP Menu screen appears.
3 Touch [User Interface].

▶User Interface screen appears.
4 Set each item as follows.
Scroll the page to show hidden items.
![User Interface Time Format 12-Hour Clock GPS-SYNC Time Zone Pacific Time [GMT -8:00] Clock Adjust](/content/2026/06/1147993/images/d34622c338e28c2835fcde8a522fc8b4c91dfb49dca2aa2a9195af855ebaf16f.jpg)
[Time Format]
Select the time display format.
12-Hour/24-Hour]
[Clock]
GPS-SYNC: Synchronizes the clock time with the GPS.
[Manual]: Set the clock manually.
[Time Zone]
Select the time zone.
[Clock Adjust]
If you select [Manual] for Clock, adjust the date and time manually. (P.9)
NOTE
- Please set the date and time. If they are not set, some functions may not work.
●Adjust the date and time manually
1 Touch [Clock Adjust] on the User Interface screen.
2 Adjust the date, then adjust the time.

3 Touch [Set].
Adjusting the volume
You can adjust the volume (0 to 40).
Press [▲] to increase, and press [▼] to decrease. Holding [▲] increases the volume continuously to level 15.
DMX957XR / DMX907S / DMX9707S

Basic Operations
Display Adjustment (DDX9907XR / DDX9707S / DMX957XR)
1 Press the [▲] button.
▶ Display Adjustment screen appears.
DMX957XR
1 Press and hold the [CAM] button.
▶ Display Adjustment screen appears.
DMX957XR
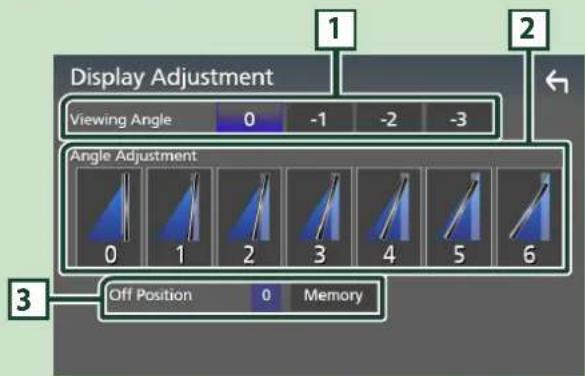
1 Viewing Angle
You can adjust the viewing angle when the image on the screen is difficult to see evenly.
The smaller the (negative) value, the more whitish the image on the screen looks.
"0" (Default)/"-1"/"-2"/"-3"
2 Angle Adjustment
Select a tilt position you want to set up. Default is "0".
3 Off Position
You can store the current monitor angle as the angle during power off. Touch [Memory] when the desired angle is selected.
Viewing Angle (DMX907S / DMX9707S)
You can adjust the viewing angle when the image on the screen is difficult to see evenly. The smaller the (negative) value, the more whitish the image on the screen looks.
1 Press the [MENU] button.
▶ Popup menu appears.
2 Touch [SETUP].
3 Touch [Display].
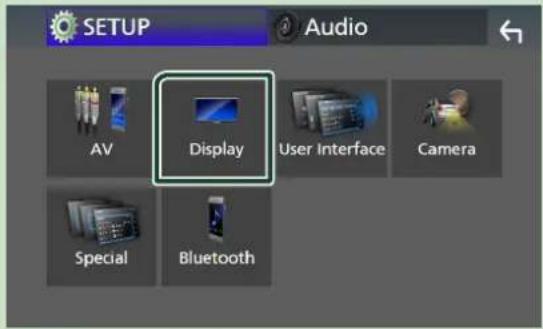
▶ Display screen appears.
4 Touch [Viewing Angle].
5 Select an angle you want to set up. Default is "0".

Touch screen operations
To perform operations on the screen, you need to touch, touch and hold, flick or swipe to select an item, display a setting menu screen or change pages.
●Touch
Touch the screen gently to select an item on the screen.

natural_image
Hand cursor icon pointing at a button (no text or symbols)●Touch and hold
Touch the screen and keep your finger in place until the display changes or a message is displayed.

natural_image
Hand cursor icon with finger pressing a circular button (no text or symbols)●Flick
Slide your finger quickly to the left or right on the screen to change the page. You can scroll a list screen by flicking up/down on the screen.

●Swipe
Slide your finger up or down on the screen to scroll the screen.

HOME screen descriptions
Most functions can be performed from the HOME screen.

1
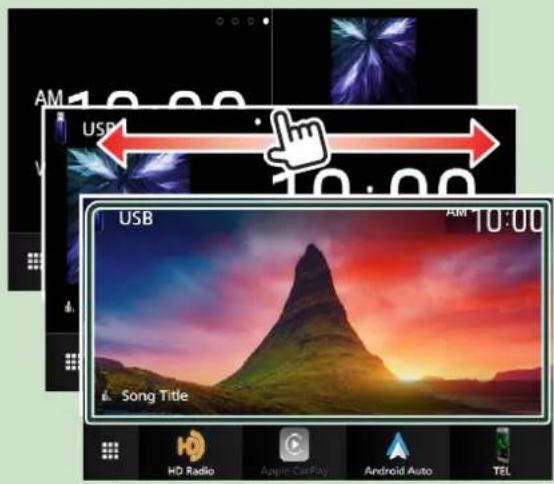
- Widget - You can change the widget by flicking left or right on the widget area. - Touch the widget to display the detailed screen.
2
• Displays the source selection screen. (P.13)
3
- Short-cut playback source icons (P.13)
Display the HOME screen
1 Press the [HOME] button.

DMX957XR / DMX907S / DMX9707S
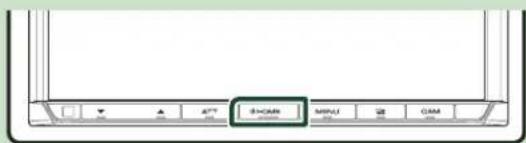
▶HOME screen appears.
Widget
1 Press the HOME button.
▶ HOME screen appears.
2 You can change the widget by flicking left or right on the widget area.
Popup menu
1 Press the MENU button.
▶ Popup menu appears.
2 Touch to display the popup menu.

The contents of the menu are as follows.
| • Displays the Screen Adjustment screen. | |
| • Turns the display off.To turn on the screen: Touch the display. | |
| • Displays the view camera screen. | |
| • Displays the SETUP Menu screen. | |
| • Displays the Audio screen.(P.24) |
| Displays the control screen of current source. Icon feature differs depending on the source. This icon is for USB source. | |
| Close the popup menu. | |
| Displays the Android Auto device list. This icon appears only when Android Auto is connected and two or more devices can be used as Android Auto source. | |
| Short-cut source icons: The source changes to the one you have set with a short-cut. For the short-cut setting, refer to Customize Short-cut source icons on HOME screen (P.13). |
Source selection screen description
You can display icons of all playback sources and options on the source selection screen.

| 1 | • Changes playback sources. For playback sources, see Select the playback source (P.13). |
| 2 | • Page indication |
| 3 | • Changes pages. (Touch <//>) You can also change pages by flicking left or right on the screen. |
| 4 | • Returns to the previous screen. |
| 5 | • Displays the SETUP Menu screen. |
Select the playback source
1 Press the HOME button.
▶ HOME screen appears.
2 Touch
From the screen, you can select the following sources and functions.
 | • Switches to the Apple CarPlay screen from the connected iPhone. |
 | • Switches to the Android Auto screen from the connected Android smartphone. |
 | • Displays the Hands Free screen. (P.22) When neither Apple CarPlay, Android Auto, nor a Bluetooth Hands-Free phone is connected, displays Bluetooth pairing waiting dialog.*1 |
 | • Switches to the Radio broadcast.*2 (P.20) |
 | • Switches to the HD Radio broadcast.*3 (P.19) |
 | • Switches to the SiriusXM® satellite radio broadcast. |
 | • Plays a Bluetooth audio player. |
 | • Plays a disc.*4 (P.15) |
 | • Plays an iPod/iPhone. (P.18) |
 | • Plays files on a USB device. (P.18) |
 | • Switches to an external component connected to the AV-IN input terminal.*5 |
 | • Switches to the USB Mirroring screen from the connected iPhone/Android smartphone. |
 | • Switches to the Wireless Mirroring screen from the connected Android smartphone. |
 | • Displays the Audio screen. (P.24) |
 | • Puts the unit in standby. (P.13) |
*1 When connecting as Apple CarPlay or Android Auto, it works as a phone provided in Apple CarPlay or Android Auto. If Apple CarPlay or Android Auto are connected during talking by the Bluetooth device or
iDataLink phone, the current call will be continued.
*2 DDX9707S / DMX9707S only
*3 DDX9907XR / DMX957XR / DMX907S only
*4 DDX9907XR / DDX9707S only
*5 CA-C3AV (optional accessory) is connected to the AV-IN input terminal for visual. (P.30)
Put the unit in standby
1 Press the HOME button.
▶ HOME screen appears.
2 Touch .
3 Touch STANDBY.

Customize Short-cut source icons on HOME screen
You can arrange the positions of the source icons as you like.
1 Press the HOME button.
▶ HOME screen appears.
2 Touch
3 Touch and hold the icon which you want to move in the customizing mode.
4 Drag the icon to the desired position.

flowchart
graph TD
    A["HD Radio"] --> B["Apple CarPlay"]
    B --> C["Android Auto"]
    C --> D["TEL"]
    E["DISC"] --> F["USB Mirroring"]
    F --> G["SiriusXM"]
    G --> H["Bluetooth"]
    I["Smartphone Icon"] --> J["Smartphone Icon"]
    K["Camera Icon"] --> L["Camera Icon"]
    M["Radio Icon"] --> N["Radio Icon"]
    O["Audio Icon"] --> P["Audio Icon"]
Basic Operations
Source control screen descriptions
There are some functions which can be performed from most screens.
Indicators
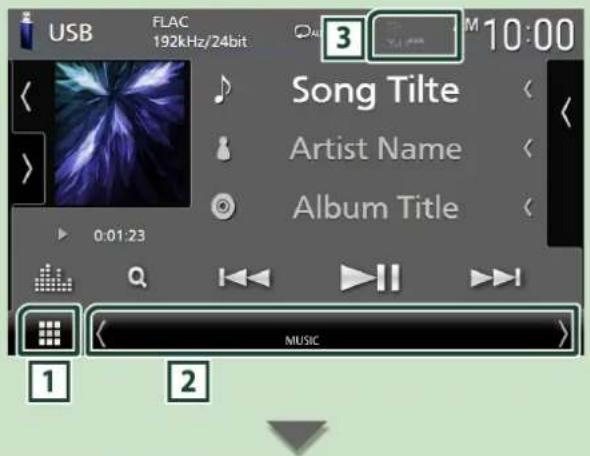
Short-cut source icons

1 All sources icon
Displays the source selection screen. (P.12)
2 Secondary screen
• 〈/〉: The Secondary screen changes to another one every time you touch it. You can also change the Secondary screen by flicking left or right on the screen.
- Indicators: Displays the current source condition and so on.
- ATT: The attenuator is active.
- DUAL: The dual zone function is active.
- MUTE: The mute function is active.
- LOUD: The loudness control function is active.
- Short-cut source icons: The source changes to the one you have set with a short-cut. For the short-cut setting, refer to Customize Short-cut source icons on HOME screen (P.13).
3 TEL 1
• Connected Bluetooth device information.
List screen
There are some common function keys in the list screens of most sources.
Display the list screen
1 Touch Q.
The list screen appears.
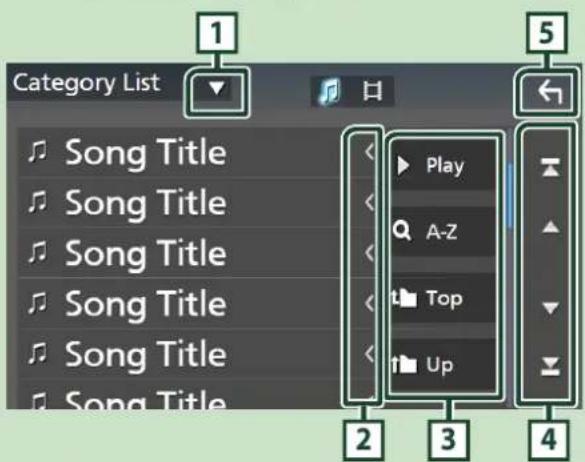
1
Displays the list type selection window.
2 Text scroll
Scrolls the displayed text.
3 ▶ Play etc.
Keys with various functions are displayed here.
- Play : Plays all tracks in the folder containing the current track.
• Q A-Z : Jumps to the letter you entered (alphabetical search). - Top Up : Moves to the upper hierarchy level.
4 / / / Page scroll
You can change pages to display more items by touching ▲/▼.
• / : Displays the top or bottom page.
5 Return
Returns to the previous screen.
Disc (DDX9907XR / DDX9707S)
Insert a disc
1 Press the ▲ button.
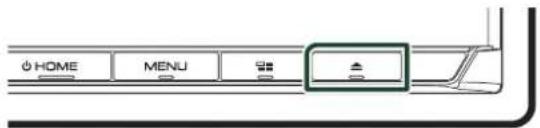
2 Touch DISC EJECT.
The panel opens.
3 Insert the disc into the slot.

natural_image
Technical line drawing of an open electronic device with a CD and drive casing (no text or symbols)The panel closes automatically. The unit loads the disc and playback starts.
Eject a disc
1 Press the ▲ button.
2 Touch DISC EJECT.
When removing a disc, pull it horizontally.
3 Press the ▲ button.
The panel closes.
NOTE
- To forcibly eject the disc, press and hold the ▲ button for 2 seconds and then touch DISC EJECT after the message is displayed.
DVD/VCD Basic Operation
NOTE
• The control screen disappears when no operation is done for 5 seconds.
1 When the operation keys are not displayed on the screen, touch 4 area.
Control screen

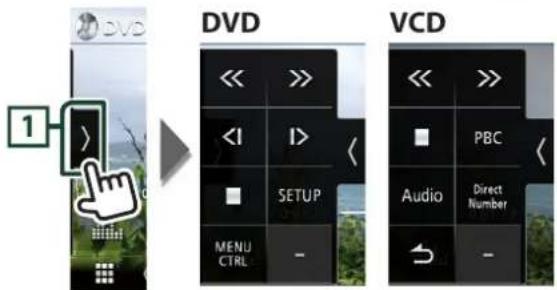
Video screen
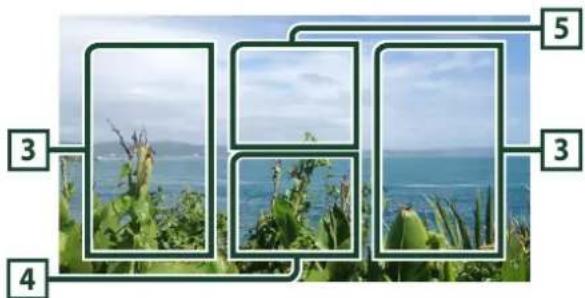
natural_image
Scenic coastal landscape with green foliage and blue sea, framed by numbered boxes (no text or symbols)1 Function panel
Touch the left side of the screen to display the function panel. Touch again to close the panel.
- ■: Stops playback. Touching twice will play the disc from the beginning when you play it next time.
- << >>: Fast-forwards or fast-backward the disc. Each time you touch the key, the speed changes. 2 times, 10 times.
• (DVD only): Plays in slow motion forward or backward.
Disc
- [SETUP] (DVD only): Touch to display the DVD SETUP screen.
- [MENU CTRL] (DVD only): Touch to display the DVD-VIDEO disc menu control screen. (P.16)
- [PBC] (VCD only): Touch to turn Playback control (PBC) on or off.
• [Audio] (VCD only): Touch to change audio output channels. - [Direct Number] (VCD only): Touch to display the Direct Number dialog only when Playback control (PBC) is on. You can directly enter the track number to play when scene is selected.
• [→] (VCD only): Returns to the previous scene only when Playback control (PBC) is on.
2 Operation keys
- [I◄◄►] [►►►I]: Searches for the previous/next content.
Touch and hold to fast-forward or fast-backward the disc. (It will be cancelled automatically after about 50 seconds.)
• [▶III]: Plays or pauses.
• [图标] : Displays the Graphic Equalizer screen. (P.24)
3 Searching area
Touch to search for the next/previous content.
4 Key display area
Touch to display the control screen.
5 [MENU CTRL] (DVD only)
Touch to display the DVD-VIDEO disc menu control screen. (P.16)
DVD Disc Menu Operation
You can set up some functions using the DVD-VIDEO disc menu.
1 Touch 5 area.
▶Menu Control screen appears.
2 Perform your desired operation as follows.
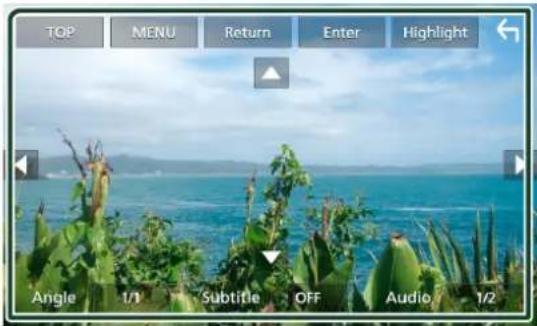
■To display the top menu
Touch [TOP].*
■To display the menu
Touch [MENU].*
■To display the previous menu
Touch [Return].*
■To enter selected item
Touch [Enter].
■To enable direct operation
Touch [Highlight] to enter the highlight control mode.
To move the cursor
Touch [▲], [▼], [◀], [▶].
■To switch among subtitle languages
Touch [Subtitle]. Each time you touch this key, subtitle languages are switched.
■To switch among audio languages
Touch [Audio]. Each time you touch this key, audio languages are switched.
■To switch among picture angles
Touch [Angle]. Each time you touch this key, picture angles are switched.
* These keys may not function depending on the disc.
USB/iPod
Connecting a USB device
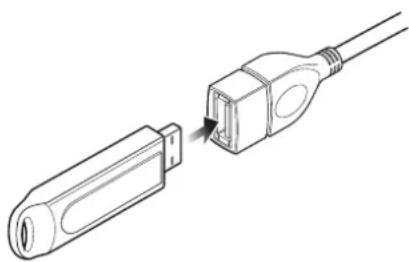
1 Connect the USB device with the USB cable. (P.31)
natural_image
Line drawing of a USB connector with a cable, showing a port and cable outlet (no text or symbols)2 Press the [HOME] button.
3 Touch
4 Touch [USB]. (P.13)
Disconnect the USB device
1 Press the [HOME] button.
2 Touch a source other than [USB].
3 Detach the USB device.
Usable USB device
You can use a mass-storage-class USB device with this unit.
The word "USB device" appearing in this manual indicates a flash memory device.
Connect iPod/iPhone
Preparation
- With an Apple CarPlay-capable iPhone, turn off Apple CarPlay by operating the iPhone at functional setup before connecting iPhone. For details of the setup method, contact the manufacturer of the terminal.
- Only one iPod/iPhone can be connected.
Wired connection
Preparation
- Connect an iPod/iPhone with the KCA-iP103 (optional accessory) while Apple CarPlay is not connected.
1 Connect the iPod/iPhone using the KCA-iP103. (P.32)
●To disconnect the iPod/iPhone connected with the cable:
1 Detach the iPod/iPhone.
Bluetooth connection
Pair the iPhone through Bluetooth.
Preparation
- To connect an iPhone via Bluetooth, register it as a Bluetooth device and do the profile setting for the connection beforehand. See Register the Bluetooth device (P.21).
- Connect an iPhone via Bluetooth while Apple CarPlay and an iPod/iPhone are not connected via USB.
Connectable iPod/iPhone
The following models can be connected to this unit.
Made for
- iPhone XS
- iPhone 8
- iPhone 6s
Max • iPhone 7 Plus • iPod - iPhone XS • iPhone 7 touch (6th
- iPhone XR • iPhone SE generation)
- iPhone X
- iPhone 6s
- iPhone 8 Plus Plus
USB/iPod Basic Operation
1 Press the HOME button.
2 Touch .
3 Touch USB or iPod. (P.13)
Control screen
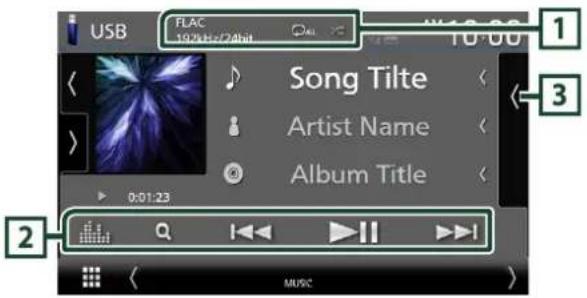
1 CODEC/
- When a high-resolution source is played, its format information is displayed.
• : Repeats the current track/folder. - : Randomly plays all tracks in the current folder.
2 Operation keys
• Q : Searches track/file.
- |◀◀ ▶▶▶ : Searches the previous/next track/file.
Touch and hold to fast forward or fast backward. (It will be cancelled automatically after about 50 seconds.)
- ▶ II : Plays or pauses.
• : Displays the Graphic Equalizer screen. (P.24)
3 Content list
- Touch the right side of the screen to display the Content list. Touch again to close the list.
- Displays the playing list. When you touch a track/file name on the list, playback will start.
HD Radio™ Tuner/Radio
HD Radio Tuner Basic Operation (DDX9907XR / DMX957XR / DMX907S)
To listen to the HD Radio source, touch HD Radio icon on the source selection screen. (P.13)
NOTE
• HD Radio broadcasting is for North American sales area only.
• The screen shot below is for tuner. It may be different from the one for HD Radio broadcasting.
Control screen

1 Information display
• Displays the information on the current station: Frequency and Channel
Touching 🔒 allows you to switch between Content A, Content B and Content C.
Content A: Station name, Song Title, Artist Name
Content B: Station Message, Radio Text
Content C: PTY Genre, Album Name
2 Seek mode
Touch to switch seek mode in the following sequence: AUTO1, AUTO2, MANUAL.
• AUTO1: Tunes in a station with good reception automatically.
- AUTO2: Tunes in the memorized stations one after another.
- MANUAL: Switches to the next frequency manually.
3 Operation keys
- I◀◀ ▶▶▶ : Tunes in a station. The method of switching frequencies can be changed (see 2 Seek mode).
- CH▼ CH▲ : Selects a channel.
• Q : Display the Channel List screen.
• ≡: Display a list of registered bookmarks.
• : Displays the Graphic Equalizer screen. (P.24)
4 Preset list
- Touching / allows you to change the display size.
• Recalls the memorized station or channel. - When touched for 2 seconds, stores the currently being received station or channel in the memory.
5 Band keys
Switches bands (between FM and AM).
6 Function panel
Touch the left side of the screen to display the function panel. Touch again to close the panel.
- 10key Direct: Display the direct station/channel search screen.
• AME: Presets stations automatically. (P.20) - RCV: Change the HD Radio reception mode.
Auto: Switch between digital and analog audio automatically.
Digital: Select this to tune to digital audio only.
Analog: Select this to tune to analog audio only.
• PTY (FM only): Searches for a program by program type.
• : Stores the information about the song being received. - Emergency Alerts : Turn on or off the alert message.
- Alert Message Log : Displays the alert message received.
7 Indicator display
While receiving an HD Radio station, it lights with orange when the audio is digital and lights with gray when it is analog. While receiving an analog station, it is off.
Radio Basic Operation (DDX9707S / DMX9707S)
To listen to the Radio source, touch Radio icon on the source selection screen. (P.13)
Control screen

1 Information display
• Displays the information on the current station: Frequency
Touching ◆ allows you to switch between Content A and Content B.
Content A: PS name, Radio Text, Title & Artist Content B: PTY Genre, Radio Text plus
Preset#: Preset number
2 Seek mode
Touch to switch seek mode in the following sequence: AUTO1, AUTO2, MANUAL.
- AUTO1: Tunes in a station with good reception automatically.
- AUTO2: Tunes in the memorized stations one after another.
- MANUAL: Switches to the next frequency manually.
3 Operation keys
- |◀◀ ▶▶▶ : Tunes in a station. The method of switching frequencies can be changed (see 2 Seek mode).
• : Displays the Graphic Equalizer screen. (P.24)
4 Preset list
- Touching { } allows you to change the display size.
• Recalls the memorized station.
- When touched for 2 seconds, stores the currently being received station in the memory.
5 Band keys
Switches bands (between FM and AM).
6 Function panel
Touch the left side of the screen to display the function panel. Touch again to close the panel.
- TI (FM only): Selects the traffic information mode.
• AME : Presets stations automatically. (P.20) - PTY (FM only) : Searches for a program by program type.
• MONO (FM only) : Selects the Monaural reception mode.
Memory Operation
Auto memory
You can store stations with good reception in the memory automatically.
1 Touch desired band key.
2 Touch ▶ on the left side of the screen.
Touch AME.
3 Touch Yes.
▶ Auto memory starts.
Manual memory
You can store the currently being received station or channel in the memory.
1 Select the station or channel you wish to store in the memory.
2 Touch FM# (#:1-15) or AM# (#:1-5) in which you want to store the station or channel for 2 seconds until a beep sounds.
Preset select
1 Touch ◀ on the right side of the screen. Select a station or channel from the list.
Bluetooth Control
Register the Bluetooth device
It is necessary to register the Bluetooth audio player or cell-phone in this unit before using the Bluetooth function.
1 Press the [MENU] button.
▶Popup menu appears.
2 Touch [SETUP].
▶SETUP Menu screen appears.
3 Touch [Bluetooth].
▶Bluetooth Setup screen appears.
4 Touch [Select Device] on the Bluetooth Setup screen.

5 Touch 📊 on the Select Device screen.
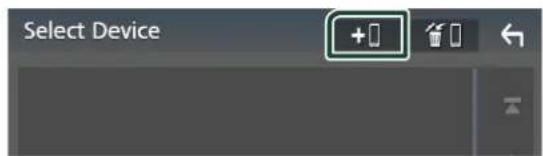
▶Bluetooth pairing waiting dialog appears.
6 Search for the unit
("DDX*****"/"DMX*****") from your smartphone/cell-phone.
Complete steps 6 to 9 within 30 seconds.
7 Operate your smartphone/cell-phone according to the displayed messages.
- Confirm the request both on the smartphone/cell-phone.

●Input the PIN Code in your smartphone/cell-phone.
PIN Code is set to "0000" as the default.

8 Select the function you want to use.
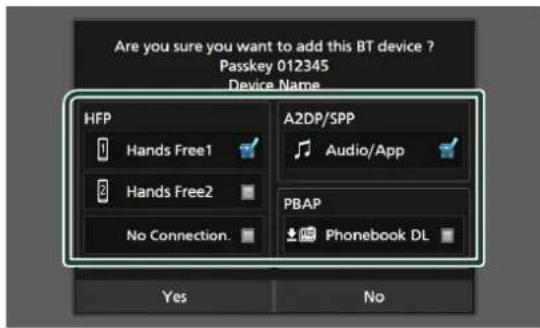
■ HFP [Hands Free1]/[Hands Free2]/[No Connection.]
Select the hands-free number to connect.
A2DP/SPP [Audio/App]
Select if you want to use the audio player app in your smartphone over A2DP, and the other apps in your smartphone over SPP.
PBAP [Phonebook DL]
Select if you want to transfer your phonebook data.
NOTE
- To select [Phonebook DL], first select [Hands Free1] or [Hands Free2] for HFP.
9 Touch [Yes].
When data transmission and connection have completed, the Bluetooth connection icon appears on the screen.
NOTE
- When registering the iPhone that is available for Apple CarPlay wirelessly, a confirmation message appears. Touch [Yes] to display the Apple CarPlay screen for wireless connection.
Using the Hands-Free Unit
You can use the telephone function by connecting the Bluetooth telephone to this unit.
NOTE
- If you use the hands-free function frequently, move the TEL short-cut key (icon) to the Home screen. (P.13)
- While Apple CarPlay or Android Auto is connected, the Bluetooth Hands-Free function and two Bluetooth devices connections cannot be used. Only the Apple CarPlay or Android Auto Hands-Free function can be used.

Make a call
1 Press the [HOME] button.
2 Touch
3 Touch [TEL].

▶Hands Free screen appears.
NOTE
- If your cell-phone supports PBAP, you can display the phone book and call lists onto the touch panel screen when the cell-phone is connected.
- Phone book: up to 1000 entries
- Up to 50 entries including dialed calls, received calls, and missed calls
4 Select a dialing method.
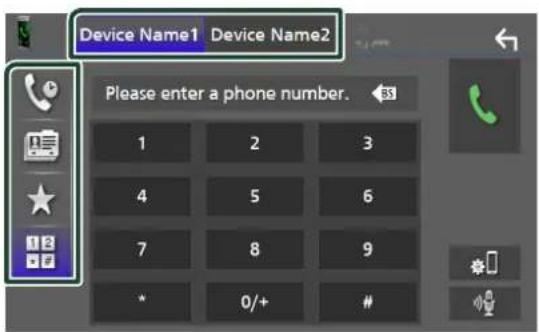
• [L] Call using call records
• [图标]: Call using the phonebook
• [★]: Call using the preset number
• [18]: Call by entering a phone number
- Select the cell-phone to use
When you connect two cell-phones
1) Touch [Device name1 Device name2] to select the phone you want to use.
Call using call records
1 Touch []
2 Select the phone number from the list.
Call using the phonebook
1 Touch
2 Touch [Q A-Z].
3 Select the initial.
• Characters with no corresponding name will not appear.
- A first character with an accent character such as "ü" can be searched for with a non-accent character "u". A character with an accent character in a sentence cannot be searched for.
4 Select the person you want to call from the list.

5 Select the phone number from the list.

NOTE
- You can sort the phone numbers in the list by last name or first name. For details, see Hands-Free Setup (P.73) in the Instruction Manual.
Call using the preset number
1 Touch

2 Touch the name or phone number.
Call by entering a phone number
1 Touch

2 Enter a phone number with number keys.
3 Touch


Receive a call
1 Touch


to reject an incoming call.

NOTE
- When shifting the gear to the reverse (R) position and monitoring the picture from the rear view camera, this screen does not appear even if a call comes in.
To end call
1 While talking, touch


Operations during a call

●Adjust the volume of your voice
1) Touch [Speech Quality].
2) Touch [◀] or [▶] for [Microphone Level].
●Adjust the receiver volume
Press the [▼] or [▲] button.
●Mute your voice
Touch [icon] to mute or not to mute your voice.
●Output the dial tone
Touch [DTMF] to display the tone input screen. You can send tones by touching desired keys on the screen.
●Switching between speaking voice output destinations
Touching [icon] / search time switches speaking voice output destinations between the cell-phone and the speaker.
●To close the Hands-Free popup screen
Touch [×] to close the Hands-Free popup screen.
To display it again
① Press the [HOME] button.
② Touch [ ]
③ Touch [TEL].
Controlling Audio
You can adjust various settings such as audio balance or subwoofer level.
1 Press the MENU button.
▶ Popup menu appears.
2 Touch Audio.

Controlling General Audio
1 Touch Fader / Balance.
2 Set each parameter as follows.

Fader, Balance
Adjust the volume balance around the touched area.
◀ and ▶ adjust the right and left volume balance.
▲ and ▼ adjust the front and rear volume balance.
Center
Clear the adjustment.
Equalizer Control
You can adjust equalizer by selecting the optimized setting for each category.
1 Touch EQ / SW Level.
2 Touch the screen and set the Graphic Equalizer as desired.
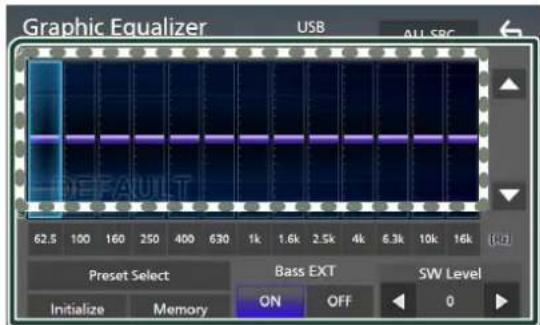
■ Gain level (area in dotted frame)
Adjust the gain level by touching each frequency bar.
You can select a frequency bar and adjust its level by ▲, ▼.
■ Preset Select
Display the screen for selecting the preset equalizer curve.
Memory
Saves the adjusted equalizer curve as "User1" to "User4".
Initialize
Initialize (flatten) the current EQ curve.
ALL SRC
Apply the adjusted equalizer curve to all sources. Touch ALL SRC and then touch OK on the confirmation screen.
■ Bass EXT (Bass Extend Settings)
When turned on, the frequencies lower than 62.5 Hz is set to the same gain level (62.5 Hz).
SW Level
Adjust the subwoofer volume.
Connection/Installation
This section is for the professional installer.
For safety's sake, leave wiring and mounting to professionals. Consult the car audio dealer.
Before Installation
Before installation of this unit, please note the following precautions.
⚠️ WARNINGS
- If you connect the ignition wire (red) and the battery wire (yellow) to the car chassis (ground), you may cause a short circuit, that in turn may start a fire. Always connect those wires to the power source running through the fuse box.
- Do not cut out the fuse from the ignition wire (red) and the battery wire (yellow). The power supply must be connected to the wires via the fuse.
CAUTION
• Install this unit in the console of your vehicle. Do not touch the metal part of this unit during and shortly after the use of the unit. Metal part such as the heat sink and enclosure become hot.
NOTE
- Mounting and wiring this product requires skills and experience. For best safety, leave the mounting and wiring work to professionals.
- Make sure to ground the unit to a negative 12V DC power supply.
- Do not install the unit in a spot exposed to direct sunlight or excessive heat or humidity. Also avoid places with too much dust or the possibility of water splashing.
- Do not use your own screws. Use only the screws provided. If you use the wrong screws, you could damage the unit.
-
If the power is not turned ON ("There is an error in the speaker wiring. Please check the connections." is displayed), the speaker wire may have a short-circuit or touched the chassis of the vehicle and the protection function may have been activated. Therefore, the speaker wire should be checked.
-
If your car's ignition does not have an ACC position, connect the ignition wires to a power source that can be turned on and off with the ignition key. If you connect the ignition wire to a power source with a constant voltage supply, such as with battery wires, the battery may be drained.
- If the console has a lid, make sure to install the unit so that the front panel will not hit the lid when closing and opening.
- If the fuse blows, first make sure the wires aren't touching to cause a short circuit, then replace the old fuse with one with the same rating.
• Insulate unconnected wires with vinyl tape or other similar material. To prevent a short circuit, do not remove the caps on the ends of the unconnected wires or the terminals. - Connect the speaker wires correctly to the terminals to which they correspond. The unit may be damaged or fail to work if you share the wires or ground them to any metal part in the car.
- When only two speakers are being connected to the system, connect the connectors either to both the front output terminals or to both the rear output terminals (do not mix front and rear). For example, if you connect the connector of the left speaker to a front output terminal, do not connect the connector to a rear output terminal.
• After the unit is installed, check whether the brake lamps, blinkers, wipers, etc. on the car are working properly. - Mount the unit so that the mounting angle is 30irc or less.
- This unit has the cooling fan to decrease the internal temperature. Do not mount the unit in a place where the cooling fan of the unit is blocked. Blocking these openings will inhibit the cooling of the internal temperature and result in malfunction.
In case of DDX9907XR

Connection/Installation
- Do not press hard on the panel surface when installing the unit to the vehicle. Otherwise scars, damage, or failure may result.
- Reception may drop if there are metal objects near the Bluetooth antenna.

natural_image
Pure electrical circuit lines without any symbolsBluetooth antenna unit
Supplied accessories for installation
| 1 |  | x1 |
| 2 |  | x1 |
| 3 |  | x1 |
| 4 | 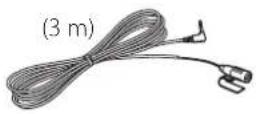 | x1 |
| 5 | 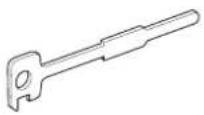 | x2 |
| 6 |  | x6 |
| 7 |  | x6 |
| 8 | 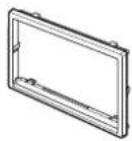 | x1 |
![(9) (3.5 m) x1 ⑩ x1 ⑪[1] x1](/content/2026/06/1147993/images/024a0e00b4815d80b4a16e637f47e8dd13a6cdb740faa9e1387eeb2fa2634da7.jpg)
[1] DDX9907XR / DMX907S / DMX957XR only
Installation procedure
1) To prevent a short circuit, remove the key from the ignition and disconnect the terminal of the battery.
2) Make the proper input and output wire connections for each unit.
3) Connect the speaker wires of the wiring harness.
4) Connect the wiring harness wires in the following order; ground, battery, ignition.
5) Connect the wiring harness connector to the unit.
6) Install the unit in your car.
7) Reconnect the terminal of the battery.
8) Perform the Initial Setup.
See Initial SETUP (P.8).
Installing the unit

Non-Japanese cars
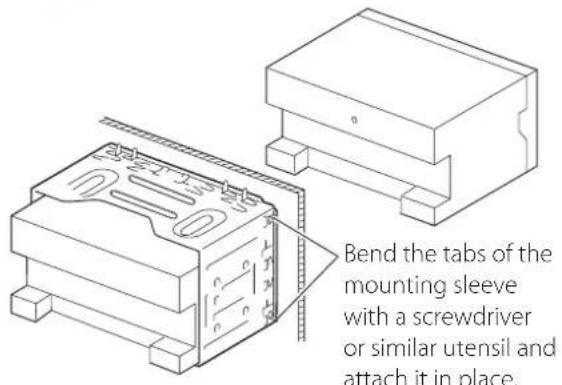

Japanese cars

NOTE
- Make sure that the unit is installed securely in place. If the unit is unstable, it may malfunction (eg, the sound may skip).

Trim plate
1) Attach accessory ⑧ to the unit.

natural_image
Diagram showing a box being placed on a frame with an arrow indicating motion (no text or symbols present)
GPS antenna
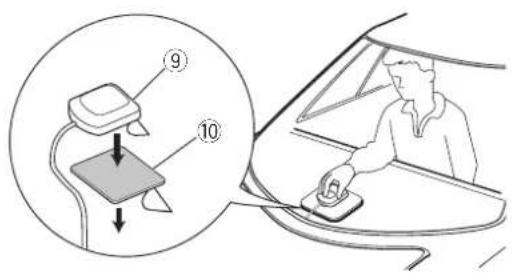
GPS antenna is installed inside of the car. It should be installed as horizontally as possible to allow easy reception of the GPS satellite signals.
To mount the GPS antenna inside your vehicle:
1) Clean your dashboard or other surface.
2) Remove the separator of the metal plate (accessory ⑩).
3) Press the metal plate (accessory ⑩) down firmly on your dashboard or other mounting surface. You can bend the metal plate (accessory ⑩) to conform to a curved surface, if necessary.
4) Remove the separator of the GPS antenna (accessory ⑨), and stick the antenna to the metal plate (accessory ⑩).
NOTE
- Use the supplied GPS antenna. Using the GPS antenna other than the supplied one may cause a drop in positioning accuracy.
- Depending on the type of car, reception of the GPS satellite signals might not be possible with an inside installation.
- Please install this GPS antenna in an area away from any antennas that are used with CB radios or satellite televisions.
- The GPS antenna should be installed at a position that is spaced at least 12 inch (30 cm) from cellular phone or other transmitting antennas. Signals from the GPS satellite may be interfered with by these types of communication.
- Painting the GPS antenna with (metallic) paint may cause a drop in performance.
Connection/Installation

Microphone unit
1) Check the installation position of the microphone (accessory ④).
2) Clean the installation surface.
3) Remove the separator of the microphone (accessory ④), and stick the microphone to the place shown below.
4) Wire the microphone cable up to the unit with it secured at several positions using tape or other desired method.
5) Adjust the direction of the microphone (accessory ④) to the driver.

Fix a cable with a commercial item of tape.

Removing the trim plate
1) Engage the catch pins on the extraction key (accessory ⑤) and remove the two locks on the lower level. Lower the trim plate (accessory ⑧) and pull it forward as shown in the figure.
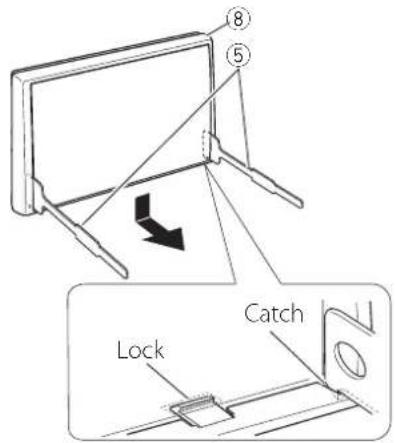
NOTE
- The trim plate can be removed from the top side in the same manner.
2) When the lower level is removed, remove the upper two locations.
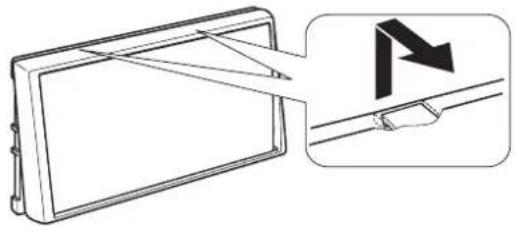
natural_image
Diagram showing light rays interacting with a rectangular panel and a separate view of a diagonal line (no text or symbols)
Removing the unit
1) Remove the trim plate. (P.28)
2) Insert the two extraction key (accessory ⑤) deeply into the slots on each side, as shown.

natural_image
Technical line drawing of a mechanical component with a triangular tool and numbered annotation (no text or symbols)3) Lower the extraction key toward the bottom, and pull out the unit halfway while pressing towards the inside.

natural_image
Line drawing of hands holding a rectangular object with arrows indicating movement or force (no text or symbols)NOTE
- Be careful to avoid injury from the catch pins on the extraction key.
4) Pull the unit all the way out with your hands, being careful not to drop it.
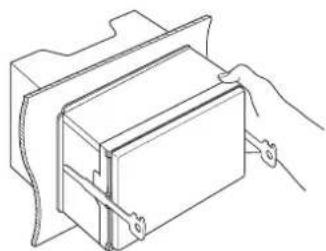
natural_image
Technical line drawing of a mechanical assembly with a hand holding a bracket (no text or symbols)
Connecting wires to terminals
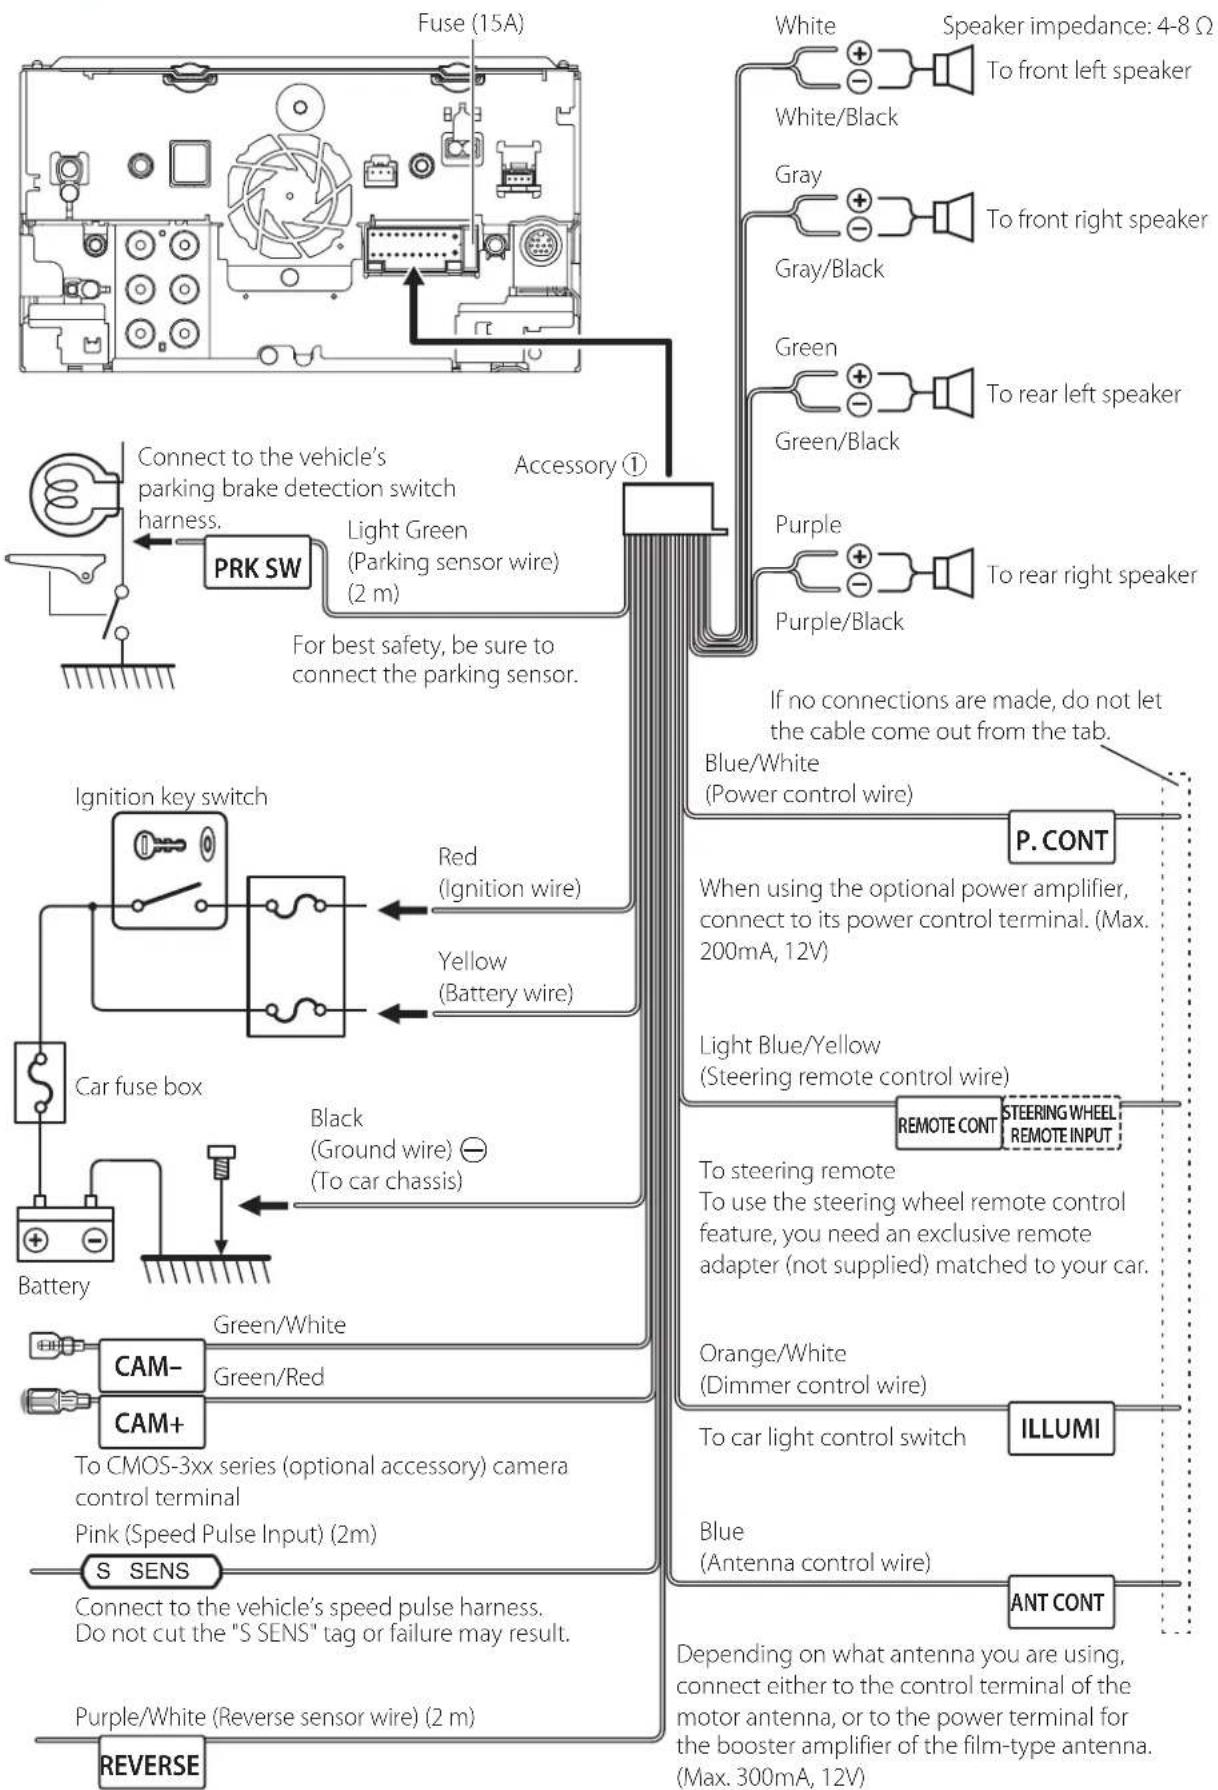
flowchart
graph TD
    A["Residential Powertrain"] --> B["PRK SW"]
    B --> C["Connect to the vehicle's parking brake detection switch harness."]
    C --> D["Light Green (Parking sensor wire) (2 m)"]
    D --> E["For best safety, be sure to connect the parking sensor."]
    E --> F["Accessory ①"]
    F --> G["Blue/White (Power control wire)"]
    F --> H["P. CONT"]
    F --> I["When using the optional power amplifier, connect to its power control terminal. (Max. 200mA, 12V)"]
    F --> J["Light Blue/Yellow (Steering remote control wire)"]
    J --> K["Remote CONT"]
    J --> L["STEERING WHEEL REMOTE INPUT"]
    F --> M["If no connections are made, do not let the cable come out from the tab."]
    M --> N["PRECO"]
    M --> O["PURPLE/Black"]
    M --> P["GREEN/Black"]
    M --> Q["Gray/White/Black"]
    M --> R["Green/White/Black"]
    M --> S["Purple/White/Black"]
    M --> T["Blue/White/Black"]
    M --> U["PURPLE/Black"]
    M --> V["PURPLE/Black"]
    M --> W["PURPLE/Black"]
    M --> X["PURPLE/Black"]
    M --> Y["PURPLE/Black"]
    M --> Z["PURPLE/Black"]
    M --> AA["PURPLE/Black"]
    M --> AB["PURPLE/Black"]
    M --> AC["PURPLE/Black"]
    M --> AD["PURPLE/Black"]
    M --> AE["PURPLE/Black"]
    M --> AF["PURPLE/Black"]
    M --> AG["PURPLE/Black"]
    M --> AH["PURPLE/Black"]
    M --> AI["PURPLE/Black"]
    M --> AJ["PURPLE/Black"]
    M --> AK["PURPLE/Black"]
    M --> AL["PURPLE/Black"]
    M --> AM["PURPLE/Black"]
    M --> AN["PURPLE/Black"]
    M --> AO["PURPLE/Black"]
    M --> AP["PURPLE/Black"]
    M --> AQ["PURPLE/Black"]
    M --> AR["PURPLE/Black"]
    M --> AS["PURPLE/Black"]
    M --> AT["PURPLE/Black"]
    M --> AU["PURPLE/Black"]
    M --> AV["PURPLE/Black"]
    M --> AW["PURPLE/Black"]
    M --> AX["PURPLE/Black"]
    M --> AY["PURPLE/Black"]
    M --> AZ["PURPLE/Black"]
    M --> BA["PURPLE/Black"]
    M --> BB["PURPLE/Black"]
    M --> BC["PURPLE/Black"]
    M --> BD["PURPLE/Black"]
    M --> BE["PURPLE/Black"]
    M --> BF["PURPLE/Black"]
    M --> BG["PURPLE/Black"]
    M --> BH["PURPLE/Black"]
    M --> BI["PURPLE/Black"]
    M --> BJ["PURPLE/Black"]
    M --> BK["PURPLE/Black"]
    M --> BL["PURPLE/Black"]
    M --> BM["PURPLE/Black"]
    M --> BN["PURPLE/Black"]
    M --> BO["PURPLE/Black"]
    M --> BP["PURPLE/Black"]
    M --> BQ["PURPLE/Black"]
Connect to vehicle's reverse lamp harness when using the optional rear view camera.

3-way speaker system setup
●DDX9907XR / DMX957XR / DMX907S
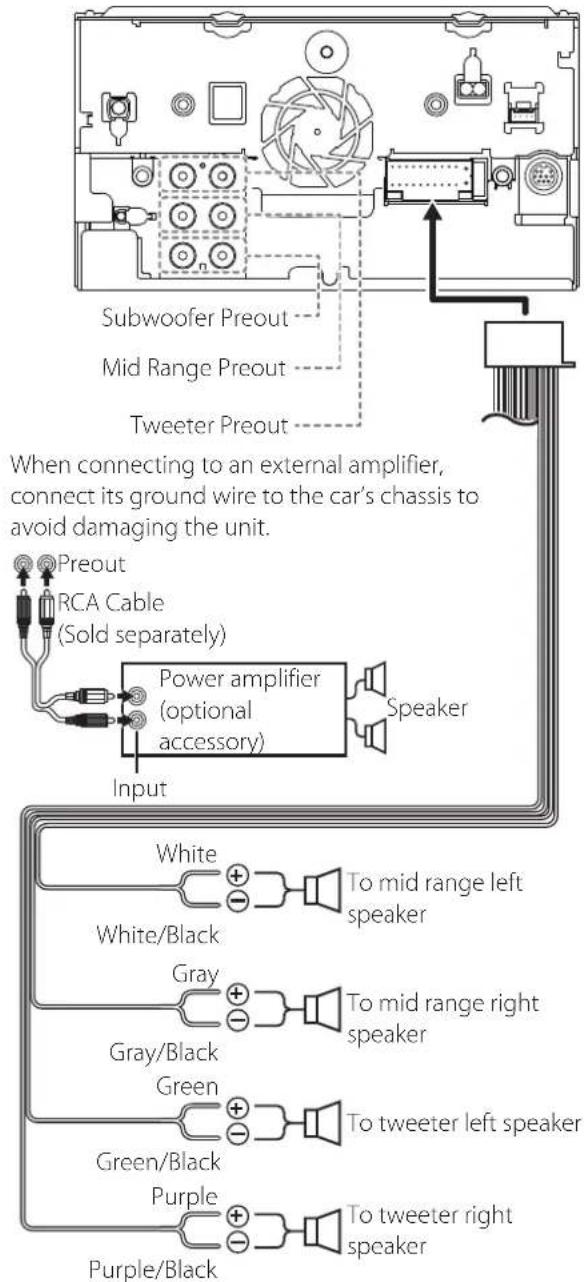
Speaker impedance: 4-8 Ω
NOTE
- For speaker system setup, see 3-way speaker system setup (P.87) in the Instruction Manual.
- For speaker setup and crossover setup, see Speaker / X'over setup (P.88) in the Instruction Manual.
- For how to connect speaker wires to terminals other than speaker terminals and Preout terminals, see Connecting the system and external components (P.30) and Connecting wires to terminals (P.29).

Connecting the system and internal components


When connecting to an external amplifier, connect its ground wire to the car's chassis to avoid damaging the unit.


SiriusXM Connect Vehicle Tuner connector For more information on how to install the SiriusXM Connect Vehicle tuner, consult the installation guide included with the tuner.

iDatalink connector

This jack accepts either AV-IN or camera input. For more information, see To set up the camera assignment settings (P.34). [DDX9907XR / DMX957XR / DMX907S:] Accessory ⑪: Mini plug to RCA cable*1

or CA-C3AV (optional accessory) [DDX9707S / DMX9707S :] CA-C3AV (optional accessory)
| 7 | Dashboard camera interfaceConnect a Dashboard Camera DRV-N520(optional accessory). (P.33) |
| 8 | Accessory 9: GPS AntennaUse the supplied GPS antenna. Using the GPS antenna other than the supplied one may cause a drop in positioning accuracy. |
| 9 | Accessory 4: Bluetooth Microphone |
| 10 | 3rd view camera input (Yellow). SeeTo set upthe camera assignment settings (P.34). |
| 11 | Rear view camera input (Yellow)* 2 |
| 12 | Front view camera/Dashboard camera input(Yellow).* 3 SeeTo set up the camera assignmentsettings (P.34). |
| 13 | VIDEO Output (Yellow) |
*1 Connecting Mini plug to RCA cable to AV-IN terminal enables you to use cameras only. If you connect CA-C3AV (optional accessory), AV-IN (for visual) or the camera is available.
*2 Connect an HD camera to Rear view camera input terminal to use HD video. (DDX9907XR / DMX957XR only)
*3 Connect an HD camera to Front view camera/ Dashboard camera input terminal to use HD video. (DDX9907XR / DMX957XR only)
Securing the USB extension cable
Secure the USB extension cable with insulating tape or the like so that its connectors are not disconnected.

natural_image
Illustration of a mechanical connector with a coiled cable (no text or symbols)Connecting a USB device
![USB device[2] Accessory ③ (Gray) (1 m) [3] Accessory ② (Black) (1 m) [3] USB (Gray) terminal[1] USB (Black) terminal[1]](/content/2026/06/1147993/images/bbd5ecdca5825c0415e76f662590013de58ec9e1d71b2a7e8cd4a39b1c84f755.jpg)
[1] USB maximum power supply current : DC 5 V = 1.5 A
[2] Sold separately
[3] See Securing the USB extension cable (P.31).

Connecting an iPod/iPhone
![KCA-iP103 (0.8m)\( ^{[3]} \) iPod/iPhone\( ^{[2]} \) Accessory ③ (Gray) (1 m)\( ^{[4]} \) Accessory ② (Black) (1 m)\( ^{[1]} \) USB (Gray) terminal\( ^{[1][5]} \) USB (Black) terminal\( ^{[1]} \) iPhone (with Apple CarPlay)\( ^{[2]} \) KCA-iP103 (0.8m)\( ^{[3]} \)](/content/2026/06/1147993/images/c49168f033ff4f77323ea8e627e608e898366a985b7d7a75995fb777a1f3eb5a.jpg)
[1] USB maximum power supply current: DC 5 V = 1.5 A
[2] Sold separately
[3] Optional accessory
[4] See Securing the USB extension cable (P.31).
[5] USB (Gray) terminal does not support USB Mirroring.

Connecting an Android
rtphone

flowchart
graph TD
    A["Micro USB to USB cable[2"]] --> B["USB (Gray) terminal[1"][4]]
    A --> C["USB (Black) terminal[1"]]
    B --> D["Android smartphone[2"]]
    C --> D
    E["Accessory ③ (Gray) (1 m)[3"]] --> F["USB (Gray) terminal"]
    G["Accessory ② (Black) (1 m)[3"]] --> H["USB (Gray) terminal"]
    I["Internal components"] --> J["Device with indicator"]
[1] USB maximum power supply current: DC 5 V = 1.5 A
[2] Sold separately
[3] See Securing the USB extension cable (P.31).
[4]: USB (Gray) terminal does not support USB Mirroring.

Connecting the camera
Left Side View Camera and Right Side View Camera [2]

flowchart
graph TD
    A["Front view camera"] --> B["3rd view camera input (Yellow)"]
    B --> C["3rd view camera"]
    C --> D["3rd view camera"]
    D --> E["AV-IN input"]
    E --> F["AV-DAV"]
    F --> G["3rd view camera"]
    G --> H["3rd view camera"]
    H --> I["3rd view camera"]
    I --> J["3rd view camera"]
    J --> K["3rd view camera"]
    K --> L["3rd view camera"]
    L --> M["3rd view camera"]
    M --> N["3rd view camera"]
    N --> O["3rd view camera"]
    O --> P["3rd view camera"]
    P --> Q["3rd view camera"]
    Q --> R["3rd view camera"]
    R --> S["3rd view camera"]
    S --> T["3rd view camera"]
    T --> U["3rd view camera"]
    U --> V["3rd view camera"]
    V --> W["3rd view camera"]
    W --> X["3rd view camera"]
    X --> Y["3rd view camera"]
    Y --> Z["3rd view camera"]
    Z --> AA["3rd view camera"]
    AA --> AB["3rd view camera"]
    AB --> AC["3rd view camera"]
    AC --> AD["3rd view camera"]
    AD --> AE["3rd view camera"]
    AE --> AF["3rd view camera"]
    AF --> AG["3rd view camera"]
    AG --> AH["3rd view camera"]
    AH --> AI["3rd view camera"]
    AI --> AJ["3rd view camera"]
    AJ --> AK["3rd view camera"]
    AK --> AL["3rd view camera"]
    AL --> AM["3rd view camera"]
    AM --> AN["3rd view camera"]
    AN --> AO["3rd view camera"]
    AO --> AP["3rd view camera"]
    AP --> AQ["3rd view camera"]
    AQ --> AR["3rd view camera"]
    AR --> AS["3rd view camera"]
    AS --> AT["3rd view camera"]
    AT --> AU["3rd view camera"]
    AU --> AV["3rd view camera"]
    AV --> AW["3rd view camera"]
    AW --> AX["3rd view camera"]
    AX --> AY["3rd view camera"]
[1] Optional accessory
[2] Sold separately
[3] Up to 2 cameras of Dashboard camera, Front view camera, Left side view camera and Right side view camera can be connected. (P.34).
[4] Insulate audio input terminals of a CA-C3AV (optional accessory) when connecting to the Camera.
[5] CMOS-3xx series (optional accessory) or commercially available camera.
[6] For HD video, an HD camera is also used as Rear view camera. (DDX9907XR / DMX957XR only)
[7] For HD video, an HD camera is also used as Front view camera. (DDX9907XR / DMX957XR only)
[8] DDX9907XR / DMX957XR / DMX907S only
To set up the camera assignment settings
1 Press the [MENU] button.
▶ Popup menu appears.
2 Touch [SETUP].
▶ SETUP Menu screen appears.
3 Touch [Camera].
▶Camera screen appears.
4 Touch [Camera Assignment Settings].
5 Select the item to set up.
■ [REAR VIEW CAMERA] (DDX9907XR / DMX957XR)
Change the HD camera picture quality setting when an HD camera is connected with this unit.
[FRONT VIEW CAMERA / DASH CAM]
Set the camera assignment from view camera connected to Front view camera/Dashboard camera input terminal.
Change the HD camera picture quality setting when an HD camera is connected. (DDX9907XR / DMX957XR)
[3rd VIEW CAMERA]
Set the camera assignment from view camera connected to 3rd view camera input terminal.
[AV-IN]
Set the camera assignment from view camera connected to AV-IN input terminal.
6 Select the view camera to set up.

1 [Picture quality settings] (DDX9907XR / DMX957XR) *1
2 [Picture from view camera]
3 [Front]*
4 [Dashboard Camera] *
5 [Right] 2
6 [Left] *
7 [None] *2
*1 The [REAR VIEW CAMERA] and [FRONT VIEW CAMERA / DASH CAM] setting screens only when HD camera is connected.
*2 Except the [REAR VIEW CAMERA] setting screen.
7 Touch [Enter].
Appendix
Note for specifications
Bluetooth section
Frequency
:2.402-2.480 GHz
Output Power
: Power Class2
General
Operating Voltage
: 12 V DC car battery
Speaker Impedance
:4-8Ω
Appendix
■Copyrights
- The Bluetooth® word mark and logos are registered trademarks owned by Bluetooth SIG, Inc. and any use of such marks by JVCKENWOOD Corporation is under license. Other trademarks and trade names are those of their respective owners.
- LDAC and LDAC logo are trademarks of Sony Corporation.
- Hi-Res Audio logo and Hi-Res Audio Wireless logo are used under license from Japan Audio Society.


- Manufactured under license from Dolby Laboratories. Dolby, Dolby Audio and the double-D symbol are trademarks of Dolby Laboratories.
• DVD is a trademark of DVD Format/Logo Licensing Corporation registered in the U.S., Japan and other countries.
- This item incorporates copy protection technology that is protected by U.S. patents and other intellectual property rights of Rovi Corporation. Reverse engineering and disassembly are prohibited.
- Windows Media is a registered trademark or trademark of Microsoft Corporation in the United States and/or other countries. This product is protected by certain intellectual property rights of Microsoft. Use or distribution of such technology outside of this product is prohibited without a license from Microsoft.
- This software is based in part on the work of the independent JPEG Group.
- Use of the Made for Apple badge means that an accessory has been designed to connect specifically to the Apple product(s) identified in the badge, and has been certified by the developer to meet Apple performance standards. Apple is not responsible for the operation of this device or its compliance with safety and regulatory standards. Please note that the use of this accessory with an Apple product may affect wireless performance.
- Apple, iPhone, iPod, iPod touch, and Lightning are trademarks of Apple Inc., registered in the U.S. and other countries.
• Apple, Siri, Apple CarPlay, Apple Music and Apple CarPlay logo are trademarks of Apple Inc., registered in the U.S. and other countries.
- IOS is a trademark or registered trademark of Cisco in the U.S. and other countries and is used under license.
- Sirius, XM and all related marks and logos are trademarks of Sirius XM Radio Inc. All rights reserved.
- HD Radio Technology manufactured under license from iBiquity Digital Corporation. U.S. and Foreign Patents. For patents see https://dts.com/patents. HD Radio and the HD, HD Radio, and "ARC" logos are registered trademarks or trademarks of iBiquity
Digital Corporation in the United States and/or other countries.
• INRIX is a registered trademark of INRIX, Inc.
- Google, Android, Google Play and Android Auto are trademarks of Google LLC.
- To use Android Auto on your car display, you'll need an Android Auto compatible vehicle or aftermarket stereo, an Android phone running Android 5.0 or higher, and the Android Auto app.
- Wi-Fi is a registered trademark of Wi-Fi Alliance .
- The Wi-Fi CERTIFIED™ Logo is a certification mark of Wi-Fi Alliance®.
• Copyright© 2018 Techpoint, Inc. All rights reserved.
HD-TVI™
- Linux is the registered trademark of Linus Torvalds in the U.S. and other countries.
- This product includes FontAvenue® fonts licenced by NEC Corporation.FontAvenue is a registered trademark of NEC Corporation.

FontAvenue
- This product includes "Ubiquitous QuickBoot TM" technology developed by Ubiquitous Corp. Ubiquitous QuickBoot TM is a trademark of Ubiquitous Corp. Copyright© 2017 Ubiquitous Corp. All rights reserved.

- THIS PRODUCT IS LICENSED UNDER THE AVC PATENT PORTFOLIO LICENSE FOR THE PERSONAL USE OF A CONSUMER OR OTHER USES IN WHICH IT DOES NOT RECEIVE REMUNERATION TO (j)ENCODE VIDEO IN COMPLIANCE WITH THE AVC STANDARD ("AVC VIDEO") AND/OR (jj)DECODE AVC VIDEO THAT WAS ENCODED BY A CONSUMER ENGAGED IN A PERSONAL ACTIVITY AND/OR WAS OBTAINED FROM A VIDEO PROVIDER LICENSED TO PROVIDE AVC VIDEO. NO LICENSE IS GRANTED OR SHALL BE IMPLIED FOR ANY OTHER USE. ADDITIONAL INFORMATION MAY BE OBTAINED FROM MPEG LA, L.L.C. SEE HTTPS://WWW.MPEGLA.COM
- THIS PRODUCT IS LICENSED UNDER THE MPEG-4 VISUAL PATENT PORTFOLIO LICENSE FOR THE PERSONAL AND NON-COMMERCIAL USE OF A CONSUMER FOR (j) ENCODING VIDEO IN COMPLIANCE WITH THE MPEG-4 VISUAL STANDARD ("MPEG-4 VIDEO") AND/OR (jj) DECODING MPEG-4 VIDEO THAT WAS ENCODED BY A CONSUMER ENGAGED IN A PERSONAL AND NON-COMMERCIAL ACTIVITY AND/OR WAS OBTAINED FROM A VIDEO PROVIDER LICENSED BY MPEG LA TO PROVIDE MPEG-4 VIDEO. NO LICENSE IS GRANTED OR SHALL BE IMPLIED FOR ANY OTHER USE. ADDITIONAL INFORMATION INCLUDING THAT RELATING TO PROMOTIONAL, INTERNAL AND COMMERCIAL USES AND LICENSING MAY BE OBTAINED FROM MPEG LA, LLC. SEE HTTPS://WWW.MPEGLA.COM.
- THIS PRODUCT IS LICENSED UNDER THE VC-1 PATENT PORTFOLIO LICENSE FOR THE PERSONAL AND NON-COMMERCIAL USE OF A CONSUMER TO (i) ENCODE VIDEO IN COMPLIANCE WITH THE VC-1 STANDARD ("VC-1 VIDEO") AND/OR (ii) DECODE VC-1 VIDEO THAT WAS ENCODED BY A CONSUMER ENGAGED IN A PERSONAL AND NON-COMMERCIAL ACTIVITY AND/OR WAS OBTAINED FROM A VIDEO PROVIDER LICENSED TO PROVIDE VC-1 VIDEO. NO LICENSE IS GRANTED OR SHALL BE IMPLIED FOR ANY OTHER USE. ADDITIONAL INFORMATION MAY BE OBTAINED FROM MPEG LA, L.L.C. SEE HTTPS://WWW.MPEGLA.COM
- libFLAC
Copyright (C) 2000-2009 Josh Coalson
Copyright (C) 2011-2013 Xiph.Org Foundation Redistribution and use in source and binary forms, with or without modification, are permitted provided that the following conditions are met:
– Redistributions of source code must retain the above copyright notice, this list of conditions and the following disclaimer.
– Redistributions in binary form must reproduce the above copyright notice, this list of conditions and the following disclaimer in the documentation and/or other materials provided with the distribution.
– Neither the name of the Xiph.org Foundation nor the names of its contributors may be used to endorse or promote products derived from this software without specific prior written permission.
THIS SOFTWARE IS PROVIDED BY THE COPYRIGHT HOLDERS AND CONTRIBUTORS ``AS IS'' AND ANY EXPRESS OR IMPLIED WARRANTIES, INCLUDING, BUT NOT LIMITED TO, THE IMPLIED WARRANTIES OF MERCHANTABILITY AND FITNESS FOR A PARTICULAR PURPOSE ARE DISCLAIMED. IN NO EVENT SHALL THE FOUNDATION OR CONTRIBUTORS BE LIABLE FOR ANY DIRECT, INDIRECT, INCIDENTAL, SPECIAL, EXEMPLARY, OR CONSEQUENTIAL DAMAGES (INCLUDING, BUT NOT LIMITED TO, PROCUREMENT OF SUBSTITUTE GOODS OR SERVICES; LOSS OF USE, DATA, OR PROFITS; OR BUSINESS INTERRUPTION) HOWEVER CAUSED AND ON ANY THEORY OF LIABILITY, WHETHER IN CONTRACT, STRICT LIABILITY, OR TORT (INCLUDING NEGLIGENCE OR OTHERWISE) ARISING IN ANY WAY OUT OF THE USE OF THIS SOFTWARE, EVEN IF ADVISED OF THE POSSIBILITY OF SUCH DAMAGE.
• libvorbis
Copyright (c) 2002-2008 Xiph.org Foundation Redistribution and use in source and binary forms, with or without modification, are permitted provided that the following conditions are met:
– Redistributions of source code must retain the above copyright notice, this list of conditions and the following disclaimer.
– Redistributions in binary form must reproduce the above copyright notice, this list of conditions and the following disclaimer in the documentation and/or other materials provided with the distribution.
- Neither the name of the Xiph.org Foundation nor the names of its contributors may be used to endorse or promote products derived from this software without specific prior written permission. THIS SOFTWARE IS PROVIDED BY THE COPYRIGHT HOLDERS AND CONTRIBUTORS ``AS IS'' AND ANY EXPRESS OR IMPLIED WARRANTIES, INCLUDING, BUT NOT LIMITED TO, THE IMPLIED WARRANTIES OF MERCHANTABILITY AND FITNESS FOR A PARTICULAR PURPOSE ARE DISCLAIMED. IN NO EVENT SHALL THE FOUNDATION OR CONTRIBUTORS BE LIABLE FOR ANY DIRECT, INDIRECT, INCIDENTAL, SPECIAL, EXEMPLARY, OR CONSEQUENTIAL DAMAGES (INCLUDING, BUT NOT LIMITED TO, PROCUREMENT OF SUBSTITUTE GOODS OR SERVICES; LOSS OF USE, DATA, OR PROFITS; OR BUSINESS INTERRUPTION) HOWEVER CAUSED AND ON ANY THEORY OF LIABILITY, WHETHER IN CONTRACT, STRICT LIABILITY, OR TORT (INCLUDING NEGLIGENCE OR OTHERWISE) ARISING IN ANY WAY OUT OF THE USE OF THIS SOFTWARE, EVEN IF ADVISED OF THE POSSIBILITY OF SUCH DAMAGE.
- libogg
Copyright (c) 2002, Xiph.org Foundation Redistribution and use in source and binary forms, with or without modification, are permitted provided that the following conditions are met:
– Redistributions of source code must retain the above copyright notice, this list of conditions and the following disclaimer.
– Redistributions in binary form must reproduce the above copyright notice, this list of conditions and the following disclaimer in the documentation and/or other materials provided with the distribution.
– Neither the name of the Xiph.org Foundation nor the names of its contributors may be used to endorse or promote products derived from this software without specific prior written permission.
THIS SOFTWARE IS PROVIDED BY THE COPYRIGHT HOLDERS AND CONTRIBUTORS ``AS IS'' AND ANY EXPRESS OR IMPLIED WARRANTIES, INCLUDING, BUT NOT LIMITED TO, THE IMPLIED WARRANTIES OF MERCHANTABILITY AND FITNESS FOR A PARTICULAR PURPOSE ARE DISCLAIMED. IN NO EVENT SHALL THE FOUNDATION OR CONTRIBUTORS BE LIABLE FOR ANY DIRECT, INDIRECT, INCIDENTAL, SPECIAL, EXEMPLARY, OR CONSEQUENTIAL DAMAGES (INCLUDING, BUT NOT LIMITED TO, PROCUREMENT OF SUBSTITUTE GOODS OR SERVICES; LOSS OF USE, DATA, OR PROFITS; OR BUSINESS INTERRUPTION) HOWEVER CAUSED AND ON ANY THEORY OF LIABILITY, WHETHER IN CONTRACT, STRICT LIABILITY, OR TORT (INCLUDING NEGLIGENCE OR OTHERWISE) ARISING IN ANY WAY OUT OF THE USE OF THIS SOFTWARE, EVEN IF ADVISED OF THE POSSIBILITY OF SUCH DAMAGE.
Table des matières
Connexion/Installation ....59
Avant l'installation ....59
DMX957XR / DMX907S / DMX9707S

REMARQUE
DMX957XR / DMX907S / DMX9707S

▶L'appareil se met en marche.
[Language]
(DMX907S/DMX9707S seulement)
REMARQUE
DMX957XR / DMX907S / DMX9707S
Utilisation de base
DMX957XR

1 Angle de vue
natural_image
Simple line drawing of a hand cursor clicking a button (no text or symbols)●Toucher longuement
DMX957XR / DMX907S / DMX9707S
1
natural_image
Technical line drawing of a CD or DVD disc assembly with an arrow indicating direction (no text or symbols present)natural_image
Scenic coastal landscape with green foliage, distant sea, and framed picture boxes (no text or symbols)natural_image
Line drawing of a USB connector with a cable, showing a connector inserted into a USB socket (no text or symbols present)■ HFP [Hands Free1]/ [Hands Free2]/ [No Connection.]
REMARQUE
Fader, Balance
natural_image
Technical line drawing of a mechanical assembly with gears, springs, and housing (no text or symbols)Ventilateur
Connexion/Installation
natural_image
Pure electrical circuit lines without any symbolsAntenne Bluetooth
natural_image
Diagram showing a box being placed on top of a rectangular frame, with an arrow indicating rotation (no text or symbols present)
Antenne GPS
REMARQUE
natural_image
Diagram showing light rays interacting with a rectangular object, with an inset illustrating the right-hand rule (no text or symbols present)
natural_image
Technical line drawing of a mechanical component with mounting holes and a triangular support (no text or symbols)natural_image
Line drawing of hands holding a rectangular object with arrows indicating movement or force (no text or symbols)REMARQUE
natural_image
Line drawing of a hand holding a rectangular object with metal brackets (no text or symbols)natural_image
Illustration of a mechanical connector with a coiled cable and ring (no text or symbols)1 [Picture quality settings] (DDX9907XR / DMX957XR) *1
2 [Picture from view camera]
3 [Front]*2
4 [Dashboard Camera]*
5 [Right]
6 [Left] *
7 [None]*
- Manufactured under license from Dolby Laboratories. Dolby, Dolby Audio and the double-D symbol are trademarks of Dolby Laboratories.
• DVD is a trademark of DVD Format/Logo Licensing Corporation registered in the U.S., Japan and other countries. - This item incorporates copy protection technology that is protected by U.S. patents and other intellectual property rights of Rovi Corporation. Reverse engineering and disassembly are prohibited.
- Windows Media is a registered trademark or trademark of Microsoft Corporation in the United States and/or other countries. This product is protected by certain intellectual property rights of Microsoft. Use or distribution of such technology outside of this product is prohibited without a license from Microsoft.
- This software is based in part on the work of the independent JPEG Group.
- Use of the Made for Apple badge means that an accessory has been designed to connect specifically to the Apple product(s) identified in the badge, and has been certified by the developer to meet Apple performance standards. Apple is not responsible for the operation of this device or its compliance with safety and regulatory standards. Please note that the use of this accessory with an Apple product may affect wireless performance.
- Apple, iPhone, iPod, iPod touch, and Lightning are trademarks of Apple Inc., registered in the U.S. and other countries.
• Apple, Siri, Apple CarPlay, Apple Music and Apple CarPlay logo are trademarks of Apple Inc., registered in the U.S. and other countries. - IOS is a trademark or registered trademark of Cisco in the U.S. and other countries and is used under license.
- Sirius, XM and all related marks and logos are trademarks of Sirius XM Radio Inc. All rights reserved.
- HD Radio Technology manufactured under license from iBiquity Digital Corporation. U.S. and Foreign Patents. For patents see https://dts.com/patents.HD Radio and the HD, HD Radio, and "ARC" logos
are registered trademarks or trademarks of iBiquity Digital Corporation in the United States and/or other countries.
• INRIX is a registered trademark of INRIX, Inc.
- Google, Android, Google Play and Android Auto are trademarks of Google LLC.
- To use Android Auto on your car display, you'll need an Android Auto compatible vehicle or aftermarket stereo, an Android phone running Android 5.0 or higher, and the Android Auto app.
- Wi-Fi is a registered trademark of Wi-Fi Alliance .
- The Wi-Fi CERTIFIED™ Logo is a certification mark of Wi-Fi Alliance®.
• Copyright© 2018 Techpoint, Inc. All rights reserved.
HD-TVI™
- Linux is the registered trademark of Linus Torvalds in the U.S. and other countries.
- This product includes FontAvenue® fonts licenced by NEC Corporation.FontAvenue is a registered trademark of NEC Corporation.

FontAvenue
- This product includes "Ubiquitous QuickBoot TM" technology developed by Ubiquitous Corp. Ubiquitous QuickBoot TM is a trademark of Ubiquitous Corp. Copyright© 2017 Ubiquitous Corp. All rights reserved.

- THIS PRODUCT IS LICENSED UNDER THE AVC PATENT PORTFOLIO LICENSE FOR THE PERSONAL USE OF A CONSUMER OR OTHER USES IN WHICH IT DOES NOT RECEIVE REMUNERATION TO (j)ENCODE VIDEO IN COMPLIANCE WITH THE AVC STANDARD ("AVC VIDEO") AND/OR (jj)DECODE AVC VIDEO THAT WAS ENCODED BY A CONSUMER ENGAGED IN A PERSONAL ACTIVITY AND/OR WAS OBTAINED FROM A VIDEO PROVIDER LICENSED TO PROVIDE AVC VIDEO. NO LICENSE IS GRANTED OR SHALL BE IMPLIED FOR ANY OTHER USE. ADDITIONAL INFORMATION MAY BE OBTAINED FROM MPEG LA, L.L.C. SEE HTTPS://WWW.MPEGLA.COM
-
THIS PRODUCT IS LICENSED UNDER THE MPEG-4 VISUAL PATENT PORTFOLIO LICENSE FOR THE PERSONAL AND NON-COMMERCIAL USE OF A CONSUMER FOR (j) ENCODING VIDEO IN COMPLIANCE WITH THE MPEG-4 VISUAL STANDARD ("MPEG-4 VIDEO") AND/OR (jj) DECODING MPEG-4 VIDEO THAT WAS ENCODED BY A CONSUMER ENGAGED IN A PERSONAL AND NON-COMMERCIAL ACTIVITY AND/OR WAS OBTAINED FROM A VIDEO PROVIDER LICENSED BY MPEG LA TO PROVIDE MPEG-4 VIDEO. NO LICENSE IS GRANTED OR SHALL BE IMPLIED FOR ANY OTHER USE. ADDITIONAL INFORMATION INCLUDING THAT RELATING TO PROMOTIONAL, INTERNAL AND COMMERCIAL USES AND LICENSING MAY BE OBTAINED FROM MPEG LA, LLC. SEE HTTPS://WWW.MPEGLA.COM.
-
THIS PRODUCT IS LICENSED UNDER THE VC-1 PATENT PORTFOLIO LICENSE FOR THE PERSONAL AND NON-COMMERCIAL USE OF A CONSUMER TO (i) ENCODE VIDEO IN COMPLIANCE WITH THE VC-1 STANDARD ("VC-1 VIDEO") AND/OR (ii) DECODE VC-1 VIDEO THAT WAS ENCODED BY A CONSUMER ENGAGED IN A PERSONAL AND NON-COMMERCIAL ACTIVITY AND/OR WAS OBTAINED FROM A VIDEO PROVIDER LICENSED TO PROVIDE VC-1 VIDEO. NO LICENSE IS GRANTED OR SHALL BE IMPLIED FOR ANY OTHER USE. ADDITIONAL INFORMATION MAY BE OBTAINED FROM MPEG LA, L.L.C. SEE HTTPS://WWW.MPEGLA.COM
- libFLAC
Copyright (C) 2000-2009 Josh Coalson
Copyright (C) 2011-2013 Xiph.Org Foundation Redistribution and use in source and binary forms, with or without modification, are permitted provided that the following conditions are met:
– Redistributions of source code must retain the above copyright notice, this list of conditions and the following disclaimer.
– Redistributions in binary form must reproduce the above copyright notice, this list of conditions and the following disclaimer in the documentation and/or other materials provided with the distribution.
- Neither the name of the Xiph.org Foundation nor the names of its contributors may be used to endorse or promote products derived from this software without specific prior written permission.
THIS SOFTWARE IS PROVIDED BY THE COPYRIGHT HOLDERS AND CONTRIBUTORS ``AS IS'' AND ANY EXPRESS OR IMPLIED WARRANTIES, INCLUDING, BUT NOT LIMITED TO, THE IMPLIED WARRANTIES OF MERCHANTABILITY AND FITNESS FOR A PARTICULAR PURPOSE ARE DISCLAIMED. IN NO EVENT SHALL THE FOUNDATION OR CONTRIBUTORS BE LIABLE FOR ANY DIRECT, INDIRECT, INCIDENTAL, SPECIAL, EXEMPLARY, OR CONSEQUENTIAL DAMAGES (INCLUDING, BUT NOT LIMITED TO, PROCUREMENT OF SUBSTITUTE GOODS OR SERVICES; LOSS OF USE, DATA, OR PROFITS; OR BUSINESS INTERRUPTION) HOWEVER CAUSED AND ON ANY THEORY OF LIABILITY, WHETHER IN CONTRACT, STRICT LIABILITY, OR TORT (INCLUDING NEGLIGENCE OR OTHERWISE) ARISING IN ANY WAY OUT OF THE USE OF THIS SOFTWARE, EVEN IF ADVISED OF THE POSSIBILITY OF SUCH DAMAGE.
• libvorbis
Copyright (c) 2002-2008 Xiph.org Foundation Redistribution and use in source and binary forms, with or without modification, are permitted provided that the following conditions are met:
– Redistributions of source code must retain the above copyright notice, this list of conditions and the following disclaimer.
– Redistributions in binary form must reproduce the above copyright notice, this list of conditions and the following disclaimer in the documentation and/or other materials provided with the distribution.
- Neither the name of the Xiph.org Foundation nor the names of its contributors may be used to endorse or promote products derived from this software without specific prior written permission. THIS SOFTWARE IS PROVIDED BY THE COPYRIGHT HOLDERS AND CONTRIBUTORS ``AS IS'' AND ANY EXPRESS OR IMPLIED WARRANTIES, INCLUDING, BUT NOT LIMITED TO, THE IMPLIED WARRANTIES OF MERCHANTABILITY AND FITNESS FOR A PARTICULAR PURPOSE ARE DISCLAIMED. IN NO EVENT SHALL THE FOUNDATION OR CONTRIBUTORS BE LIABLE FOR ANY DIRECT, INDIRECT, INCIDENTAL, SPECIAL, EXEMPLARY, OR CONSEQUENTIAL DAMAGES (INCLUDING, BUT NOT LIMITED TO, PROCUREMENT OF SUBSTITUTE GOODS OR SERVICES; LOSS OF USE, DATA, OR PROFITS; OR BUSINESS INTERRUPTION) HOWEVER CAUSED AND ON ANY THEORY OF LIABILITY, WHETHER IN CONTRACT, STRICT LIABILITY, OR TORT (INCLUDING NEGLIGENCE OR OTHERWISE) ARISING IN ANY WAY OUT OF THE USE OF THIS SOFTWARE, EVEN IF ADVISED OF THE POSSIBILITY OF SUCH DAMAGE.
- libogg
Copyright (c) 2002, Xiph.org Foundation Redistribution and use in source and binary forms, with or without modification, are permitted provided that the following conditions are met:
– Redistributions of source code must retain the above copyright notice, this list of conditions and the following disclaimer.
– Redistributions in binary form must reproduce the above copyright notice, this list of conditions and the following disclaimer in the documentation and/or other materials provided with the distribution.
– Neither the name of the Xiph.org Foundation nor the names of its contributors may be used to endorse or promote products derived from this software without specific prior written permission.
THIS SOFTWARE IS PROVIDED BY THE COPYRIGHT HOLDERS AND CONTRIBUTORS ``AS IS'' AND ANY EXPRESS OR IMPLIED WARRANTIES, INCLUDING, BUT NOT LIMITED TO, THE IMPLIED WARRANTIES OF MERCHANTABILITY AND FITNESS FOR A PARTICULAR PURPOSE ARE DISCLAIMED. IN NO EVENT SHALL THE FOUNDATION OR CONTRIBUTORS BE LIABLE FOR ANY DIRECT, INDIRECT, INCIDENTAL, SPECIAL, EXEMPLARY, OR CONSEQUENTIAL DAMAGES (INCLUDING, BUT NOT LIMITED TO, PROCUREMENT OF SUBSTITUTE GOODS OR SERVICES; LOSS OF USE, DATA, OR PROFITS; OR BUSINESS INTERRUPTION) HOWEVER CAUSED AND ON ANY THEORY OF LIABILITY, WHETHER IN CONTRACT, STRICT LIABILITY, OR TORT (INCLUDING NEGLIGENCE OR OTHERWISE) ARISING IN ANY WAY OUT OF THE USE OF THIS SOFTWARE, EVEN IF ADVISED OF THE POSSIBILITY OF SUCH DAMAGE.
Contenido
DMX957XR / DMX907S / DMX9707S

NOTA
DMX957XR / DMX907S / DMX9707S

[Language]
NOTA
▶Aparece la pantalla SETUP Menu.
3 Toque [User Interface].
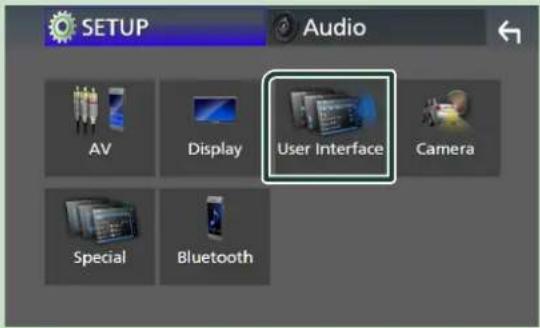
▶Aparecerá la pantalla User Interface.
DMX957XR / DMX907S / DMX9707S
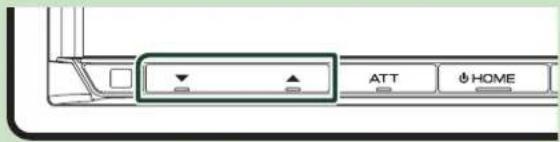
Funciones básicas
Ajuste del visualizador (DDX9907XR / DDX9707S / DMX957XR)
DMX957XR
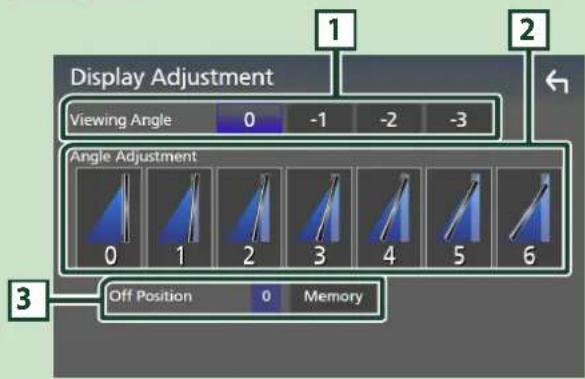
natural_image
Simple line drawing of a hand cursor clicking a button (no text or symbols)natural_image
Hand icon with finger pressing a circular button (no text or symbols)●Hojear
DMX957XR / DMX907S / DMX9707S
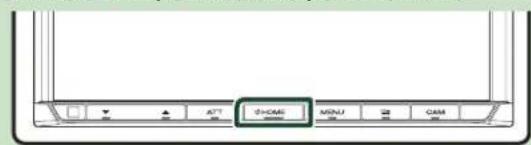
▶Aparece la pantalla INICIO.
Widget
1
natural_image
Technical line drawing of a CD or DVD disc assembly with an arrow indicating direction (no text or symbols present)natural_image
Scenic coastal landscape with green foliage, distant ocean, and framed photos of plants and sea (no text or symbols)natural_image
Line drawing of a USB connector with a cable, showing a port and cable outlet (no text or symbols)2 Pulse el botón [HOME].
3 Toque
4 Toque [USB]. (P.81)

Desconecte el dispositivo USB
■ HFP [Hands Free1]/[Hands Free2]/[No Connection.]
NOTA
Control general del audio
Fader, Balance
natural_image
Technical line drawing of a mechanical assembly with gears and components (no text or symbols)natural_image
Pure electrical circuit lines without any symbolsnatural_image
Diagram showing a box being inserted into a rectangular frame, with an arrow indicating the direction of movement (no text or symbols present)Antena GPS
NOTA
natural_image
Diagram showing light rays interacting with a rectangular object, with an inset illustrating a right-hand rule (no text or symbols present)
natural_image
Technical line drawing of a mechanical component with mounting holes and a triangular guide pin (no text or symbols)natural_image
Line drawing of hands using a tool to adjust or install a rectangular object (no text or symbols present)NOTA
natural_image
Line drawing of a hand holding a rectangular device with metal brackets (no text or symbols)
[DDX9707S / DMX9707S :]
natural_image
Illustration of a cable connector with a coiled cable (no text or symbols)1 [Picture quality settings] (DDX9907XR/DMX957XR) *1
2 [Picture from view camera]
3 [Front]*2
4 [Dashboard Camera] *
5 [Right] 2
6 [Left] *
7 [None]*
- Manufactured under license from Dolby Laboratories. Dolby, Dolby Audio and the double-D symbol are trademarks of Dolby Laboratories.
• DVD is a trademark of DVD Format/Logo Licensing Corporation registered in the U.S., Japan and other countries. - This item incorporates copy protection technology that is protected by U.S. patents and other intellectual property rights of Rovi Corporation. Reverse engineering and disassembly are prohibited.
- Windows Media is a registered trademark or trademark of Microsoft Corporation in the United States and/or other countries. This product is protected by certain intellectual property rights of Microsoft. Use or distribution of such technology outside of this product is prohibited without a license from Microsoft.
- This software is based in part on the work of the independent JPEG Group.
- Use of the Made for Apple badge means that an accessory has been designed to connect specifically to the Apple product(s) identified in the badge, and has been certified by the developer to meet Apple performance standards. Apple is not responsible for the operation of this device or its compliance with safety and regulatory standards. Please note that the use of this accessory with an Apple product may affect wireless performance.
- Apple, iPhone, iPod, iPod touch, and Lightning are trademarks of Apple Inc., registered in the U.S. and other countries.
• Apple, Siri, Apple CarPlay, Apple Music and Apple CarPlay logo are trademarks of Apple Inc., registered in the U.S. and other countries. - IOS is a trademark or registered trademark of Cisco in the U.S. and other countries and is used under license.
- Sirius, XM and all related marks and logos are trademarks of Sirius XM Radio Inc. All rights reserved.
- HD Radio Technology manufactured under license from iBiquity Digital Corporation. U.S. and Foreign Patents. For patents see https://dts.com/patents. HD Radio and the HD, HD Radio, and "ARC" logos
are registered trademarks or trademarks of iBiquity Digital Corporation in the United States and/or other countries.
• INRIX is a registered trademark of INRIX, Inc.
- Google, Android, Google Play and Android Auto are trademarks of Google LLC.
- To use Android Auto on your car display, you'll need an Android Auto compatible vehicle or aftermarket stereo, an Android phone running Android 5.0 or higher, and the Android Auto app.
- Wi-Fi is a registered trademark of Wi-Fi Alliance .
- The Wi-Fi CERTIFIED™ Logo is a certification mark of Wi-Fi Alliance®.
• Copyright© 2018 Techpoint, Inc. All rights reserved.
HD-TVI™
- Linux is the registered trademark of Linus Torvalds in the U.S. and other countries.
- This product includes FontAvenue® fonts licenced by NEC Corporation.FontAvenue is a registered trademark of NEC Corporation.

FontAvenue
- This product includes "Ubiquitous QuickBoot TM" technology developed by Ubiquitous Corp. Ubiquitous QuickBoot TM is a trademark of Ubiquitous Corp. Copyright© 2017 Ubiquitous Corp. All rights reserved.

- THIS PRODUCT IS LICENSED UNDER THE AVC PATENT PORTFOLIO LICENSE FOR THE PERSONAL USE OF A CONSUMER OR OTHER USES IN WHICH IT DOES NOT RECEIVE REMUNERATION TO (j)ENCODE VIDEO IN COMPLIANCE WITH THE AVC STANDARD ("AVC VIDEO") AND/OR (jj)DECODE AVC VIDEO THAT WAS ENCODED BY A CONSUMER ENGAGED IN A PERSONAL ACTIVITY AND/OR WAS OBTAINED FROM A VIDEO PROVIDER LICENSED TO PROVIDE AVC VIDEO. NO LICENSE IS GRANTED OR SHALL BE IMPLIED FOR ANY OTHER USE. ADDITIONAL INFORMATION MAY BE OBTAINED FROM MPEG LA, L.L.C. SEE HTTPS://WWW.MPEGLA.COM
-
THIS PRODUCT IS LICENSED UNDER THE MPEG-4 VISUAL PATENT PORTFOLIO LICENSE FOR THE PERSONAL AND NON-COMMERCIAL USE OF A CONSUMER FOR (j) ENCODING VIDEO IN COMPLIANCE WITH THE MPEG-4 VISUAL STANDARD ("MPEG-4 VIDEO") AND/OR (jj) DECODING MPEG-4 VIDEO THAT WAS ENCODED BY A CONSUMER ENGAGED IN A PERSONAL AND NON-COMMERCIAL ACTIVITY AND/OR WAS OBTAINED FROM A VIDEO PROVIDER LICENSED BY MPEG LA TO PROVIDE MPEG-4 VIDEO. NO LICENSE IS GRANTED OR SHALL BE IMPLIED FOR ANY OTHER USE. ADDITIONAL INFORMATION INCLUDING THAT RELATING TO PROMOTIONAL, INTERNAL AND COMMERCIAL USES AND LICENSING MAY BE OBTAINED FROM MPEG LA, LLC. SEE HTTPS://WWW.MPEGLA.COM.
-
THIS PRODUCT IS LICENSED UNDER THE VC-1 PATENT PORTFOLIO LICENSE FOR THE PERSONAL AND NON-COMMERCIAL USE OF A CONSUMER TO (i) ENCODE VIDEO IN COMPLIANCE WITH THE VC-1 STANDARD ("VC-1 VIDEO") AND/OR (ii) DECODE VC-1 VIDEO THAT WAS ENCODED BY A CONSUMER ENGAGED IN A PERSONAL AND NON-COMMERCIAL ACTIVITY AND/OR WAS OBTAINED FROM A VIDEO PROVIDER LICENSED TO PROVIDE VC-1 VIDEO. NO LICENSE IS GRANTED OR SHALL BE IMPLIED FOR ANY OTHER USE. ADDITIONAL INFORMATION MAY BE OBTAINED FROM MPEG LA, L.L.C. SEE HTTPS://WWW.MPEGLA.COM
- libFLAC
Copyright (C) 2000-2009 Josh Coalson
Copyright (C) 2011-2013 Xiph.Org Foundation Redistribution and use in source and binary forms, with or without modification, are permitted provided that the following conditions are met:
– Redistributions of source code must retain the above copyright notice, this list of conditions and the following disclaimer.
– Redistributions in binary form must reproduce the above copyright notice, this list of conditions and the following disclaimer in the documentation and/or other materials provided with the distribution.
- Neither the name of the Xiph.org Foundation nor the names of its contributors may be used to endorse or promote products derived from this software without specific prior written permission.
THIS SOFTWARE IS PROVIDED BY THE COPYRIGHT HOLDERS AND CONTRIBUTORS ``AS IS'' AND ANY EXPRESS OR IMPLIED WARRANTIES, INCLUDING, BUT NOT LIMITED TO, THE IMPLIED WARRANTIES OF MERCHANTABILITY AND FITNESS FOR A PARTICULAR PURPOSE ARE DISCLAIMED. IN NO EVENT SHALL THE FOUNDATION OR CONTRIBUTORS BE LIABLE FOR ANY DIRECT, INDIRECT, INCIDENTAL, SPECIAL, EXEMPLARY, OR CONSEQUENTIAL DAMAGES (INCLUDING, BUT NOT LIMITED TO, PROCUREMENT OF SUBSTITUTE GOODS OR SERVICES; LOSS OF USE, DATA, OR PROFITS; OR BUSINESS INTERRUPTION) HOWEVER CAUSED AND ON ANY THEORY OF LIABILITY, WHETHER IN CONTRACT, STRICT LIABILITY, OR TORT (INCLUDING NEGLIGENCE OR OTHERWISE) ARISING IN ANY WAY OUT OF THE USE OF THIS SOFTWARE, EVEN IF ADVISED OF THE POSSIBILITY OF SUCH DAMAGE.
- libvorbis
Copyright (c) 2002-2008 Xiph.org Foundation Redistribution and use in source and binary forms, with or without modification, are permitted provided that the following conditions are met:
– Redistributions of source code must retain the above copyright notice, this list of conditions and the following disclaimer.
– Redistributions in binary form must reproduce the above copyright notice, this list of conditions and the following disclaimer in the documentation and/or other materials provided with the distribution.
- Neither the name of the Xiph.org Foundation nor the names of its contributors may be used to endorse or promote products derived from this software without specific prior written permission. THIS SOFTWARE IS PROVIDED BY THE COPYRIGHT HOLDERS AND CONTRIBUTORS ``AS IS'' AND ANY EXPRESS OR IMPLIED WARRANTIES, INCLUDING, BUT NOT LIMITED TO, THE IMPLIED WARRANTIES OF MERCHANTABILITY AND FITNESS FOR A PARTICULAR PURPOSE ARE DISCLAIMED. IN NO EVENT SHALL THE FOUNDATION OR CONTRIBUTORS BE LIABLE FOR ANY DIRECT, INDIRECT, INCIDENTAL, SPECIAL, EXEMPLARY, OR CONSEQUENTIAL DAMAGES (INCLUDING, BUT NOT LIMITED TO, PROCUREMENT OF SUBSTITUTE GOODS OR SERVICES; LOSS OF USE, DATA, OR PROFITS; OR BUSINESS INTERRUPTION) HOWEVER CAUSED AND ON ANY THEORY OF LIABILITY, WHETHER IN CONTRACT, STRICT LIABILITY, OR TORT (INCLUDING NEGLIGENCE OR OTHERWISE) ARISING IN ANY WAY OUT OF THE USE OF THIS SOFTWARE, EVEN IF ADVISED OF THE POSSIBILITY OF SUCH DAMAGE.
- libogg
Copyright (c) 2002, Xiph.org Foundation Redistribution and use in source and binary forms, with or without modification, are permitted provided that the following conditions are met:
– Redistributions of source code must retain the above copyright notice, this list of conditions and the following disclaimer.
– Redistributions in binary form must reproduce the above copyright notice, this list of conditions and the following disclaimer in the documentation and/or other materials provided with the distribution.
– Neither the name of the Xiph.org Foundation nor the names of its contributors may be used to endorse or promote products derived from this software without specific prior written permission.
THIS SOFTWARE IS PROVIDED BY THE COPYRIGHT HOLDERS AND CONTRIBUTORS ``AS IS'' AND ANY EXPRESS OR IMPLIED WARRANTIES, INCLUDING, BUT NOT LIMITED TO, THE IMPLIED WARRANTIES OF MERCHANTABILITY AND FITNESS FOR A PARTICULAR PURPOSE ARE DISCLAIMED. IN NO EVENT SHALL THE FOUNDATION OR CONTRIBUTORS BE LIABLE FOR ANY DIRECT, INDIRECT, INCIDENTAL, SPECIAL, EXEMPLARY, OR CONSEQUENTIAL DAMAGES (INCLUDING, BUT NOT LIMITED TO, PROCUREMENT OF SUBSTITUTE GOODS OR SERVICES; LOSS OF USE, DATA, OR PROFITS; OR BUSINESS INTERRUPTION) HOWEVER CAUSED AND ON ANY THEORY OF LIABILITY, WHETHER IN CONTRACT, STRICT LIABILITY, OR TORT (INCLUDING NEGLIGENCE OR OTHERWISE) ARISING IN ANY WAY OUT OF THE USE OF THIS SOFTWARE, EVEN IF ADVISED OF THE POSSIBILITY OF SUCH DAMAGE.
■FCC CAUTION
Changes or modifications not expressly approved by the party responsible for compliance could void the user's authority to operate the equipment.
NOTE
- This equipment has been tested and found to comply with the limits for a Class B digital device, pursuant to part 15 of the FCC Rules. These limits are designed to provide reasonable protection against harmful interference in a residential installation.
- This equipment generates, uses and can radiate radio frequency energy and, if not installed and used in accordance with the instructions, may cause harmful interference to radio communications. However, there is no guarantee that interference will not occur in a particular installation. If this equipment does cause harmful interference to radio or television reception, which can be determined by turning the equipment off and on, the user is encouraged to try to correct the interference by one or more of the following measures:
– Reorient or relocate the receiving antenna.
– Increase the separation between the equipment and receiver. - Connect the equipment into an outlet on a circuit different from that to which the receiver is connected.
- Consult the dealer or an experienced radio/TV technician for help.
CAUTION
Use of controls or adjustments or performance of procedures other than those specified herein may result in hazardous radiation exposure.
In compliance with Federal Regulations, following are reproductions of labels on, or inside the product relating to laser product safety.
THIS PRODUCT COMPLIES WITH DHHS RULES 21 CFR SUBCHAPTER J IN EFFECT AT DATE OF MANUFACTURE.
Location: Bottom plate (DDX9907XR) Top plate (DDX9707S)
This transmitter must not be co-located or operated in conjunction with any other antenna or transmitter.
■IC (Industry Canada) Caution
This device contains licence-exempt transmitter(s)/receiver(s) that comply with Innovation, Science and Economic Development Canada's licence-exempt RSS(s).
Operation is subject to the following two conditions:
(1) This device may not cause interference.
(2) This device must accept any interference, including interference that may cause undesired operation of the device.
CAUTION
This equipment complies with FCC/IC radiation exposure limits set forth for an uncontrolled environment and meets the FCC radio frequency (RF) Exposure Guidelines and RSS-102 of the IC radio frequency (RF) Exposure rules. This equipment should be installed and operated keeping the radiator at least 20cm or more away from person's body.
■Attention de 'IC (Industrie Canada)
Supplier's Declaration of Conformity
Trade Name: KENWOOD
Products: MONITOR WITH DVD RECEIVER
Model Name: DDX9907XR / DDX9707S
Products: MONITOR WITH RECEIVER
Model Name: DMX957XR / DMX907S / DMX9707S
Responsible Party: JVCKENWOOD USA
CORPORATION
2201 East Dominguez Street,
Long Beach, CA 90810, U.S.A.
PHONE: 310 639-9000
THIS DEVICE COMPLIES WITH PART 15 OF THE FCC RULES. OPERATION IS SUBJECT TO THE FOLLOWING TWO CONDITIONS:
(1) THIS DEVICE MAY NOT CAUSE HARMFUL INTERFERENCE, AND
(2) THIS DEVICE MUST ACCEPT ANY INTERFERENCE RECEIVED, INCLUDING INTERFERENCE THAT MAY CAUSE UNDESIRED OPERATION.
Hi-Res Audio logo and Hi-Res Audio Wireless logo are used under license from Japan Audio Society.


Bluetooth®

CERTIFIED

Radio®
This HD Radio receiver enables:
HD2/HD3
Bookmark
Digital Sound
Program Info
Artist Experience
Emergency Alerts

- DDX9907XR
- DDX9707S
- DMX957XR
- DMX907S
- DMX9707S
- Quick Start Guide
- For your records
- US Residence Only
- Register Online
- Important Notice on Software
- Software License on This
- Product
- EULA
- Software License Agreement
- Article 1 (General)
- Article 2 (Right of Use)
- Article 3 (Terms of License)
- Article 4 (Rights to Licensed Software)
- Article 5 (Exemption Granted to Licensor)
- Article 6 (Responsibility for Third Parties)
- Article 7 (Secrecy Obligation)
- Article 8 (Cancellation of the Agreement)
- Article 9 (Destruction of Licensed Software)
- Article 10 (Copyright Protection)
- Article 11 (Export Control)
- Article 12 (Miscellaneous)
- Contents
- Contents 4
- Before Use 4
- Basic Operations ......6
- Disc 15
- USB/iPod......17
- HD Radio™ Tuner/Radio ......19
- Bluetooth Control ......21
- Controlling Audio ......24
- Connection/Installation ......25
- Appendix 35
- Before Use
- About the Quick start guide
- How to read this manual
- Precautions
- ⚠️ WARNINGS
- To prevent injury or fire, take the following precautions:
- Precautions on using this unit
- Protecting the monitor
- Cleaning the unit
- NOTE
- Lens fogging
- Precautions on handling discs
- Acquiring GPS signal
- About GLONASS
- Caution for Smartphone Users
- Basic Operations
- Functions of the Buttons on the Front Panel
- Turning on the Unit
- Press the [HOME] button.
- ●To turn off the unit:
- Press the [HOME] button for 1 second.
- Initial Settings
- Initial SETUP
- Set each item as follows.
- [Language]
- [Clock]
- [Display]
- [Camera]
- [OEM SETUP]
- [DEMO]
- Touch [Finish].
- Calendar/clock settings
- Press the [MENU] button.
- Touch [SETUP].
- Touch [User Interface].
- Set each item as follows.
- [Time Format]
- [Time Zone]
- [Clock Adjust]
- ●Adjust the date and time manually
- Touch [Clock Adjust] on the User Interface screen.
- Adjust the date, then adjust the time.
- Touch [Set].
- Adjusting the volume
- Display Adjustment (DDX9907XR / DDX9707S / DMX957XR)
- Press the [▲] button.
- Press and hold the [CAM] button.
- Viewing Angle
- Angle Adjustment
- Off Position
- Viewing Angle (DMX907S / DMX9707S)
- Touch [Display].
- Touch [Viewing Angle].
- Select an angle you want to set up. Default is "0".
- Touch screen operations
- ●Touch
- ●Touch and hold
- ●Flick
- ●Swipe
- HOME screen descriptions
- 1
- 2
- 3
- Display the HOME screen
- Widget
- Popup menu
- Source selection screen description
- Select the playback source
- Press the HOME button.
- Touch
- Put the unit in standby
- Touch .
- Touch STANDBY.
- Customize Short-cut source icons on HOME screen
- Touch and hold the icon which you want to move in the customizing mode.
- Drag the icon to the desired position.
- Source control screen descriptions
- All sources icon
- Secondary screen
- TEL 1
- List screen
- Display the list screen
- Touch Q.
- Text scroll
- ▶ Play etc.
- / / / Page scroll
- Return
- Disc (DDX9907XR / DDX9707S)
- Insert a disc
- Press the ▲ button.
- Touch DISC EJECT.
- Insert the disc into the slot.
- Eject a disc
- DVD/VCD Basic Operation
- When the operation keys are not displayed on the screen, touch 4 area.
- Function panel
- Disc
- Operation keys
- Searching area
- Key display area
- [MENU CTRL] (DVD only)
- DVD Disc Menu Operation
- Touch 5 area.
- Perform your desired operation as follows.
- USB/iPod
- Connecting a USB device
- Connect iPod/iPhone
- Preparation
- Wired connection
- Bluetooth connection
- Connectable iPod/iPhone
- USB/iPod Basic Operation
- CODEC/
- Content list
- HD Radio™ Tuner/Radio
- HD Radio Tuner Basic Operation (DDX9907XR / DMX957XR / DMX907S)
- Information display
- Seek mode
- Operation keys
- Preset list
- Band keys
- Function panel
- Indicator display
- Radio Basic Operation (DDX9707S / DMX9707S)
- Memory Operation
- Auto memory
- Manual memory
- Preset select
- Bluetooth Control
- Register the Bluetooth device
- Using the Hands-Free Unit
- Make a call
- - Select the cell-phone to use
- Call using call records
- Call using the phonebook
- Select the phone number from the list.
- Call using the preset number
- Call by entering a phone number
- Receive a call
- To end call
- Operations during a call
- ●Adjust the volume of your voice
- ●Adjust the receiver volume
- ●Mute your voice
- ●Output the dial tone
- ●Switching between speaking voice output destinations
- ●To close the Hands-Free popup screen
- To display it again
- Controlling Audio
- Press the MENU button.
- Touch Audio.
- Controlling General Audio
- Touch Fader / Balance.
- Set each parameter as follows.
- Fader, Balance
- Center
- Equalizer Control
- Touch EQ / SW Level.
- Touch the screen and set the Graphic Equalizer as desired.
- ■ Gain level (area in dotted frame)
- ■ Preset Select
- Memory
- Initialize
- ALL SRC
- ■ Bass EXT (Bass Extend Settings)
- SW Level
- Connection/Installation
- Before Installation
- CAUTION
- Supplied accessories for installation
- Installation procedure
- Installing the unit
- Non-Japanese cars
- Japanese cars
- Trim plate
- GPS antenna
- Microphone unit
- Removing the trim plate
- Removing the unit
- 3-way speaker system setup
- Connecting the system and internal components
- Securing the USB extension cable
- Connecting the camera
- To set up the camera assignment settings
- Appendix
- Note for specifications
- Bluetooth section
- General
- ■Copyrights
- HD-TVI™
- FontAvenue
- Table des matières
- Connexion/Installation ....59
- REMARQUE
- Utilisation de base
- Angle de vue
- ●Toucher longuement
- Connexion/Installation
- Antenne GPS
- Contenido
- NOTA
- Funciones básicas
- Ajuste del visualizador (DDX9907XR / DDX9707S / DMX957XR)
- ●Hojear
- Desconecte el dispositivo USB
- Control general del audio
- Antena GPS
- ■FCC CAUTION
- ■IC (Industry Canada) Caution
- ■Attention de 'IC (Industrie Canada)
- Supplier's Declaration of Conformity
Brand : KENWOOD
Model : DDX9707XR
Category : Gps