65C11 - Television HAIER - Free user manual and instructions
Find the device manual for free 65C11 HAIER in PDF.

User questions about 65C11 HAIER
0 question about this device. Answer the ones you know or ask your own.
Ask a new question about this device
Download the instructions for your Television in PDF format for free! Find your manual 65C11 - HAIER and take your electronic device back in hand. On this page are published all the documents necessary for the use of your device. 65C11 by HAIER.
USER MANUAL 65C11 HAIER
LED Television
CONTENTS
- IMPORTANT SAFETY INSTRUCTIONS 2
- PRECAUTIONS AND REMINDERS 3
- OPERATING INSTRUCTIONS 4
- TROUBLESHOOTING 15
- E-WASTE GUIDELINE 16
- WARRANTY 18
Illustration in this manual are provided for reference only and may differ from actual product appearance. Product design and specification may get changed without notice.
1) Read these instructions.
2) Keep these instructions.
3) Heed all warnings.
4) Follow all instructions.
5) Do not use this product near water.
6) Clean only with dry cloth.
7) Do not block any ventilation openings.
8) Do not install this device near heat sources such as radiators, stoves or any other device that produce heat.
9) Do not defeat the safety purpose of the polarized plug. If the provided plug does not fit into your power outlet, consult an electrician for the replacement of the absolute outlet.
10) Protect power cord from being walked on or pinched, particularly at plugs, convenience receptacles and the point where they exit from this device.
11) Only use attachments/accessories specified by the manufacturer.
12) Unplug this device during lightning storm or when unused for long period of time.
13) Refer all servicing to qualified service personnel. Servicing is required when the device has been damaged in any way such as, power cord or plug is damaged, liquid has been spilled or objects have fallen over this device, the device has been exposed to rain or moisture, does not function normally or has been dropped.
14) Mains plug is used as the disconnect device, it shall remain readily operable.
15) The ventilation should not be blocked by any means such as newspaper, table clot, curtains etc.
16) No naked flame sources such as candles should be placed on device.
17) Attention should be drawn to the environmental aspects of battery disposal. (Refer E-waste guideline)
18) If mounted on stand, ensure the device is kept on horizontal surface.
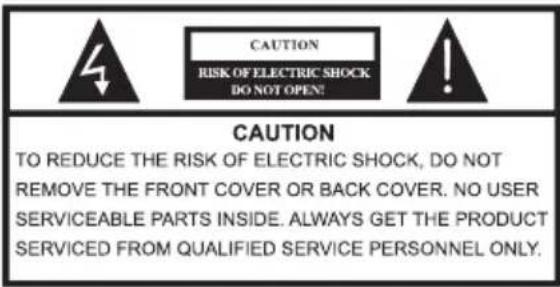

This symbol indicates that dangerous voltages constituting a risk of electric shock are present within this unit.

This symbol indicates that there are important operating and maintenance instructions provided in the user manual given with this unit.
WARNING
To reduce the risk of fire or electric shock, do not expose this device to rain or moisture.
WARNING
The batteries shall not be exposed to excessive heat such as radiators or fire.

This symbol indicates that this product incorporates double insulation between hazardous mains voltage and user accessible parts. While servicing, use only identical replacement parts.
natural_image
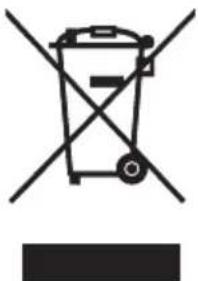
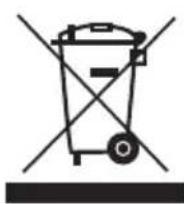
Symbol of a trash bin crossed with a diagonal line and a horizontal line, representing no waste or discharge (no text or labels)This marking indicates that this product should not be disposed with other household wastes (Refer E-waste guidelines). To prevent possible harm to the environment or human health from uncontrolled waste disposal, recycle it responsibly to promote the sustainable reuse of material resources. To return your used device, please use return and collection system or contact retailer where the product was purchased. They can take this product for environmental safe recycling.
High voltages are used in the operation of this TV receiver. Do not remove the cabinet back from your set. Refer servicing to qualified service personnel.
natural_image
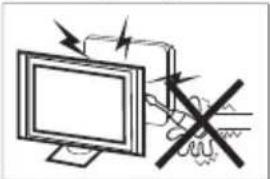
Illustration of a computer monitor with an 'X' symbol crossed out by a hand, no text or symbols present.To prevent fire or electric shock hazard, do not expose the TV receiver to rain or moisture.

natural_image
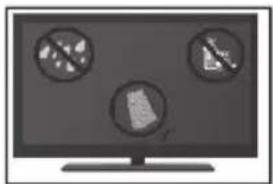
Simple line drawing of a monitor with a cross mark and a curtain in the background (no text or symbols)Do not drop or push objects into the television cabinet slots or openings. Never spill any kind of liquid on the TV receiver.
natural_image
Simple line drawing of a computer monitor with a cross symbol crossed out, surrounded by stars (no text or symbols)Do not block the ventilation holes in the back cover. Adequate ventilation is essential to prevent failure of electric components.
natural_image
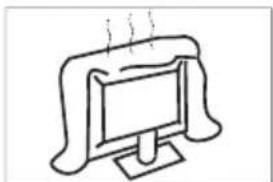
Simple line drawing of a computer monitor with a curved top and base, emitting exhaust smoke (no text or symbols)Do not trap power cord under the TV receiver.
natural_image
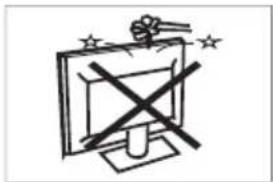
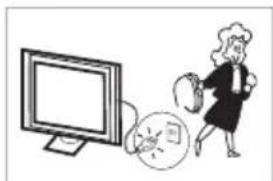
Simple line drawing of a flat-screen TV mounted on a stand (no text or symbols)If you are going to clean the product, unplug the TV and use soft fabric with no water or chemicals.
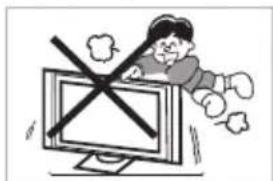
Never stand on, lean on, or suddenly push the TV or its stand. you should pay special attention to children. Serious injury may result if TV falls.
natural_image
Cartoon illustration of a person running away from a computer monitor with a crossed-out X symbol (no text or symbols present)Do not place your TV on an unstable cart, stand, shelf or table. Serious injury to an individual and damage to the TV may cause.
natural_image
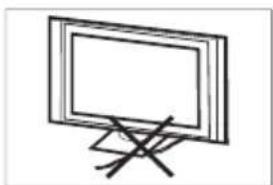
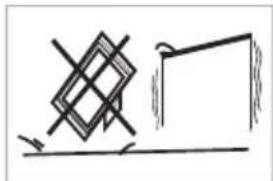
Simple line drawing of a geometric shape with intersecting lines and a rectangular block, no text or symbols present.When the TV receiver is not used for an extended period of time, it is advisable to disconnect the AC power cord from power outlet.
natural_image
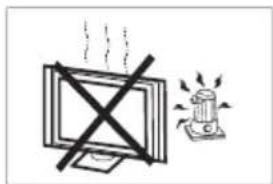
Illustration of a person running away from a computer screen next to a circular object with a broken ring (no text or symbols)Avoid exposing the TV receiver to direct sunlight and other sources of heat. Do not stand the TV receiver directly on other products which give off heat. Do not place naked flame sources such as candle on the TV.
natural_image
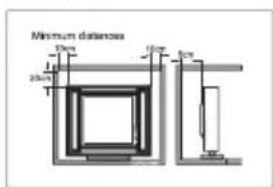
Simple line drawing of a monitor with a cross symbol crossed out, next to a lit candle and a lamp (no text or symbols)If the TV is to be built into compartment or similar enclosure, the minimum distance must be maintained. Heat build-up can reduce the life of your TV and can be dangerous.
The first time you turn on your TV, the setup wizard will guide you through setting up basic settings. Please finish the initial setup following on screen instructions.
At first you need to pair your BT remote with the TV. Follow the instructions given on screen. Once the pairing is successful, you can use your BT remote to operate the TV.

Press ▲/▼ to select the system language and press OK to confirm the desired language.

Press ▲▼ to select the system language and press OK to confirm the desired language.
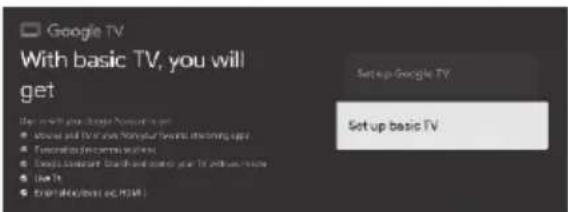
Press ▲▼ to select "Set up basic TV" and press OK to complete the setup.
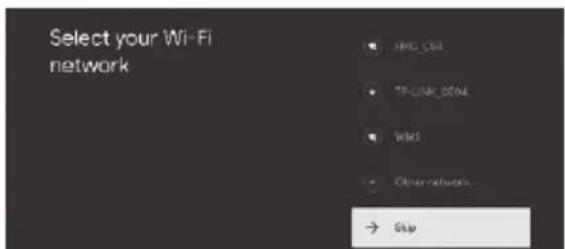
Press ▲▼ to select the available WiFi networks and press OK to get connected to desired network. You will be asked to put in the password of the WiFi network.
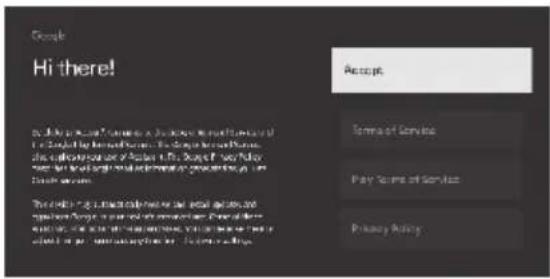
By accepting the "Google Terms of Service", you will be forwarded to the next step.

You can set the device password to ensure the security and privacy. Soft keyboard can be activated by pressing OK in the password input area.
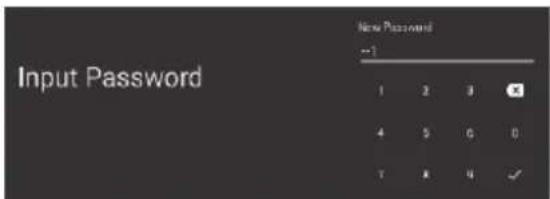
From the input key board, set 4 digit password. After setting up the password you will be forwarded to next screen.

On this screen put in the same credentials to confirm the password.

Select the mode either "Home" or "Retail" by navigating ▲▼ keys.

Navigate with ▲▼ keys to select the option of choice for Chromecast feature.
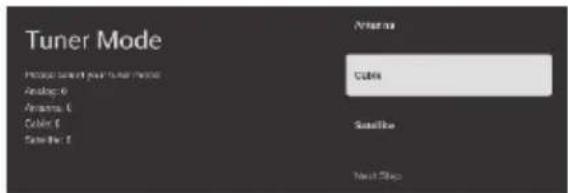
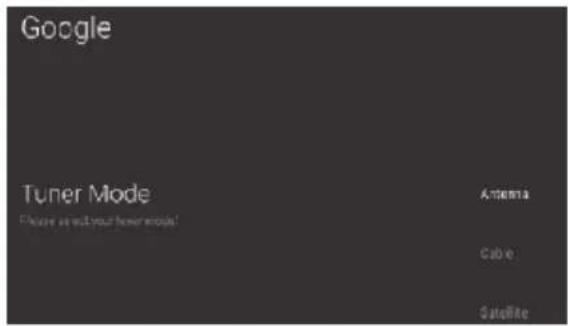
To select the tuner mode navigate with ▲/▼ keys.
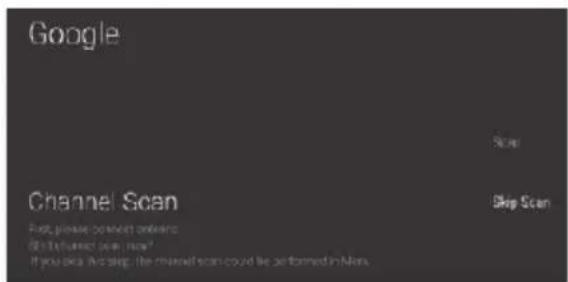
If selected antenna, you will now be forwarded to auto channel scanning screen. Use navigation key ▲/▼ to "Scan" or "Skip" the operation.
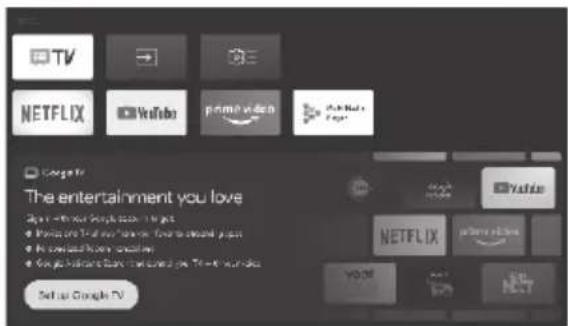
Once the initial set up is completed you can set up your Google TV from the home Screen by navigating to "Set up Google TV" using ▲/▼ keys. Press "OK" to set up Google TV.
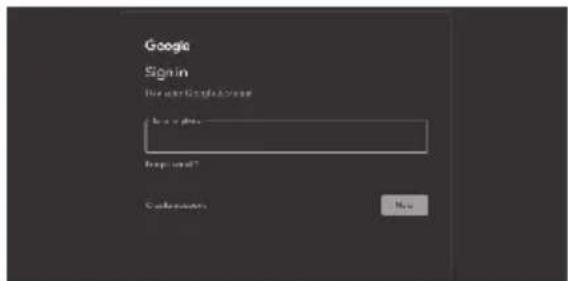
Sign in your Google account to continue set up.
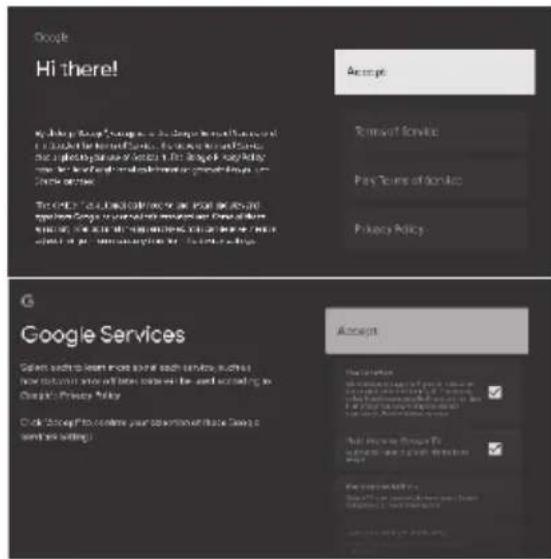
Select "Accept" to accept mandatory terms and conditions by Google.
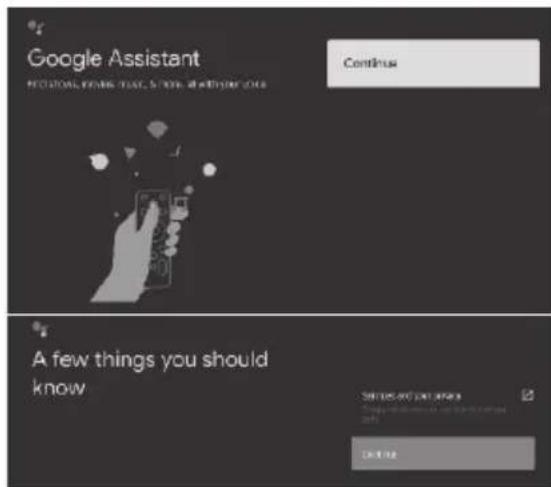
Select "continue" to progress to next screen.

Navigate with ▲▼ keys to select the option of choice for personalized results.
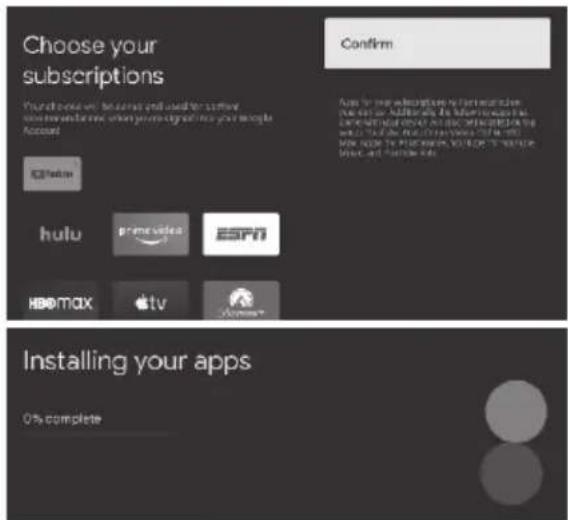
Navigate with ▲▼ keys to choose the subscriptions and select "confirm" to install the recommended Apps. Your device will now install the Apps.

Google TV set up is now completed. Press "Start exploring" to navigate to Home Screen.
ON SCREEN MENU & SETTINGS
There are two ways to enter into settings.
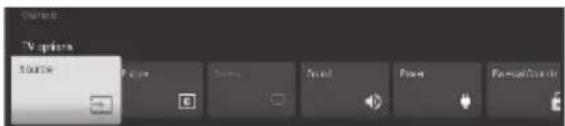
- Through "Live TV"
Navigate with ◀/▶ keys to select "Settings" and press "OK"
- From "Home Screen"
Navigate with ▲/▼ ◀/▶ to circular Icon of Google Profile and select "Settings" by pressing "OK".
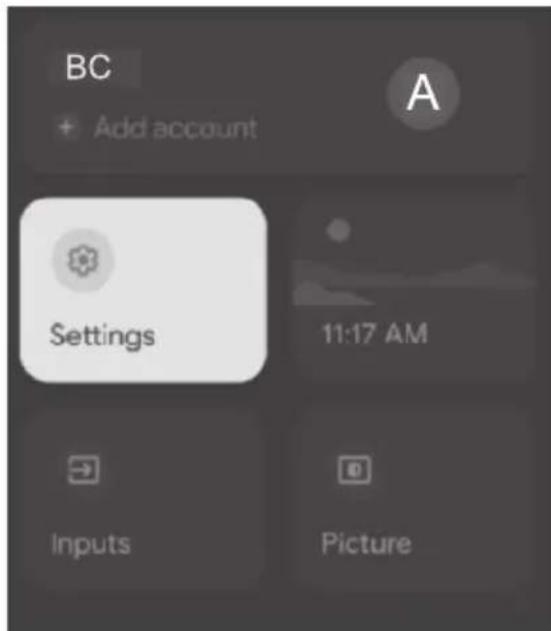
Settings can be accessed by pressing "Settings" from the selection.
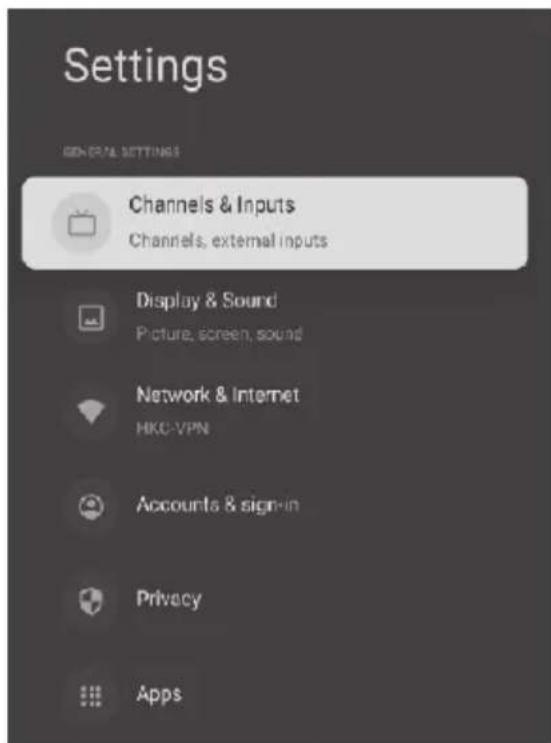
Navigate with ▲▼ keys to enter into desired settings.
Press back to return the previous menu.
CHANNEL & INPUTS
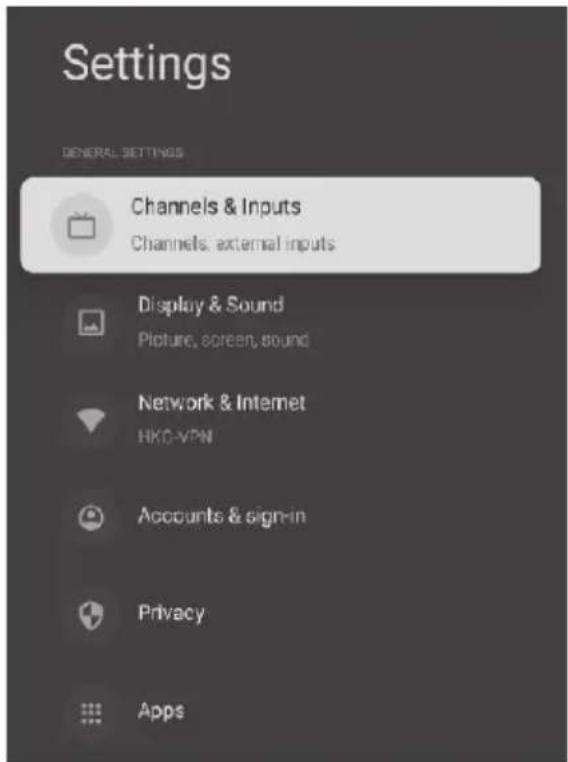
In the "Settings", navigate with keys to select "Channels & inputs". Press OK to see available options.
Select "Channels" to enter into channel menu.
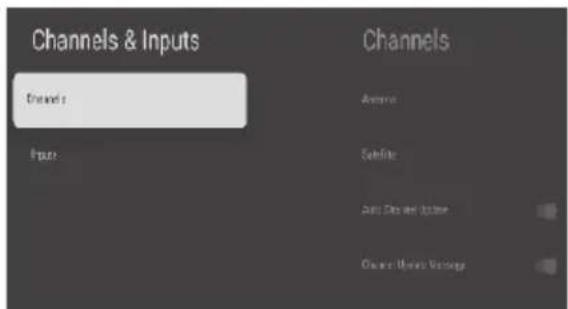
CHANNEL MENU
Analog/Antenna/Cable/Satellite
Navigate with ▲/▼ ◀/▶ keys to select appropriate sub-menu.
Auto Channel Update
If this is active, system will automatically scan and update the channels after 5 minutes of standby.
Channel Update Message
If this is active, the system will show you the update message.
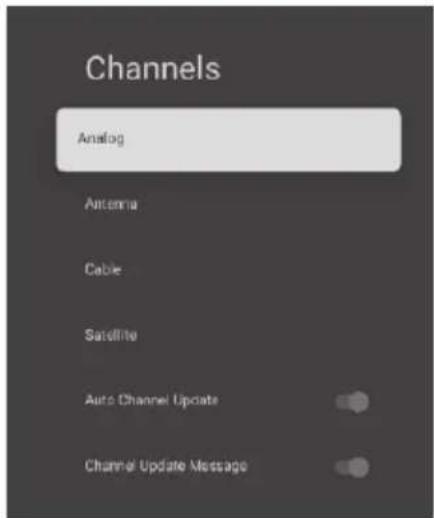
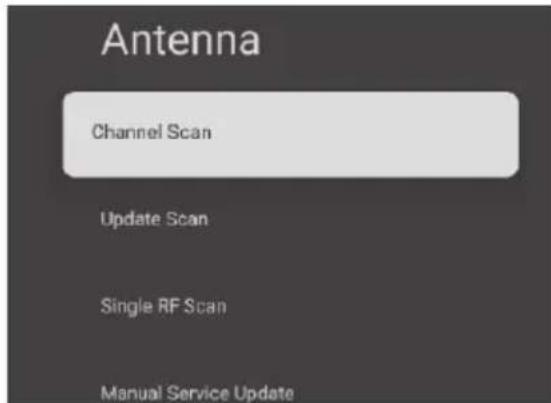
ANTENNA (ANALOG)
Follow the path to enter into sub-menu Menu > Settings > Channels & Inputs > Antenna.
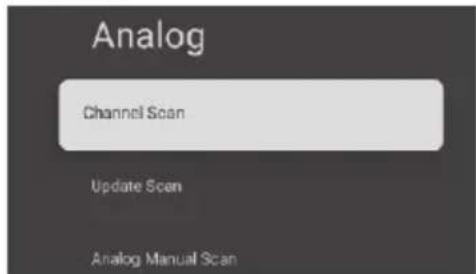
Select "Channel Scan" to look for the available ATV channels automatically.

Update Scan
With this option, system will automatically search for the channels outside frequency points.
Analog Manual Scan
With this option you can manually input the ATV station. Once the station is searched you can use up and down option to choose frequency from.
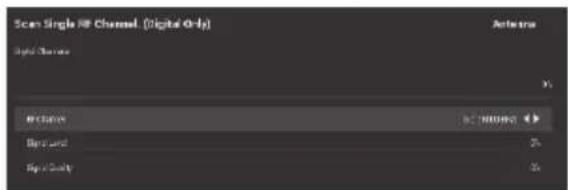
ANTENNA (ANTENNA)
Follow the path to enter into sub-menu Menu > Settings > Channels & Inputs > Antenna > Antenna.
Select "Channel Scan" to look for the available DTV channels automatically.

Update Scan
With this option, system will automatically search for the channels outside frequency points.
Single RF Scan
DTV Manual search. Select left or right to choose from available frequencies.
ANTENNA (CABLE)
Follow the path to enter into sub-menu Menu > Settings > Channels & Inputs > Antenna > Cable.
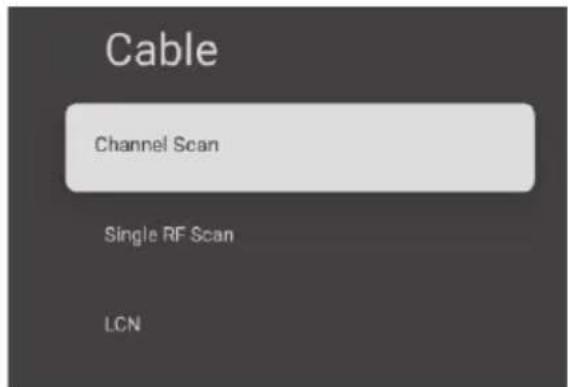
Select "Channel Scan" to look for the available Cable channels automatically.

Single RF Scan
Select this for manual cable channel search.
ANTENNA (SATELLITE)
Follow the path to enter into sub-menu Menu > Settings > Channels & Inputs > Antenna > Satellite.
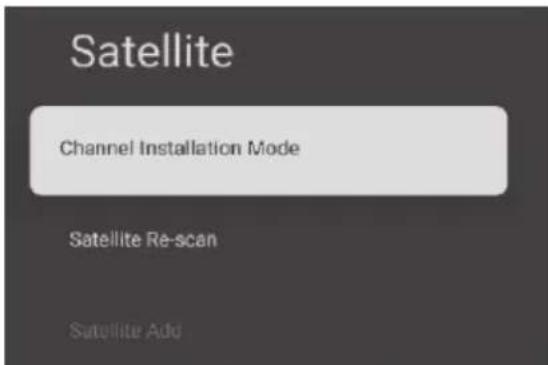
Channel Installation Mode
Press ▲/▼ ◀/▶ to select preferred options
Satellite Re-Scan
Menu > Settings > Channels & Inputs > Antenna > Satellite > Satellite Re-Scan
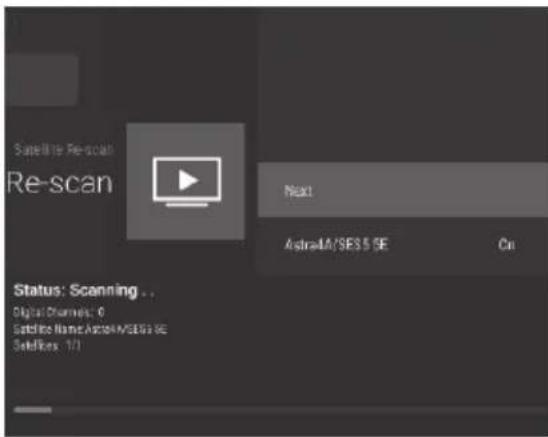
Press "Next" to enter Satellite parameter settings which include LNB POWER, LNB Frequency, DiSEqC Set, 22K and other parameters. Then return to Satellite Re-Scan and right click to enter the search menu. Then in Satellite Re-Scan, search the satellite channels.
Satellite Add
Use this to add a broadcast signal manually.
Satellite Manual Tuning
Manually search for the broadcast signal.
INPUTS
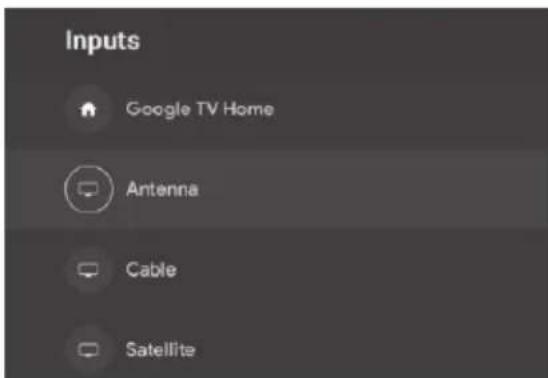
Navigate with ▲/▼ to enter into inputs section where you can see the available input sources. You can select the desired input source by pressing "OK".
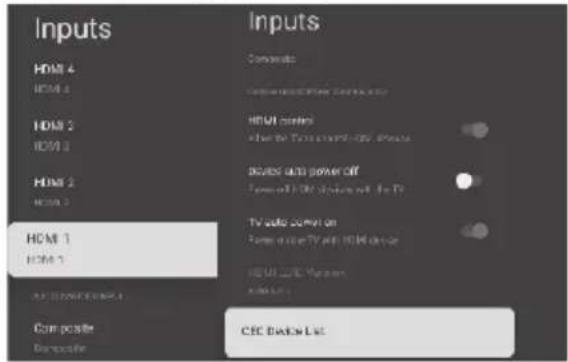
HDMI Control - Navigate with ▲/▼ keys to enable or disable the access to TV for controlling HDMI devices connected.
Device auto power off - Navigate with
▲/▼ keys to enter into sub-menu. After enabling this feature, HDMI devices will turn off with TV.
TV auto power on - Navigate with ▲/▼ keys to enter into sub-menu. After enabling this feature, if the TV is in standby mode it will turn on with the HDMI device.
HDMI EDID Version - Shows the EDID version.
CEC Device List - Shows the list of CEC devices connected.
DISPLAY & SOUND
PICTURE
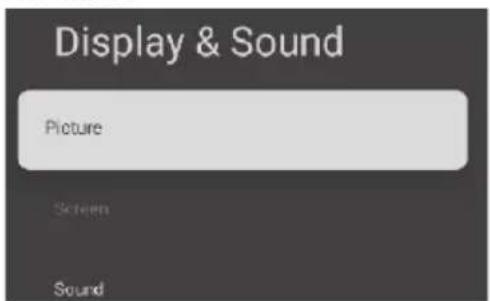
In the "Settings", navigate with keys to select "Display & Sound". Press Picture to see available picture related settings. Use these settings to manage the picture performance of your TV.
Picture Mode
Navigate with ▲/▼ keys to enter into sub-menu. Here you can select the picture mode from available options User/Standard/Vivid/Sport/Movie/Game and Energy Saving.
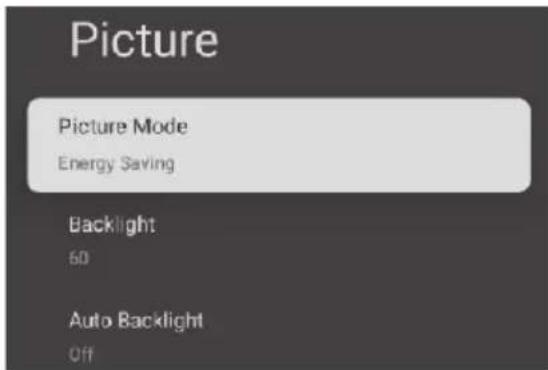
Backlight/Brightness/Contrast/Saturat ion/Hue/Sharpness
Navigate with ▲/▼ keys to enter into sub-menu. Use this to view/adjust the picture settings.
Auto Backlight
Navigate with ▲/▼ keys to enter into sub-menu. Use this to set system on auto backlight.
Advanced Video
Navigate with ▲/▼ keys to enter into sub-menu.
Reset To Default
Use this option to reset the picture settings to default.
SOUND

Dolby Audio Processing (If Applicable)
Navigate with ▲/▼ keys to enter into sub-menu. Here you can either ON or OFF the Dolby Audio Processing via this setting.
Sound Style
Navigate with ▲/▼ keys to enter into sub-menu. Here you can select the audio mode from available options User/Standard/Vivid/Sport/Movie/Music/News
Sound Style
Navigate with ▲/▼ keys to enter into sub-menu. Here you can select the audio mode from available options User/Standard/Vivid/Sport/Movie/Music/News
Balance/Bass/Treble
Navigate with ▲/▼ keys to enter into sub-menu. Use this to increase or decrease the specific parameter.
dbx-tv (If Applicable)
Navigate with ▲/▼ keys to enter into sub-menu.
Sound Surround
Navigate with ▲/▼ keys to switch ON/OFF the surround sound effect.
Equalizer Details
Navigate with▲/▼ keys to enter into sub-menu. Use this feature to view/change the sound equalizer.
Speakers
Navigate with ▲/▼ keys to enter into sub-menu. Use this feature to see list of external devices connected.
Speaker Delay
Navigate with▲/▼ keys to enter into sub-menu. Use this to increase or decrease the specific parameter.
eARC
Navigate with ▲/▼ keys to enter into sub-menu. Choose between Auto/Off
Digital Output
Navigate with ▲/▼ keys to enter into sub-menu. Use this feature to select from digital outputs (Auto/Bypass/PCM/Dolby Digital Plus/Dolby Digital)
Digital Output Delay
Navigate with ▲/▼ keys to enter into sub-menu. Use this to manage the audio delay in output.
Auto Volume Control
Navigate with▲/▼ keys to enter into sub-menu. Enable this feature for consistent volume level.
Downmix Mode
Navigate with ▲/▼keys to enter into sub-menu. Choose option from Stereo/Surround.
Dialogue Enhancer
Navigate with ▲/▼ keys to enter into sub-menu. Choose from Low/Medium/High/Off.
Reset to Default
Reset all settings to default.
Audio Output
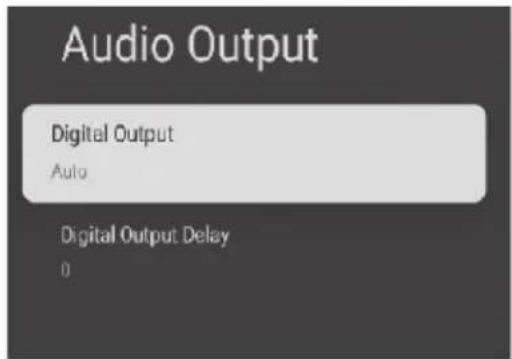
Navigate with ▲/▼ keys to enter into sub-menu. Use this feature to view/change audio output settings.
NETWORK & INTERNET
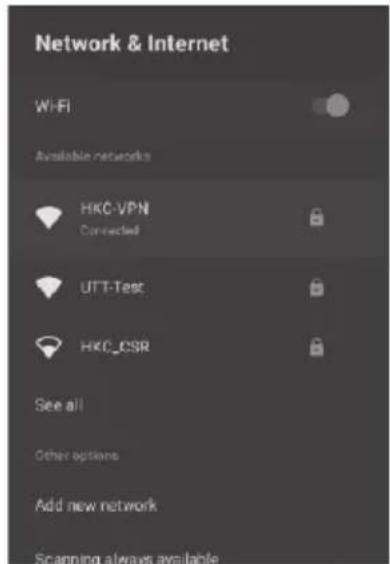
In the "Settings", navigate with keys to select "Network & Internet". Press OK to see available network options. Navigate With ▲/▼ keys, select the desired network to be connected and press OK. (You may need to input the password for WiFi network)
ACCOUNT & SIGN IN
Use this feature to manage the accounts in device.

PRIVACY
Use this feature to manage the privacy features.

Navigate with ▲/▼ keys to select the appropriate setting.
APPS
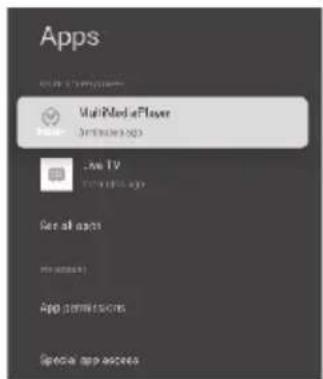
Navigate with▲/▼ keys to select the appropriate option for managing apps and app permissions. previous menu.
SYSTEM
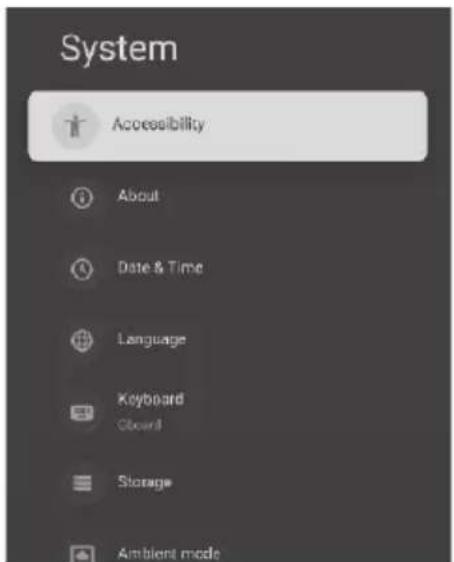
Use these settings to set the system preferences.
ACCESSIBILITY
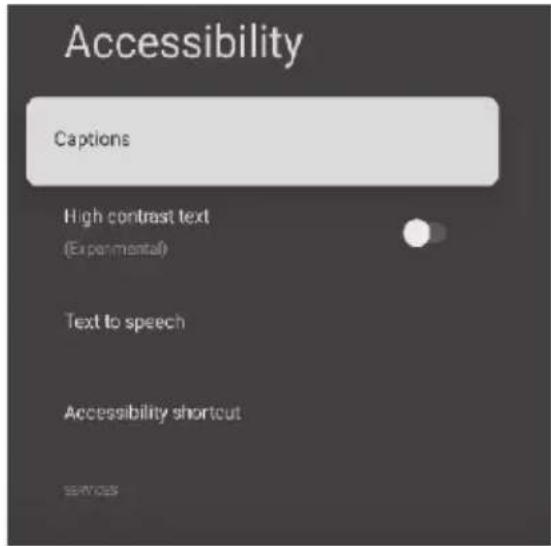
Navigate with ▲/▼ keys to select the appropriate setting.
Captions
Navigate with ▲/▼ keys to select the option and press "OK" to On/Off the captions.
High Contrast Text
Navigate with ▲/▼ keys to select the option and press "OK" enable/disable the high contrast text.
Text to Speech
Navigate with▲▼ keys to select the option and press "OK" to enter into sub-menu.
Accessibility Shortcut
Navigate with ▲/▼ keys to select the option and press "OK" to enter into sub-menu.
Services
Navigate with ▲/▼ keys to select the option and press "OK" to enter into sub-menu.
ABOUT
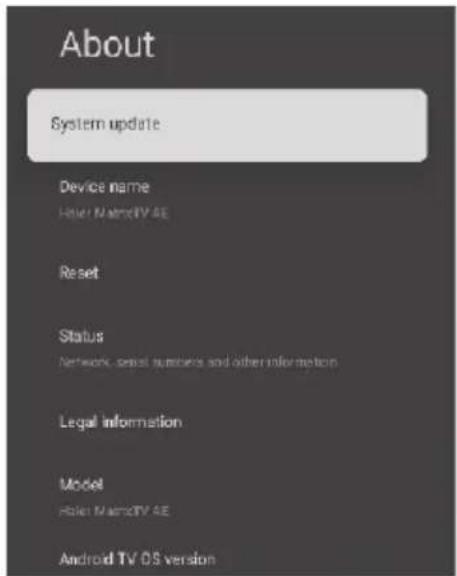
This menu gives the system information and update center from where you can check the system updates.
DATE & TIME
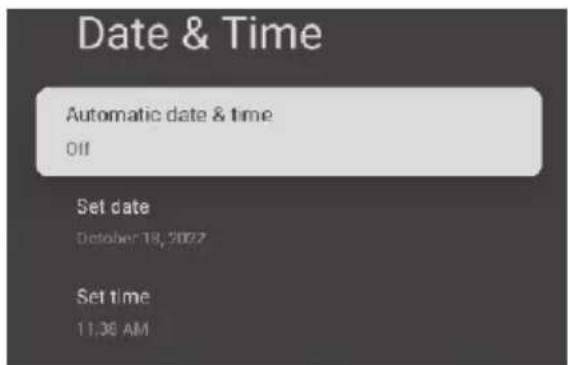
Automatic Date & Time
Set this preference for automatic updates of date and time.
Set Date
Use this to manually set the date.
Set Time
Use this to manually set the time.
Set Time Zone
Use this to set the time zone for your region. (e.g. For India it is GMT+5:30)
Use 24-hour format
Use this to enable or disable the 24-hour format for the time.
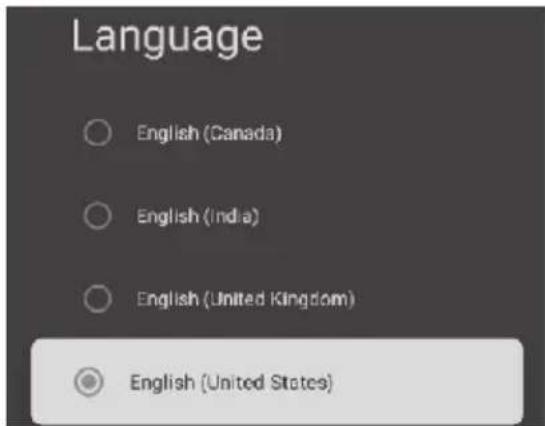
LANGUAGE
Navigate with ▲/▼ keys to select the desired system language.
STORAGE
Use this setting to manage the storage of the device.
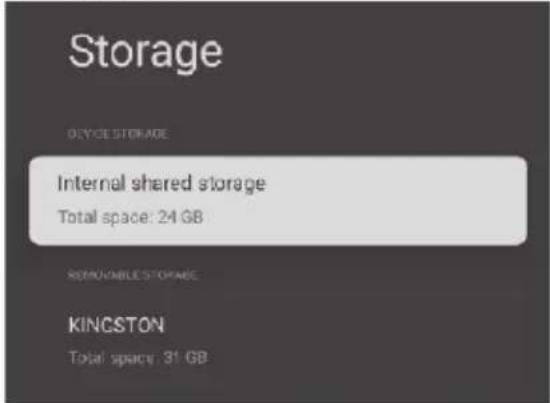
Internal Shared Storage - Navigate with ▲/▼ keys to enter into sub-menu. Use this feature to manage the internal storage.
Removable Storage - Navigate with ▲/▼ keys to enter into sub-menu. Use this feature to manage the external storage.
AMBIENT MODE
Use this setting to slide show the photos when the screen is idle.
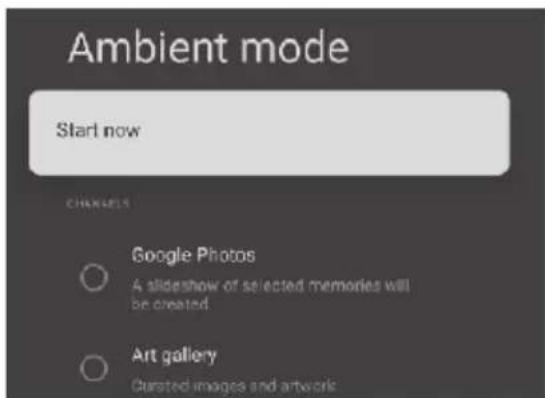
Navigate with ▲/▼ keys to select the appropriate option.
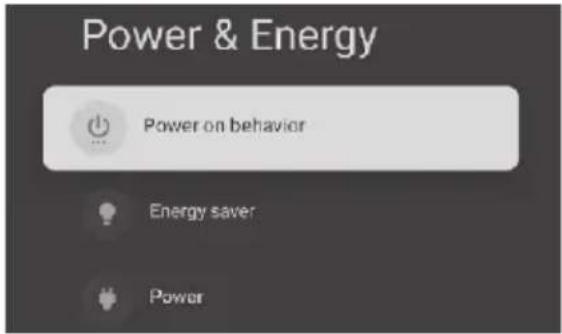
POWER & ENERGY
Use this setting to manage power settings of your device.
Navigate with ▲/▼ keys to select the appropriate option.
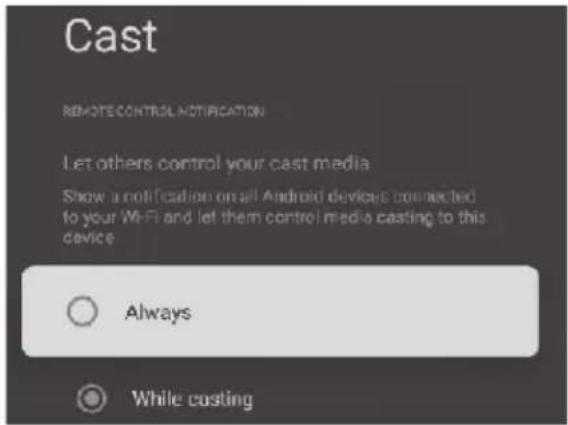
CAST
Navigate with ▲/▼ keys to enter into sub-menu. Use this feature to manage chrome cast feature.
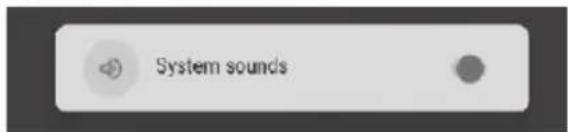
SYSTEM SOUNDS
Navigate with ▲/▼ keys to enter into sub-menu. Use this feature to manage the system sounds.
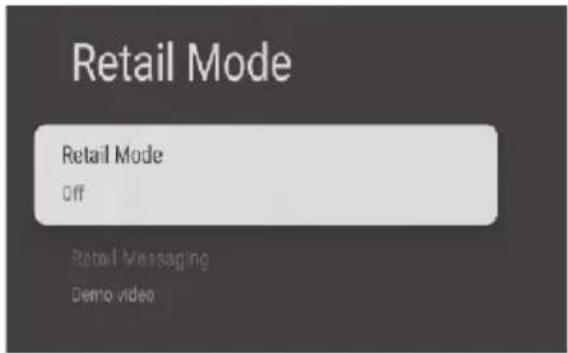
RETAIL MODE
Use this setting to either switch on or switch off the retail mode.
RESET
Use this setting to RESET the system.

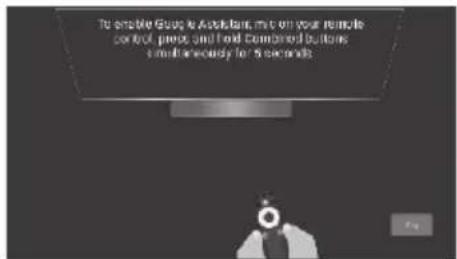
REMOTE & ACCESSORIES

- Press " " and " " buttons on remote simultaneously for 5 seconds.
- When the LED starts to flash, release the buttons. Remote will now send pairing information to TV and display information of the remote control on right side of the screen.
- Press OK button to display the pairing. If the pairing is successful, the remote will be shown into added accessories.

ADD AND USE OF MULTI MEDIA PLAYER
In the "Apps" column on home screen, click on "+" icon. Press up and down to select available multimedia player.
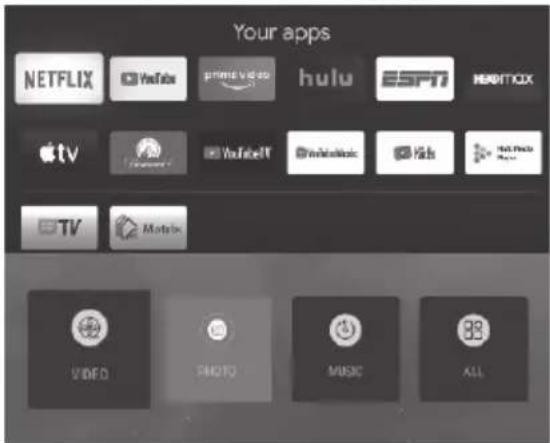
Press "OK" to enter into multi media player. Here you will see the available options for multi media player. You can view the corresponding files in the USB flash drive. (FAT32 Format)
Read Before Using Apps & Devices
(*Terms & Conditions Apply)
- Due to the product characteristics featured on the Apps store, as well as limitations in available content, certain featured applications and services may not be available on all devices or in all territories. Some Apps features may also require additional peripheral device or membership fees. Services and contents availability are subject to change without prior notice.
• Manufacturer takes no legal responsibility whatsoever for any interruption of App services caused by the service provider for any reason. - An unstable internet connection may cause delay or interruptions. In additional, applications may terminate automatically depending on the network environment.
• Application services and updates may become unavailable.
• Application content is subject to change by the service provider without prior notice.
• Specific services may differ with the version of the application installed on TV. - An application's functionality may change in the future version of the application.
- Depending on the third party service provider's policies, certain applications may not support multitasking.
- The response to remote commands and the resulting on-screen display may be delayed while a web page is loading.
• The copy and paste operations are not supported.
• The web browsing speed will differ with the network environment. - Depending on the types of video/audio codecs supported, it might not be possible to play certain video and audio files while playing content.
- Apps store have certain limitations, it consist many inbuilt apps for various needs of user but user doesn't have facility to add other apps from any other media.
• If you experience a problem using an application, please contact content provider. - Bluetooth audio reception uses 2.4 GHz frequency which may get interrupted by Wifi access points, routers, or microwave oven which uses 2.4 GHz frequency.
• All Bluetooth devices may not be compatible with TV.
HDMI®
The terms HDMI and HDMI High-Definition Multimedia Interface, and the HDMI logo are the trademarks or registered trademarks of HDMI Licensing Administrator, Inc. in the United States and other countries.
Please make these simple checks before calling service. These tips may save you time and money since charges for receiver installation and adjustments of customer controls are not covered under your warranty.
| Symptoms | Items to Check and Actions to Follow |
| "Ghost" or double image | This may be caused by obstruction to the antenna due to high rise buildings or hills. Using highly directional antenna may improve the picture. |
| No power | Check if the Tv's AC power cord is plugged into the outlet.Unplug the TV, wait for 60 seconds. Then reinsert plug into the outlet and turn on the TV again. |
| No picture | Check antenna connections at the rear of the TV to see if it is properly connected to the TV.Possible broadcast station trouble, try another channel.Adjust the contrast and brightness settings.Check the closed captions control. Some text modes could block the screen. |
| Good picture but no sound | Increase the volume level by pressing the VOL+ button on the remote control or on the keys provided on TV.Press the MUTE button on the remote control to ensure MUTE is disabled. |
| Good sound but poor color | Adjust the contrast, color and brightness settings. |
| Poor picture | Poor picture quality may occur when an activated S-VHS camera or camcorder is connected to your TV and other peripherals at the same time. Switch off one of the peripherals. |
| Snowy picture or noise | Check the antenna connection. |
| Horizontal dotted line | This may be caused by electrical interference (e.g. hair dryer, nearby neon lights, etc.) Turn off the equipments. |
| Television not responding to remote control | Check whether the batteries are working. Replace if necessary.Clean the remote control sensor lens on the TV.You can still use the buttons provided on TV. |
| Pixels (dots) that are always dark or always lit | Your TV is precision-manufactured using an extremely high level of technology. However, sometimes pixels may not display correctly. These types of occurrences are inherent to this type of product and do not constitute a defective product. |
This marking indicates that this product should not be disposed with other household wastes. To prevent possible harm to the environment or human health from uncontrolled waste disposal, recycle it responsibly to promote the sustainable reuse of material resources. To return your used device, please use return and collection system or contact retailer where the product was purchased. They can take this product for environmental safe recycling, as per e-waste Management and Handling Rules, 2011
Do's
- Handover/Donate/Give the discarded electronic equipment only at the authorized collection centers.
- Drop the discarded electronic equipment only in bins meant for electronic waste.
- Ask the retailer about the take back schemes.
- Consult the authorized service center whether the electronic equipment can be repaired or not, before discarding the same.
- Tell your neighbors and other person about hazards of improper disposal or handling or improper recycling of electronic waste.
- If the unwanted electronic equipment still works or can be repaired then consider donating them.
- To minimize our impact on earth and to protect the environment for future generations return your discarded electronic equipments at authorized collections centers only.
Don'ts
- The product should not be opened by the user himself/herself, but only by authorized service personnel.
- The product is not meant for re-sale to any unauthorized agencies/scrap dealers.
- The product is not meant for mixing into household waste stream.
- Do not keep any replaced spare part(s) from the product in exposed area.
- Any disposal through unauthorized agencies/person will attract action under Environment (Protection) Act 1986.
This product is complied with the requirement of Hazardous Substances as specified under Rule 13 (1) & (2) of the E-Waste (Management & Handling) Rules, 2011.
To locate a nearest collection centre, please contact Toll Free No. 1800-419-9999 / 1800-102-9999 for details. All collection centre are operated by third parties with Haier Appliances India Pvt. Ltd. Merely as a facilitator.
E WASTE TOXIC COMPONENT & THEIR DAMAGE TO HUMAN HEALTH
| Toxic Materials | Birth Defects | Brain Damage | Heart, Liver, Lung & Spleen Damage | Kidney Damage | Nervous/ Reproductive System Damage | Skeletal System Damage |
| Barium | √ | X | X | √ | √ | √ |
| Cadmium | X | √ | X | X | X | X |
| Lead | X | X | √ | X | X | √ |
| Lithium | X | X | X | X | X | √ |
| Mercury | X | X | X | X | √ | √ |
| Nickel | X | √ | X | X | X | √ |
| Palladium | X | X | X | X | √ | √ |
| Rhodium | √ | √ | X | √ | √ | √ |
| Silver | X | X | X | X | X | √ |
Without proper recycling, most of these toxic components will end up in land fill poisoning soil and water.
Reach us at -
Haier Appliances (India) Pvt. Ltd.
Building No. 1, Okhla Industrial Estate, Phase III, New Delhi - 110020
Haier

CUSTOMER CARE
1800-419-9999 [Toll Free - 24x7 ]
1800-102-9999 [Toll Free - 24x7 ]
Haier
CUSTOMER WARRANTY CARD
Customer Name :
Address :
Date of Purchase :
Model Name: Serial Number:
Dealer Seal and Signature :
HAIER APPLIANCES (INDIA) PVT. LTD. (here –in-after referred to as "the company" hereby offers the following warranty to the domestic purchaser commencing from the date of purchase.
| Warranty | ||
| Product | Period | Parts Not Covered |
| LCD/LED TV | 12 Months | Remote, Cabinet |
TERMS AND CONDITIONS :
1) The company will free of charge repair or replace any defective part or parts which prove to be defective in workmanship and / or material not due to abnormal or improper usage, at its sole discretion.
2) This warranty will automatically terminate on the expiry of the applicable warranty period from the date of invoice.
3) While the company will make every efforts to carry out the repairs as soon as possible, however the company is not liable for any delay in servicing due to reasons beyond control of the company or any of its authorized service centers.
4) It is entirely left to Company's discretion to repair/replace parts at the site of installation or at the authorized service center of the Company.
5) The warranty shall be strictly limited to the repairs or replacement of the defective parts specified in the warranty.
6) The parts shall be replaced by functionally operating equivalent material only and not with brand new ones and are likely to be different from the one originally fitted. The parts thus removed shall be taken back to company.
7) This warranty shall continue to be in force for the term herein specified, irrespective of what replacements may be provided under it, and such replacement shall not attract any fresh warranty.
8) The company reserves the right to retain any part or component replaced at its sole discretion during the warranty period.
9) The warranty shall not in any case extend towards payment of any monetary consideration whatsoever or replacement or return of the product.
10) In no event the Company or its authorized service center be liable for any consequential damages or resulting liability, damage or loss arising directly or indirectly out of any defect in the appliance.
11) During the period of additional / non comprehensive warranty, visit charges as applicable will be payable in addition to and fro charges.
12) Any change of location or change in the ownership during the warranty period must be intimated in writing to the Company.
13) The Company's employees or its authorized representatives or dealer/service franchise have no authority to vary the terms of this warranty.
14) The Company is not liable to provide the service support beyond 5 years after the end of manufacturing of the particular model of the product except in cases where the product is covered under warranty.
15) This warranty is effected in New Delhi and claims, if any, shall be made only before the courts having jurisdiction in New Delhi and no claim shall be made against the
Company outside New Delhi notwithstanding that appliance may have been sold or delivered elsewhere.
16) This warranty is not valid in case of following events :
a) If the product has been installed/serviced/ repaired/opened or tampered by any unauthorized personnel
b) If original serial number is removed or obliterated from the product.
c) If defects arise/caused by improper electrical circuit, major fluctuations in voltage, alteration, misuse, neglect, substitution of original components with spurious/non-genuine components, attacked by household pest/rodents, fire, flood, earthquake, lightning and/or any other accident or act of God/natural calamities.

1800-419-9999 [Toll Free - 24x7] 1800-102-9999 [Toll Free - 24x7]
Haier Appliances (India) Pvt. Ltd. Building No. 1, Okhla Industrial Estate, Phase III, New Delhi - 110020
Customer Name :
Address :
Date of Purchase :
Serial Number :
Dealer Seal and Signature :
Haier
Haier
Inspired Living