WN-N40 - Fan Infiniton - Free user manual and instructions
Find the device manual for free WN-N40 Infiniton in PDF.

User questions about WN-N40 Infiniton
0 question about this device. Answer the ones you know or ask your own.
Ask a new question about this device
Download the instructions for your Fan in PDF format for free! Find your manual WN-N40 - Infiniton and take your electronic device back in hand. On this page are published all the documents necessary for the use of your device. WN-N40 by Infiniton.
USER MANUAL WN-N40 Infiniton
natural_image
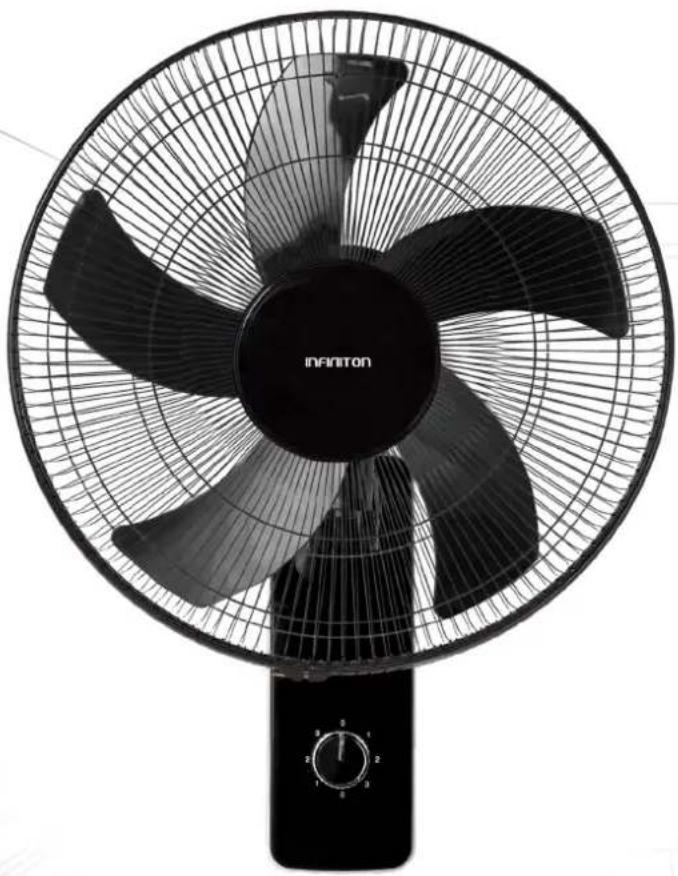
Black and white photo of a Infinity 10 air fan with visible blades and mesh grille (no text or symbols on the fan itself)VENTILADOR DE PARED
WN-N40
ean: 8436546197126
text_image
Diagram showing four different fan blade assembly steps with labeled diagrams and directional arrows indicating motion.natural_image
Symbol of a trash bin crossed with a diagonal line and a horizontal bar below (no text or labels)natural_image
Black and white photo of an Infiniton air fan with four blades and a control knob (no text or symbols on the fan itself)DESKTOP FAN
WN-N40
ean: 8436546197126
Before using your new Infiniton product, please read this user manual carefully to learn how to safely and efficiently use the features offered by this device.
Índice
Español
Safety warnings 3
Installation 4
How to use 5
Cleaning and maintenance 6
Please read these instructions carefully and familiarize yourself with your new 40 cm 3-in-1 combi fan before using it for the first time.
POWER SUPPLY
230V\~50Hz
Make sure that the voltage indicated on the nameplate corresponds to the mains voltage.
ASSEMBLY OF THE 2-PIN PLUG
IMPORTANT: The wires of this socket are colored according to the following code:
Blue - Neutral
Brown - Live
If the colors of the wires in the socket of this appliance do not correspond to the colored markings identifying the terminals of your plug, proceed as follows:
The blue colored wire should be connected to the terminal marked "N" or colored black.
The brown wire should be connected to the terminal marked "L" or red.
IMPORTANT
READ CAREFULLY – ALWAYS MAINTAIN SAFETY WHEN WORKING WITH ANY DEVICE.
- Before using the product, check that the mains voltage corresponds to the rated voltage of the product.
- To avoid electric shock, do not immerse cables, plugs or appliances in water or any other liquid.
- Do not leave any appliance unattended while it is in operation.
- This appliance is not intended for use by persons (including children) with reduced physical, sensory or mental capabilities, or lack of experience and knowledge, unless they have been given supervision or instruction concerning use of the appliance by a person responsible for their safety. Children should be supervised to ensure that they do not play with the appliance.
- Unplug from outlet when not in use or before cleaning. Allow it to cool down before putting on or removing any parts.
- Do not use the appliance with a damaged cord or plug, or after the appliance has been damaged in any way. If the power cord is damaged, it must be replaced by the manufacturer, its service agent or a similarly qualified person in order to avoid a hazard.
- The use of accessories not recommended by the appliance manufacturer may cause injury.
- Do not use the appliance outdoors.
- Do not let the cord hang over the edge of a table or countertop or come into contact with hot surfaces.
- To disconnect the appliance, unplug it from the electrical outlet. Do not pull the plug by the cord.
- Do not use this product for other than its intended use. This appliance is for household use only.
- No liability will be accepted for damage caused by failure to follow these instructions or by any other misuse or incorrect handling.
- Do not use the appliance without the protective grilles.
- Do not attempt to force the grille to rotate or stop the fan.
- Never insert objects into the grilles when the appliance is connected to the mains.
- It is not advisable to expose people (especially babies and elderly people) to a continuous stream of cold air for a long time.
This appliance is not intended for use by children.
Keep the appliance and the power cord out of the reach of children.
Children should be supervised to ensure that they do not play with the appliance.
Mode of use
On/Off, speed selection:
On/ OFF, speed controlled by double rope.
Oscillation:
Push down the oscillation nut, and the fan will oscillate from right to left.
Pull up the oscillation nut, and the fan will stop oscillating.
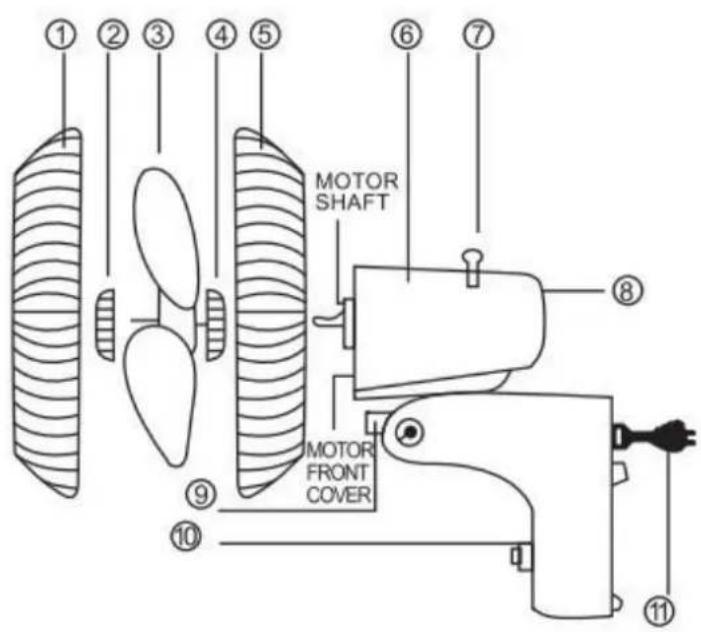
| 1 | Front guard |
| 2 | Blade cover |
| 3 | Fan blades |
| 4 | Rear guard mounting nut |
| 5 | Rear guard |
| 6 | Motor |
| 7 | Swing switch |
| 8 | Swivel joint |
| 9 | Rear cover |
| 10 | Switch |
| 11 | Power cable |
text_image
① ② ③ ④ ⑤ ⑥ ⑦ MOTOR SHAFT MOTOR FRONT COVER ⑧ ⑨ ⑩ ⑪ASSEMBLY
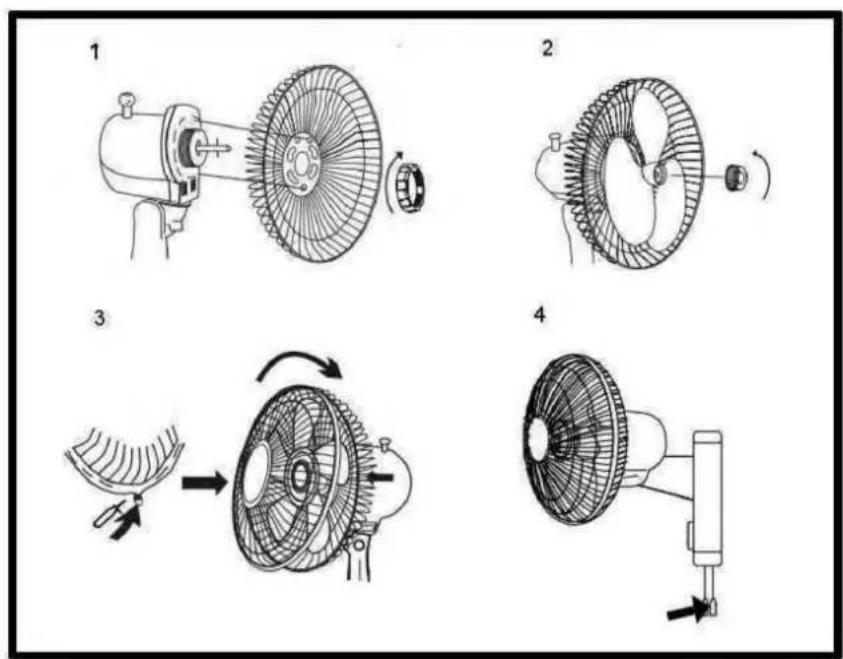
Install the mounting plate on the wall using the three screws provided.
Hang the fan on the mounting plate.
Make the electrical connections to the power supply.
Install the fan on the wall.
text_image
Diagram showing four different fan blade assembly steps with labeled components and directional arrows indicating motion.Maintenance instructions
The fan requires little maintenance. Do not attempt to repair it yourself. If necessary, refer to qualified personnel.
- Before cleaning and mounting, do not plug the connectors into the power socket.
- To ensure proper air circulation in the motor, keep the vents at the rear of the motor housing free of dust, lint, etc. Do not disassemble the fan to remove lint.
- Do not disassemble the fan to remove lint. Clean the exterior parts with a soft cloth soaked in mild detergent.
Do not use abrasive detergents or solvents to avoid scratching the surface.
Do not use the following as cleaner: gasoline, thinner, abrasive products.
- Do not allow water or any other liquid to enter the motor housing or internal parts.
Environmental protection
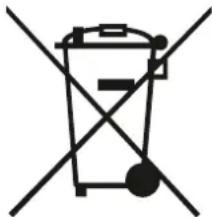
This appliance does not contain gases that could damage the ozone layer, neither in its refrigerant circuit nor in the insulation materials. The appliance must not be disposed of with municipal waste and rubbish. The insulation foam contains flammable gases. The appliance must be disposed of in accordance with the regulations of the appliance to be obtained from the local authorities. Avoid damaging the cooling unit, especially the heat exchanger. The materials used in this appliance marked with the symbol are recyclable.
natural_image
Symbol of a trash bin crossed with two crossed lines, representing waste or discharge (no text or labels)This symbol on the product or on its packaging indicates that this product must not be treated as household waste. Instead, it must be taken to the appropriate collection point for the recycling of electrical and electronic equipment.
By ensuring this product is disposed of correctly, you will help prevent potential negative consequences for the environment and human health, which could otherwise be caused by inappropriate waste handling of this product.
For more detailed information about recycling of this product, please contact your local authorities, your household waste disposal service or the shop where you purchased the product.
Packing materials
Materials with the symbol 📁 are recyclable. Dispose of the packaging in a suitable collection container for recycling.
Disposal of the appliance
- Disconnect the plug from the socket.
- Cut the power cord and discard it.
INFINITON
natural_image
Black and white photo of an Infiniton air fan with four blades and a control knob (no text or symbols on the fan itself)DESKTOP FAN
WN-N40
ean: 8436546197126
text_image
Technical diagram showing four different fan blade assembly steps with labeled diagramsnatural_image
Symbol of a trash bin crossed with a diagonal line, representing no waste or elimination (no text or labels)
text_image
QR code image containing encoded data, with a central logo or watermark¿Necesitas ayuda?
text_image
QR code image with a central logo, likely linking to a digital resource or website.text_image
QR code image containing encoded data, with a central logo or watermarknatural_image
Silhouette icon of a person wearing a headset with a wrench inside, symbolizing repair or maintenance (no text)text_image
QR code image containing encoded data and a central logo, likely for digital scanning and linking to online content.text_image
QR code image with a central logo, likely linking to a digital resource or website.
text_image
QR code with central Facebook logo, likely linking to a digital resource or websiteINFINITON
