CMPCR-T90S - Kitchen hood Infiniton - Free user manual and instructions
Find the device manual for free CMPCR-T90S Infiniton in PDF.

| Product Type | Chimney Cooker Hood |
| Mounting Type | Wall-mounted |
| Width | 90 cm |
| Height (max) | 115 cm |
| Depth | 50 cm |
| Net Weight | Approx. 14 kg |
| Power Supply | 220-240 V, 50 Hz |
| Rated Power (motor) | 220 W |
| Lighting | 2 x 1.5 W LED |
| Extraction Rate (max) | 620 m³/h |
| Noise Level (max) | 65 dB(A) |
| Number of Speeds | 3 |
| Filter Type | Aluminum grease filters |
| Control Type | Push buttons |
| Air Outlet Diameter | 150 mm |
| Energy Class | A |
| Grease Filter Cleaning | Dishwasher safe |
| Charcoal Filter (optional) | Recirculation mode, replaceable |
| Safety Features | Auto shut-off, overload protection |
Frequently Asked Questions - CMPCR-T90S Infiniton
User questions about CMPCR-T90S Infiniton
0 question about this device. Answer the ones you know or ask your own.
Ask a new question about this device
Download the instructions for your Kitchen hood in PDF format for free! Find your manual CMPCR-T90S - Infiniton and take your electronic device back in hand. On this page are published all the documents necessary for the use of your device. CMPCR-T90S by Infiniton.
USER MANUAL CMPCR-T90S Infiniton
natural_image
Line drawing of a kitchen chimney with ventilation slots and a lid (no text or symbols)Manual del usuario
modelo: CMPCR-T90S
natural_image
Pure technical diagram showing a vertical structure with a curved base and dashed centerline (no text or symbols)Correcto
natural_image
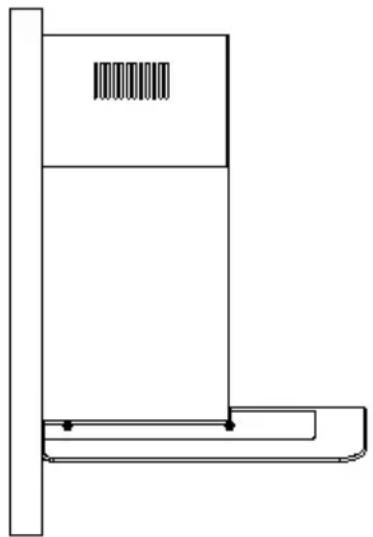
Pure geometric diagram showing a vertical rectangle intersecting a curved base with dashed centerlines (no text or symbols)Incorrecto
natural_image
Pure technical line drawing of a mechanical or architectural component without any text, numbers, or symbolsFig.1
Fig.4 Fig.5
natural_image
Technical line drawing of a mechanical device with no visible text or symbolsFig.6 Fig.7
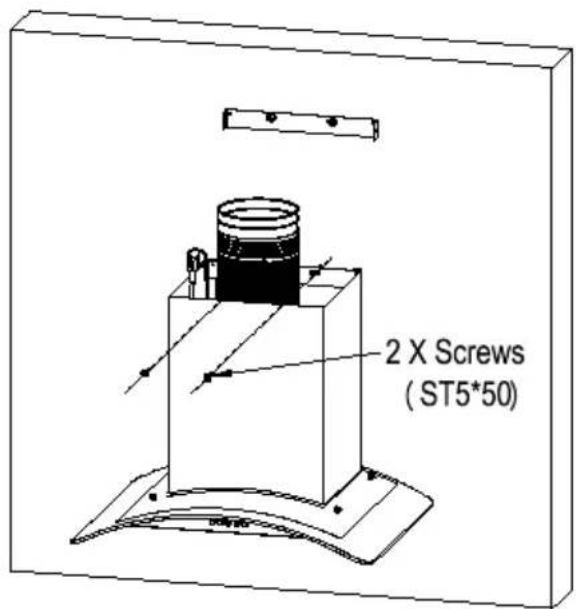
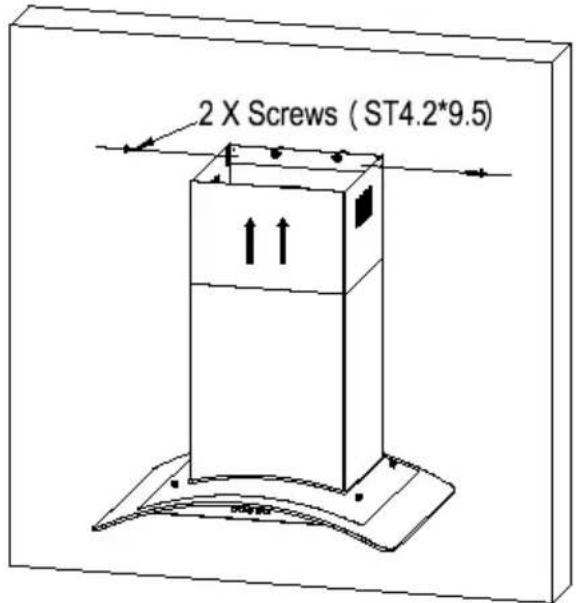
Fig.8
Uso
natural_image
Technical line drawing of a door frame with directional arrows indicating flow or movement (no text or symbols)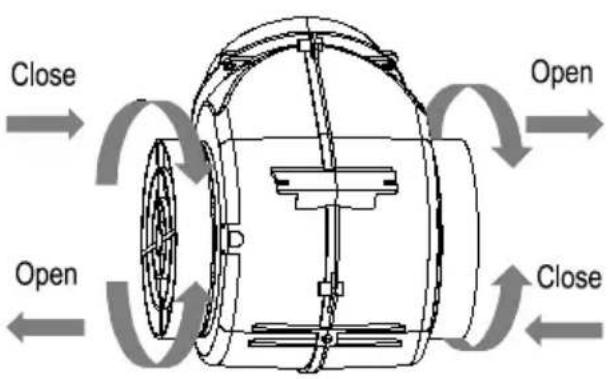
Fig.10 Fig.11
- This appliance can be used by children aged from 8 years and above and persons with reduced physical, sensory or mental capabilities or lack of experience and knowledge if they have been given supervision or instruction concerning use of the appliance in a safe way and understand the hazards involved. Children shall not play with the appliance. Cleaning and user maintenance shall not be made by children without supervision. If the supply cord is damaged, it must be replaced by the manufacturer, its service agent or similarly qualified persons in order to avoid a hazard.
- There shall be adequate ventilation of the room when the range hood is used at the same time as appliances burning gas or other fuels.
● The filter is made of high density aluminum. - Please do not use corrosive detergent for cleaning. The proper function of the unit is conditioned by the regularity of the maintenance.
- To protect the main body from corrosive of the long time accumulation of dirt, the cooker hood should be cleaned with hot water with non-corrosive detergent every two months.
- There is a fire risk if cleaning is not carried out in accordance with the instructions.
- Do not flame under the range hood.
- The air must not be discharged into a flue that is used for exhausting fumes from appliances burning gas or other fuels.
- The minimum distance between the supporting surface for the cooking vessels on the hob and the lowest part of the range hood is 65 mm.
● Regulations concerning the discharge of air have to be fulfilled.
● The appliance uses 4 hob elements at most. -
CAUTION :Accessible parts may become hot when used with cooking appliances.
-
The appliance is not intended for use by young children or infirm persons without supervisions.
- Young children should be supervised to ensure they do not play with the appliance.
- Plug the power cord to socket outlet with earthing continuity terminal.
- The cooker hood is for home use only, not suitable for barbecue, roast shop and other commercial purposes.
- The cooker hood and its filter should be cleaned regularly according to the instruction.
- Do not use open flame, or allow oil to go beneath the appliance.
- If there is any fault occurred with the appliance, please call after-sale service department.
- Please keep the kitchen room ventilated.
- Prior to any maintenance, cleaning operation, ensure the power is cut off.
- If the supply cord is damaged, it must be replaced by the manufacturer, service agent or similarly qualified person in order to avoid a hazard. The replaced power cord should be provided by manufacturer or seller.
- If the plug or cord is damaged, please call after-sale service center.
- There is a fire risk if cleaning is not carried out in accordance with the instruction.
- In case of damaged connecting wire, please refer to the manufacturer, after-sale service personnel or other qualified technicians.
- Use the unit according to the instructions to avoid any fire hazard.
- The exhaust air must not be introduced into a smoke flue or chimney that is used for exhausting fumes from appliances burning gas.
-
Follow the local laws applicable for external air evacuation.
-
It can not share the same air ventilation tube with other appliance such as gas tube, warmer tube, and hot wind tube. There will be hazard of underpressure, combustion impaired and harmful gases drawn back.
- The bending of ventilation tube should be ≥ 120^ , parallel or above the start point/should be connected to the external wall.
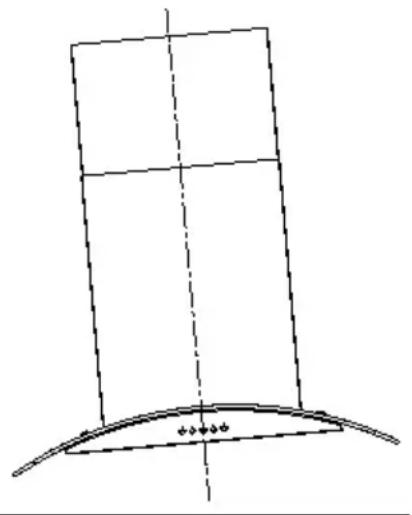
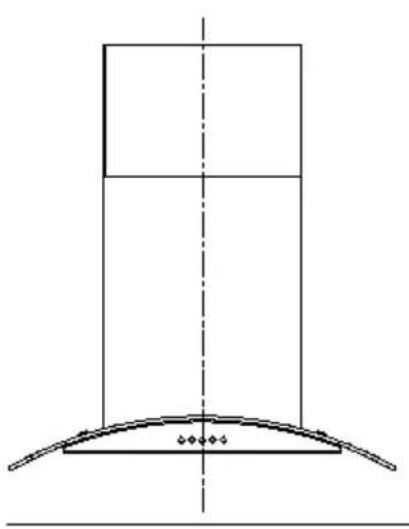
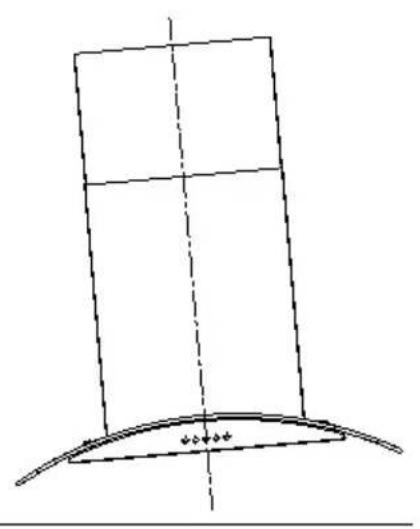
- pPlacehorizontally the aviosdallation plate is grease collection at one end. See Fig.1.
natural_image
Pure technical diagram showing a vertical structure with a curved base and dashed centerline, no text or symbols present.Right
natural_image
Pure geometric diagram showing a curved structure with dashed centerlines and no text or symbolsWrong

natural_image
Pure technical line drawing of a mechanical or architectural component without any text, numbers, or symbolsFig.1
● After installation, make sure that plug can be pulled out if necessary.
- ed 650e75Remhoop should be plac cooking plane for safe and a good effect. See Fig.2.
- There shall be adequate ventilation of the room when the cooker hood is working.
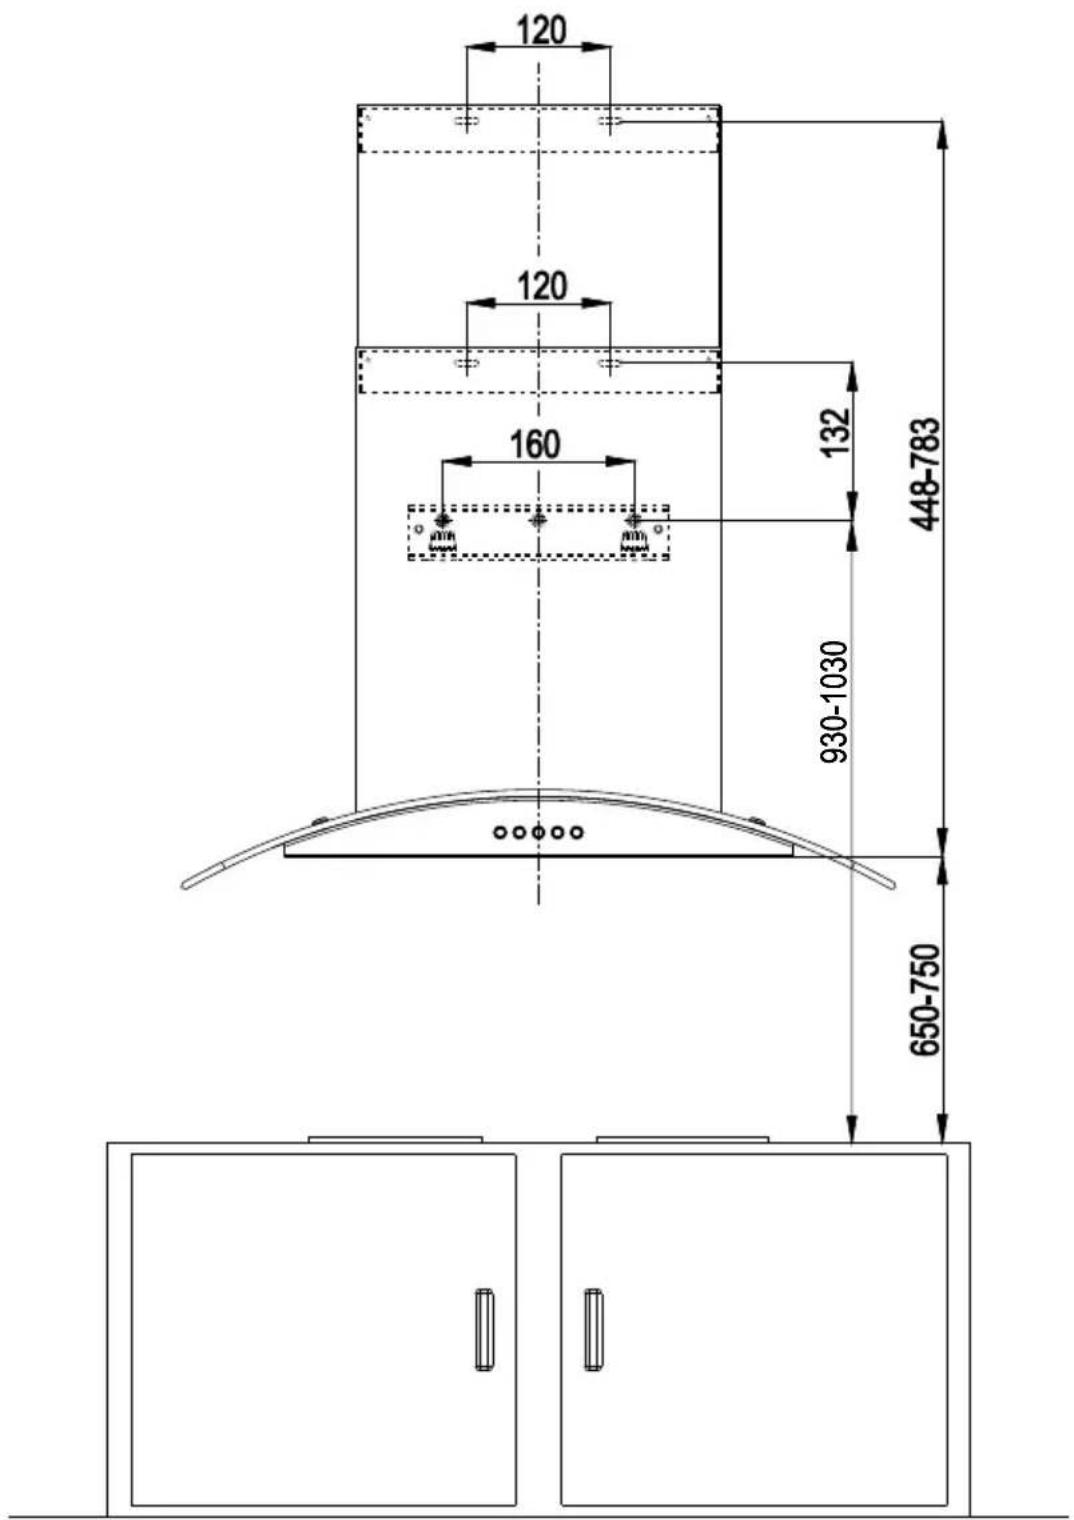
Fig.2
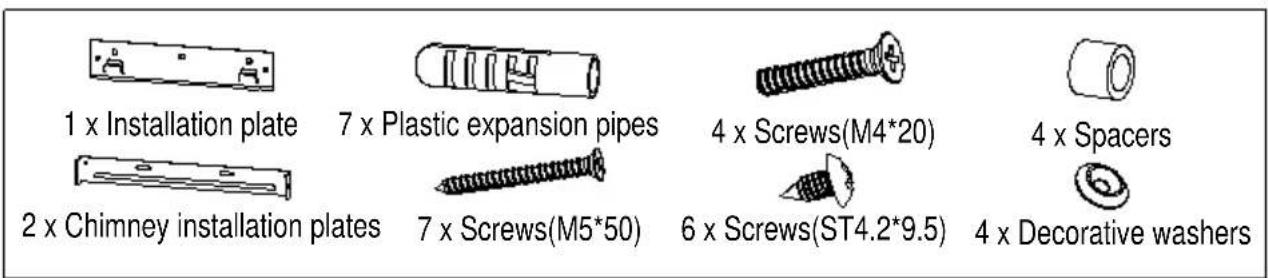
Fig.3
Installation
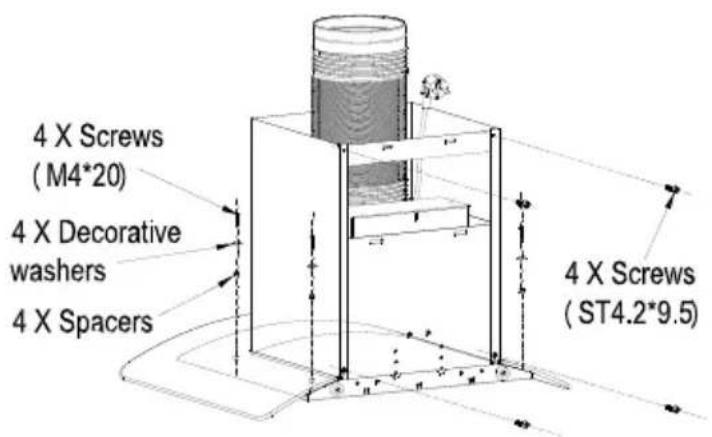
- Accessories. See Fig.3. (Type and quantity of accessories is subject to actual demand.)
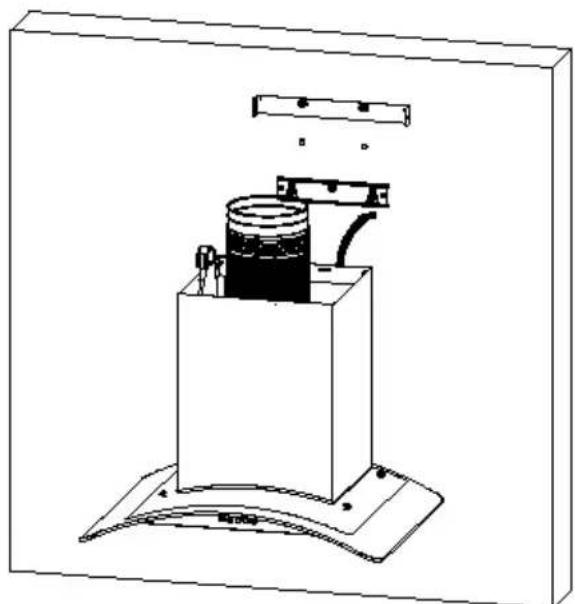
- Fix installation plate and extension chimney installation plate, install the plastic expansion pipes of chimney installation plate on wall. See Fig.4.
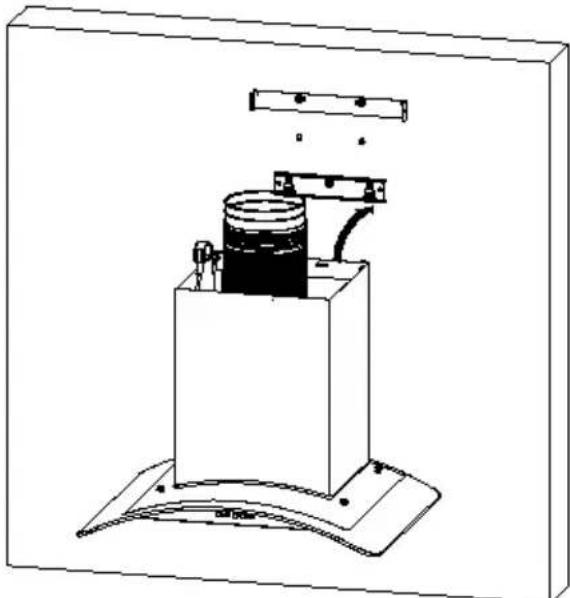
- Fix the exhaust pipe and chimney on the main body, connect chimney installation plate and chimney. Intall the glass according to the drawings. See Fig.5.
● Hang range hood on the installation plate. See Fig.6. - After connecting the exhaust pipe well, fix chimney installation plate to prevent the range hood from accidentally sliding off the installation plate. See Fig.7.
● Fix extension chimney. See Fig.8.
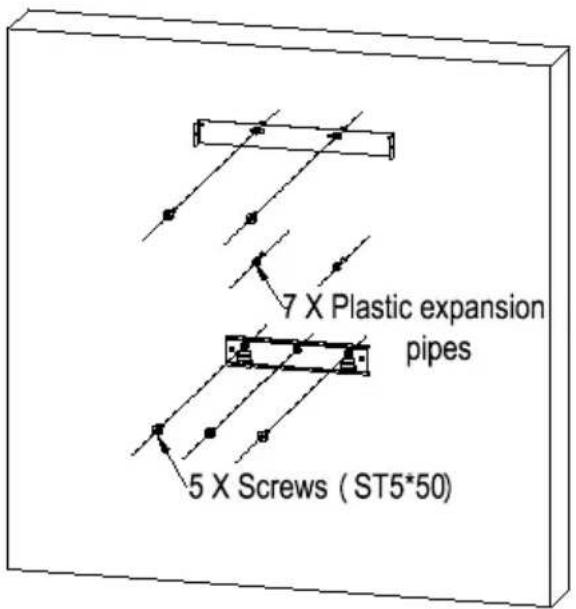
Fig.4
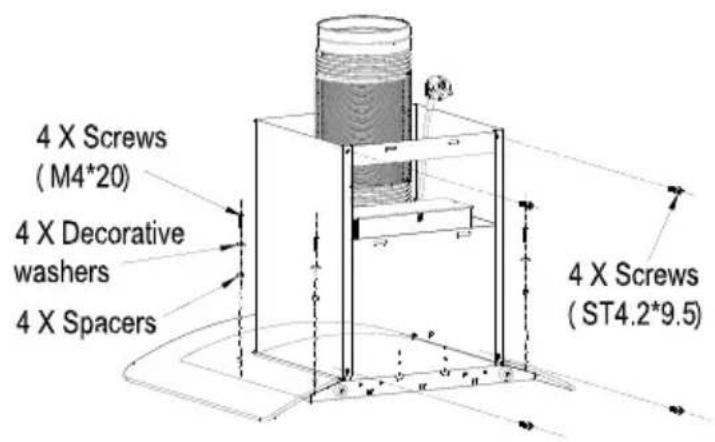
Fig.5
natural_image
Technical line drawing of a mechanical device with no visible text or symbolsFig.6 Fig.7
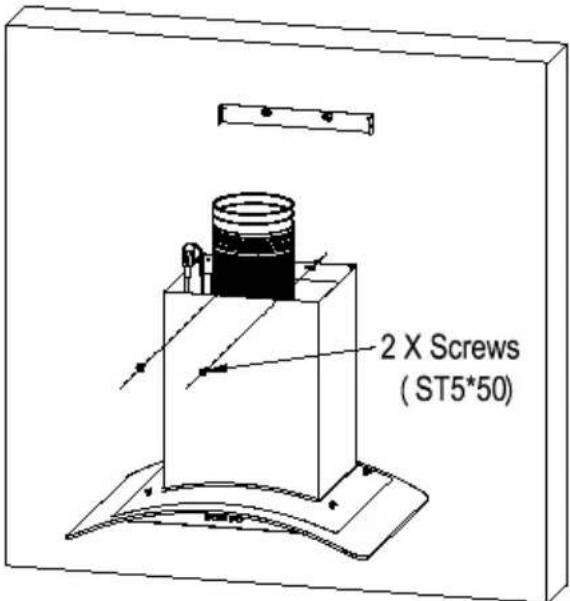
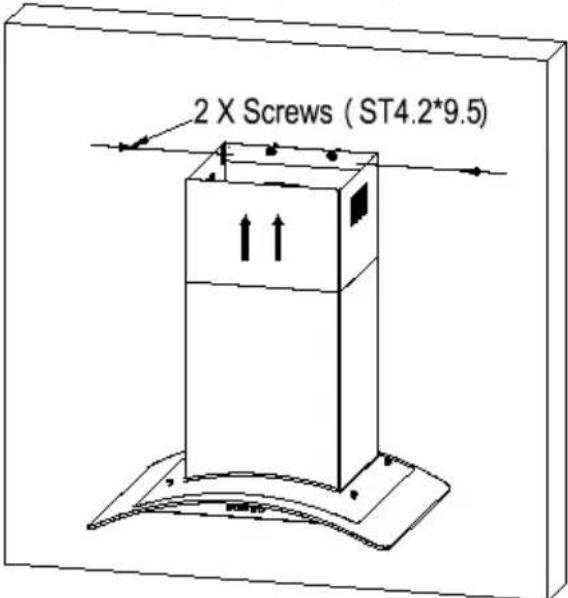
Fig.8
Speed adjustment. See Fig.9.1. (For some models)
- After the following, isuzonrecedo with the electricity. After the connection:
- Press the Boost button, control motor power: under standby state, press this button, motor will run at Boost speed, and light for power and Boost speed button will be on, after 8 minutes speed will automatically switch to high speed; under power-on state, press this button, hood will enter 3-min—delay-shutdown state, press power button again under this state, the hood will turn off (motor stops running).
- Press the Light button, control light being on and off independently without any other buttons' help. Press it once, lights will be on. Press again, they will be off.
- Press the High button, valid under power-on state. While running at middle or low speed mode, press this button, the hood will enter high speed mode. If already running at high speed, pressing this button takes no effect. In 3-min-delay-shutdown state, press it, the hood cancels delay shutdown mode and enter high speed running state.
- Press the Low button, valid under power-on state. While running at high or middle speed mode, press this button, the hood will enter low speed mode. If already running at low speed, pressing this button takes no effect. In 3-min-delay-shutdown state, press it, the hood cancels delay shutdown mode and enter low speed running state.
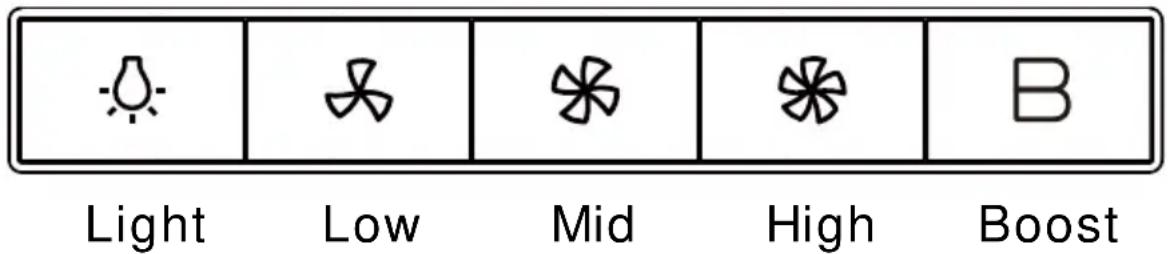
Fig.9.1
Speed adjustment. See Fig.9.2. (For some models)
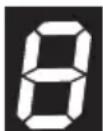
After the hood is switched on, a beep sound heard and all key lights are lightened for 1 s, indicating the hood has been powered on. Under the condition of hood power-on:
- Power Key: control the motor power, under standby state, press the “power” button, “power” key light is on, the motor starts up at low speed, digital screen displays setting 1; under power-on state, press the “power” button, enter 3-min-delay-shutdown state, setting switched to low speed, the power key flashes at one second interval, which means entering delay-shutdown state; under delay-shutdown state, press the “power” button, it’s shut down immediately (motor stops running).
● Light Key: independently control the light on and off free from the effect of other keys. Press it once, the light is on, meanwhile the light key light is on; press again, the light is off and light key light is off too. - Plus (+) Key: valid under power-on state, press plus (+) key once, motor speed increased one setting, digital tube displays corresponding setting. When the plus (+) key is pressed down, plus (+) key light is on. When at the highest setting, only give out key touch sound, the setting no longer changes.
- Minus (-) Key: valid under power-on state, press “minus (-)” key once, motor speed decreased one setting, digital tube displays corresponding setting. When the “minus (-)”key is pressed down, “minus (-)”key light is on. When at the lowest setting, only give out key touch sound, the setting no longer changes.


Light
Minus
Digital screen
Plus
Power
Fig.9.2
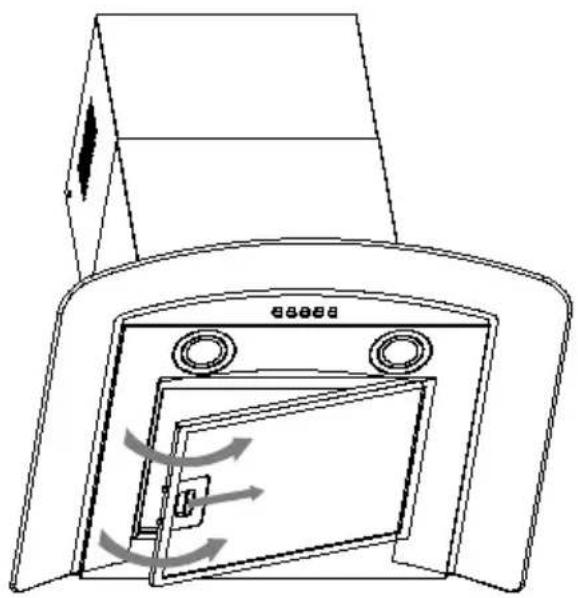
Cleaning of the filters
- Removing the filters according to Fig.10.
- Put into a dishwasher with detergent, set the temperature below 60 degrees.
- Please do not use abrasive detergent for it will damage the hood.
● Make sure that the hood is shut off before cleaning.
natural_image
Technical line drawing of a door with internal components and directional arrows indicating flow or movement (no text or symbols)
Fig.10 Fig.11
Replacement of the carbon filters (Optional
- Remove the filters see Fig.10.
● The carbon filters are located at both end of the motor.
Turn the carbon filters until they are locked. ee Fig.11. - Apply reverse procedure to remove the carbon filter.
- It should be replaced after approximately 2-3 months of use.
● The carbon filer cannot be washed or recycled.
● Carbon filter is not supplied with your appliance.
| Fault | Cause Solution | |
| Light on, but does not work. | The blades are blocked. | |
| The capacitor is damaged. | Replace capacitor. | |
| motorThe motor is damaged. Replace motor. | ||
| The internal wiring of motor is cut off / disconnected. An unpleasant smell may be produced. | Replace motor. | |
| Both light and do not work. | Apart from the above mentioned, check the following: | |
| light damaged. Replace lights. | ||
| Power cord loose. | Connect the wires as per the electric diagram. | |
| Oil leakage. | Outlet and the air ventilation entrance are not tightly sealed. | Take down the outlet and seal with glue. |
| Leakage from the connection of U-shaped section and cover. | Take U-shaped section down and seal with soap or paint. | |
| Vibration. | The blade, if damaged, can cause vibrating. | Replace the blade. |
| The motor is not tightly fastened. Fasten the motor tightly. | ||
| The cooker hood is not tightly fixed. Fixed the cooker hood tightly. | ||
| Insufficient suction. | The distance between the cooker hood and the cooker top is too large. | Readjust the distance. |
| Too much ventilation from open doors or windows. | Choose a new place to install the appliance or close some doors / windows. | |
| The machine inclines. | The fixing screws are not tight enough. | Tighten the fixing screw and make it horizontal. |
| The hanging screws are not tight enough. | Tighten the hanging screw and make it horizontal. | |
Electrical Diagram
● Electrical diagram see label on main body of the actual product.
| egatloV | 220-240V~50/60Hz |
| Rated Power | 253W |
| Lighting Power | 2 X 1.5W |
| Motor Power | 250W |
| Diameter of air tube | 150mm |
| wolf riA | 800m3/h |
| esioN | ≤65dB |
The air flow parameter is tested under conditions of 230V\~50Hz when the voltage is 220-240V\~50/60Hz and without carbon filters.
Disposal
Please dispose of it at your local community waste collection / recycling center and ensure it presents no danger to children while being stored for disposal. The plug must be rendered useless and the cable cut off to prevent misuse.