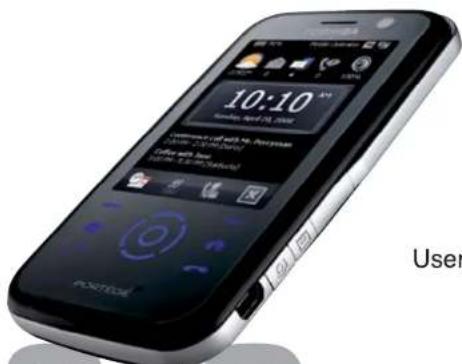
G810 - Mobile Phone TOSHIBA - Free user manual and instructions
Find the device manual for free G810 TOSHIBA in PDF.

| Product Type | Mobile Phone (Smartphone) |
| Brand | Toshiba |
| Model | G810 |
| Operating System | Windows Mobile 6.0 Professional |
| Display | 2.8-inch TFT touchscreen, 240 x 320 pixels |
| Camera (Rear) | 2.0 megapixel with flash |
| Camera (Front) | VGA for video telephony |
| Memory | ROM: 256 MB, RAM: 128 MB |
| Storage Expansion | microSD card slot (supports up to 32 GB) |
| Connectivity | GSM/GPRS/EDGE, UMTS/HSDPA, Wi-Fi 802.11b/g, Bluetooth 2.0, A-GPS |
| Battery | Removable Lithium-ion, 1300 mAh |
| Talk Time | Up to 4 hours (GSM) / 3 hours (3G) |
| Standby Time | Up to 300 hours |
| Dimensions | 110 x 58 x 13.9 mm |
| Weight | 131 g (including battery) |
| SIM Card Type | Mini SIM (standard) |
| Input Method | Touchscreen, Stylus, Full QWERTY Keyboard |
| Multimedia | FM Radio, Camera, Video Player, Music Player |
| Connectivity Ports | Mini USB (charging/sync), 3.5mm headset jack |
| Special Features | TOSHIBA User Interface, A-GPS, Video Calling, Java support, Office Mobile |
| Included Accessories | Battery, AC charger, USB cable, Headset, Stylus, User guide, CD (Getting Started) |
Frequently Asked Questions - G810 TOSHIBA
User questions about G810 TOSHIBA
0 question about this device. Answer the ones you know or ask your own.
Ask a new question about this device
Download the instructions for your Mobile Phone in PDF format for free! Find your manual G810 - TOSHIBA and take your electronic device back in hand. On this page are published all the documents necessary for the use of your device. G810 by TOSHIBA.
USER MANUAL G810 TOSHIBA
© 2008 Toshiba Information Systems UK Limited. Toshiba and the Toshiba logo are trademarks of Toshiba Corporation in Japan and other countries.
Other trademarks and trade names may be used here to refer to the product. Toshiba disclaims proprietary interest in the marks and names of others.
G810-EN
TOSHIBA
Leading Innovation >>>
PORTÉGÉ
G810
User guide
G810
Table of contents
Preface 5
Toshiba Corporation 6
EU Warranty 9
Licenses 10
Declaration of conformity 12
Health and safety 13
General 13
Operating environment 14
Electronic devices 15
Battery safety 15
AC charger safety 16
Emergency calls 17
European RF Exposure Information 17
Care and maintenance 19
General 19
Battery care and maintenance 21
Restarting your Toshiba phone 22
Resetting your Toshiba phone 22
Reinitialising your Toshiba phone 23
Getting started 24
Unpacking 24
Phone layout and functions 25
Today screen 28
Start menu 29
Common status icons 30
Installing the SIM card and battery 33
Installing a microSD card 35
Removing and reinserting the stylus 36
Using the stylus 36
Charging the battery 37
Switching the power on and off 38
Keypad lock 39
Auto Configurator 39
TOSHIBA User Interface 40
Table of contents
Call functions 45
Making a call 45
Speed Dial 47
Receiving a call 48
Ending a call 48
In-call options 49
Video telephony 51
Call History 52
Messaging 54
Text messages 54
MMS messages 56
E-mail 60
General messaging options 65
Text input 67
Input methods 67
Block Recognizer 67
Keyboard 68
Letter Recognizer 68
Input Options 69
Transcriber 69
Drawing and writing on the screen 75
Full Screen Keyboard 76
Table of contents
Applications and multimedia 77
Office Mobile 78
Calendar 79
Contacts 82
Internet Explorer 86
Games 89
TOSHIBA User Interface 90
ActiveSync 90
A-GPS 92
AutoInstall 92
BlackList 93
Calculator 94
Camera 95
Certificate Enrollment 97
File Explorer 97
FM Radio 97
Getting Started 99
Home 99
Image Editor 100
Image To Text 100
JBlend 102
Messenger 103
Notes 104
Picsel Viewer 105
Pictures & Videos 106
Search 107
SIM Toolkit 108
Streaming Player 108
Tasks 109
Windows Live 110
Windows Media 111
Connectivity 115
Wireless Manager 115
Bluetooth 116
Beam 119
Cell Broadcast 119
Internet connections 120
CSD Line 125
Domain Enroll 125
Internet Sharing 126
Network Mode 126
USB to PC 127
Wi-Fi 127
Table of contents
Settings 129
Volume control 129
Reassigning button functions 129
Security settings 130
Customising the Start menu 132
Owner Information 133
Phone settings 133
Video Phone settings 138
Sounds & Notifications 140
Customising the Today screen 141
About 142
Backlight settings 143
Certificates 143
Clock & Alarms 144
Customer Feedback 145
Encryption 145
Error Reporting 146
External GPS 146
Headset Volume Limiter 147
Memory management settings 147
Managed Programs 147
Power settings 148
Regional Settings 148
Remove Programs 149
Screen settings 149
Spb Mobile Shell for Toshiba 150
System Information 151
Task Manager 152
Windows Update 153
Specifications 154
Troubleshooting 157
Purchase record 161
Menu tree 162
End User License Agreements (EULAs) 164
Index 173
Preface
To use your Toshiba phone, you must have service from a wireless service provider. Many of the features in your Toshiba phone depend on features in the wireless network to function. These network services may not be available on all networks, or you may have to make specific arrangements with your service provider before you can utilise network services. Your service provider may need to give you additional instructions for their use and explain what charges will apply. Some networks may have limitations that affect how you can use network services. For instance, some networks may not support all language-dependent characters and services.
Please note that the Messenger and Windows Live applications described in this user manual may not be available on your Toshiba phone because support for these applications is dependent on your network service provider.
The availability of particular products may vary by region.
Due to the continual development of our products, Toshiba reserves the right to modify this document at any time without prior notice.
Toshiba Corporation

IMPORTANT: PLEASE READ THE FOLLOWING BEFORE USING YOUR MOBILE PHONE AS ATTEMPTING TO USE ANY SOFTWARE ON THE SUPPLIED PHONE CONSTITUTES YOUR ACCEPTANCE OF THESE EULA TERMS. IF YOU REJECT OR DO NOT AGREE WITH ALL THE TERMS OF THIS EULA, PLEASE DO NOT ATTEMPT TO ACCESS OR USE THE SUPPLIED SOFTWARE.
End User License Agreement
This End User License Agreement ("EULA") is a legal agreement between you (as the user) and TOSHIBA CORPORATION ("Toshiba") with regard to the copyrighted software installed in a Toshiba 3G mobile phone supplied to you (the "Phone"). Use or employment of any software installed in the Phone and related documentations (the "Software") will constitute your acceptance of these terms, unless separate terms are provided by the Software supplier on the Phone, in which case certain additional or different terms may apply. If you do not agree with the terms of this EULA, do not use or employ the Software.
- License Grant. Toshiba grants to you a personal, non-transferable and non-exclusive right to use the Software as set out in this EULA. Modifying, adapting, translating, renting, copying, making available, transferring or assigning all or part of the Software, or any rights granted hereunder, to any other persons, and removing any proprietary notices, labels or marks from the Software is strictly prohibited, except as expressly permitted in this EULA. Furthermore, you hereby agree not to create derivative works based on the Software.
- Copyright. The Software is licensed, not sold. You acknowledge that no title to the intellectual property in the Software is or will be transferred to you. You further acknowledge that title and full ownership rights to the Software will remain the exclusive property of Toshiba, Toshiba's affiliates, and/or their suppliers, and you will not acquire any rights to the Software, except as expressly set out in this EULA. You may keep a backup copy of the Software only so far as necessary for its lawful use. All copies of the Software must contain the same proprietary notices as contained in the Software and are subject to the terms of this EULA. All rights not expressly granted under this EULA are reserved
Toshiba Corporation
to Toshiba, Toshiba's affiliates and/or their suppliers.
-
Reverse Engineering. You agree that you will not attempt, and if you are a business organisation, you will use your best efforts to prevent your employees, workers and contractors from attempting, to reverse engineer, decompile, modify, translate or disassemble the Software in whole or in part except to the extent that such actions cannot be excluded by mandatory applicable law and only if those actions are taken in accordance with such applicable law. Any failure to comply with the above or any other terms and conditions contained herein will result in the automatic termination of this license and the reversion of the rights granted hereunder to Toshiba.
-
LIMITED WARRANTY. Only during the warranty period for the Phone, Toshiba, Toshiba's affiliates, its suppliers or its authorised service company will repair or replace, at Toshiba's sole discretion, defective Software unless such defect results from acts or incidences beyond the reasonable control of Toshiba. EXCEPT AS PROVIDED IN THIS EULA:
(A) TOSHIBA, TOSHIBA'S AFFILIATES, AND THEIR SUPPLIERS DISCLAIM ALL
WARRANTIES, CONDITIONS OR OTHER TERMS (WHETHER EXPRESS OR IMPLIED), INCLUDING BUT NOT LIMITED TO WARRANTIES, CONDITIONS AND TERMS OF SATISFACTORY QUALITY, MERCHANTABILITY, FITNESS FOR A PARTICULAR PURPOSE AND NON-INFRINGEMENT OF THIRD-PARTY RIGHTS; AND (B) THE ENTIRE RISK AS TO THE QUALITY AND PERFORMANCE OF THE SOFTWARE IS WITH YOU. YOU ACCEPT THAT SOFTWARE MAY NOT MEET YOUR REQUIREMENTS AND NO WARRANTY CAN BE GIVEN THAT OPERATION OF THE SOFTWARE WILL BE UNINTERRUPTED OR ERROR-FREE.
- LIMITATION OF LIABILITY. TO THE FULLEST EXTENT LEGALLY PERMITTED, IN NO EVENT SHALL TOSHIBA, TOSHIBA'S AFFILIATES OR THEIR SUPPLIERS BE LIABLE TO YOU FOR ANY DAMAGES FOR (A) LOST BUSINESS OR REVENUE, BUSINESS INTERRUPTION, LOSS OF BUSINESS DATA; OR (B) CONSEQUENTIAL, SPECIAL, INCIDENTAL OR INDIRECT DAMAGES OF ANY KIND (WHETHER UNDER CONTRACT, TORT OR OTHERWISE) ARISING OUT OF: (I) THE USE
Toshiba Corporation
OR INABILITY TO USE THE SOFTWARE, EVEN IF TOSHIBA, TOSHIBA'S AFFILIATES OR THEIR SUPPLIER HAS BEEN ADVISED OF THE POSSIBILITY OF SUCH DAMAGES; OR (II) ANY CLAIM BY A THIRD PARTY. SAVE AS SET OUT IN THIS SECTION, TOSHIBA'S ENTIRE LIABILITY UNDER THIS EULA SHALL NOT EXCEED THE PRICE PAID FOR THE SOFTWARE, IF ANY. THE ABOVE DISCLAIMER AND LIMITATION DOES NOT EXCLUDE OR LIMIT (A) LIABILITY FOR DEATH OR PERSONAL INJURY CAUSED BY NEGLIGENCE; OR (B) ANY MANDATORY LEGAL RIGHT OR LIABILITY TO THE EXTENT THAT IT CANNOT BE LAWFULLY EXCLUDED OR LIMITED UNDER APPLICABLE LAW. PLEASE MAKE AND RETAIN A COPY OF ALL DATA YOU HAVE INSERTED INTO YOUR PRODUCT, FOR EXAMPLE NAMES, ADDRESSES, PHONE NUMBERS, PICTURES, RINGTONES ETC, BEFORE SUBMITTING YOUR PRODUCT FOR A WARRANTY SERVICE, AS SUCH DATA MAY BE DELETED OR ERASED AS PART OF THE REPAIR OR SERVICE PROCESS.
- Laws. This EULA will be governed by the laws of England and Wales. All disputes arising out of this EULA shall be subject to the exclusive jurisdiction of the English Courts.
- Export Laws. Any use, duplication or employment of the Software involves products and/or technical data that may be controlled under the export laws of applicable countries or region, and may be subject to the approval of the applicable governmental authorities prior to export. Any export, directly or indirectly, in contravention of the export laws of applicable countries or region is prohibited.
- Third Party Beneficiary. You agree that certain suppliers of the Software to Toshiba have a right as a third party beneficiary to enforce the terms of this EULA against you as a user.
- Transfers. The Software may be transferred only as installed on the Phone to a lawful third party user, where that party accepts the terms of this EULA, which will continue to apply.
- IF YOU ARE DEALING AS A CONSUMER IN THE UK AND THE SOFTWARE QUALIFIES AS 'GOODS', YOUR STATUTORY RIGHTS UNDER APPLICABLE LAW ARE NOT AFFECTED.
Toshiba Corporation
EU Warranty
Your Toshiba phone, battery and AC charger contain no user serviceable parts. For further information on service, please contact your retailer or service provider.
Licenses
Licensed by QUALCOMM Incorporated under one or more of the following United States Patents and/or their counterparts in other nations:
4,901,307 5,504,773 5,109,390 5,535,239
5,267,262 5,600,754 5,416,797 5,778,338
5,490,165 5,101,501 5,511,073 5,267,261
5,568,483 5,414,796 5,659,569 5,056,109
5,506,865 5,228,054 5,544,196 5,337,338
5,657,420 5,710,784
Microsoft, Windows, Windows Mobile, Windows Live, Hotmail, Windows Media, ActiveSync, Internet Explorer, Outlook, Excel, PowerPoint and Word are either registered trademarks or trademarks of Microsoft Corporation in the United States and/or other countries.
ArcSoft and the ArcSoft logo are registered trademarks of ArcSoft, Inc.

The Bluetooth™ word mark and logos are trademarks owned by Bluetooth SIG, Inc.

Bluetooth™
Java™ and all Java-based marks are trademarks or registered trademarks of Sun Microsystems, Inc.

microSD ^TM and the microSD ^TM logo are trademarks.

Licenses
Picsel, Picsel Powered, Picsel Viewer, Picsel File Viewer, Picsel Document Viewer, Picsel PDF Viewer and the Picsel cube logo are trademarks or registered trademarks of Picsel Technologies and/or its affiliates.

The Wi-Fi CERTIFIED Logo is a certification mark of the Wi-Fi Alliance.

Declaration of conformity
We, Toshiba Information Systems UK (Ltd), Mobile Communications Division, of
Toshiba Court, Weybridge Business Park, Addlestone Road, Weybridge, KT15 2UL declare under our sole responsibility that this product (G810, Type (Model) Name TK5-E01) is in conformity with the following standards and/or other normative documents:
EN 301 511, EN 301 908-1, EN 301 908-2, EN 50360, EN 50361, EN 301 489-1, EN 301 489-7, EN 301 489-17, EN 301 489-24, EN 300 328, EN 55013, EN 55020, EN 50392 and EN 60950
We hereby declare that all essential radio test suites, EMC & safety requirements have been carried out and that the above named product is in conformity to all the essential requirements of Directive 1999/5/EC.
The conformity assessment procedure referred to in Article 10(5) and detailed in Annex IV of Directive 1999/5/EC has been followed with the involvement of the following Notified Body(ies):
Cetecom ICT Services GmbH, Untertürkheimer Straße 6-10, D-66117 Saarbrücken, Germany
C€0682
20 March 2008
Takoshi Kamoto
Takashi Okamoto
Deputy Managing Director of TIU
General Manager Mobile Communications Division
Health and safety
General
- Do not attempt to dismantle the phone or any of its accessories. Only qualified service personnel should repair the phone and its accessories.
- Do not touch the phone, battery or AC charger with wet hands.
- Keep your Toshiba phone, and all parts and accessories, out of the reach of small children and pets. The SIM card and other small parts could present a choking hazard.
- Use only Toshiba approved batteries and accessories.
- The bundled battery and AC charger are only for use with your Toshiba phone. Do not use this battery or AC charger with any other device.
- Use of third party equipment (including batteries, cables and accessories) not manufactured or authorised by Toshiba may invalidate the warranty of your phone and adversely affect the operation of the phone.
- Before connecting your Toshiba phone to another device, read the supporting documentation to confirm that the other device is compatible.
-
When using the headset, be careful not to listen at excessive volumes. Listening to loud sound levels may lead to hearing loss.
-
It is recommended that pregnant and young women take precautions while in a call and keep the phone at a distance from their lower abdomen. For this situation, use of a hands-free kit is recommended.
- Your phone contains metal that may cause skin irritation.
- Do not operate the camera flash too close to somebody's eyes - this may cause damage to their eyes.
Health and safety
Operating environment
- Observe all local safety regulations regarding the use of mobile phones while driving.
- Pull off the road and park before making or answering a call.
- Do not stop on the hard shoulder of a motorway to answer or make a call, except in an emergency.
- If using an integrated hands-free device, make sure the phone is securely placed in its holder.
- Only qualified personnel should install the device in a vehicle. Faulty installation or service may be dangerous and may invalidate any warranty. For more information, consult your vehicle manufacturer or representative.
- Do not place objects, including either installed or portable wireless equipment, in the area over the airbag or in the airbag deployment area.
- Switch off your Toshiba phone when refuelling.
- Do not handle your Toshiba phone when operating machinery.
- Switch your Toshiba phone off if you are entering a hospital or health care facility. Medical equipment may be affected by phone usage.
- Switch your Toshiba phone an aircraft. The phone signal may interfere with systems in the aircraft. You are legally bound to comply with this recommendation.
- Switch your Toshiba phonec where posted notices prohibit phone usage. Always follow building regulations governing phone usage.
- Switch your Toshiba phone progress, and observe all provided guidelines and regulations.
- Switch your Toshiba phone off in areas with potentially explosive atmospheres, such as fuel storage areas and spray paint facilities.
- Switch your Toshiba phone off v during an electrical storm.
- Keep your Toshiba phone away from fuel and chemicals.
Health and safety
Electronic devices
- If you wear a pacemaker, or are in the company of someone who does, you should be aware that there is a small risk of mobile phone usage interfering with the operation of the pacemaker. You should contact your doctor, or the manufacturer of the pacemaker, for more information. If you have any reason to suspect that interference is taking place, switch off your phone immediately.
- Mobile phone usage may interfere with some hearing aids. If this happens, you should contact your service provider or doctor for further information.
- Mobile phone usage may interfere with the functionality of inadequately shielded medical devices. Consult a physician or the manufacturer of the device to ensure safe procedures are used.
- Mobile phone usage may interfere with the functionality of any inadequately shielded electronic system in a motor vehicle. Examples include airbags and fuel injection systems. You should contact the manufacturer of the vehicle or system to ensure that the system is properly shielded.
Battery safety
- Only use batteries approved by Toshiba for use in this handset. There is a risk of explosion if the battery is replaced with an incorrect type.
- Only recharge the battery with the recommended charger supplied by Toshiba.
- Stop using the battery if you detect any abnormalities, such as odour, discolouration or heat during use, charging or storage.
- Do not use your Toshiba phone with a damaged battery.
- When the charger is not in use, disconnect it from the power source.
- Do not short-circuit the battery. Accidental short-circuiting can occur when a metallic object causes a direct connection between the + and - terminals of the battery.
- Do not touch the battery terminals.
- Do not leave the battery in areas of extreme cold or heat.
- Never soak the battery in water or any other liquid.
- Never attempt to open the battery. The battery contains substances that may be harmful if swallowed or allowed to come into contact with unprotected skin.
Health and safety
- In the unlikely event of a battery leak, take care to keep the battery discharge away from your eyes and skin. If the leakage does come into contact with eyes or skin, flush thoroughly with clean water and consult a doctor.
- Do not dispose of the battery in a fire.
- Do not dispose of the battery in a regular waste container. The battery contains toxic chemicals and must be disposed of appropriately. Contact your local authorities for more information.
AC charger safety
- Do not use a damaged or worn AC charger. The use of a damaged or worn AC charger could result in electric shock, burns or fire. Contact an authorised Toshiba service provider immediately to obtain suitable replacements.
- Do not bend or twist the cable of the AC charger.
- Do not pull on the cable of the AC charger in order to remove the plug from a socket. Grasp the plug directly when unplugging the AC charger to avoid causing any damage to the cable.
- Do not touch the pins of the plug when connecting or disconnecting it from a power source.
- Do not place heavy objects on the AC charger.
Health and safety
Emergency calls
When making emergency calls from your Toshiba phone, ensure that the phone is switched on and in service.
Calls cannot be made to emergency services while data communication is being performed within a GSM area. Also, calls may not be able to be made to emergency services depending on the network services of some service providers.

IMPORTANT: You can still make calls to emergency services when the SIM card is not inserted, the SIM card is locked, the phone is locked, Call Barring is set, or Fixed Dialing is set.
There is no guarantee that a connection can be established in all countries and areas because operation of your phone differs depending on the wireless network, wireless signal and your setting status. Do not rely solely on your mobile phone when you need to make emergency calls.
European RF Exposure Information
Your Toshiba phone is a radio transmitter and receiver. It is designed not to exceed the limits for exposure to radio waves recommended by international guidelines. These guidelines were developed by the independent scientific organisation ICNIRP and include safety margins designed to assure the protection of all persons, regardless of age and health.
The guidelines use a unit of measurement known as the Specific Absorption Rate, or SAR. The SAR limit for mobile devices is 2 W/kg and the SAR value for this device when tested at the ear was 0.684 W/kg*.
As SAR is measured utilising the device's highest transmitting power, the actual SAR of this device while operating is typically below that indicated above. This is due to automatic changes to the power level of the device to ensure it only uses the minimum level required to reach the network.
The World Health Organization has stated that present scientific information does not indicate the need for any special precautions for the use of mobile devices. They state that if you want to reduce your exposure then you can do so by limiting the length of calls or using a 'hands-free' device to keep
Health and safety
the mobile phone away from the head and body. Additional Information can be found on the website of the World Health Organization (http://www.who.int/emf).
* The tests are carried out in accordance with international guidelines for testing.
The following Information is only for European Union Member States:

natural_image
Symbol of a trash bin crossed with a diagonal line, no text or numbers presentThe use of the above symbol indicates that this product may not be treated as household waste. By ensuring this product is disposed of correctly, you will help prevent potential negative consequences for the environment and human health, which could otherwise be caused by inappropriate waste handling of this product. For more detailed information about recycling of this product, please contact your local city office, your household waste disposal service or the shop where you purchased the product.
Please recycle the cardboard packaging supplied with this phone.
Care and maintenance
General
You can greatly enhance the lifespan of your Toshiba phone, and the parts and accessories, by following the suggestions below.

TIP: Maintaining your Toshiba phone, and the parts and accessories, in a good condition will help you fulfil the warranty obligations.
• Always use your Toshiba phone in the intended manner. Incorrect usage may affect performance.
• To avoid permanent damage to your Toshiba phone, use only Toshiba approved batteries and accessories.
- The bundled battery and AC charger are only for use with your Toshiba phone. Do not use this battery or AC charger with any other device. This could cause permanent damage to the device, battery or charger.
- Use of third party equipment (including batteries, cables and accessories) not manufactured or authorised by Toshiba may invalidate the warranty of your phone and adversely affect the operation of the phone.
- Before connecting your Toshiba phone to another device, read the supporting documentation to confirm that the other device is compatible.
- Keep your Toshiba phone, and all parts and accessories, out of the reach of small children and pets.
- Do not allow your Toshiba phone, battery or accessories to come into contact with liquids or moisture. Moisture of any kind can corrode the electronic circuits. The manufacturer's warranty may become invalid if the phone or battery get wet due to misuse.
- Do not use or store your Toshiba phone in dusty or dirty locations.
- Do not use or store your Toshiba phone in hot areas. High temperatures will shorten the lifespan of the phone, damage the battery, and warp/melt internal circuits.
- Do not store your Toshiba phone in, or near, direct heat sources such as radiators. This could cause the battery to overheat and explode.
- Do not store your Toshiba phone in cold areas. A big difference between room temperature and the temperature in the phone can cause condensation to form inside the phone, damaging the electronic circuits.
- Do not place your Toshiba phone alongside computer disks, credit cards, travel cards and other magnetic media. Information contained on
Care and maintenance
disks or cards may be affected by the phone.
- Do not expose your Toshiba phone to strong magnetic fields. This may cause temporary malfunction.
- Do not open your Toshiba phone unless absolutely necessary.
- Do not mishandle or abuse your Toshiba phone. Dropping the phone, or knocking or shaking it, can damage the internal circuits.
- Do not apply paint or other such substances to your Toshiba phone.
- Interference may affect the performance of your Toshiba phone. This is normal and the phone should operate as normal once you move away from the source of the interference.
- If your Toshiba phone, or any of the accessories, are not working as they should, please consult your dealer. They can provide you with the expert assistance you require.
- Do not attempt to disassemble your Toshiba phone. Only Toshiba authorised personnel should service the phone.
-
When your Toshiba photo vibration may cause the phone to move. Take care not to place the phone near a heat source or the edge of a high surface.
-
Only use a soft, clean cloth to clean your Toshiba phone. Do not use chemicals, detergents, abrasive substances, or any liquids. Use a cotton swab to clean the camera lens.
- Do not use water to clean the touch screen.
- Keep the touch screen and tip of the stylus clean to avoid permanent damage.
- Keep sharp objects away from the touch screen to avoid it being scratched and damaged.
- For touch screen input, use only the included stylus or your finger. Use of other objects can damage the input panel and will void the warranty.
- If the tip of the stylus is damaged, do not use it. If you operate the touch screen with a damaged stylus, the touch screen may be damaged. When the stylus is damaged, please purchase a new one.
- Do not tap hard on the touch screen, as this may cause permanent damage to the screen.
- To avoid scratches on the touch screen, avoid placing your Toshiba phone with the touch screen facing downwards.
It is recseh to be ided that you use the bundled stylus when pressing the Reset button.
Care and maintenance
Battery care and maintenance
Your Toshiba phone is powered by a rechargeable Lithium ion (Li-ion) battery.
The full performance of a new battery is achieved only after two or three complete charge and discharge cycles.
The battery can be charged and discharged hundreds of times, but it will eventually wear out. When the talk and standby times are noticeably shorter than normal, it is recommended that you buy a new battery.
- A new battery, or one that has not been used for a long time, could have reduced capacity during initial use.
- Do not leave the battery connected to the charger and power source for longer than necessary. This will result in repeated short charging, which will reduce battery performance and lifespan. Please disconnect the AC charger when the battery is full.
- Do not leave the battery in areas of extreme cold or heat. This could affect the performance of the battery.
-
The battery has optimum performance in an ambient temperature of between +5 °C (+41 °F) and +35 °C (+95 °F).
-
Only remove the battery with the phone switched off.
- Do not leave the battery empty or disconnected for a long time, as this may cause data to be reset.
- If you are not going to use your phone for a long time, fully charge the battery, then switch off the phone. The phone should be stored in a dry place away from direct sunlight. Recharge the phone approximately every six months.
- Avoid repeated short charging. It is preferable to let the battery go flat and then recharge it completely.
Care and maintenance
Restarting your Toshiba phone
If you have any problems, such as the phone freezing, restart the phone.
To restart your Toshiba phone:
- Press and hold the Power key.
- Tap Yes to confirm powering off the phone.
- Wait a few seconds, the press and hold the Power key to switch on the phone.

IMPORTANT: If you restart your Toshiba phone, data that you have not saved will be lost.
If, after you have restarted your Toshiba phone, there is still a problem:
- Remove the battery (refer to Getting started for instructions).
- Re-insert the battery, then switch on the phone (refer to Getting started for instructions).
Resetting your Toshiba phone
If you still have problems after restarting your phone, you can reset the phone.
Resetting your Toshiba phone causes it to restart and adjusts memory allocation. Your phone will return to the same status as the last time you used it, though unsaved data may be lost.
To reset your Toshiba phone:
Using the stylus, press and hold the Reset button. The phone will switch on after resetting.

IMPORTANT: If you reset your Toshiba phone, data that you have not saved may be lost.
Care and maintenance
Reinitialising your Toshiba phone
Reinitialising your Toshiba phone resets all settings to their factory defaults, and deletes all of your data. You should only use this procedure as a last resort. We recommend that you back up all of your data before resetting your Toshiba phone.
If you are experiencing a problem with an application, it is most likely a result of a conflict between installed programs. We recommend uninstalling the most recently added program first. Also verify that the program is designed to be run on your Toshiba phone by comparing the requirements to the information provided with your phone. To view this information:
- From the Today screen, tap Start > Settings.
- Tap the System tab.
- Tap About.
To reinitialise your Toshiba phone:
- With your Toshiba phone switched off, press and hold both Volume keys.
- While keeping the the Volume keys pressed, press the Power key for approximately three seconds.
- Wait for the touch panel to load.
- Press Y to reinitialise your Toshiba phone, or N to cancel. Your phone will restart.

IMPORTANT: If you reset your Toshiba phone, any applications that you have installed will be deleted. You will also lose all personal data such as music, ringtones and pictures.

IMPORTANT: It is recommended that you frequently back up the data on your Toshiba phone.

TIP: This procedure is also referred to as a hard reset.
Getting started
Unpacking
Please ensure that the contents of your sales pack include:
- Your Toshiba phone
- Battery
- A C charger
- USB cable
- Headset
- User guide
- CD (Getting Started)

NOTE: If any of the items listed above are missing, contact the retailer where you purchased your Toshiba phone.
Getting started Phone layout and functions
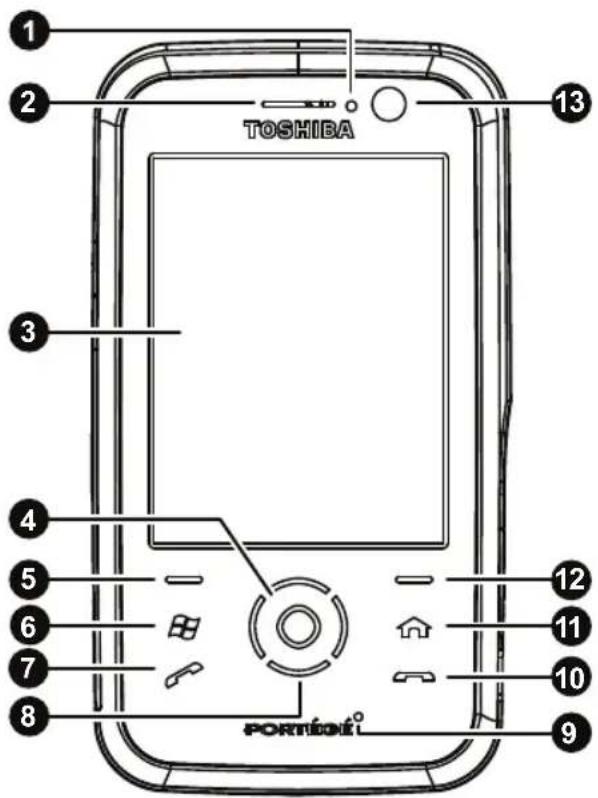
- LED indicator - indicates various states of the phone. Red- Phone is charging. Red flashing - charging from very low battery. Blue flashing - Bluetooth™ wireless technology is active. Green flashing slowly - new message received. Green flashing quickly - incoming call.
2. Earpiece
3. Touch screen
-
Action key - press to select items and confirm operations.
-
Left softkey - press to perform operations indicated on the touch screen.
-
Start key - press to access the Start menu.
-
Send key - short press to access the Phone screen, and make, answer and hold calls, long press to activate speakerphone while in a call.
-
Navigation keys - press to scroll up, down, left and right.
9. Microphone
-
End key - press to end calls or operations and return to the Today screen.
-
Home key - press to access the Home screen.
-
Right softkey - press to perform operations indicated on the touch screen.
Getting started
13. Front camera lens
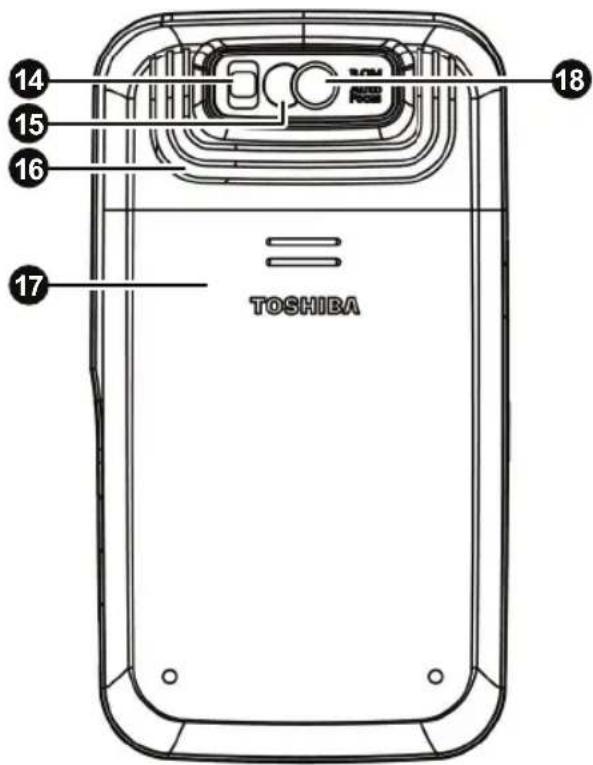
- Camera flash
- Preview mirror - used when taking a self-portrait photo.
- Speaker
- Battery cover
- Rear camera lens
Getting started
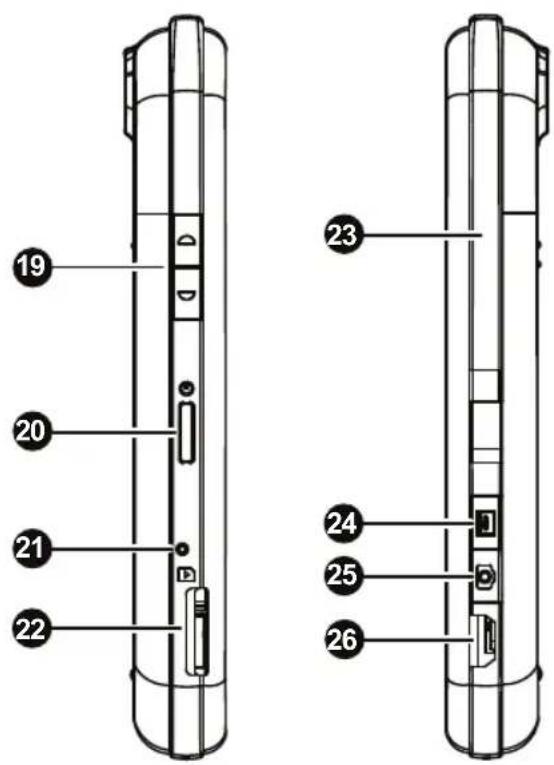
- Volume keys - press the upper key to increase the volume, and the lower key to decrease the volume.
- Power key - short press to enter/leave standby mode, long press to switch phone on/off.
- Reset button - press using the stylus to reset the phone.
- microSD card slot
- Stylus and stylus slot
- Record key - short press to access the Notes application, long press to record a voice note.
- Camera key - press to launch the Camera application. If Camera application is already running, press to capture a photo or begin recording of a video clip.
- Cable, phone charging and headset connector (mini USB)
Getting started
Today screen
Important information such as date, time, status indicators and appointments is displayed on the Today screen.
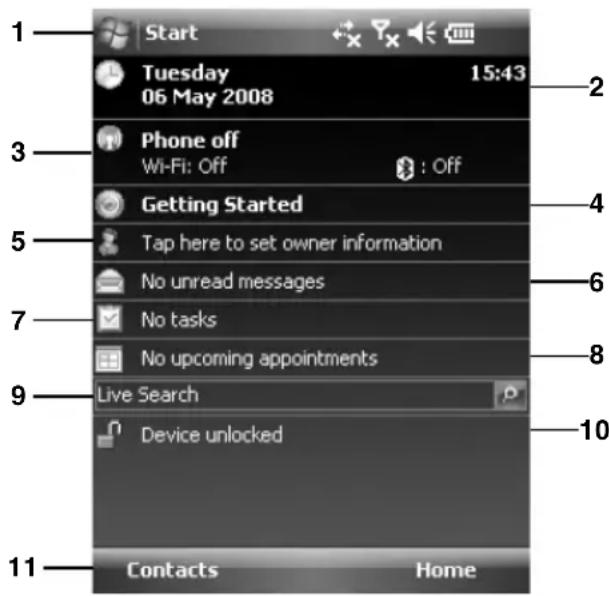
- Title bar. Status icons are also displayed here.
-
Time and date. See Clock & Alarms in Settings for information on setting the time and date.
-
Name of wireless service provider, and Wi-Fi and Bluetooth status. See the Connectivity section for further information about these items.
- Getting Started. Tap this item to view instructions on carrying out simple operations on your Toshiba phone.
- Owner information. See Owner Information in Settings for details on setting the owner information.
- Unread messages. See the Messaging section for information about messages.
- Tasks. See Tasks in Applications and multimedia for information about tasks.
- Upcoming appointments. See Calendar in Applications and multimedia for information about appointments.
- Live Search. See Searching the Internet using Live Search in Applications and multimedia for further information.
- Lock status.
- Command bar. These buttons are dynamic, and depend on previous activity on the phone.
You can open an application directly by tapping it.
To access the Today screen at any time, press the End key.
Getting started
For information on customising the Today screen, refer to Customising the Today screen in Settings.
Start menu
To access the Start menu, tap Start from the Today screen.
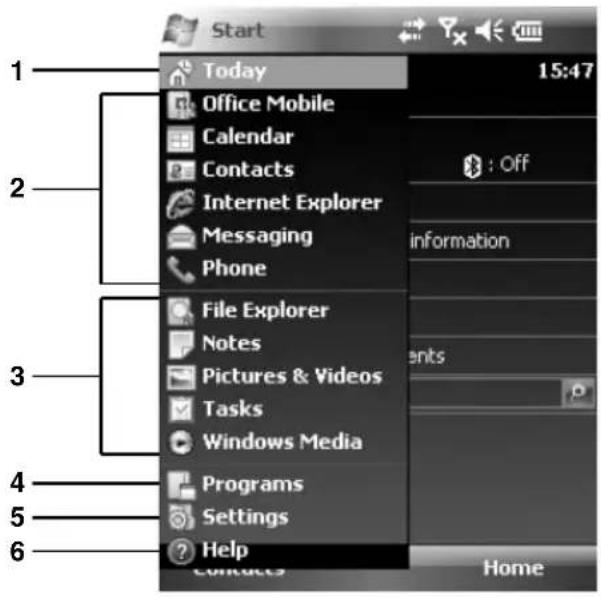
- Today
- Pinned applications.
- Recently used applications.
- Programs. See the Applications and multimedia section for information about the programs/applications on your Toshiba phone.
- Settings. See the Settings section for information about the settings on your Toshiba phone.
- Help
Tap the required item to access it.
Getting started
Common status icons
| Type Icon Description | ||
| Radio signal icons Signa | Strength | |
| Y | No signal | |
| Y! | No radio service. The phone has not yet connected to a network. | |
| Y... | Radio signal lost. The phone is searching for a signal. | |
| Yx | Phone set to Off. Refer to Switching radio transmission on/off in Connectivity for details. | |
| G | GPRS available | |
| E | EDGE available | |
| 3G | 3G/UMTS available | |
| H | HSDPA available | |
| G+ | Connecting to GPRS | |
| E+ | Connecting to EDGE | |
| 3G+ | Connecting to 3G/UMTS | |
| H+ | Connecting to HSDPA | |
| G|| | Active GPRS connection | |
| E|| | Active EDGE connection | |
| 3G|| | Active 3G/UMTS connection | |
| H|| | Active HSDPA connection | |
| ▲ | Roaming | |
Getting started
| Type Icon Description | ||
| Connectivity icons | Bluetooth set to On. Refer to Changing Bluetooth mode in Connectivity for details. | |
| Incoming beam. Refer to Beam in Connectivity for details. | ||
| Wi-Fi set to On. Refer to Wi-Fi in Connectivity for details. | ||
| Wi-Fi network(s) in range. | ||
| Animated - connecting to a Wi-Fi network.Static - connected to a Wi-Fi network. | ||
| Call icons Call in progress | ||
| Data call in progress | ||
| Call on hold | ||
| Speakerphone on | ||
| Calls forwarded | ||
| Missed call | ||
| Volume icons Ringer on for incoming calls | ||
| Notification icons New message(s) received (includes voice mail messages) | ||
Getting started
| Type Icon Description | ||
| Notification icons | Multiple notifications. This icon is displayed when there are multiple occurrences that would normally each display an icon, for example, when there is a missed call and a message received.This icon is displayed automatically after the last notification icon has been displayed briefly. You can tap this icon to view the individual notifications. | |
| Battery icons Battery level | ||
| Battery level low | ||
| Battery charging | ||
| ActiveSync icons Sync | Ronisation over GPRS in progress | |
| Synchronisation over EDGE in progress | ||
| Synchronisation over 3G/UMTS in progress | ||
| Synchronisation over Wi-Fi in progress | ||
| Synchronisation error | ||
| Other icons Alarm pend | ||
| No SIM card | ||
| Headset connected | ||
^1 The volume control window is displayed when you tap these icons. Refer to Volume control in Settings for further details.
^2 The type of voice mail message indicator displayed is dependent on your service provider. Your service provider may also allow you to select the type of voice mail notification that you receive. Please contact your service provider for details.
Getting started
Installing the SIM card and battery

WARNING: There is a danger of explosion if the battery is incorrectly replaced. To reduce risk of fire or burns, do not disassemble, crush, puncture, short external contacts, expose to temperature above 60^ C ( 140^ F), or dispose of battery in fire or water. Replace only with specified batteries according to the local regulations.

IMPORTANT: The SIM card is easily damaged by scratching and bending, so take care when handling it.

IMPORTANT: Keep SIM card away from static, dust and water.

IMPORTANT: Power off the phone and disconnect the charger before inserting or removing the SIM card.
To install the SIM card and battery:
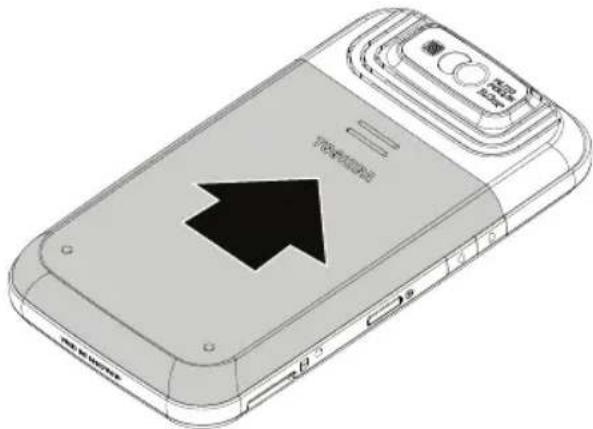
- With the back of the phone facing up, press down on the back cover. Slide the cover as shown in the diagram below, and remove it from the phone.
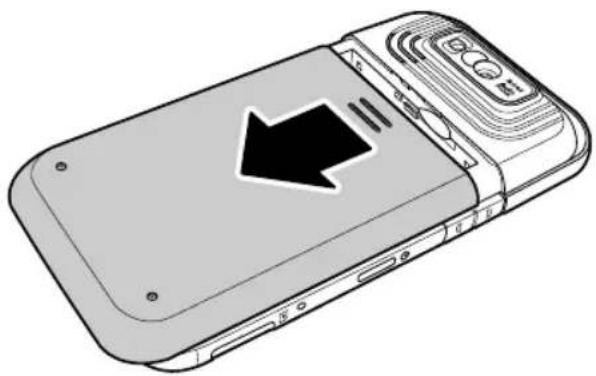
natural_image
Illustration of a smartphone with an arrow pointing to the front panel (no text or symbols present)Getting started
- If the battery is already installed, lift the tab at the base of the battery. Remove the battery from its compartment.
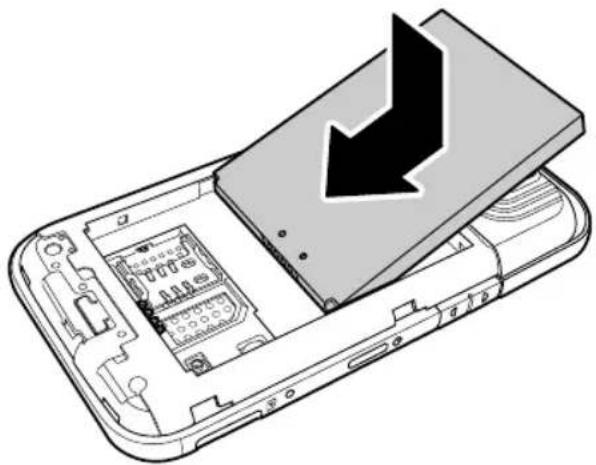
- With the gold connectors facing downwards, align the SIM card the correct way, as shown in the diagram below. Push down lightly while sliding the SIM card into place.
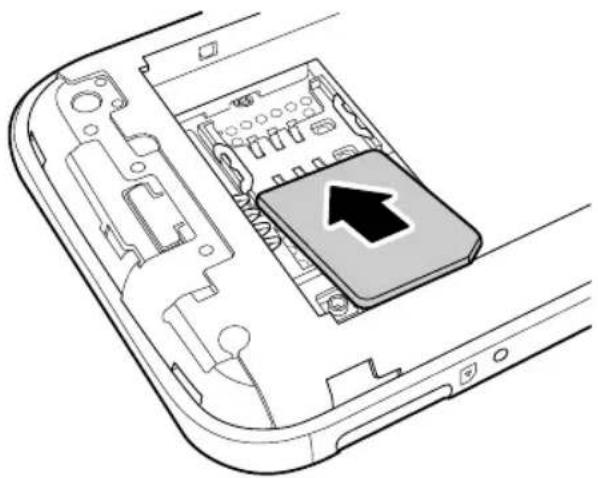
natural_image
Diagram of an electronic device showing internal components and a highlighted chip with an arrow (no text or symbols present)- Insert the battery into the battery compartment with the gold connectors facing towards the bottom of the phone. The battery is shaped so that it can only be inserted this way. Gently push on the bottom of the battery (non-connector end) to insert it completely.
natural_image
Diagram of an open mobile phone showing internal circuit board and a screen with a downward arrow (no text or symbols)Getting started
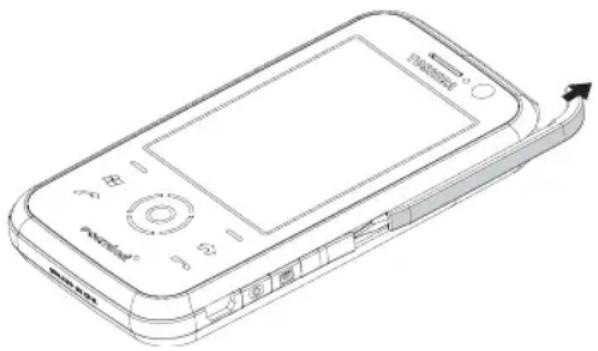
- Gently slide the back cover upward into place.
natural_image
Line drawing of a smartphone with an upward arrow on the screen (no text or symbols)Installing a microSD card
A microSD card is a removable storage card that can be used to increase the memory of the phone.
i IMPORTANT: Do not remove the microSD card while the phone is reading data from, or writing data to, the card.
To install a microSD card:
- With the gold connectors facing upwards, align the microSD card the correct way, as shown in the diagram below.
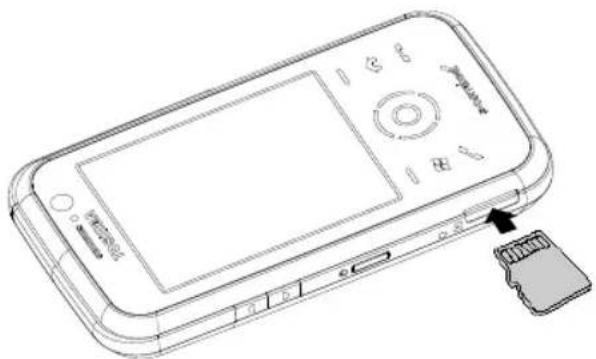
natural_image
Line drawing of a smartphone with an attached card and a display screen (no text or symbols)- Gently slide the microSD card into the slot until it clicks into place.
To remove the microSD, gently press it inwards. It will automatically eject.
Getting started
Removing and reinserting the stylus
- Remove the stylus by pushing it upwards along the side of the phone (from above the Record key) sliding it towards the top of the phone, as shown in the diagram below.
- To reinsert the stylus, slide it downwards along the side of the phone until it clicks into place.
natural_image
Line drawing of a mobile phone with control panel and buttons (no text or symbols)Using the stylus
The stylus is used for menu selection and data input on the touch screen of your Toshiba phone.
- Tap: Touch the screen once with the stylus to open items and select options.
- Drag: Hold the stylus on the screen and drag it to select text and images. Drag in a list to select multiple items.
- Tap and hold: Tap and hold the stylus on an item to see a list of actions available for that item. On the pop-up menu that is displayed, tap the required action.
WARNINGS: • For touch sc
- For touch screen input, use only the included stylus or your finger. Use of other objects can damage the touch screen and will void the warranty.
- If the tip of the stylus is damaged, do not use it. If you use the touch screen with a damaged stylus, the touch screen may be damaged. When the stylus is damaged, please purchase a new one.
- Do not tap hard on the touch screen, as this may cause permanent damage to the screen.
Getting started
Charging the battery
You will need to fully charge the battery before you can switch your Toshiba phone on for the first time. You can charge your battery in the following two ways:
- Either plug the AC charger into an AC outlet and connect it to the charger connector on your Toshiba phone. When the battery is fully charged, unplug the AC charger from the AC outlet and disconnect it from the phone charger connector by gripping it tightly and pulling gently, or
- connect your Toshiba USB cable.

IMPORTANT: Do not remove the battery while it is charging.
Fully charging the battery may take up to four hours when using the AC charger, or up to eight hours when using the USB cable.
The battery will only achieve optimum performance after two or three complete charges.
When charging is complete, disconnect the AC charger from the power source, or the USB cable from the PC, then disconnect your Toshiba phone.
Low battery
When the battery charge level drops to 20% of its total capacity, an alert message and the low battery icon are displayed.
If the battery charge level runs too low for normal operation, your Toshiba phone will automatically switch off.
Battery information
Battery performance depends on many factors, such as your service provider's network configuration, signal strength, the temperature of the environment with then you operate your Toshiba phone, the features and/or settings you select and use, items attached to your phone's connecting ports, and your voice, data, and other program usage patterns.

NOTE: It is recommended that you save the data in your phone memory to a PC or storage card. The manufacturer is not responsible for data lost or altered due to battery discharge.

TIP: For information on optimising the power performance of your Toshiba phone, refer to Backlight settings and Power settings in Settings.
Getting started
Managing a low battery
When the low battery alert is displayed, you should do the following:
- Save your current data.
- Charge the battery as soon as possible.
- If you are unable to charge the battery immediately, we recommend that you switch off your phone.
Switching the power on and off
To switch your Toshiba phone on:
- Press and hold the Power key.
- If a PIN or security code is requested, enter the code.

WARNING: The PIN code activates the services in your Toshiba phone and should be provided in the documentation supplied by your service provider. If you enter the incorrect PIN for your SIM card three consecutive times, you will need to contact your service provider to obtain the Personal Unblocking Key (PUK). Do not attempt to guess the PUK as your SIM card will be rendered permanently inoperative following ten consecutive unsuccessful attempts.
To switch your Toshiba phone off:
- Press and hold the Power key.
- Tap Yes to confirm powering off the phone.
Getting started
Keypad lock
This feature prevents accidental calls and operations.

NOTE: Emergency calls can be placed at any time, without requiring deactivation of any security feature first.
Locking the keypad
To lock the keypad, on the Today screen, tap Device unlocked.
Unlocking the keypad
To unlock the keypad, tap the Unlock softkey, then tap Unlock on the screen.
Auto Configurator
The Auto Configurator application provides a quick and easy way to configure service provider settings, including GPRS, WAP, and MMS.
To use Auto Configurator:
- From the Today screen, tap Start > Programs.
- Tap AutoConfig.
- Select your country in the Country field.
- Select your service provider in the Operator field.
- Tap ok.
- Tap Yes. The configuration is carried out. This may take a few seconds.
Getting started
TOSHIBA User Interface
Overview
The TOSHIBA User Interface provides a customisable user interface and behaviour, while keeping all the advantages of a Windows Mobile device.
The TOSHIBA User Interface enables you to access information, run applications, make calls and navigate your Toshiba phone in a simple and flexible manner, even using one hand.
You can customise items such as the Now Screen, Today plug-in, softkeys, tabs and weather updates. For details of customising the TOSHIBA User Interface, refer to Spb Mobile Shell for Toshiba in Settings.
The TOSHIBA User Interface consists of three main screens:
- Home screen
- Now Screen
- Quick Dial screen
All of these screens are designed for one-handed stylus-free navigation, and animated transitions are supported.
You can use a left or right gesture, or tap the appropriate icons, to switch between these screens. You can also use a left gesture to return to the previous menu level.
Slide your finger in a downwards gesture or tap the exit icon to return to the Today screen or last active application.
Getting started
Home screen
The Home screen adds a fast and convenient way to navigate through your Toshiba phone. It has been designed for one-handed navigation and stylus-free use.
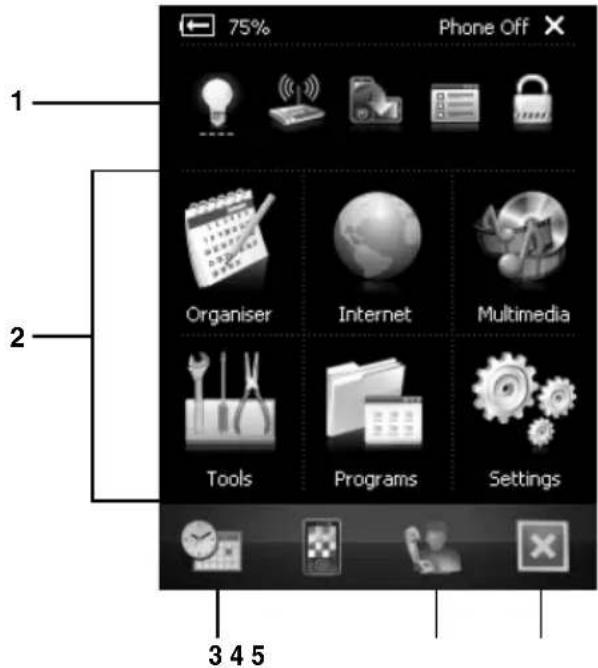
- Smart launcher.
- Menu style icons.
- To access the Now Screen.
- To access the Quick Dial screen.
- To exit the TOSHIBA User Interface.
The Home screen consists of two parts - a smart launcher in the top part of the screen, and six menu style items below.
The smart launcher uses an algorithm to display shortcuts for frequently used items. You can tap and hold on any of the smart launcher items to customise the shortcuts.
The six menu style icons enable you to quickly and easily access items available via the standard Windows Mobile user interface, along with some extras such as Phone Profiles.
Getting started
Now Screen
The Now Screen displays all of your important information in one place.
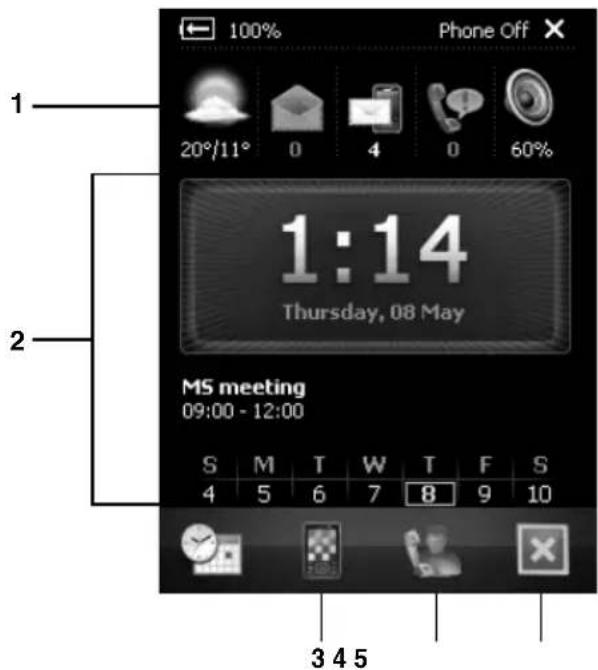
- Weather, messaging, call and phone volume information.
- Time, date and calendar information.
- To access the Home screen.
- To access the Quick Dial screen.
- To exit the TOSHIBA User Interface.
Getting started
Quick Dial screen
The Quick Dial screen displays up to sixteen photo contacts of your choice for quick access. You can also keep a shortcut to all your Toshiba Contacts here.
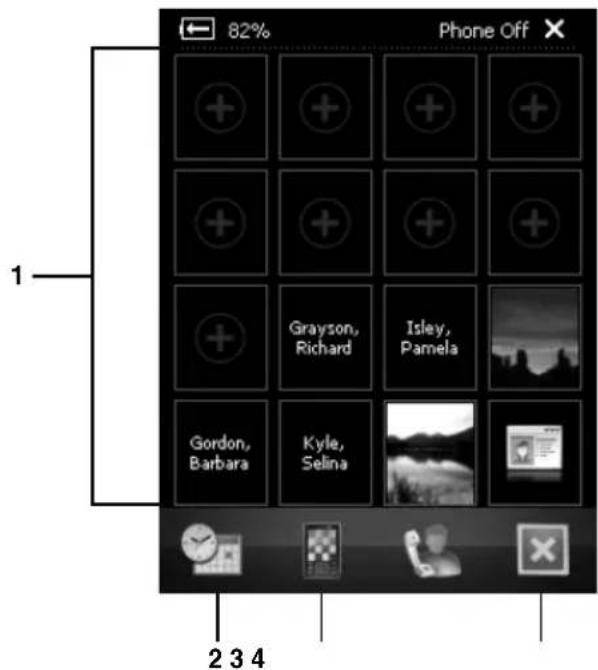
- Contacts for quick access.
- To access the Now Screen.
- To access the Home screen.
- To exit the TOSHIBA User Interface.
You can add your favourite contacts from those stored in Contacts on your Toshiba phone. You can also add a shortcut to Recent Calls.
Tap and hold on an entry to view the available options.
To make a call from the Quick Dial screen:
- Tap the required Quick Dial entry.
- Tap the phone number to call.
Getting started
Today plug-in
The TOSHIBA User Interface also contains a Today plug-in that enables you to add TOSHIBA User Interface items to the Today screen.
For information on setting up the Today plug-in, refer to Customising the TOSHIBA User Interface in Settings.
Call functions
Making a call
Before making a call, ensure that your Toshiba phone is switched on, that there is a valid SIM card installed, and that the signal is sufficiently strong.
Making a call from the Phone screen
To make a call from the Phone screen:
- From the Today screen, press the Send key or tap Start > Phone.
- Enter a phone number using the numeric keypad.
- Press the Send key or tap Talk.

TIP: When you tap a key on the numeric keypad, a list of names and/or numbers is displayed. This list shows matching names and numbers from Contacts, Call History, Speed Dial and the SIM card.
For example, if you tap 2, names beginning with A, B or C and phone numbers beginning with 2 are displayed.
You can enter more characters to reduce the number of matching entries.
To call an entry, tap it, then tap Call.
Making an emergency call
You can make calls to emergency service numbers under almost any circumstances, even if you have locked your Toshiba phone or if you have not enabled your SIM.
For further information, see Emergency calls in Health and safety.
Making a call from Contacts
To make a call from Contacts:
- From the Today screen, tap Contacts or Start > Contacts.
- Scroll to the required contact, then press the Send key.

TIP: If you have a long list of contacts, enter the first few letters of the contact's name. The phone will display only the matching contact. To call the contact, press the Send key.
Making a call to a non-default number
You can assign a work phone number (w), mobile phone number (m) and home phone number (h) to a contact that is saved to the phone.
The mobile phone number is dialled by default.
Call functions
To make a call to a non-default number:
- From the Today screen, tap Contacts or Start > Contacts.
- Tap the required contact.
- Scroll to the required phone number, then press the Send key or Action key, or tap Call.
Making a call from Call History
Call History displays calls you have made, received, and missed recently.
To make a call from the Call History:
- From the Today screen, press the Send key or tap Start > Phone.
- Tap Hide Keypad.
- Tap Call History.
- Scroll to the required name or phone number, then press the Send key or tap Call.
Dialling the last number called
To dial the last number called:
From the Today screen, press the Send key twice.
Making an international call
To make an international call:
- From the Today screen, press the Send key or tap Start > Phone.
- Tap and hold 0 on the keypad until the + sign is displayed.
- Enter the full phone number, including the country code, area code (without the first 0) and phone number.
- Press the Send key or tap Talk.
Call functions
Speed Dial
Creating a speed dial
To create a speed dial:
- From the Today screen, press the Send key or tap Start > Phone.
- Tap Hide Keypad.
- Tap Speed Dial.
- Tap Menu > New.
- Tap the required contact.
- In the Location: field, select the speed dial number.
- Tap ok twice.

NOTE: The digit 0 is reserved for inserting the + character when dialling an international phone number. The digit 1 is reserved for calling your voice mail mailbox as a speed dial.

TIP: You can also create a speed dial from Contacts. To do this:
- From Contacts, tap the required contact.
- Scroll to the required phone number, then tap Menu > Add to Speed Dial...
- In the Location: field, select the speed dial number.
- Tap ok twice.
Setting up voice mail speed dial
The voice mail speed dial is normally preconfigured. If it is not preconfigured, you can save your voice mail number to the phone manually.
To set up voice mail speed dial manually:
- From the Today screen, tap Start > Settings.
- On the Personal tab, tap Phone.
- Tap the Services tab.
- Tap Voice Mail and Text Messages, then tap Get Settings...
- Enter your voice mail number in the Voice Mail: field. This can be obtained from your service provider.
- Tap ok twice.
Call functions
Making a call using speed dial
To make a call using speed dial:
- From the Today screen, press the Send key or tap Start > Phone.
- Tap Hide Keypad.
- Tap Speed Dial.
- Scroll to the required speed dial, then press the Send key or tap Call.

TIP: You can also make a call using speed dial from the Phone screen. To do this:
From the Phone screen, tap and hold the required speed dial number on the keypad. If the speed dial number has two digits, tap the first digit, then tap and hold the second digit.
Deleting a speed dial
To delete a speed dial:
- From the Today screen, press the Send key or tap Start > Phone.
- Tap Hide Keypad.
- Tap Speed Dial.
- Scroll to the required speed dial, then tap Menu > Delete.
- Tap Yes to confirm the deletion.
- Tap ok.
Receiving a call
Answering or ignoring a call
- To answer an incoming call, press the Send key or tap Answer.
- To ignore an incoming call, press the End key or tap Ignore.

NOTE: If you choose to ignore a call, the caller will be connected to your voice mail, provided you are subscribed to this service.

TIP: When you have the headset connected to your Toshiba phone, you can do the following:
- Answer an incoming call by pressing the headset button.
- Ignore an incoming call by pressing and holding the headset button.
Ending a call
To end a call, press the End key or tap End.

TIP: When you have the headset connected to your Toshiba phone, you can end a call by pressing and holding the headset button.
Call functions
In-call options
Adjusting the volume
To adjust the volume while in a call:
Press the upper volume key to increase the volume, and the lower volume key to decrease the volume.
Putting a call on hold
To put a call on hold, tap Hold or Menu > Hold.
To unhold the call, tap Unhold or Menu > Unhold.

TIP: When you have the headset connected to your Toshiba phone, you can place a call on hold by pressing the headset button.
To unhold the call, press the button again.
Muting a call
To mute a call, tap Mute or Menu > Mute.
To unmute the call, tap Unmute or Menu > Unmute.
Putting a call on speakerphone
To put a call on speakerphone, press and hold the Send key or tap Menu > Turn Speakerphone On.
To switch the speakerphone off, press and hold the Send key or tap Menu > Turn Speakerphone Off.

NOTE: The speakerphone is automatically switched off at the end of a call.
Putting a call on hands-free
To put a call on hands-free:
When hands-free equipment is attached to your Toshiba phone, the item Menu > Turn Hands-free On will be enabled.
Making a second call
To make a second call while already in a call:
- Tap Hold or Menu > Hold to put the first call on hold.
- Dial the second number, then press the Send key. The first call will remain on hold.
Answering or ignoring a second call
- To answer a second call, press the Send key or tap Answer. The original call will be put on hold.
- To ignore a second call, press the End key or tap Ignore.

NOTE: To interact with a second call, you need to have Call Waiting enabled. For information on enabling Call Waiting, see Call Waiting in Settings.
Call functions
Swapping between calls
To swap between calls, press the Send key, or tap Swap or Menu > Swap.
Creating a conference call
To create a conference call:
With two calls active on your Toshiba phone, one active and the other on hold, tap Menu >
Conference. The calls will be joined together, and each party will be able to hear the other.

NOTE: The conference call feature is dependent on your service provider supporting it.
Adding a party to a conference call
To add another party to a conference call:
- Tap Hold or Menu > Hold to put the conference call on hold.
- Dial the number for the new party, then press the Send key.
- When the new party has answered, tap Menu > Conference.
Having a private conversation with a conference call party
To have a private conversation with a conference call party, you need to split the conference call.
To have a private conversation from a conference call:
- Tap Menu > Private.
- Scroll to the party with whom you wish to have the private conversation, then tap Private.
Creating a note
You can create a note from the Phone screen during or after a call. The note will be saved as an attachment to the call in the Call History.
To create a note:
- While in a call, tap Note.
- Add the required information to the note.
- Tap ok when you have finished.
For more information about Notes, see Notes in Applications and multimedia.
Call functions
Video telephony
Video calls allow you to enjoy live ‘face-to-face’ conversations with friends, family and colleagues.

NOTE: Before making a video call, you will need to confirm that the person you are calling has a phone enabled for video telephony.
Making a video call from the Phone screen
To make a video call from the Phone screen:
- From the Today screen, press the Send key or tap Start > Phone.
- Enter a phone number using the numeric keypad.
- Tap the video call icon.
Making a video call from Contacts
To make a video call from Contacts:
- From the Today screen, tap Contacts or Start > Contacts.
- Tap and hold the required contact until the pop-up menu is displayed.
- Tap Video Call.
Making a video call from Call History
To make a video call from the Call History:
- From the Today screen, press the Send key or tap Start > Phone.
- Tap Hide Keypad.
- Tap Call History.
- Tap and hold the required entry until the pop-up menu is displayed.
- Tap Video Call.
Answering or ignoring a video call
- To answer an incoming video call, press the Send key or tap Answer.
- To ignore an incoming video call, press the End key or tap Ignore.
Blocking video sending
To block sending of video during a video call: While in a video call, tap Options > Block Video. The other party will see a blank image.
Tap Options > Unblock Video to start sending video again.
Call functions
Sharing images and videos
To share an image or video during a video call:
- Tap Options > Share Image/Share Video.
- Tap the required image or video.
Tap Options > Stop Sharing to stop sending the image.
Recording video
To record the video received or sent during a video call, tap Options > Recording > Record Incoming Video/Record Outgoing Video.
Tap Options > Recording > Stop Recording to stop recording the video.
Call History
Call History displays a list of calls that you have missed, received and dialled recently.
Viewing Call History
To view the Call History:
- From the Today screen, press the Send key or tap Start > Phone.
- Tap Hide Keypad.
- Tap Call History.
- If required, you can filter the list by tapping Menu > Filter > Missed/Outgoing/Incoming.
- To view the details of a call, tap the required call.
Creating a contact from Call History
For details of how to create a contact from Call History, see Creating a new contact in Applications and multimedia.
Deleting a call from Call History
To delete a call from the Call History:
- From the Today screen, press the Send key or tap Start > Phone.
- Tap Hide Keypad.
Call functions
-
Tap Call History.
-
Scroll to the required entry in the list, then tap Menu > Delete.
-
Tap Yes to confirm the deletion.
Deleting all calls from Call History
To delete all calls from the Call History:
- From the Today screen, press the Send key or tap Start > Phone.
- Tap Hide Keypad.
- Tap Call History.
- Tap Menu > Delete All Calls.
- Tap Yes to confirm the deletion.

NOTE: Deleting all calls from the Call History does not reset the Call Timers. These need to be reset separately (see Resetting Call Timers).
Viewing Call Timers
To view Call Timers:
- From the Today screen, press the Send key or tap Start > Phone.
- Tap Hide Keypad.
- Tap Call History.
- Tap Menu > Call Timers...

NOTE: The length of waiting calls is not recorded.
Resetting Call Timers
To reset Call Timers:
- From the Today screen, press the Send key or tap Start > Phone.
- Tap Hide Keypad.
- Tap Call History.
- Tap Menu > Call Timers...
- Tap Reset.
Messaging
This chapter describes how you can create, send, receive, organise, delete and store the following message types on your Toshiba phone:
- Text messages (SMS, Short Message Service)
• Multimedia messages (MMS)
• E - m a i l
You can also use Windows Live for instant messaging with Windows Live Messenger and to access Hotmail.
Text messages
Text messaging, or the Short Message Service (SMS), enables you to exchange text messages with other phones. For details on text messages, contact your service provider.
For information on setting up your text message service centre, refer to Viewing and editing text messages service centre in Settings.
Your Toshiba phone supports the sending of more than the standard 160-character limit. If you enter more than 160 characters, the message is split into linked text messages. These linked messages will be sent at the same time.
Creating and sending a text message (SMS)
To create and send a text message:
- From the Today screen, tap Start > Messaging.
- Tap Text Messages.
- Tap Menu > New > SMS.
- With the cursor in the To: field, add recipient(s) using one or more of the following methods:
- Press the Action key, then tap a recipient from the list of contacts.
Messaging
- Tap Menu > Add Recipient..., then tap a recipient from the list of contacts.
- Enter the first few letters of a name stored in Contacts, then tap Menu > Check Names. If several matches are displayed, select the required one.
-
Enter mobile phone number(s) in the To: field. Use a semicolon to separate multiple recipients.
-
Scroll to the message area and enter your message.

TIP: To save time by inserting predefined text:
- Tap Menu > My Text.
- Select the text to insert.
You can also edit existing My Text items as required.

TIP: To check spelling before sending the message, tap Menu > Spell Check.
- Tap Send.

TIP: To delete the message without sending it, tap Menu > Cancel Message.
Saving a message as a draft
To save a message as a draft: From the message creation screen, tap Menu > Save to Drafts.
Requesting delivery notification
To request a delivery notification:
- From the message creation screen, tap Menu > Message Options....
- Press the Action key to tick the Request message delivery notification checkbox.
- Tap ok.
Receiving text messages
Text messages are automatically received when your Toshiba phone is switched on. When your phone is off, messages are held by your service provider until the next time your phone is connected to the network.
Your Toshiba phone will alert you when a new text message arrives.
Messaging
Replying to a message
To reply to a message:
- From an open message, tap Reply. If you are replying to multiple recipients, tap Menu > Reply > Reply All.
- Enter your message.
- Tap Send.
Forwarding a message
To forward a message:
- From an open message, tap Menu > Reply > Forward.
- Add recipient(s). For details of how to add a recipient, refer to Creating and sending a text message (SMS).
- If required, edit the message in the message area.
- Tap Send.
Deleting messages
To delete a message:
- From the Today screen, tap Start > Messaging.
- Tap Text Messages.
- Scroll to the message to delete, then tap Delete.
MMS messages
The Multimedia Messaging Service (MMS) enables you to exchange multimedia messages containing data such as text, pictures, sounds, animation and video clips. You can send MMS messages to other mobile phones or to e-mail addresses. For details of MMS, and to enable your account for this service, contact your service provider.
Configuring MMS settings
If your Toshiba phone has not been preconfigured, you will need to manually enter the details of the MMS account. These details are available from your service provider.
To configure MMS settings:
- From the Today screen, tap Start > Messaging.
- Tap Text Messages.
- Tap Menu > MMS Options...
- Tap the Servers tab.
- Tap New.
- Enter the following MMSC details:
- Server name: - enter a descriptive name, such as the name of your service provider.
Messaging
- Gateway: - enter the WAP gateway to be used for this connection.
- Port number: - enter the HTTP port number for connecting to the MMS server and for file transfer.
- Server address: - enter the URL address of the MMS server.
- Connect via: - select the connection point for the MMS server. This is typically The Internet.
- Send limit: - select the maximum MMS message size permitted by your service provider.
7. Tap Done.

TIP: If you have several MMS providers, you can set one as the default. To do this, scroll to the required MMSC entry, then tap Set as Default. A red arrow mark is displayed next to the default MMSC entry.
Creating an MMS message
An MMS message can consist of many pages, also known as 'slides'. Each slide can hold an image, a sound and text, but you do not need to set all of these for each message. The maximum amount of content that can be sent in a message is set by your service provider.
To create an MMS message:
- From the Today screen, tap Start > Messaging.
- Tap Text Messages.
- Tap Menu > New > MMS.
- With the cursor in the To: field, add recipient(s) using one or more of the following methods:
- Press the Action key, then tap a rec the list of contacts.
- Tap Menu > Add Recipient > From Contacts.../From Call History..., then tap a recipient.
-
Enter mobile phone number(s) in the To: field. Use a semicolon to separate multiple recipients.
-
Enter a subject for the message in the Subject: field if required.
-
Enter a message.
-
Tap Send when the message is ready.

TIP: To preview the message before sending, tap the Play icon.

TIP: To delete the message without sending it, tap Menu > Cancel Message.
Messaging
Inserting a picture or video
To insert a picture or video in the message:
- Scroll to the Insert picture/video area, then press the Action key. A preview of all pictures and videos in the current folder is displayed.
- Either select one of the previewed pictures or launch the Camera application and capture a new picture or video. Once you have selected a picture or video, the message creation screen is displayed again.

NOTE: If you add a video to a slide, you cannot add any further audio to that slide.

TIP: You can also insert a picture or video from the message creation screen by tapping Menu > Insert > Picture/Video...
Inserting text
To insert text in the message:
- Scroll to the Insert text here area, then press the Action key.
- Enter text. To insert predefined text, tap Menu > Insert My Text...
- Tap Done when you have finished inserting text.

TIP: You can also insert text from the message creation screen by tapping Menu > Insert > Text...
Inserting audio
To insert audio in the message:
- Scroll to the Insert audio area, then press the Action key. A list of all audio files in the current folder is displayed.
- Select one of the audio files.

TIP: You can also insert audio from the message creation screen by tapping Menu > Insert > Audio...
Using and creating templates
To use or create a template:
From the message creation screen, tap Menu > Template. Tap Select a Template... to select a template to use for a new MMS message, or Save as Template to save the current MMS message as a template for future use.
Messaging
Selecting a message background colour
To select a background colour for the message:
-
From the message creation screen, tap Menu > Options > Background. A list of colours is displayed.
-
Tap the required colour.
Additional MMS message options
You can add recipient(s) in copy (Cc:) or blind copy (Bcc:) to your message.

TIP: Scroll up to view the Cc: and Bcc: fields.
You can also set the priority of the message, a delivery time delay for the sending of the message, an expiry time for the message, and request delivery and read reports.
To set these options, from the message creation screen, tap Menu > Options > Send Options..., then set the options as required.
Receiving MMS messages
Your Toshiba phone will alert you when a new MMS message arrives. Depending on your settings, the message contents may download a few moments later, when the message will be ready to view in your Inbox.
Messaging
Before you can send or receive e-mails, you need to set up an e-mail account. Your Toshiba phone supports the following types of e-mail accounts:
- Internet e-mail (POP3/IMAP).
• Exchange server (Outlook).
Setting up an e-mail account automatically
To set up an e-mail account automatically:
- From the Today screen, tap Start > Messaging.
- Tap Setup E-mail.
- In the E-mail address: field, enter the e-mail address for this account.
- Enter a password in the Password: field.

TIP: Choose a strong password - strengthen the security of your password by selecting a combination of alphabet and numeric characters.
- Tick the Save password checkbox if you wish to save your password to your Toshiba phone. This will mean that you do not need to enter it each time you connect to your e-mail server.
This may or may not be required by your internet service provider (ISP).

WARNING: If you save your password and then lose your Toshiba phone, you run the risk of someone else being able to access your e-mail account.
- Tap Next.
- Tick the Try to get email settings automatically from the Internet checkbox.
- Tap Next.
If the account has set up successfully, you are prompted to send and receive e-mail.
If the account has not set up successfully, you will need to set up the account manually, as described in the following section.
Setting up an e-mail account manually
If you need to manually enter the details of an e-mail account, you may need to obtain some of these details from your ISP.
- From the Today screen, tap Start > Messaging.
- Tap Setup E-mail.
Messaging
- In the E-mail address: field, enter the e-mail address for this account.
- Enter a password in the Password: field.

TIP: Choose a strong password - strengthen the security of your password by selecting a combination of alphabet and numeric characters.
- Tick the Save password checkbox if you wish to save your password to your Toshiba phone. This will mean that you do not need to enter it each time you connect to your e-mail server. This may or may not be required by your internet service provider (ISP).

WARNING: If you save your password and then lose your Toshiba phone, you run the risk of someone else being able to access your e-mail account.
- Tap Next.
- Select the required option in the Your e-mail provider: field, then tap Next.
- Enter the name that you want displayed when you send e-mail in the Your name: field.
-
Enter a unique name for this account in the Account display name: field, then tap Next. This name cannot be changed later.
-
Enter the name of the incoming server in the Incoming mail server: field.
- Select the server type that hosts your e-mail mailbox in the Account type: list (POP3 or IMAP4), then tap Next.
- Enter the user name assigned to you by your ISP or network administrator in the User name: field. This is usually the first part of your e-mail address, before the '@' sign.
13.Enter a password in the Password: field. - Tick the Save password checkbox if you wish to save your password to your Toshiba phone.
- Tap Next.
- Enter the name of the outgoing server in the Outgoing (SMTP) mail server: field.
- Tick the Outgoing server requires authentication checkbox if the outgoing server requires authentication. This authentication will use the user name and password that you have already entered.
- Tick the Use the same user name and password for sending e-mail checkbox if required.
- Tap the Advanced Server Settings link to set the following additional settings if required.
Messaging
Tick the checkboxes if you wish to enable SSL connection.

IMPORTANT: SSL connection enables you to send and/or receive personal information more securely. If you select one or both of these options and your ISP does not support SSL connection, you will not be able to send and/or receive e-mail.
The Network connection: field enables you to select the network to which your e-mail server connects.
Tap Done when you have finished.
20.Tap Next.
- Select the frequency with which to send and receive your e-mail in the Automatic Send/Receive: field.
- Tap the Review all download settings link to set the following additional settings if required:
The Download messages: field enables you to set the time range for downloading messages from the server.
Tap Advanced Settings to edit additional settings for sending, receiving and deleting e-mails if required.
Tap Done, then Next when you have finished.
- Select the format for sending messages (HTML or Plain Text) in the Message format: field.
- Select the download size limitation in the Message download limit: field.
- Tap Finish.
Creating an e-mail
To create an e-mail:
- From the Today screen, tap Start > Messaging.
- Tap the e-mail account to use.
- Tap Menu > New.
-
With the cursor in the To: field, add recipient(s) using one or more of the following methods:
-
Press the Action key, then tap a recipient from the list of contacts.
- Tap Menu > Add Recipient..., then tap a recipient from the list of contacts.
- Enter the first few letters of a name stored in Contacts, then tap Menu > Check Names. If several matches are displayed, select the required one.
- Enter e-mail address(es) in the To: field. Use a semicolon to separate multiple recipients.
Messaging
- Add recipients in the Cc: and/or Bcc: fields if required.

TIP: Scroll up to view the Cc: and Bcc: fields.
-
Enter a subject for the e-mail in the Subject: field if required.
-
Scroll to the message area and enter your message.

TIP: To save time by inserting predefined text:
-
Tap Menu > My Text.
-
Select the text to insert.
You can also edit existing My Text items as required.

TIP: To check spelling before sending the message, tap Menu > Spell Check.

TIP: To set the priority of the e-mail:
-
Tap Menu > Message Options...
-
Select the required option in the Priority: field.
-
Tap Send when the message is ready. E-mails are stored in your Outbox and are sent to recipients the next time you synchronise or connect to your e-mail server.

TIP: To delete the message without sending it, tap Menu > Cancel Message.
Adding an attachment to an e-mail
To add an attachment to an e-mail:
-
Tap Menu > Insert > Picture/Voice Note/File.
-
Select the item to add.
Digitally signing an e-mail
Digitally signing an e-mail applies your certificate with the public key to the e-mail. This provides the recipient with proof that the e-mail is from you and not an imposter, and that it has not been altered.
To digitally sign an e-mail:
-
Tap Menu > Message Options...
-
In the Security: field, select the required security function.

NOTE: S/MIME encryption and digital signatures for Windows Mobile-based devices are available only with Exchange Server 2003 Service Pack 2 or a later version that supports S/MIME. If you are not using one of these products, or have not yet synchronised, these options will not be available.
Messaging
Sending and receiving e-mail
To send and receive e-mail:
- From the Today screen, tap Start > Messaging.
- Tap the required e-mail account.
- Tap Menu > Send/Receive. Your Toshiba phone connects to your Internet e-mail server and sends and receives your messages.

TIP: To stop this process, tap Menu > Stop Send/Receive.
Downloading a complete e-mail
To download a complete e-mail:
- From the Today screen, tap Start > Messaging.
- Tap the required e-mail account.
- Scroll to the required e-mail, then tap Menu > Download Message. The complete message is retrieved the next time you synchronise or connect to your e-mail server to send/receive e-mail.
Downloading an e-mail attachment
To download an e-mail attachment:
From an open message with an attachment, select the attachment. The attachment is downloaded the next time you synchronise or connect to your e-mail server to send/receive e-mail.
Viewing an attachment
To view an attachment:
In an open message containing a downloaded attachment, select the attachment.
Messaging
General messaging options
You can customise the options for your Messaging accounts, message options, addressing, and message storage.
To access the Messaging options:
- From the Today screen, tap Start > Messaging.
- Scroll to an account, then tap Menu > Options.
- Customise the following options as required:
- Accounts tab - Enables you to change the settings for each messaging account. For example, tap Text Messages to change the Request delivery notifications and Use Unicode when necessary settings as required.
Tap New account... to set up a new messaging account.
Tick the Display account picker when opening Messaging checkbox if you would like to select the messaging account each time you open Messaging.
- Message tab - Enables you to change options for sending and deleting messages.
- Address tab - Enables you to select whether to check Contacts as well as any online address books for e-mail addresses.
You can also add online address books and select which ones to use for e-mail address checking.
- Storage tab - Enables you to check the memory space of your phone, storage card and attachments. You can also select whether to store attachments on a storage card, and specify how deleted items are emptied.
Switching between messaging accounts
You can switch between Text Messages, MMS or any e-mail account.
To switch between messaging accounts:
-
From any Messaging folder, tap Menu > Go To.
-
Tap the required account.
Messaging
Switching between messaging folders
For each Messaging account, you can switch between the Deleted Items, Drafts, Inbox, Outbox and Sent Items folders.
To switch between messaging folders:
-
From any Messaging folder, tap Menu > Go To > Folders...
-
Tap the folder that you want to view.
Inserting a signature
For each Messaging account, you can specify a signature to be automatically inserted into messages that you send.
To create a signature and insert it in messages:
- From the Today screen, tap Start > Messaging.
- Scroll to an account, then tap Menu > Options.
- On the Accounts tab, tap Signatures...
- In the Select an account: field, select the account for which you are creating the signature.
- Tick the Use signature with this account checkbox.
- To insert a signature in every message you send, tick the Use when replying and forwarding checkbox. If this checkbox is not ticked, the signature is inserted in new messages only.
- Enter the signature.
- Tap ok twice.
Text input
Input methods
Your Toshiba phone enables you to enter information in three different ways:
- Typing - Using the Input Panel.
- Writing - Using the stylus, writing directly on the screen.
- Drawing - Using the stylus, drawing directly on the screen.
The Input Panel provides various input methods, including Block Recognizer, Keyboard, Letter Recognizer and Transcriber.
The Input Panel icon is displayed on the command bar when text input is possible.
To open the Input Panel, tap the Input Panel icon. You can then tap the arrow beside the icon to select other input methods.
When you begin entering a word using any of the input methods except Transcriber, your Toshiba phone will suggest possible words. Tap on one of the suggested words to enter it.
Your Toshiba phone will learn words as you use them. They will then be used as suggested words in the future.
Block Recognizer
With Block Recognizer, you use a single stroke to write individual letters, numbers and punctuation, which are then converted into typed text.
To use Block Recognizer, tap the Input Panel selector arrow, then tap Block Recognizer.
The handwriting area is divided into two designated parts: abc and 123.
Write characters, numbers, symbols and punctuation in the separate areas:
- Write in the abc area to enter lower case letters.
- Write in the 123 area to enter numbers.
- Tap the button in the bottom right corner labelled '@\$*' to open the table of symbols and punctuation.

NOTE: Block Recognizer is available when text entry is possible.

TIP: For help with using Block Recognizer, tap ? in the right corner to see a demo.
Text input
Keyboard
With the on-screen keyboard, you use the stylus to tap on the keyboard to enter characters.

TIP: Tap áü to enter miscellaneous letters and symbols.
To use Keyboard, tap the Input Panel selector arrow, then tap Keyboard.
To set the Keyboard options:
- Tap the Input Panel selector arrow, then tap Options...
- In the Input method: field, tap Keyboard.
- Select the required options by:
- tapping Large keys or Small keys to select the size of the buttons on the keyboard.
- ticking the Use ges keys: checkbox to enable gesture commands.
Letter Recognizer
With Letter Recognizer, you can write individual letters, numbers and punctuation, which are then converted into typed text.
To use Letter Recognizer, tap the Input Panel selector arrow, then tap Letter Recognizer.
The handwriting area is divided into three designated parts: ABC, abc and 123.
Write characters, numbers, symbols, and punctuation in the separate areas:
- Write in the ABC area to enter upper case letters.
- Write in the abc area to enter lower case letters.
- Write in the 123 area to enter numbers.
- Tap the button in the bottom right corner labelled '@\$*' to open the table of symbols and punctuation.

NOTE: Letter Recognizer is available when text entry is possible.

TIP: For help with using Letter Recognizer, tap ? in the right corner to see a demo.
Text input
Input Options
To set the input options:
- Tap the Input Panel selector arrow, then tap Options...
- Tap the Word Completion tab to change the settings for suggested words and automatic correction.
- Tap the Options tab to change the general input settings, including zoom levels and capitalisation.
- Tap ok when you have finished.
TIP: You can also access the input options from the Today screen by tapping Start > Settings > Input.
Transcriber
Transcriber is a handwriting recognition program that enables you to write in cursive, print, or a combination of both.
Transcriber enables you to write anywhere on the screen using the stylus, just as you would write on paper. Unlike Block Recognizer and Letter
Recognizer, you can write entire sentences. When you pause, Transcriber will convert the written text to typed text.
Transcriber works transparently in the background, recognising words with its integrated dictionary.
When Transcriber is active, it interprets stylus movement anywhere on the screen as handwriting input.
Text input
Starting Transcriber
Because Transcriber works transparently in the background of applications that accept text input, you need to have one of these programs open to use Transcriber.
To start Transcriber:
- Start an application such as Word Mobile.
- Tap the Input Panel selector arrow, then tap Transcriber. The Transcriber Intro screen will be displayed.

TIP: To stop the Transcriber Intro screen being displayed each time you use start Transcriber, tick the Don't show this checkbox, then tap ok.
Showing and hiding the Transcriber toolbar
The Transcriber toolbar provides easy access to several tools, as well as Enter, Space, and Backspace buttons, and left and right arrow buttons. It is displayed at the bottom of the screen when Transcriber is active.
To show or hide the Transcriber toolbar, tap the Transcriber icon at the bottom of the screen.
Text input
Transcriber toolbar functions
| Toolbar icon | Description |
| Displays theTranscriber: Optionsscreen. From here, you can set options such asWriting Direction:, pen settings, Shorthand and Dictionaries. | |
| Displays theLetter Shapesscreen. This screen enables you to set your personal writing styles to maximise recognition. | |
| Displays the on-screen keyboard. This enables you to quickly enter numbers, punctuation, and other symbols. | |
| a | Toggles between the following character recognition modes:a - default mode for optimum handwriting recognition.123 - numbers and some letters are allowed.A - all letters are converted to upper case.FromAand123modes, recognition returns automatically to the default (a) mode when you lift the stylus. |
| spc | Inserts a space at the cursor. Equivalent to the Space key on a keyboard. |
| Inserts a paragraph return at the cursor. Equivalent to the Enter key on a keyboard. | |
| Moves the cursor one space to the left. | |
| Moves the cursor one space to the right. | |
| Moves the cursor one space back and erases any text. Equivalent to the Backspace key on a keyboard. |
Text input
| Toolbar icon | Description |
 | Displays the Overview of Microsoft Transcriber. |
Using the Transcriber keyboard
Transcriber comes with an on-screen keyboard that provides an easy way to add punctuation or a special symbol to existing text.
To access the Transcriber keyboard:
Tap the keyboard button on the Transcriber toolbar. The keyboard is displayed until you tap the keyboard button again.

TIP: To reposition the keyboard, tap and hold the top bar, then drag it to the desired location.

TIP: When no text is selected, you can open the keyboard by doing the gesture.
Writing with Transcriber
To write with Transcriber:
- Position the cursor where you want to enter text.
- Using the stylus, write on the screen. The handwriting will be converted to text after you lift the stylus from the screen.
Editing text with Transcriber
To edit text with Transcriber:
- Draw a line across the text you want to edit. After you lift the stylus from the screen, the line will disappear and the selected text will be highlighted.
- Do one of the following:
- Rewrite the text.
- Use gestures to capitalise letters, insert a space, etc.
Using gestures in Transcriber
To use gestures in Transcriber:
Use quick strokes of the stylus to edit your text. Do the Enter, Space, and Tab gestures while writing text to insert returns, spaces, or tabs.
Available gestures are described in the following table.
Text input
| Name Action Description | ||
| Enter Inserts | a paragraph | return at the cursor.The horizontal portion of this gesture must be at least two times longer than the vertical portion. |
| Space Insert |   | the cursor.The horizontal portion of this gesture must be at least two times longer than the vertical portion. |
| Backspace | Moves the cursor one space back and erases any text. | Do this gesture by drawing a line from right to left. |
| Words Opens | the menu | of alternate words if a word is selected, or the on-screenTranscriberkeyboard if no text is selected.Do this gesture by drawing a line straight down and back up. |
| Caps Chang |   | alisation of a selected letter, word, or block of text.Do this gesture by drawing a line straight up. |
Undo To undo the last action | Do this gesture by drawing a line straight up and back down. | |
| Cut Cuts the selected text. | Do this gesture by drawing a line from right to left and back. | |
| Copy Copies the selected text.Do this gesture by drawing a line from left to right and back. | ||
Text input
| Name Action Description | ||
Paste Pastes cut or copied text. | Do this gesture by drawing a line from the lower left of the screen diagonally up toward the right and back down to the right. | |
| Tab Inserts a tab. | The horizontal portion of this gesture must be at least two times longer than the vertical portion. | |
Optimising handwriting recognition for Transcriber
If Transcriber does not recognise your handwriting as accurately or quickly as you would like, there are some things you can do to optimise handwriting recognition.
- Select the Writing Direction: picture that best matches the slant of your handwriting.
- Use Letter Shapes to eliminate letter shapes that you do not use or to learn methods of writing characters that will make them easier for Transcriber to recognise.
- Try writing in another format. If you have been printing, try writing cursive, or if you have been writing in both cursive and print, try printing alone.
- Adjust the speed at which Transcriber returns text after you write.
- Add a user dictionary that contains special terms you may be using, such as medical or legal terms.
- Verify that you are using your Letter Shapes user profile.
Text input
Drawing and writing on the screen
With your Toshiba phone, you can draw directly on the screen, write on the screen, and save notes in your own handwriting. To do this, you must first set the input mode in Notes to Writing. If you prefer to use handwriting or frequently add drawings to your notes, you may find it helpful to set Writing as the default input mode. If you prefer typed text, set Typing as the default input mode.
To set the input mode for Notes:
- Tap Start > Programs > Notes.
- Tap Menu > Options...
- In the Default mode: field, select one of the following:
- Writing - if you want to draw or enter handwritten text in a note.
-
Typing - if you want to create a typed note.
-
Tap ok.
To hand write a note:
- Tap Start > Programs > Notes.
- Tap New.
- Tap Menu, and make sure that Draw is ticked.
- Write text on the screen.
- Tap ok when you have finished.

NOTE: If a letter crosses three or more ruled lines, it is treated as a drawing rather than text.
To draw on the screen using the stylus:
- Tap Start > Programs > Notes.
- Tap New.
- Tap Menu, and make sure that Draw is ticked.
- Using the stylus, draw over at least three ruled lines. A box labelled Drawing is displayed around the drawing.
- Tap ok when you have finished.

TIP: To select a drawing (for example, to copy or delete it), tap and hold the drawing briefly. When you lift the stylus, the drawing is selected.
Text input
Full Screen Keyboard
Full Screen Keyboard enables you to enter text from a full screen keyboard that has keys large enough to be typed with your fingertips. Since the keyboard can be operated with both hands, it is convenient for entering large amounts of text.
To use Full Screen Keyboard:
-
Tap the Input Panel selector arrow, then tap Full Screen Keyboard.
-
Tap the keyboard icon. The Full Screen Keyboard is displayed.
-
Enter text.
-
Tap the keyboard icon when you have finished. You can configure Full Screen Keyboard to your own requirements and preferences. Items that you can configure include the keyboard skin, character repeat settings, sounds, auto correction settings and dictionaries.
To configure Full Screen Keyboard:
- Tap the Input Panel selector arrow, then tap Options...
- In the Input method: field, tap Full Screen Keyboard.
- Tap Options...
- Select the required options, then tap ok twice.
Applications and multimedia
The following items are available from the Start menu of your Toshiba phone:
- Office Mobile
- Calendar
- Contacts
- Internet Explorer
- Games
• TOSHIBA User Interface
- ActiveSync
• A-GPS
- AutoConfig
- Autolnstall
- BlackList
- Calculator
- Camera
• Certificate Enrollment
- File Explorer
• FM Radio
• Full Screen Keyboard
- Getting Started
• Home
- Image Editor
- Image To Text
- Internet Sharing
- JBlend
- Messenger
- Notes
- Picsel Viewer
- Pictures & Videos
- Search
- SIM Toolkit
- Streaming Player
- Task Manager
- Tasks
- Windows Live
- Windows Media
Applications and multimedia
Office Mobile
To access Office Mobile on your Toshiba phone:
- From the Today screen, tap Start > Office Mobile.
-
Select one of the following applications:
-
Excel Mobile
- OneNote Mobile
- PowerPoint Mobile
- Word Mobile
Excel Mobile
With Excel Mobile you can work on spreadsheets in the same way as on a PC. You can create new spreadsheets and charts, and open and edit workbooks created on a PC.

NOTE: Excel Mobile does not fully support some features. Refer to the Microsoft website for details.

NOTE: Some data and formatting may be lost when you save a workbook created on a PC to your Toshiba phone. Refer to the Microsoft website for details.
OneNote Mobile
With OneNote Mobile, you can gather notes and information in one place.
Notes in OneNote Mobile can contain text, images and voice recordings. You can also synchronise the notes with OneNote on a PC using ActiveSync.
PowerPoint Mobile
With PowerPoint Mobile, slide show presentations created on your PC can be opened and viewed on your Toshiba phone.
Slide shows created in *.ppt and *.pps format with PowerPoint '97 and later are supported.
Many presentation elements built into the slide shows, such as slide transitions and animations, will play back on your Toshiba phone. If the presentation is set up as a timed slide show, one slide will advance to the next automatically. Links to URLs are also supported.

NOTE: PowerPoint Mobile does not fully support some features. Refer to the Microsoft website for details.
Applications and multimedia
Word Mobile
With Word Mobile you can work on documents in the same way as on a PC. You can create new documents and templates, and open and edit documents created on a PC.

NOTE: Word Mobile does not fully support some features. Refer to the Microsoft website for details.

NOTE: Some data and formatting may be lost when you save the document on your Toshiba phone. Refer to the Microsoft website for details.
Calendar
The Calendar application works like an electronic diary. You can keep track of your appointments, including meetings and other events.
You can display reminders on your Toshiba phone, as well as synchronising your phone with Outlook on your PC.
Scheduling an appointment
To schedule a new appointment:
- From the Today screen, tap Start > Calendar.
- Tap Menu > New Appointment.
- Enter details of the appointment, then tap ok.

NOTE: All day events do not occupy blocks of time in the Calendar - instead they are displayed as banners at the top of the Calendar.
Sending a meeting request
You can use the Calendar application to schedule meetings via e-mail with contacts who use Microsoft Outlook or Outlook Mobile.
To send a meeting request:
- From the Today screen, tap Start > Calendar.
Applications and multimedia
- Schedule a new appointment or open an existing one.
- Tap Menu > Edit.
- If the appointment is recurring, tap All.
- Tap the Attendees: field.
- Tap Add Required Attendee... or Add Optional Attendee... as required.
- Tap the contact to invite.
- Add more contacts if required.
- Tap ok or Done when you have finished adding attendees.
- Tap ok.
- Tap Yes to save the change and send the meeting request to the attendees. The meeting request will be sent to the attendees when you next synchronise your Toshiba phone with your PC.
NOTE: When attendees accept the meeting request, the meeting is automatically added to their schedules. When their responses are received, your calendar is updated.

Sending an appointment
You can send an appointment within an MMS message.
To send an appointment:
- From the Today screen, tap Start > Calendar.
- Tap the required appointment.
- Tap Menu > Send as vCalendar.
- Add a recipient to the message, then tap Send.
Updating an appointment
To update an appointment:
- From the Today screen, tap Start > Calendar.
- Tap the required appointment.
- Tap Menu > Edit.
- If the appointment is recurring, tap All to edit all occurrences, or tap One to edit only the next occurrence.
- Update the appointment details, then tap ok.
Applications and multimedia
Changing the default reminder time
By default, the reminder time is set to 15 minutes before an appointment.
To change the default reminder time:
- From the Today screen, tap Start > Calendar.
- Tap Menu > Tools > Options...
- Tap the Appointments tab.
- Make sure that the Set reminders for new items checkbox is ticked, then change the reminder time.
- Tap ok.
Deleting an appointment
To delete an appointment:
- From the Today screen, tap Start > Calendar.
- Tap the required appointment.
- Tap Menu > Delete.
- If the appointment is recurring, tap All to delete all occurrences, or tap One to delete only the next occurrence.

NOTE: If an appointment that has been synchronised with your PC is deleted, it will be deleted on the PC the next time you synchronise.
Changing the work week display
To change the work week display:
- From the Today screen, tap Start > Calendar.
- Tap Menu > Tools > Options...
- On the General tab, set the following as required:
- In the 1st day of week: field, select Sunday or Monday as required.
- In the Week view: field, select 5-day week, 6-day week or 7-day week as required.
- Tap ok when you have finished.
Viewing today's agenda
To view today's agenda:
- From the Today screen, tap Start > Calendar > Menu > Go to Today or
- From Day, Week, Month or Year view, tap Menu > View > Agenda or Agenda.

TIP: To view past or future dates, press the left and right navigation keys.
Applications and multimedia
Viewing your agenda for a specific date
To view your agenda for a specific date:
- From the Today screen, tap Start > Calendar.
- Tap Menu > Go to Date.
- Tap the required date.
Viewing your schedule for the next week
To view your schedule for the next week:
- From the Today screen, tap Start > Calendar.
- Tap Menu > View > Week.
Viewing your schedule for the next month
To view your schedule for the next month:
- From the Today screen, tap Start > Calendar.
- Tap Menu > View > Month.
Contacts
You can use the Contacts feature to store phone numbers, e-mail addresses, home addresses, and other information relating to a contact. You can also add a picture or assign a ring tone to a contact.
If you use Microsoft Outlook on a PC, you can synchronise contacts between your Toshiba phone and the PC.
Creating a new contact
To create a new contact:
- From the Today screen, tap Contacts or Start > Contacts.
- Tap New.
- Tap the contact type to create (Outlook Contact or SIM Contact). Outlook contacts are stored on your Toshiba phone.

NOTE: SIM contacts (except when using a USIM card) only support a single name and phone number. Contacts stored on a USIM card can include a name, three phone numbers and an e-mail address.

NOTE: If you move the SIM card to another phone, your SIM contacts are moved as well.
- Enter the details of the new contact.
Applications and multimedia
- Tap ok.

TIP: You can customise Outlook contacts by adding a picture or a ring tone to uniquely identify the person calling you.

TIP: If someone whose phone number isn't stored in Contacts calls you, you can create a contact for that person. To do this:
- From the Today screen, press the Send key or tap Start > Phone.
- Tap Hide Keypad.
- Tap Call History.
- Scroll to the required call, then tap Menu > Save to Contacts.
- Tap
. - Edit the details of the new contact as required, then tap Save.
Assigning phone numbers to a contact
You can assign a work phone number (w), mobile phone number (m) and home phone number (h) to a contact that is saved to the phone.
The mobile phone number is dialled by default.
For further information, refer to Making a call to a non-default number in Call functions.
Finding a contact
To find a contact by name:
- From the Today screen, tap Contacts or Start > Contacts.
- Tap the Enter a name... field.
- Enter the first letter of the name of the contact to find. Matching contacts will be listed.
To find a contact by company:
- From the Today screen, tap Contacts or Start > Contacts.
- Tap Menu > View By.
- Tap Company.
Viewing and editing a contact
To view and edit a contact:
- From the Today screen, tap Contacts or Start > Contacts.
- Tap the required contact.
- To edit the contact, tap Menu > Edit.
- Tap ok when you have finished.
To set the viewing filter:
- From the Today screen, tap Contacts or Start > Contacts.
- Tap Menu > Filter.
Applications and multimedia
- Tap the required filter item.

NOTE: To display all contacts again, tap Menu > Filter > All Contacts.
Adding a picture to a contact
To add a picture to a contact:
- From the Today screen, tap Contacts or Start > Contacts.
- Tap the required contact.
- Tap Menu > Edit.
- On the Details tab, tap Select a picture...
- Tap a picture, or tap Camera and capture a photograph.
- Tap ok twice.
Removing a picture from a contact
To remove a picture from a contact:
- From the Today screen, tap Contacts or Start > Contacts.
- Tap the required contact.
- Tap Menu > Edit.
- Tap Menu > Remove Picture.
- Tap Yes to confirm the removal.
- Tap ok.
Assigning a ring tone to a contact
To assign a ring tone to a contact:
- From the Today screen, tap Contacts or Start > Contacts.
- Tap the required contact.
- Tap Menu > Edit.
- On the Details tab, tap Ring tone:, then tap the required ring tone.
- Tap ok.
Assigning a category to a contact
You can use categories to help organise your contacts.
To assign a category to a contact:
- From the Today screen, tap Contacts or Start > Contacts.
- Tap the required contact.
- Tap Menu > Edit.
- On the Details tab, tap Categories:, then tap the required categories.

TIP: Tap New to create a new category.

TIP: You can assign more than one category to a contact.
Applications and multimedia
- Tap ok twice.

NOTE: Categories are shared between your appointments, Contacts, and Tasks.

NOTE: If you filter your list of contacts by a category, when you create a new contact, it will be automatically assigned to that category.
Copying contacts
To copy a phone contact to the SIM card:
- From the Today screen, tap Contacts or Start > Contacts.
- Tap the required contact.
- Tap Menu > Save to SIM.

NOTE: When copying phone contacts to a SIM card, only the supported fields will be copied.
To copy a SIM contact to the phone:
- From the Today screen, tap Contacts or Start > Contacts.
- Tap the required contact.
- Tap Menu > Save to Contacts.
To copy all phone contacts to the SIM card:
- From the Today screen, tap Contacts or Start
Contacts.
- Tap Menu > SIM > Copy all phone contacts to SIM.
To copy all SIM contacts to the phone:
- From the Today screen, tap Contacts or Start > Contacts.
- Tap Menu > SIM > Copy all SIM contacts to phone.
Deleting a contact
To delete a contact:
- From the Today screen, tap Contacts or Start > Contacts.
- Tap the required contact.
- Tap Menu > Delete Contact.
- Tap Yes to confirm the deletion.
Deleting all contacts
To delete all contacts from the phone:
- From the Today screen, tap Contacts or Start > Contacts.
- Tap Menu > SIM > Delete all phone contacts.
- Tap Yes to confirm the deletion.
Applications and multimedia
To delete all contacts from the SIM card:
- From the Today screen, tap Contacts or Start > Contacts.
- Tap Menu > SIM > Delete all SIM contacts.
- Tap Yes to confirm the deletion.
Sending contact information
You can send contact information in a text message or MMS message, or using Bluetooth.
To send contact information in a text message:
- From the Today screen, tap Contacts or Start > Contacts.
- Tap the required contact.
- Tap Menu > Send Contact > Text Messages.
- Select the specific information to send, then tap Done.
-
Add a recipient to the message, then tap Send. To send contact information in an MMS message:
-
From the Today screen, tap Contacts or Start > Contacts.
-
Tap the required contact.
-
Tap Menu > Send as vCard.
-
Add a recipient to the message, then tap Send.
For details of sending contact information using Bluetooth, refer to Beaming an item in
Connectivity.
Internet Explorer
Internet Explorer Mobile gives quick and easy access to searching using Live Search and web pages in your Favorites and History.
You can also type in an address to access other web pages.
Searching the Internet using Live Search
To search the Internet using Live Search:
- From the Today screen, tap Start > Internet Explorer.
- Enter a search term into the search field, then tap the search icon.
Accessing a web page
To access a web page:
- From the Today screen, tap Start > Internet Explorer.
- Tap Menu > Address Bar.
- Enter the address of the web page.
- Tap the icon to the right of the address bar (green arrow).
Applications and multimedia
Changing the text size of web pages
To change the text size of a web page:
- From a web page, tap Menu > View > Zoom Level.
- Tap the required size.
Showing or hiding pictures on web pages
To show or hide pictures on a web page: From a web page, tap Menu > View > Show Pictures.
Adding a web page to Favorites
To add a web page to Favorites:
- From a web page, tap Menu > Add to Favorites...
- Edit the details if required, then tap Add.

TIP: You can also add Favorites from your PC to your Toshiba phone using ActiveSync. For more information, see Microsoft ActiveSync Help on your PC.
Creating a folder in Favorites
To create a folder in Favorites:
- From the Today screen, tap Start > Internet Explorer.
- Tap Menu > Favorites...
- Tap the Add / Delete tab.
- Tap New Folder.
- Enter a name for the folder, then tap Add.
- Tap ok.
Accessing a web page from Favorites
To access a web page from Favorites:
- From the Today screen, tap Start > Internet Explorer.
- Tap Favorites.
- Tap the required web page in the list.

TIP: You can also select a web page from your Favorites by tapping Menu > Favorites...
Applications and multimedia
Deleting a web page from Favorites
To delete a web page from Favorites:
- From the Today screen, tap Start > Internet Explorer.
- Tap Menu > Favorites...
- Tap the Add / Delete tab.
- Tap the required web page, then tap Delete.
- Tap Yes to confirm the deletion.
- Tap ok.
Viewing the History
To view the History:
- From the Today screen, tap Start > Internet Explorer.
- Tap History.

TIP: You can also view the History by tapping Menu > Tools > History...

TIP: To access a web page from the History, tap the required page in the list.
Changing the home page
To change the home page:
- From a web page, tap Menu > Tools > Options...
- On the General tab, tap the required item for the Home page:
- Use Current - sets the currently displayed page as your home page.
-
Use Default - sets the default home page.
-
Tap ok.
Changing security settings and clearing cookies
Internet Explorer Mobile supports the protocols used by Secure Sockets Layer (SSL). A connection that uses SSL helps you to send personal information more safely.
Cookies are small files containing information about your identity and preferences so that a page can tailor information to your needs. The page sends the file, and it is stored on your Toshiba phone.
To change cookies and security settings:
- From the Today screen, tap Start > Internet Explorer.
- Tap Menu > Tools > Options...
Applications and multimedia
- Tap the Security tab.
- Tick the checkboxes for the required security options.
- Tap ok.
To clear cookies:
- From the Today screen, tap Start > Internet Explorer.
- Tap Menu > Tools > Options...
- Tap the Security tab.
- Tap Clear Cookies.
- Tap ok.
Clearing History and temporary files
When you use the Internet, your Toshiba phone stores data that uses up some of the storage capacity of the phone. You can delete these files to free up storage.
To clear History and temporary files:
- From the Today screen, tap Start > Internet Explorer.
- Tap Menu > Tools > Options...
- Tap the Memory tab.
-
Tap Clear History to delete web page links stored in the History.
-
Tap Delete Files to delete temporary internet files.
- Tap ok.
Sending a link
To send a link using Messaging:
- From a web page, tap Menu > Tools > Send Link...
- Select the Messaging account to use to send the link. A new message is created with the web page address in the body of the message.
- Add a recipient and edit the message if required.
- Tap Send.
Games
Your Toshiba phone comes preloaded with two games.
To access the games on your Toshiba phone:
- From the Today screen, tap Start > Programs.
- Tap Games.
- Tap the required game.
Applications and multimedia
TOSHIBA User Interface
This application enables you to quickly access all items of the Toshiba UI. For further information on the Toshiba UI, see TOSHIBA User Interface in Getting started.
ActiveSync
ActiveSync enables you to create a synchronisation relationship between your Toshiba phone and PC, and between your Toshiba phone and your Exchange server. This means that the shared data, such as contacts and tasks, is always consistent. If you make a change, it is automatically made to the corresponding information on the other computer. This is an effective way of keeping your data up-to-date.
The synchronisation relationship is created to manage the data that is copied between your Toshiba phone and PC.
You can connect your Toshiba phone to your PC using the USB cable or over a Bluetooth connection. You can also use ActiveSync to connect your Toshiba phone to other resources through your PC. However, you cannot synchronise remotely to a PC using a modem or network connection. You can connect to your Exchange server using a cellular connection, or you can connect your Toshiba phone to your PC as a way of connecting back to the Internet.
Applications and multimedia
Installing and setting up ActiveSync
You can either install ActiveSync from your Windows Mobile Getting Started CD or you can download a copy of ActiveSync from http://www.microsoft.com/windowsmobile/activesync/activesync45.mspx.
Once the software has been installed and your Toshiba phone is connected to your PC, the ActiveSync Setup Wizard is started. Simply follow the on-screen instructions.

NOTE: If you have a PC which is already fully synchronized with your Exchange server, you should synchronise your Toshiba phone with your PC rather than synchronising your Toshiba phone with the Exchange server. Data will be downloaded via your PC, saving you the charges for traffic volume. In addition, synchronising via your mobile phone network will take longer than it would with your local PC.
If you are not synchronising directly with a Microsoft Exchange server, do not select the option to synchronise directly with a server. The alternative is to synchronise your Toshiba phone with your PC. You cannot do both at the same time.
Changing ActiveSync settings
Once you have set up synchronisation using the ActiveSync Setup Wizard on the PC, you can change your synchronization settings at a later stage:
- If you want to change ActiveSync settings for synchronising with a PC, use ActiveSync on the PC. For more information, see ActiveSync Help on the PC.
- If you want to change ActiveSync settings for synchronising with an Exchange server, use ActiveSync on your Toshiba phone.

NOTE: Disconnect your Toshiba phone from your PC before changing the synchronisation settings.
Starting and stopping synchronisation
To start and stop synchronisation:
- From the Today screen, tap Start > Programs.
- Tap ActiveSync.
- To start synchronisation, tap Sync.
- To stop synchronisation, tap Stop.
Applications and multimedia
A-GPS
A-GPS enables you to regularly download updated GPS satellite data. This can improve the GPS performance.
Using A-GPS greatly reduces the time taken by your Toshiba phone to calculate its starting location when first switched on. There will also be improved performance in challenging environments, such as indoors and when surrounded by tall buildings or trees.
You can set A-GPS to automatically download updated GPS data, or you can manually update the data.
To access A-GPS:
- From the Today screen, tap Start > Programs.
- Tap A-GPS.
AutoConfig
For details of AutoConfig, refer to Auto Configurator in Getting started.
AutoInstall
AutoInstall enables you to easily install applications loaded on your Toshiba phone.
To install applications using AutoInstall:
- From the Today screen, tap Start > Programs.
- Tap AutoInstall.
- Tick the checkboxes for the applications to install. To select all applications, tap Menu > Select All.
- Tap Next.
- Tap Yes to confirm the installation.
- Tap ok when the installation is complete. You may need to restart your Toshiba phone for the changes to take effect.
Applications and multimedia
BlackList
BlackList enables you to allow or block incoming calls from particular contacts or groups. You can set specific times for allowing and blocking callers.
The blocked caller will receive a busy tone when they call you.
The default BlackList settings allow the following groups to call you:
- All - all callers.
- Unknown - callers with no caller ID.
- All Contacts - callers with a phone number that is stored in Contacts.
- Not in Contacts - callers with a phone number that is not stored in Contacts.
You can also disable or enable the BlackList service.
Allowing and blocking groups
To allow or block the default BlackList groups:
- From the Today screen, tap Start > Programs.
- Tap BlackList.
- Tap and hold the required group. The pop-up menu is displayed.
- Select the required action from the following:
- To allow the group, tap Set Action > Allow.
- To block the group, tap Set Action > Block.
- Tap ok.
Setting specific times
To set specific times for allowing or blocking a group:
- From the Today screen, tap Start > Programs.
- Tap BlackList.
- Tap and hold the required group.
- Tap Edit.
- In the Action: field, select whether to Allow or Block the group.
- Tick the Enable during set times checkbox.
- Select the days and times during which you want to allow or block the group.
- If you want to be notified when a call has been blocked, tick the Show notifications checkbox.
- Tap Save.
- Tap ok.
Adding a block
To add a new block:
- From the Today screen, tap Start > Programs.
- Tap BlackList.
Applications and multimedia
- Tap Menu > New.
- Tap the grey box in the top right corner.
- Select an existing contact or add a new contact to block.
- Edit the settings as required.
- Tap Save.
- Tap ok.
Deleting a block
To delete an existing block:
- From the Today screen, tap Start > Programs.
- Tap BlackList.
- Tap and hold the required group.
- Tap Delete.
- Tap ok.

TIP: You can only delete groups or contacts that you have added.
Disabling/Re-enabling BlackList
When you disable the BlackList service, all BlackList settings will be ignored.
To disable the BlackList service:
- From the Today screen, tap Start > Programs.
-
Tap BlackList.
-
Tap Menu > Disable Service.
-
Tap ok.
To re-enable the BlackList service:
- From the Today screen, tap Start > Programs.
- Tap BlackList.
- Tap Menu > Enable Service.
- Tap ok.
Calculator
To access the Calculator:
- From the Today screen, tap Start > Programs.
- Tap Calculator.
Use the Calculator buttons to enter numbers and perform calculations.
Applications and multimedia
Camera
Your Toshiba phone is equipped with a digital camera which can be used to capture photographs and video clips.
Starting the Camera
You can launch the Camera application using one of the following methods:
- From the Today screen, tap Start > Programs > Camera.
- Press the Camera key.
Capturing a photo
To capture a photo:
- Start the Camera.
- Aim the camera at the subject, then press the Action key or Camera key. A preview of the photo is displayed.
- Select the required action by tapping one of the following icons:
- t o s a v e t h Camera screen.
• -to send the photo in an e-mail.
- -to beam the photo to another device.
• to send the photo in an MMS message.

TIP: You can also send a photo in an MMS message by selecting MMS photo mode (☐) before capturing the photo.
- to delete the photo.
To capture a framed photo:
- Tap the mode icon ( ) until framed photo mode ( ) is displayed.
- To change the frame, tap the frame icon ( ) until the required frame is displayed.
- Capture the photo by pressing the Action key or Camera key.
Capturing a video
To capture a video:
- Start the Camera.
- Tap the mode icon until video mode (is displayed.
- Aim the camera at the subject, then press the Action key or Camera key to start recording the video.
- Press the Action key or Camera key to stop recording the video.
- Select the required action by tapping one of the icons (see Capturing a photo for details of the icons).
Applications and multimedia

TIP: You can send a video in an MMS message by selecting MMS video mode (before capturing the video.

TIP: You can capture a framed video by selecting framed video mode ( ) before capturing the video.
Main Camera screen
The following options are available from the main Camera screen:
- to select the required resolution for the photo or video. The default resolution is dependent on the Camera mode.

NOTE: Images of higher resolution (quality) will use more storage space.
-
- to activate/deactivate the Camera flash.
- set the storage location for photos and videos if you have a storage card installed.
- to exit the Camera application.
• + - t o z o o m i n . - to zoom out.
-
-to access the Camera settings. These settings include extra photo and video settings, as well as advanced settings such as colour effects and ambient light settings.
-
to access Pictures & Videos.
- -to use the front camera (for example, to take a self-portrait photograph).
- to use the rear camera (default).
Tips for using the camera
- Fingerprints or grease sticking to the lens may result in problems such as blurred pictures. If this happens, you should wipe the lens clean with a lens tissue.
- Try to maintain a steady hand when capturing pictures. Any movement of the phone may lead to blurred pictures.
- Avoid aiming the camera at bright light sources as this will affect the quality of the picture.
Applications and multimedia
Certificate Enrollment
Certificate Enrollment enables you to add or enroll for trusted digital certificates.
To use Certificate Enrollment:
- From the Today screen, tap Start > Programs.
- Tap Certificate Enrollment.
- Enter your user name and password, and the server from which to obtain the certificate.
- Tap Certificate Fetch. The certificate request is sent to the server.
File Explorer
File Explorer enables you to view and manage files saved in your Toshiba phone, or on a storage card.
To access File Explorer:
- From the Today screen, tap Start > Programs.
- Tap File Explorer. The My Documents folder is opened by default.
FM Radio
You can listen to FM radio stations on your Toshiba phone using the FM Radio application.
You can manually search for new radio stations, save favourite stations, and record current or scheduled radio programmes.

NOTE: You can only use the FM Radio application when the headset is connected.
To access FM Radio:
- From the Today screen, tap Start > Programs.
- Tap FM Radio.
Applications and multimedia
The main FM Radio screen is shown opposite. The main items and functions on this screen are as follows:
- Radio signal strength.
- Current radio channel and frequency.
- Frequency slider bar. Drag this bar to change the frequency.
- Current volume.
- Saved radio stations.
- To play a previously saved audio file.
- To skip to the previous radio station in the list.
- To skip to the next radio station in the list.
- To stop playing or recording of an audio file.
- To start recording the current radio station.
- To toggle playback between headset and phone speaker.
- To change the volume.
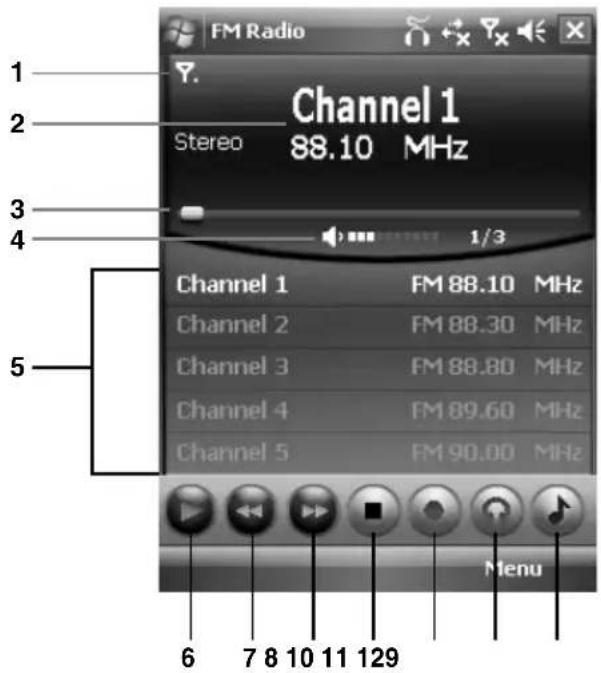
Applications and multimedia
The following menu items are available when using the FM Radio application:
- Auto Scan - starts automatic scanning for radio stations.

NOTE: If you use the Auto Scan feature, the current list of radio stations will be deleted.
- Favourites - to add, edit and delete saved radio stations.
• Auto recording - to set up recording of a future radio programme. - Settings - to edit the FM Radio settings. These include settings for saved audio files, settings to be used when the signal quality is low, and settings for services such as traffic announcements.
- About - to view details of the FM Radio application.
- Exit - to exit the FM Radio application.

NOTE: The FM Radio application will be muted during a voice call. When you end the call, the radio will resume.
Full Screen Keyboard
For details of Full Screen Keyboard, refer to Full Screen Keyboard in Text input.
Getting Started
Getting Started gives you step-by-step instructions for carrying out common procedures with your Toshiba phone.
To access Getting Started:
- From the Today screen, tap Start > Programs.
- Tap Getting Started.
- Tap a procedure to view the instructions.
Home
Home enables you to access the Home screen. This is the main Toshiba UI screen. For further information on the Toshiba UI, see TOSHIBA User Interface in Getting started.
Applications and multimedia
Image Editor
Image Editor enables you to easily edit images stored on your Toshiba phone.
To start using Image Editor:
- From the Today screen, tap Start > Programs.
- Tap Image Editor.
- Tap an image to edit.
Image Editor functions
Tap the file icon (i) to open image files, save edited files, view information about the Image Editor application, or exit Image Editor.
Tap the edit icon (D) to access and use the main editing tools, including cropping and transformation tools.
Tap the filter icon (i) to select and apply filters and colour effects to the image.
Tap the frame icon (☐) to select and add a frame to the image.
Tap the clip art icon (Q) to select and add clip art to the image.
Image To Text
Image To Text is an Optical Character Reader (OCR) application that enables you to scan business cards or documents using the Camera application. You can save the extracted data as a contact or a plain text document.
Saving business card information
To save business card information as a contact:
- From the Today screen, tap Start > Programs.
- Tap Image To Text.
- Tap Business Card Reader.
- Select the source of the image file.
- Select Camera to start the Camera application. Tap Next, then capture a photograph of the business card.
-
Select My Pictures to open the My Pictures folder, then tap the required image.
-
Tap Next.
-
Wait a few seconds while the image is processed.
-
Edit details of the contact as required.
-
Tap Menu > Save > Outlook Contacts/SIM Contact, depending on where you would like the contact to be stored.
Applications and multimedia

NOTE: When saving the contact to the SIM card, only the fields supported on the SIM card will be saved.
- Tap ok when the confirmation is displayed.

TIP: Depending on the contact details available, you can call the contact, send them a text message or e-mail, or browse the contact's URL using the menu items from the current screen.
-
Tap Menu > Back as many times as needed to return to the first Image To Text screen.
-
Tap ok.
Saving plain text information
To save plain text information from an image:
- From the Today screen, tap Start > Programs.
- Tap Image To Text.
- Tap Newspaper Reader.
-
Select the source of the image file.
-
Select Camera to start the Camera application. Tap Next, then capture a photograph of the required text.
-
Select My Pictures to open the My Pictures folder, then tap the required image.
-
Tap Next.
-
Wait a few seconds while the image is processed.
- Edit the text information as required.
- Tap Menu > File > Save As...
- Edit the name, file type and storage location as required.
- Tap Save.
- Tap ok twice.
- Tap Menu > Back as many times as needed to return to the first Image To Text screen.
- Tap ok.
Internet Sharing
For details of Internet Sharing, refer to Internet Sharing in Connectivity.
Applications and multimedia
JBlend
Your Toshiba phone supports Java applications (also known as MIDlets) that are written for mobile devices. Java applications include games and utilities.
Your phone supports Java 2 Edition and J2ME.
The JBlend application on your Toshiba phone enables you to download, install and manage Java applications.
To access the JBlend application:
- From the Today screen, tap Start > Programs.
- Tap JBlend.
Installing a Java application
To install a Java application:
- From the Today screen, tap Start > Programs.
- Tap JBlend.
- Tap Install.
- Select where to install the application from:
- To install from a website, tap Download. This will launch the default browser. Go to the website with the required Java application and download the application. It is then loaded into the JBlend application.
- To install an application stored on your Toshiba phone, tap Local Install. All uninstalled Java applications stored on the phone and the storage card are displayed. Select one to install.
- The details of the selected application will be displayed and you will be prompted to confirm the installation. Tap Yes to install the application.
- Wait a few seconds while the application is installed. You can then run the application.
Running a Java application
Once Java applications are successfully installed, they are displayed on the main JBlend screen.
To run a Java application:
- From the Today screen, tap Start > Programs.
- Tap JBlend.
- Tap the required application.
Applications and multimedia
Deleting Java applications
You may want to delete Java applications to free up memory.
To delete a single installed Java application:
- From the Today screen, tap Start > Programs.
- Tap JBlend.
- Scroll to the required application, then tap Menu > Application > Delete.
- Tap Yes to confirm the deletion.
To delete all installed Java applications:
- From the Today screen, tap Start > Programs.
- Tap JBlend.
- Tap Menu > Application > Delete All.
- Tap Yes to confirm the deletion.
Exiting the JBlend application
To exit the JBlend application:
From the main JBlend screen, tap Menu > Exit.
Messenger
Windows Live Messenger on your Toshiba phone enables you to:
- send instant messages or join group chats.
- set your status and see the presence of friends and colleagues.
- send messages via voice as well as text.
- send pictures and files.
- use emoticons to express how you feel.
To use Windows Live Messenger, you need Windows Live ID credentials.
For details of Windows Live ID, go to: https://accountservices.passport.net/ppnetworkhome.srf.
You will also need to sign in to Windows Live before you can sign in to Windows Live Messenger.
To access Windows Live Messenger:
- From the Today screen, tap Start > Programs.
- Tap Messenger.
Applications and multimedia
Notes
With Notes, you can quickly capture ideas, questions, reminders, to-do lists and meeting notes by writing, typing or recording your voice in a note. This is especially useful when you don't have a pen and paper to hand.
For further details of Notes, refer to Drawing and writing on the screen in Text input.
Creating a note
To create a note:
- From the Today screen, tap Start > Programs.
- Tap Notes.
- Tap New.
- Change the input method if required. Refer to Input methods in Text input for further details.
- Enter the note using your selected input method.
- Tap ok when you have finished.

NOTE: To record a voice note, use the recording toolbar.
If this bar is not displayed, tap Menu > View Recording Toolbar.
Viewing or playing a note
To view a or play a note:
- From the Today screen, tap Start > Programs.
- Tap Notes.
- Tap the note to view or play.
Applications and multimedia
Picsel Viewer
Picsel Viewer is a tool used to view documents.
Opening Picsel Viewer
To open Picsel Viewer:
- From the Today screen, tap Start > Programs.
- Tap Picsel Viewer.
- Tap the required document.
Picsel Viewer menu
To access the Picsel Viewer menu:
- From the Today screen, tap Start > Programs.
- Tap Picsel Viewer.
- If the Open screen is displayed, tap the Cancel button.
- Tap Menu.
Picsel Viewer has the following menu items:
- Open File - to open the selected file.
- Recent - to display the list of recently viewed files.
- Page - to rotate or resize the page, or view a different page in the document.
- Settings - enables you to clear the history and select the file types to associate with Picsel Viewer. You can also view information about the Picsel Viewer application.
- Close - to close Picsel Viewer.
Applications and multimedia
Pictures & Videos
Viewing pictures and videos
You can view pictures and videos stored on your Toshiba phone or storage card using the Pictures & Videos application.
To view pictures and videos:
- From the Today screen, tap Start > Programs.
- Tap Pictures & Videos.
- Tap the required picture or video.
Pictures & Videos menu items
The following menu items are available when a picture is highlighted in the main Pictures & Videos screen:
- Send... - to send a picture or video in an MMS message or e-mail.
- Beam... - to send a picture or video over a Bluetooth connection.
- Save to Contact... - to save a picture to a contact.
- Delete - to delete a picture or video.
-
Edit - enables you to move and copy pictures and videos between folders.
-
Play Slide Show - to play all pictures in the current folder as a slide show.
- Set as Today Background... - to set the picture as the background for the Today screen.
- Go To - to view pictures and videos stored in other folders on your Toshiba phone.
- Tools - to display file information, sort files, and access settings for configuration of the Pictures & Videos application.
- Send to your space - to send a picture to your Windows Live space.
The following menu items are available when viewing a picture:
- Zoom - to zoom in or out of the picture.
- Play Slide Show - to play all pictures in the current folder as a slide show.
- Set as Today Background... - to set the picture as the background for the Today screen.
- Beam picture... - to send the picture over a Bluetooth connection.
- Save - to save the picture to a contact or rename the picture.
- Edit - to edit the picture using the simple tools built in to the Pictures & Videos application.
- Properties - displays information about the picture, such as file type and size.
Applications and multimedia
- Options... - to access settings for configuration of the Pictures & Videos application.
- Send to your space - to send the picture to your Windows Live space.
Search
You can search for files and other items stored on your Toshiba phone in the My Documents folder or on a storage card.
You can search by file name or by keywords located in the item. For example, you can search e-mail messages, notes, appointments, contacts, and tasks as well as in Help.
To search for a file or an item:
- From the Today screen, tap Start > Programs.
- Tap Search.
- In the Search for: field, enter the file name, word, or other information you require.
- If you have searched for an item before, tap the arrow to the right of the Search for: field to find it in the searching history.
- In the Type: field, select a data type to help narrow your search.
- Tap Search.
In the Results list, you can tap the item you require to open it.

NOTE: The My Documents folder and its subfolders are included in the search.

NOTE: Results found on a storage card are indicated by an icon.
Applications and multimedia
SIM Toolkit
When you install a SIM card that has applications loaded on it, you can run the applications using the SIM Toolkit application.
To run an application from the SIM card:
- From the Today screen, tap Start > Programs.
- Tap SIM Toolkit. The list of SIM applications is displayed.
- Select the application that you want to run, then tap Select.

NOTE: The SIM Toolkit icon ( 📄 ) is not displayed when the installed SIM card does not have any applications loaded.
The title of this icon depends on title of the SIM.
Streaming Player
Streaming Player enables you to play live and recorded streaming media on your Toshiba phone.
To use Streaming Player:
- From the Today screen, tap Start > Programs.
- Tap Streaming Player.
- Tap Open.
- Enter the URL of the required media, then tap Connect.

NOTE: To access the URL of a streaming media item, your Toshiba phone must connect to the network. For more information about connecting your phone to a network, refer to Internet connections in Connectivity.
To edit the Streaming Player settings:
- From the Today screen, tap Start > Programs.
- Tap Streaming Player.
- Tap Menu > Options.
- Edit the settings as required, then tap Done.
Task Manager
For details of Task Manager, refer to Task Manager in Settings.
Applications and multimedia
Tasks
With the Tasks application, you can create one-off tasks or recurring tasks. You can also set reminders for your tasks, and organise them by category. Overdue tasks will be displayed in red.
Creating a task
To create a new task:
- From the Today screen, tap Start > Programs.
- Tap Tasks.
- Tap Menu > New Task.

TIP: You can also create a task by entering a name for the task in the Tap here to add a new task field, then pressing the Action key. However, using this method you will need to add the details of the task separately.
-
Edit the details of the task as required.
-
Tap ok.

TIP: You can synchronise tasks on your Toshiba phone with your PC. This will keep tasks up to date in both locations. If you create a new task with a reminder on your PC and then synchronise tasks with your phone, the reminder is activated at the time set on your PC.
Applications and multimedia
Changing the status of a task
When a new task is created, it will be set as active. When you have completed the task, you can update its status.
To mark a task as completed:
- From the Today screen, tap Start > Programs.
- Tap Tasks.
- Scroll to the required task, then tap Complete.

TIP: If you need to reactivate a task, scroll to the required task, then tap Activate.
Sorting and filtering tasks
To sort and filter tasks:
- From the Today screen, tap Start > Programs.
- Tap Tasks.
- To sort the tasks, tap Menu > Sort By, then select an item by which to sort the list or to filter the tasks, tap Menu > Filter, then select a filter.

TIP: You can use the filter option for Active Tasks or Completed Tasks at the same time as another filter.
Deleting a task
To delete a task:
- From the Today screen, tap Start > Programs.
- Tap Tasks.
- Tap the required task.
- Tap Menu > Delete.
- Tap Yes to confirm the deletion.
Windows Live
Windows Live gives access to searching using Live Search, as well as access to Windows Live Messenger.
For information on using Live Search, see Searching the Internet using Live Search.
For information on Windows Live Messenger, see Messenger.
Applications and multimedia
Windows Media
Overview of Windows Media Player Mobile
You can use Windows Media Player 10 Mobile to play digital audio and video files that are stored on your Toshiba phone, a storage card or on the Internet.
Windows Media Player Mobile can play files with the following extensions by default:
- . a s f
• . w m a
• . w m v
• . m p 3 .
Your Toshiba phone can also play .mid, .wav, .3gp and .mp4 files.
Overview of screens and menus
Windows Media Player Mobile has three primary screens:
- Library screen - enables quick access of files and playlists. It also includes an item that enables you to switch to the Now Playing screen.
To switch to the Playback screen from the Library screen, tap ok.
The Library screen will be the default screen displayed when you first use Windows Media Player Mobile.
- Now Playing screen - displays the Now Playing playlist. This shows the file currently playing, as well as any files that are queued up to play next.
- Playback screen - displays the playback controls and the video window. You can change the appearance of this screen by selecting a different skin.
Tapping Menu from any of these screens will give menu items relevant to the screen.
Applications and multimedia
Library screen menu items
- Queue Up - adds the highlighted item to the end of the current playlist.
- Delete from Library - deletes the highlighted item from the library.
- Now Playing - switches to the Now Playing screen.
- Library - to switch between libraries.
- Update Library... - adds new items to the library by searching your Toshiba phone, and storage card if available.
- Open File... - enables you to play files that are stored on your phone or storage card but are not in the library.
- Open URL... - enables you to play a file stored on a network, such as the Internet.
- Properties - displays information about the highlighted file.
Now Playing screen menu items
- Library... - switches to the Library screen.
- Move Up - moves the highlighted item up in the playlist order.
- Move Down - moves the highlighted item down in the playlist order.
- Remove from Playlist - deletes the highlighted item from the playlist.
- Shuffle/Repeat > Shuffle - sets items in the playlist to play in a random order.
- Shuffle/Repeat > Repeat - sets items in the playlist to play repeatedly.
- Save Playlist... - to save the current playlist. You can enter a name for the playlist, or a default name can be used.
- Clear Now Playing - to delete all items from the Now Playing playlist.
- Error Details- displays error information about the highlighted item. An exclamation mark is displayed before the item name if error details are available.
- Properties - displays information about the highlighted file.
Applications and multimedia
Playback screen menu items
- Library... - switches to the Library screen.
- Play/Pause - starts or pauses playback.
- Stop - stops playback.
- Shuffle/Repeat > Shuffle - sets items in the playlist to play in a random order.
- Shuffle/Repeat > Repeat - sets items in the playlist to play repeatedly.
- Full Screen - plays video files in full screen mode.
- Options... - enables you to set options for Windows Media Player Mobile, including changing the appearance of the Playback screen.
- Properties - displays information about the current file.
- About - displays information about Windows Media Player Mobile.
Playing items stored on your Toshiba phone
Use the Library to find and play music, videos, and playlists that are stored on your Toshiba phone or storage card.
To play an item stored on your Toshiba phone:
- From the Today screen, tap Start > Programs.
- Tap Windows Media.
- If the item is in the Library, scroll to the item, then tap Play. If the item is not in the Library, tap Menu > Open File... Scroll to the item, then tap Play.

TIP: To add files to the Library, tap Menu > Update Library...
Playing items stored on a network
To play an item stored on a network:
- From the Today screen, tap Start > Programs.
- Tap Windows Media.
- From the Library screen, tap Menu > Open URL...
- Enter the URL of the file, then tap OK, or select a URL from the History: field.
Applications and multimedia

NOTE: To play an item on a network, your Toshiba phone must connect to the network. For more information about connecting your phone to a network, refer to Internet connections in Connectivity.
Changing the appearance of the player
You can change the appearance of the Playback screen by selecting a new skin.
To select a new skin:
- From the Today screen, tap Start > Programs.
- Tap Windows Media.
- Tap Menu > Options...
- Tap the Skins tab.
- Tap the required skin.
- Tap ok.

NOTE: To download new skins, access the WMplugins website at: www.wmplugins.com.
After downloading a skin to your computer, use ActiveSync to copy the *.skn and *.bmp files to your Toshiba phone. To ensure that the skin is displayed on the Skins tab, do not store skin files in the Windows folder on your Toshiba phone.
Troubleshooting
If you encounter any difficulty while using Windows Media Player Mobile, refer to the Troubleshooting Windows Media Player Mobile page on the Microsoft website at:
http://www.microsoft.com/windows/windowsmedia/player/windowsmobile/troubleshooting.aspx.
Connectivity
Wireless Manager
Wireless Manager enables you to easily switch the Phone, Data, Bluetooth and Wi-Fi functionality on or off.
To access Wireless Manager:
- From the Today screen, tap the area the service provider name.
- From the Today screen, tap Start > Settings > Connections > Wireless Manager.
Switching radio transmission on/off
You can switch the telephony radio transmission of your Toshiba phone on and off.
When the radio transmission is off, it is in 'Flight Mode'. In this mode, you will not be able to make or receive calls, send or receive messages, or access the Internet.
To switch radio transmission on/off:
From Wireless Manager, tap the Phone item.
Radio transmission will toggle on or off.
Disconnecting current active data connection
You can disconnect an active data connection without switching off the radio transmission by tapping Data from Wireless Manager.
shawver, the data connection will automatically reconnect if you are using Direct Push e-mail. This is because your Toshiba phone must have a connection permanently open to receive e-mails from the e-mail server. To disconnect the data connection in this scenario, you must first disable the Direct Push e-mail.
To disable Direct Push e-mail:
- From the Today screen, tap Start > Programs.
- Tap ActiveSync.
- Tap Menu > Schedule...
- Set the Peak times: and Off-peak times: fields to Manually.
To re-enable Direct Push e-mail:
- From the Today screen, tap Start > Programs > ActiveSync.
- Tap Menu > Schedule...
- Set the Peak times: and Off-peak times: fields to As items arrive.
Connectivity
Switching all wireless functions on/off
To switch all wireless functions on or off at the same time:
From Wireless Manager, tap Switch all Wireless Off.

NOTE: You can conserve battery power by switching off Bluetooth and Wi-Fi when they are not in use.
Bluetooth
Bluetooth is a short-range wireless communications technology. Devices with Bluetooth capabilities can exchange data over a distance of approximately 10 metres without requiring a wired connection.
Bluetooth on your Toshiba phone has three modes: Off, On and Visible.
In Off mode, you cannot send or receive data using Bluetooth.
In On mode, your Toshiba phone can search for and connect to other devices. However, your phone will not be visible in searches by other devices.
In Visible mode, your Toshiba phone can search for and connect to other devices. Your phone will also be visible to other devices.
Changing Bluetooth mode
By default, Bluetooth is in Off mode. Bluetooth will remain in the same mode when turning your Toshiba phone off and on.
To change Bluetooth mode:
- From the Today screen, tap Start > Settings.
- Tap the Connections tab.
- Tap Bluetooth.
- Tab the Mode tab.
Connectivity
- To set Bluetooth to Off mode, untick the Turn on Bluetooth checkbox. To set Bluetooth to On mode, tick the Turn on Bluetooth checkbox. To set Bluetooth to Visible mode, tick both the the Turn on Bluetooth and Make this device visible to other devices checkboxes.

TIP: You can also toggle Bluetooth mode using Wireless Manager.
Pairing devices
When devices are paired, a relationship is created that enables the exchange of data between the devices.
The pairing can be set up using a passcode, which will ensure that exchanged data is kept secure.
Pairing of devices only needs to be carried out once. After this, the devices can connect to each other and exchange data without the passcode needing to be entered again.
Before pairing your Toshiba phone with another device, ensure that:
- Your Toshiba phone and the other device are within 10 metres of each other.
- Bluetooth on your Toshiba phone is set to On or Visible.
- Bluetooth on the other device is set to Visible.
To pair your Toshiba phone with another device:
- From the Today screen, tap Start > Settings.
- Tap the Connections tab.
- Tap Bluetooth.
- On the Devices tab, tap Add new device... Your Toshiba phone will search for other Bluetooth-enabled devices and display them in a list.
- Tap the required device, then tap Next.
- For enhanced security, enter a passcode in the Passcode: field. This is alphanumeric, and can be between 1 and 16 characters in length.
- Tap Next.
- Wait for the other device to accept the pairing. If a passcode has been set on your Toshiba phone, then it will need to be entered on the other device.
- To edit the settings for the device, tap Advanced. You can then edit the name to be used for the device, and select services to use from the device. Tap Save when you have finished.
To finish the pairing without editing the settings, tap Done.
Connectivity
Connecting a Bluetooth headset
Before connecting a Bluetooth headset to your Toshiba phone, ensure that:
- Bluetooth on your Toshiba phone is set to Visible.
- the Bluetooth headset is set to pairing mode.
To connect a Bluetooth headset:
- From the Today screen, tap Start > Settings.
- Tap the Connections tab.
- Tap Bluetooth.
- On the Devices tab, tap Add new device...
- Tap the Bluetooth headset in the list of devices, then tap Next.
-
Enter the passcode for the headset. This will be provided with your Bluetooth headset.
-
Tap Next.
-
Wait for the headset to accept the pairing.
-
A confirmation will be displayed when the headset has been connected. Tap Advanced.
-
If required, edit the name of the headset.
-
Make sure that the Hands Free checkbox is ticked. If you are using a stereo Bluetooth headset, also make sure that the Wireless Stereo checkbox is ticked.
-
Tap Save when you have finished.
Unpairing devices
To unpair your Toshiba phone from another device:
- From the Today screen, tap Start > Settings.
- Tap the Connections tab.
- Tap Bluetooth.
- On the Devices tab, tap and hold the required device.
- When the options are displayed, tap Delete.
- Tap Yes to confirm the deletion.
Bluetooth security
Although your Toshiba phone has security features compliant with the Bluetooth standard specification, this security might not work properly when using your Toshiba phone in a non-secure environment. Take care when using the Bluetooth feature.
Connectivity
Beam
The term 'Beam' is used to describe the short range transfer of data between two devices via a Bluetooth connection.
You can beam Calendar, Contacts, Tasks, and Pictures & Videos items, and other files stored on your Toshiba phone, to other devices.

NOTE: Bluetooth must be set to On or Visible to send beamed items.
To receive beamed items, Bluetooth must be set to Visible.
Beaming an item
To beam an item to another device:
- Scroll to the item that you want to beam, then tap Menu >Beam... (This path will vary slightly depending on the type of item that you want to beam.)
- Tap the device to which you want to send the item.
Configuring your Toshiba phone to receive beamed data
To configure your Toshiba phone to receive beamed data:
- From the Today screen, tap Start > Settings.
- Tap the Connections tab.
- Tap Beam.
- Tick the Receive all incoming beams. checkbox, then tap ok.
Cell Broadcast
Cell Broadcast receives broadcast channel information and news from your service provider.

NOTE: This functionality is only available if it is supported by your service provider. Please contact your service provider for further information.
Connectivity
Internet connections
Your Toshiba phone is equipped with powerful networking functions that enable you to connect to the Internet through a General Packet Radio Service (GPRS) or Universal Mobile Telecommunications System (UMTS) network. You can set up connections to the Internet or to a corporate network to browse the Internet, and exchange e-mail or instant messages.
Your phone has two groups of connection settings:
My ISP and My Work Network. The My ISP settings are used to connect to the Internet, while My Work Network settings can be used to connect to any private, corporate network.

NOTE: Before you begin, you will need to obtain the following information:
- From your phone service provider - data connectivity plan information, access point name, and PAP/CHAP security settings.
- From your ISP or wireless service provider - access point name, user name and password, and other security information.

NOTE: If you connect to the Internet using your service provider's data network, the service may be provided through a GPRS connection (fast, but generally billed by volume of data transferred), or through a Circuit Switched Data (CSD) connection (slow, but generally billed by amount of time connected). You should check with your service provider which connection you will be using on their network.
Connectivity
Setting up a GPRS connection
GPRS is a packet-based wireless communication service which enables data to be sent and received using mobile phones.
You can use GPRS to connect to the Internet or to send and receive MMS messages using your phone. When you use GPRS, you will usually be billed based on the data traffic volume. However, you should check billing information with your service provider.

NOTE: Before setting up a GPRS connection, you will need to obtain the required settings from your service provider. As a minimum, the access point name will be required.

TIP: You can quickly and easily configure your GPRS settings using Auto Configurator. For details, see Auto Configurator in Getting started.
To set up a GPRS connection manually:
- From the Today screen, tap Start > Settings.
- Tap the Connections tab.
- Tap Connections.
- On the Tasks tab, tap Add a new modem connection for the required group.
-
Enter a name for the connection.
-
In the Select a modem: field, select Cellular Line (GPRS).
- Tap Next.
- Enter the GPRS APN for your service provider, then tap Next.
- Enter details for the following fields if they are required by your service provider:
- User name: - your user name for the network.
- Password: - your password.
-
Domain: - domain name.
-
If you need to specify extra settings, tap the Advanced... button and enter the following information:
- On the TCP/IP tab, tap the Use server-assigned IP address radio button to automatically configure the IP address. Otherwise, tap the Use specific IP address radio button and manually enter the IP address.
- Tick the Use software compression checkbox if required.
- Tick the Use IP header compression checkbox if required.
- On the Servers tab, tap the Use server-assigned addresses radio button to automatically configure the server address.
Connectivity
Otherwise, tap the Use specific server address radio button to manually enter the server address information in the DNS:, Alt DNS:, WINS:, and Alt WINS: fields. Tap ok.
- Tap Finish.
Setting up a dial-up connection

NOTE: Before setting up a dial-up connection, you will need to obtain the required settings from your service provider.
To set up a dial-up connection:
- From the Today screen, tap Start > Settings.
- Tap the Connections tab.
- Tap Connections.
- On the Tasks tab, tap Add a new modem connection for the required group.
- Enter a name for the connection.
- In the Select a modem: field, select Cellular Line.
- Tap Next.
- Enter the phone number used to dial the network, then tap Next.
- Enter the required information. Refer to Setting up a GPRS connection for details.
- Tap Finish.
Connectivity
Setting up a VPN connection

IMPORTANT: Please ensure that you have set up a GPRS connection before attempting to set up a VPN connection. The VPN connection uses the GPRS connection to connect to a network, such as a corporate network.

NOTE: Before setting up a VPN connection, you will need to obtain the required settings.
To set up a VPN connection:
- From the Today screen, tap Start > Settings.
- Tap the Connections tab.
- Tap Connections.
- On the Tasks tab, tap Add a new VPN server connection in the My Work Network section.
- Enter the following information:
- Name: - name for the connection.
- Host name/ IP: - name of the VPN server.
-
VPN type: - select the type of VPN.
-
Tap Next.
-
If you selected IPSec/L2TP in the VPN type: field, select the type of authentication. Enter the pre-shared key if required. Tap Next.
-
Enter the required information. Refer to Setting up a GPRS connection for details.
- Tap Finish.
Connectivity
Setting up a proxy connection
Depending on your service provider's configuration, you may need to add a proxy connection to allow your Toshiba phone to access the Internet or WAP services.
Your service provider will be able to advise whether you need to create a proxy connection.

NOTE: Before setting up a proxy connection, you will need to obtain the required settings from your service provider.
To set up a proxy connection:
- From the Today screen, tap Start > Settings.
- Tap the Connections tab.
- Tap Connections.
- On the Tasks tab, tap Set up my proxy server for the required group.
- In the Proxy Settings tab, tick the This network connects to the Internet and This network uses a proxy server to connect to the Internet checkboxes.
- In the Proxy server: field, enter the name of the proxy server.
- If you need to specify extra settings, tap the Advanced... button and edit the settings as required.
Tap ok when you have finished.
- Tap ok.
Connecting to intranet URLs
Some URLs for corporate intranet pages may use ‘.’ characters, for example: intranet.companyname.com. To view these pages, you need to set up a URL exception.
To set up a URL exception:
- From the Today screen, tap Start > Settings.
- Tap the Connections tab.
- Tap Connections.
- Tap the Advanced tab.
- Tap the Exceptions... button.
- Tap Add new URL...
- In the Work URL: field, enter the required URL.
- Tap ok three times.
Connectivity
Advanced settings
Advanced settings allow you to specify the particular connection to be used for different connection types.
You can also specify dialing rules.
To access advanced settings:
- From the Today screen, tap Start > Settings.
- Tap the Connections tab.
- Tap Connections.
- Tap the Advanced tab.
CSD Line
CSD Line enables you to select the line settings for CSD connections.

NOTE: The default setting on your Toshiba phone is set for optimal use. Do not change the CSD line settings unless you are having trouble using the CSD connection.
To edit CSD line settings:
- From the Today screen, tap Start > Settings.
- Tap the Connections tab.
- Tap CSD Line.
- Select the data rate and type of connection, then tap ok.
Domain Enroll
Domain Enroll enables you to enroll your Toshiba phone as a domain member. You can then connect your phone securely to a network, e.g. your work network.
To use Domain Enroll:
- From the Today screen, tap Start > Settings.
- Tap the Connections tab.
- Tap Domain Enroll.
- Tap Enroll.
- A notification screen is displayed. Tap Next.
- Enter your e-mail address for the domain server to which you are enrolling.
- Tap Next.
- If required, enter the name of the domain server.
- Enter the enrollment password, then tap Next.
- Restart your Toshiba phone if requested.
Connectivity
Internet Sharing
Internet Sharing enables you to use your Toshiba phone as a modem for a PC.

NOTE: This functionality is only available if it is supported on your SIM card. Please contact your service provider for further information.
To connect to the Internet using Internet Sharing:
- Connect your Toshiba phone to a PC using the USB cable or Bluetooth.
- From the Today screen, tap Start > Programs.
- Tap Internet Sharing.
- In the PC Connection: field, select the type of connection used for connecting the phone and PC.
- In the Network Connection: field, select the connection to use to connect to the Internet.
- Tap Connect. Once the connection is enabled, you can access the Internet on a PC using your Toshiba phone as a modem.
- When you have finished using the Internet, tap Disconnect on your phone.
Network Mode
Network Mode enables you to set the radio system used by your Toshiba phone, and the frequency band.

NOTE: Changing the Network Mode settings may limit the ability of your Toshiba phone to connect to the wireless network, and may result in signal failure.
To change the Network Mode settings:
- From the Today screen, tap Start > Settings.
- Tap the Connections tab.
- Tap Network Mode.
- Select a network mode from one of the following:
- Auto - selects network mode automatically.
- GSM - selects 2G/2.5G network mode.
-
UMTS - selects 3G network mode.
-
Select a GSM/UMTS frequency band if required.
-
Tap ok.
Connectivity
USB to PC
USB to PC enables you to change the type of USB connection used between your Toshiba phone and PC.
To change the USB to PC setting:
- From the Today screen, tap Start > Settings.
- Tap the Connections tab.
- Tap USB to PC.
- Tap the required mode, then tap ok.
Wi-Fi
Your Toshiba phone supports Wi-Fi (Wireless LAN), which is IEEE 802.11b/g compliant.
Connecting to a Wi-Fi network
Before connecting to a Wi-Fi network, ensure that Wi-Fi on your Toshiba phone is on.
To connect to a Wi-Fi network:
- From the Today screen, tap Start > Settings.
- Tap the Connections tab.
- Tap Wi-Fi. Available networks will be displayed on the Wireless tab.

TIP: You can filter the networks displayed by selecting Only access points or Only computer-to-computer in the Networks to access: field.
- Tap the required network, or add a new network by tapping Menu > Add New... and entering the details of the network.
Connectivity
Configuring a network adapter
To configure a network adaptor:
- From the Today screen, tap Start > Settings.
- Tap the Connections tab.
- Tap Wi-Fi.
- Tap the Network Adapters tab.
- Tap the adaptor to configure.
- On the IP Address tab, tick the Use server-assigned IP address or Use specific IP address radio button.
- On the Name Servers tab, specify DNS:, Alt DNS:, WINS: and Alt WINS:.
- Tap ok.
Wi-Fi security
It is possible for an outside party to easily gain unlawful access to your Toshiba phone via Wi-Fi if the security function is not used.
Without this security, your Toshiba phone carries the risk of unlawful access, wiretapping, and loss or destruction of data.
You should set up your Toshiba phone to use the authentication and encryption features in order to prevent such access.
When using a public Wi-Fi access point, your Toshiba phone should be protected from unlawful access by the Windows firewall of Windows Security Centre and the anti-virus software within the firewall feature.
Settings
Volume control
You can access the phone sound volume and ringer/call volume settings by tapping the ringer icon on the title bar.
Volume control has the following settings:
• Phone sound volume - 6 levels.
• Ringer/call volume - 6 levels.
- Both phone volume and ringer/call volume can be set to On, Vibrate or Off.
You can also change the volume settings by pressing the Volume keys.
Reassigning button functions
There are already applications assigned to the hardware buttons. However, you may want to change some assignments to applications that you use more frequently.
To reassign a button:
- From the Today screen, tap Start > Settings.
- On the Personal tab, tap Buttons. On the Program Buttons tab, a list of buttons and their assigned application is displayed.

TIP: An icon represents the original function of a button. This helps you to identify a button and restore its default.
- Tap a button to reassign.
- In the 2. Assign a program: field, select an application for this button.
- Tap ok.
Input method settings
For details of changing the input method settings, refer to the Text input section.
Settings
Security settings
It is advisable to apply certain security features in case your Toshiba phone is lost or stolen.
You can apply the following security to prevent unauthorised use:
- Device lock - using a password, this feature prevents unauthorised use of your Toshiba phone.
When this feature is activated, you will be prompted for a password when you switch on your Toshiba phone, and when you leave it idle for a set period of time.
When this feature is activated, you will need to enter the password before you can use your Toshiba phone. - Phone lock - using a personal identification number (PIN), this feature prevents unauthorised use of your SIM card in any phone. When this feature is activated, you will be prompted for your PIN when you switch on your Toshiba phone. You cannot use the SIM card until the PIN is entered correctly.

NOTE: Emergency calls can be placed at any time, without requiring deactivation of any security feature first.
Enabling device lock
To enable the device lock:
- From the Today screen, tap Start > Settings.
- On the Personal tab, tap Lock.
- On the Password tab, tick the Prompt if device unused for checkbox, and select how long your device can be left idle before a password is required.
- Select a password type.
- Enter and confirm a password.

NOTE: Make a note of the password.
- Enter a hint on the Hint tab if required.
- Tap ok.
- Tap Yes to confirm the changes.

IMPORTANT: If you forget your password, you will need to reinitialise your phone. Refer to Reinitialising your Toshiba phone in Care and maintenance for details. This will delete any applications that you have installed. You will also lose all personal data such as music, ringtones and pictures, and will need to restore the data from a backup file.
Settings
Changing device lock password
To change the device lock password:
- From the Today screen, tap Start > Settings.
- On the Personal tab, tap Lock.
- Enter your current password, then tap Unlock.
- Enter and confirm a new password.
- Tap ok.
- Tap Yes to confirm the changes.
Disabling device lock
To disable the device lock:
- From the Today screen, tap Start > Settings.
- On the Personal tab, tap Lock.
- Enter your current password, then tap Unlock.
- On the Password tab, untick the Prompt if device unused for checkbox.
- Tap ok.
- Tap Yes to confirm the change.
Enabling phone lock
To enable the phone lock:
- From the Today screen, tap Start > Settings.
- On the Personal tab, tap Phone.
-
Tap the Security tab.
-
Tick the Require PIN when phone is used checkbox.
- Tap ok.
Changing SIM PIN

NOTE: Before you start, you will need to know the SIM PIN. This is provided with your SIM card.
To change the SIM PIN:
- From the Today screen, tap Start > Settings.
- On the Personal tab, tap Phone.
- Tap the Security tab.
- Tap Change PIN.
- Enter the old SIM PIN, then tap Enter.

WARNING: If you enter the incorrect PIN for your SIM card three consecutive times, you will need to contact your service provider to obtain the PUK. Do not attempt to guess the PUK as your SIM card will be rendered permanently inoperative following ten consecutive unsuccessful attempts.
- Enter the new SIM PIN, then tap Enter.
- Confirm the new SIM PIN, then tap Enter.

NOTE: Make a note of the new SIM PIN.
Settings
Disabling phone lock
To disable the phone lock:
- From the Today screen, tap Start > Settings.
- On the Personal tab, tap Phone.
- Tap the Security tab.
- Untick the Require PIN when phone is used checkbox.
- Enter the SIM PIN, then tap Enter.

WARNING: If you enter the incorrect PIN for your SIM card three consecutive times, you will need to contact your service provider to obtain the PUK. Do not attempt to guess the PUK as your SIM card will be rendered permanently inoperative following ten consecutive unsuccessful attempts.
- Tap ok.
Changing PIN2

NOTE: You can only change PIN2 if this functionality is enabled on your SIM card.
To change PIN2:
- From the Today screen, tap Start > Settings.
- On the Personal tab, tap Phone.
-
Tap the Security tab.
-
Tap Change PIN2.
- Enter the old PIN2, then tap Enter.
NOTE: If you enter the incorrect PIN2 for your SIM card three consecutive times, you will need to contact your service provider to obtain the PUK2. - Enter the new PIN2, then tap Enter.
- Confirm the new PIN2, then tap Enter.


NOTE: Make a note of the new PIN2.
Customising the Start menu
You can select the applications to be displayed in the Start menu. Applications that are not selected can be accessed by tapping Start > Programs from the Today screen.
To customise the Start menu:
- From the Today screen, tap Start > Settings.
- On the Personal tab, tap Menus.
- Tick the checkboxes for the required applications, then tap ok.

NOTE: Only seven items can be selected for the Start menu.
Settings
Owner Information
Owner Information enables you to enter contact information so that your phone can be easily returned if it is lost.
To enter or edit Owner Information:
- From the Today screen, tap Start > Settings.
- On the Personal tab, tap Owner Information.
- Enter your contact information on the Identification tab. You can also make any important notes on the Notes tab. On the Options tab, you can select whether to display information from the Identification and Notes tabs when your Toshiba phone is switched on.

TIP: You can also set owner information by tapping the appropriate section on the Today screen.
- Tap ok when you have finished.
Phone settings
Setting ring tones
To set a ring tone:
- From the Today screen, tap Start > Settings.
- On the Personal tab, tap Phone.
- On the Phone tab, select the following:
- In the Ring type: field, select the required type of tone. This can be ringing, vibration, a combination of ringing and vibration, or none.
- In the Ring tone: field, select the required tone.

TIP: Tap the Play icon to listen to a sample of the selected ring tone.
- Tap ok.

TIP: You can also set the ring tone from the Sounds & Notifications settings.

TIP: You can also use custom sounds as ring tones. You can copy the files to your phone from your PC using ActiveSync, or download them from the Internet.
Settings
Setting keypad tones
- From the Today screen, tap Start > Settings.
- On the Personal tab, tap Phone.
- On the Phone tab, select the required type of keypad tones in the Keypad: field. To have no keypad tones, select Off.
Call Barring
Call Barring enables you to block certain categories of incoming and outgoing calls (for example, international calls).

NOTE: Call Barring is only available if it is supported by your service provider.

NOTE: Before setting up Call Barring, you will need to obtain your call barring password from your service provider.
To set up Call Barring:
- From the Today screen, tap Start > Settings.
- On the Personal tab, tap Phone.
- Tap the Services tab.
- In the list of services, tap Call Barring, then tap the Get Settings... button. The settings will then be read from the network.
- When the current settings are displayed, select the settings required for blocking incoming and
outgoing calls.
- Tap ok.
- Enter the call barring password, then tap ok. The settings are sent to the network.
Caller ID
Caller ID allows selected call recipients to view your name and phone number information on their phone when you call them.
To configure Caller ID:
- From the Today screen, tap Start > Settings.
- On the Personal tab, tap Phone.
- Tap the Services tab.
- In the list of services, tap Caller ID, then tap the Get Settings... button. The settings will then be read from the network.
-
In the Provide my caller ID to: field, select one of the following:
-
Everyone - your information will be displayed to everyone that you call.
- No one - your information will be hidden from everyone that you call.
-
Only to contacts - your information will only be displayed when you call a number stored in Contacts.
-
Tap ok. The settings are sent to the network.
Settings
Call Forwarding
Call Forwarding enables you to forward incoming calls to another number.

NOTE: Call Forwarding is only available if it is supported by your service provider.
To set up Call Forwarding:
- From the Today screen, tap Start > Settings.
- On the Personal tab, tap Phone.
- Tap the Services tab.
- In the list of services, tap Call Forwarding, then tap the Get Settings... button. The settings will then be read from the network.
- When the current settings are displayed, select the conditions during which you would like to forward incoming calls. Enter the phone number(s) for forwarded calls.

TIP: If you have set up voice mail, you can select Voicemail as the phone number for forwarded calls. For details of setting up voice mail, refer to Setting up voice mail.
- Tap ok. The settings are sent to the network.
Call Waiting
Call Waiting notifies you of incoming calls when you are already in a call. You will then have the option to answer or ignore the second call.

NOTE: Call Waiting is only available if it is supported by your service provider.
To enable Call Waiting:
- From the Today screen, tap Start > Settings.
- On the Personal tab, tap Phone.
- Tap the Services tab.
- In the list of services, tap Call Waiting, then tap the Get Settings... button. The settings will then be read from the network.
- When the current settings are displayed, select whether or not you wish to be notified of waiting calls.
- Tap ok. The settings are sent to the network.
Viewing and editing text messages service centre
To view and edit the text messages service centre:
- From the Today screen, tap Start > Settings.
- On the Personal tab, tap Phone.
- Tap the Services tab.
Settings
- In the list of services, tap Voice Mail and Text Messages, then tap the Get Settings... button. The settings will then be read from the network.
- Edit the number in the Text messages service center: field if required. This number can be obtained from your service provider.
- Tap ok. The settings are sent to the network.
Setting up voice mail
To set up voice mail:
- From the Today screen, tap Start > Settings.
- On the Personal tab, tap Phone.
- Tap the Services tab.
- In the list of services, tap Voice Mail and Text Messages, then tap the Get Settings... button. The settings will then be read from the network.
- Enter your voice mail number in the Voice Mail: field. This can be obtained from your service provider.
- Tap ok. The settings are sent to the network.
Fixed Dialing
Fixed Dialing restricts the numbers that you can call from your Toshiba phone. When Fixed Dialing is activated, you can only call predefined numbers or area codes. These numbers are stored in a list that you can set up and edit using your Toshiba phone.

NOTE: Fixed Dialing is only available if it is supported by your service provider.

NOTE: Before setting up Fixed Dialing, you will need to obtain PIN2 from your service provider.
To set up Fixed Dialing:
- From the Today screen, tap Start > Settings.
- On the Personal tab, tap Phone.
- Tap the Services tab.
- In the list of services, tap Fixed Dialing, then tap the Get Settings... button. The settings will then be read from the network.
- Tick the Enable fixed dialing checkbox.
- Tap Menu > Add.
- In the Add or change the number pattern: field, enter the phone number or area code you want to be able to call.
- Tap Done.
Settings
- If required, add more numbers, then tap Done.
- Enter PIN2, then tap Done. The settings are sent to the network.
Network settings
You can select whether your Toshiba phone will automatically search and select a network to connect to, or whether you will be prompted to select one manually.
You can set up and update a list of Preferred networks that your phone will attempt to connect to if your current network becomes unavailable. This setting will also apply if you roam out of the service area of your current network.
You can also search for new networks and select a network to connect to.
For details of setting the network mode, refer to Network Mode in Connectivity.
Setting the network selection type
To set the network selection type:
- From the Today screen, tap Start > Settings.
- On the Personal tab, tap Phone.
-
Tap the Network tab.
-
In the Network selection field, select Automatic or Manual as required.
- If you select Automatic, your Toshiba phone will register to the default network. This network is defined by your SIM card.
-
If you select Manual, you will need to wait for the phone to search for all available networks. When the list of networks is displayed, tap the required network, then tap OK. Your Toshiba phone will register to the selected network.
-
Tap ok.
The default setting is Automatic.
If you select Manual, and your current network becomes unavailable, you will need to wait for the phone to search for all available networks. You can then select one to connect to.
Preferred networks
If you have selected the Automatic network selection type, following any failure in connection to your home network, your Toshiba phone will attempt to connect to the first network in the list of Preferred networks. If this fails, the phone will attempt to connect to the next network in the list, and so on.
To set up or update the list of Preferred networks:
- From the Today screen, tap Start > Settings.
Settings
- On the Personal tab, tap Phone.
- Tap the Network tab.
- Tap Set Networks. The settings will then be read from the network.
- Add new networks or reorder the list as required. You can also remove networks from the list by unticking the checkbox beside the network name.
- Tap ok when you have finished. The settings are sent to the network.
Connecting to a network
To connect to a network:
- From the Today screen, tap Start > Settings.
- On the Personal tab, tap Phone.
- Tap the Network tab.
- Tap Find Network. You will need to wait for the phone to search for all available networks. When the list of networks is displayed, tap the required network, then tap OK. Your Toshiba phone will register to the selected network.
Video Phone settings
Call Barring
Call Barring on the Video Phone tab enables you to block certain categories of incoming and outgoing video calls.

NOTE: Call Barring is only available if it is supported by your service provider.

NOTE: Before setting up Call Barring, you will need to obtain your call barring password from your service provider.
To set up Call Barring for video calls:
- From the Today screen, tap Start > Settings.
- On the Personal tab, tap Phone.
- Tap the Video Phone tab.
- In the list of services, tap Call Barring, then tap the Get Settings... button. The settings will then be read from the network.
- When the current settings are displayed, select the settings required for blocking incoming and outgoing video calls.
- Tap ok.
- Enter the call barring password, then tap ok. The settings are sent to the network.
Settings
Call Forwarding
Call Forwarding on the Video Phone tab enables you to forward incoming video calls to another number.

NOTE: Call Forwarding is only available if it is supported by your service provider.
To set up Call Forwarding for video calls:
- From the Today screen, tap Start > Settings.
- On the Personal tab, tap Phone.
- Tap the Video Phone tab.
- In the list of services, tap Call Forwarding, then tap the Get Settings... button. The settings will then be read from the network.
- When the current settings are displayed, select the conditions during which you would like to forward incoming video calls. Enter the phone number(s) for forwarded calls.
- Tap ok. The settings are sent to the network.
Call Waiting
Call Waiting on the Video Phone tab notifies you of incoming video calls when you are already in a call. You will then have the option to answer or ignore the second call.

NOTE: Call Waiting is only available if it is supported by your service provider.
To enable Call Waiting for video calls:
- From the Today screen, tap Start > Settings.
- On the Personal tab, tap Phone.
- Tap the Video Phone tab.
- In the list of services, tap Call Waiting, then tap the Get Settings... button. The settings will then be read from the network.
- When the current settings are displayed, select whether or not you wish to be notified of waiting video calls.
- Tap ok. The settings are sent to the network.
Settings
Sounds & Notifications
You can set a different sound for different events. The sound can be set to something different for each type of event.

TIP: You can also use custom sounds. You can copy the files to your phone from your PC using ActiveSync, or download them from the Internet.
Setting the sound and notification for an event
To set the sound and notification for an event:
- From the Today screen, tap Start > Settings.
-
On the Personal tab, tap Sounds & Notifications.
-
On the Sounds tab, select the required settings from the following:
-
Tick the Events checkbox to enable sounds for events such as warnings.
- Tick the Programs checkbox to enable sounds for applications.
-
Select whether to enable sounds for Screen taps or pressing Hardware buttons. You can also specify the level of the sounds.
-
On the Notifications tab, select the specific sound required for each event, and the way in which you want to be notified of the event. Available items are dependent on the event selected.

TIP: Tap the Play icon to listen to a sample of the selected sound.
- Tap ok when you have finished.

TIP: Disabling sounds and flashing lights for events will help to conserve battery power.
Settings
Customising the Today screen
You can customise the Today screen using:
- A theme. This is a pre-packaged file that includes a picture, colour scheme and new layout. It will be a *.hme or *.cab file type.
- A picture file. This will only replace the background of the Today screen.

TIP: You can copy the theme and picture files to your phone from your PC using ActiveSync, or download them from the Internet.
Setting the theme for the Today screen
To set the theme for the Today screen:
- From the Today screen, tap Start > Settings.
- On the Personal tab, tap Today.
- On the Appearance tab, tap the required theme for the Today screen.
- Tap ok.
Setting a picture as the Today screen background
To set a picture as the Today screen background:
- From the Today screen, tap Start > Settings.
- On the Personal tab, tap Today.
- On the Appearance tab, tick the Use this picture as the background checkbox.
- Tap the Browse button to view the picture files.
- Tap the file name of the selected picture.
- Tap ok.
Setting information displayed on the Today screen
To set the information displayed on the Today screen:
- From the Today screen, tap Start > Settings.
- On the Personal tab, tap Today.
- Tap the Items tab.
- Tick the checkboxes for the items that you want to display on the Today screen. You can also set the order of the items on the screen, and set extra options for some items such as Tasks.
- Tap ok when you have finished.
Settings
About
The About setting enables you to view technical information about your Toshiba phone, including the operating system and memory of the phone. This information is useful when installing new applications on your Toshiba phone.
You can also change the name of your Toshiba phone as it is displayed to other devices (for example, when using Bluetooth).
Viewing phone information
To view the phone information:
- From the Today screen, tap Start > Settings.
- Tap the System tab.
- Tap About. The phone information is displayed on the Version tab.
- Tap ok when you have finished.
Changing device name
To change the device name:
- From the Today screen, tap Start > Settings.
- Tap the System tab.
- Tap About.
-
Tap the Device ID tab.
-
Enter a new name for your Toshiba phone in the Device name: field. You can also add a description if required.

NOTE: The device name should start with a letter and contain only a combination of the letters A to Z, numbers 0 to 9, and underscore and hyphen characters.
- Tap ok.

NOTE: The device name is used to identify your Toshiba phone in the following situations:
- Synchronising with PC.
- Connecting to a network.
- Restoring information from a back up.
- Bluetooth pairing.
• Data exchange via beaming.
Settings
Backlight settings
You can adjust the brightness of the backlight, and set the backlight to dim after a specific amount of time has elapsed.
You can configure settings to prolong battery power. To change the backlight settings:
- From the Today screen, tap Start > Settings.
- Tap the System tab.
- Tap Backlight.
- On the Brightness tab, you can adjust the brightness of the screen when using battery or external power.
- On the On battery power tab, you can select when to turn off the backlight when using battery power, and specify the time delay.
- On the On external power tab, you can select when to turn off the backlight when using external power, and specify the time delay.
- Tap ok when you have finished.

NOTE: The higher the brightness, and the longer the backlight remains on, the more power will be used.
Certificates
To view certificate details:
- From the Today screen, tap Start > Settings.
- Tap the System tab.
- Tap Certificates. On each tab, the certificate names, along with their issuing authority and expiry date, are displayed. Tap a certificate to view its details.
Settings
Clock & Alarms
Setting the date and time
To set the date and time:
- From the Today screen, tap Start > Settings.
- Tap the System tab.
- Tap Clock & Alarms.
- On the Time tab, in the Home section, you can set the time zone, current time and date for when you are at home.
- In the Visiting section, you can set the time zone, current time and date when visiting another country or time zone.
- Tap ok when you have finished.

NOTE: These settings are only lost if you reset your Toshiba phone. Your settings are saved if you power off the phone, or if the battery is fully discharged.
Setting an alarm
To set an alarm:
- From the Today screen, tap Start > Settings.
- Tap the System tab.
- Tap Clock & Alarms.
-
Tap the Alarms tab.
-
To enter a description of the alarm, tap < Description >, and enter a description using the keyboard or another input method.
- Tap the letters below the < Description > field to select the days when the alarm is required.
- Tap the time display on the right to set a time for this alarm.
- Tap the bell icon to select the types of alarm to use.
- Tap ok twice.
Cancelling an alarm
To cancel an alarm:
- From the Today screen, tap Start > Settings.
- Tap the System tab.
- Tap Clock & Alarms.
- Tap the Alarms tab.
- Untick the checkbox beside the alarm you want to cancel.
- Tap ok.
Settings
Setting the clock display
To set the clock to be displayed on the title bar at all times:
- From the Today screen, tap Start > Settings.
- Tap the System tab.
- Tap Clock & Alarms.
- Tap the More tab.
- Tick the Display the clock on the title bar in all programs checkbox.
- Tap ok.
Customer Feedback
Customer Feedback sends anonymous information to Microsoft for use in helping improve Windows Mobile software.

NOTE: You will not incur any data charges to send this information.
To enable/disable Customer Feedback:
- From the Today screen, tap Start > Settings.
- Tap the System tab.
- Tap Customer Feedback.
- Tap Send Feedback or Don't Send Feedback as required.
- Tap ok.
Encryption
This feature allows you to secure sensitive information on your storage card. The data will only be accessible when the card is installed in your Toshiba phone. If the card is lost or stolen, the information remains secure. The contents of the storage card cannot be accessed by anyone else because they are encrypted.
To encrypt the contents of your storage card:
- From the Today screen, tap Start > Settings.
- Tap the System tab.
- Tap Encryption.
- Tick the Encrypt files when placed on a storage card. checkbox.
- Tap ok.

WARNING: Anyone in possession of the encryption key can decrypt and access information stored on the storage card.
Settings
Error Reporting
Error Reporting sends data from your Toshiba phone to Microsoft technical support groups. The data is used to diagnose program errors for devices running Windows Mobile software.
If a program error occurs, Error Reporting starts automatically. The information Microsoft receives is used by programming groups at Microsoft. The data is used for quality control and will not be used for tracking individual users, installations or for any marketing purpose.

NOTE: You will not incur any data charges to send this information.
To enable/disable Error Reporting:
- From the Today screen, tap Start > Settings.
- Tap the System tab.
- Tap Error Reporting.
- Tap Enable error reporting or Disable error reporting as required.
- Tap ok.
External GPS
To set up External GPS:
- From the Today screen, tap Start > Settings.
- Tap the System tab.
- Tap External GPS.
- On the Programs tab, select the port that your Toshiba phone will use to obtain GPS data.
- On the Hardware tab, select the hardware port to which your GPS device is connected. You can also set the baud rate.
- On the Access tab, tick the Manage GPS automatically (recommended) checkbox if required. You are strongly advised to use this feature as it will enable Windows Mobile to manage access to your GPS device, and allows multiple programs to obtain GPS data simultaneously.
- Tap ok when you have finished.
Settings
Headset Volume Limiter
Headset Volume Limiter enables you to set a maximum headset volume to suit your needs.
To set the maximum headset volume:
- From the Today screen, tap Start > Settings.
- Tap the System tab.
- Tap Headset Volume Limiter.
-
Slide the marker to change the maximum volume. The dB level for the current setting is displayed. To reset the maximum volume to the default value, tap Reset to Default.
-
Tap ok.
Memory management settings
To ensure optimum performance of your Toshiba phone, it is necessary to maintain sufficient memory.
Checking memory
To check the memory available on your Toshiba phone:
- From the Today screen, tap Start > Settings.
- Tap the System tab.
- Tap Memory.
- On the Main tab, you can view the details of Storage and Program memory.
- On the Storage Card tab, you can view the memory available on the storage card.
- Tap Find large files using storage memory. to search for specific files.
Managed Programs
Managed Programs lists applications that have been installed remotely by your company system administrator. You can view details of these applications.
Settings
Power settings
The Power settings enable you to check the battery status and configure settings to prolong battery power.
To view and change Power settings:
- From the Today screen, tap Start > Settings.
- Tap the System tab.
- Tap Power.
- On the Battery tab, the remaining battery power is displayed.
- On the Advanced tab, you can select when to turn off the phone when using battery or external power, and specify the time delay.
- Tap ok when you have finished.
Regional Settings
Regional Settings enables you to specify the styles in which numbers, currency, time and date are displayed.
To change Regional Settings:
- From the Today screen, tap Start > Settings.
- Tap the System tab.
- Tap Regional Settings.
- On the Region tab, select your region in the drop-down list. Changing this setting automatically updates the styles in which numbers, currency, time and date are displayed to the defaults for the selected region.
- Change specific items on the other tabs if required.
- Tap ok when you have finished.
Settings
Remove Programs
Remove Programs enables you to delete applications that you have installed.

NOTE: Programs that were pre-installed on your Toshiba phone cannot be removed in this way.
To remove a program:
- From the Today screen, tap Start > Settings.
- Tap the System tab.
- Tap Remove Programs.
- Tap the application to remove, then tap Remove.
- Tap Yes to confirm the deletion.
- Tap ok when you have finished removing programs.
Screen settings
To adjust screen settings:
- From the Today screen, tap Start > Settings.
- Tap the System tab.
- Tap Screen.
- On the General tab, you can set up the screen orientation and alignment.
- On the ClearType tab, you can enable ClearType, which smooths the edge of screen fonts.
- On the Text Size tab, you can slide the marker to adjust the text size. An example of the selected text size is displayed.
- Tap ok when you have finished.
Settings
Spb Mobile Shell for Toshiba
Spb Mobile Shell for Toshiba provides customisation settings for the TOSHIBA User Interface.
You can customise items such as the Now Screen, Today plug-in, softkeys, tabs and weather updates. To access Spb Mobile Shell for Toshiba settings:
- From the Today screen, tap Start > Settings.
- Tap the System tab.
- Tap Spb Mobile Shell for Toshiba.
Customising the TOSHIBA User Interface
On the Now Screen tab, tick the Show the Now Screen when device wakes up checkbox to display the Now Screen each time your Toshiba phone wakes up from standby mode.
Tap the Configure... button to set the alarm and calendar display settings for the Now Screen. If you select Auto in the display settings, the displayed item will be automatically adjusted for the best fit and information view in the Now Screen.
On the Today tab, tick the Auto-hide the tab content checkbox to see only the tab headers in the Today plug-in. You can tap the header icon to view the hidden tab content.
Tick the Backlight indicator in the Home Tab checkbox to show the backlight indicator icon in the Home Tab for quick access.
You can also set the items to be available on the left and right softkeys.

NOTE: The Today plug-in is disabled by default. To enable it:
- From the Today screen, tap Start > Settings.
- On the Personal tab, tap Today.
- Tap the Items tab.
- Tick the checkboxes for the TOSHIBA User Interface items that you want to display on the Today screen.
- Tap ok when you have finished.
On the Animation tab, you can change the animation transitions for the main TOSHIBA User Interface screens.
Tick the Enable taskbar smart gestures checkbox to enable launching of the main TOSHIBA User Interface screens from any application. To use a smart gesture, tap and hold in the middle of the title bar/task bar while moving your finger down the screen. When the grey pop-up windows are displayed, drag your finger to the required screen
Settings
then release. The required screen will be displayed. Tick the Animate transitions checkbox to enable animated transitions for the main TOSHIBA User Interface screens.
You can also select the type of animation effect when shifting between panels of a main window, and when moving backwards and forwards between sub-panels of a main window,
On the Tabs tab, you can select items to be displayed in the Today plug-in. You can also change the order in which the items are displayed.
On the Advanced tab, you can customise the advanced options for the main TOSHIBA User Interface screens. You can also reset the settings for these screens to their defaults.
On the Weather tab, you can select the required units for temperature measurement.
You can also select and remove cities that you would like to receive weather information for, and select whether to update the weather information automatically.
System Information
System Information displays all of the system information for your Toshiba phone.
To view System Information:
- From the Today screen, tap Start > Settings.
- Tap the System tab.
- Tap System Information.
- Tap ok when you have finished.
Settings
Task Manager
Task Manager enables you to quickly switch between currently running applications. It also enables you to end an application if it becomes unstable or the memory is low.
Switching between applications
To switch between applications using Task Manager:
- From the Today screen, tap Start > Settings.
- Tap the System tab.
- Tap Task Manager.
- Double-tap on the application to access.

TIP: Alternatively, tap the application, then tap Menu > Switch To.
Ending applications
To end an application using Task Manager:
- From the Today screen, tap Start > Settings.
- Tap the System tab.
- Tap Task Manager.
-
Tap the application to end, then tap End Task. To end all running applications, tap Menu > End All Tasks, then tap Yes to confirm the action.
-
Tap Menu > Exit when you have finished.
Settings
Windows Update
You can use Windows Update to update the Microsoft applications on your Toshiba phone.
Setting up Windows Update
To set up Windows Update:
- From the Today screen, tap Start > Settings.
- Tap the System tab.
- Tap Windows Update.
- Tap Next.
- Select one of the following options:
• Automatic - your Toshiba phone will automatically check for and download important updates.
- Manual - you will need to manually download and install important and optional updates.
-
Tap Next.
-
Tap Finish.
Checking for updates

NOTE: Your Toshiba phone will need to connect to the update server to check for updates. Refer to Internet connections in Connectivity for details of setting up the connection.
To check for updates:
- From the Today screen, tap Start > Settings.
- Tap the System tab.
- Tap Windows Update.
- Tap Check Now.
Connections
For details of the Connections settings, refer to the Connectivity section.
Specifications
| System Information | |
| Processor Qualcomm | ^ MSM7200 Processor at 400MHz |
| Memory RAM : 128 MB | ROM : 256 MB |
| Operating System Windows Mobile | ^ 6.1 Professional |
| UMTS/HSDPA/HSUPA GSM/GPRS/EDGE Frequency Range | |
| Within 3G (UMTS) 850 824 - 894 MHz | |
| Within 3G (UMTS) 1900 1850 - 1990 MHz | |
| Within 3G (UMTS) 2100 1920 - 2170 MHz | |
| Within GSM 850 824 - 894 MHz | |
| Within GSM 900 880 - 960 MHz | |
| Within DCS 1800 1710 - 1880 MHz | |
| Within PCS 1900 1850 - 1990 MHz | |
| Continuous Talk Time | |
| Within 3G (UMTS) area Approximately 240 minutes | |
| Video call Approximately 150 minutes | |
| Within GSM area Approximately 330 minutes | |
| Continuous Standby Time | |
| Within 3G (UMTS) area Approximately 315 hours | |
| Within GSM area Approximately 315 hours | |
Specifications
| Maximum Output | |
| Within 3G (UMTS) 850 Class 3 0.25W | |
| Within 3G (UMTS) 1900 Class 3 0.25W | |
| Within 3G (UMTS) 2100 Class 3 0.25W | |
| Within GSM 850 Class 4 2W | |
| Within GSM 900 Class 4 2W | |
| Within DCS 1800 Class 1 1W | |
| Within PCS 1900 Class 1 1W | |
| Dimensions (H × W × D) Approximately | 112.5 mm x 61 mm x 13.9 mm |
| Weight Approximately 123 g | |
| AC Charger | |
| Input voltage 100 to 240 VAC, 50/60 Hz | |
| Charging temperature range 5 to 35 °C | |
| Battery charging time Approximately 160 minutes | |
| Display | |
| LCD 2.8" TFT LCD with Touch screen | |
| Resolution 240 x 320 (64k colours) | |
Specifications
| Audio/Video codecs | |
| Audio AAC, AAC+, AMR, AMRNB, AWB, | M4A, MID, MMF, MP3,WMA, WAV |
| Video 3GP, ASF, AVI, H.263, MPEG-4, W | MV |
| Connectivity | |
| Bluetooth BluetoothTM ver2.0 + EDR (Power Class 2) | Advanced Audio Distribution Profile (A2DP)Audio/Video Remote Control Profile (AVRCP)Generic Access Profile (GAP)Hands-Free Profile (HFP)Headset Profile (HSP)Human Interface Device Profile (HID)Object Push Profile (OPP)Personal Area Networking Profile (PAN)Serial Port Profile (SPP) |
| Wireless LAN IEEE 802.11b/g | AES, TKIP, WEP, WPA, WPA-PSK, WPA2, WPA2-PSK |
| Interface | |
| Cable, headset and phone charging mini | USB (Client, Full Speed) / Headset/ Charger |
| Headset Connector mini USB stereo headset | |
| Expansion slot microSDTM | |
Troubleshooting
| Problem Possible cause Possible solution | ||
| Cannot switch phone on | Battery out of power Charge the battery (see page 37). | |
| Battery not installed correctly Ensure that the battery is inserted correctly (see page 34). | ||
| Phone switches off automatically | Battery out of power Charge the battery (see page 37). | |
| Cannot charge battery | Battery not installed correctly Ensure that the battery is inserted correctly (see page 34). | |
| AC charger not connected Ensure that the AC charger is connected to the phone and to a working AC outlet. | ||
| Connectors are dirty Clean the connectors of the AC charger and battery. | ||
| Battery has worn out Replace the battery. | ||
| Battery or AC charger is damaged | Replace the battery or charger. Contact your dealer for assistance. | |
| Battery loses power quickly | Backlight and Power settings need to be adjusted | Adjust settings to optimise power performance (see pages 143 and 148). |
Troubleshooting
| Problem Possible cause Possible solution | ||
| Network not displayed | SIM card not installed correctly Ensure that the SIM card is inserted correctly (see page 34). | |
| Contacts between SIM card and phone are dirty | Gently clean the contacts of the SIM card and phone. | |
| Network signal is weak Move clear of any obstructions that may block the signal. | ||
| SIM card is damaged Contact your service provider to obtain a replacement SIM card. | ||
| Cannot make a voice or video call | You are outside of your network service area | Connect to a different network if this is supported by your service provider (see page 138). |
| A video call can only be made in an area with UMTS/3G coverage. | Ensure that the icon indicating that you are in an area with UMTS/3G coverage is displayed. | |
| Phone or SIM card is locked | Unlock the phone or SIM card (see page 130). | |
| Call Barring is active | Deactivate Call Barring (see page 134). | |
| Cannot answer a voice or video call | A video call can only be received in an area with UMTS/3G coverage. | Ensure that the icon indicating that you are in an area with UMTS/3G coverage is displayed. |
| Call Forwarding is active | Deactivate Call Forwarding (see page 135). | |
| Call Barring is active | Deactivate Call Barring (see page 134). | |
| No ringing for an incoming call | Phone is set to not ring for incoming calls | Edit the ringtone settings (see page 133). |
Troubleshooting
| Problem Possible cause Possible solution | ||
| Poor call quality Net | Network signal is weak Move clear of any | obstructions that may block the signal. |
| Network signal is changing frequently, e.g. when travelling on a train. | Wait until signal strength is consistently high before making or answering a call. | |
| Other party in a call cannot hear you | Phone is muted Unmute the phone (see page 49). | |
| Cannot send or receive text messages | Your service provider is not enabling this service | Contact your service provider to check your subscription status. |
| Service centre number is not correct | Ensure that the service centre number is correct (see page 135). To obtain the number, contact your service provider. | |
| Cannot send or receive MMS messages | Your service provider is not enabling this service | Contact your service provider to check your subscription status. |
| MMS settings are missing or incorrect | Ensure that the MMS settings are correct (see page 56). To obtain the settings, contact your service provider. | |
| Cannot access the Internet | Your service provider is not enabling this service | Contact your service provider to check your subscription status. |
| Network settings are missing or incorrect | Ensure that the network settings are correct (see page 120). To obtain the settings, contact your service provider. | |
Troubleshooting
| Problem Possible cause Possible solution | ||
| Storage memory is low | Too many items stored on the phone | Delete any unwanted messages, clear the Internet history, and delete any unwanted files. |
| Storage card is not recognised | Storage card not installed correctly En | Ensure that the storage card is inserted correctly (see page 35). |
| Storage card is damaged Replace the | storage card. | |
Purchase record
For your future reference, we recommend that you fill in your purchase details in the form below.
Serial Number*:
Dealer Name:
Purchase Date:
* The serial number is printed on the bottom of the battery compartment.
Menu tree
Start
Today
Office Mobile
Excel Mobile
OneNote Mobile
PowerPoint Mobile
Word Mobile
Calendar
Contacts
Internet Explorer
Messaging
Text Messages
Outlook E-mail
Setup E-mail
Phone
Help
Programs
Games
TOSHIBA User Interface
ActiveSync
A-GPS
AutoConfig
AutoInstall
BlackList
Calculator
Camera
Certificate Enrollment
File Explorer
FM Radio
Full Screen Keyboard
Getting Started
Home
Image Editor
Image To Text
Internet Sharing
JBlend
Messenger
Notes
Picsel Viewer
Pictures & Videos
Search
SIM Toolkit
Streaming Player
Task Manager
Tasks
Windows Live
Windows Media
Menu tree
Settings
Personal
Buttons
Input
Lock
Menus
Owner Information
Phone
Sounds & Notifications
Today
System
About
Backlight
Certificates
Clock & Alarms
Customer Feedback
Encryption
Error Reporting
External GPS
Headset Volume Limiter
Managed Programs
Memory
Power
Regional Settings
Remove Programs
Screen
Spb Mobile Shell for Toshiba
System Information
Task Manager
Windows Update
Connections
Beam
Bluetooth
Cell Broadcast
Connections
CSD Line
Domain Enroll
Network Mode
USB to PC
Wi-Fi
Wireless Manager
End User License Agreements (EULAs)
MICROSOFT SOFTWARE LICENSE TERMS FOR WINDOWS MOBILE 6.1 SOFTWARE
These license terms are an agreement between you and TOSHIBA. Please read them. They apply to the software included on this device. The software also includes any separate media on which you received the software.
The software on this device includes software licensed by TOSHIBA from Microsoft Corporation or its affiliate.
The terms also apply to any
- updates,
- supplements,
- Internet-based services, and
- support services
for this software, unless other terms accompany those items. If so, those terms apply.
As described below, using some features also operates as your consent to the transmission of certain standard computer information for Internet-based services.
By using the software, including use on this device, you accept these terms. If you do not accept them, do not use the device or software.
Instead, contact TOSHIBA to determine its return policy for a refund or credit.
WARNING: If the software contains voice operated technologies, then operating this software requires user attention. Diverting attention away from the road while driving can possibly cause an accident or other serious consequence. Even occasional, short diversions of attention can be dangerous if your attention is diverted away from your driving task at a critical time. TOSHIBA and Microsoft make no representations, warranties or other determinations that ANY use of this software is legal, safe, or in any manner recommended or intended while driving or otherwise operating a motor vehicle.
If you comply with these license terms, you have the rights below.
- USE RIGHTS. You may use the software on the device with which you acquired the software.
- ADDITIONAL LICENSING REQUIREMENTS AND/OR USE RIGHTS.
a. Specific Use. TOSHIBA designed this device for a specific use. You may only use the software for that use.
b. Included Microsoft Programs and Additional Required Licenses. Except as provided below, these license terms apply to
End User License Agreements (EULAs)
all Microsoft programs included with the software. If the license terms with any of those programs give you other rights that do not expressly conflict with these license terms, you also have those rights.
i. This agreement does not grant you any rights with respect to the Windows Mobile Device Center, Microsoft ActiveSync or Microsoft Outlook 2007 Trial which are subject to the licenses accompanying those items.
c. Speech Recognition. If the software includes speech recognition component(s), you understand that speech recognition is an inherently statistical process and that recognition errors are inherent in the process. Neither TOSHIBA nor Microsoft or their suppliers shall be liable for any damages arising out of errors in the speech recognition process.
d. Phone Functionality. If the device software includes phone functionality, all or certain portions of the device software may be inoperable if you do not have and maintain a service account with a wireless telecommunication carrier ("Mobile Operator"), or if the Mobile Operator's network
is not operating or configured to operate with the device.
- SCOPE OF LICENSE. The software is licensed, not sold. This agreement only gives you some rights to use the software. TOSHIBA and Microsoft reserve all other rights. Unless applicable law gives you more rights despite this limitation, you may use the software only as expressly permitted in this agreement. In doing so, you must comply with any technical limitations in the software that allow you to use it only in certain ways. You shall not:
• work around any technical limitations in the software;
- reverse engineer, decompile or disassemble the software;
• make more copies of the software than specified in this agreement;
- publish the software for others to copy;
- rent, lease or lend the software; or
- use the software for commercial software hosting services.
Except as expressly provided in this agreement, rights to access the software on this device do not give you any right to implement Microsoft patents or other Microsoft intellectual property in software or
End User License Agreements (EULAs)
devices that access this device.
You may use remote access technologies in the software such as Remote Desktop Mobile to access the software remotely from a computer or server.
You are responsible for obtaining any licenses required for use of the protocols to access other software.
- INTERNET-BASED SERVICES. Microsoft provides Internet-based services with the software. Microsoft may change or cancel them at any time.
a. Consent for Internet-Based Services. The software features described below connect to Microsoft or service provider computer systems over the Internet. In some cases, you will not receive a separate notice when they connect. You may switch off some of these features or not use them. For more information about these features, visit http://go.microsoft.com/fwlink/?LinkId=81931.
By using these features, you consent to the transmission of this information.
Microsoft does not use the information to identify or contact you.
Device Information. The following features use Internet protocols, which send to the
appropriate systems device information, such as your Internet protocol address, the type of operating system, browser and name and version of the software you are using, and the language code of the device where you installed the software. Microsoft uses this information to make the Internet-based services available to you.
- Windows Mobile Update Feature. The Windows Mobile Update feature provides you the ability to obtain and install software updates on your device if updates are available. You may choose not to use this feature. TOSHIBA and/or your Mobile Operator may not support this feature or an update for your device.
• Windows Media Digital Rights
Management. Content owners use Windows Media digital rights management technology (WMDRM) to protect their intellectual property, including copyrights. This software and third party software use WMDRM to play and copy WMDRM-protected content. If the software fails to protect the content, content owners may ask Microsoft to revoke the software's ability to use WMDRM to play or copy protected content. Revocation does not
End User License Agreements (EULAs)
affect other content. When you download licenses for protected content, you agree that Microsoft may include a revocation list with the licenses. Content owners may require you to upgrade WMDRM to access their content. Microsoft software that includes WMDRM will ask for your consent prior to the upgrade. If you decline an upgrade, you will not be able to access content that requires the upgrade.
b. Misuse of Internet-based Services. You shall not use these services in any way that could harm them or impair anyone else's use of them. You shall not use the services to try to gain unauthorized access to any service, data, account or network by any means.
- NOTICES ABOUT THE MPEG-4 VISUAL STANDARD. The software may include MPEG-4 visual decoding technology. This technology is a format for data compression of video information. MPEG LA, L.L.C. requires this notice: USE OF THIS PRODUCT IN ANY MANNER THAT COMPLIES WITH THE MPEG 4 VISUAL STANDARD IS PROHIBITED, EXCEPT FOR USE DIRECTLY RELATED TO (A) DATA OR INFORMATION (i) GENERATED BY AND OBTAINED WITHOUT CHARGE FROM A
CONSUMER NOT THEREBY ENGAGED IN A BUSINESS ENTERPRISE, AND (ii) FOR PERSONAL USE ONLY; AND (B) OTHER USES SPECIFICALLY AND SEPARATELY LICENSED BY MPEG LA, L.L.C. If you have questions about the MPEG-4 visual standard, please contact MPEG LA, L.L.C., 250 Steele Street, Suite 300, Denver, CO 80206; www.mpegla.com.
- DIGITAL CERTIFICATES. The software uses digital certificates in X.509 format. These digital certificates are used for authentication.
- CONNECTIVITY SOFTWARE. Your device package may include Windows Mobile Device Center or Microsoft ActiveSync software. If it is included, then you may install and use it in accordance with the license terms that are provided with it. If no license terms are provided, then you may install and use only one (1) copy of the software on a single computer.
- NETWORK ACCESS. If you are using a network, such as an employer network, the network administrator may limit features or functionality on your device.
- PRODUCT SUPPORT. Contact TOSHIBA for support options. Refer to the support information provided with the device.
End User License Agreements (EULAs)
- LINKS TO THIRD PARTY WEBSITES. If the software provides links to third party websites, those links are provided to you only as a convenience, and the inclusion of any link does not imply an endorsement of the third party website by Microsoft or TOSHIBA.
- BACKUP COPY. You may make one backup copy of the software. You may use it only to reinstall the software on the device.
- PROOF OF LICENSE. If you acquired the software on the device, or on a disc or other media, a genuine Certificate of Authenticity label with a genuine copy of the software identifies licensed software. To be valid, this label must be affixed to the device, or included on or in TOSHIBA's software packaging. If you receive the label separately, it is not valid. You should keep the label on the device or packaging to prove that you are licensed to use the software. To identify genuine Microsoft software, see http://www.howtotell.com.
- TRANSFER TO A THIRD PARTY. You may transfer the software only with the device, the Certificate of Authenticity label, and these license terms directly to a third party. Before the transfer, that party must agree that these license terms apply to the transfer and use of the
software. You may not retain any copies of the software including the backup copy.
- RESTRICTED USE. The Microsoft software was designed for systems that do not require fail-safe performance. You may not use the Microsoft software in any device or system in which a malfunction of the software would result in foreseeable risk of injury or death to any person. This includes operation of nuclear facilities, aircraft navigation or communication systems and air traffic control.
- NO WARRANTIES FOR THE SOFTWARE. The software is provided "as is". You bear all risks of using it. Microsoft gives no express warranties, guarantees or conditions. Any warranties you receive regarding the device or the software do not originate from, and are not binding on, Microsoft or its affiliates. When allowed by your local laws, TOSHIBA and Microsoft exclude implied warranties of merchantability, fitness for a particular purpose and non-infringement.
- LIABILITY LIMITATIONS. You can recover from Microsoft and its affiliates only direct damages up to fifty U.S. Dollars (U.S. \$50.00). You cannot recover any other damages, including consequential, lost
End User License Agreements (EULAs)
profits, special, indirect or incidental damages.
This limitation applies to:
- anything related to the software, services, content (including code) on third party internet sites, or third party programs, and
- claims for breach of contract, breach of warranty, guarantee or condition, strict liability, negligence, or other tort to the extent permitted by applicable law. It also applies even if Microsoft should have been aware of the possibility of the damages. The above limitation may not apply to you because your country may not allow the exclusion or limitation of incidental, consequential or other damages.
- EXPORT RESTRICTIONS. The software is subject to United States export laws and regulations. You must comply with all domestic and international export laws and regulations that apply to the software. These laws include restrictions on destinations, end users and end use. For additional information, see www.microsoft.com/exporting.
End User License Agreement for ArcSoft Software
The following is a legal software license agreement between you, the software end user, and ArcSoft, Inc. Carefully read this license agreement before using the relevant ArcSoft software ("Software"). Installing the Software on a computer or other hardware device indicates that you have read this license agreement and agree to its terms.
- Grant of License. This license permits you to use one copy of the Software included in this package or product on any single computer. For each software licensee, the program can be "in use" on only one computer or hardware device at any given time. The Software is "in use" when it is either loaded into RAM or installed into the hard disk or other permanent memory of a computer or other hardware device. A special license permit from ArcSoft is required if the program is going to be installed on a network server for the sole purpose of distribution to other computers. You may not modify, translate, reverse assemble, decompile, disassemble or otherwise attempt (i) to defeat, avoid, bypass, remove, deactivate or otherwise circumvent any software protection mechanisms in the Software,
End User License Agreements (EULAs)
including without limitation any such mechanism used to restrict or control the functionality of the Software, or (ii) to derive the source code or the underlying ideas, algorithms, structure or organization from the Software (except to the extent that such activities may not be prohibited under applicable law).
- Copyright. The Software contained in this package or device is protected by United States copyright laws, international treaty provisions, and all other applicable national laws. The Software must be treated like all other copyrighted materials (e.g. books and musical recordings). This license does not allow the Software to be rented or leased, and the written materials accompanying the Software (if any) may not be copied.
-
Ownership. Title, ownership rights, and all intellectual property rights in and to the Software and any accompanying documentation, and any copy of the foregoing, shall remain the sole and exclusive property of ArcSoft and/or its third party licensors. You agree to abide by the copyright law and all other applicable laws. You acknowledge that the Software contains valuable confidential information and trade secrets of ArcSoft and/or its third party licensors.
-
Warranty Disclaimer. NO WARRANTIES, EITHER EXPRESS OR IMPLIED, ARE MADE WITH RESPECT TO THIS SOFTWARE, INCLUDING BUT NOT LIMITED TO THE IMPLIED WARRANTIES OF MERCHANTABILITY AND FITNESS FOR A PARTICULAR PURPOSE AND WARRANTIES FOR NON-INFRINGEMENT OF INTELLECTUAL PROPERTY, AND ARCSOFT EXPRESSLY DISCLAIMS ALL WARRANTIES NOT STATED HEREIN. YOU ASSUME THE ENTIRE RISK AS TO THE QUALITY AND PERFORMANCE OF THE SOFTWARE. SHOULD THE SOFTWARE PROVE DEFECTIVE, YOU, AND NOT ARCSOFT OR AN AUTHORIZED RESELLER, ASSUME THE ENTIRE COST OF NECESSARY SERVICING, REPAIR, OR CORRECTION. SOME STATES DO NOT ALLOW THE EXCLUSION OF IMPLIED WARRANTIES, SO THE ABOVE EXCLUSION MAY NOT APPLY TO YOU. THIS WARRANTY GIVES YOU SPECIFIC LEGAL RIGHTS, AND YOU MAY ALSO HAVE OTHER RIGHTS THAT VARY FROM STATE TO STATE.
YOUR SOLE REMEDY AND THE ENTIRE LIABILITY OF ARCSOFT ARE SET FORTH
End User License Agreements (EULAs)
ABOVE. IN NO EVENT WILL ARCSOFT BE LIABLE TO YOU OR ANY OTHER PERSON FOR ANY DAMAGES, INCLUDING ANY INCIDENTAL OR CONSEQUENTIAL DAMAGES, EXPENSES, LOST PROFITS, LOST SAVINGS, OR OTHER DAMAGES ARISING OUT OF USE OF OR INABILITY TO USE SUCH SOFTWARE.
- No Liability for Consequential Damages. In no event shall ArcSoft be liable for any damages whatsoever (including but not limited to damages for loss of business profits, business interruption, loss of business information, or any other pecuniary loss) which results from an inability to use this Software, even if ArcSoft, Inc. has been advised of the possibility of such damages. Because some states/jurisdictions do not allow the exclusion or limitation of consequential or incidental damages, the above limitations may not apply to you.
- Export. Subject to permission of the appropriate United States or foreign licenses, export or re-export the product incorporating the Software is able to be made.
- U.S. Government Restricted Rights. If you are a unit or agency of the United States government, the Software and related
documentation are deemed to be "commercial computer software" and "commercial computer software documentation," respectively, pursuant to DFAR Section 227.7202 and FAR Section 12.212(b), as applicable. Any use, modification, reproduction, release, performing, displaying or disclosing of the Software and/or the related documentation by the United States government shall be governed solely by the terms of this Agreement and shall be prohibited except to the extent expressly permitted by the terms of this Agreement. Any technical data provided that is not covered by the above provisions is deemed to be "technical data commercial items" pursuant to DFAR Section 227.7015(a). Any use, modification, reproduction, release, performing, displaying or disclosing of such technical data shall be governed by the terms of DFAR Section 227.7015(b).
- High Risk Activities. The Software is not fault-tolerant and is not designed or intended for use in hazardous environments requiring fail-safe performance, or any other application in which the failure of the Software could lead directly to death, personal injury, or severe physical or property damage (collectively, "High Risk Activities"). ARCSOFT EXPRESSLY
End User License Agreements (EULAs)
DISCLAIMS ANY EXPRESS OR IMPLIED WARRANTY OF FITNESS FOR HIGH RISK ACTIVITIES.
-
Termination. Your rights with respect to the Software may be terminated, either immediately or after a notice period not exceeding thirty (30) days, upon unauthorized copying of the Software or failure to comply with the restrictions contained in this license agreement. Upon termination of the license, you shall cease to use thereof. [Toshiba comment: This is a ROM based product and there is no way for the end user to return or uninstall the Software thereof.]
-
Governing Law. If this product was purchased in the United States, this Agreement is governed by the laws of the state of California; otherwise, local laws may apply.
End User License Agreement for Picsel Software
- The End User shall be made aware that all copyrights and intellectual property rights in the Product are proprietary to Picsel and that PICSEL, PICSEL POWERED, PICSEL BROWSER, PICSEL DOCUMENT VIEWER, PICSEL PDF VIEWER, EPAGE, e-PAGE, DEMOCRACY OF ACCESS or the Picsel Cube Logo are trademarks or registered trademarks of Picsel Technologies Limited.
- The End User shall be prohibited from reverse engineering, disassembling, reversing translating, or in any way decoding the Product or any copying of part of it in order to derive any source code.
- US law and international agreements currently prohibit (as of May 2005) export of the device and the software to the following countries - Cuba, Iran, Libya, North Korea, Sudan and Syria.
Index
A
About 142
AC charger 157
AC charger safety 16
ActiveSync 90
A-GPS 92
Alarm 144
Animation 150
Attachments 63, 64
Auto Configurator 39
AutoInstall 92
B
Backlight 143, 150, 157
Battery 21, 33, 34, 37, 143, 148, 157
Battery safety 15
Beam 119
BlackList 93
Block Recognizer 67
Blocking video 51
Bluetooth 90, 116
Bluetooth headset 118
Bluetooth mode 116
Bluetooth security 118
Business cards 100
Buttons 129
Index
C
Calculator 94
Calendar 79
Call Barring 134, 138, 158
Call barring password 134, 138
Call Forwarding 135, 139, 158
Call History 46, 52
Call Timers 53
Call Waiting 135, 139
Caller ID 134
Camera 95
Categories 84
Cell Broadcast 119
Certificate Enrollment 97
Certificates 143
Clock 145
Conference calls 50
Contacts 45, 51, 82
Cookies 88
Creating a contact 82
Creating an e-mail 62
Creating an MMS message 57
CSD Line 125
Customer Feedback 145
D
Data connection 115
Date 144
Deleting messages 56
Device lock 130
Device name 142
Dial-up connection 122
Digital signing 63
Direct Push e-mail 115
Domain Enroll 125
Draft messages 55
Drawing 75
Index
E
Electronic devices 15
E-mail 60
Emergency calls 17, 45
Encryption 145
Ending a call 48
Ending applications 152
Error Reporting 146
European RF Exposure Information 17
Excel Mobile 78
Exchange server 60, 90
External GPS 146
F
File Explorer 97
Fixed Dialling 136
Flight Mode 115
FM Radio 97
Forwarding a message 56
Full Screen Keyboard 76
G
Games 89
Gestures 72, 150
Getting Started 99
GPRS connection 121
GSM 126
H
Hands-free 49
Headset Volume Limiter 147
Holding a call 49
Home 99
Home screen 41
Home Tab 150
Index
|
Image Editor 100
Image To Text 100
Input Options 69
Input Panel 67
International calls 46
Internet 159
Internet connections 120
Internet e-mail 60
Internet Explorer 86
Internet Favourites 87
Internet History 88
Internet Sharing 126
J
Java 102
JBlend 102
K
Keyboard 68
Keypad lock 39
Keypad tones 134
L
Letter Recognizer 68
Live Search 86
M
Making a call 45
Managed Programs 147
Meeting requests 79
Memory 147
Messaging folders 66
Messenger 103
MMS messages 56, 159
MMS settings 56
Muting a call 49
N
Network adaptor 128
Network Mode 126
Network settings 137
Notes 104
Notifications 140
Now Screen 42, 150
Index
0
Office Mobile 78
OneNote Mobile 78
Operating environment 14
Owner Information 133
P
Pairing 117
Phone layout 25
Phone lock 131
Photographs 95
Picsel Viewer 105
Pictures 84, 106
Pictures & Videos 106
PIN2 132
Power 148, 157
PowerPoint Mobile 78
Preferred Networks 137
Proxy connection 124
Q
Quick Dial screen 43
R
Receiving a call 48
Receiving MMS messages 59
Regional Settings 148
Reinitialising (hard reset) 23
Reminders 81
Removing Programs 149
Replying to a message 56
Resetting 22
Restarting 22
Ring tone 84
Ring tones 133
Index
s
Screen 149
Search 107
Security 130
Sending a text message 54
Sending and receiving e-mail 64
Sending contacts 86
Setting up e-mail 60
Signatures 66
SIM card 33, 34, 158
SIM PIN 131
SIM Toolkit 108
Slide show 106
SMS 54
Sounds 140
Speakerphone 49
Speed Dial 47
Start menu 29, 132
Starting and stopping synchronisation 91
Status icons 30
Streaming Player 108
Stylus 36
System Information 151
T
Tabs 151
Task Manager 152
Tasks 109
Text messages 54, 159
Text messages service centre 135
Themes 141
Time 144
Today plug-in 44
Today screen 28, 106, 141
Toshiba UI 150
TOSHIBA User Interface 40, 90
Transcriber 69
Transcriber toolbar 70
U
UMTS 126
Unpairing 118
USB to PC 127
Index
V
Video calls 51
Videos 95, 106
Voice mail 47, 136
Volume 49
Volume control 129
VPN connection 123
W
Weather 151
Wi-Fi 127
Wi-Fi security 128
Windows Live 106, 110
Windows Live Messenger 103
Windows Media Player 111
Windows Update 153
Wireless Manager 115
Word Completion 69
Word Mobile 79
Word Mobile 78
G810-EN-V1.1
