
MC-UL672 - Vacuum Cleaner PANASONIC - Free user manual and instructions
Find the device manual for free MC-UL672 PANASONIC in PDF.

| Brand | Panasonic |
| Model | MC-UL672 |
| Product Type | Canister Vacuum Cleaner |
| Color | Red and Black |
| Bag Type | Disposable paper bag |
| Bag Capacity | 3.5 L |
| Suction Power | 400 AW |
| Filtration System | HEPA 14 filter |
| Cord Length | 8 m |
| Operating Radius | 12 m |
| Noise Level | 75 dB(A) |
| Weight | 5.8 kg |
| Dimensions (L x W x H) | 45 x 30 x 25 cm |
| Voltage | 220-240 V |
| Power Consumption | 1200 W |
| Accessories Included | Combination tool, crevice tool, dusting brush, upholstery nozzle |
| Maintenance | Replace bag when full, clean HEPA filter every 3 months |
| Safety Features | Automatic cord rewind, thermal protection |
Frequently Asked Questions - MC-UL672 PANASONIC
User questions about MC-UL672 PANASONIC
0 question about this device. Answer the ones you know or ask your own.
Ask a new question about this device
Download the instructions for your Vacuum Cleaner in PDF format for free! Find your manual MC-UL672 - PANASONIC and take your electronic device back in hand. On this page are published all the documents necessary for the use of your device. MC-UL672 by PANASONIC.
USER MANUAL MC-UL672 PANASONIC
The model and serial number of the product may be found on the nameplate located at the back of your vacuum cleaner. You should note the model and serial number in the spaces provided and retain this book for future reference.
Model Number: ..... Serial Number: ..... Date Purchased: ..... Where Purchased: ....
Panasonic®
Operating Instructions Vacuum Cleaner
Model No. MC-UL672
natural_image
Line drawing of a vacuum cleaner with handle and ventilation slots (no text or symbols)Matsushita Electric Industrial Co., Ltd
© 2007 Matsushia Electric Industrial Co., Ltd. All rights Reserved.
C01ZDBV00E00 AC01ZDBVZ0E0 Printed in P.R.C.
We would advise that you carefully study these Operating Instructions before attempting
to operate the vacuum cleaner and that you note the Important Safety Instructions.
Please keep in a safe place with your Authorised Dealer Service booklet.
This product complies with the European directive 73/23/EEC and 89/336/EEC and with the Australian
Standards AS 3350.2.2 (1995) and Australian EMC requirements for the C-Tick Mark.
TABLE OF CONTENTS
| Page | Page | ||
| • Caution for AC Mains Lead (UK and Republic of Ireland only) | 2 | MAINTENANCE AND SERVICING | |
| • Important Safety Instructions for the user | 3 | A) Vacuum cleaner storage | 8 |
| • Cautions | 3 | B) Cleaning exterior and accessories | 8 |
| • Identification of main parts | 4 | C) Dust bin cleaning and removal | 9 |
| HOW TO OPERATE YOUR VACUUM CLEANER | D) Dust bin filter changing and cleaning | 10 | |
| A) How to attach the telescopic handle | 4 | E) Cleaning secondary filter screen | 11 |
| B) How to attach the hose | 5 | F) Exhaust filler maintenance | 11 |
| C) How to use the telescopic handle | 5 | G) Bell changing and cleaning | 12,13 |
| D) Mains lead reel | 6 | H) Blockages | 14 |
| E) ON/OFF Switch | 6 | I) How to remove the telescopic handle | 14 |
| F) Handle lock / release by foot pedal | 6 | J) Trouble-shooting guide | 15 |
| G) How to use the accessories | 7 | • Specifications | 16 |
| H) Motor protector | 7 | • Consumables / Accessories | 17 |
| I) Thermal cut-out | 7 | • Disposal Information | 18 |

CAUTION FOR AC MAINS LEAD (UK and Republic of Ireland only)
FOR YOUR SAFETY PLEASE READ THE FOLLOWING TEXT CAREFULLY
This appliance is supplied with a moulded three pin mains plug for your safety and convenience.
A 13 amp fuse is fitted in this plug.
Should the fuse need to be replaced please ensure that the replacement fuse has rating of 13 amps and that it is approved
by ASTA or BSI to BS1362.
Check for the ASTA mark of the BSI mark on the body of the fuse.
If the plug contains a removable fuse cover you must ensure that it is refitted when the fuse is replaced.
If you lose the fuse cover the plug must not be used until a replacement cover is obtained.
A replacement fuse cover can be purchased from your local Panasonic Dealer
IF THE FITTED MOULDED PLUG IS UNSUITABLE FOR THE SOCKET OUTLET IN YOUR HOME THEN THE FUSE SHOULD BE REMOVED AND THE PLUG CUT OFF AND DISPOSED OF SAFELY. THERE IS A DANGER OF SEVERE ELECTRICAL SHOCK IF THE CUT OFF PLUG IS INSERTED INTO ANY 13 AMP SOCKET.
If a new plug is to be fitted please observe the wiring code as shown below.
If in any doubt please consult a qualified electrician.
IMPORTANT: The wires in this mains lead are coloured in accordance with the following code:
Blue : Neutral
As the colours of the wire in the mains lead of this appliance may not correspond with the coloured markings identifying the terminals in your plug, proceed as follows:
The wire which is coloured BLUE must be connected to the terminal in the plug which is marked with the letter N or coloured BLACK.
The wire which is coloured BROWN must be connected to the terminal in the plug which is marked with the letter L or coloured RED.
Under no circumstances should either of these wires be connected to the earth terminal of the three pin plug, marked with the letter E or the Earth Symbol 12
How to replace the Fuse:
• There are two types of the supplied AC Mains Lead : A and B as shown below.
1 Open the fuse compartment with a screwdriver
2 Replace the fuse and fuse cover if detachable.

natural_image
Four-step diagram showing a plug-in socket with wires and connectors, no text or symbols presentTYPE A TYPE B
Information on Disposal for Users of Waste Electrical & Electronic Equipment (private households)
This symbol on the products and/or accompanying documents means that used electrical and electronic products should not be mixed with general household waste. For proper treatment, recovery and recycling, please take these products to designated collection points, where they will be accepted on a free of charge basis. Alternatively, in some countries you may be able to return your products to your local retailer upon the purchase of an equivalent new product. Disposing of this product correctly will help to save valuable resources and prevent any potential negative effects on human health and the environment which could otherwise arise from inappropriate waste handling. Please contact your local authority for further details of your nearest designated collection point. Penalties may be applicable for incorrect disposal of this waste, in accordance with national legislation.
For business users in the European Union
If you wish to discard electrical and electronic equipment, please contact your dealer or supplier for further information.
Information on Disposal In other Countries outside the European Union
This symbol is only valid in the European Union.
If you wish to discard this product, please contact your local authorities or dealer and ask for the correct method of disposal.
IMPORTANT SAFETY INSTRUCTIONS FOR THE USER

Before using the vacuum cleaner, please read these basic precautions.
WARNING: To reduce the risk of fire, electric shock, or injury
- Do not leave the vacuum cleaner plugged into mains socket. Unplug from the socket when not in use and before cleaning the appliance or undertaking maintenance operations.
- This appliance is not intended for use by persons (including children) with reduced physical, sensory or mental capabilities, or lack of experience and knowledge, unless they have been given supervision or instruction concerning use of the appliance by a person responsible for their safety.
- Children should be supervised to ensure that they do not play with the appliance.
- Do not use if the mains lead or mains plug is damaged. If the vacuum cleaner is not working as it should be, or has been dropped, damaged, left outdoors, or come into contact with water, consult an authorised Panasonic Service Centre.
- Do not pull or carry by the mains lead, use the mains lead as a handle, close a door on the mains lead, pull the mains lead around sharp edges or corners. Do not run over the mains lead with the vacuum cleaner. Keep the mains lead away from heated surfaces.
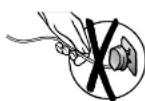
- Do not handle plug or vacuum cleaner with wet hands.
- Do not put any object into openings. Do not use with any opening blocked; keep free of dust, lint, hair and anything that may block or reduce air flow.
- Keep hair, loose clothing, fingers, and all parts of body away from openings and moving parts.
- Do not use the vacuum cleaner without filters and /or dust bin in place.
• Do not use wet filters after wash, see D) Dust Bin filter Changing and Cleaning.
• Turn off all controls before unplugging.
- Do not use to pick up flammable or combustible materials, or others that may become so or use in areas where they may be present.
- This appliance should be serviced by an authorised Panasonic Service Centre, and only genuine Panasonic spare parts should be used.
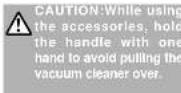
- Use extra care when cleaning on stairs. Keep hold of the handle to prevent the vacuum cleaner from falling.
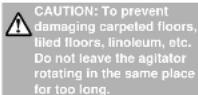
- To prevent damaging carpeted floors, tiled floors, Linoleum, etc. Do not leave the agitator rotating in the same place for too long.
- Keep bare feet and hands away from the agitator. (It may cause injury)
NOTE: This vacuum cleaner is designed for general household use only and is not suitable for use in a garage, garden or to suck up liquids.

CAUTIONS
- To avoid any possible damage to the mains lead, never run over the mains lead or allow it to become caught in the agitator when using the vacuum cleaner.
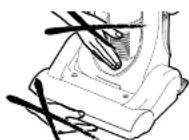
- Do not run the vacuum cleaner over tassels or fringes of rugs or mats as they could get caught up in the agitator and may cause damage to belt.
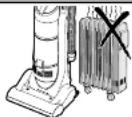
- Keep the vacuum cleaner away from heat sources such as radialors, fires, direct sunlight, etc.

- To avoid damaging the vacuum cleaner, never let the vacuum cleaner pick up wet matter. mud, burning ashes or large and sharp objects.
- Do not pull on the mains lead when disconnecting the appliance from the mains, always pull on the plug body itself.
- To avoid injury, keep your fingers and hands away from the agitator, and never put them between the body parts.
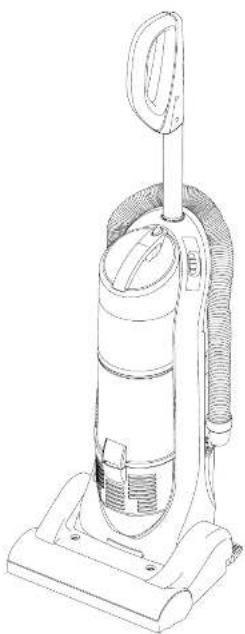
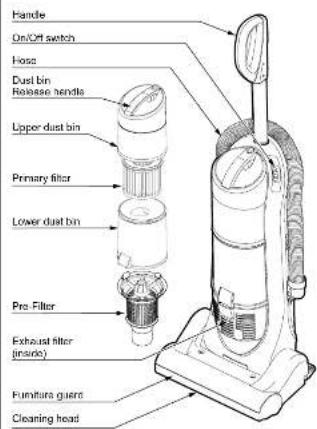
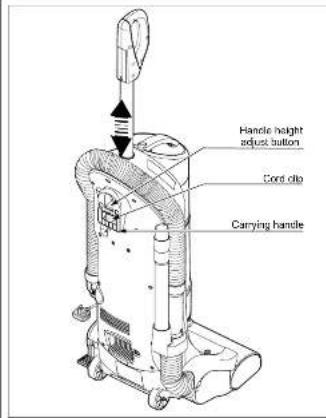
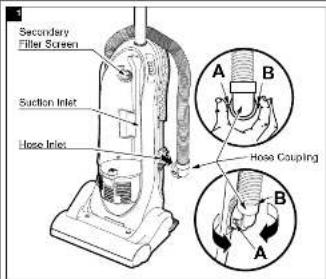
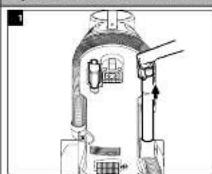
IDENTIFICATION OF MAIN PARTS
Line up telescopic handle with handle opening on top of vacuum cleaner, and insert handle.
Ensure handle alignment button is in alignment slot in front of handle opening and depress until handle slides down and is engaged.
Depress handle height adjust button to allow handle to be lowered into vacuum cleaner.
Push down on handle until it locks into place at desired height.
NOTE: You should hear a noticeable "click" sound when handle reaches the operating position.
Vacuum Cleaner Consumables / Accessories
For customers within the UK:
For customers within the Republic of Ireland:
| DESCRIPTION MC-UL672 | ||
| Primary filter Part number |  | AC95KDBVZ000 |
| Exhaust filter Part numberHEPA Filter AC38KDBVZ000 |  | |
| Filter case Part number |  | AC42KDBVZVUT |
| Dust bin cover Part number |  | AC92LDDEZU03 |
| Pre-tilter Part number | [206T] | AC43KDDEZY02 |
| Filter supporter unit Part number | [IMAGE] | AC36KDBVZU03 |
| Extension wand (with tabs) Part numbers |  | AC40PCHNZV06 |
| Crevice nozzle Part number |  | AC60RCHPZV06 |
| Dusting brush Part number |  | AC88RCHPZV06 |
| Bet Part number |  | AC28SIDDEZ000 |
| Bet Part number |  | AC28SDBVZ000 |
| Agitator assembly Part number |  | AC92SDBVZU00 |
| Hose Part number | [X24Y] | AC84PDBVZ000 |
| Nozzle cover latch Part number | ### | AC08DDBVZU03 |
Note: Specifications are subject to change without notice.
Sales and Support Information
Customer Care Centre
• For customers within the UK: 0844 844 3868
• For customers within the Republic of Ireland:
01 289 8933
- Visit our website for product information
• E-mail: customer.care@panasonic.co.uk
Direct sales at Panasonic UK
- Order accessory and consumable items for your product with ease and confidence by phoning our Customer Care Centre Monday - Thursday 9:00am - 5:30pm, Friday 9:30am - 5:30pm (excluding public holidays).
- Or go on line through our Internet Accessory ordering application at www.panasonic.co.uk
- Most major credit and debit cards accepted.
- All enquiries transactions and distribution facilities are provided directly by Panasonic UK Ltd.
- It couldn't be simpler!
- Also available through our Internet is direct shopping for a wide range of finished products, take a browse on our website for further details.
SPECIFICATIONS
| MODEL NO. MC-UL672 | |
| POWER SOURCE 230-240V / 50Hz | |
| MAX. INPUT POWER 2000w | |
| MOTOR PROTECTION YES | |
| DUST BIN CAPACITY 1.8 litres | |
| EXHAUST FILTER HEPA | |
| DIMENSIONS (W x L x H) 362x397x1000 mm | |
| NET WEIGHT 11.0kg | |
| DUSTING BRUSH | YES |
| PIPE YES | |
| CREVICE NOZZLE YES |
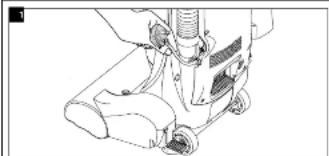
B) HOW TO ATTACH THE HOSE
To assemble hose coupling:
Depress tab A and tab B as shown.
Install hose coupling into nose inlet.
Stretch hose and wrap around vacuum cleaner.
Aligned hose connector and the connector pipe.
Push down to a press fitting.
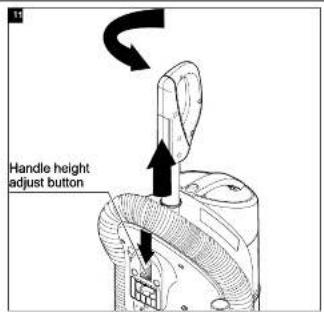
C) HOW TO USE YOUR TELESCOPIC HANDLE
Telescopic handle may be raised or lowered as desired for vacuuming or storage.
To raise or lower the telescopic handle to one of four (4) positions, depress handle height adjust button and position the handle to the desired setting.
NOTE: You should hear a noticeable "click" sound when handle reaches the operating position.
Make sure the handle is locked in the operating position before using the vacuum cleaner. DO NOT operate the vacuum cleaner unless handle is locked.
NOTE: Always lift the vacuum cleaner by the carrying handle when transporting to storage.
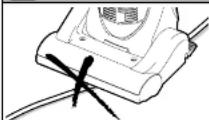
D) MAINS LEAD REEL
natural_image
Technical line drawing of a mechanical device with no visible text or symbols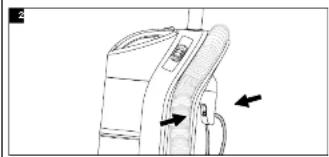
natural_image
Diagram of a device with a handle and cable, showing directional arrows (no text or symbols)
natural_image
Mechanical assembly diagram showing a hand operating a sewing machine with a tool and screw (no text or symbols visible)Pull mains lead out of mains reel until the end is reached.
Do not use vacuum cleaner without mains lead pulled out all the way.
Push mains lead into mains lead clip in back of vacuum cleaner.
Plug the polarized mains lead into a 240V mains located near floor.
To prevent injury or damage, hold plug head while rewinding mains lead.
Push mains lead retract pedal down to rewind.
E) ON/OFF SWITCH
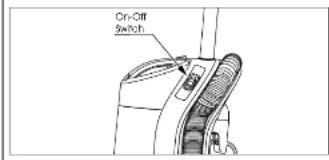
To start or stop the vacuum cleaner, push the switch button to "I" to turn ON and to "O" to turn OFF.
F) HANDLE LOCK / RELEASE BY FOOT PEDAL
Release the handle by pressing down on the foot pedal with your foot and pulling back and down on the handle with your hand.
Use low position for clearing under furniture. To move the vacuum cleaner to the low position press the foot pedal again.
NOTE: After use, unplug from the mains and store the vacuum cleaner in the upright position.
Before contacting your Panasonic service centre, check the following points:
NOTE: Failure to correctly maintain your product, for example regular cleaning and unblocking, may result in a charge if referred to a service agent for attention.

CAUTION: DISCONNECT from the mains socket before carrying out any kind of maintenance operation.
| TROUBLE CHECK POINT CAUSE / REMEDY | ||
| Motor fails to rotate • Mains (no noise is heard at all) mains socket is ON.• Mains plug fuse. {UK, IRL only} • Check fuse and replace it blown.• Thermal cut-out device may have • (See Thermal cut-out protection feature below operated, described). | ||
| Motor runs but there • Hose inlet is blocked. • If there is a blockage, remove it. is no suction. see (BLOCKAGES)• Check dust mark.• Primary filter• Check hose is properly inserted to the suction pipe inlet.• Check dust accumulated on primary filter.• Exhaust filter.• Dust bin inlet is blocked. | • If it shows full, empty the dust bin.• If the primary filter is full of dust, clean it or replace. (see DUST BIN FILTER CHANGING AND CLEANING)• Re-insert the hose to suction pipe inlet correctly.• Remove dust accumulated or replace the filters. (see DUST BIN FILTER CHANGING AND CLEANING)• If exhaust filter is full of dust replace it. (see EXHAUST FILTER MAINTENANCE)• If there is a blockage, remove it. (see BLOCKAGES) | |
| Agitator does not rotate. | • Clogged by a large object in the agitator housing.• Bells broken or loose. | • If there is any obstruction, remove it.• If the bell is broken, replace it. if loose re-install it. |
THERMAL CUT-OUT
This vacuum cleaner is fitted with a thermal cut-out device which automatically turns off the vacuum cleaner to prevent overheating of the motor. When this happens, disconnect the vacuum cleaner from the mains socket and check the dust bin and filters as it may be full or clogged with fine dust. Check for any other obstructions.
After emptying the dust bin or removing the obstruction, leave the vacuum cleaner to cool down until the thermal cut-out resets after approximately 40 minutes.
IMPORTANT: The thermal cut-out will not reset if the vacuum cleaner is not disconnected from the mains socket.
MAINS LEAD
IMPORTANT: If the mains lead becomes damaged, it must be repaired by Panasonic, authorised service centre or a qualified person in order to avoid any hazard.
H) BLOCKAGES
The hose located on the vacuum cleaner carries the dirt from the nozzle up to the dust bin. If the hose should become clogged:
Unplug the vacuum cleaner from mains outlet.
Remove hose coupling and check hose coupling and hose inlet for clogs according to the following procedure.
To remove hose coupling:
-
Depress and tilt tab A as shown.
-
Once tab A is clear of the vacuum cleaner inlet, depress and tilt tab B as shown.
To re-install hose coupling: Reverse steps above.
Check suction inlet and secondary filter screen for clogs.
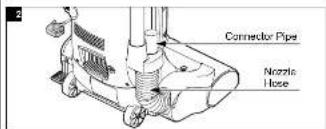
Disconnect nozzle hose from connector pipe. check the hose. Plug in vacuum cleaner and turn on.
Stretch hose in and out to remove clog. If clogs still exist, turn the vacuum cleaner over and inspect agitator area for clogs, see BELT CHANGING AND CLEANING for details.
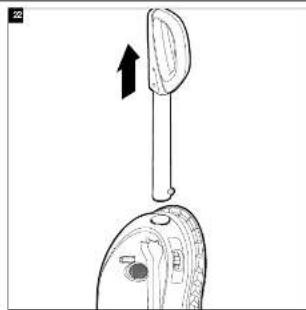
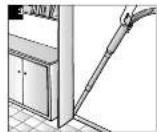
I) HOW TO REMOVE THE TELESCOPIC HANDLE
natural_image
Diagram of a mechanical device with a vertical rod and an arrow indicating upward motion (no text or symbols)With the handle on its lowest position, depress the handle height adjustment button and raise handle about 6 cm while turning it counterclockwise.
You should be able to turn the handle 90° to a transversal position.
Pull handle straight out until free from vacuum cleaner. Do not use excessive force.
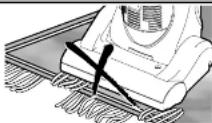
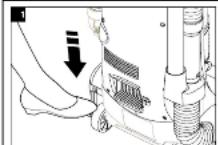
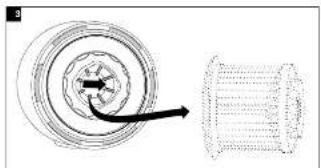
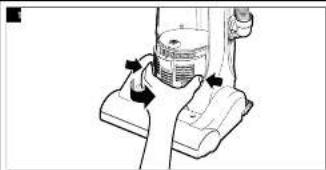
G) HOW TO USE THE ACCESSORIES
Lift out accessories needed
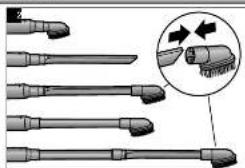
natural_image
Illustration of a brush with multiple tips and a magnified inset showing the tip structure (no text or symbols)Connect any of the accessories, as indicated.
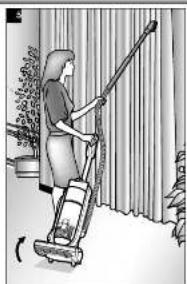
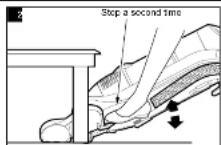
natural_image
Illustration of a person using a vacuum cleaner to clean or clean outdoor curtains (no text or symbols visible)To prevent damage to carpeted floors when using tools, the vacuum cleaner should not remain in one place for a period of time.

To avoid accidental injury, keep children away from the agitator while in operation.
NOTE: After using the accessories, re-insert the hose to the connector pipe.
H) MOTOR PROTECTOR
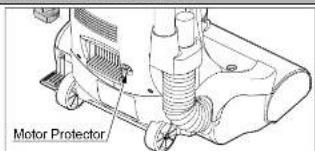
This vacuum cleaner has a motor protector by-pass valve which automatically opens to provide cooling air to the motor when a clog prevents the normal flow of air to the motor. If the by-pass valve opens to prevent motor overheating and possible damage to the vacuum cleaner, you will notice a change of sound as air rushes through the valve opening.
CAUTION: Do not block motor protector.
To correct problem: See the TROUBLE-SHOOTING guide.
NOTE: The motor protector may open when using attachments or when cleaning new carpet, due to reduced airflow by the attachments themselves or by new carpet fulfill filling the dust bin quickly. See the TROUBLE-SHOOTING guide.
I) THERMAL CUT-OUT
This vacuum cleaner has a thermal cut-out which automatically trips to protect the vacuum cleaner from overheating. If a clog prevents the normal flow of air to the motor, the thermal cut-out turns the motor off automatically to allow the motor to cool in order to prevent possible damage to the vacuum cleaner.
To correct problem: If this occurs, turn the vacuum cleaner off and unplug the vacuum cleaner from the mains outlet to allow the vacuum cleaner to cool and the thermal cut out to reset. Check for and remove clogs, if necessary. Also check and clean/replace any clogged filters. Wait approximately forty (40) minutes before switching on the vacuum cleaner. The motor protector will not reset if the vacuum cleaner is not disconnected from the mains socket even if the vacuum cleaner has cooled down.
MAINTENANCE AND SERVICING
Always follow all safety precautions when cleaning and servicing the vacuum cleaner.

WARNING: Electrical Shock And Personal Injury Hazard
Disconnect from electrical supply before servicing or cleaning the vacuum cleaner. Failure to do so could result in
electrical shock or personal injury from vacuum cleaner suddenly starting.
A) VACUUM CLEANER STORAGE
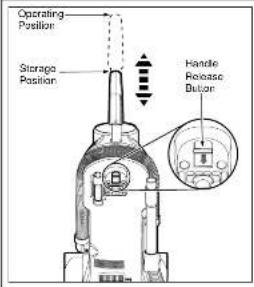
To return the handle to the storage position when the vacuum cleaner is not in use, press handle release button and push the handle down for easy storage.
NOTE: You should hear a noticeable "click" sound when handle reaches the storage position.
B) CLEANING EXTERIOR AND ACCESSORIES

CAUTION: Do not use attachments if they are wet. Attachments used in dirty areas, such as under a refrigerator, should not be used on other surfaces until they are washed. They could leave marks.
Disconnect mains plug from wall outlet.
Clean exterior using a clean, soft cloth that has been dipped in a solution of mild liquid detergent and water, then wrung dry. Wipe dry after cleaning. DO NOT drip water on vacuum cleaner.
Wash attachments in warm soapy water, rinse and air dry. Do not clean in dishwasher.
DO NOT use accessories if they are wet.
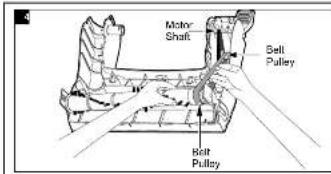
TO REPLACE BELT
Seat left end of agitator into nozzle base. To seat agitator end, place rounded portion of agitator end cap down into slot in nozzle base.
Loop the new belt on the bell pulley.
Loop the other end of belt onto the belt pulley on the right end of agitator.
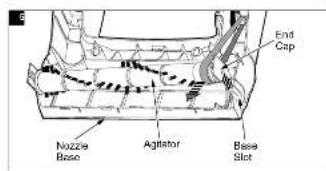
Pull right end of agitator forward and seat it into nozzle base.
Press firmly, checking to see that each end is completely inserted.
Check to see that the belt is centered on the belt pulley and that the agitator turns freely.
Make sure the nozzle cover retainers are in the UNLOCK position. Hook the front of the nozzle cover on to the nozzle base and rotate downward. Make sure tabs snap in. Once in place, rotate the nozzle cover retainers to the LOCK position.
G) BELT CHANGING AND CLEANING

WARNING: Electrical Shock And Personal Injury Hazard
Disconnect from electrical supply before servicing or cleaning the vacuum cleaner. Failure to do so could result in
electrical shock or personal injury from vacuum cleaner suddenly starting.
Frequently check and remove hair, string and lint build-up in the brush area. If build-up becomes excessive, follow the steps below. Should the belt become loose or should it break, follow the Belt Removal Instructions.

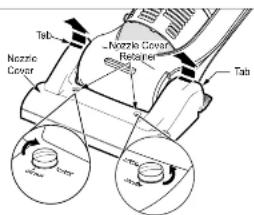
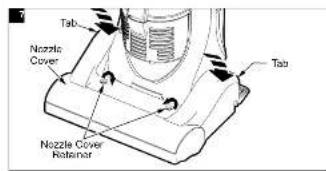
TO REMOVE NOZZLE COVER
Disconnect from electrical supply. Press foot pedal and tilt the handle down so the vacuum cleaner is laying flat on the floor.
To protect the floor surface, always place paper under the nozzle any time the nozzle cover is removed.
Release the nozzle cover by rotating the nozzle cover retainers to the UNLOCK position and depress labs to remove. Grasp back of nozzle cover on each side and lift up to remove it from nozzle.

WARNING: Personal Injury Hazard
Always unplug the vacuum cleaner before cleaning the brush area as agitator may suddenly restart. Failure to
io so can result in personal injury

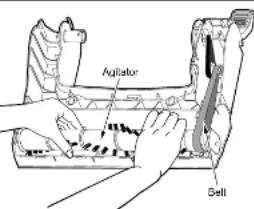
Carefully remove any residue that may exist in the belt area.
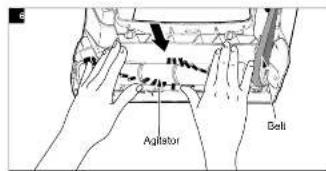
TO REMOVE BELT/CLEAN AGITATOR
Position hands on the agitator. If the belt is still attached to the agitator, there will be tension on it.
Carefully lift the right end (belt side) of the agitator and then lift the left end.
Remove the worn or broken belt from the pulley or motor drive shaft.

Cut off any carpel pile, hair or lint entangled around the agitator and remove any string or debris located near the end caps.


WARNING: Personal Injury Hazard
Be careful when removing the agitator as the belt
tension is high. Failure to do so could result in
personal injury from the agitator releasing quickly
and snapping away.
Usage
Clean Agitator
HEAVY
every
week


NOTE: In order to keep cleaning efficiency high and to prevent damage to your vacuum cleaner, the agitator must be cleaned every time the belt is changed.
MODERATE - every month
(used 2-3 times/week)
LIGHT - every 2 months
(used 1 time/week)
C) DUST BIN CLEANING AND REMOVAL
Always empty the dust bin when dirt level reaches the "MAX FILL" line.

CAUTION: Electrical Shock And Personal Injury Hazard
Always disconnect the vacuum cleaner from mains outlet before carrying out any service or maintenance on the vacuum cleaner.

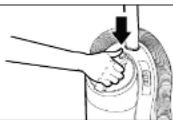
TO REMOVE DUST BIN
Remove dust bin assembly from vacuum cleaner by pressing the release button as shown.

Remove dust bin from vacuum cleaner tilling it out as shown.

TO EMPTY DUST BIN
Hold dust bin over a trash container.


Press the dust bin lid release lever.
Empty wastes into the trash container.

Push the dust bin lid to close the dust bin.
NOTE: You should hear a noticeable "click" sound when lid locks in place.


TO REPLACE DUST BIN
First align base of dust bin with the vacuum cleaner. Then push dust bin back in place making sure dust bin is securely latched.
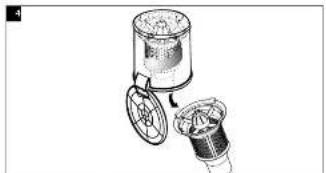
D) DUST BIN FILTER CHANGING AND CLEANING
Check primary filter frequently and clean when dirty. Remove the dust bin assembly as outlined in the DUST BIN CLEANING section and empty contents of dust bin.
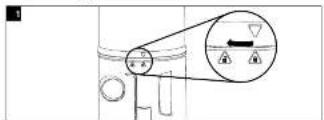
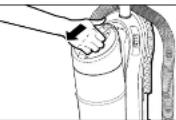
Rotate upper dust bin clockwise from the locked position to the unlocked position as shown.
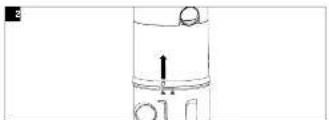
Separate the upper dust bin from the lower dust bin by lifting it straight off.
natural_image
Diagram showing a spiral component with an arrow pointing to it, alongside a cylindrical structure (no text or symbols)Simply tap the filter on the edge of cap for normal dry cleaning.
CAUTION: Make sure upper dust bin is empty before filter is removed.
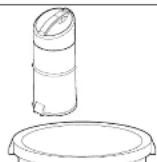
Grasp primary filter and push it against the inner wall of the upper dust bin to release it. Then pull primary filter straight out from upper dust bin as shown.
Clean primary filler by gently lapping over a trash container.
CAUTION: When cleaning filter, do not use brush or other similar tools that would damage the filter itself.
For more thorough cleaning, rinse outside of filter with water and allow to dry thoroughly before reuse in vacuum cleaner.
natural_image
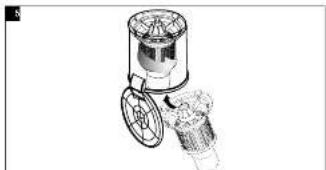
Illustration of a mechanical device with two components, one cylindrical and one circular, showing internal structure (no text or symbols)TO CLEAN PRE-FILTER
Turn clockwise and pull the pre-filter. Clean by gently tapping over a trash container.
natural_image
Technical line drawing of a mechanical valve or tap with a central hub and side arm (no text or symbols)Return the pre-filler to the dust bin, aligning the filter screen tabs to the lower dust bin slots, then turn counter-clockwise to the lock position.
CAUTION: Rinse with water only, do not use detergent or soap. Allow filter to dry 24 hours before putting it back into the dust bin. When the cleaning of the filter no longer restores vacuum cleaner suction to full power you need to replace the filter.

natural_image
Line drawing of a mechanical component with a rotating wheel and arrow indicating motion (no text or symbols)TO ASSEMBLE THE DUST BIN
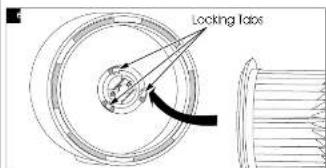
Align the filter with the locking tabs in the dust bin and push down until you hear a click.
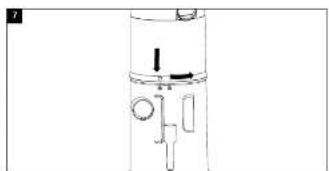
natural_image
Pure mechanical diagram of a vertical cylindrical device with internal components and no text or symbolsAssemble and align the top and bottom of dust bin. Turn counter-clockwise to the lock position.
E) CLEANING SECONDARY FILTER SCREEN
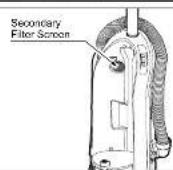
The secondary filter screen protects the motor.
Always check filter screen when cleaning dust bin.
If dirty or clogged, remove debris from filter screen.
F) EXHAUST FILTER MAINTENANCE
natural_image
Diagram of a vacuum cleaner with attached pump and valve (no text or labels)The exhaust filter removes dirt from recirculated air.
Check filter after emptying dust bin.
To remove, press on the tiller cover latch, pull both sides of the exhaust filter cover with a counter-clockwise movement.
Grasp the HEPA exhaust filter and pull out to remove.
Replace the exhaust filter making sure that the foam seal on the exhaust filter is down and the arrows indicating the air flow direction point up.
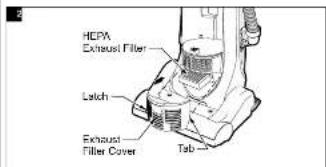
Reinstall exhaust filter cover by snapping into place.
IMPORTANT - Exhaust Filter cannot be cleaned and should be replaced at least once each year.
- Panasonic®
- CAUTION FOR AC MAINS LEAD (UK and Republic of Ireland only)
- FOR YOUR SAFETY PLEASE READ THE FOLLOWING TEXT CAREFULLY
- Information on Disposal for Users of Waste Electrical & Electronic Equipment (private households)
- For business users in the European Union
- Information on Disposal In other Countries outside the European Union
- IMPORTANT SAFETY INSTRUCTIONS FOR THE USER
- CAUTIONS
- Sales and Support Information
- Customer Care Centre
- Direct sales at Panasonic UK
- D) MAINS LEAD REEL
- E) ON/OFF SWITCH
- F) HANDLE LOCK / RELEASE BY FOOT PEDAL
- THERMAL CUT-OUT
- MAINS LEAD
- CAUTION: Do not block motor protector.
- I) THERMAL CUT-OUT
- MAINTENANCE AND SERVICING
- B) CLEANING EXTERIOR AND ACCESSORIES
- TO REPLACE BELT
- G) BELT CHANGING AND CLEANING
- TO REMOVE NOZZLE COVER
- TO REMOVE BELT/CLEAN AGITATOR
- C) DUST BIN CLEANING AND REMOVAL
- TO REMOVE DUST BIN
- TO EMPTY DUST BIN
- TO REPLACE DUST BIN
- D) DUST BIN FILTER CHANGING AND CLEANING
- TO ASSEMBLE THE DUST BIN
- E) CLEANING SECONDARY FILTER SCREEN
- F) EXHAUST FILTER MAINTENANCE
Brand : PANASONIC
Model : MC-UL672
Category : Vacuum Cleaner