KX-P4401 - Printer PANASONIC - Free user manual and instructions
Find the device manual for free KX-P4401 PANASONIC in PDF.

User questions about KX-P4401 PANASONIC
0 question about this device. Answer the ones you know or ask your own.
Ask a new question about this device
Download the instructions for your Printer in PDF format for free! Find your manual KX-P4401 - PANASONIC and take your electronic device back in hand. On this page are published all the documents necessary for the use of your device. KX-P4401 by PANASONIC.
USER MANUAL KX-P4401 PANASONIC
Operating Instructions
KX-P4401
Congratulations on purchasing a Panasonic LED page printer.
Before proceeding, inspect the printer and accessories for damage.
This printer has been factory set to operate with most of the popular software packages.
Your software should control the printer functions. In most cases, there will be no need to change the front panel settings.
Contents
Unpacking 3
Precautions 3
Preparation 4
- Printer Stand Installation 4
- Toner Cartridge 4
- Drum Unit Installation 5
Connecting and Power On 6
-
Connecting Your Printer and Computer ..... 6
-
Power On 7
Loading Paper 7
Test Print 9
Software-Printer Selection 9
Clearing a Paper Jam 10
Printer Specifications 12
Paper Specifications 13
Paper Specifications 13
Types of Paper to Avoid 13
Printable Area 14
Printing OHP Film and Labels 15
Printing Used Paper 15
Front Panel Operation 16
Menu Mode Operation 17
Resetting the Printer 20
Maintenance 20
Cleaning the Printer 20
Troubleshooting 21
Error Message 22
Repacking Instructions 23
Character Tables 26
Resident Century Font Width Tables 31
Options, Accessories and Supplies 37
For Users in U.K.
IMPORTANT:
CLASS I FOR BS 7002
FOR YOUR SAFETY PLEASE READ THE FOLLOWING TEXT CAREFULLY.
This appliance is supplied with a moulded three pin mains plug for your safety and convenience.
A 5 amp fuse is fitted in this plug.
Should the fuse need to be replaced please ensure that the replacement fuse has a rating of 5 amps and that it is approved by ASTA or BSI to 1362.
Check for the ASTA mark

or the BSI mark

on the body of the fuse.
If the plug contains a removable fuse cover you must ensure that it is refitted when the fuse is replaced.
If you lose the fuse cover the plug must not be used until a replacement cover is obtained.
A replacement fuse cover can be purchased from your local Panasonic Dealer.
IF THE FITTED MOULDED PLUG IS UNSUITABLE FOR THE SOCKET OUTLET IN YOUR HOME THEN THE FUSE SHOULD BE REMOVED AND THE PLUG CUT OFF AND DISPOSED OF SAFELY. THERE IS A DANGER OF SEVERE ELECTRICAL SHOCK IF THE CUT OFF PLUG IS INSERTED INTO ANY 13 AMP SOCKET.
If a new plug is to be fitted please observe the wiring code as shown below.
If in any doubt please consult a qualified electrician.
WARNING: THIS APPLIANCE MUST BE EARTHED.
IMPORTANT: The wires in this mains lead are coloured in accordance with the following code.
Green-and-Yellow:
Earth
Blue:
Neutral
Brown:
Live
As the colours of the wire in the mains lead of this appliance may not correspond with the coloured markings identifying the terminals in your plug, proceed as follows.
The wire which is coloured GREEN-AND-YELLOW must be connected to the terminal in the plug which is
marked with the letter E or by the Earth symbol

, or coloured GREEN or GREEN-AND-YELLOW.
The wire which is coloured BLUE must be connected to the terminal in the plug which is marked with the letter N or coloured BLACK.
The wire which is coloured BROWN must be connected to the terminal in the plug which is marked with the letter L or coloured RED.
How to replace the fuse: Open the fuse compartment with a screwdriver and replace the fuse.
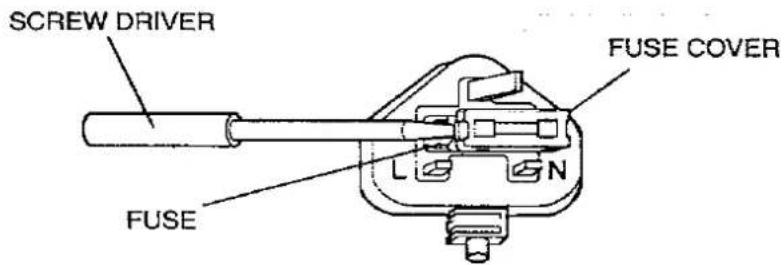
text_image
SCREW DRIVER FUSE COVER L N FUSEWARNING
- The power source voltage of this unit is listed on the nameplate. Plug the printer only into an outlet with the proper voltage.
• To prevent fire or shock hazard, do not expose this product to rain or any type of moisture. - When you operate this equipment, the outlet should be near the equipment and should be easily accessible.
- Do not remove covers and do not repair yourself. Refer servicing to qualified personnel.
To ensure safe operation the three-pin plug supplied must be inserted only into a standard three-pin power point which is effectively earthed through the normal household wiring.
Extension cords used with the equipment must be three-core and be correctly wired to provide connection to earth. Wrongly wired extension cords are a major cause of fatalities.
The fact that the equipment operates satisfactorily does not imply that the power point is earthed and that the installation is completely safe. For your safety, if in any doubt about the effective earthing of the power point, consult a qualified electrician.
The serial number of the unit may be found on the label on the rear of the unit. For your convenience, note this number below and retain this book along with your proof of purchase, to serve as a permanent record of your purchase in the event of a theft or for future reference.
MODEL NO. KX-P4401
NAME OF DEALER
SERIAL NO.
DATE OF PURCHASE
Times, Helvetica and Univers are trademarks of Linotype-Hell AG and/or its subsidiaries.
HP and LaserJet are trademarks of Hewlett-Packard Company.
IBM and IBM PC are trademarks of International Business Machines Corporation.
Century 702, Dutch 801 and Swiss 721 are trademarks of Bitstream, Inc.
CG and Intellifont are trademarks of Agfa Corporation.
CG Times, based on Times New Roman under license from Monotype Corporation Plc, is a product of Agfa Corporation.


All other acknowledgements are trademarks or registered trademarks of their respective holders.
All Rights Reserved. © COPYRIGHT 1994 KYUSHU MATSUSHITA ELECTRIC CO., LTD.
Any details given in these Operating Instructions are subject to change without notice.
Unpacking
Having unpacked the printer, make sure none of the contents shown below are missing or damaged. Report damage, or shortages to the store from which the unit was purchased.
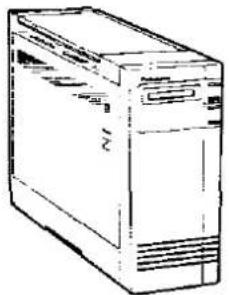
natural_image
Line drawing of a desktop computer tower (no text or labels)Printer (KX-P4401)
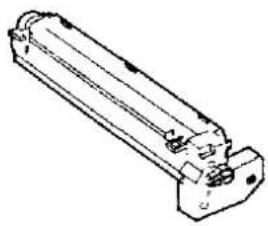
natural_image
Technical line drawing of a cylindrical mechanical component with internal components (no text or symbols)Drum Unit
Power Cord
Manual
Storage bag
Precautions
[1]
• Extremely high or low temperature
• Extremely high or low humidity (humidity range: 20% to 80% RH)
- Areas of poor ventilation
- Areas of high dust or chemical fume concentration (thinner etc.)
- Directly in front of air conditioning vents
- Areas on an unstable or unlevel surface
Precautions
- Do not keep all liquids near the printer. (Accidental spillage of a liquid into the printer can cause severe damage.)
- Do not remove the green fuser cleaning pad except when you replace it with a new one.
- Do not open the left cover while in operation to avoid a paper jam.
- Do not add paper to the paper tray when paper remains in it, since it may cause a paper jam.
- If the printer is not going to be used for an extended period, unplug the power cord.
- Do not place the printer either by its left or right side or by its front side facing upward.
Minimum Space Requirements
Minimum space requirements are shown below.

text_image
2 cm (0.8") Ventilation space Printer (Top)2 cm (0.8")
25 cm (10")
Ventilation space [22.4 cm (8.8")
Paper tray opening space
Left cover opening space]

text_image
Scanned text of contract clauses with visible Chinese characters and partial table structure- Use a voltage level which does not vary more than ±10% from the voltage level marked on the nameplate (located on the rear of the printer).
- Do not use an extension cord
• This printer should be connected to a grounded outlet. - Do not use a line conditioner, transient suppressor or surge protector as it may cause a machine error.
Preparation
1. Printer Stand Installation
Note:
Do not place the printer either by its left or right side or by its front side facing upward, because the toner may move to one side and cause undesirable print quality.
1 Lift the printer by holding its front side and remove the both printer stands by firmly sliding them downward.
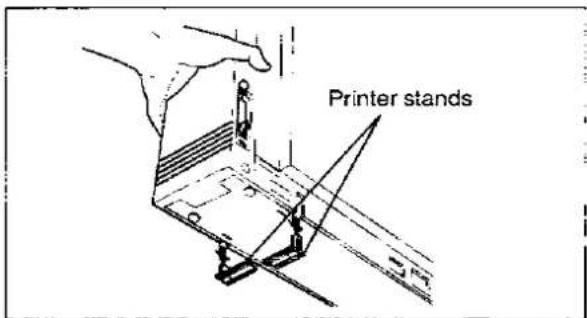
text_image
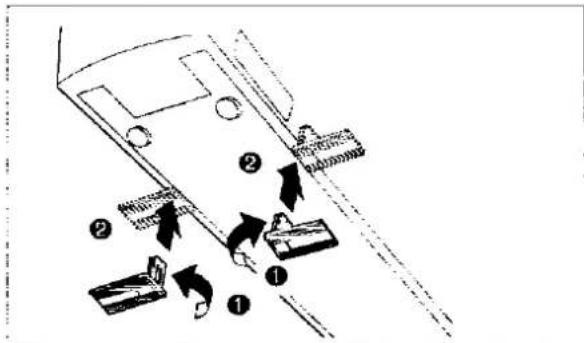
Printer stands2 Turn around the both printer stands and install them into the printer.
text_image
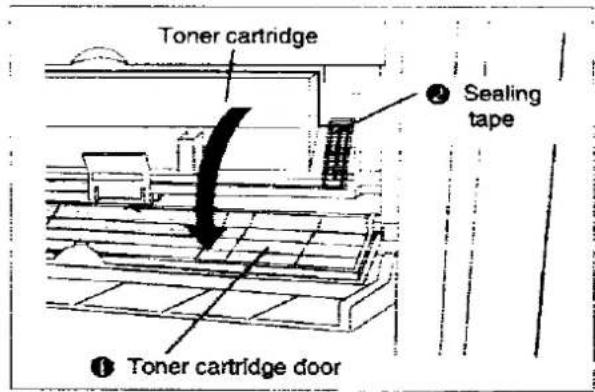
Diagram illustrating vehicle safety or repair process with numbered components and directional arrows indicating movement2. Toner Cartridge
1 ① Open the paper tray.
② Open the toner cartridge door.
Remove the toner cartridge pads.
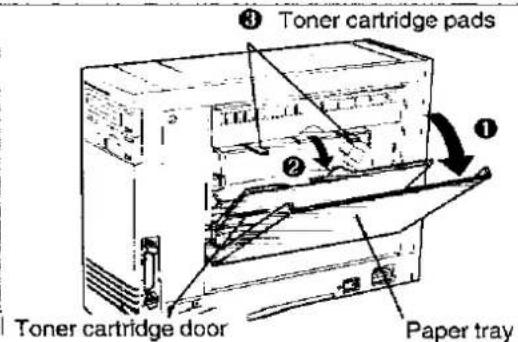
text_image
③ Toner cartridge pads ① ② Toner cartridge door Paper trayNote:
* Place the toner cartridge pads in the storage bag and keep them in the event the printer must be repacked and transported.
(23) P 23
2 ① Peel off the green tape.
② Firmly hold the printer, grasp the clear plastic sealing film and pull it toward you to completely remove.
Do not twist the sealing film while you are pulling it, since toner may spill over.
③ Lightly tap the toner cartridge to empty toner into the developer unit.
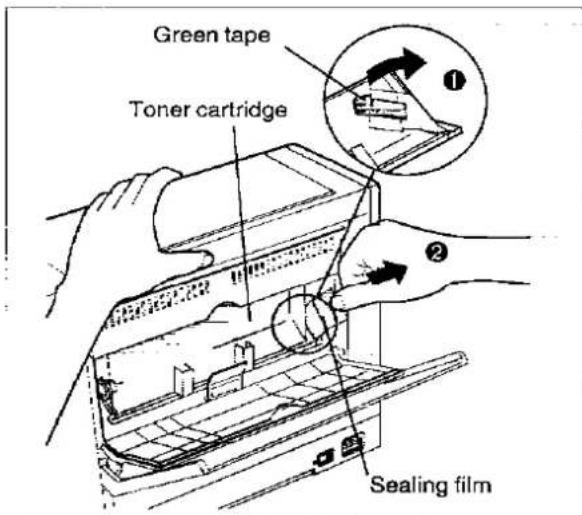
text_image
Green tape Toner cartridge Sealing filmNote:
- Be careful handling the sealing film since it may contain toner residue.
3 ① Take the sealing tape out of the storage bag and remove the paper backing. Firmly press this tape over the slot on the right side of the toner cartridge.
② Close the toner cartridge door.
③ Close the paper tray.
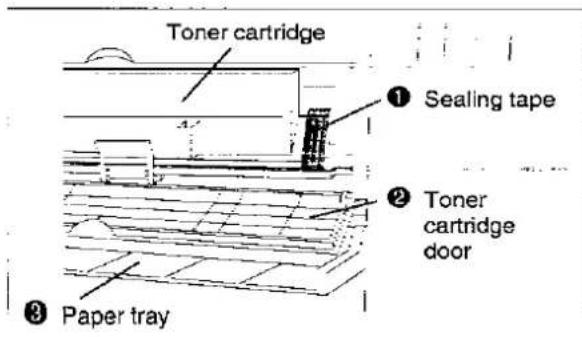
text_image
Toner cartridge ① Sealing tape ② Toner cartridge door ③ Paper tray3. Drum Unit Installation
Important:
- Do not expose the drum unit to light for more than 5 minutes.
- Do not touch the green drum surface.
- Do not keep the drum unit near dust or dirt.
- Do not place the drum unit in a high humidity area and keep it out of direct sunlight.
1 Open the left cover by gently pulling the cover release tab.
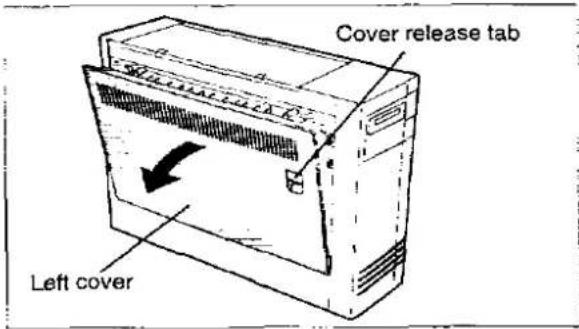
text_image
Cover release tab Left cover2
① Remove the shipping cover pads by pulling them toward you.
② Press the tab of the shipping cover firmly toward the right.
③ Lift the left side of the shipping cover up and remove it by pulling it toward you.
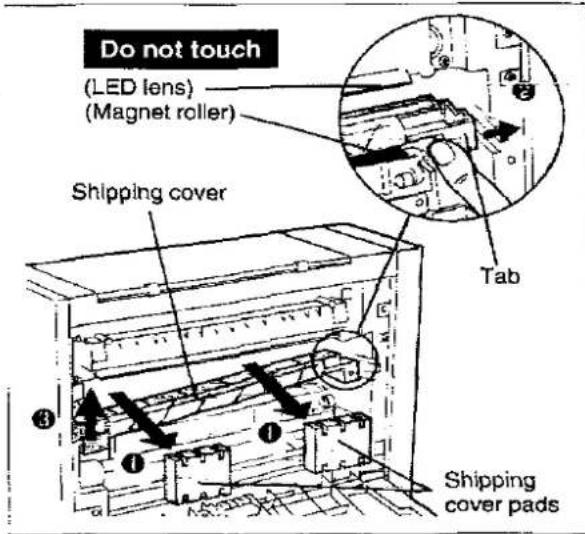
text_image
Do not touch (LED lens) (Magnet roller) Shipping cover Tab Shipping cover padsNote:
- Place the shipping cover in the shipping cover bag to ensure toner residue does not spill. Place this bag and the shipping pads in the storage bag and keep them in the event the printer must be repacked and transported. (P. 24 and P. 25)
3 Open the protective bag.
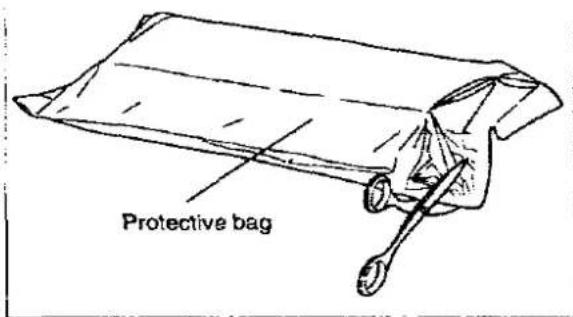
text_image
Protective bag4 Take out the drum unit.
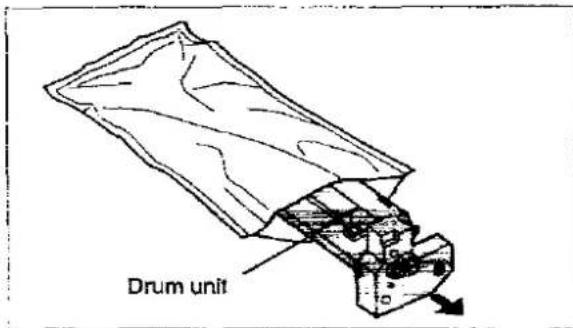
text_image
Drum unitNotes:
- Do not expose the drum unit to light for more than 5 minutes as it may damage the drum unit.
- Place the protective bag in the storage bag and keep it in the event the printer must be repacked and transported. (rs° P. 24)
5
Remove the drum protection cap by pushing the right and left tabs to the center.
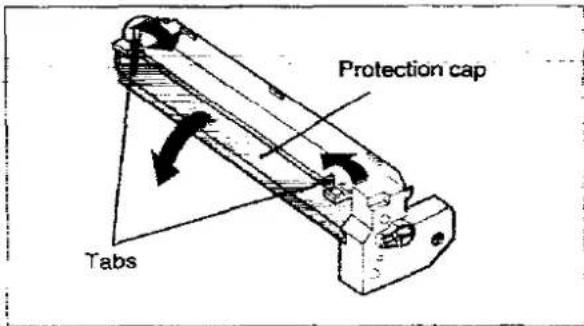
text_image
Protection cap TabsNotes:
- Do not touch the green drum surface (under the protection cap) as it may damage the drum unit.
- Place the protection cap in the storage bag and keep it in the event the printer must be repacked and transported. (P. 24)
6 Install the drum unit by holding the green labeled tabs and pushing it firmly.
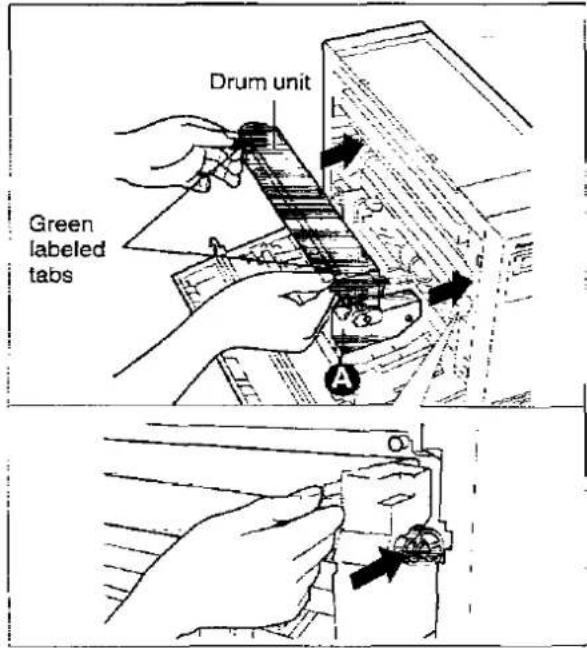
text_image
Drum unit Green labeled tabsNote:
• If the printer equipped with a previously used
drum unit displays "CHNG DRUM", remove
the drum unit and gently tap point Ⓐ of the drum unit. Do not touch the green drum surface.
7 Close the left cover.
Gently push the left cover on the location marked "PUSH" to close it properly.
NOTE:
PLEASE DO NOT THROW AWAY THE PACKING MATERIALS. YOU MAY NEED THEM TO SHIP OR TRANSPORT THE PRINTER.
Connecting and Power On
1. Connecting Your Printer and Computer
1 Turn OFF both the printer and computer power switches.
2 Plug one end of the cable into the parallel interface connector of the printer.
Snap the clips into place.
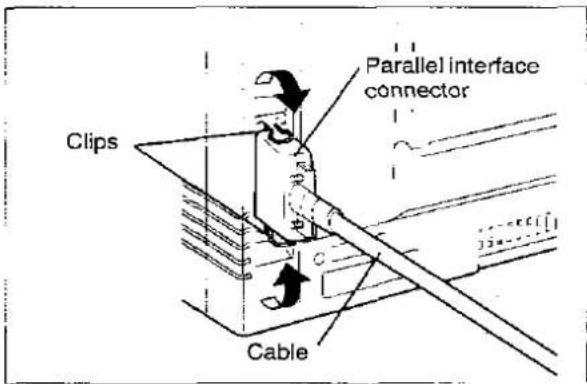
text_image
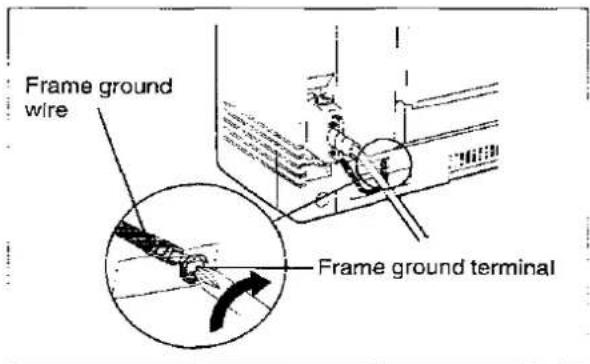
Clips Cable Parallel interface connectorIf the cable has a frame ground wire, connect it to the frame ground terminal.
text_image
Frame ground wire Frame ground terminal3 Plug the other end of the cable into the connector of the computer.
2. Power On
Be sure the printer is OFF.
1 Connect the power cord into the printer's power connector plug.
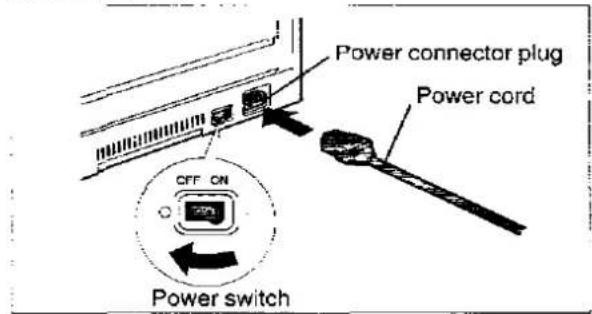
text_image
Power connector plug Power cord OFF ON Power switch2 Plug the power cord into a 3 prong AC socket.
3 Turn the power ON.

text_image
OFF ON Power switch4 The printer is warming up.
WARM.UP 00
- If the paper is not installed, "PAPER EMPTY U11" will be displayed. (below "Loading Paper" to install the paper)
- If the output tray (top cover) is not opened, "JAM3/TOP COVER" will be displayed. The message will be cleared after opening the output tray (top cover).
5 The printer is ready for printing.
ON LINE 01
Loading Paper
This printer has a multi-purpose paper tray.
The paper size selected through the front panel or software commands should match the size of the paper in the paper tray.
If the selected paper size is different from the installed paper size, a paper jam may occur.
Notes:
- When setting up the printer for the first time, please allow the printer to warm-up before installing the paper.
- Ensure the green fuser cleaning pad has been installed before installing the paper.
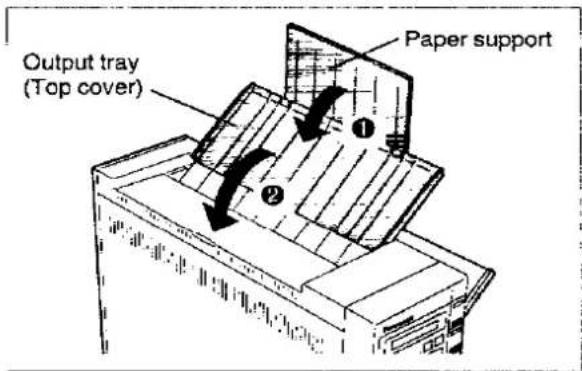
1 0 Open the output tray (top cover).
② Extend the paper support.
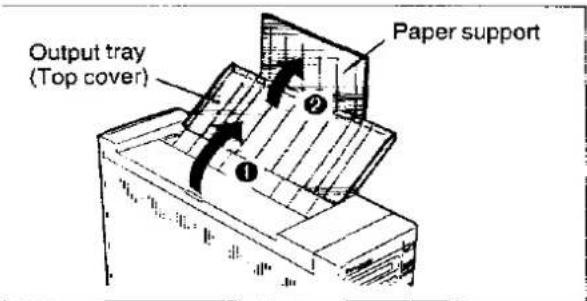
text_image
Output tray (Top cover) Paper support2 Open the paper tray.
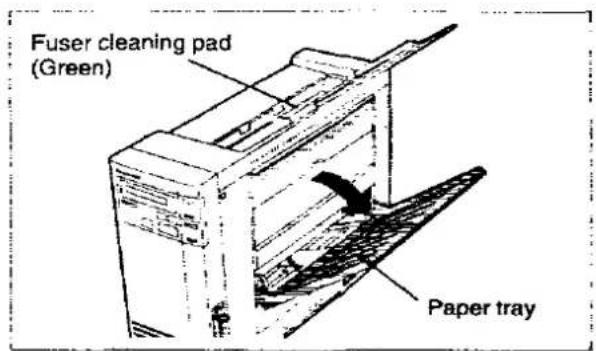
text_image
Fuser cleaning pad (Green) Paper tray3 Separate the paper guides to the approximate width of your paper. Refer to the size indicators above the paper guides, for accurate paper width.
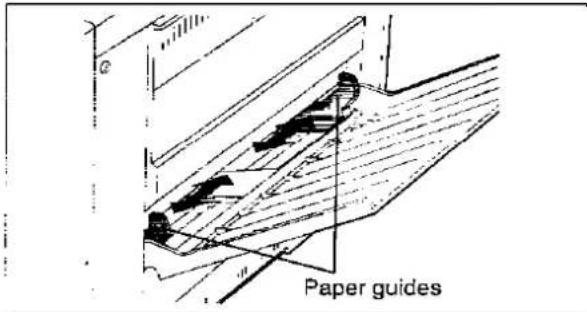
text_image
Paper guides4 Fan the stack of paper to avoid a paper jam.
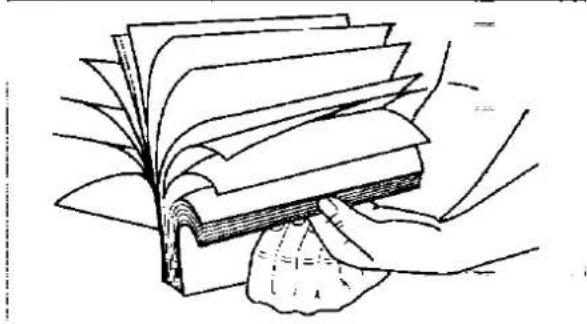
natural_image
Illustration of a hand holding a stack of papers or documents, with no visible text or symbols.5 Place the paper in the paper tray properly and adjust the paper guides to your paper size. The height of the paper should not exceed the limit mark on the paper guide, since it may cause a paper jam.
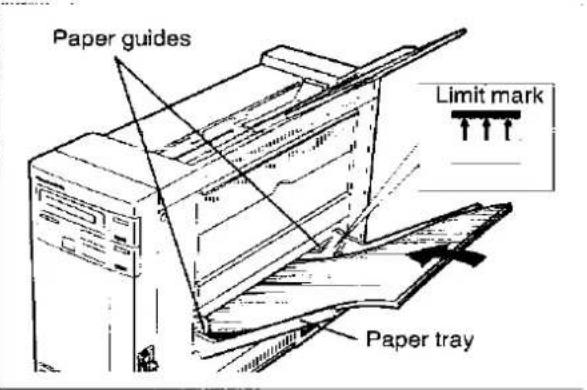
text_image
Paper guides Limit mark Paper trayNotes:
If the paper guides are not adjusted properly, you may get diagonal printout.
Do not load different types or thickness of paper at one time since this may cause a paper jam.
- When you use OHP or Label, it is recommended that you feed OHP or Label without removing the remaining paper since this will make the feeding smooth.
- When you want to add new paper to the paper tray, you first remove the remaining paper from the paper tray and then place both paper together into the paper tray properly.
Make sure you load the paper with the print side up. Most paper has instructions recommending the side to be printed first.
(15 P. 13)
6 If the display does not show "ON LINE", press ONLINE to get ready to print.

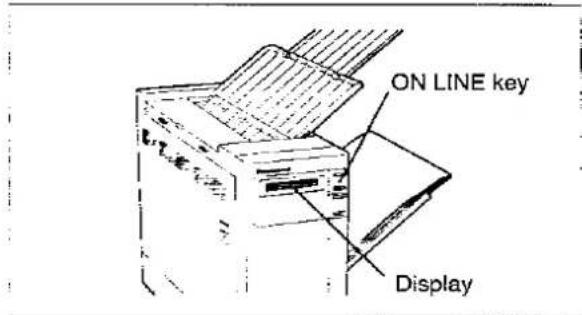
text_image
ON LINE key DisplayThe display will show:
ON LINE 01
7 If you want to change the paper size, refer to Pages 16 and 19.
The current page size is indicated by "▼" mark on the display screen.
Notes:
After you set the paper size, press to return to the ON LINE mode.
Do not print more than 50 sheets [75 g/m ^2 (20 lbs.)] at one time. This may cause a paper jam.
8 After you load the paper, performing Test Print is recommended. (P. 9 "Test Print")
Test Print
Your Panasonic printer has a test print feature to verify the printer configuration and the active printer settings.
We recommend that you follow the operation charts to ensure the printer is set up correctly and is providing high quality output.

flowchart
graph TD
    A["Press ON LINE"] --> B["OFF LINE 01"]
    B --> C["TEST TEST"]
    C --> D["ENTER STATUS PRINT"]
    D --> E["ENTER FONT LIST PRINT"]
    E --> F["ENTER CHARACTER PRINT"]
    F --> G["ENTER USER AVAIL RAM *"]
    G --> H["ENTER *** KB FREE"]
    H --> I["ENTER OFF LINE 01"]
    style A fill:#f9f,stroke:#333
    style I fill:#f9f,stroke:#333
: Press or for less than 2 seconds to make the desired selection.
To exit this operation: Press to return to the ON LINE mode.
* This feature shows the remaining memory capacity.
Note:
- If you execute test print when data remains in the printer, "CNANCEL JOB" is displayed for two seconds and the printer will not print the test page. When this occurs, press the PRINT key to print the remaining data, and then execute test print via front panel.
Software-Printer Selection
This procedure is the final step before printing and is performed in your application software program.
The steps will vary, depending on the software program. Consult your software package for proper procedures.
The Panasonic KX-P4401 will be your first choice. However, if the Panasonic KX-P4401 printer is not listed in your software, you must select an alternative from the following table.
| Emulation Mode |
| Panasonic KX-P4401 |
| Panasonic KX-P4430 |
| Panasonic KX-P4440 |
| Panasonic KX-P4451 |
| HP LaserJet Series III |
Clearing a Paper Jam
Paper Jam Areas
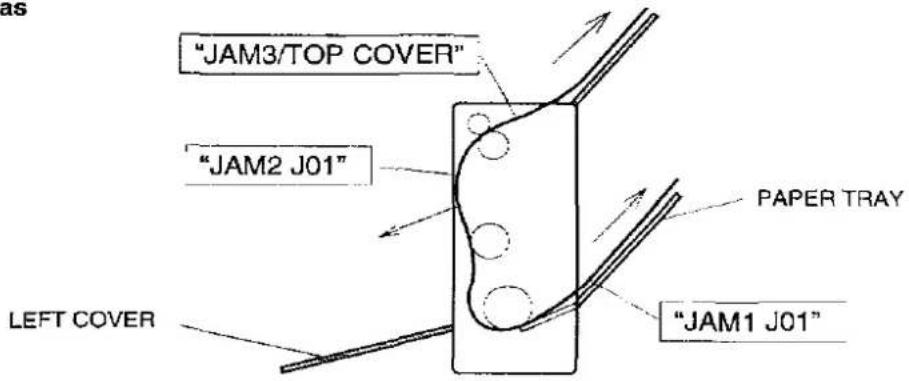
text_image
"JAM3/TOP COVER" "JAM2 J01" LEFT COVER PAPER TRAY "JAM1 J01"Cautions:
The fuser is hot, do not touch it.
Do not expose the drum unit to light for more than 5 minutes.
Do not touch the green drum surface.
If the jammed paper has toner on it, do not pull it out through the paper feed slot.
Be sure that no paper fragments remain in the printer.
When "JAM 1" is displayed
1 Remove the stack of paper in the paper tray, then jammed paper.

text_image
Paper tray Jammed paper2 Reinstall the paper and press printing.

to resume
Note:
- If stains appear on the back of printed paper after a paper jam is cleared, it is recommended that you run several test prints.
(04 P.9 "Test Print")
When "JAM 2" is displayed
1 Open the left cover and remove the jammed paper.
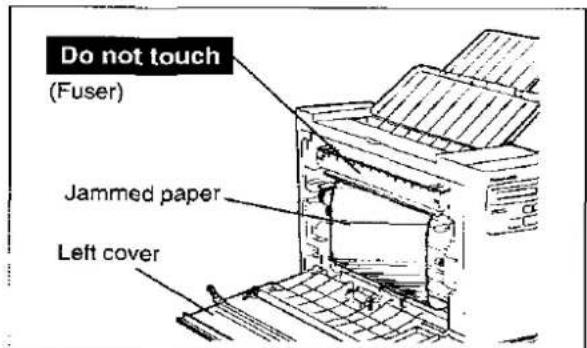
text_image
Do not touch (Fuser) Jammed paper Left cover2 Close the left cover and press printing.
When "JAM 3/TOP COVER" is displayed
1 Remove the jammed paper by carefully pulling it up. Press ☐ to resume printing.

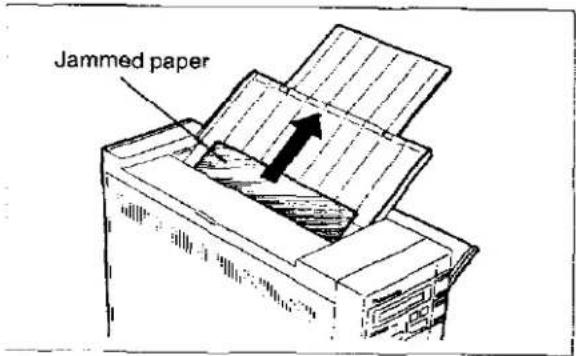
text_image
Jammed paperor
Open the left cover and remove the jammed paper. Then, close the left cover and press to resume printing.

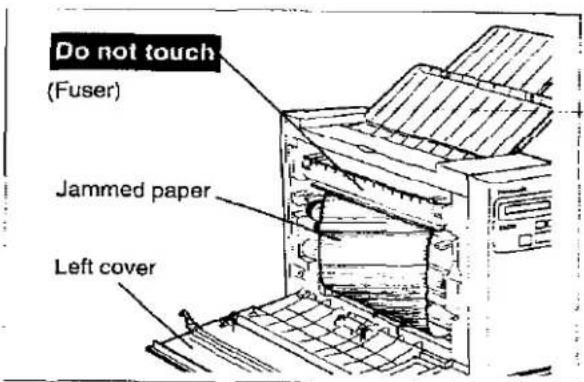
text_image
Do not touch (Fuser) Jammed paper Left coverPrinter Specifications
Printing Method: Electrophotographic LED array
Print Speed: 4 pages per minute (ppm) maximum (Letter size paper, text mode, 5% image area, all originals)
Resolution: 300 dots per inch (dpi)
Paper Feed: 1 Multi-purpose manual feed up to 100 sheets of paper [75 g/m² (20 lbs.)]
Paper Output: Up to 50 sheets of paper [75 g/m ^2 (20 lbs.)]
Power Source: Refer to the nameplate on the rear of the unit
Software Emulation: Panasonic LP (HP LaserJet Series III)
Resident Fonts: Courier_10; Upright, Italic, Bold
Courier 12; Upright, Italic, Bold
Courier 15; Upright, Italic
Courier 17; Upright, Italic
Courier 20; Upright
Century PS; Upright, Italic, Bold
CG Times: Upright, Italic, Bold, Bold Italic
Univers; Upright, Italic, Bold, Bold Italic
RAM Buffer: 1 MB
(expandable to a maximum of 2 MB with optional 1MB RAM Board, 3 MB with optional 2 MB RAM Board and 5 MB with optional 4 MB RAM Board)
Interface: Centronics compatible parallel
Operating Environment: 10 to 32.5°C {50 to 90.5°F}
20 to 80% RH
Storage Environment: 0 to 35°C {32 to 95°F}
10 to 80% RH
Dimensions: 127 (W) × 381 (D) × 297 (H) mm {5.0"×15.0"×11.7"}
Mass {Weight}: Approx. 6.3 kg {13.9 lbs.}
Consumables/Life: Toner; 1,600 pages average
(5% image area with repetitive printing of 10 pages)
Drum; 6,000 pages average
(5% image area with repetitive printing of 10 pages)
Paper Specifications
This printer is designed to work well with most types of paper. However, differences in paper may have significant effects on the quality of the print or the reliability of paper handling. It is strongly recommended that you always test paper before purchasing it to make sure it provides desirable performance. The following guidelines will be helpful.
Note:
- Please store your paper according to the recommendations of the manufacturer.
Paper Specifications
Basic Weight: 60 to 120 g/m ^4 (16 to 32 lbs.)
Thickness: 3.7 to 7.5 mils (1 mil=1/1000")
Moisture Content: 4% to 6%
Smoothness: 100 to 300 Sheffield
Acid Content: 5.5 PH minimum
Fusing Compatibility: Must not scorch, melt, offset material, or release hazardous emissions when heated to 200°C (392°F) for 0.1 second
Cutting Dimensions: ±0.0313 inch of nominal, corners 90°±4°
Grain: Long grain
Cut Edge conditions: Cut with sharp blades, no paper dust
Ash Content: Not to exceed 10%
Curl: No allowable curl toward side to be imaged (printed)
Packing: Polylaminated moisture proof ream wrap
Types of Panel to Avoid
- Extremely smooth or shiny paper or paper that is highly textured
- Coated papers
- Letterhead imprinted with low temperature or thermography. These materials may transfer onto the fusing roller and cause damage. Any pre-printed paper should use inks compatible with 200°C (392°F) for 0.1 second.
- Damaged or wrinkled paper, or paper with irregularities such as tabs, staples, etc.
- Multipart forms or carbonless paper
• Paper with a cotton and/or fiber content over 20%
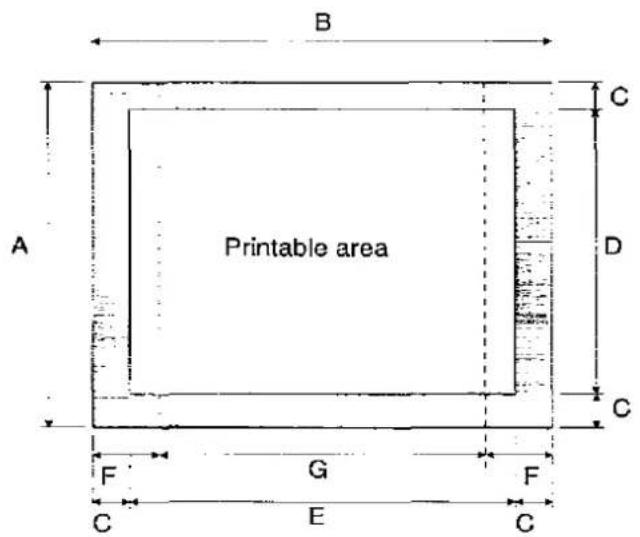
Printable Area
The printable area refers to the area where texts and figures can be printed. There exists an unprintable area on the margins of the paper where text and figures cannot be printed (illustrated below by gray area).
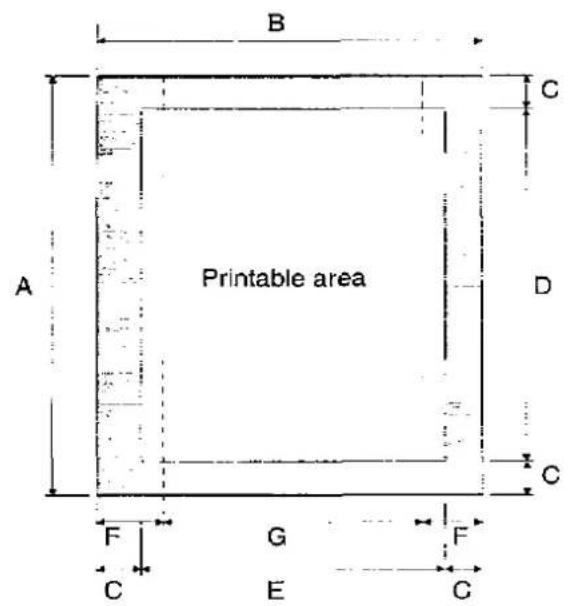
text_image
B A Printable area C D F G E C C F C F CPortrait
text_image
B A Printable area C D C F G F C E CLandscape
二:Unprintable area
A: Paper length
B: Paper width
C: Distance between the edge of the paper and the printable area
D: Length of the printable area
E: Width of the printable area
F: Distance between the edge of the paper and the logical page
G : Width of the logical page
Printable Area Size — Portrait printing mode
| Paper Type | Paper Size | A (dots) | B (dots) | C (dots) | D (dots) | E (dots) | F (dots) | G (dots) |
| A4 | 210 × 297 mm | 3,507 | 2,480 | 50 | 3,407 | 2,380 | 71 | 2,338 |
| Letter | 215.9 × 279.4 mm | 3,300 | 2,550 | 50 | 3,200 | 2,450 | 75 | 2,400 |
| Legal | 215.9 × 355.6 mm | 4,200 | 2,550 | 50 | 4,100 | 2,450 | 75 | 2,400 |
| Executive | 184.1 × 266.7 mm | 3,150 | 2,175 | 50 | 3,050 | 2,075 | 75 | 2,025 |
(1 dot=1/300")
Printable Area Size — Landscape printing mode
| Paper Type | Paper Size | A (dots) | B (dots) | C (dots) | D (dots) | E (dots) | F (dots) | G (dots) |
| A4 | 210 × 297 mm | 2,480 | 3,507 | 50 | 2,380 | 3,407 | 59 | 3,389 |
| Letter | 215.9 × 279.4 mm | 2,550 | 3,300 | 50 | 2,450 | 3,200 | 60 | 3,180 |
| Legal | 215.9 × 355.6 mm | 2,550 | 4,200 | 50 | 2,450 | 4,100 | 60 | 4,080 |
| Executive | 184.1 × 266.7 mm | 2,175 | 3,150 | 50 | 2,075 | 3,050 | 60 | 3,030 |
(1 dot=1/300")
Printing OHP Film and Labels
You may also print on labels and transparencies that are made for printer. Panasonic has tested and found that the following work satisfactorily.
OHP film 3M PP2500
Labels
AVERY 5351, AVERY XS6016
AVERY ACL01, ACL08, ACL16, ACL24, ACL33
Avery Graphic
LG703724, LG704221, LG1053716, LG1054214
Avery Copier Labels (70 × 36 mm)
Avery White (105 × 37 mm) 16 labels per sheet
COPY TACK C-16. C-24
ESSELTE DATALINE,
ESSELTE KOPIETIKETTER
15914, 15917, 15920, 15922
FASTONALL COPY-LINE
18-030, 18-033, 18-034, 18-035, 18-036, 18-037
HERMA Copy-print 4455, 4464
Note:
- With any label stock, the labels must completely cover the backing material.
YES
Labels cover the entire backing material
The backing material is exposed.
Printing Used Paper
Two sided printing is possible. However, you should not expect the same print quality and reliability that you get with one sided printing. We strongly recommend that you follow the guidelines below.
- Use 75 to 90g / m^2 (20 to 24 lbs.) paper. [Do not use 60g / m^2 (16 lbs.) paper.]
- Do not load more than 50 sheets in the paper tray.
- Before loading paper in the tray, adjust it so that the edges are even.
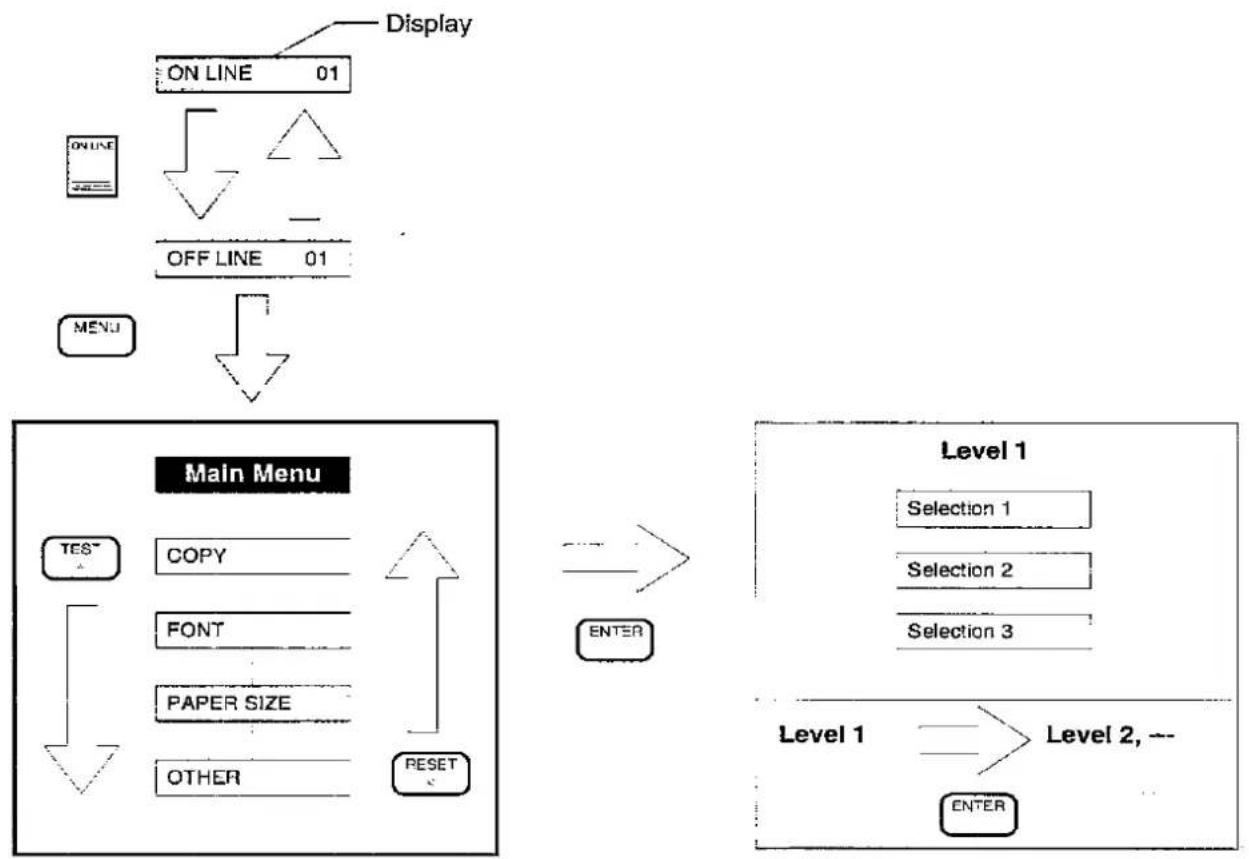
Front Panel Operation
You can enter the menu mode by pressing the MENU key while in the OFF LINE mode. Menu mode is composed of a main menu and levels that allow you to select your desired setting.
flowchart
graph TD
    A["Display ON LINE 01"] --> B["ON LINE OFF LINE 01"]
    B --> C["MENU"]
    C --> D["Main Menu"]
    D --> E["TES COPY FONT PAPER SIZE OTHER RESET"]
    E --> F["ENTER"]
    G["Level 1 Selection 1 Selection 2 Selection 3"] --> H["Level 1 Level 2, ENTER"]

: You can enter the ON LINE or OFF LINE mode by pressing this key.

: You can enter the Main Menu by pressing this key.

: You can display the next selection by pressing this key for less than 2 seconds.

: You can display the previous selection by pressing this key for less than 2 seconds.

: You can make your selection operational or proceed to the next level by pressing this key.
To exit operation: Press to return to the ON LINE mode.
Menu Mode Operation
| Main Menu | Level 1 | Level 2 | Level 3 | Level 4 |
| COPY | NUM OF COPY | COPY= ** | Factory default setting of the number of copies is "01". | |
| VERIFY | OFF | |||
| ON | ||||
| FONT | RESIDENT | BITMAP FONTS | COURIER 10 | (€3* next page) |
| COURIER 10 BOLD | ||||
| COURIER 10 ITA. | ||||
| COURIER 12 | ||||
| COURIER 12 BOLD | ||||
| COURIER 12 ITA. | ||||
| COURIER 15 | ||||
| COURIER 15 ITA. | ||||
| COURIER 17 | ||||
| COURIER 17 ITA. | ||||
| COURIER 20 | ||||
| CENTURY PS | ||||
| CENTURY PS BOLD | ||||
| CENTURY PS ITA. | ||||
| OUTLINE FONTS | CG TIMES | *** POINTS(4.00 to 999.75)(€3* next page) | ||
| CG TIMES ITALIC | ||||
| CG TIMES BOLD | ||||
| CG TIMES BD ITA. | ||||
| UNIVERS | ||||
| UNIVERS ITALIC | ||||
| UNIVERS BOLD | ||||
| UNIVERS BD ITA. | ||||
| ZERO CHARACTER | 0 | |||
| ∅ | ||||
| θ | ||||
| FONT GROUP | FONT GROUP 1 | The RESIDENT is displayed when downloaded fonts are not available. | ||
| FONT GROUP 2 | ||||
| FONT GROUP 3 | ||||
| SOFT FONT | SOFT FONT B### | The SOFT FONT is displayed only when downloaded fonts are available. Symbol set menu will be displayed according to the font type selected in Level 2. | ||
| SOFT FONT O### | *** POINTS(4.00 to 999.75) | The SOFT FONT is displayed only when downloaded fonts are available. Symbol set menu will be displayed according to the font type selected in Level 2. | ||
( P. 19)
(□=Factory default setting)
Symbol sets
| Level 3 | Symbol sets | Level 3 | Symbol sets |
| 8U | Roman-8 | 5S | ISO 84: ISO Portuguese: IBM |
| ∅U | ISO 6: US ASCII | ∅D | ISO 60: ISO Norwegian Version 1 |
| ∅E | Roman-8 Extensions | 1D | ISO 61: ISO Norwegian Version 2 |
| 2U | ISO 2: International Reference Version | *1 ∅N | ISO 100: ECMA-94 (Latin 1) |
| 1E | ISO 4: United Kingdom | *1 1∅U | PC-8 |
| ∅F | ISO 25: ISO French | *1 11U | PC-8 Danish/Norwegian |
| 1F | ISO 69: ISO French | *1 12U | PC-850 |
| ∅G | German | *1 1U | Legal |
| 1G | ISO 21: ISO German | *2 6M | VN Math: Ventura Math |
| ∅I | ISO 15: ISO Italian | *2 13J | VN Intl: Ventura International |
| ∅K | ISO 14: JIS ASCII | *2 14J | VN US: Ventura US |
| 2K | ISO 57: ISO Chinese | *2 5M | PS Math: PS Math |
| 3S | ISO 10: ISO Swedish/Finnish | *2 10J | PS Text: PS Text |
| ∅S | ISO 11: ISO Swedish: names | *2 8M | Math-8: Math-8 |
| 1S | Spanish | *2 15U | Pi Font: Pi Font |
| 2S | ISO 17: ISO Spanish | *2 6J | MS Publ: Microsoft Publishing |
| 6S | ISO 85: ISO Spanish: IBM | *2 9U | Windows: Windows |
| 4S | ISO 16: ISO Portuguese | *2 7J | DeskTop: DeskTop |
*1 If you select SOFT FONT, these are not displayed. (——=Factory default setting)
*2 Outline Fonts (Intellifont Scalable Typefaces)
Font Groups
| Fonts | Font Groups | ||
| 1 | 2 | 3 | |
| Courier 10 | A | A | A |
| Courier 10 Bold | A | A | A |
| Courier 10 Italic | A | A | A |
| Courier 12 | A | A | A |
| Courier 12 Bold | A | A | A |
| Courier 12 Italic | A | A | A |
| Courier 15 | A | A | — |
| Courier 15 Italic | A | A | — |
| *3 Courier 17 | A | A | A |
| *3 Courier 17 Italic | A | A | — |
| Courier 20 | A | A | — |
| Century PS | A | — | — |
| Century PS Bold | A | — | — |
| Century PS Italic | A | — | — |
| CG Times PS | A | A | A |
| CG Times PS Italic | A | A | A |
| CG Times PS Bold | A | A | A |
| CG Times PS Bold Italic | A | A | A |
| Univers PS | A | A | A |
| Univers PS Italic | A | A | A |
| Univers PS Bold | A | A | A |
| Univers PS Bold Italic | A | A | A |
(A=active / —=not active)
^*3 Courier 17 is actually 16.66 cpi.
Font group 1 selects all resident fonts.
Font group 2 selects all resident fonts except Century.
Font group 3 selects HP LaserJet Series III resident fonts.
| Main Menu | Level 1 | Level 2 | Level 3 | Level 4 | Level 5 |
| PAPER SIZE | A4 | PORTRAIT | ORIGIN X | *** DOT COLUMNS | |
| ORIGIN Y | *** DOT ROWS | ||||
| LINES PER INCH | ** LPI | ||||
| PAGE LENGTH | # OF INCHES | *** INCHES | |||
| # OF LINES | *** LINES | ||||
| PAGE WIDTH | # OF INCHES | *** INCHES | |||
| # OF COLUMNS | *** COLUMNS | ||||
| TOP MARGIN | # OF INCHES | *** INCHES | |||
| # OF LINES | *** LINES | ||||
| BOTTOM MARGIN | # OF INCHES | *** INCHES | |||
| # OF LINES | *** LINES | ||||
| LEFT MARGIN | # OF INCHES | *** INCHES | |||
| # OF COLUMNS | *** COLUMNS | ||||
| RIGHT MARGIN | # OF INCHES | *** INCHES | |||
| # OF COLUMNS | *** COLUMNS | ||||
| LANDSCAPE | Same selections as PORTRAIT mode. | ||||
| EXECUTIVE | Same selections as A4 mode. | ||||
| LETTER | |||||
| LEGAL | |||||
| OTHER | PWR ON STAT | OFF | |||
| PRT | ON | ||||
| POWER SAVE | ON | 15 MINUTES | |||
| 30 MINUTES | |||||
| 1 HOUR | |||||
| OFF | |||||
| HEX DUMP | OFF | ||||
| ON | |||||
| DATA TIME OUT | ON | ***SEC | |||
| OFF | |||||
| AUTO CONTINUE | OFF | ||||
| ON | |||||
| DENSITY | MEDIUM | ||||
| DARK | |||||
| LIGHT | |||||
| PERMANENT SAVE | NO | ||||
| YES | |||||
| LANGUAGE | ENGLISH | ||||
| FRENCH | |||||
| GERMAN | |||||
| SPANISH | |||||
| ITALIAN | |||||
| PAGE PROTECTION* | OFF | ||||
| LETTER | |||||
| A4 | * The PAGE PROTECTION menu is displayed only when optional RAM is installed. | ||||
| LEGAL | |||||
* The PAGE PROTECTION menu is displayed only when optional RAM is installed.
(□ =Factory default setting)
Resetting the Printer
Press

for more than 2 seconds.
| Level 1 | Level 2 |
| RESET | USER DEFAULT |
| CLEAR BUFFER | |
| CLEAR SOFT FONTS | |
| CLEAR MACROS | |
| FACTORY DEFAULT |
Maintenance
Cleaning the Printer
Periodic cleaning of the printer is recommended. The frequency of cleaning is dependent upon the environment. You should clean the printer:
• at least once a month.
- when you install a new drum unit.
- when conditions such as blurred printing or stains on paper have occurred.
Outside of the Printer
1 Turn the power OFF.
2 Clean the cover with a soft cloth. Use any mild commercial cleaner.
Inside of the Printer
1 Turn the power OFF.
2 Open the left cover.
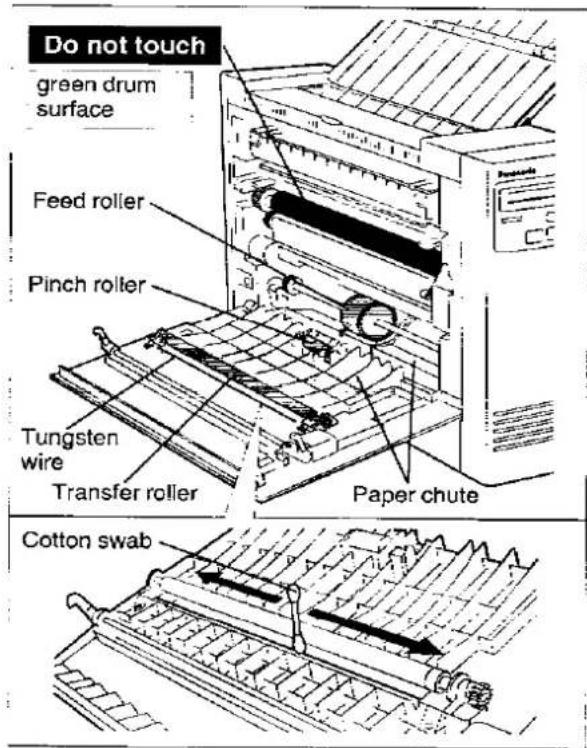
3 Clean the following areas with a dry cloth or a cotton swab.
With a dry cloth
- Pinch roller
- Feed roller
- Transfer roller
• Paper chute (Paper dust)
With a cotton swab
- Carefully wipe the tungsten wire by sliding a cotton swab from end to end 4 to 5 times.
text_image
Do not touch green drum surface Feed roller Pinch roller Tungsten wire Transfer roller Paper chute Cotton swabCautions:
The printer must be turned OFF prior to cleaning.
Do not clean the fuser with stiff material or you may damage the fuser roller.
Do not expose the drum unit to light for more than 5 minutes.
Do not touch the green drum surface.
4 Close the left cover.
Troubleshooting
Many problems associated with the printer can be traced to improper setup, installation, or cabling. The error messages shown on the display (P. 22) and the following tables will assist the user in identifying and correcting some of the more common problems.
| Trouble | Possible Cause | Corrective Action |
| Printer not printing and no message in display | No AC power | Check power cord. |
| Power on but printer not printing data | Printer not ON LINE | Press ON LINE key. |
| Interface cable not connected | Check interface cable. | |
| Front panel keys not operational | Printer not OFF LINE | Press ON LINE key. |
| Paper jam occurs continually | Paper size selected by the front panel or software commands is different from the installed paper size | Select the correct paper size through the front panel. (P. 19) |
| Stains on paper | Dirty paper path | Clean paper path. (P. 20) |
| Vertical line on paper | Dirty paper path | Clean paper path. (P. 20) |
| Dirty tungsten wire | Clean tungsten wire. (P. 20) | |
| Scratch on drum | Replace drum | |
| Scratch on fuser roller | Replace fuser.The printer requires service by an Authorized Panasonic Service Center. | |
| Very faint print | Print density not adjusted | Select the proper print density. (P. 19) |
| Abnormal transfer corona current | Replace transfer corona.The printer requires service by an Authorized Panasonic Service Center. | |
| "JAM3/TOP COVER" message appears on the display | Output tray (top cover) not opened or paper jam occurred | Open output tray (top cover) or remove jammed paper. |
| "REMAINING DATA" and "OFF LINE" or "ON LINE" messages appear on the display alternately | Remaining data still in the buffer | Press ON LINE or PRINT key. |
| "CALL SERVICE" message appears on the display, no display or the printer does not function properly | Internal errors | If one of these error appears, turn the power off for a few seconds then on again.If the error continues, service by an Authorized Panasonic Service Center is required. |
Error Message
| Error Message | Error Code | Possible Cause | Recovery |
| PAPER EMPTY | U11 | Paper is empty | Load paper in paper tray. (P. 7) |
| LOAD LGL | U14 | Printer requires Legal paper | Load Legal paper and then set to Legal size in PAPER SIZE Menu of force printing by the ON LINE key. |
| LOAD LTR | U15 | Printer requires Letter paper | Load Letter paper and then set to Letter size in PAPER SIZE Menu of force printing by the ON LINE key. |
| LOAD EXEC | U16 | Printer requires Executive paper | Load Executive paper and then set to Executive size in PAPER SIZE Menu of force printing by the ON LINE key. |
| LOAD A4 | U17 | Printer requires A4 paper | Load A4 paper and then set to A4 size in PAPER SIZE Menu of force printing by the ON LINE key. |
| CHNG TONER | U20 | Toner is low in the toner cartridge (Printing is possible) | Change toner cartridge. |
| TONER EMPTY | U21 | Over 50 copies tried with "CHNG TONER U20" displayed (Printing is not possible. It is possible to print 50 copies with only 5% image area. If dense or complex printing is attempted, it may not be possible to print 50 copies.) | Change toner cartridge. |
| CHNG DRUM | U27 | Drum unit needs to be replaced | Install new drum unit. The printer will enable approximately 50 pages print-out after the message is displayed. And then the printer will automatically stop printing. |
| CHK OPC/DOOR | U29 | Drum unit is not installed correctly or door is open | Install drum unit or close the door. |
| BUFFER FULL | U35 | Receive buffer overflow | Power off then on. |
| RAM OVERFLOW | U36 | Page overflow, image overflow or download overflow has occurred | Press ON LINE key. |
| PAGE FORMAT | U37 | Overrun has occurred | Press ON LINE key. Set the PAGE PROTECTION (LETTER, A4 or LEGAL) through the front panel keys depending on the installed paper, if optional RAM is installed. |
| RE-DO FORMAT | U38 | Format designation from Format menu is not correct | Reset format. |
Repacking Instructions
It is highly recommended that you keep the original carton and ALL packing materials. Should you need to transport or ship your printer, please follow these instructions.
Please Note:
- .Please use the original carton and all of the original packing material. If you do not have the original packing material, a Shipping Kit is available from Panasonic. Please contact your dealer and request it.
- Improper repacking of the printer may result in a service charge to repair the unit or a cleaning charge to remove spilled toner.
- Since the printer uses dry toner, extreme care must be taken when handling. The printer should be handled in the upright (vertical) position.
Material Required:
• Original Printer Carton & Packing Materials
• Original Drum Unit Carton & Packing Materials
• Newspaper or drop cloth
• Shipping Tape & Scissors
1 Disconnect your printer from both the electrical outlet and the printer/computer cable.
2 Spread newspaper or drop cloth under the unit to keep the work area clean.
3 Close the paper support and the output tray (top cover).
text_image
Output tray (Top cover) Paper support4 Sealing the toner cartridge:
① Open the toner cartridge door.
② If you have not covered the slot on the right side of the toner cartridge with the sealing tape (provided), clean the area around the slot before affixing the tape.
text_image
Toner cartridge Sealing tape ① Toner cartridge door③ Install the toner cartridge pads.
④ Close the toner cartridge door and paper tray.
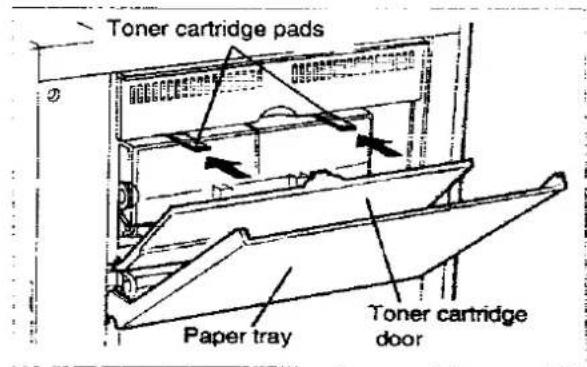
text_image
Toner cartridge pads Paper tray Toner cartridge door5 Repacking the drum unit:
Cautions:
Do not touch the green drum surface. Do not ship or transport the printer with the drum unit installed.
① Open the left cover.
② Remove the drum unit by slightly raising both green labeled tabs and pulling the drum unit toward you.
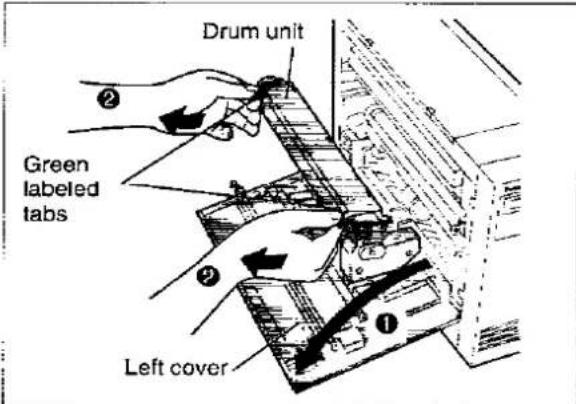
text_image
Drum unit Green labeled tabs Left cover③ Replace the drum protection cap on the drum unit.
Always place the drum unit with the sticker side facing up, otherwise the printer may not be able to function properly.
4 Place the drum unit in the protective bag and repack it in the original drum unit carton.
The drum unit should be packed along with the printer in the printer carton.
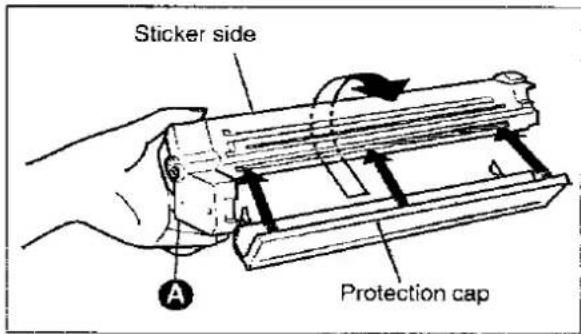
text_image
Sticker side Protection capNote:
If the printer equipped with a transported drum unit displays "CHNG DRUM", remove the drum unit and gently tap point Ⓐ of the drum unit. Do not touch the green drum surface.
6 Sealing the developer unit:
① Place the left clip of the shipping cover over the shaft the developer unit and press firmly.
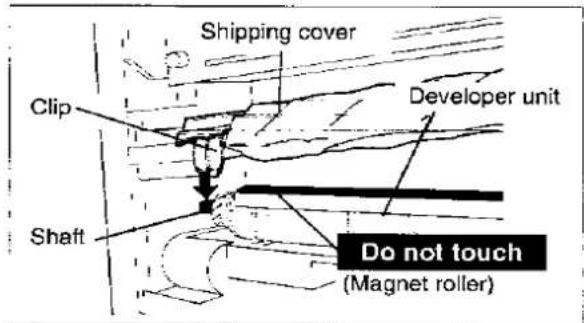
text_image
Shipping cover Clip Developer unit Shaft Do not touch (Magnet roller)② Firmly press the right side of the shipping cover and insert the tab of the developer unit into the slot.
A click sound will be heard.
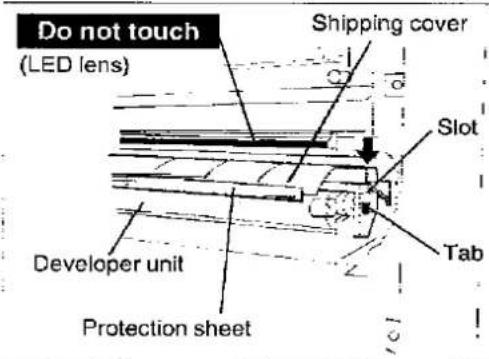
text_image
Do not touch (LED lens) Shipping cover Slot Developer unit Protection sheet TabCaution:
Make sure the protection sheet remains visible while you are installing the shipping cover.
③ Install both the shipping cover pads straight between the shipping cover and the fuser unit.
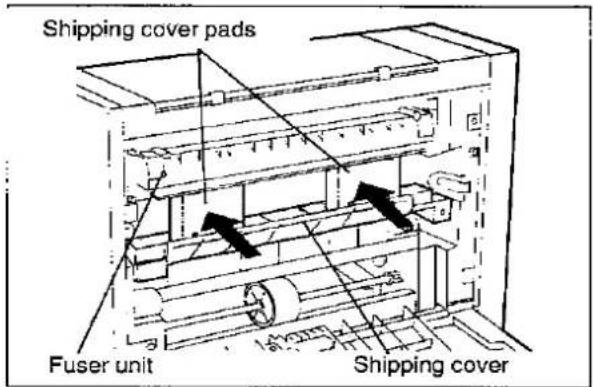
text_image
Shipping cover pads Fuser unit Shipping coverThe pads should be placed in the cutouts in the shipping cover corresponding to the green labels as shown in the illustration below.
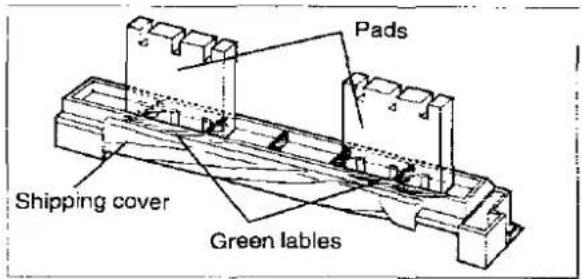
text_image
Pads Shipping cover Green lables7 Close the left cover.
8 Remove and replace the printer stands into their original positions. (P. 4)
9 Packing the printer:
① Wrap the printer in the protective foam poly sheet.
② Install the printer in the Front (F) and Rear (R) foam pads.
③ Place the printer and drum unit carton in the original carton.
④ Seal the carton with plastic shipping tape.
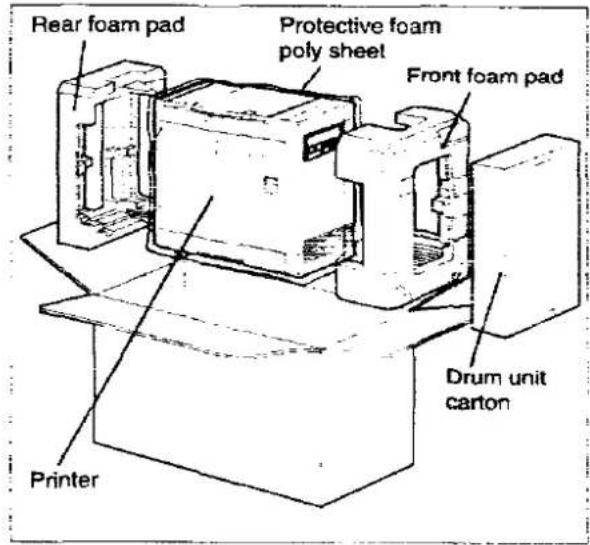
text_image
Rear foam pad Protective foam poly sheet Front foam pad Drum unit carton PrinterCharacter Tables
Symbol Set: Roman-8
| Dec. | 0 | 10 | 32 | 48 | 64 | 80 | 96 | 112 | 128 | 144 | 160 | 76 | 192 | 208 | 224 | 240 | |
| Hex. | 0 | 1 | 2 | 3 | 4 | 5 | 6 | 7 | 8 | 9 | A | B | C | D | E | F | |
| 0 | 0 | SP | 0 | @ | P | · | p | - | å | Å | Å | p | |||||
| 1 | ! | ! | 1 | A | Q | a | q | Å | ÿ | è | î | Å | P | ||||
| 2 | 2 | * | 2 | B | R | b | r | Å | ÿ | ô | O | å | |||||
| 3 | 3 | # | 3 | C | S | c | s | E | ° | û | Æ | ð | μ | ||||
| 4 | 4 | S | 4 | D | T | d | t | È | Ç | å | å | ð | ¶ | ||||
| 5 | 5 | % | 5 | E | U | ø | u | È | ç | é | í | í | § | ||||
| 6 | 6 | & | 6 | F | V | f | v | ! | N | ó | ø | i | |||||
| 7 | 7 | * | 7 | G | W | g | w | i | ñ | ù | æ | Ó | ¥ | ||||
| 8 | 8 | BS | ( | 8 | H | X | h | x | ì | à | Å | Ó | ¿ | ||||
| 9 | 9 | HT | ) | 9 | I | Y | i | y | ¿ | è | ì | Ö | * | ||||
| 10 | A | LF | : | J | Z | j | z | ☐ | ò | Ö | ð | ° | |||||
| 11 | B | VT ESC | : | K | i | k | i | £ | ù | Ù | Š | ° | |||||
| 12 | C | FF | , | < | L | \ | l | ¥ | å | È | š | ■ | |||||
| 13 | D | CR | - | = | M | ] | m | } | Ü | § | è | ? | Ù | ||||
| 14 | E | SO | > | N | ^ | n | Ü | f | ð | ʒ | ÿ | ||||||
| 15 | F | SI | / | ? | O | o | 蒙 | £ | ¢ | ü | Ö | ÿ | |||||
Symbol Set: PC-8
| Dec. | 0 | 16 | 32 | 48 | 64 | 00 | 96 | 112 | 120 | 144 | 160 | 175 | 192 | 206 | 224 | 240 | |
| Hex | 0 | 1 | 2 | 3 | 4 | 5 | 6 | 7 | 8 | 9 | A | B | C | D | E | F | |
| 0 | 0 | ▶ | SP | 0 | @ | P | p | Ç | É | á | ¿ | - | α | = | |||
| 1 | 1 | ♡ | ◀ | ! | 1 | A | Q | a | q | ü | æ | í | — | = | ß | ¿ | |
| 2 | 2 | ● | ♡ | ’ | 2 | B | R | b | r | é | Æ | ó | ¬ | - | Γ | ≥ | |
| 3 | 3 | ♥ | !! | # | 3 | C | S | c | s | à | ò | ú | † | - | π | ≤ | |
| 4 | 4 | ♠ | ¶ | S | 4 | D | T | d | t | á | ð | ñ | - | - | k | Σ | ? |
| 5 | 5 | ♠ | § | % | 5 | E | U | e | u | à | ð | Ñ | = | + | F | σ | j |
| 6 | 6 | ♠ | — | & | 6 | F | V | f | v | à | û | • | ‡ | π | μ | ÷ | |
| 7 | 7 | ● | ˆ | ’ | 7 | G | W | g | w | ç | ù | ° | |· | || | ‡ | = | |
| 8 | 8 | ☐ | ^ | ( | 8 | H | X | h | x | è | ý | ¿ | L | ‡ | Φ | ° | |
| 9 | 9 | ○ | ⊥ | ) | 9 | I | Y | i | y | è | Ó | — | ‡ | ¶ | θ | ° | |
| 10 | A | ■ | → | · | · | J | Z | ! | z | è | Ü | — | ± | ¶ | Ω | · | |
| 11 | B | ♂ | ← | + | · | K | [ | k | { | ì | c | ‡ | ¶ | ¶ | δ | · | |
| 12 | C | ♀ | ⊥ | · | < | L | √ | l | ī | ε | ‡ | ⊥ | ¶ | ■ | ∞ | η | |
| 13 | D | ∫ | ↔ | — | = | M | ] | m | } | i | ¥ | ; | ♣ | = | φ | 2 | |
| 14 | E | ↓ | ▲ | · | > | N | ^ | n | ~ | Ä | Pt | “ | ♣ | + | ¶ | ≡ | |
| 15 | F | ∅ | ▼ | / | ? | O | _ | o | △ | Ä | f | ” | = | ■ | ∩ |
Symbol Set: PC-8 (D/N)
| Dec. | 0 | 16 | 32 | 48 | 64 | 80 | 96 | 1:2 | 128 | 144 | 160 | 176 | 192 | 208 | 224 | 240 | |
| Hex. | 0 | 1 | 2 | 3 | 4 | 5 | 6 | 7 | 8 | 9 | A | B | C | D | E | F | |
| 0 | 0 | ▶ | SP | 0 | @ | P | p | Ç | Ê | á | - | α | = | ||||
| 1 | 1 | ⊂ | ◀ | ! | 1 | A | Q | a | q | ü | æ | i | - | = | 3 | ||
| 2 | 2 | ● | ~ | * | 2 | B | R | b | é | Æ | ó | T | τ | Γ | 2 | ||
| 3 | 3 | ▼ | !! | # | 3 | C | S | c | s | å | ð | ú | - | π | ≤ | ||
| 4 | 4 | + | † | $ | 4 | D | T | d | t | å | ð | ñ | - | ε | ^ | ||
| 5 | 5 | ♠ | § | % | 5 | É | U | e | u | å | ð | Ñ | - | = | σ | ||
| 6 | 6 | ♠ | - | & | 6 | F | V | l | v | å | ð | ð | = | - | μ | ||
| 7 | 7 | ● | ˆ | ! | 7 | G | W | g | w | ç | ú | Ó | | | || | τ | ||
| 8 | 8 | ⊂ | ^ | ( | 8 | H | X | h | x | ð | ý | = | = | Φ | |||
| 9 | 9 | ○ | I | ) | 9 | i | Y | i | y | é | Ó | ä | | | Γ | θ | ||
| 10 | A | ■ | → | · | J | Z | z | è | Ü | Ä | + | - | Ω | ||||
| 11 | B | ♂ | ← | + | K | [ | k | { | i | ø | £ | ? | ¬ | ■ | ð | ||
| 12 | C | ♀ | ~ | < | L | \ | | | | | i | £ | n | ∫ | ! | ■ | ∞ | ||
| 13 | D | ↔ | - | = | M | m | ] | i | ∅ | φ | 2 | ||||||
| 14 | E | ▲ | • | > | N | ^ | n | Å | L | ɔ | + | ε | |||||
| 15 | F | ø | ▼ | ? | O | o | ¿ | Å | l | ø | ± | ■ | ~ | ||||
Symbol Set: ECMA-94
| Dec. 0 16 | 32 | 48 | 64 | 80 | 96 | 112 | 128 | 144 | 160 | 176 | 192 | 206 | 224 | 240 | |||
| Hex | 0 1 | 2 | 3 | 4 | 5 | 6 | 7 | 8 | 9 | A | B | C | D | E | F | ||
| 0 | 0 | SP | 0 | @ | P | p | À | Đ | à | ß | |||||||
| ! | 1 | | | 1 | A | Q | a | q | i | ± | À | Ñ | à | ñ | |||||
| 2 | 2 | " | 2 | B | R | b | r | € | 2 | À | Ö | à | ò | |||||
| 3 | 3 | # | 3 | C | S | c | s | £ | 3 | À | Ó | à | ó | ||||
| 4 | 4 | S | 4 | D | T | d | : | n | ' | À | Ó | à | ò | ||||
| 5 | 5 | % | 5 | E | U | e | u | ¥ | ¿ | À | Ö | à | ò | ||||
| 6 | 6 | & | 6 | F | V | f | v | ; | ¶ | Æ | Ó | æ | ö | ||||
| 7 | 7 | 7 | G | W | g | w | § | Ç | × | ç | ÷ | ||||||
| 8 | 8 | BS | ( | 8 | H | X | h | x | È | ∅ | è | ø | |||||
| 9 | 9 | HT | ) | 9 | I | Y | i | y | : | È | Ù | é | ù | ||||
| 10 | A | LF | · | J | Z | : | z | • | s | Ê | Ù | è | ù | ||||
| 11 | B | VT ESC | - | K | [ | k | i | È | Ù | è | ù | ||||||
| 12 | C | FF | < | L | : | l | i | - | 4 | ì | Ù | i | ù | ||||
| 13 | D | CR | - = | M | : | m | } | - | 5 | í | ý | í | ý | ||||
| 14 | E | SO | > | N | ' | n | - | î | p | i | p | ||||||
| 15 | F | SI | / ? | O | _ | o | ß | ì | ß | ì | ý | ||||||
Symbol Set: PC-850
| Dec. | 0 | 16 | 32 | 48 | 64 | 80 | 98 | 112 | 128 | 144 | 160 | 176 | 192 | 208 | 224 | 240 | |
| Hex | 0 | 1 | 2 | 3 | 4 | 5 | 6 | 7 | 8 | 9 | A | B | C | D | E | F | |
| 0 | 0 | ▶ | SP | 0 | @ | P | · | p | Ç | È | à | ← | ô | Ô | - | ||
| 1 | 1 | ⊂ | ◀ | ' | 1 | A | Ò | a | q | ü | æ | í | ¶ | — | Đ | ß | ± |
| 2 | 2 | ● | ⊂ | ' | 2 | B | R | b | r | é | Æ | ó | ¶ | — | È | Ô | = |
| 3 | 3 | ♥ | !! | # | 3 | C | S | c | s | â | ô | ù | | | - | È | Ô | 12 |
| 4 | 4 | ♦ | ¶ | S | 4 | D | T | d | ! | ä | ô | ñ | | | — | È | ô | ¶ |
| 5 | 5 | ♠ | § | % | 5 | E | U | e | ü | à | ô | Ñ | À | + | ı | Ô | § |
| 6 | 6 | ♠ | — | & | 6 | F | V | f | v | à | ô | ♦ | À | à | İ | μ | + |
| 7 | 7 | ♦ | ' | 7 | G | W | g | w | ç | û | ♦ | À | À | Î | p | , | |
| 8 | 8 | ☐ | T | ( | 8 | H | X | h | x | è | ÿ | ¿ | = | = | İ | p | ° |
| 9 | 9 | = | ) | 9 | I | Y | i | y | è | Ô | ≠ | 111 | — | J | Û | - | |
| 10 | A | ■ | → | • | : | j | Z | j | z | è | Û | ~ | — | ≡ | r | Û | ♦ |
| 11 | B | ♂ | ← | + | ; | K | [ | k | { | I | ø | 12 | = | — | ¶ | Û | ' |
| 12 | C | ♀ | — | , | < | L | \ | l | : | i | £ | 12 | = | 12 | ■ | ÿ | ^3 |
| 13 | D | , | ↔ | - | = | M | ] | m | } | i | ∅ | : | c | = | ; | ÿ | ^2 |
| 14 | E | ; | ▲ | • | > | N | ^ | n | - | A | × | ♦ | ¥ | 111 | I | · | ♦ |
| 15 | F | ◦ | ▼ | / | ? | O | — | o | À | f | - | — | o | ■ | · | · | |
Symbol Set: Legal
| Dec. | 0 | 15 | 32 | 48 | 64 | 80 | 96 | 112 | 128 | 144 | 160 | 176 | 192 | 208 | 224 | 240 | |
| Hex. | 0 | 1 | 2 | 3 | 4 | 5 | 6 | 7 | 8 | 9 | A | B | C | D | E | F | |
| 0 | 0 | SP | 0 | ∅ | P | ° | p | ||||||||||
| 1 | 1 | I | 1 | A | Q | a | q | ||||||||||
| 2 | 2 | ° | 2 | B | R | b | r | ||||||||||
| 3 | 3 | # | 3 | C | S | c | s | ||||||||||
| 4 | 4 | $ | 4 | D | T | d | t | ||||||||||
| 5 | 5 | ↘ | 5 | E | U | e | u | ||||||||||
| 6 | 6 | & | 6 | F | V | f | v | ||||||||||
| 7 | 7 | ° | 7 | G | W | g | w | ||||||||||
| 8 | 8 | BS | ( | 8 | H | X | h | x | |||||||||
| 9 | 9 | HT | ) | 9 | i | Y | j | y | |||||||||
| 10 | A | LF | - | : | J | Z | j | z | |||||||||
| 11 | B | VT | ESC | + | ; | K | I | k | § | ||||||||
| 12 | C | FF | , | = | L | e | I | ¶ | |||||||||
| 13 | D | CR | - | = | M | J | m | † | |||||||||
| 14 | E | SO | , | c | N | e | n | - | |||||||||
| 15 | F | SI | / | ? | O | - | o | ¶ | |||||||||
Symbol Set: Ventura Math
| Doc | 0 | 16 | 32 | 48 | 64 | 80 | 96 | 112 | 128 | 144 | 160 | 176 | 192 | 208 | 224 | 240 | |
| Hex | 0 | 1 | 2 | 3 | 4 | 5 | 6 | 7 | 8 | 9 | A | B | C | D | E | F | |
| 0 | 0 | SP | 0 | ≡ | Π | π | 0 | ⊗ | ≤ | ↓ | | | | | |||||
| 1 | 1 | | | 1 | A | O | α | θ | √ | ⊃ | ♦ | ← | · | | | ||||
| 2 | 2 | ▽ | 2 | B | P | β | ρ | | | = | ≥ | ⊗ | ∠ | = | ||||
| 3 | 3 | # | 3 | X | Σ | χ | σ | " | | | ∂ | " | | | ↔ | ||||
| 4 | 4 | ∃ | 4 | Δ | T | δ | τ | ✕ | f | √ | |||||||
| 5 | 5 | % | 5 | E | Y | ε | υ | ¿ | ♠ | ' | 3 | { | Σ | ||||
| 6 | 6 | & | 6 | Φ | ζ | ø | ω | | | ⊗ | ✕ | ∅ | | | | | ||||
| 7 | 7 | > | 7 | Γ | Ω | γ | ω | ⊗ | ρ | ± | ) | ; | |||||
| 8 | 8 | BS | ( | 8 | H | ≡ | η | ξ | ? | ⊂ | ∞ | → | | | ||||
| 9 | 9 | HT | ) | 9 | ! | Ψ | ! | ψ | = | ∪ | ♠ | - | ¬ | ∅ | |||
| 10 | Δ | LF | * | : | ∅ | Z | φ | ζ | ↓ | - | < | ≠ | ∇ | ∩ | |||
| 11 | B | VT ESC | + | : | K | [ | κ | { | α | ... | • | ¤ | ∫ | ∈ | |||
| 12 | C | FF | - | < | Λ | .. | λ | | | ⊂ | | | / | < | | | ⊗ | |||
| 13 | ∅ | CR | - | = | M | ] | μ | ] | ∫ | ∧ | ♥ | ↔ | } | ∉ | |||
| 14 | E | SO | . | > | N | ⊥ | ν | - | _ | ✕ | ] | ;} | } | ||||
| 15 | F | SI | / | ? | O | o | } | = | Υ | ∫ | + | 〈 | |||||
Symbol Set: Ventura International
| Dec. | 0 | 18 | 32 | 46 | 64 | 80 | 95 | 112 | 128 | 144 | 160 | 178 | 192 | 208 | 224 | 240 |
| Hex | 0 | 1 | 2 | 3 | 4 | 5 | 6 | 7 | 8 | 9 | A | B | C | D | E | |
| 0 | 0 | SP | 0 | ∅ | P | · | p | - | ∞ | a | A | A | CE | |||
| 1 | 1 | ! | 1 | A | Q | a | q | A | · | a | I | A | ∞ | |||
| 2 | 2 | · | 2 | B | R | b | r | A | · | o | O | a | ¶ | |||
| 3 | 3 | # | 3 | C | S | c | s | E | · | o | A | E | ||||
| 4 | 4 | $ | 4 | D | T | d | t | E | C | á | A | ‡ | ||||
| 5 | 5 | % | 5 | E | U | e | u | E | ç | é | i | I | — | |||
| 6 | 6 | & | 6 | F | V | f | v | I | Ñ | ó | o | I | — | |||
| 7 | 7 | · | 7 | G | W | g | w | I | ñ | ú | m | Ó | ||||
| 8 | 8 | BS | ( | 8 | H | X | h | x | ° | i | a | A | Ó | |||
| 9 | 9 | HT | ) | 9 | I | Y | i | y | ° | ¿ | é | i | Ó | ° | ||
| 10 | 11 | LF | + | : | J | Z | j | z | ° | o | ó | Ó | ó | ° | ||
| 11 | 12 | VTESC | + | ; | K | [ | k | { | · | £ | ú | Ú | S | — | ||
| 12 | 13 | FF | , | < | L | \ | l | l | · | ¥ | é | É | s | ° | ||
| 13 | 14 | CR | - | = | M | ] | m | } | ú | § | é | I | Ú | — | ||
| 14 | 15 | SO | , | > | N | · | n | — | Ú | f | ó | ß | ý | |||
| 15 | 16 | St | / | ? | O | _ | o | o | ó | Ó | ý | ... |
Symbol Set: Ventura US
| Dec | 0 | 16 | 32 | 48 | 64 | 60 | 96 | 112 | 128 | 144 | 150 | 176 | 192 | 208 | 224 | 240 | |
| Hok | 0 | 1 | 2 | 3 | 4 | 5 | 6 | 7 | 8 | 9 | A | B | C | D | E | F | |
| 0 | 0 | SP | 0 | @ | P | ' | p | - | % | ||||||||
| 1 | 1 | ! | 1 | A | Q | a | q | - | |||||||||
| 2 | 2 | ' | 2 | B | R | b | r | - | ¶ | ||||||||
| 3 | 3 | # | 3 | C | S | c | s | ° | † | ||||||||
| 4 | 4 | S | 4 | D | T | d | l | ‡ | |||||||||
| 5 | 5 | % | 5 | E | U | e | u | - | |||||||||
| 6 | 6 | & | 8 | F | V | I | v | - | |||||||||
| 7 | 7 | · | 7 | G | W | g | w | ||||||||||
| 8 | 8 | BS | ( | 8 | H | X | h | x | e | ||||||||
| 9 | 9 | HT | ) | 9 | ; | Y | I | y | |||||||||
| 10 | A | LF | - | : | J | Z | j | z | |||||||||
| 11 | B | VT ESC | + | ; | K | ! | k | [ | J | ||||||||
| 12 | C | FF | , | < | L | ; | I | I | - | · | |||||||
| 13 | D | CR | - | = | M | ; | m | ;} | § | ||||||||
| 14 | E | SO | - | > | N | * | r | - | - | ||||||||
| 15 | F | SI | / | ? | O | - | o | ☐ | c | ... | |||||||
Symbol Set: PS Math
| Dec. | 0 | 16 | 32 | 48 | 64 | 80 | 96 | 12 | 126 | 144 | 160 | 176 | 192 | 208 | 224 | 240 | |
| Hex. | 0 | 1 | 2 | 3 | 4 | 5 | 6 | 7 | 8 | 9 | A | B | C | D | E | F | |
| 0 | 0 | SP | 0 | ≡ | Π | - | π | - | K | ∠ | 0 | ||||||
| 1 | 1 | ! | 1 | A | θ | α | θ | - | ± | 3 | ▽ | ( | ) | ||||
| 2 | 2 | √ | 2 | B | P | 3 | ρ | ' | " | 8 | ∅ | ∅ | ! | ||||
| 3 | 3 | # | 3 | X | Σ | χ | σ | ≤ | ≥ | ∅ | ∅ | ∅ | ∫ | ||||
| 4 | 4 | ≡ | 4 | Δ | T | δ | τ | / | × | 8 | 14 | √ | ! | ||||
| 5 | 5 | % | 5 | E | Y | ε | υ | ∞ | ∞ | ∅ | Π | Σ | J | ||||
| 6 | 6 | & | 6 | Φ | ζ | ø | ω | f | ∂ | ∅ | √ | / | ) | ||||
| 7 | 7 | ∃ | 7 | Γ | Ω | γ | ω | ▲ | ● | ∩ | |||||||
| 8 | 8 | BS | ( | 8 | H | ≡ | η | ξ | + | ∪ | ¬ | ) | |||||
| 9 | 9 | HT | ) | 9 | | | Ψ | ι | ∨ | ▼ | = | ⊃ | ∧ | [ | ||||
| 10 | A | LF | × | ∅ | Z | φ | ζ | ▲ | ≡ | ⊃ | ∨ | | | |||||
| 11 | B | VT ESC | + | : | K | i | κ | { | ↔ | = | ∅ | ⇔ | L | - | |||
| 12 | C | FF | < | Λ | λ | l | ← | ... | ⊂ | ⇐ | · | | | |||||
| 13 | D | CR | - | = | M | μ | } | - | | | ≡ | 11 | < | } | ||||
| 14 | E | SO | · | > | N | ⊥ | ν | ~ | → | — | ε | ⇒ | 、 | | | |||
| 15 | F | SI | ? | ? | O | ø | - | ← | ε | 11 | |||||||
Symbol Set: PS Text
| Dec. | 0 | 16 | 32 | 48 | 64 | 80 | 96 | 112 | 128 | 144 | 160 | 176 | 192 | 208 | 224 | 240 | |
| Hex | 0 | 1 | 2 | 3 | 4 | 5 | 6 | 7 | 8 | 9 | A | B | C | D | E | F | |
| 0 | 0 | SP | 0 | @ | P | ' | p | — | |||||||||
| 1 | 1 | ! | 1 | A | Q | a | q | i | - | AE | æ | ||||||
| 2 | 2 | ' | 2 | B | R | b | r | c | † | ||||||||
| 3 | 3 | # | 3 | C | S | c | s | £ | ‡ | * | |||||||
| 4 | 4 | S | 4 | D | T | d | t | / | - | ||||||||
| 5 | 5 | % | 5 | E | U | e | u | ¥ | |||||||||
| 6 | 6 | & | 6 | F | V | f | v | f | ¶ | ||||||||
| 7 | 7 | · | 7 | G | W | g | w | § | * | ||||||||
| 8 | 8 | BS | ( | 8 | H | X | h | x | o | , | L | l | |||||
| 9 | 9 | HT | ) | 9 | I | Y | i | y | .. | ∅ | ø | ||||||
| 10 | A | LF | * | : | J | Z | j | z | * | " | CE | ∞ | |||||
| 11 | B | VT | ESC | + | ; | K | [ | k | ! | " | " | = | β | ||||
| 12 | C | FF | , | < | L | ' | | | , | ... | ||||||||
| 13 | D | CR | · | = | M | ] | m | } | ‰ | ||||||||
| 14 | E | SO | · | > | N | n | ~ | fi | |||||||||
| 15 | F | Si | / | ? | O | o | II | ↓ | |||||||||
Symbol Set: Math-8
| Dec. | 0 | 16 | 32 | 48 | 64 | 80 | 96 | 112 | 128 | 144 | 160 | 176 | 192 | 208 | 224 | 240 | ||
| Hex. | 0 | 1 | 2 | 3 | 4 | 5 | 6 | 7 | 8 | 9 | A | B | C | D | E | F | ||
| 0 | 0 | SP | 0 | .. | - | ∈ | A | [ | ] | |||||||||
| 1 | 1 | : | 1 | A | P | ^ | ∀ | ⊗ | - | L | ] | |||||||
| 2 | 2 | " | 2 | B | Σ | → | ∃ | ⊗ | - | [ | ] | |||||||
| 3 | 3 | ° | 3 | Γ | T | - | T | θ | ⊥ | J | , | |||||||
| 4 | 4 | = | 4 | Δ | T | δ | ← | ⊥ | 2 | 3 | i | , | ||||||
| 5 | 5 | ÷ | 5 | E | ^ | ∪ | ∧ | ∫ | ∫ | ! | ||||||||
| 6 | 6 | = | 6 | Z | X | ζ | ≡ | ∩ | ∨ | § | ! | |||||||
| 7 | 7 | ' | 7 | H | Ψ | η | Ψ | √ | ∈ | V | ∠ | J | , | |||||
| 8 | 8 | BS | ( | 8 | Ω | ω | ⇐ | ⊃ | ¬ | ∅ | < | ¬ | ||||||
| 9 | 9 | HT | ) | 9 | I | V | ι | ε | ° | K | | | ; | ||||||
| 10 | A | LF | × | e | K | K | ↔ | ⊂ | · | = | ∠ | , | ||||||
| 11 | B | VT | ESC | + | ε | Λ | ζ | λ | ⊃ | • | j | / | , | |||||
| 12 | C | FF | , | < | M | ≤ | μ | - | ⇔ | ∅ | • | G | - | ( | ||||
| 13 | O | CR | - | = | N | ≠ | v | = | + | ∅ | 3 | = | x | |||||
| 14 | E | SO | , | > | ∃ | ≥ | ξ | + | ≡ | † | ∅ | + | x | |||||
| 15 | F | SI | / | = | O | - | o | ※ | ≡ | ‡ | ∅ | ± | ||||||
Symbol Set: Pi Font
| Dec. | 0 | 16 | 32 | 48 | 64 | 80 | 96 | 112 | 128 | 144 | 160 | 176 | 192 | 208 | 224 | 240 | |
| Hex | 0 | 1 | 2 | 3 | 4 | 5 | 6 | 7 | 8 | 9 | A | B | C | D | E | F | |
| 0 | 0 | SP | |||||||||||||||
| 1 | 1 | ||||||||||||||||
| 2 | 2 | R | |||||||||||||||
| 3 | 3 | Σ | |||||||||||||||
| 4 | 4 | + | |||||||||||||||
| 5 | 5 | + | |||||||||||||||
| 6 | 6 | F | - | ||||||||||||||
| 7 | 7 | I | |||||||||||||||
| 8 | 8 | BS | ( | a | h | L | |||||||||||
| 9 | 9 | HT | ) | ∩ | |||||||||||||
| 10 | A | LF | II | ||||||||||||||
| 11 | B | VT | ESC | I | L | ||||||||||||
| 12 | C | FF | ∅ | = | |||||||||||||
| 13 | D | CR | < | § | [ | ○ | ◆ | ||||||||||
| 14 | E | SO | > | ||||||||||||||
| 15 | F | SI | ? | ※ | |||||||||||||
Symbol Set: Microsoft Publishing
| Doc. | 0 | 16 | 32 | 48 | 64 | 80 | 96 | 112 | 128 | 144 | 160 | 176 | 192 | 208 | 224 | 240 | |
| Hex. | 0 | 1 | 2 | 3 | 4 | 5 | 6 | 7 | 8 | 9 | A | B | C | D | E | F | |
| P | 0 | SP | 2 | - | - | Ω | |||||||||||
| T | T | 1 | - | - | - | - | |||||||||||
| E | 2 | - | R | - | - | - | - | ||||||||||
| E | 3 | 5 | S | % | # | - | - | - | - | ||||||||
| E | 4 | - | - | - | - | - | - | ||||||||||
| E | 5 | - | O | - | - | - | |||||||||||
| E | 6 | 7 | O | - | - | U | U | ||||||||||
| Z | 7 | - | - | - | - | L | I | ||||||||||
| E | 8 | BS | - | ■ | - | - | L | I | |||||||||
| E | 9 | HT | - | Y | H | ■ | |||||||||||
| 10 | A | LF | - | Z | 2 | H | = | - | |||||||||
| 11 | B | VT | ESC | † | H | = | - | - | |||||||||
| 12 | C | FF | - | - | ( | H | □ | ||||||||||
| 13 | D | CR | - | - | - | H | % | - | - | ||||||||
| 14 | E | SO | ... | - | - | - | Pt | - | + | - | - | ||||||
| 15 | F | SI | / | CE | = | ce | f | - | ◇ | - | - | h | |||||
Symbol Set: Windows
| Dec. | 0 | 16 | 32 | 48 | 64 | 80 | 96 | 112 | 128 | 144 | 160 | 176 | 192 | 208 | 224 | 240 | |
| Hex | 0 | 1 | 2 | 3 | 4 | 5 | 6 | 7 | 8 | 9 | A | B | C | D | E | F | |
| 0 | 0 | SP | 0 | @ | P | p | · | A | D | à | ò | ||||||
| 1 | 1 | ! | 1 | A | O | a | q | · | ; | ± | À | Ñ | à | ñ | |||
| 2 | 2 | · | 2 | B | R | b | ? | · | c | 2 | À | Ó | à | ò | |||
| 3 | 3 | # | 3 | C | S | c | s | £ | 3 | À | Ó | à | ó | ||||
| 4 | 4 | S | 4 | D | T | d | : | o | · | À | Ó | à | ò | ||||
| 5 | 5 | % | 5 | E | U | e | u | ¥ | ù | À | Ó | à | ò | ||||
| 6 | 6 | & | 6 | F | V | I | v | ¶ | Æ | Ó | àè | ò | |||||
| 7 | 7 | · | 7 | G | W | g | w | § | · | Ç | × | ç | ÷ | ||||
| 8 | 8 | BS | ( | 6 | H | X | h | x | · | È | ∅ | è | ø | ||||
| 9 | 9 | HT | ) | 9 | i | Y | i | y | · | · | È | Ù | é | ù | |||
| 10 | A | LF | · | : | J | Z | | | z | · | ° | È | Û | é | ù | |||
| 11 | B | VT ESC | + | ; | K | I | k | I | « | » | È | Û | é | ò | |||
| 12 | C | FF | . | < | L | \ | l | l | - | k | | | Û | i | ù | |||
| 13 | D | CR | - | = | M | ] | m | } | - | ½ | í | Ÿ | i | ÿ | |||
| 14 | E | SO | . | > | N | · | n | - | · | ä | ì | p | I | p | |||
| 15 | F | SI | / | ? | O | _ | o | - | ¿ | ì | ß | I | ÿ | ||||
Symbol Set: DeskTop
| Name | 一 | 0 | 16 | 32 | 48 | 54 | 50 | 96 | 112 | 126 | 144 | 160 | 176 | 192 | 206 | 224 | 240 |
| Hoc | 0 | 1 | 2 | 3 | 4 | 5 | 6 | 7 | 8 | 9 | A | B | C | D | E | F | |
| 0 | 0 | SP | 0 | @ | P | . | p | . | - | . | . | . | |||||
| 1 | 1 | | | 1 | A | Q | a | q | ¶ | - | x | . | . | . | ||||
| 2 | 2 | " | 2 | B | R | b | r | § | μ | x | - | æ | . | ||||
| 3 | 3 | # | 3 | C | S | c | s | † | % | + | - | Æ | . | ||||
| 4 | 4 | $ | 4 | D | T | d | t | ‡ | . | . | , | ð | . | ||||
| 5 | 5 | % | 5 | E | U | ø | u | ° | • | . | . | D | . | ||||
| 6 | 6 | & | 6 | F | V | / | v | ° | . | - | . | ij | . | ||||
| 7 | 7 | ' | 7 | G | W | g | w | " | o | k | i | U | . | ||||
| 8 | 8 | BS | ( | B | H | X | h | x | % | * | ‡ | ¿ | i | . | |||
| 9 | 9 | HT | ) | 9 | I | Y | i | y | c | = | ¶ | Pl | L | . | |||
| 10 | A | LF | * | : | J | Z | j | z | - | o | ! | { | ø | . | |||
| 11 | ß | VT | ESC | + | ; | K | [ | k | { | - | ☐ | ? | £ | CE | . | ||
| 12 | C | FF | . | < | L | \ | l | l | ... | . | , | ¥ | ø | . | |||
| 13 | ß | CR | - | = | M | j | m | } | ¶ | - | / | o | ∅ | . | |||
| 14 | E | SO | . | > | N | " | n | - | ¶ | ! | f | p | . | ||||
| 15 | F | SI | / | ? | O | - | o | 鎧 | = | B | r |
Symbol Set: ISO (Conversion Table)
| ID | Symbol Set. | 330 20- | 360 24h | 645 45m | 210 55m | 950 30- | 200 50m | 340 55m | 180 80m | 125: 70m | 124c 70m | 125c 70m | 250 75m |
| QU | LS ASCII (ISO 6) | π | ∅ | ! | : | J | : | : | : | : | : | : | |
| 2U | INV (ISO 2) | π | ∅ | ∅ | : | : | J | : | : | : | : | ||
| 1E | United Kingdom: (ISO 4) | £ | ∅ | : | : | J | : | : | : | : | : | : | |
| OF | French (ISO 25) | £ | € | : | ∅ | ^ | : | ∅ | ∅ | ∅ | : | ||
| TF | French (ISO 69) | £ | # | : | ∅ | ^ | μ | ∅ | ∅ | ∅ | : | ||
| A | ∅ | ∅ | ^ | : | ∅ | ∅ | ∅ | ∅ | |||||
| 00 | German | £ | A | ∅ | ∅ | ^ | : | a | ∅ | ∅ | ∅ | ||
| 10 | German (ISO 21) | # | A | ∅ | ∅ | ^ | ∅ | ∅ | ∅ | ∅ | ∅ | ||
| OT | Italian (ISO 15) | £ | : | ∅ | ∅ | ^ | : | : | : | : | : | ||
| DK | JIS ASCII (ISO 14) | # | ∅ | [ | # | ] | ^ | : | : | : | : | : | |
| 2K | Chinese (ISO 57) | # | # | ∅ | : | : | ] | ^ | : | : | : | : | |
| 3S | Swedish (ISO 10) | # | ∅ | ∅ | A | ∅ | A | ^ | : | ∅ | ∅ | ∅ | ∅ |
| QS | Swedish (ISO 11) | # | ∅ | ∅ | A | ∅ | A | ∅ | ∅ | ∅ | ∅ | ∅ | ∅ |
| 1S | Spanish | £ | ∅ | N | ∅ | ∅ | ∅ | ∅ | ∅ | ∅ | ∅ | ∅ | |
| 2S | Spanish (ISO 17) | £ | F | ∅ | ^ | : | : | ∅ | ∅ | ∅ | ∅ | ||
| 6S | Spanish (BV (ISO 85) | # | # | ∅ | ∅ | ∅ | ∅ | ∅ | ∅ | ∅ | ∅ | ∅ | |
| 4S | Portuguese (ISO 18) | # | ∅ | ∅ | ∅ | ∅ | ∅ | ∅ | ∅ | ∅ | ∅ | ||
| 6S | Portuguese (ISO 84) | # | A | ∅ | ∅ | ∅ | ∅ | ∅ | ∅ | ∅ | ∅ | ∅ | |
| 00 | Norwegian v2 (ISO 82) | # | ∅ | ∅ | ∅ | ∅ | ∅ | ∅ | ∅ | ∅ | ∅ | ∅ | |
| 1D | Norwegian v2 (ISO 8°) | $ | ∅ | ∅ | ∅ | ∅ | ∅ | ∅ | ∅ | ∅ | ∅ | ∅ |
Resident Century Font Width Tables
Symbol Set: Roman-8
Century PS 10 pts Upright Medium
| Dec. | 0 | 16 | 32 | 48 | 64 | 60 | 96 | 1:2 | 128 | 144 | 180 | 176 | 192 | 208 | 224 | 240 | |
| Hex. | 0 | 1 | 2 | 3 | 4 | 5 | 6 | 7 | 8 | 9 | A | B | C | D | E | F | |
| 0 | 0 | 11 | 22 | 40 | 28 | 41 | 23 | 21 | 21 | 29 | 29 | 28 | |||||
| 1 | 1 | 11 | 22 | 29 | 32 | 21 | 23 | 29 | 29 | 21 | 11 | 29 | 23 | ||||
| 2 | 2 | 13 | 22 | 29 | 29 | 23 | 18 | 29 | 21 | 21 | 32 | 21 | 11 | ||||
| 3 | 3 | 32 | 22 | 29 | 26 | 18 | 18 | 29 | 21 | 24 | 42 | 31 | 23 | ||||
| 4 | 4 | 22 | 22 | 31 | 28 | 23 | 16 | 29 | 29 | 21 | 21 | 23 | 20 | ||||
| 5 | 5 | 33 | 22 | 29 | 34 | 21 | 24 | 29 | 18 | 21 | 11 | 16 | 13 | ||||
| 6 | 6 | 33 | 22 | 27 | 30 | 14 | 21 | 16 | 33 | 21 | 21 | 16 | 13 | ||||
| 7 | 7 | 12 | 22 | 32 | 40 | 21 | 31 | 16 | 24 | 24 | 32 | 32 | 13 | ||||
| 8 | 8 | 15 | 22 | 34 | 29 | 24 | 22 | 21 | 11 | 21 | 29 | 32 | 13 | ||||
| 9 | 9 | 15 | 22 | 16 | 27 | 11 | 21 | 21 | 18 | 21 | 11 | 32 | 15 | ||||
| 10 | A | 21 | 12 | 22 | 25 | 11 | 20 | 21 | 25 | 21 | 32 | 21 | 14 | ||||
| 11 | B | 41 | 12 | 31 | 15 | 24 | 21 | 21 | 22 | 24 | 34 | 26 | 20 | ||||
| 12 | C | 11 | 41 | 27 | 21 | 11 | 21 | 21 | 27 | 21 | 29 | 18 | 21 | ||||
| 13 | D | 13 | 41 | 38 | 15 | 35 | 21 | 34 | 21 | 21 | 11 | 34 | 20 | ||||
| 14 | E | 11 | 41 | 33 | 41 | 24 | 41 | 34 | 22 | 21 | 23 | 27 | 41 | ||||
| 15 | F | 12 | 18 | 32 | 21 | 21 | 42 | 22 | 22 | 24 | 32 | 21 | |||||
Century PS 10 pts Upright Bold
| Dec. | 0 | 16 | 32 | 48 | 64 | 80 | 96 | 112 | 128 | 144 | 160 | 176 | 192 | 208 | 224 | 240 | |
| Hex. | 0 | 1 | 2 | 3 | 4 | 5 | 6 | 7 | 8 | 9 | A | B | C | D | E | F | |
| 0 | 0 | 12 | 24 | 41 | 32 | 41 | 27 | 21 | 25 | 31 | 31 | 31 | |||||
| 1 | 1 | 13 | 24 | 31 | 34 | 25 | 27 | 31 | 30 | 24 | 14 | 31 | 27 | ||||
| 2 | 2 | 14 | 24 | 32 | 34 | 26 | 21 | 31 | 24 | 25 | 34 | 25 | 12 | ||||
| 3 | 3 | 32 | 24 | 32 | 29 | 23 | 20 | 32 | 21 | 28 | 45 | 35 | 25 | ||||
| 4 | 4 | 24 | 24 | 34 | 30 | 27 | 18 | 32 | 32 | 25 | 25 | 27 | 21 | ||||
| 5 | 5 | 35 | 24 | 32 | 34 | 24 | 26 | 32 | 23 | 24 | 14 | 17 | 13 | ||||
| 6 | 6 | 34 | 24 | 30 | 32 | 17 | 25 | 17 | 35 | 25 | 25 | 17 | 13 | ||||
| 7 | 7 | 13 | 24 | 34 | 39 | 25 | 36 | 17 | 26 | 28 | 36 | 34 | 13 | ||||
| 8 | 8 | 17 | 24 | 36 | 30 | 28 | 25 | 21 | 13 | 25 | 31 | 34 | 13 | ||||
| 9 | 9 | 17 | 24 | 17 | 30 | 14 | 24 | 21 | 22 | 24 | 14 | 34 | 19 | ||||
| 10 | A | 21 | 13 | 27 | 28 | 14 | 22 | 21 | 25 | 25 | 34 | 25 | 19 | ||||
| 11 | B | 41 | 13 | 34 | 17 | 27 | 21 | 21 | 24 | 28 | 34 | 29 | 22 | ||||
| 12 | C | 12 | 41 | 30 | 21 | 14 | 21 | 21 | 29 | 25 | 32 | 20 | 23 | ||||
| 13 | D | 14 | 41 | 41 | 17 | 40 | 21 | 34 | 21 | 24 | 14 | 34 | 22 | ||||
| 14 | E | 12 | 41 | 35 | 41 | 28 | 41 | 34 | 24 | 25 | 25 | 30 | 41 | ||||
| 15 | F | 12 | 22 | 34 | 21 | 25 | 42 | 24 | 24 | 28 | 34 | 24 | |||||
Century PS 10 pts Italic Medium
| Dec. | 0 | 16 | 32 | 48 | 64 | 80 | 96 | 112 | 128 | 144 | 160 | 176 | 192 | 208 | 224 | 240 | |
| Hex | 0 | 1 | 2 | 3 | 4 | 5 | 6 | 7 | 8 | 9 | A | B | C | D | E | F | |
| 0 | 0 | 11 | 22 | 40 | 26 | 41 | 23 | 21 | 23 | 29 | 29 | 28 | |||||
| 1 | 1 | 14 | 22 | 29 | 32 | 23 | 22 | 29 | 28 | 18 | 14 | 29 | 23 | ||||
| 2 | 2 | 13 | 22 | 30 | 31 | 21 | 18 | 29 | 20 | 21 | 32 | 23 | 11 | ||||
| 3 | 3 | 32 | 22 | 29 | 27 | 18 | 19 | 29 | 21 | 25 | 43 | 32 | 23 | ||||
| 4 | 4 | 22 | 22 | 32 | 29 | 25 | 13 | 29 | 29 | 23 | 23 | 25 | 20 | ||||
| 5 | 5 | 34 | 22 | 29 | 33 | 18 | 25 | 29 | 18 | 18 | 14 | 17 | 13 | ||||
| 6 | 6 | 36 | 22 | 28 | 27 | 14 | 21 | 17 | 33 | 21 | 21 | 17 | 13 | ||||
| 7 | 7 | 12 | 22 | 32 | 37 | 23 | 31 | 17 | 25 | 25 | 30 | 32 | 13 | ||||
| 8 | 8 | 13 | 22 | 35 | 29 | 25 | 20 | 21 | 14 | 23 | 29 | 32 | 13 | ||||
| 9 | 9 | 13 | 22 | 17 | 27 | 14 | 19. | 21 | 20 | 18 | 14 | 32 | 16 | ||||
| 10 | A | 21 | 12 | 25 | 27 | 14 | 18 | 21 | 25 | 21 | 32 | 21 | 14 | ||||
| 11 | B | 41 | 12 | 31 | 14 | 23 | 21 | 21 | 22 | 25 | 33 | 27 | 20 | ||||
| 12 | C | 11 | 41 | 27 | 21 | 14 | 21 | 21 | 24 | 23 | 29 | 19 | 23 | ||||
| 13 | D | 13 | 41 | 38 | 14 | 36 | 21 | 33 | 21 | 18 | 14 | 33 | 20 | ||||
| 14 | E | 11 | 41 | 33 | 41 | 25 | 41 | 33 | 22 | 21 | 23 | 27 | 41 | ||||
| 15 | F | 12 | 20 | 32 | 21 | 21 | 42 | 22 | 22 | 25 | 32 | 19 | |||||
(Unit=1/300")
Symbol Set: PC-8
Century PS 10 pts Upright Medium
| Dec. | 0 | 16 | 32 | 48 | 64 | 80 | 96 | 112 | 128 | 144 | 160 | 176 | 192 | 208 | 224 | 240 | |
| Hex. | 0 | 1 | 2 | 3 | 4 | 5 | 6 | 7 | 8 | 9 | A | B | C | D | E | F | |
| 0 | 0 | 25 | 11 | 22 | 40 | 28 | 21 | 23 | 29 | 29 | 21 | 30 | 30 | 30 | 24 | 41 | |
| 1 | 1 | 36 | 25 | 11 | 22 | 29 | 32 | 21 | 23 | 24 | 32 | 11 | 30 | 30 | 30 | 23 | 41 |
| 2 | 2 | 36 | 21 | 13 | 22 | 29 | 29 | 23 | 18 | 21 | 42 | 21 | 30 | 30 | 30 | 24 | 41 |
| 3 | 3 | 40 | 24 | 32 | 22 | 29 | 26 | 18 | 18 | 21 | 21 | 24 | 30 | 30 | 30 | 25 | 41 |
| 4 | 4 | 40 | 20 | 22 | 22 | 31 | 28 | 23 | 16 | 21 | 21 | 24 | 30 | 30 | 30 | 26 | 25 |
| 5 | 5 | 40 | 21 | 33 | 22 | 28 | 34 | 21 | 24 | 21 | 21 | 33 | 30 | 30 | 30 | 22 | 25 |
| 6 | 6 | 40 | 39 | 33 | 22 | 27 | 30 | 14 | 21 | 21 | 24 | 15 | 30 | 30 | 30 | 23 | 41 |
| 7 | 7 | 28 | 21 | 7 | 22 | 32 | 40 | 21 | 31 | 18 | 24 | 14 | 30 | 30 | 30 | 19 | 41 |
| 8 | 8 | 41 | 21 | 15 | 22 | 34 | 29 | 24 | 22 | 21 | 21 | 18 | 30 | 30 | 30 | 33 | 21 |
| 9 | 9 | 33 | 21 | 15 | 22 | 16 | 27 | 11 | 21 | 21 | 32 | 41 | 30 | 30 | 30 | 21 | 13 |
| 10 | A | 41 | 41 | 21 | 12 | 22 | 25 | 11 | 20 | 21 | 34 | 41 | 30 | 30 | 30 | 33 | 13 |
| 11 | B | 34 | 41 | 41 | 12 | 31 | 15 | 24 | 21 | 11 | 22 | 13 | 30 | 30 | 30 | 22 | 23 |
| 12 | C | 34 | 35 | 11 | 41 | 27 | 21 | 11 | 21 | 11 | 22 | 13 | 30 | 30 | 30 | 41 | 17 |
| 13 | D | 22 | 41 | 13 | 41 | 38 | 15 | 35 | 21 | 11 | 27 | 11 | 30 | 30 | 30 | 25 | 15 |
| 14 | E | 30 | 25 | 11 | 41 | 33 | 21 | 24 | 21 | 29 | 30 | 20 | 30 | 30 | 30 | 41 | 28 |
| 15 | F | 36 | 25 | 12 | 18 | 32 | 21 | 21 | 36 | 29 | 22 | 20 | 30 | 30 | 30 | 41 | |
Century PS 10 pts Upright Bold
| Dec. | 0 | 16 | 32 | 48 | 64 | 80 | 96 | 112 | 128 | 144 | 160 | 176 | 192 | 208 | 224 | 240 | |
| Hex | 0 | 1 | 2 | 3 | 4 | 5 | 6 | 7 | 8 | 9 | A | B | C | D | E | F | |
| 0 | 0 | 25 | 12 | 24 | 41 | 32 | 21 | 27 | 32 | 32 | 25 | 30 | 30 | 30 | 26 | 35 | |
| 1 | 1 | 36 | 25 | 13 | 24 | 31 | 34 | 25 | 27 | 28 | 36 | 14 | 30 | 30 | 30 | 25 | 41 |
| 2 | 2 | 36 | 21 | 14 | 24 | 32 | 34 | 26 | 21 | 24 | 45 | 25 | 30 | 30 | 30 | 25 | 35 |
| 3 | 3 | 40 | 26 | 32 | 24 | 32 | 29 | 23 | 20 | 25 | 25 | 28 | 30 | 30 | 30 | 30 | 35 |
| 4 | 4 | 40 | 21 | 24 | 24 | 34 | 30 | 27 | 18 | 25 | 25 | 28 | 30 | 30 | 30 | 27 | 25 |
| 5 | 5 | 40 | 21 | 35 | 24 | 32 | 34 | 24 | 28 | 25 | 25 | 35 | 30 | 30 | 30 | 24 | 25 |
| 6 | 6 | 40 | 39 | 34 | 24 | 30 | 32 | 17 | 25 | 25 | 28 | 19 | 30 | 30 | 30 | 25 | 35 |
| 7 | 7 | 28 | 21 | 7 | 24 | 34 | 39 | 25 | 36 | 23 | 28 | 19 | 30 | 30 | 30 | 21 | 35 |
| 8 | 8 | 41 | 21 | 17 | 24 | 36 | 30 | 28 | 25 | 24 | 24 | 22 | 30 | 30 | 30 | 32 | 21 |
| 9 | 9 | 33 | 21 | 17 | 24 | 17 | 30 | 14 | 24 | 24 | 34 | 35 | 30 | 30 | 30 | 33 | 13 |
| 10 | A | 41 | 41 | 21 | 13 | 27 | 28 | 14 | 22 | 24 | 34 | 35 | 30 | 30 | 30 | 32 | 13 |
| 11 | B | 34 | 41 | 41 | 13 | 34 | 17 | 27 | 21 | 14 | 24 | 13 | 30 | 30 | 30 | 21 | 27 |
| 12 | C | 34 | 35 | 12 | 41 | 30 | 21 | 14 | 21 | 14 | 24 | 13 | 30 | 30 | 30 | 35 | 21 |
| 13 | D | 22 | 41 | 14 | 41 | 41 | 17 | 40 | 21 | 14 | 29 | 13 | 30 | 30 | 30 | 27 | 16 |
| 14 | E | 30 | 25 | 12 | 41 | 35 | 21 | 28 | 21 | 31 | 37 | 22 | 30 | 30 | 30 | 41 | 28 |
| 15 | F | 36 | 25 | 12 | 22 | 34 | 21 | 25 | 36 | 31 | 24 | 22 | 30 | 30 | 30 | 35 | |
Century PS 10 pts Italic Medium
| Dec. | 0 | 16 | 32 | 48 | 64 | 80 | 96 | 12 | 128 | 144 | 160 | 176 | 92 | 208 | 224 | 240 | |
| Hex | C | 1 | 2 | 3 | 4 | 5 | 6 | 7 | 8 | 9 | A | B | C | D | E | F | |
| 0 | 0 | 25 | 11 | 22 | 40 | 28 | 21 | 23 | 29 | 28 | 23 | 30 | 30 | 30 | 24 | 41 | |
| 1 | 1 | 36 | 25 | 14 | 22 | 29 | 32 | 23 | 22 | 25 | 30 | 14 | 30 | 30 | 30 | 23 | 41 |
| 2 | 2 | 36 | 21 | 13 | 22 | 30 | 31 | 21 | 18 | 18 | 43 | 21 | 30 | 30 | 30 | 24 | 41 |
| 3 | 3 | 40 | 28 | 32 | 22 | 29 | 27 | 18 | 19 | 23 | 21 | 25 | 30 | 30 | 30 | 25 | 41 |
| 4 | 4 | 40 | 20 | 22 | 22 | 32 | 29 | 25 | 13 | 23 | 21 | 25 | 30 | 30 | 30 | 26 | 25 |
| 5 | 5 | 40 | 21 | 34 | 22 | 29 | 33 | 18 | 25 | 23 | 21 | 33 | 30 | 30 | 30 | 22 | 25 |
| 6 | 6 | 40 | 39 | 36 | 22 | 28 | 27 | 14 | 21 | 23 | 25 | 16 | 30 | 30 | 30 | 23 | 41 |
| 7 | 7 | 28 | 21 | 12 | 22 | 32 | 37 | 23 | 31 | 18 | 25 | 14 | 30 | 30 | 30 | 19 | 41 |
| 8 | 8 | 41 | 21 | 13 | 22 | 35 | 29 | 25 | 20 | 18 | 19 | 20 | 30 | 30 | 30 | 33 | 21 |
| 9 | 9 | 33 | 21 | 13 | 22 | 17 | 27 | 14 | 19 | 18 | 32 | 41 | 30 | 30 | 30 | 21 | 13 |
| 10 | A | 41 | 41 | 21 | 12 | 25 | 27 | 14 | 18 | 18 | 33 | 41 | 30 | 30 | 30 | 33 | 13 |
| 11 | B | 34 | 41 | 41 | 12 | 31 | 14 | 23 | 21 | 14 | 22 | 13 | 30 | 30 | 30 | 22 | 23 |
| 12 | C | 34 | 35 | 11 | 41 | 27 | 21 | 14 | 21 | 14 | 22 | 13 | 30 | 30 | 30 | 41 | 17 |
| 13 | D | 22 | 41 | 13 | 41 | 38 | 14 | 36 | 21 | 14 | 24 | 14 | 30 | 30 | 30 | 25 | 15 |
| 14 | E | 30 | 25 | 11 | 41 | 33 | 21 | 25 | 21 | 29 | 30 | 20 | 30 | 30 | 30 | 41 | 28 |
| 15 | F | 36 | 25 | 12 | 20 | 32 | 21 | 21 | 36 | 29 | 22 | 20 | 30 | 30 | 30 | 41 | |
(Unit=1/300")
Symbol Set: PC-8 (D/N)
Century PS 10 pts Upright Medium
| Dec. | 0 | 16 | 32 | 48 | 64 | 80 | 96 | 112 | 128 | 144 | 160 | 176 | 192 | 208 | 224 | 240 | |
| Hex. | 0 | 1 | 2 | 3 | 4 | 5 | 6 | 7 | 8 | 9 | A | B | C | D | E | F | |
| 0 | 0 | 25 | 11 | 22 | 40 | 28 | 21 | 23 | 29 | 29 | 21 | 30 | 30 | 30 | 24 | 41 | |
| 1 | 1 | 36 | 25 | 11 | 22 | 29 | 32 | 21 | 23 | 24 | 32 | 11 | 30 | 30 | 30 | 23 | 41 |
| 2 | 2 | 36 | 21 | 13 | 22 | 29 | 29 | 23 | 18 | 21 | 42 | 21 | 30 | 30 | 30 | 24 | 41 |
| 3 | 3 | 40 | 24 | 32 | 22 | 29 | 26 | 18 | 18 | 21 | 21 | 24 | 30 | 30 | 30 | 25 | 41 |
| 4 | 4 | 40 | 20 | 22 | 22 | 31 | 28 | 23 | 16 | 21 | 21 | 24 | 30 | 30 | 30 | 26 | 25 |
| 5 | 5 | 40 | 21 | 33 | 22 | 29 | 34 | 21 | 24 | 21 | 21 | 33 | 30 | 30 | 30 | 22 | 25 |
| 6 | 6 | 40 | 39 | 33 | 22 | 27 | 30 | 14 | 21 | 21 | 24 | 21 | 30 | 30 | 30 | 23 | 41 |
| 7 | 7 | 28 | 21 | 7 | 22 | 32 | 40 | 21 | 31 | 18 | 24 | 32 | 30 | 30 | 30 | 19 | 41 |
| 8 | 8 | 41 | 21 | 15 | 22 | 34 | 29 | 24 | 22 | 21 | 21 | 16 | 30 | 30 | 30 | 33 | 21 |
| 9 | 9 | 33 | 21 | 15 | 22 | 16 | 27 | 11 | 21 | 21 | 32 | 21 | 30 | 30 | 30 | 21 | 13 |
| 10 | A | 41 | 41 | 21 | 12 | 22 | 25 | 11 | 20 | 21 | 34 | 29 | 30 | 30 | 30 | 33 | 13 |
| 11 | B | 34 | 41 | 41 | 12 | 31 | 15 | 24 | 21 | 11 | 21 | 21 | 30 | 30 | 30 | 22 | 23 |
| 12 | C | 34 | 35 | 11 | 41 | 27 | 21 | 11 | 21 | 11 | 22 | 31 | 30 | 30 | 30 | 41 | 17 |
| 13 | D | 22 | 41 | 13 | 41 | 38 | 15 | 35 | 21 | 11 | 32 | 11 | 30 | 30 | 30 | 25 | 15 |
| 14 | E | 30 | 25 | 11 | 41 | 33 | 21 | 24 | 21 | 29 | 38 | 15 | 30 | 30 | 30 | 41 | 28 |
| 15 | F | 36 | 25 | 12 | 18 | 32 | 21 | 21 | 36 | 29 | 23 | 25 | 30 | 30 | 30 | 41 | |
Century PS 10 pts Upright Bold
| Dec. | 0 | 16 | 32 | 48 | 64 | 80 | 96 | 112 | 128 | 144 | 160 | 176 | 192 | 208 | 224 | 240 | |
| Hex. | 0 | 1 | 2 | 3 | 4 | 5 | 6 | 7 | 8 | 9 | A | B | C | D | E | F | |
| 0 | 0 | 25 | 12 | 24 | 41 | 32 | 21 | 27 | 32 | 32 | 25 | 30 | 30 | 30 | 26 | 25 | |
| 1 | 1 | 36 | 25 | 13 | 24 | 31 | 34 | 25 | 27 | 28 | 36 | 14 | 30 | 30 | 30 | 25 | 41 |
| 2 | 2 | 36 | 21 | 14 | 24 | 32 | 34 | 26 | 21 | 24 | 45 | 25 | 30 | 30 | 30 | 25 | 35 |
| 3 | 3 | 40 | 26 | 32 | 24 | 32 | 29 | 23 | 20 | 25 | 25 | 28 | 30 | 30 | 30 | 30 | 35 |
| 4 | 4 | 40 | 21 | 24 | 24 | 34 | 30 | 27 | 18 | 25 | 25 | 28 | 30 | 30 | 30 | 27 | 25 |
| 5 | 5 | 40 | 21 | 35 | 24 | 32 | 34 | 24 | 28 | 25 | 25 | 35 | 30 | 30 | 30 | 24 | 25 |
| 6 | 6 | 40 | 39 | 34 | 24 | 30 | 32 | 17 | 25 | 25 | 28 | 25 | 30 | 30 | 30 | 25 | 35 |
| 7 | 7 | 28 | 21 | 7 | 24 | 34 | 39 | 25 | 36 | 23 | 28 | 34 | 30 | 30 | 30 | 21 | 35 |
| 8 | 8 | 41 | 21 | 17 | 24 | 36 | 30 | 26 | 25 | 24 | 24 | 22 | 30 | 30 | 30 | 32 | 21 |
| 9 | 9 | 33 | 21 | 17 | 24 | 17 | 30 | 14 | 24 | 24 | 34 | 25 | 30 | 30 | 30 | 33 | 13 |
| 10 | A | 41 | 41 | 21 | 13 | 27 | 28 | 14 | 22 | 24 | 34 | 31 | 30 | 30 | 30 | 32 | 13 |
| 11 | B | 34 | 41 | 41 | 13 | 34 | 17 | 27 | 21 | 14 | 25 | 21 | 30 | 30 | 30 | 21 | 27 |
| 12 | C | 34 | 35 | 12 | 41 | 30 | 21 | 14 | 21 | 14 | 24 | 36 | 30 | 30 | 30 | 35 | 21 |
| 13 | D | 22 | 41 | 14 | 41 | 41 | 17 | 40 | 21 | 14 | 34 | 13 | 30 | 30 | 30 | 27 | 16 |
| 14 | E | 30 | 25 | 12 | 41 | 35 | 21 | 28 | 21 | 31 | 42 | 16 | 30 | 30 | 30 | 41 | 28 |
| 15 | F | 36 | 25 | 12 | 22 | 34 | 21 | 25 | 36 | 31 | 26 | 25 | 30 | 30 | 30 | 35 | |
Century PS 10 pts Italic Medium
| Dec. | 0 | 16 | 32 | 48 | 64 | 80 | 96 | 112 | 128 | 144 | 160 | 176 | 192 | 208 | 224 | 240 | |
| Hex. | 0 | 1 | 2 | 3 | 4 | 5 | 6 | 7 | 8 | 9 | A | B | C | D | E | F | |
| 0 | 0 | 25 | 11 | 22 | 40 | 28 | 21 | 23 | 29 | 29 | 23 | 30 | 30 | 30 | 24 | 41 | |
| 1 | 1 | 36 | 25 | 14 | 22 | 29 | 32 | 23 | 22 | 25 | 30 | 14 | 30 | 30 | 30 | 23 | 41 |
| 2 | 2 | 36 | 21 | 13 | 22 | 30 | 31 | 21 | 18 | 18 | 43 | 21 | 30 | 30 | 30 | 24 | 41 |
| 3 | 3 | 40 | 28 | 32 | 22 | 29 | 27 | 16 | 19 | 23 | 21 | 25 | 30 | 30 | 30 | 25 | 41 |
| 4 | 4 | 40 | 20 | 22 | 22 | 32 | 29 | 25 | 13 | 23 | 21 | 25 | 30 | 30 | 30 | 26 | 25 |
| 5 | 5 | 40 | 21 | 34 | 22 | 29 | 33 | 16 | 25 | 23 | 21 | 33 | 30 | 30 | 30 | 22 | 25 |
| 6 | 6 | 40 | 39 | 36 | 22 | 28 | 27 | 14 | 21 | 23 | 25 | 21 | 30 | 30 | 30 | 23 | 41 |
| 7 | 7 | 28 | 21 | 12 | 22 | 32 | 37 | 23 | 31 | 18 | 25 | 32 | 30 | 30 | 30 | 19 | 41 |
| 8 | 8 | 41 | 21 | 13 | 22 | 35 | 29 | 25 | 20 | 18 | 19 | 20 | 30 | 30 | 30 | 33 | 21 |
| 9 | 9 | 33 | 21 | 13 | 22 | 17 | 27 | 14 | 19 | 18 | 32 | 23 | 30 | 30 | 30 | 21 | 13 |
| 10 | A | 41 | 41 | 21 | 12 | 25 | 27 | 14 | 18 | 18 | 33 | 29 | 30 | 30 | 30 | 33 | 13 |
| 11 | B | 34 | 41 | 41 | 12 | 31 | 14 | 23 | 21 | 14 | 21 | 21 | 30 | 30 | 30 | 22 | 23 |
| 12 | C | 34 | 36 | 11 | 41 | 27 | 21 | 14 | 21 | 14 | 22 | 32 | 30 | 30 | 30 | 41 | 17 |
| 13 | D | 22 | 41 | 13 | 41 | 38 | 14 | 36 | 21 | 14 | 32 | 14 | 30 | 30 | 30 | 25 | 15 |
| 14 | E | 30 | 25 | 11 | 41 | 33 | 21 | 25 | 21 | 29 | 39 | 15 | 30 | 30 | 30 | 41 | 28 |
| 15 | F | 36 | 25 | 12 | 20 | 32 | 21 | 21 | 36 | 29 | 25 | 25 | 30 | 30 | 30 | 41 | |
(Unit=1/300")
Smbol Set: ECMA-94
Century PS 10 pts Upright Medium
| Dec. | 0 | 16 | 32 | 48 | 64 | 80 | 96 | 1:2 | 128 | 144 | 160 | 176 | 92 | 208 | 224 | 240 | |
| Hex. | 0 | 1 | 2 | 3 | 4 | 5 | 6 | 7 | 8 | 9 | A | B | C | D | E | F | |
| 0 | 0 | 11 | 22 | 40 | 28 | 21 | 23 | 21 | 29 | 31 | 21 | 23 | |||||
| 1 | 1 | 11 | 22 | 29 | 32 | 2: | 23 | 11 | 41 | 20 | 33 | 21 | 24 | ||||
| 2 | 2 | 13 | 22 | 29 | 29 | 23 | 18 | 22 | 15 | 29 | 32 | 21 | 2: | ||||
| 3 | 3 | 32 | 22 | 29 | 26 | 18 | 18 | 22 | 15 | 29 | 32 | 21 | 21 | ||||
| 4 | 4 | 22 | 22 | 31 | 28 | 23 | 16 | 25 | 21 | 29 | 32 | 21 | 2: | ||||
| 5 | 5 | 33 | 22 | 29 | 34 | 21 | 24 | 27 | 23 | 29 | 32 | 2: | 21 | ||||
| 6 | 6 | 33 | 22 | 27 | 30 | 14 | 21 | 21 | 20 | 42 | 32 | 32 | 21 | ||||
| 7 | 7 | 7 | 22 | 32 | 40 | 21 | 31 | 21 | 1: | 29 | 35 | 18 | 41 | ||||
| 8 | 8 | 15 | 22 | 34 | 29 | 24 | 22 | 21 | 21 | 29 | 32 | 21 | 21 | ||||
| 9 | 9 | 15 | 22 | 16 | 27 | 11 | 21 | 23 | 15 | 29 | 34 | 2: | 24 | ||||
| 10 | A | 21 | 12 | 22 | 25 | 11 | 20 | 15 | 14 | 29 | 34 | 21 | 24 | ||||
| 1: | B | 4: | 12 | 3: | 15 | 24 | 21 | 20 | 20 | 29 | 34 | 21 | 24 | ||||
| 12 | C | 11 | 41 | 27 | 21 | 11 | 21 | 41 | 13 | 16 | 34 | 1: | 24 | ||||
| 13 | D | 13 | 41 | 38 | 15 | 35 | 21 | 13 | 13 | 16 | 29 | 11 | 21 | ||||
| 14 | E | 11 | 41 | 33 | 21 | 24 | 21 | 23 | 13 | 16 | 28 | 1: | 23 | ||||
| 15 | F | 12 | 18 | 32 | 21 | 21 | 42 | 21 | 18 | 16 | 23 | 11 | 21 | ||||
Century PS 10 pts Upright Bold
| Dec. | 0 | 16 | 32 | 48 | 64 | 80 | 96 | 112 | 128 | 144 | 160 | 176 | 192 | 208 | 224 | 240 | |
| Hex. | 0 | 1 | 2 | 3 | 4 | 5 | 6 | 7 | 8 | 9 | A | B | C | D | E | F | |
| 0 | 0 | 12 | 24 | 41 | 32 | 21 | 27 | 21 | 31 | 35 | 25 | 27 | |||||
| 1 | 1 | 13 | 24 | 31 | 34 | 25 | 27 | 13 | 41 | 31 | 35 | 25 | 26 | ||||
| 2 | 2 | 14 | 24 | 32 | 34 | 26 | 21 | 24 | 16 | 31 | 34 | 25 | 25 | ||||
| 3 | 3 | 32 | 24 | 32 | 29 | 23 | 20 | 24 | 16 | 31 | 34 | 25 | 25 | ||||
| 4 | 4 | 24 | 24 | 34 | 30 | 27 | 18 | 25 | 21 | 31 | 34 | 25 | 25 | ||||
| 5 | 5 | 35 | 24 | 32 | 34 | 24 | 28 | 29 | 25 | 31 | 34 | 25 | 25 | ||||
| 6 | 6 | 34 | 24 | 30 | 32 | 17 | 25 | 21 | 21 | 45 | 34 | 36 | 25 | ||||
| 7 | 7 | 7 | 24 | 34 | 39 | 25 | 36 | 21 | 12 | 32 | 35 | 23 | 35 | ||||
| 8 | 8 | 17 | 24 | 36 | 30 | 28 | 25 | 21 | 21 | 32 | 34 | 24 | 25 | ||||
| 9 | 9 | 17 | 24 | 17 | 30 | 14 | 24 | 23 | 16 | 32 | 34 | 24 | 28 | ||||
| 10 | A | 21 | 13 | 27 | 28 | 14 | 22 | 19 | 19 | 32 | 34 | 24 | 28 | ||||
| 11 | B | 41 | 13 | 34 | 17 | 27 | 21 | 22 | 22 | 32 | 34 | 24 | 28 | ||||
| 12 | C | 12 | 41 | 30 | 21 | 14 | 21 | 35 | 13 | 17 | 34 | 14 | 28 | ||||
| 13 | D | 14 | 41 | 41 | 17 | 40 | 21 | 14 | 13 | 17 | 30 | 14 | 24 | ||||
| 14 | E | 12 | 41 | 35 | 21 | 26 | 21 | 23 | 13 | 17 | 31 | 14 | 27 | ||||
| 15 | F | 12 | 22 | 34 | 21 | 25 | 42 | 21 | 22 | 17 | 25 | 14 | 24 | ||||
Century PS 10 pts Italic Medium
| Dec. | 0 | 16 | 32 | 48 | 64 | 80 | 96 | 112 | 128 | 144 | 160 | 176 | 192 | 238 | 224 | 240 | |
| Hex. | 0 | 1 | 2 | 3 | 4 | 5 | 6 | 7 | 8 | 9 | A | B | C | D | E | F | |
| 0 | 0 | 11 | 22 | 40 | 28 | 21 | 23 | 21 | 29 | 32 | 23 | 25 | |||||
| 1 | 1 | 14 | 22 | 29 | 32 | 23 | 22 | 14 | 41 | 29 | 33 | 23 | 25 | ||||
| 2 | 2 | 13 | 22 | 30 | 31 | 21 | 18 | 22 | 15 | 29 | 32 | 23 | 21 | ||||
| 3 | 3 | 32 | 22 | 29 | 27 | 18 | 19 | 22 | 15 | 29 | 32 | 23 | 21 | ||||
| 4 | 4 | 22 | 22 | 32 | 29 | 25 | 13 | 25 | 2: | 29 | 32 | 23 | 21 | ||||
| 5 | 5 | 34 | 22 | 29 | 33 | 18 | 25 | 24 | 23 | 29 | 32 | 23 | 21 | ||||
| 6 | 6 | 36 | 22 | 28 | 27 | 14 | 21 | 21 | 20 | 43 | 32 | 30 | 21 | ||||
| 7 | 7 | 12 | 22 | 32 | 37 | 23 | 31 | 21 | 1: | 29 | 35 | 18 | 41 | ||||
| 8 | 8 | 13 | 22 | 35 | 29 | 25 | 20 | 21 | 21 | 29 | 32 | 18 | 2: | ||||
| 9 | 9 | 13 | 22 | 17 | 27 | 14 | 19 | 23 | 15 | 29 | 33 | 18 | 25 | ||||
| 10 | A | 21 | 12 | 25 | 27 | 14 | 18 | 16 | 14 | 29 | 33 | 18 | 25 | ||||
| 11 | B | 41 | 12 | 3: | 14 | 23 | 21 | 20 | 20 | 29 | 33 | 18 | 25 | ||||
| 12 | C | 1: | 4: | 27 | 21 | 14 | 21 | 41 | 13 | 17 | 33 | 14 | 25 | ||||
| 13 | D | 13 | 41 | 38 | 14 | 36 | 21 | 13 | 13 | 17 | 28 | 14 | 20 | ||||
| 14 | E | 11 | 41 | 33 | 21 | 25 | 2: | 23 | 13 | 17 | 28 | 14 | 23 | ||||
| 15 | F | 12 | 20 | 32 | 21 | 21 | 42 | 21 | 20 | 17 | 23 | 14 | 19 | ||||
(Unit=1/300")
Symbol Set: Legal
Century PS 10 pts Upright Medium
| Dec. | 0 | 16 | 32 | 48 | 64 | 80 | 96 | 112 | 128 | 144 | 180 | 176 | 192 | 208 | 224 | 240 | |
| Hex. | 0 | 1 | 2 | 3 | 4 | 5 | 6 | 7 | 8 | 9 | A | B | C | D | E | F | |
| 0 | 0 | 11 | 22 | 40 | 28 | 21 | 23 | ||||||||||
| 1 | 1 | 11 | 22 | 29 | 32 | 21 | 23 | ||||||||||
| 2 | 2 | 14 | 22 | 29 | 29 | 23 | 18 | ||||||||||
| 3 | 3 | 32 | 22 | 29 | 26 | 18 | 18 | ||||||||||
| 4 | 4 | 22 | 22 | 31 | 28 | 23 | 16 | ||||||||||
| 5 | 5 | 33 | 22 | 29 | 34 | 21 | 24 | ||||||||||
| 6 | 6 | 33 | 22 | 27 | 30 | 14 | 21 | ||||||||||
| 7 | 7 | 14 | 22 | 32 | 40 | 21 | 31 | ||||||||||
| 8 | 8 | 15 | 22 | 34 | 29 | 24 | 22 | ||||||||||
| 9 | 9 | 15 | 22 | 16 | 27 | 11 | 21 | ||||||||||
| 10 | A | 21 | 12 | 22 | 25 | 11 | 20 | ||||||||||
| 11 | B | 41 | 12 | 31 | 15 | 24 | 21 | ||||||||||
| 12 | C | 11 | 21 | 27 | 23 | 11 | 20 | ||||||||||
| 13 | D | 13 | 41 | 38 | 15 | 35 | 21 | ||||||||||
| 14 | E | 11 | 22 | 33 | 23 | 24 | 34 | ||||||||||
| 15 | F | 12 | 18 | 32 | 21 | 21 | 42 | ||||||||||
Century PS 10 pts Upright Bold
| Dec. | 0 | 16 | 32 | 48 | 64 | 80 | 96 | 112 | 128 | 144 | 160 | 176 | 192 | 208 | 224 | 240 | |
| Hex | 0 | 1 | 2 | 3 | 4 | 5 | 6 | 7 | 8 | 9 | A | B | C | D | E | F | |
| 0 | 0 | 12 | 24 | 41 | 32 | 21 | 27 | ||||||||||
| 1 | 1 | 13 | 24 | 31 | 34 | 25 | 27 | ||||||||||
| 2 | 2 | 14 | 24 | 32 | 34 | 26 | 21 | ||||||||||
| 3 | 3 | 32 | 24 | 32 | 29 | 23 | 20 | ||||||||||
| 4 | 4 | 24 | 24 | 34 | 30 | 27 | 18 | ||||||||||
| 5 | 5 | 35 | 24 | 32 | 34 | 24 | 28 | ||||||||||
| 6 | 6 | 34 | 24 | 30 | 32 | 17 | 25 | ||||||||||
| 7 | 7 | 14 | 24 | 34 | 39 | 25 | 36 | ||||||||||
| 8 | 8 | 17 | 24 | 36 | 30 | 28 | 25 | ||||||||||
| 9 | 9 | 17 | 24 | 17 | 30 | 14 | 24 | ||||||||||
| 10 | A | 21 | 13 | 27 | 28 | 14 | 22 | ||||||||||
| 11 | B | 41 | 13 | 34 | 17 | 27 | 21 | ||||||||||
| 12 | C | 12 | 21 | 30 | 23 | 14 | 21 | ||||||||||
| 13 | D | 14 | 41 | 41 | 17 | 40 | 21 | ||||||||||
| 14 | E | 12 | 24 | 35 | 23 | 28 | 34 | ||||||||||
| 15 | F | 12 | 22 | 34 | 21 | 25 | 42 | ||||||||||
Century PS 10 pts Italic Medium
| Dec. | 0 | 16 | 32 | 48 | 64 | 80 | 96 | 112 | 128 | 144 | 160 | 176 | 192 | 206 | 224 | 240 | |
| Hex. | 0 | 1 | 2 | 3 | 4 | 5 | 6 | 7 | 8 | 9 | A | B | C | D | E | F | |
| 0 | 0 | 11 | 22 | 40 | 28 | 21 | 23 | ||||||||||
| 1 | 1 | 14 | 22 | 29 | 32 | 23 | 22 | ||||||||||
| 2 | 2 | 14 | 22 | 30 | 31 | 21 | 18 | ||||||||||
| 3 | 3 | 32 | 22 | 29 | 27 | 18 | 19 | ||||||||||
| 4 | 4 | 22 | 22 | 32 | 29 | 25 | 13 | ||||||||||
| 5 | 5 | 34 | 22 | 29 | 33 | 18 | 25 | ||||||||||
| 6 | 6 | 36 | 22 | 28 | 27 | 14 | 21 | ||||||||||
| 7 | 7 | 14 | 22 | 32 | 37 | 23 | 31 | ||||||||||
| 8 | 8 | 13 | 22 | 35 | 29 | 25 | 20 | ||||||||||
| 9 | 9 | 13 | 22 | 17 | 27 | 14 | 19 | ||||||||||
| 10 | A | 21 | 12 | 25 | 27 | 14 | 18 | ||||||||||
| 11 | B | 41 | 12 | 31 | 14 | 23 | 21 | ||||||||||
| 12 | C | 11 | 21 | 27 | 23 | 14 | 20 | ||||||||||
| 13 | D | 13 | 41 | 38 | 14 | 36 | 21 | ||||||||||
| 14 | E | 11 | 22 | 33 | 23 | 25 | 34 | ||||||||||
| 15 | F | 12 | 20 | 32 | 21 | 21 | 42 | ||||||||||
(Unit=1/300")
Symbol Set: PC-850
Century PS 10 pts Upright Medium
| Dec. | 0 | 16 | 32 | 48 | 64 | 80 | 96 | 112 | 128 | 144 | 160 | 176 | 192 | 208 | 224 | 240 | |
| hex | 0 | 1 | 2 | 3 | 4 | 5 | 6 | 7 | 8 | 9 | A | B | C | D | E | F | |
| 0 | 0 | 25 | 11 | 22 | 40 | 28 | 21 | 23 | 29 | 29 | 21 | 30 | 30 | 23 | 32 | 13 | |
| 1 | 1 | 36 | 25 | 11 | 22 | 29 | 32 | 21 | 23 | 24 | 32 | 11 | 30 | 30 | 31 | 23 | 41 |
| 2 | 2 | 36 | 21 | 13 | 22 | 29 | 29 | 23 | 18 | 21 | 42 | 21 | 30 | 30 | 29 | 32 | 21 |
| 3 | 3 | 40 | 24 | 32 | 22 | 29 | 26 | 18 | 18 | 21 | 21 | 24 | 30 | 30 | 29 | 32 | 13 |
| 4 | 4 | 40 | 20 | 22 | 22 | 31 | 28 | 23 | 16 | 21 | 21 | 24 | 30 | 30 | 29 | 21 | 20 |
| 5 | 5 | 40 | 21 | 33 | 22 | 29 | 34 | 21 | 24 | 21 | 21 | 33 | 29 | 30 | 11 | 32 | 21 |
| 6 | 6 | 40 | 39 | 33 | 22 | 27 | 30 | 14 | 21 | 21 | 24 | 15 | 29 | 21 | 16 | 23 | 41 |
| 7 | 7 | 28 | 21 | 7 | 22 | 32 | 40 | 21 | 31 | 18 | 24 | 14 | 29 | 29 | 16 | 23 | 21 |
| 8 | 8 | 41 | 21 | 15 | 22 | 34 | 29 | 24 | 22 | 21 | 21 | 18 | 23 | 30 | 16 | 28 | 21 |
| 9 | 9 | 33 | 21 | 15 | 22 | 16 | 27 | 11 | 21 | 21 | 32 | 23 | 30 | 30 | 30 | 34 | 21 |
| 10 | A | 41 | 41 | 21 | 12 | 22 | 25 | 11 | 20 | 21 | 34 | 41 | 30 | 30 | 30 | 34 | 11 |
| 11 | B | 34 | 41 | 41 | 12 | 31 | 15 | 24 | 21 | 11 | 21 | 13 | 30 | 30 | 30 | 34 | 15 |
| 12 | C | 34 | 35 | 11 | 41 | 27 | 21 | 11 | 21 | 11 | 22 | 13 | 30 | 30 | 30 | 21 | 15 |
| 13 | D | 22 | 41 | 3 | 41 | 36 | 15 | 35 | 21 | 11 | 32 | 11 | 22 | 30 | 21 | 29 | 15 |
| 14 | E | 30 | 25 | 11 | 41 | 33 | 21 | 24 | 21 | 29 | 35 | 20 | 27 | 30 | 16 | 13 | 28 |
| 15 | F | 36 | 25 | 12 | 18 | 32 | 21 | 21 | 36 | 29 | 22 | 20 | 30 | 25 | 30 | 21 | |
Century PS 10 pts Upright Bold
| Dec. | 0 | 16 | 32 | 48 | 64 | 80 | 96 | 112 | 128 | 144 | 160 | 176 | 192 | 208 | 224 | 240 | |
| Hex. | O | 1 | 2 | 3 | 4 | 5 | 6 | 7 | 8 | 9 | A | B | C | D | E | F | |
| 0 | 0 | 25 | 12 | 24 | 41 | 32 | 21 | 27 | 32 | 32 | 25 | 30 | 30 | 27 | 34 | 13 | |
| 1 | 1 | 36 | 25 | 13 | 24 | 31 | 34 | 25 | 27 | 28 | 36 | 14 | 30 | 30 | 35 | 25 | 41 |
| 2 | 2 | 36 | 21 | 14 | 24 | 32 | 34 | 26 | 21 | 24 | 45 | 25 | 30 | 30 | 32 | 34 | 21 |
| 3 | 3 | 40 | 26 | 32 | 24 | 32 | 29 | 23 | 20 | 25 | 25 | 28 | 30 | 30 | 32 | 34 | 13 |
| 4 | 4 | 40 | 21 | 24 | 24 | 34 | 30 | 27 | 18 | 25 | 25 | 28 | 30 | 30 | 32 | 25 | 21 |
| 5 | 5 | 40 | 21 | 35 | 24 | 32 | 34 | 24 | 28 | 25 | 25 | 35 | 31 | 30 | 14 | 34 | 21 |
| 6 | 6 | 40 | 39 | 34 | 24 | 30 | 32 | 17 | 25 | 25 | 28 | 19 | 31 | 25 | 17 | 25 | 35 |
| 7 | 7 | 28 | 21 | 7 | 24 | 34 | 39 | 25 | 36 | 23 | 28 | 19 | 31 | 31 | 17 | 27 | 21 |
| 8 | 8 | 41 | 21 | 7 | 24 | 36 | 30 | 28 | 25 | 24 | 24 | 22 | 23 | 30 | 17 | 31 | 21 |
| 9 | 9 | 33 | 21 | 17 | 24 | 17 | 30 | 14 | 24 | 24 | 34 | 23 | 30 | 30 | 30 | 34 | 21 |
| 10 | A | 41 | 41 | 21 | 13 | 27 | 28 | 14 | 22 | 24 | 34 | 35 | 30 | 30 | 30 | 34 | 11 |
| 11 | B | 34 | 41 | 41 | 13 | 34 | 17 | 27 | 21 | 14 | 25 | 13 | 30 | 30 | 30 | 34 | 16 |
| 12 | C | 34 | 35 | 12 | 41 | 30 | 21 | 14 | 21 | 14 | 24 | 13 | 30 | 30 | 30 | 24 | 16 |
| 13 | D | 22 | 41 | 14 | 41 | 41 | 17 | 40 | 21 | 14 | 34 | 13 | 24 | 30 | 21 | 30 | 16 |
| 14 | E | 30 | 25 | 12 | 41 | 35 | 21 | 28 | 21 | 31 | 35 | 22 | 29 | 30 | 17 | 14 | 28 |
| 15 | F | 36 | 25 | 12 | 22 | 34 | 21 | 25 | 36 | 31 | 24 | 22 | 30 | 25 | 30 | 21 |
Century PS 10 pts Italic Medium
| Dec. | 3 | 16 | 32 | 48 | 64 | 80 | 96 | 112 | 128 | 144 | 160 | 76 | 192 | 208 | 224 | 240 | |
| Hex. | C | 1 | 2 | 3 | 4 | 5 | 6 | 7 | 8 | 9 | A | B | C | D | E | F | |
| 0 | 0 | 25 | 1 | 22 | 40 | 28 | 21 | 23 | 29 | 29 | 23 | 30 | 30 | 25 | 32 | 13 | |
| 1 | 1 | 36 | 25 | 14 | 22 | 29 | 32 | 23 | 22 | 25 | 30 | 14 | 30 | 30 | 32 | 23 | 41 |
| 2 | 2 | 36 | 21 | 13 | 22 | 30 | 31 | 21 | 18 | 18 | 43 | 2: | 30 | 30 | 29 | 32 | |
| 3 | 3 | 40 | 28 | 32 | 22 | 29 | 27 | 18 | 19 | 23 | 21 | 25 | 30 | 30 | 29 | 32 | 13 |
| 4 | 4 | 40 | 20 | 22 | 22 | 32 | 29 | 25 | 13 | 23 | 21 | 25 | 30 | 30 | 29 | 21 | 20 |
| 5 | 5 | 40 | 21 | 34 | 22 | 28 | 33 | 18 | 25 | 23 | 21 | 33 | 29 | 30 | 14 | 32 | 21 |
| 6 | 6 | 40 | 39 | 36 | 22 | 26 | 27 | 14 | 2: | 23 | 25 | 16 | 29 | 23 | 17 | 23 | 41 |
| 7 | 7 | 28 | 21 | 12 | 22 | 32 | 37 | 23 | 31 | 18 | 25 | 14 | 29 | 29 | 17 | 23 | 21 |
| 8 | 8 | 41 | 21 | 13 | 22 | 35 | 29 | 25 | 20 | 18 | 19 | 20 | 23 | 30 | 17 | 28 | 2: |
| 9 | 9 | 33 | 21 | 13 | 22 | 17 | 27 | 14 | 19 | 18 | 32 | 23 | 30 | 30 | 30 | 33 | 2: |
| 10 | A | 41 | 41 | 21 | 12 | 25 | 27 | 14 | 18 | 18 | 33 | 41 | 30 | 30 | 30 | 33 | 11 |
| 11 | B | 34 | 41 | 41 | 12 | 31 | 14 | 23 | 21 | 14 | 21 | 13 | 30 | 30 | 30 | 33 | 15 |
| 12 | C | 34 | 35 | 11 | 41 | 27 | 21 | 14 | 21 | 14 | 22 | 13 | 30 | 30 | 30 | 20 | 15 |
| 13 | D | 22 | 41 | 13 | 41 | 38 | 14 | 36 | 21 | 14 | 32 | 14 | 22 | 30 | 21 | 28 | 15 |
| 14 | E | 30 | 25 | 11 | 41 | 33 | 21 | 25 | 21 | 29 | 35 | 20 | 24 | 30 | 17 | 13 | 28 |
| 15 | F | 36 | 25 | 12 | 20 | 32 | 21 | 21 | 36 | 29 | 22 | 20 | 30 | 25 | 30 | 21 | |
(Unit=1/300")
Options, Accessories and Supplies
Please contact your local Panasonic dealer for availability.
| 2016/10/24 | 2015/10/24 |
KX-PEM1 2MB RAM Expansion Board Can be used to expand the printer's memory.
KX-PEM2 4MB RAM Expansion Board Can be used to expand the printer's memory.
KX-PEM3 1MB RAM Expansion Board Can be used to expand the printer's memory.
The above options has its own Installation and Instruction Manuals.
| S&P500 |
KX-P455 Toner Kit — 1,600 page life
KX-PDM6 Drum Unit — 6,000 page life
Note:
- The page life above is based upon printing 5% image area with repetitive printing of 10 pages.
203
Matsushita Electric Industrial Co., Ltd.
Central P.O. Box 288, Osaka 530-91, Japan