40DM1000 - Television Star-Light - Free user manual and instructions
Find the device manual for free 40DM1000 Star-Light in PDF.

User questions about 40DM1000 Star-Light
0 question about this device. Answer the ones you know or ask your own.
Ask a new question about this device
Download the instructions for your Television in PDF format for free! Find your manual 40DM1000 - Star-Light and take your electronic device back in hand. On this page are published all the documents necessary for the use of your device. 40DM1000 by Star-Light.
USER MANUAL 40DM1000 Star-Light
natural_image
Front view of a flat-screen computer monitor with blank screen (no text or symbols visible)40 DM 1000
32 DM 1000
LEDTV
Wide Screen Digital LED TV
This user manual is for reference only, the actual unit maybe changed due to product improvement.
CONTENTS
Your LED TV 2
Remote control 4
USING THE FEATURES....6
Select Input Source 6
First Time Setup 7
Picture Menu 8
Sound Menu 10
Channel Menu 12
Lock System Menu....16
Setup Menu 18
PVR Settings 20
PC Setting Menu 22
SETTING UP YOUR LED TV
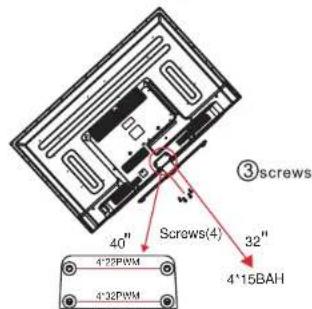
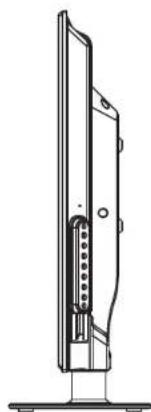
HOW TO INSTALL THE TV STAND
- Match the TV unit into the stand, then hold the TV stand, revolve and lock the tv unit tightly as the arrowhead point.
- Fix the screws into the TV stand after installing the tv unit and tv stand.
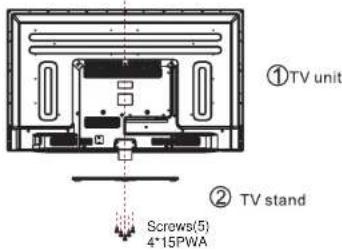
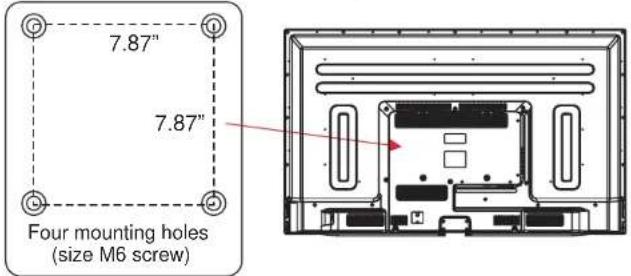
- Mounting on the wall
This unit is VESA-compliant, and is designed to be wall-mounted with a VESA-compliant 7.87"x7.87"(200mmx200mm) mounting kit designed for flat-panel TVs (not supplied). Mount this unit according to the instructions included in the monting kit. Length of screw should not exceed 8 mm
NOTE
Remove the base stand before mounting the unit on the wall.
1
SETTING UP YOUR LED TV
YOUR LED TV
natural_image
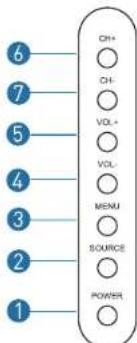
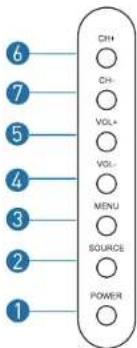
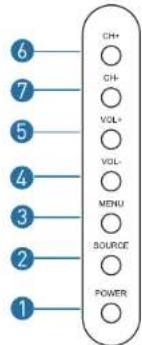
Line drawing of a flat-screen monitor with base and stand (no text or symbols)- POWER: Turn on TV/Standby
- SOURCE: Audio/video input source selection
- MENU: Open settings menu
- VOL: Decrease volume
- VOL+: Increase volume
- CH: Previous channel
- CH+: Next channel
- IR RECEIVER: Receives infrared signals from the remote control
- INDICATOR LED: Status indicator (Power On: Green / Standby: Red)
natural_image
Technical line drawing of a vertical panel or bracket with internal components, mounted on a base (no text or symbols)2
SETTING UP YOUR LED TV
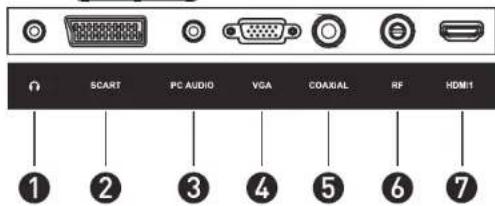
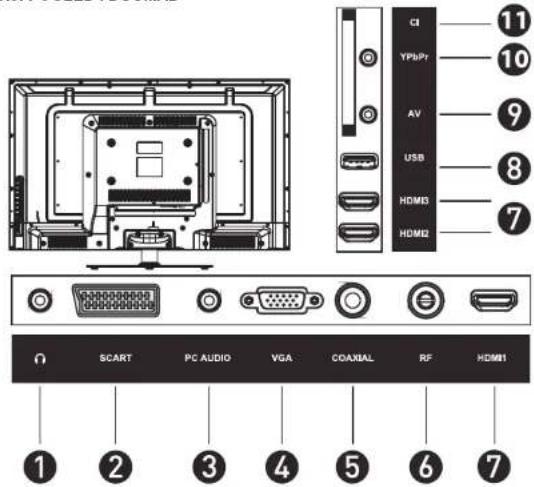
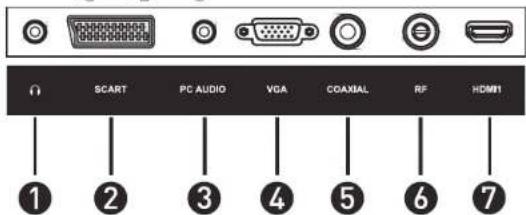
REAL VIEW AND JACKS
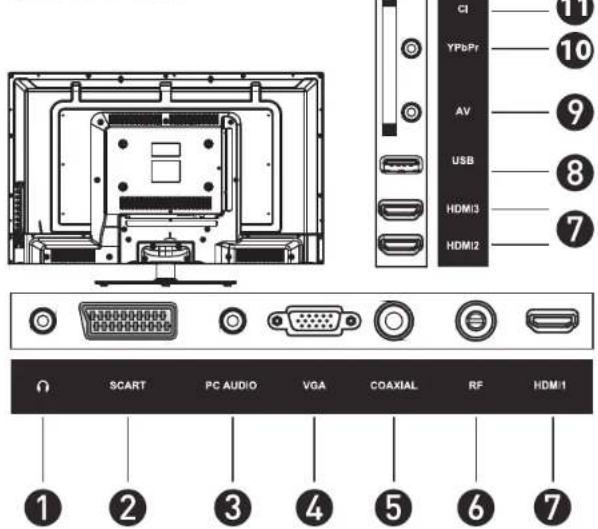
1. Headphones
- SCART
- PC AUDIO: Connect it to the audio output terminal of PC
- VGA: PC video input
- Coaxial: Digital audio output
- RF: Antenna connection
HDMI
- USB
- AV: Video input & Stereo audio input
- YPbPr: Connect to the YPbPr video output terminal of DVD
- Cl : Insert the CI card into the slot.
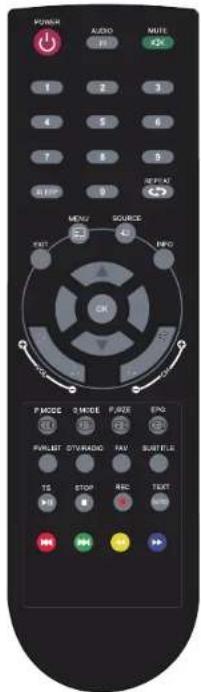
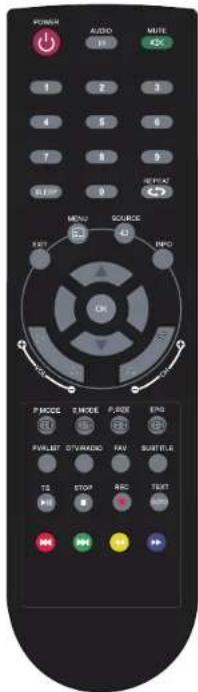
REMOTE CONTROL
POWER Turns the LCD TV on and into standby mode.
AUDIO I/II Switch the audio channel of multimedia playing
MUTE Mutes and restores your LCD TV sound.
0-9 Pressing a number selects a channel.
SLEEP Set the sleep timer.
REPEAT → Switches back and forth between the current and previous channels
EXIT Exits the OSD menu.
MENU Displays the OSD menu on the screen.
SOURCE Pressing SOURCE displays the source
list, use ▲▼ to select the video equipment connected to the video inputs of your LCD TV, and press OK button to confirm.
INFO Pressing once displays a variety of information such as the current channel and the input source.
▲▼◀▶/OK Allows you to navigate the on-screen menus and adjust the system setting to you preferenceOK confirms option settings. OK Display the channel list
VOL+/VOL- Increases and decreases volume.
CH+/CH- Scans up and down the channels.
P.MODE Selection picture mode
Displays the main index in Teletext mode
S.MODE Selects sound effect options
☐? Reveals hidden information such as the answers to a quiz in TELETEXT mode
P.SIZE Cycles through wide screen mode settings
Displays the top, bottom or all of page
REMOTE CONTROL
EPG Displays the Programm Guide on the screen in DTV mode. Press again to turn GUIDE off.
(=p Freeze a multi-page changing on Teletext mode
PVRLIST In DTV mode, displays the executed PVR LIST and Index
DTV/RADIO In DTV mode, press DTV/RADIO button to enter DTV or RADIO mode.
FAV.CH Pressing FAV.CH displays favorites
SUBTITLE Select subtitle of media video file (needs the support of disk or flie).
TS Cycles through wide screen mode settings
▶ In Media mode, press to start playback or pause.
STOP ■ In Media mode, press to stop playback. track.chapter or track.
TEXT Turns on and off the Teletext function
GOTO Play from the desired location.
Press the appropriate colour to direct access functions in TELETEXT or EPG OSD mode
In Media mode, press to jump to the previous of the currently played chapter or track.
▶▶ In Media mode, press to jump to the next of the currently played chapter or track.
In Media mode, use to reverse/advance
▶ playback rapidly.
USING THE FEATURES
SELECT INPUT SOURCE
Press INPUT button to display the input source list,
Press ▼/ ▲ or INPUT button to select the input source you want to,
Press OK button to enter the input source,
Press EMIN to quit.
Source
DTV
ATV
SCART
AV
YPbPr
HDMI1
HDMI2
HDMI3
PC
USB
SOURCE: Exit
First Time Setup
Connect an RF cable from the TV's input called "RF-In" and to your TV Aerial socket.
OSD Language
Press ◀/▶ button to select the language to be used for menus and message.
Mode Setting
Press ◀/▶ button to select mode.
Country
Press ◀/▶ button to select the country you want to.
Antenna Type
Press ◀/▶ button to select Antenna(DVB-T) or Cable(DVB-C).
Auto Scan
Press ◀️/▶edoMtcelesotnottub DTV+ATV, DTV, ATV
LCN
Press ◀ / ▶ button to select: On /Off
Auto Channel Update
Press ◀ / ▶ button to select: On / Off
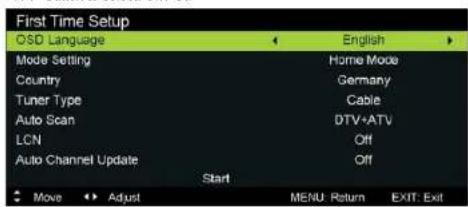
Auto Tuning Status
First tuning , press Meiru button to skip lapiding, Second tuning , press Menu bootoratoskip euturings
Main Menu Operation
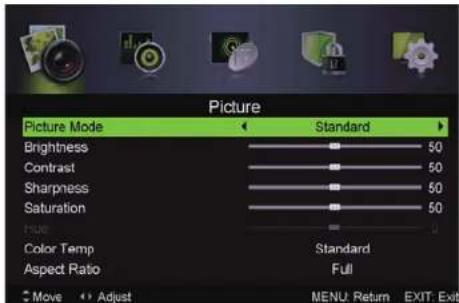
Picture Menu
Press MENU button to display the main menu.
Press ◀/▶ button selectPICTURE in the main menu, then press ▲ / ▼ to enter
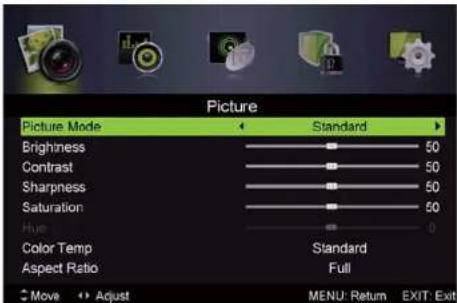
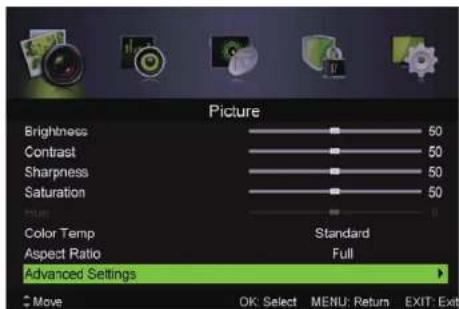
- Press ▼ / ▲ button to select the option that you want to adjust in the PICTURE menu.
- Press ◀ button to adjust
- After finishing your adjustment, Press MENU button to return back to the previous menu.
USING THE FEATURES
USING THE FEATURES
Picture MODE
Press ▼' ▲button to select Picture Mode, then press ◀/▶ button to select.
Brightness/ Saturati/Sharpness/
Press ▼ / ▲ button to select option, then press ◀ / ▶ button to adjust.
Color Temp
Change the overall color cast of the picture.
Press ▼ / ▲ button to select Color Temp, then press ◀ / ▶ button to select Standard/Cool/Warm.
Aspect Ratio
Press▼button to selectAspec 1 Ratio, then press◀/▶ button to select.
Full/4:3/Zoom1/Zoom2 To select the available display format.
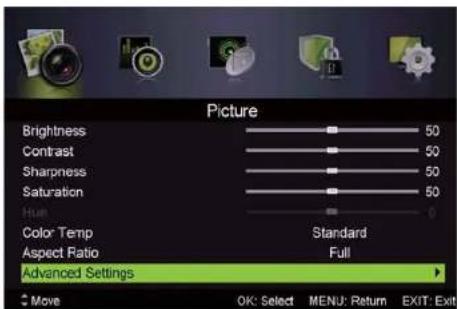
AdvancedSettings
Adjust advanced video features to fine tune the picture.
Press ▼/▲button to select Advanced Settings, then press ◀/▶ button to enter sub-menu.
NR
Set options to reduce video noise.
Press▼/▲ button to selectNR, then press◄/► button to select.
Mpeg NR
Set optionstoreduce MPEGnoise.
Press ▼ /▲ button to selectMpeg NR, then press ◀ /▶ button to select
Dynamic Contrast
Automatically adjust picture detail and brightness.
Press ▼ / ▲ button to select Dynamic Contrast , then press ◀ / ▶ button to select .
(Available Dynamic Contrast: Off.Weak .Medium.Strong)
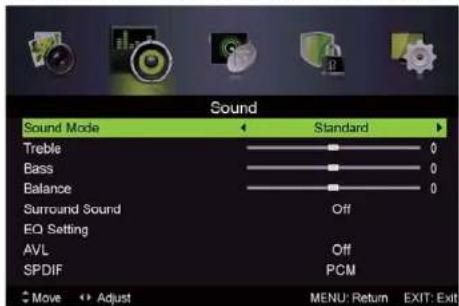
Sound Menu
Press MENU button to display the main menu.
Press ◀/▶ button select SOUND in the main menu, then Press ▼ / ▲ to enter.

-
Press ▼ /▲ button to select the option that you want to adjust in the SOUND menu.
-
Press ◀/▶ button to adjust
-
After finishing your adjustment, Press MENU button to return back to the previous menu.
USING THE FEATURES
USING THE FEATURES
Sound Mode
Press ▼ /▲ button to selectAudio Mode then press ◀ /▶ button to select.
Treble/Bass/Balance
Press ▼ / ▲ button to select option, then press ◀ / ▶ button to adjust.
SurroundSound
Press ▼ / ▲ button to select Surround Sound, then press ◀ / ▶ button to select On or Off.
EQ Setting
Adjust the curve of 7 bands equalizer.
Press ▼ / ▲ button to select EQ Setting, then press ◀ / ▶ button to enter sub-menu.
AVL
Automatically reduces sudden volume changes, for example, when switching between the channels.
Press ▼ / ▲ button to select AVL, then press ◀ / ▶ button to select On or Off.
SPDIF
Press ▼ / ▲ button to select Digital Output, then press ◀ / ▶ button to select Off / Auto/PCM
AudioDescription
Press ▼/ ▲button to select Audio Description then press ◀/ ▶ button to enter sub-menu.
Mode
Press ▼ / ▲ button to select Mode, then press ◀ / ▶ button to select On or Off.
When the mode is On, Volume can be adjust by users.
SoundType
Press ▼ / ▲ button to select Sound Type, then press ◀ / ▶ button to select.
(Available Sound Type: Stereo, Dual I, Dual II. Mixed).
NOTE:
Balance: This item can adjust the speaker's output, it enables you to listen to best at your position.
AVL: This item uses for reducing the difference between channel and program's
volume automatically.
it made the overall water to be even. This function will also reduce the fluctuation of the sound.
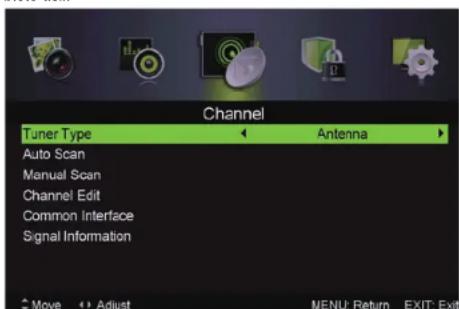
Channel Menu
Press MENU button to display the main menu.
Press ◀/ ▶ button to select CHANNEL in the main menu, then press ▼ / ▲ to enter
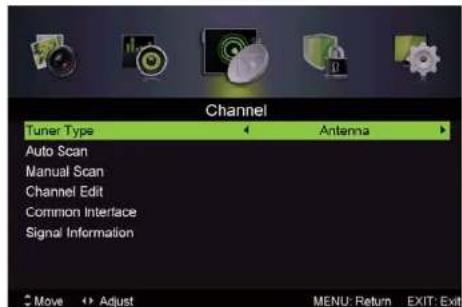
- Press ▼ / ▲ button to select the option that you want to select in the CHANNEL menu.
- Press Enterbutton to enter sub-menu
- Press MENU button to return back to the previous menu.
Tuner Type
Press ▼ / ▲ button to select Tuner Type, then press ◀ / ▶ button to select Antenna or Cable.
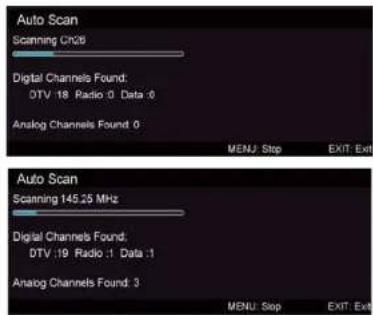
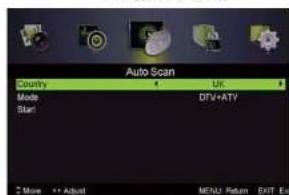
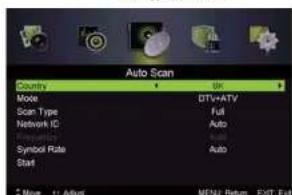
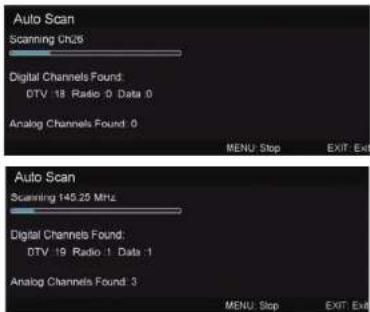
Auto Scan
Press ▼: ▲ button to select Auto Scan, then press ◀/▶ button to enter sub-menu.
Tuner type is Antenna
Tuner type is Cable
USING THE FEATURES
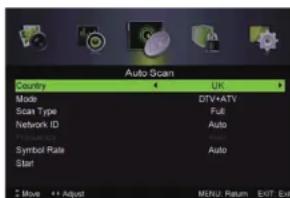
Country
Press ◀ / ▶ button to select country
Mode
Press ◀/▶ button to select Mode: DTV+ATV, DTV, ATV.
ScanType
Press ◀/▶ button to select Scan Type:Advanced,Quick,Full.
Network ID
Press ◀/▶ button to select Network ID: Auto or enter digital numbers.
Frequency
Press ◀/▶ button to select Frequency:Auto or enter digital numbers.
Symbol Rate
Press ◀/▶ button to select Symbol Rate: Auto or nter digital numbers.
Start
Press ◀/▶ button to start the auto searching.
It will search digital channels first, then analog channels.
Before execute auto channel search, please confirm your antenna type is Antenna or Cable.
Wrong setting of Signal Type maybe cause finding no channel.
Manual Scan
Search for the channels manually.
Press ▼/ ▲button to select Manual Scan. then press ◀/ ▶ button to enter sub-menu.
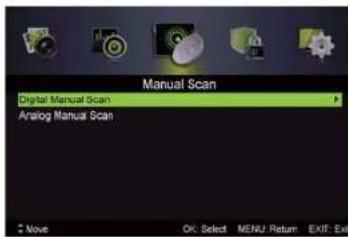
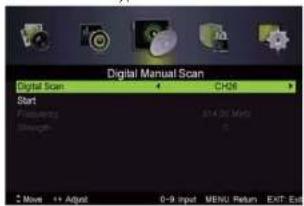
Digital Manual Scan
Press ▼ /▲ button to select Digital Manual Scan , then press ◀ /▶ button to enter sub-menu. Tunertype is Antenna Tunertype is Cable
USING THE FEATURES
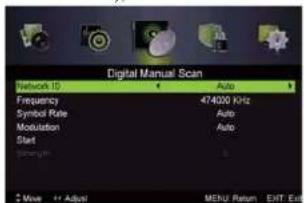
Network ID
Press ◀ /▶ button to select Network ID: Auto or enter digital numbers.
Frequency
Press ◀ /▶ button to select FrequenAuto or enter digital numbers.
SymbolRate
Press◀ /▶ buttonto selectSymbolRaAuto or enter digital numbers.
Modulation
Press ▶ /▶ button to select ModulationAuto,16QAM,32QAM,64QAM,128QAM,256QAM.
Start
Press ◀ / ▶ button to start the channel searching.
Analog Manual Scan
Press ▼ /▲ button to select Analog Manual Scan , then press ◀ /▶ button to enter sub-menu.
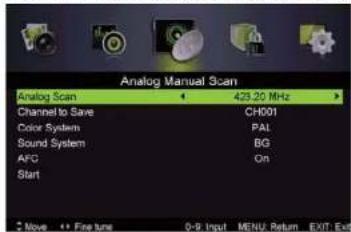
Analog Scan
Press ▶ /▶ button to select Analog Scan.
Channel to Save
Press ◀/▶ button to select Channel to Save.
Color System
Press ◀/▶ button to select Color System:Auto, PAL or SECAM.
Sound System
Press ◀/▶ button to select Sound System: Auto, DK, BG, I.
AFC
Auto Frequency control
press ◀/▶ button to select On or Off.
Start
Press ◀/▶ button to start the channel searching.
USING THE FEATURES
Channel Edit
Press ▼ / ▲ button to select Channel Edit, then press ◀ / ▶ button to enter sub-menu.
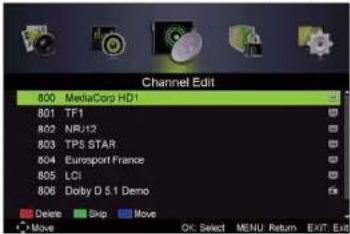


The three colored key are the shortcut key for programming the channels.
First press ▼/▲ to highlight the channel you want to delete or move or skip, then:
Press the button to delete the channel.
Pressthe Broom toskipthe selectchannel.
(Your TV set will skip the channel automatically when using CH+/- to view the channels.)
Press the Blue button to set the channel to moving state, then press ▼; ▲to move
it to the position you want to put, and press Bluebutton again to done the move operation.
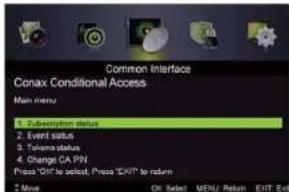
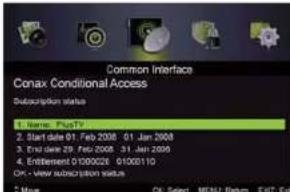
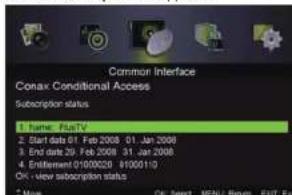
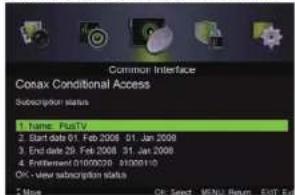
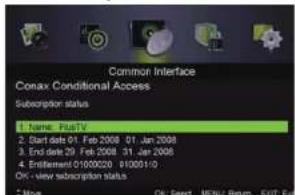
Common interface
Press ▼ / ▲ button to select Common interface. then press OK button to enter sub-menu.
Only available when there is CL card under DTV.
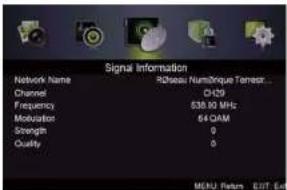
SignallInformation
Press ▼ / ▲ button to select Signal Information, then press the OK button to see the detail
information about the signal. Only available when there is signal under DTV.
USING THE FEATURES
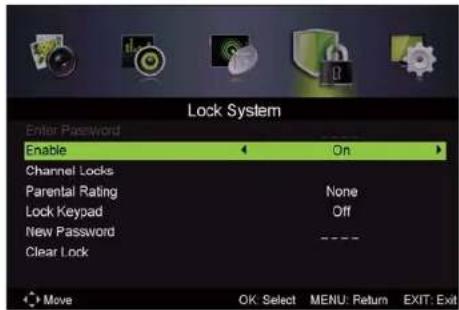
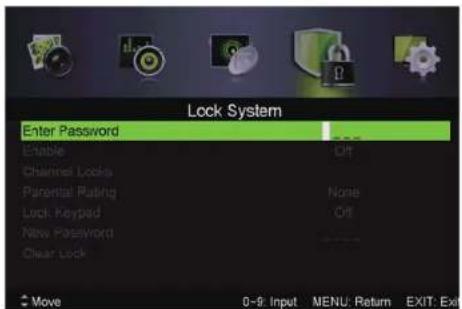
Lock System Menu
Press MENU button to display the main menu.
Press ◀/▶ button select LOCK SYSTEM in the main menu, then press ▼ / ▲ to enter.

- Press▼/▲ button to select the option that you want to adjust in the LOCKSYSTEM menu.
- Press ◀/▶ button to adjust.
- After finishing your adjustment. Press MENU button to return back to the previous menu.
Default password is 0000, and if forget what you set, please call the service center.
USING THE FEATURES
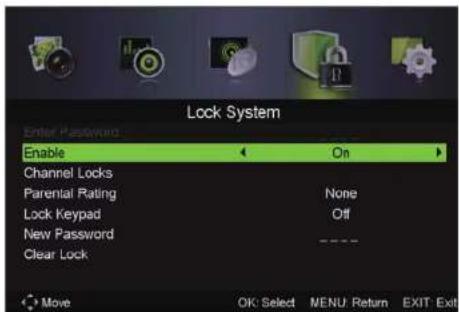
Enable
Press ▼ / ▲ button to select Enable, then press ◀ / ▶ button to select On or Off.
Channel Locks, Parental Rating and lock Keypad available when Enable is On.
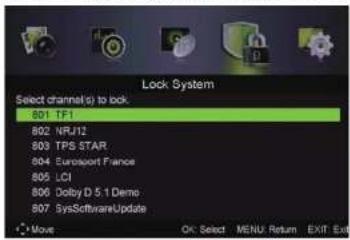
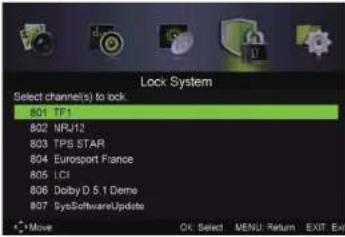
Channal Locks
Press ▼ / ▲ button to select Channal Locks, then press ◀ / ▶ button to enter sub-menu.
Parental Rating
Press ▼ / ▲ button to select Parental Rating, then press ◀ / ▶ button to select.
Lock Keypad
Set to prevent it from being used by young children, or other unexpected usage.
Press ▼ / ▲ button to select Lock Keypad, then press ◀ / ▶ button to select On or Off.
New Password
Press ▼ / ▲ button to select New Password, then a nter a 4-digital number you want to set twice.
Clear Lock
Press ▼ / ▲ button to select Clear Lock.
USING THE FEATURES
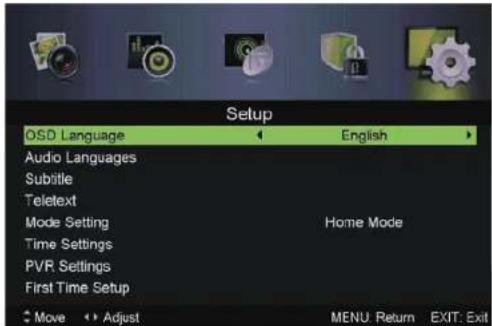
Setup Menu
Press MENU button to display the main menu.
Press ◀ / ▶ button select SETUP in the main menu, then press ENTER / ▼ to enter.
-
Press ▼ / ▲ button to select the option that you want to adjust in the SETUP menu.
-
Press ◀/▶ button to adjust.
-
After finishing your adjustment. Press MENU button to save and return back to the previous menu.
USING THE FEATURES
USING THE FEATURES
OSD Language
Select an OSD menu language can be displayed. Default English is selected as menu language. Press ▼/▲button to select OSD Language, then press ◀/▶ button to select.
AudioLanguages
Select an audio language can be displayed. Default English is selected as audio language.
Press ▼ / ▲ button to select Audio Languages, then press OK button to enter sub-menu.
Press ▼/▲/◄/► button to select the Audio Primary Language and Audio Secondary Language.
Subtitle
Select a subtitle language can be displayed. Default English is selected as subtitle language.
Press Button to select Subtitle, then press OK button to enter sub-menu.
Mode
Press ▼ / ▲ button to select Mode, then press ◀ / ▶ button to select On or Off.
Press / /◄/► button to select the Subtitle Primary Language and Subtitle Secondary Language.▼ ▲
Hearing Impaired
Press ▼ / ▲ button to select Hearing Impaired, then press ◀ / ▶ button to select On or Off.
Teletext
Adjust Teletextsettings. Only available under DTV, ATV, AV and SCART source.
Press ▼ / ▲ button to select Teletext, then press ◀ / ▶ button to enter sub-menu.
Mode Setting
Pres▲/button to select Mode Selling
Time Settings
Press ▼ /▲ button to select Time Settings, then press ◀ /▶ button to enter sub-menu.
OSD Time
Press ▼button to select OSD Timepress ◀/▶ button to select.
(Available OSD Time:Off,10seconds,20seconds,30seconds,60seconds)
Sleep Timer
Seta timerforthe TV to turn offautomatically.
Press ▼ button to select Sleep Timer press ◀ / ▶ button to select.
(Available Sleep Timer:Off, 5mins. 15mins, 30mins, 60mins, 90mins, 120mins, 240mins)
Auto Sleep
Press button to select Auto Sle ep press ◀/▶ button to select Off,3 hours,4 hours or 5 hours.
Time Zone
Select your time zone.
Press button to select Time Zone, then press ▶/▶ button to enter sub-menu.
Time
Press▼button to select Time . then press ◀ / ▶ button to enter sub-menu.
SetAuto Sync to Off, then you can setthe time manually
Note: In the case of loss of power, the clock setting will be lost.
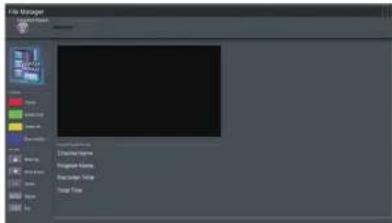
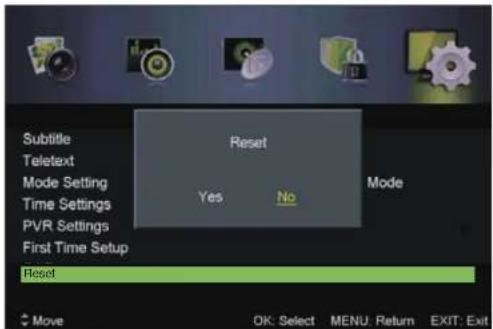
PVR Settings
Press ▼ / ▲ button to select PVR Settings, then press Enter button to enter sub-menu. It will check the USB.
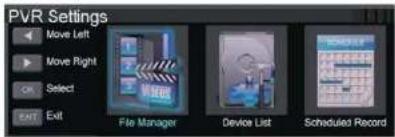
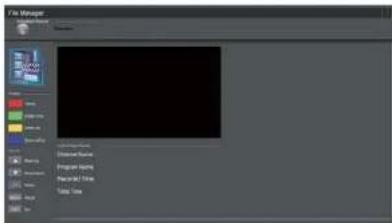
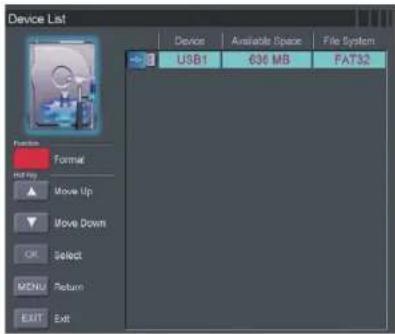
Press ◀ / ▶ button to select File Manager, then press Enter button to enter sub-menu.
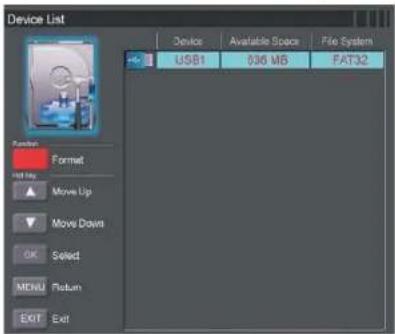
Press ◀ / ▶ button to select Device List, then press Enter button to enter sub-menu.
USING THE FEATURES
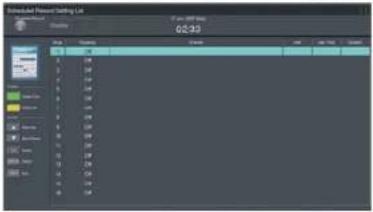
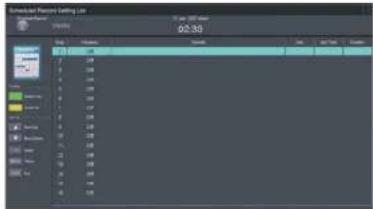
Press ◀ / ▶ button to select Scheduled Record, then press Enter button to enter sub-menu.
First Time Setup
Press ▼ / ▲ button to select First time Setup, then press Enter button to enter.
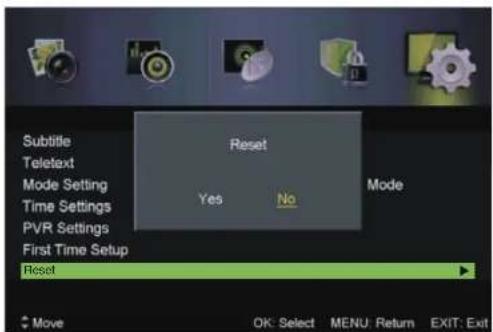
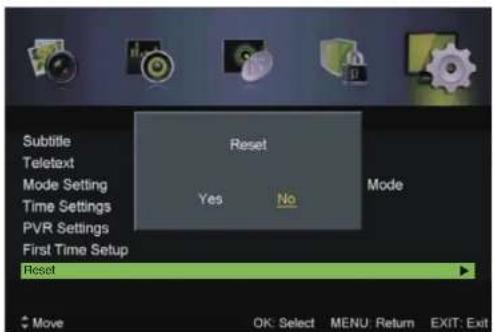
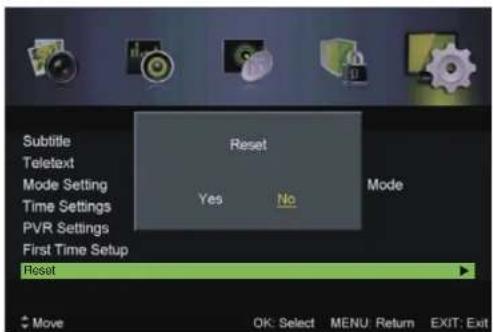
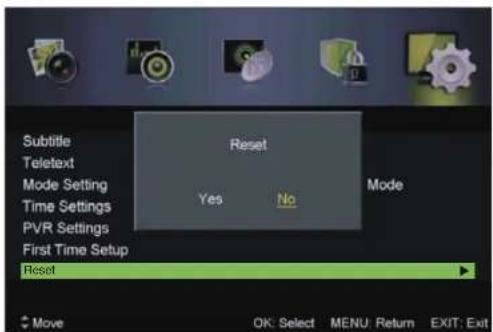
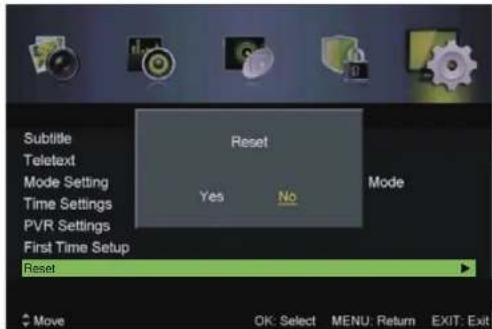
Reset
Press ▼ / ▲ button to select Reset, then press Enter button to enter sub-menu.
If you are sure to reset, press Yes to reset.
EPG Menu
Press the button EPG in the remote control to enter EPG menu.
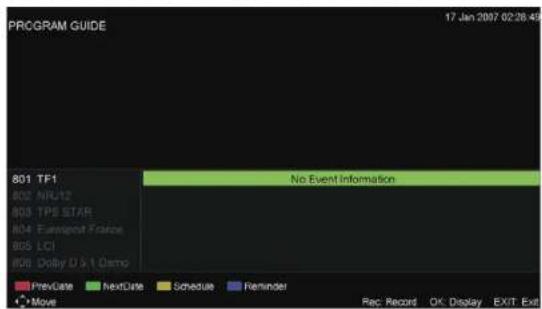
Press the RED button to display previous date.
Press the GREEN button to display next date.
Press the YELLOW button to see the setting you have done before.
Press the BLUE button to set the time you want to remind the program you want to see.
USING THE FEATURES
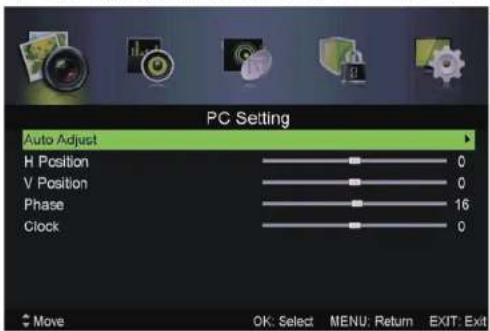
PC Setting Menu
Press INPUT button on the remote control to select PC.
Press MENU button on the remote control to display the main menu.
Press ◀ / ▶ button on the remote control to select PC SETTING In the main menu.
-
Press ▼ / ▲ button on the remote control to select the option that you want to adjust In the PC SETTING menu.
-
Press Enter button on the remote control to adjust.
-
After finishing your adjustment, Press MENU button to return back to the previous menu.
Auto Adjust
Press Enter/▶ button to adjust the screen automatically to the optimal position of the picture.
H Position.
Adjust the horizontal position of the picture.
V Position.
Adjust the vertical position of the picture.
Phase
Adjust the horizontal interfering lines.
Clock
Adjust the vertical interfering lines.
ATV /SCART/AV/YPbPr/HDMI
-
PICTURE menu and description are the same as that for DTV mode.
-
Audio Description and Sound Type in SOUND menu is invalid..
-
SCART/AV/YPbPr/DVD/HDMI mode has no CHANNEL menu.
-
Parental Rating and Channel Locks in LOCK menu is invalid for SCART/HDMI/AV/YPbPr mode. Parental Rating is invalid for ATV mode.
-
Audio Languages, Subtitle and PVR Settings in SETUP option are invalid for SCART/AV/DVD mode. Audio Languages, Subtitle, Teletext PVR Settings in SETUP option are invalid for HDMI/YPbPr mode.
-
HDMI have screen mode in picture menu.
Video for DVD input.PC for computer input.Auto to auto choose Video or PC mode.
| MODEL | 40DM1000 | 32DM1000 |
| Panel Size | 100cm | 80cm |
| Brightness | 260 cd/m2 | 240 cd/m2 |
| Contrast | 5000:1 | 3000:1 |
| MAX.RESOLUTION | 1920X1080 | 1366X768 |
| USB | 1 | 1 |
| YPbPr | 1 | 1 |
| PC Audio | 1 | 1 |
| VGA | 1 | 1 |
| HDMI IN | 3 | 3 |
| VHF/UHF input | 1 | 1 |
| Earphones | 1 | 1 |
| AV IN | 1 | 1 |
| CI | 1 | 1 |
| COAXIAL | 1 | 1 |
| SCART | 1 | 1 |
| Power Source | AC 100-240V~ 50/60Hz AC 100-240V~ 50/60Hz | |
| Power Consumption | Max 75W | Max 65W |
Features and Specifications are subject to change without notice.
Conformity Declaration No. 1516 / date 11.11.2014
We, DANTE INTERNATIONAL S.A with headquarters in Soseaua Virtutii, No. 148, space E47, sector 6, Bucharest, Romania registered at the Trade Register Office (Registrul Comertului) under no. J40/372/23.01.2002, tax code RO14399840, in our quality as importers, hereby declare, ensure and guarantee at our own risk that the product:
Commercial name: LED TV
32DM1000
40DM1000
Brand: Star-Light
does not endanger the life, health, work safety, does not have a negative impact on the environment and meets the standards listed in the declarations of conformity of the manufacturer, meets the protection requirements and is in accordance with the following:
ROHS Directive 2002 / 95 / EC; Low Voltage Directive 2006 / 95 / EC; EMC Directive 2004 / 108 / EC EN 55013:2013
EN 55020: 2007 + A11: 2011
EN 55022: 2010
EN 55024: 2010
EN61000-3-2:2006+A1+2009+A2:2009
EN 61000-3-3:2013
LDV: EN 60065:2002+A1:2006+A11:2008+A2:2010+A12:2011
The product is marked "CE", as well as the RoHS.
The technical file is available at S.C. DANTE INTERNATIONAL S.A. address Swan Office Park, Windsor Building, Street: Soseaua Bucuresti Nord, No. 15-23, postal code: 077190, Voluntari, Ilfov, Romania
The Conformity Declaration is available at: www.star-light.com

Dante International SA
natural_image
Line drawing of a flat-screen monitor with base mount and stand (no text or symbols)- POWER: Pornire TV/Repaus
- SOURCE: Selectarea sursei de intrare audio/video
- MENU: Deschiderea meniului de setari
- VOL-: Diminuarea volumului
- VOL+: Amplificarea volumului
- CH-: Postul anterior
- CH+: Postul urmator
- RECEIVER IR: Primeste semnalele cu infrarosu de la telecomanda.
- BEC INDICATOR: Indicator de stare (Pornit: Verde/ Repaus: Rosu)
natural_image
Technical line drawing of a vertical panel or support structure with mounting base (no text or symbols)SETAREA TELEVIZORULUI DVS. LED
VEDERE REALA SI JACK-URI
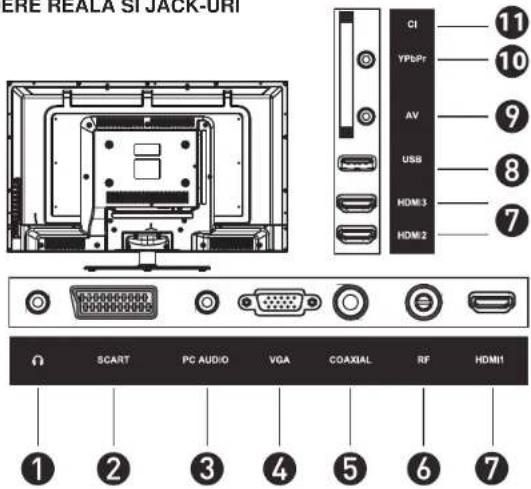
- Casti
- SCART
- AUDIO PC: Conectati-I la terminalul de iesire audio al calculatorului
- VGA: Intrare video PC
- Coaxial: lesire audio digitala
- RF: Conectarea antenei
- HDMI
- USB
9.AV: Intrare video&Intrare audio stereo - YPbPr: Conectare la terminalul video de iesire YPbPr al DVD-ului
- CI: Introduceti cardul CI in fanta.
Telecomanda
POWER: Se deschide televizorul LCD si intra in modul de repaus
AUDIO I/II: Se comuta postul audio de redare multimedia
Statutul de Acord Fin Automat
UTILIZAREA CARACTERISTICILOR UTILIZAREA
Inalt/Bas/Echilibrare
UTILIZAREA CARACTERISTICILOR UTILIZAREA
Activare
ROHS Directive 2002 / 95 / EC; Low Voltage Directive 2006 / 95 / EC; EMC Directive 2004 / 108 / EC
EN 55013:2013
EN 55020: 2007 + A11: 2011
EN 55022: 2010
EN 55024: 2010
EN61000-3-2:2006+A1+2009+A2:2009
EN 61000-3-3:2013
LDV: EN 60065:2002+A1:2006+A11:2008+A2:2010+A12:2011
Produsul este marcat "CE", precum si RoHS.
Dosarul tehnic este disponibil la S.C. DANTE INTERNATIONAL S.A. adresa Swan Office Park, Windsor Building, Strada: Soseaua Bucuresti Nord, No. 15-23, cod postal: 077190, Voluntari, Ilfov, Romania
Declaratia de conformitate este disponibila la adresa: www.star-light.com

Dante International SA
natural_image
Line drawing of a flat-screen monitor with base and stand, no text or symbols presentnatural_image
Technical line drawing of a vertical mechanical component with internal components (no text or symbols)НАСТРОЙКА НА ВАШИЯ LED ТЕЛЕВИЗОР
natural_image
Technical line drawing of a mechanical assembly with no visible text or symbols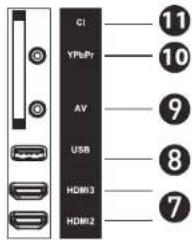
ROHS Directive 2002 / 95 / EC; Low Voltage Directive 2006 / 95 / EC; EMC Directive 2004 / 108 / EC
EN 55013:2013
EN 55020: 2007 + A11: 2011
EN 55022: 2010
EN 55024: 2010
EN61000-3-2:2006+A1+2009+A2:2009
EN 61000-3-3: 2013
LDV: EN 60065:2002+A1:2006+A11:2008+A2:2010+A12:2011
natural_image
Line drawing of a flat-screen monitor with base and stand (no text or symbols)natural_image
Technical line drawing of a vertical panel or shelf with internal components and mounting base (no text or symbols)2
Automata Finomhangolás
Fömenü használata
kép menü
ID hálózat
16
TULAJDONSÁGOK ALKALMAZÁSATULAJDONSÁ
Aktiválás
natural_image
Line drawing of a flat-screen monitor with base and stand (no text or symbols)- UKLJUČIVANJE: Uključite televizor / Standby
- IZVOR: Odabir ulaznog audio / video izvora
- MENI: Otvaranje menia za podešavanje
- VOL-: Smanjite jačinu zvuka
- VOL+: Povećajte jačinu zvuka
- CH-: Prethodni kanal
- CH+: Sledeći kanal
- IR RECEPTOR: Prima signale od daljinskog upravljača
- LED INDIKATOR: Indikator stanja (Funkcioniše: Zeleno / Standby: Crveno)
natural_image
Technical line drawing of a vertical mechanical component with mounting base (no text or symbols)2
VAŠ LED TV UREĐAJ DALJINSKI UPRAVLJAČ
STRAŽNJI POGLED I DUGMAD
- Slušalice
- SCART
- PC AUDIO: Povezivanje sa izlaznim audio terminalom PC-a.
- VGA: Ulaz video PC
- Koaksial: Digitalni audio izlaz
- RF: Otvor za antenu
- HDMI
- USB
- AV: Ulaz video & Stereo audio ulaz
- YPbPr: Povezivanje sa izlaznim video terminalom YPbPr DVD-a.
- Cl: Ubacite karticu Cl u otvoru
UKLJUČITI Uključuje LCD televizor i stavlja ga u standby. AUDIO I/II: Prebacite audio kanal za multimedijalnu reprodukciju
MUTE: Isključuje i uključuje zvuk LCD televizora.
0-9: Pritiskanjem broja izabire se jedan kanal.
SLEEP: Podesite tajmer za ulazak u SLEEP režimu.
REPEAT: Prebacuje trenutni kanal na prethodni kanal. EXIT: Izlazak iz menia prikazanog na ekranu.
MENI: Prikazuje meni na ekranu.
SOURCE: Pritiskom na dugme SOURCE pojavljuje se spisak izvora, koristite ▼▲da biste izabrali video uređaj povezan sa LCD televizorom preko video ulaza, a zatim pritisnite OK radi potvrde.
INFO Jednim pritiskom se pojavljuju razne informacije kao na primer trenutni kanal i ulazni izvor
Stanje autoreglaże
Prva digitalna reglaža, pritisnite dugme MENI da biste prešli preko digitalne reglaže.
Druga analogna reglaža, pritisnite dugme MENI da biste prešli preko analogne reglaže.
Meni Slika
Pritisnite dugme MENI da biste otvorili glavni meni.
Pritisnite dugme ◀/▶ da biste izabrali SLIKU iz glavnog menija, a zatim pritisnite ▲/▼ da biste ušli.
- Pritisnite dugme ▲/▼ da biste izabrali opciju koju želite da podesite u meniju SLIKA.
- Pritisnite dugme ◀/▶ za podešavanje.
- Nakon završetka podešavanja, pritisnite dugme MENI da biste se vratili u prethodnom meniju.
RUKOVANJE U GLAVNOM MENIJU RUKOVANJE U GLAVNOM MENIJU
REŽIM Slika
Pritisnite ▲/▼da biste izabrali Režim Slika, zatim pritisnite ◀/▶za odabir.
Svellost / Kontrast / Tačnost & Zasićenje / Nijanse
Pritisnite ▲/▼ da biste izabrali opciju, zatim pritisnite ◀/▶ ba biste podesili.
Boje
- Pritisnite dugme ▲/▼ da biste izabrali općiu koju želite da podesite iz menija ZVUK.
- Pritisnite dugme ◀/▶ da biste podesili.
- Nakon podešavanja, pritisnite dugme MENI da biste se vratili prethodnom meniju.
Režim zvuk
Pritisnite dugme ▲/▼ da biste izabrali Režim zvuk, zatim pritisnite dugme ◀/► da biste odabrali.
Treble/Bass/Balans
Pritisnite dugme ▲/▼ da biste izabrali opciju, zatim pritisnite dugme ◀/▶ da biste odabrali.
Surround Sound
Pritisnite dugme ▲/▼ da biste izabrali Surround Sound, zatim pritisnite dugme ◀/▶ da biste izabrali Uključeno ili Isključeno.
Podešavanje EQ
Podesite parametre ekvilajzera sa 7. traka. Pritisnite dugme ▲/▼ da biste izabrali Podešavanje EQ, zatim pritisnite dugme ◀/▶ da biste ušli u pod - meniju.
AVL
Automatski smanjuje nagle promene jačine zvuka, na primer kada menjate kanale. Pritisnite dugme ▲/▼ da biste izabrali AVL, zatim pritisnite dugme ◀/▶ da biste izabrali Uklijučeno ili Isključeno.
SPDIF
Pritisnite dugme ▲/▼ da biste izabrali Digitalni izlaz, zatim pritisnite dugme ◀/► da biste izabrali Off/Auto/PCM.
Audio opis
Pritisnite dugme ▲/▼ da biste izabrali Audio opis, zatim pritisnite dugme ◀/► da biste ušli u pod - meniju.
Režim
Pritisnite dugme ▲/▼ da biste izabrali Režim, zatim pritisnite dugme ◀/► da biste izabrali Uključeno ili Isključeno.
Kada je režim uključen, jačinu zvuka može da podesi korisnik.
Vrsta zvuka
Pritisnite dugme ▲/▼ da biste izabrali Vrstu zvuka, zatim pritisnite dugme ◀/▶ da biste odabrali.
(Dostupne vrste zvzka: Stereo, Dual I, Dual II, Mixt).
PRIMEDBA:
Balans: Ova opcija može podesiti izlaz prema zvučnicima, tako da vam pruža optimalno slušanje u zavisnosti od vašeg položaja.
AVL: Ova opcija se koristi da bi automatski smanjila razlike u jačini zvuka kod različitih kanala i programa. Opšti zvuk će biti jednak. Ova opcija će smanjiti i fluktuacije zvuka.
Meni kanali
Pritisnite dugme MENI da biste otvorili glavni meni.
Pritisnite dugme ◀/▶ da biste izabrali KANAL iz glavnog menija, zatim pritisnite ▲/▼ da biste ušli.
- Pritisnite dugme ▲/▼ da biste izabrali opciju koju želite da podesite u meniju KANAL.
- Pritisnite dugme Enter da biste ušli u pod - meniju.
- Pritisnite dugme MENI da biste se vratili na prethodnom meniju.
Tip tuner
Pritisnite dugme ▲/▼ da biste izabrali Tip tuner, zatim pritisnite dugme ◀/▶ da biste izabrali Antena ili Kabel.
Auto Scan
Pritisnite dugme ▲/▼ da biste izabrali Auto Scan, zatim pritisnite dugme ◀/► da biste ušli u pod - meniju.
RUKOVANJE U GLAVNOM MENIJU RUKOVANJE U GLAVNOM MENIJU
Država
Pritisnite dugme ◀/▶ da biste izabrali državu.
Režim
Pritisnite dugme ◀/▶ da biste izabrali Režim: DTV+ATV, DTV, ATV.
Način pretrage
Pritisnite dugme ◀/▶ da biste izabrali način pretrage: Napredan, Brz, Kompletan.
ID mreže
Pritisnite dugme ◀/▶ da biste izabrali ID mreže: Auto ili ubacite digitalne brojeve.
Frekvencija
Pritisnite dugme ◀/▶ da biste izabrali frekvenciju: Auto ili ubacite digitalne brojeve.
Simbol
Pritisnite dugme ◀/▶ da biste izabrali simbol: Auto ili ubacite digitalne brojeve.
Start
Pritisnite dugme ◀/▶ da biste pokrenuli auto – pretraživanje.
Analogna pretraga
Pritisnite dugme ◀/▶ da biste izabrali Analognu pretragu.
Spašen kanal
Pritisnite dugme ◀/▶ da biste izabrali Spašen kanal.
Sistem boja
Pritisnite dugme ◀/▶ da biste izabrali sistem boja: Auto, PAL ili SECAM.
AFC
Informacije o signalu
Pritisnite dugme ▲/▼ da biste izabrali Informacije o signalu, zatim pritisnite dugme OK da biste videli detaljne informacije o signalu. Opcija je moguća samo kada postoji signal u režimu DTV.

Meni blokiranje sistema
Pritisnite dugme MENI da biste otvorili glavni meni.
Pritisnite dugme ◀/▶ da biste izabrali BLOKIRANJE SISTEMA iz glavnog menija, zatim pritisnite ▲/▼ da biste ušli.
- Pritisnite dugme ▲/▼ da biste izabrali opciju koju želite da podesite iz menija BLOKIRANJE SISTEMA.
- Pritisnite dugme ◀/▶ za podešavanje.
- Nakon završetka podešavanja, pritisnite dugme MENI da biste se vratili u prethodni meni. Standardna šifra je 0000 a ukoliko zaboravite šifru koju stavite, pozovite pozivni centar.
RUKOVANJE U GLAVNOM MENIJU RUKOVANJE U GLAVNOM MENIJU
Aktiviranje
Pritisnite dugme ▲/▼ da biste izabrali Aktiviranje, zatim pritisnite dugme ◀/► da biste izabrali Uključeno ili Isključeno. Kada je opcija aktivisana, dostupne opcije su Blokiranje kanala, Roditeljska kontrola i Zaključavanje tipki.
Blokiranje kanala
Pritisnite dugme ▲/▼ da biste izabrali Blokiranje kanala, zatim pritisnite dugme ◀/▶ da biste ušli u pod - meniju.
Roditeljska kontrola
Pritisnite dugme ▲/▼ da biste izabrali Roditeljsku kontrolu, zatim pritisnite dugme ◀/▶ da biste odabrali.
Blokiranje tipki
Koristite opciju radi sprečavanja korišćenja od strane dece ili drugih neželjenih korišćenja. Pritisnite dugme ▲/▼ da biste izabrali Blokiranje tipki, zatim pritisnite dugme ◀/► da biste izabrali Uključeno ili Isključeno.
Nova šifra
Pritisnite dugme ▲/▼ da biste izabrali Novu šifru, zatim unesite 4 cifre koje želite da bude šifra, dva puta.
Otključavanje
Pritisnite dugme ▲/▼ da biste izabrali Otključavanje.
Meni za podešavanje
Pritisnite dugme MENI da biste otvorili glavni meni.
Pritisnite dugme ◀/▶ da biste izabrali PODEŠAVANJE iz glavnog menija, zatim pritisnite ENTER /▼ da biste ušli.
- Pritisnite dugme ▲/▼ da biste izabrali opciju koju želite da podesite u meniju PODEŠAVANJA.
- Pritisnite dugme ◀/▶ da biste podesili.
- Nakon završetka podešavanja, pritisnite dugme MENI da biste spasli i vratili se prethodnom meniju.
RUKOVANJE U GLAVNOM MENIJU RUKOVANJE U GLAVNOM MENIJU
Jezik OSD
Pritisnite dugme ◀/▶ da biste izabrali File Manager, zatim pritisnite dugme Enter da biste ušli u pod - meniju.
Pritisnite dugme ◀/▶ da biste izabrali Lista uređaja, zatim pritisnite dugme Enter da biste ušli u pod - meniju.
RUKOVANJE U GLAVNOM MENIJU RUKOVANJE U GLAVNOM MENIJU
Pritisnite dugme ◀/▶ da biste izabrali Planirano snimanje, zatim pritisnite dugme Enter da biste ušli u pod - meniju.
Početno podešavanje
Pritisnite dugme ▲/▼ da biste izabrali Početno podešavanje, zatim pritisnite dugme Enter da biste ušli.
Resetovanje
Pritisnite dugme ▲/▼ da biste izabrali Resetovanje, zatim pritisnite dugme Enter da biste ušli u pod - meniju.
-
Pritisnite dugme ▲/▼ sa daljinskog upravljača da biste izabrali opciju koju želite da podesite iz menija PODEŠAVANJE PC.
-
Pritisnite dugme Enter sa daljinskog upravljača za podešavanje.
-
Nakon izvršenja podešavanja, pritisnite dugme MENI da biste se vratili u prethodni meni.
Auto podešavanje
Pritisnite dugme Enter / ▶ za automatsko podešavanje ekrana u optimalnom položaju slike.
Pozicia H
Ustawienia PVR....20
natural_image
Line drawing of a flat-screen monitor with base and stand (no text or symbols)natural_image
Technical line drawing of a vertical mechanical component with mounting base (no text or symbols)2
OBSŁUGA MENU GŁÓWNE
Menu Obrazu
16
Aktywacja
ROHS Directive 2002 / 95 / EC; Low Voltage Directive 2006 / 95 / EC; EMC Directive 2004 / 108 / EC
EN 55013:2013
EN 55020: 2007 + A11: 2011
EN 55022: 2010
EN 55024: 2010
EN61000-3-2:2006+A1+2009+A2:2009
EN 61000-3-3:2013
LDV: EN 60065:2002+A1:2006+A11:2008+A2:2010+A12:2011
natural_image
Line drawing of a flat-screen monitor with base and stand (no text or symbols)natural_image
Technical line drawing of a vertical panel or enclosure with internal components, no text or symbols present2
LED TV'NIZIN KURULUMU
GERÇEK GÖRÜNÜŞ VE JAKLAR
natural_image
Technical line drawing of a mechanical assembly with no visible text or symbols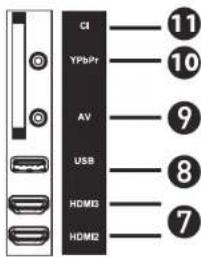
Otomatik Arama Statusü
Sinyal Bilgisi
15
16

(Mevcut OSD Zamani: Off, 10seconds, 20seconds, 30seconds, 60seconds [Kapali, 10
saniye, 20 saniye, 30 saniye, 60 saniye]).
Otomatik Kapanma
ROHS Directive 2002 / 95 / EC; Low Voltage Directive 2006 / 95 / EC; EMC Directive 2004 / 108 / EC
EN 55013:2013
EN 55020: 2007 + A11: 2011
EN 55022: 2010
EN 55024: 2010
EN61000-3-2:2006+A1+2009+A2:2009
EN 61000-3-3: 2013
LDV: EN 60065:2002+A1:2006+A11:2008+A2:2010+A12:2011