
SC-17 - Vacuum Cleaner SANYO - Free user manual and instructions
Find the device manual for free SC-17 SANYO in PDF.


| Product Type | Upright Vacuum Cleaner |
| Brand | Sanyo |
| Model | SC-17 |
| Color | White/Grey (typical) |
| Power Source | Corded Electric |
| Voltage | See nameplate (e.g., 120V or 230V) |
| Dust Collection Type | Cloth bag (washable) |
| Filter Type | Washable foam filter |
| Attachments Included | Crevice tool, floor nozzle, extension pipes, hose |
| Cleaning Surfaces | Carpet, hard floors, tabletops, grooves, narrow spaces |
| Power Cord Length | Approximately 5 m (estimated) |
| Weight | Approximately 6 kg (estimated) |
| Dimensions (H x W x D) | Approximately 30 x 30 x 50 cm (estimated) |
| Dust Capacity | Approximately 1.5 L (estimated) |
| Wall-Mountable Storage | Yes |
| Maintenance | Washable cloth bag and filter; wipe exterior with damp cloth |
| Safety Features | Automatic shut-off? (not specified); follow safety instructions |
| Warranty | Refer to purchase documentation |
Frequently Asked Questions - SC-17 SANYO
User questions about SC-17 SANYO
0 question about this device. Answer the ones you know or ask your own.
Ask a new question about this device
Download the instructions for your Vacuum Cleaner in PDF format for free! Find your manual SC-17 - SANYO and take your electronic device back in hand. On this page are published all the documents necessary for the use of your device. SC-17 by SANYO.
USER MANUAL SC-17 SANYO
natural_image
Line drawing of a vacuum cleaner with coiled hose and base mount (no text or symbols)IMPORTANT SAFETY INSTRUCTIONS....1
FEATURES....2
NAMES OF PARTS....2
ASSEMBLING THE VACUUM CLEANER...3
USING THE VACUUM CLEANER......4
DUST DISPOSAL....5
PRODUCT MAINTENANCE....6
TROUBLESHOOTING....7
IMPORTANT SAFETY INSTRUCTIONS
When using an electrical appliance, basic precautions should always be followed, including the following.
READ ALL INSTRUCTIONS BEFORE USING THIS VACUUM CLEANER
WARNING – To reduce the risk of fire, electric shock or injury:
- Do not leave appliance when plugged in. Unplug from outlet when not in use and before servicing.
- Do not use outdoors or on wet surfaces.
- Do not allow to be used as a toy. Close attention is necessary when used by or near children.
- Use only as described in this manual. Use only manufacturer's recommended attachments.
- Do not use with damaged cord or plug. If appliance is not working as it should, has been dropped, damaged, left outdoors, or dropped into water, return it to a service center.
- Do not pull or carry by cord, use cord as a handle, close a door on cord, or pull cord around sharp edges or corners. Do not run appliance over cord. Keep cord away from heated surfaces.
- Do not unplug by pulling on cord. To unplug, grasp the plug, not the cord.
- Do not handle plug or appliance with wet hands.
- Do not put any object into openings. Do not use with any opening blocked; keep free of dust, lint, hair, and anything that may reduce air flow.
- Keep hair, loose clothing, fingers, and all parts of body away from openings and moving parts.
- Do not pick up anything that is burning or smoking, such as cigarettes, matches, or hot ashes.
- Do not use without filters in place.
- Turn off all controls before unplugging.
- Use extra care when cleaning on stairs.
- Do not use to pick up flammable or combustible liquids such as gasoline or use in areas where they may be present.
- Unplug before connecting any hose attachment accessory.
SAVE THESE INSTRUCTIONS
This vacuum cleaner is intended for household use only.
FEATURES
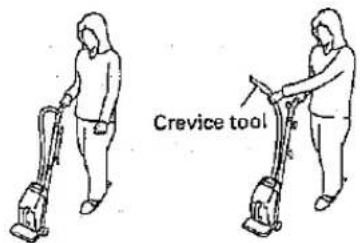
CLEANS CARPETS AND OTHER
FLOORING
TABLETOP CLEANING AND CLEANING OF SLIDING WINDOW OR DOOR GROOVES, ETC:
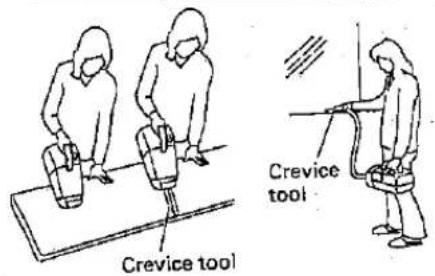
CLEANING IN NARROW SPACES AND HARD-TO-REACH PLACES, SUCH AS UNDER BEDS, ETC.
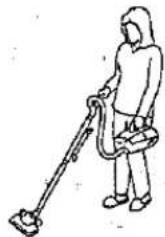
natural_image
Line drawing of a person using a handheld device to clean or walk (no text or symbols)WALL-MOUNTABLE STORAGE
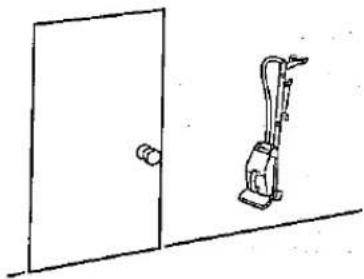
natural_image
Simple line drawing of a door and a small mechanical device (no text or symbols)NAMES OF PARTS
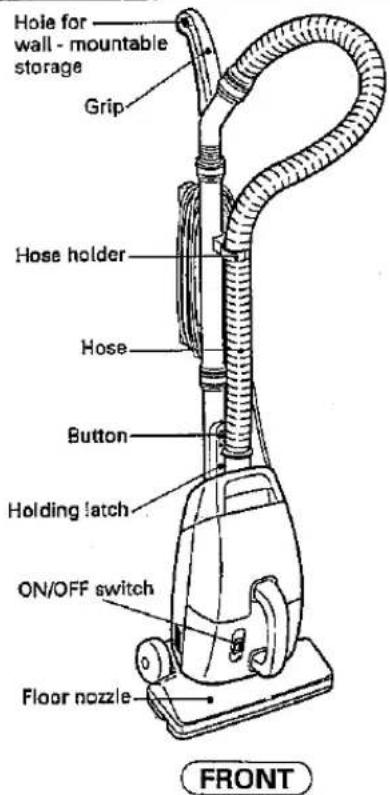
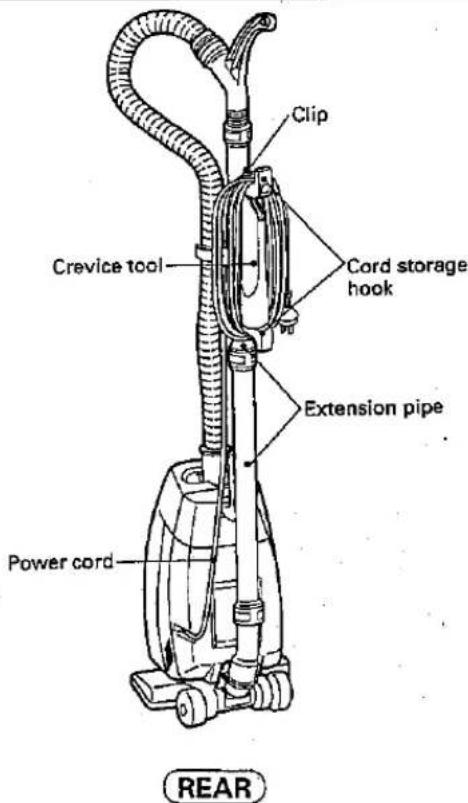
WARNING:
Operate vacuum cleaner only at the voltage specified on nameplate.
9BF-6-P111-25117
ASSEMBLING THE VACUUM CLEANER
Caution: Do not connect the power plug to the wall socket until assembly is completed.
1 Insert the hose into the main unit.
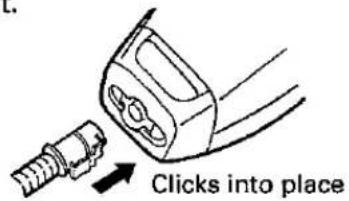
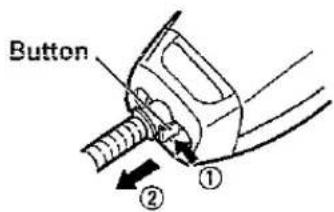
REMOVAL
Pull while pressing button.
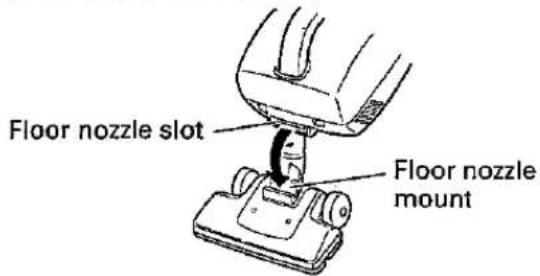
3 Fit the floor nozzle slot onto the floor nozzle mount.
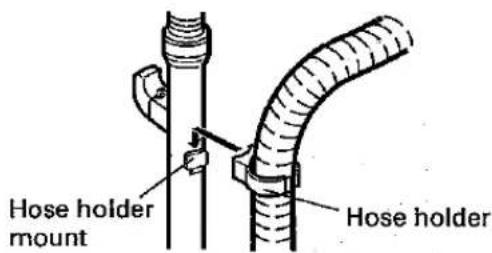
5 Hook the hose holder onto the hose holder mount
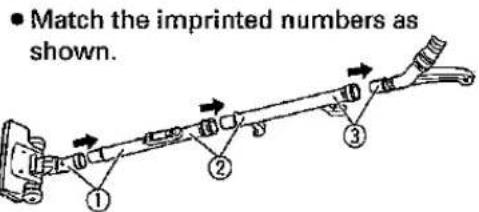
2 Attach the extension pipes and the floor nozzle as shown.
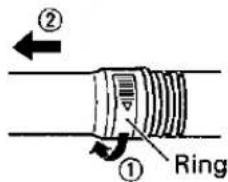
REMOVAL
Rotate the rings in the direction shown by the arrows and pull pipes apart.
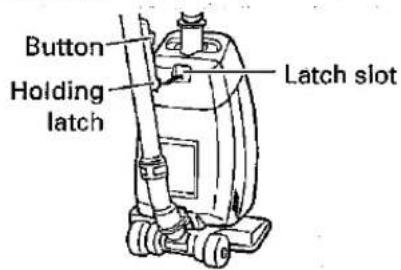
4 Setting the holding latch into the latch slot.
REMOVAL
- Slide the button in the direction shown by the arrow.
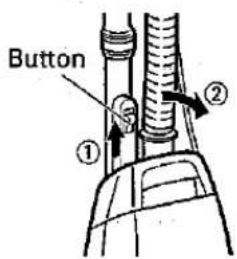
Caution: • Do not lift or carry the vacuum cleaner by the hose or extension pipes. There is a hazard if the hose or extension pipes become detached.
- Be careful not to sandwich the electrical cord between the pipe and the main unit when inserting the holding latch into the latch slot.
USING THE VACUUM CLEANER
ON/OFF SWITCH
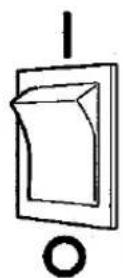
1 Set the ON/OFF switch to "I" to operate the vacuum cleaner.
2 Set the ON/OFF switch to "O" to stop the vacuum cleaner.
POWER CORD
WINDING THE POWER CORD
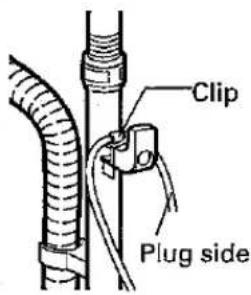
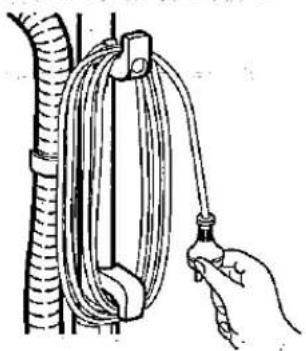
1 Hook the power cord over the clip which is located on the upper cord storage hook as shown.
UNWINDING THE POWER CORD
1 Rotate the upper cord storage hook downward.
Upper cord storage hook
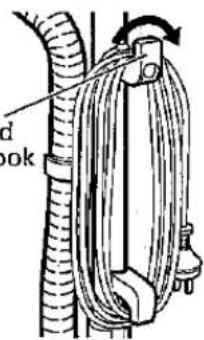
2 Wind the power cord around the cord storage hooks.
- Plug shown in figure may differ from actual plug attached to unit for your area.
2 Return the hook to the upright position before attempting to rewind the power cord.
natural_image
Illustration of a hand holding a coiled cable or hose with a handle, attached to a vertical pipe (no text or symbols present)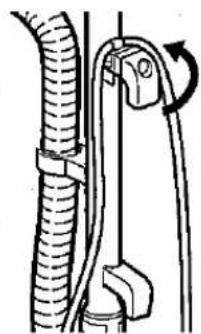
natural_image
Diagram of a rope being lifted by a pulley, showing rope routing and angle (no text or symbols)CREVICE TOOL
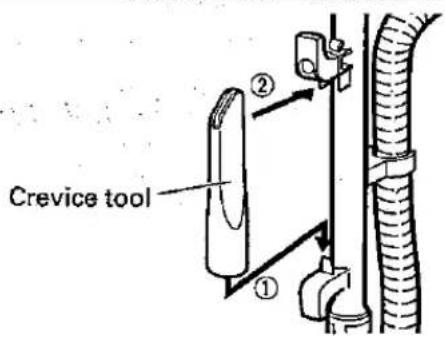
- First, attach the main unit to the extension pipes.
- When the crevice tool is not in use, place it in the storage area between the cord storage hooks.
DUST DISPOSAL
Caution: Be sure to turn the ON/OFF switch to the "O" position and disconnect the power cord from the wall outlet when replacing the cloth bag. Always make sure the cloth bag is installed properly before using.
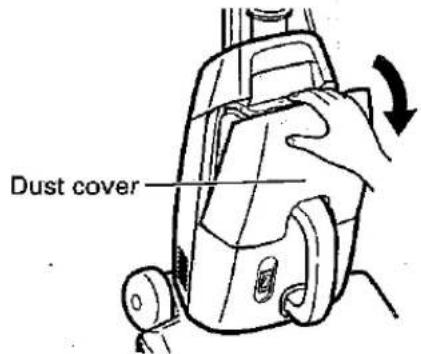
1 Pull the dust cover to remove it.
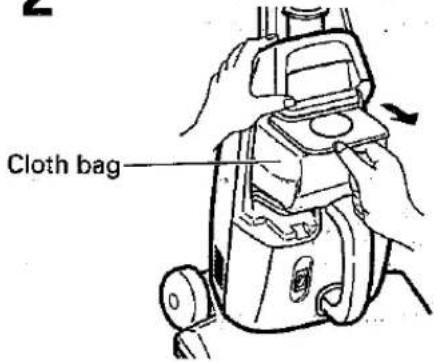
2 Remove the cloth bag.
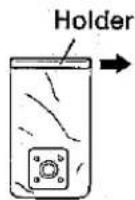
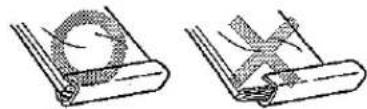
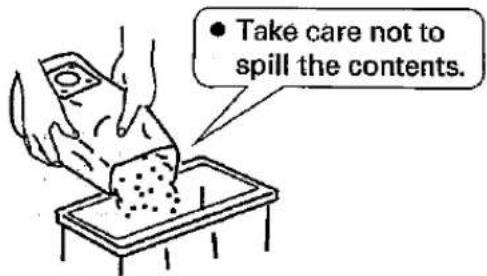
3 Remove the holder for the cloth bag and empty the contents of the bag.
Reinstall the holder exactly as it was before. Holder
natural_image
Two mechanical diagrams showing a circular component being inserted into a rectangular block, with no visible text or symbols.Remove by pulling in the direction of the arrow.
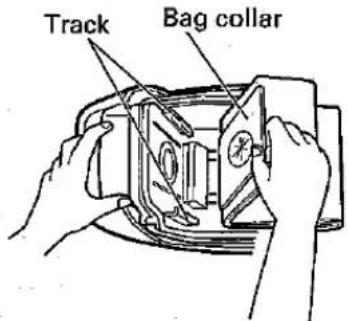
4 Slide the bag collar of the cloth bag into track completely.
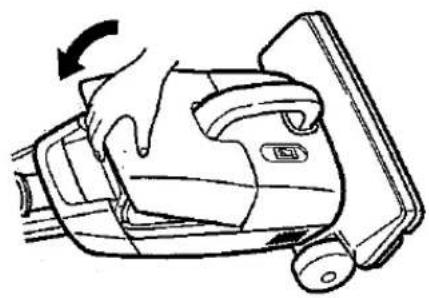
5 Return the dust cover to its original position.
natural_image
Line drawing of a hand pressing down on a car seatbelt device (no text or symbols)Caution:
- Be careful not to clamp the cloth bag with the edge of the dust cover.
- Never use your vacuum cleaner without a cloth bag.
IN CASE OF EXTREMLY SOILED CLOTH BAG
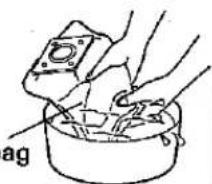
A severely soiled or clogged cloth bag should be thoroughly washed with fresh tepid water.
A neutral detergent could be used if required.
- Washing
- Drying
NOTE
Never insert the cloth bag into the vacuum cleaner unless it is completely dry.
Cloth bag
PRODUCT MAINTENANCE
Caution: Be sure to turn the ON/OFF switch to the "O" position and disconnect the power cord from the wall outlet before cleaning.
MAIN UNIT
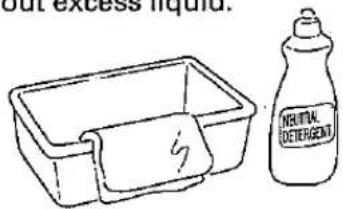
1 Wet a soft cloth with neutral detergent solution and wring out excess liquid.
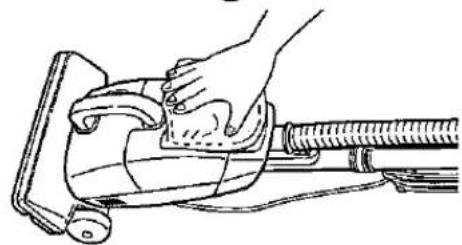
2 Wipe the external surfaces of the unit.
3 Wipe with a dry cloth.
natural_image
Line drawing of a hand washing a hairdryer with a hose (no text or symbols)Caution: Do not use organic solvents, including thinner, or other strong cleaning liquids such as alkali detergents. Use of such substances may cause discoloration or deterioration of materials, resulting in deformation or cracking.
FLOOR NOZZLE: If the floor nozzle becomes clogged.
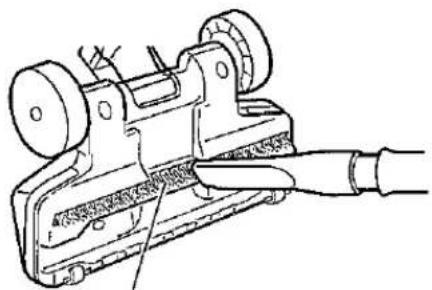
If the floor nozzle becomes clogged, remove any blockage in the nozzle and clean the brush with the crevice tool as shown.
natural_image
Technical line drawing of a mechanical device with a tool inserted (no text or symbols)Brush
FILTER
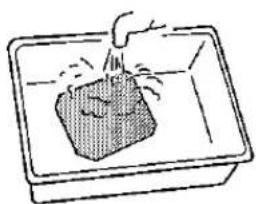
1 Remove the filter from the vacuum cleaner.
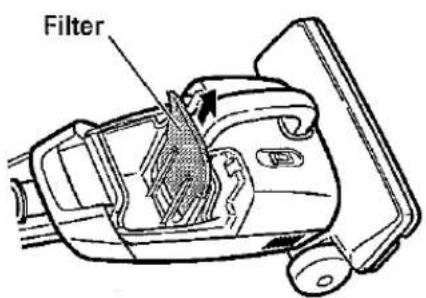
2 Wash it in water.
natural_image
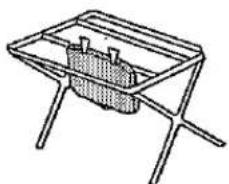
Simple line drawing of a hand washing a rectangular block with liquid, no text or symbols present3 Dry it by hanging it out of the sunlight for approximately one day, then reinstall it.
NOTE
Do not wash the filter in a washing machine and do not dry it with hot air from a drier, blow drier, etc. because it may cause deformation.
natural_image
Line drawing of a folding table with a mesh basket and handle (no text or symbols)TROUBLESHOOTING
- If there is a problem with the vacuum cleaner, carry out the following checks to find the cause. If the problem still persists after the checks have been made, do not use the vacuum cleaner to prevent the possibility of an accident occurring. Turn the ON/OFF switch to the "O" position, disconnect the power cord from the wall outlet, and contact the place of purchase or your nearest Sanyo service center.
| Problem | Cause |
| Motor does not operate when the switch is depressed to the “ON” position. | Is the cord plugged completely into the power outlet? - Check the connection of the cord into the power outlet for complete insertion.Is the cord damaged where it is connected to the plug, or are you pulling on the cord too hard or bending it? - Have the cord replaced at a Sanyo service center. |
| Suction does not improve after replacing the bag. | Is the filter dirty? - Clean the filter.Is the floor nozzle or the hose clogged? - If so, clean it out. |
- IMPORTANT SAFETY INSTRUCTIONS
- READ ALL INSTRUCTIONS BEFORE USING THIS VACUUM CLEANER
- WARNING – To reduce the risk of fire, electric shock or injury:
- SAVE THESE INSTRUCTIONS
- FEATURES
- NAMES OF PARTS
- WARNING:
- ASSEMBLING THE VACUUM CLEANER
- REMOVAL
- USING THE VACUUM CLEANER
- ON/OFF SWITCH
- POWER CORD
- WINDING THE POWER CORD
- UNWINDING THE POWER CORD
- CREVICE TOOL
- DUST DISPOSAL
- Caution:
- IN CASE OF EXTREMLY SOILED CLOTH BAG
- NOTE
- PRODUCT MAINTENANCE
- MAIN UNIT
- FLOOR NOZZLE: If the floor nozzle becomes clogged.
- FILTER
- TROUBLESHOOTING
Brand : SANYO
Model : SC-17
Category : Vacuum Cleaner