42833 - Câbles pour ordinateurs et périphériques Lindy - Free user manual and instructions
Find the device manual for free 42833 Lindy in PDF.

| Product Type | Computer cable |
| Brand | Lindy |
| Model | 42833 |
| Category | Cables for computers and peripherals |
| Length | 1.8 m (estimate) |
| Connector Type | USB-A to USB-B (typical) |
| Shielding | Aluminum foil and braid |
| Data Transfer Rate | Up to 480 Mbps (USB 2.0) |
| Cable Diameter | 5 mm (estimate) |
| Color | Black |
| Operating Temperature | -20°C to 80°C |
| Weight | Approx. 80 g |
| Compliance | RoHS, CE |
| Warranty | 2 years |
| Maintenance | Wipe with dry cloth |
| Safety Instructions | Do not bend excessively; avoid liquid contact |
| Repairability | Non-repairable, replace if damaged |
| Package Contents | 1 cable |
Frequently Asked Questions - 42833 Lindy
User questions about 42833 Lindy
0 question about this device. Answer the ones you know or ask your own.
Ask a new question about this device
Download the instructions for your Câbles pour ordinateurs et périphériques in PDF format for free! Find your manual 42833 - Lindy and take your electronic device back in hand. On this page are published all the documents necessary for the use of your device. 42833 by Lindy.
USER MANUAL 42833 Lindy
USB2.0 NAS Dongle User's Manual
1.0 Product overview
Thank you for purchasing USB2.0 NAS Dongle storage device. Now you can easily add USB2.0 Storage into your network. Before using this device, please read the Key Features below.
Key Features
- Support USB mass storage device
- Support Auto IP (DHCP server or DHCP Client)/ Fixed IP
- Under network environment, it supports one 10/100Mbps Ethernet port
- Password management provides secure access to HDD and web management
- Support Samba/FTP server
- Support Bit Torrent download server
- Support XBOX360 media & Apple i-Tunes music server
- Support USB Printer server
- Compatible with Windows 2000/XP/VISTA, Mac 10.5.4 above
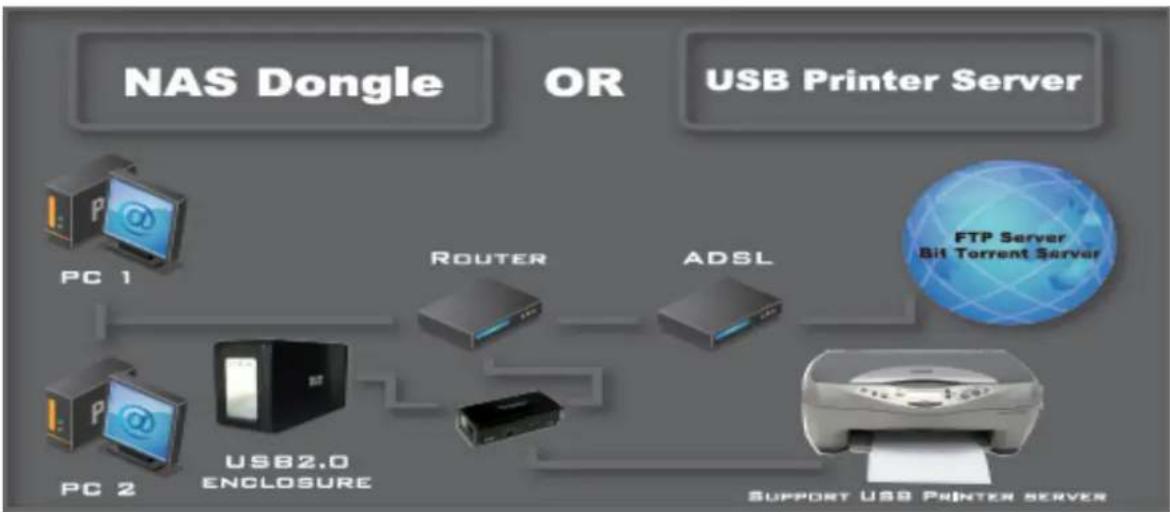
NAS Dongle is a flexible, economical and powerful unit for your network. Follow the instructions to help you connect, set it up, and configure it.
Network environment
There are 3 different setup conditions you can choose:
- Setup NAS Dongle as DHCP Client: If your NAS Dongle operates under a built-in DHCP server router (ex. Internet Sharing Hub), it will obtain an IP from DHCP Server automatically.
- Setup NAS Dongle as DHCP Server: If your operating environment does not support DHCP server, NAS Dongle will immediately act as DHCP server and assign an IP for installation.
- In Static IP environment: You need first configure the IP for NAS Dongle to operate in the static IP environment. For configuring details, please refer to "IP Config" setup page.
flowchart
graph LR
    A["NAS Dongle"] --> B["PC 1"]
    C["USB Printer Server"] --> D["Router"]
    D --> E["ADSL"]
    F["PC 2"] --> G["USB2.0 ENCLOSURE"]
    G --> H["Server"]
    I["FTP Server Bit Torrent Server"] --> J["Server"]
    K["SUPPORT USB PRINTER SERVER"] --> L["Server"]
2.0 NAS Dongle Hardware installation
If you connect NAS Dongle to your computer directly, make sure to obtain the IP address and DNS settings automatically, otherwise you may not be able to find the device.
- Connect USB mass storage into USB port
- Connect LAN cable via LAN switch or Router.
- Connect 5V power adapter to power up.
Connect USB Cable to USB device.
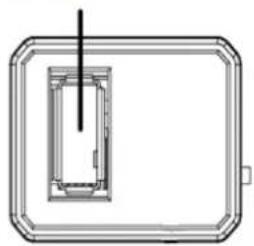
natural_image
Pure technical diagram of a rectangular frame with internal components, no text or symbols present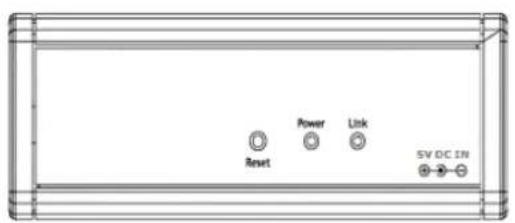
text_image
Reset Power Link 5V DC INConnect LAN cable to LAN Switch or Router

text_image
Connect to 5V power adapter3.0 Search NAS Dongle by Utility
- Browse the CD enclosed in the product package, copy and paste "SDisk Utility" into your computer. Double click the icon to start search.

SDisk.jar
Executable Jar File
12 KB
Note: "SDisk utility" was written in JAVA, please make sure you have installed the JAVA runtime environment on your computer before. If not, please install it from the CD.

pre-1 5 0 10-windows-i586-p.exe
- When NAS Dongle is found, click "Connect" to enter configurations.

text_image
Search Disk IP: 192.168.1.58 | Name: NASTEST | Group Name: SOFT-E Search Next Connect3.1 Search NAS Dongle by using Internet explorer.
- Open IE and type default host name "storage" in the search bar.

storage
- Default login is "admin" for both user name and password, click "OK" to enter configurations.
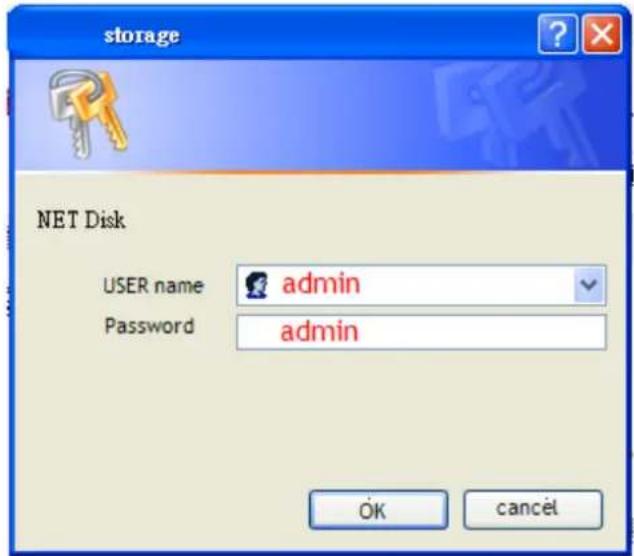
text_image
storage NET Disk USER name admin Password admin OK cancel3.2 Hard Disk format
For the first time installation, you need to format hard disk into FAT32 system file, this procedure applies to either new or used hard disk.

text_image
Network Attached Storage Disk Utility Disk ID HTS54106 0G9SA00 Format Disk You will lost all data!! Do you want to do it? Sleep Time Disable (minutes) Scan Disk Wait several minute to scan your hard discs information. 2008/ 5/20 11:40: 3 Scan complete 2 File(s), 2 Dir(s), Used Size=2K, 0 Error(s)4.0 Status
Provide the basic information for NAS Dongle.
Status
Identification
Date/Time
IP Config
Disk Utility
Maintenance
SMB Server
FTP Server
Media Server
Identification
| Host Name | STORAGE-000B |
| Group Name | WORKGROUP |
| Administrator | admin |
Date and Time
| Date | 2008/05/20 16:52:28 GMT8 |
| Disk Usage & Frim | |
| Firmware Version | CR1618-1.11 LOADER 3.3 |
| Free Size | 57209 MB free |
| Total Size | 57231 MB |
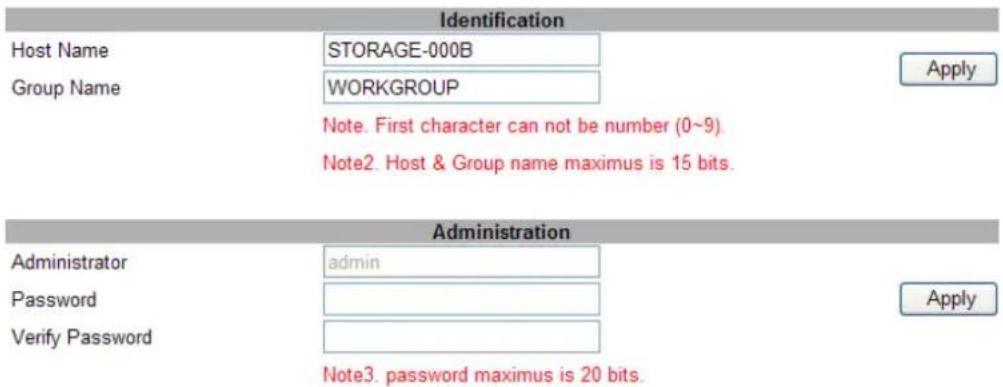
4.1 Identification
You can change and modify your host & group name, and password from this page. Click "Apply" to save the setting.
- Host name: This is used to identify your device on the network. If you prefer a different name, type in the new name and click "Apply" to save setting.
- Group Name: This should be same as your workgroup. In general, the default "WORKGROUP" will be OK. But if your workstation belongs to different workgroup, type in the correct group name to modify.
In Window O/S, right click on "My computer", choose "Properties", and go to the computer name tab to see your current workgroup.
For Mac O/S to join windows workgroup, open the directory access utility (under Applications-> utilities), select SMB and click configure to modify the settings (administrator access required to access this option.)
Note: we strongly suggest you to change the password as soon as you logged in, to prevent unauthorized access.
NAS
Network Attached Storage
Status
Identification
Date/Time
IP Config
Disk Utility
Maintenance
SMB Server
FTP Server
Media Server
text_image
Identification Host Name STORAGE-000B Group Name WORKGROUP Note. First character can not be number (0~9). Note2. Host & Group name maximus is 15 bits. Administration Administrator admin Password Verify Password Apply Apply Note3. password maximus is 20 bits.4.2 Date/ Time setting
You can change time setting form this page. Clicks "Apply" to save the setting. By default SNTP is in network time service, your can also select "Synchronize to PC". If internet access is available we recommended setting SNTP to Network time service instead.
NAS
Network Attached Storage
Status
Identification
Date/Time
IP Config
Disk Utility
Maintenance
SMB Server
FTP Server
Media Server
Date and Time Config
System's Date
SNTP
Time Server
Tue May 20 16:50:42 UTC+0800 2008
Network Time Service
clock.isc.org
©
○ Synchronize to PC
Apply
4.3 IP Configuration
By default, the "IP config" is set to "Automatic IP". This is the recommended setting and will allow NAS Dongle to obtain its IP address automatically. If you prefer setting it manually, select the static IP option, enter your own value and click apply to confirm the new setting.
Setting it manually is useful when it often obtain a different IP address but you have a static IP address in order to mount the network drive or setup port forwarding as an example.
NAS
Network Attached Storage

text_image
Status Identification Date/Time IP Config Disk Utility Maintenance SMB Server FTP Server Media Server IP Config Automatic IP Static IP as below IP 192.168.1.121 SubnetMask 255.255.255.0 Gateway 192.168.1.254 Primary DNS 168.95.192.1 Secondary DNS 168.95.1.1 Apply DHCP Config DHCP server Off Enable Disable Apply MAC address MAC address 7A:B5:F6:00:00:0B4.4 Disk Utility
In this page, you can manage the hard disk setting.
- Format: For the first time installation, you need to format hard disk into FAT32 system file, this procedure applies to either new or used hard disk.
- Sleep Time: This is to select time frame to setup hard disk sleeping mode.
- Scan Disk: After the scan, it will show the number of file content and health status for the hard disk.

text_image
Disk Utility Disk ID HTS54106 0G9SA00 Format Disk You will lost all data!! Do you want to do it? Sleep Time Disable (minutes) Scan Disk Wait several minute to scan your hard discs information. 2008/ 5/20 11:40: 3 Scan complete 2 File(s), 2 Dir(s), Used Size=2K, 0 Error(s)4.5 Maintenance
This page allows you to update NAS dongle firmware, to go back to default setting or to reboot NAS system.
- Firmware update: Follow the steps below to update the loader and firmware for NAS Dongle.
- Obtain the latest firmware from your vendor.
- Store the firmware file in your computer and decompress them if necessary.
- Browse your system and locate the firmware (BIN file).
- Click on "upload".
- Confirm the pop-up massage to start the update.
- Wait and DO NOT click anywhere else or turn off the power! This might take a few minutes.
- Once the update is done, it will prompt you to reboot the device.
- Click on "reboot" to restart the device.
- Wait for about one minute and then go to the status page to confirm the update is successful.
- Factory defaults: Forgot your admin password?? Click on factory and go back to default password setting.
- System reboot: This can be used to restart the network drive after a firmware update.
NAS
Network Attached Storage
Status
Identification
Date/Time
IP Config
Disk Utility
Maintenance
SMB Server
FTP Server
Media Server
Firmware Upload
Select new firmware to update.
瀏覽...
Update
Factory Defaults
Click "Reset" to clear all configuration and restore to default settings.
Reset
System Reboot
Click "Reboot" to have the device perform a software restart.
Reboot
5.0 SMB Server
SMB server allows you to share data or files through LAN environment. A default "guest" folder is created and shared to all from NAS Dongle.
Note: Use ONLY English alphabet for folder names and no special characters when creating new folders.
NAS
Network Attached Storage
Status
Identification
Date/Time
IP Config
Disk Utility
Maintenance
SMB Server
FTP Server
Media Server
SMB Server
SMB Status
ENABLE
○ DISABLE
Apply
Account List
User Name
Password
Access
En / Disable
Guest
用最新数据
RM
ENABLED
Add
Modify
Delete
En/Disable
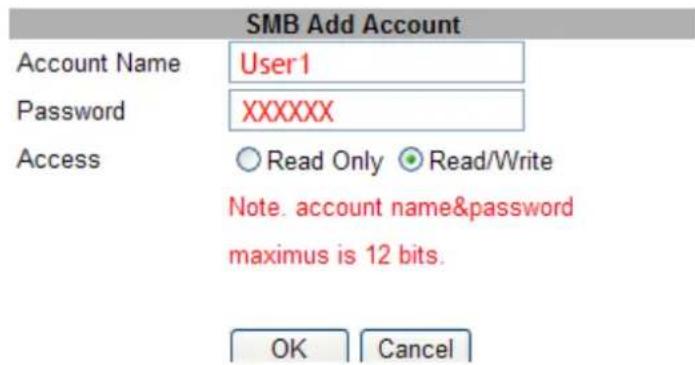
5.1 How to crate user.
Click on the "Add" button and type new account name and password and than "OK".
Eg: "User1" for demonstrations.
text_image
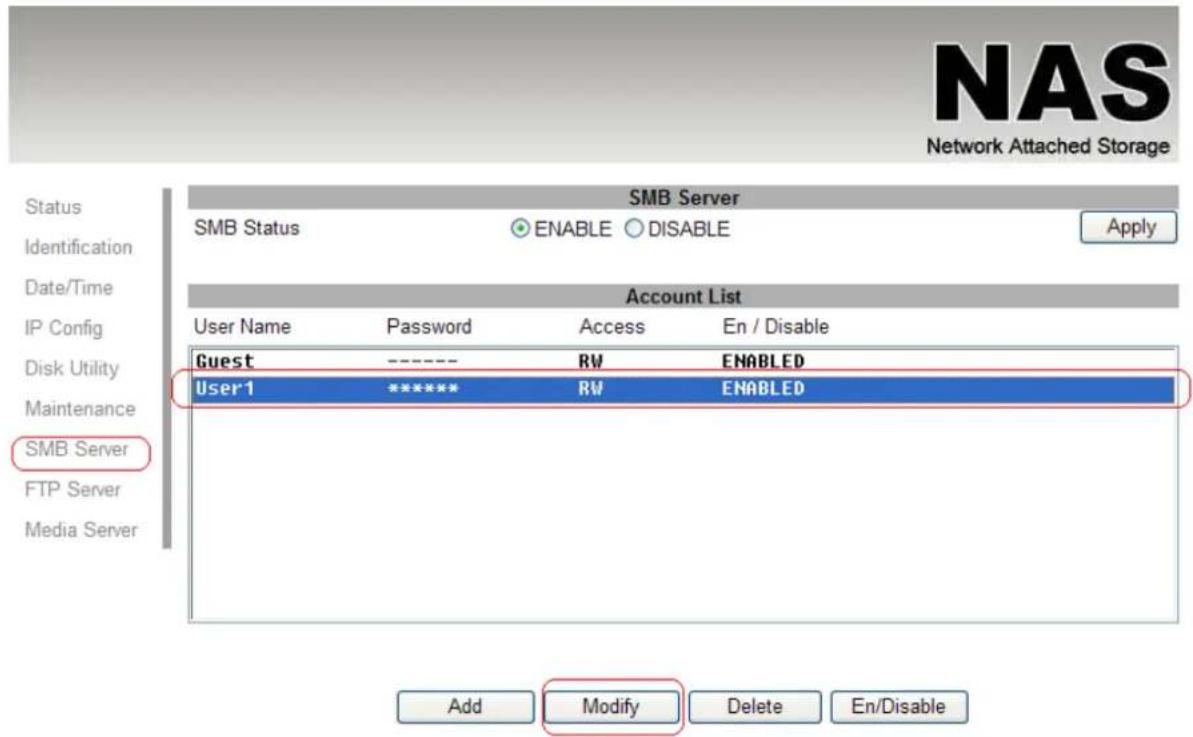
SMB Add Account Account Name User1 Password XXXXXX Access ○ Read Only ● Read/Write Note. account name&password maximus is 12 bits. OK CancelIn the same time, NAS Dongle will also crate a SAMBA folder named "User1", click "Modify" to share the folder.
text_image
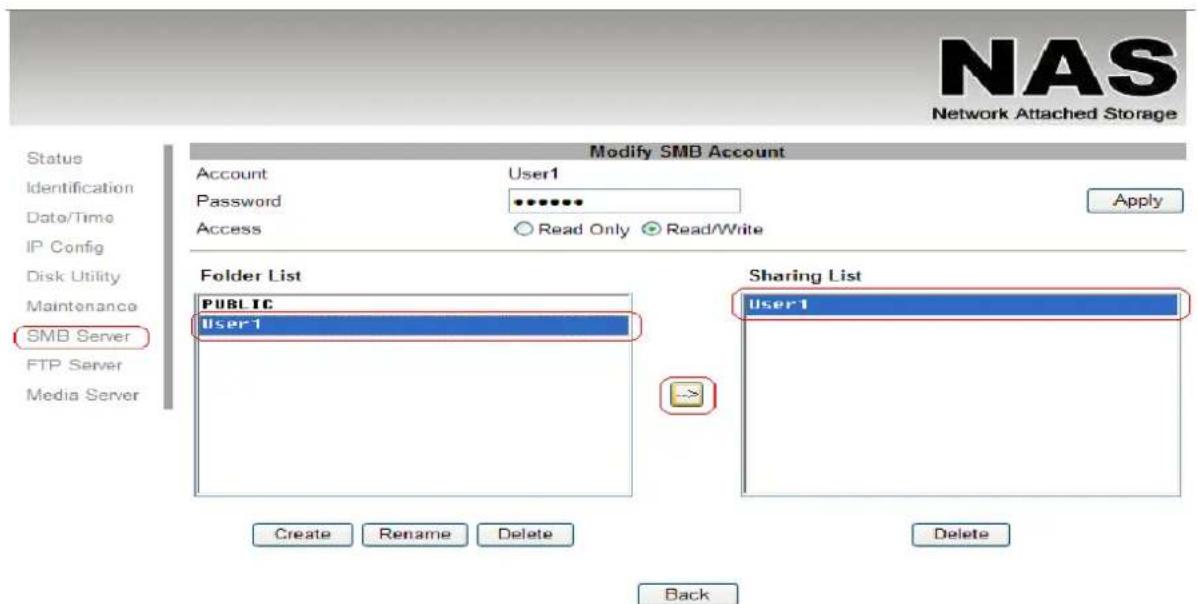
NAS Network Attached Storage Status Identification Date/Time IP Config Disk Utility Maintenance SMB Server FTP Server Media Server SMB Server SMB Status ENABLE DISABLE Apply Account List User Name Password Access En / Disable Guest ---- RW ENABLED User1 ***** RW ENABLED Add Modify Delete En/DisableSelect "User1" and add in to "Sharing List".
text_image
NAS Network Attached Storage Modify SMB Account Account User1 Password Access Read Only Read/Write Apply Folder List PUBLIC User1 Sharing List User1 Create Rename Delete Delete BackYou can "Run" from window start button, type \ follow by the IP address (eg:\192.168.1.121), and click OK to continue.
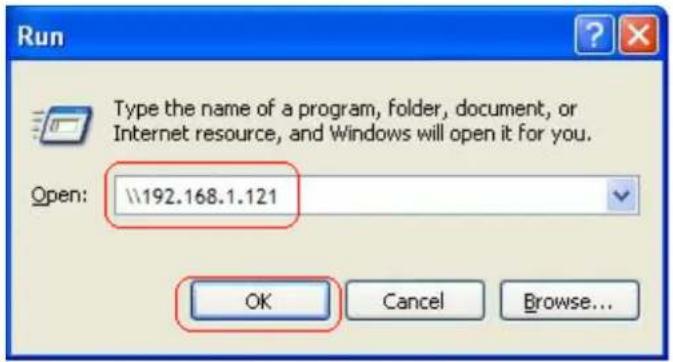
text_image
Run Type the name of a program, folder, document, or Internet resource, and Windows will open it for you. Open: \192.168.1.121 OK Cancel Browse...Type "User1" and password to login.
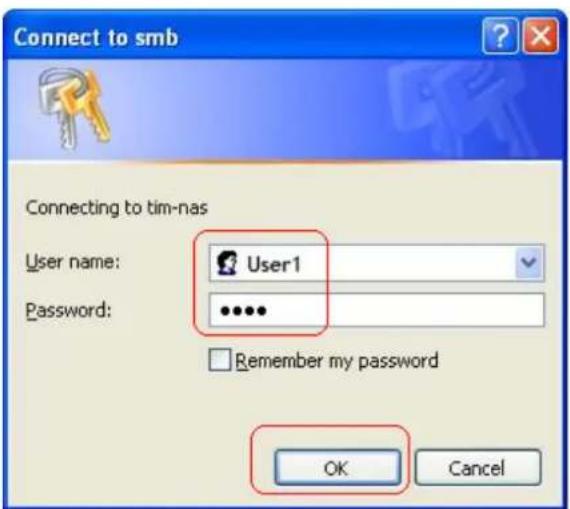
text_image
Connect to smb Connecting to tim-nas User name: User1 Password: ***** Remember my password OK CancelNow you have set up the folder that you wish to share on your NAS Dongle. The shared folder can be accessed from other computer on your local network.
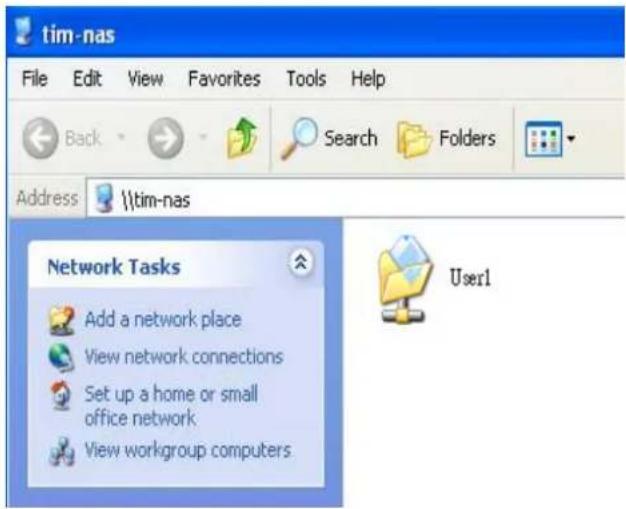
text_image
tim-nas File Edit View Favorites Tools Help Back Search Folders Address \tim-nas Network Tasks Add a network place View network connections Set up a home or small office network View workgroup computers User15.2 How to modify account password Select the "User1" and than click "Modify".
NAS
Network Attached Storage
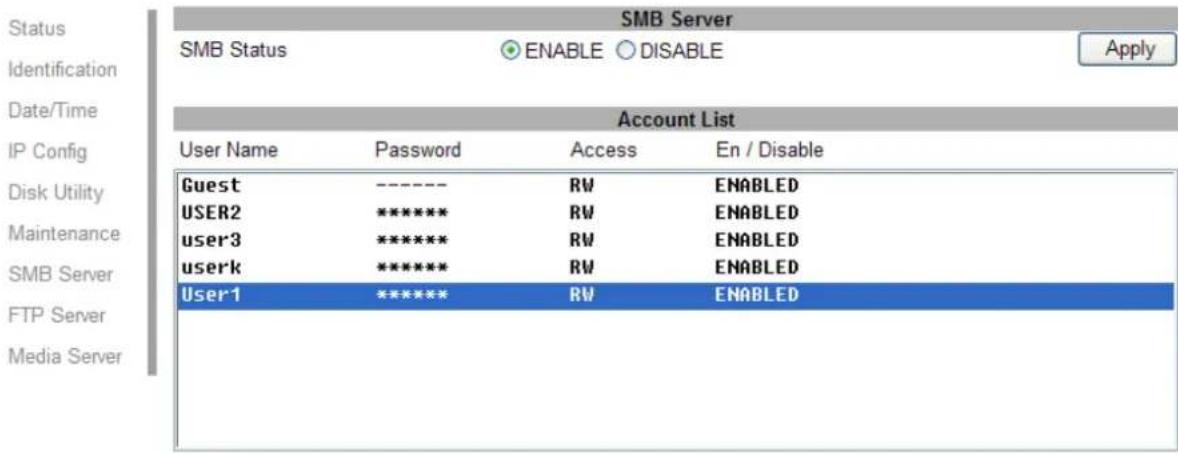
text_image
SMB Server SMB Status ENABLE DISABLE Apply Account List User Name Password Access En / Disable Guest ---- RW ENABLED USER2 ***** RW ENABLED user3 ***** RW ENABLED userk ***** RW ENABLED User1 ***** RW ENABLED Media Server
flowchart
graph LR
    A["Add"] --> B["Modify"]
    B --> C["Delete"]
    C --> D["En/Disable"]
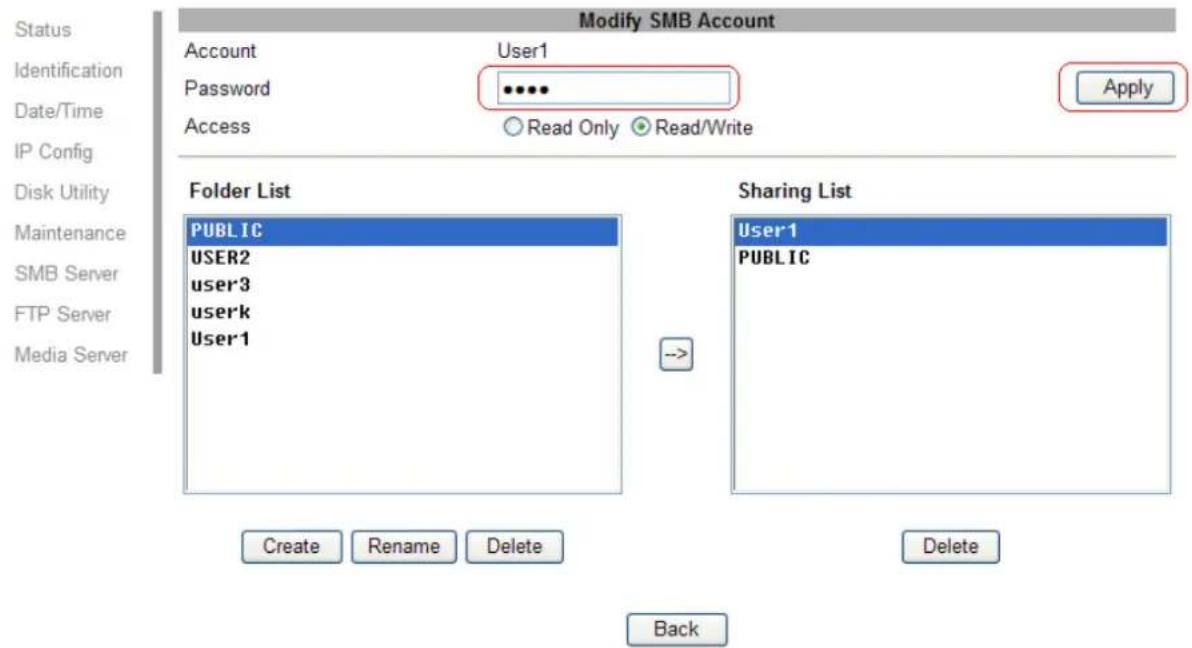
Enter new password and click "Apply" to save setting.
NAS
Network Attached Storage
text_image
Modify SMB Account Account User1 Password ••••• Access ○ Read Only ▼ Read/Write Apply Folder List PUBLIC USER2 user3 userk User1 Sharing List User1 PUBLIC Create Rename Delete Delete Back5.3 How to delete a SMB (SAMBA) account
Select an account you wish to delete, click "Delete" to proceed. Please note that all the data inside the folder will be lost after the delete.

text_image
NAS Network Attached Storage SMB Server SMB Status ENABLE DISABLE Apply Account List User Name Password Access En / Disable Guest ---- RW ENABLED USER2 ***** RW ENABLED user3 ***** RW ENABLED userk ***** RW ENABLED User1 ***** RW ENABLED Microsoft Internet Explorer Selected account will be deleted! Are you sure? OK Cancel Add Modify Delete En/Disable6.0 FTP Server
Remember to "Enable" the FTP service on the status page, when you plan on using the FTP server.
- FTP server Configuration: The standard port for FTP service is 21. If required, you can change it into any port ranging from 1025-6550. But in general, we recommended using the default port of 21.
File language support: By default, the encoding is set to English. If you want to store or transfer files with a different encoding (different language), choose the corresponding language for the drop down list. In order to transfer and view the files correctly, it is important that you select the correct language!
Anonymous: By default an anonymous user name has been created, it allows FTP users to login without username and password. For security reasons, it is best to add a password!.
Note: to be able to share FTP resource via internet, you need a router to assign the external IP to your NAS Dongle. Contact your router vendor on how to assign the external IP.

text_image
NAS Network Attached Storage FTP Configuration FTP Status ENABLE DISABLE Port : 21 File Language support Traditional Chinese(cp950) Note: Port set either from 1025 to 65500 or 21. Account List User Name Password Access En / Disable anonymous ---- RO ENABLED rick ***** RW ENABLED Add Modify Delete En/Disable6.1 How to crate FTP account
FTP server allows you to share your data through internet, so an internet resource and router is required before setting up FTP server.
Select FTP server and clicks "add" button and enter a name and password for the new FTP account and click "OK". to continue.
In the account list, you can see an overview of the existing accounts and status. For FTP file transfers, we recommend to use other dedicated FTP client software e.g.: SyncQuick FTP, Cute FTP etc.
Note: When creating FTP accounts, please use ONLY English alphabet and no special character or space for FTP account name.

text_image
NAS Network Attached Storage Status Identification Date/Time IP Config Disk Utility Maintenance SMB Server FTP Server Media Server FTP Configuration FTP Status ENABLE DISABLE Port : 21 File Language support Arabic(cp1256) Note. Port set either from 1025 to 65500 or 21. Apply Apply Change Account List User Name Password Access En / Disable anonymous Add http://192.168.1.121 FTP New Account Microsoft FTP Add Account Account Name User2 Password XXXX Access Read only Read/Write Note: account name&password maximus is 12 bits. OK Cancel 完成 網隔網路6.2 How to delete FTP account
In the "Account List", you can see an overview of the existing account and status; you can change them at any time by selecting the account and modifying, disabling or deleting it.
Note: Deleting a folder will also erase all the files on the hard drive that are stored inside that folder.

text_image
NAS Network Attached Storage FTP Configuration FTP Status ENABLE DISABLE Port : 21 File Language support Traditional Chinese(cp950) Note: Port set either from 1025 to 65500 or 21. Account List User Name Password Access En / Disable anonymous ---- RO ENABLED User2 ***** RW ENABLED Add Modify Delete En/Disable7.0 XBOX 360 UPnP Media server
The Media server on NAS Dongle can be used to share your photo and music files with a XBOX360 video game console from Microsoft that is connected to the same local network.
Before you start, make sure both devices are connected to the same local network and turned on.
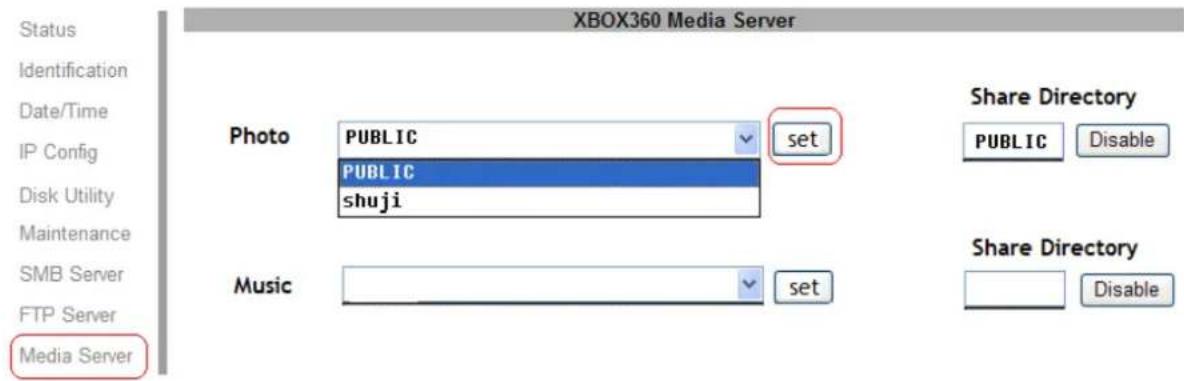
On your NAS Dongle, go to the XBOX360 media page and make sure photo and are set to share folder and not disable, e.g. the "PUBLIC" is enabled Photo directory.
NAS
Network Attached Storage
text_image
XBOX360 Media Server Status Identification Date/Time IP Config Disk Utility Maintenance SMB Server FTP Server Media Server Photo PUBLIC set PUBLIC shuji Music set Share Directory PUBLIC Disable Share Directory DisableGo to media, select either Music or Pictures, and press A to continue on your XBOX 360.

text_image
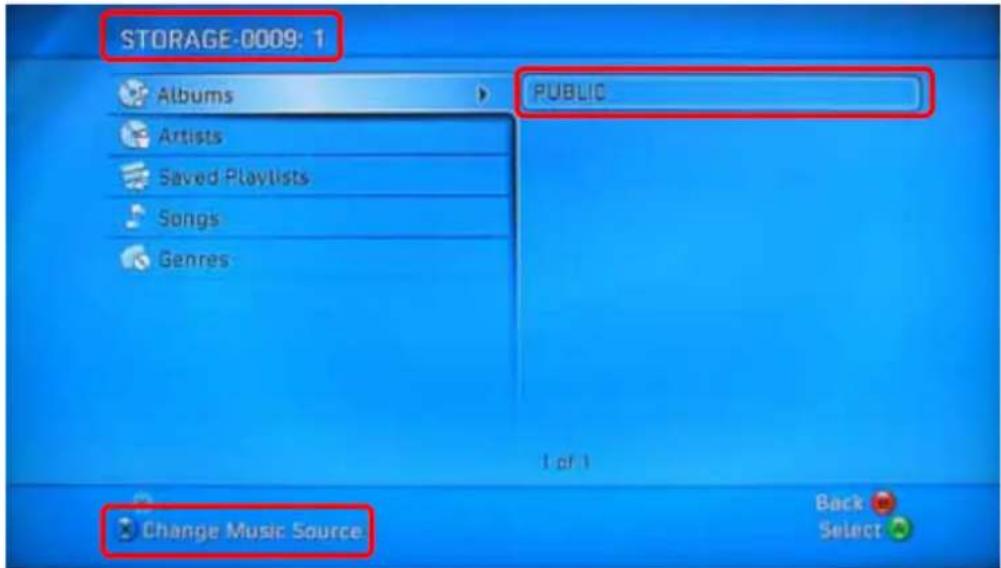
Media Soco Games 1 Gamerscore 0 Achievements 0 Music Pictures Turn your Xbox 380 into a music player Videos Video Store Media Center Open Tray Sign Out SelectPress X to change the source and select your network drive, it should show up as storage-xxx and display the folder that you have set up earlier on your NAS Dongle.
text_image
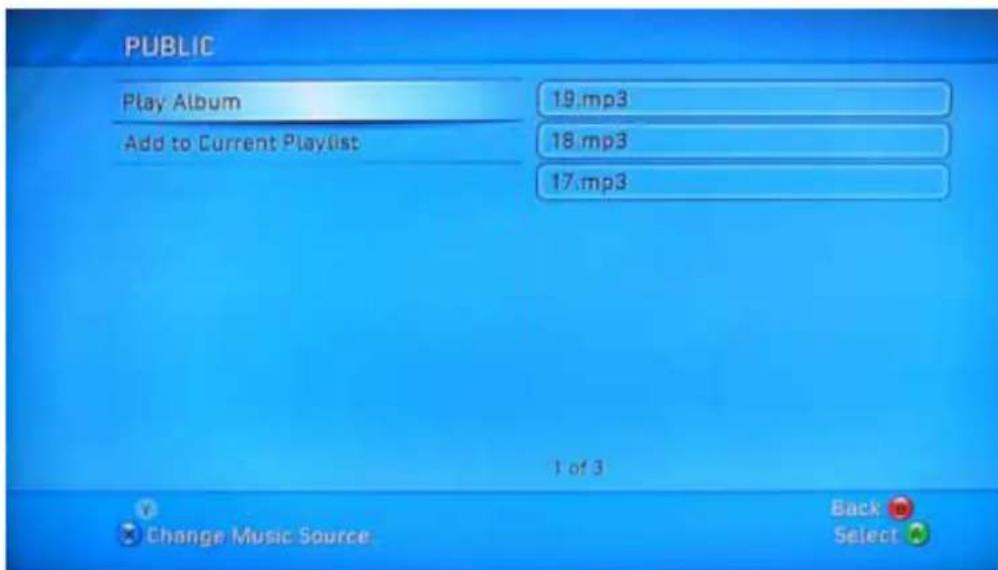
STORAGE-0009: 1 Albums Public Artists Saved Playlists Songs Genres Change Music Source Back SelectInside the shared folder, you can access to your picture or music files, depending on which mode you are currently using. Select the files you would like to see or to listen, and start playback.
text_image
PUBLIC Play Album 19.mp3 Add to Current Playlist 18.mp3 17.mp3 1 of 3 Change Music Source Back Select8.0 Printer Server
- Install your Printer driver into your computer, (for example. if Epson PL-6200L Printer is connected to the NAS, you must install PL-6200L driver in to the computer first). After driver installation, please click "Start" → "Setting" → "Printer and Faxes" → "Add a printer" → "Next".

text_image
MSI Live Monitor Back Search Fold Address Printers and Faxes MSI Live Updates 3 Printer Tasks Add a printer Set up fixing MSI Live Update 3 Windows Catalog Windows Update Programs Documents Settings Control Panel Network Connections Printers and Faxes Taskfor and Start Menu Add, remove, and configure local end network printers and tax printers. Welcome to the Add Printer Wizard The wizard helps you install a printer or make printer connections. If you have a Plug and Play printer that connects through a USB port (or any other hot pluggable port, such as IEEE 1394, infrared, and so on), you do not need to use this wizard. Click Cancel to close the wizard, and then plug the printer's cable into your computer or point the printer toward your computer's infrared port, and turn the printer on. Windows will automatically install the printer for you. To continue, click Next. < Back Next > Cancel 5 Windows XP PROFESSIONS Start Printers and Faxes- Connect the USB printer in to NAS Dongle, your network environment should looks like diagram below:
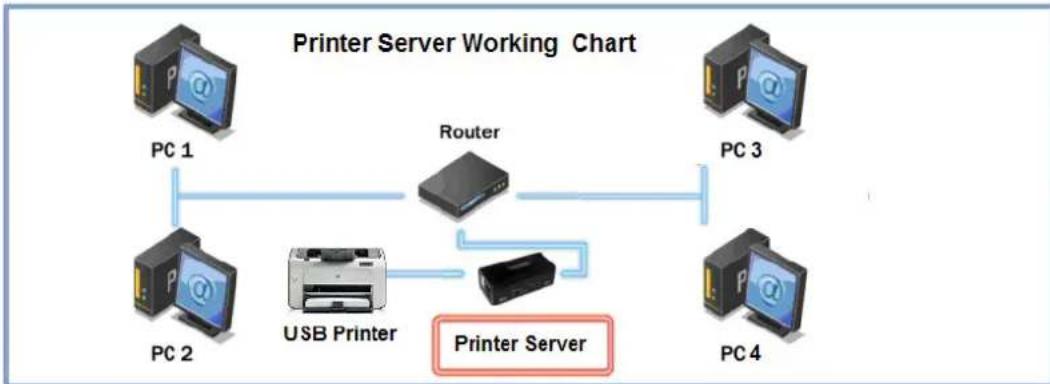
flowchart
graph TD
    PC1["PC 1"] --> Router["Router"]
    PC2["PC 2"] --> Router
    PC3["PC 3"] --> Router
    PC4["PC 4"] --> Router
    Router -->|USB Printer| Printer["Printer Server"]
- Select "Local printer" and click "next" to continue.
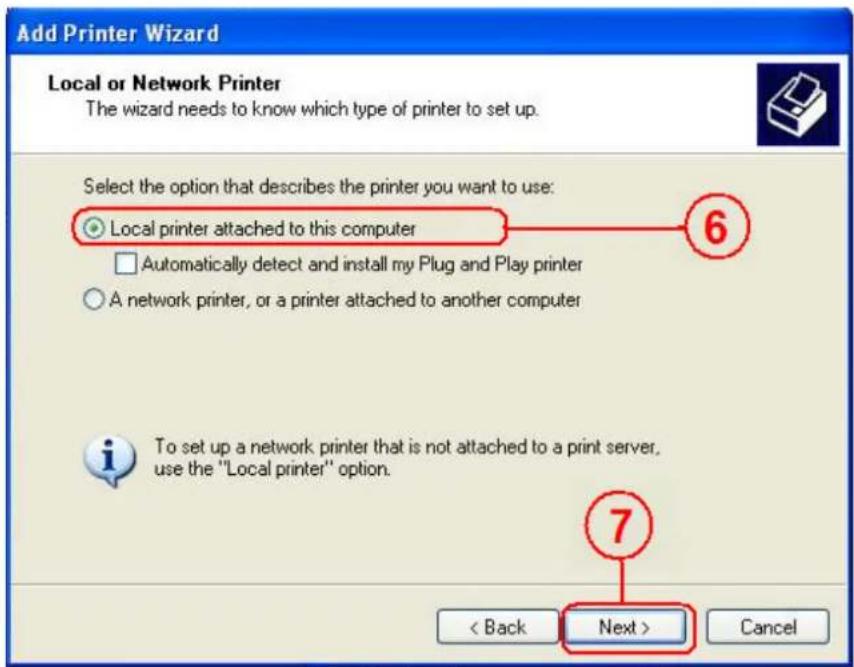
text_image
Add Printer Wizard Local or Network Printer The wizard needs to know which type of printer to set up. Select the option that describes the printer you want to use: Local printer attached to this computer Automatically detect and install my Plug and Play printer A network printer, or a printer attached to another computer To set up a network printer that is not attached to a print server, use the "Local printer" option. < Back Next > Cancel- Select "Create a new port type of port:", choose "Standard TCP/IP Port", and click "next" to continue.

text_image
Add Printer Wizard Select a Printer Port Computers communicate with printers through ports. Select the port you want your printer to use. If the port is not listed, you can create a new port. Use the following port: LPT1: [Recommended Printer Port] Note: Most computers use the LPT1: port to communicate with a local printer. The connector for this port should look something like this. 9 Create a new port: Type of port: 10 Local Port Local Port Standard TCP/IP Port < Back Next > Cancel 11- Enter the NAS Dongle IP address than click "next" to continue.
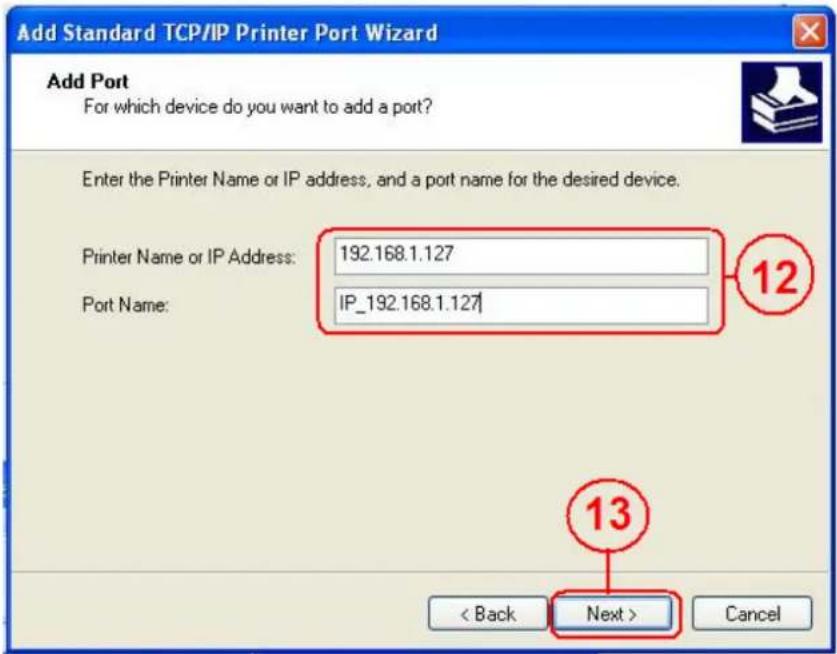
text_image
Add Standard TCP/IP Printer Port Wizard Add Port For which device do you want to add a port? Enter the Printer Name or IP address, and a port name for the desired device. Printer Name or IP Address: 192.168.1.127 Port Name: IP_192.168.1.127 12 13 < Back Next > Cancel- Select "Custom" and go to "setting".

text_image
Add Standard TCP/IP Printer Port Wizard Additional Port Information Required The device could not be identified. The detected device is of unknown type. Be sure that: 1. The device is properly configured. 2. The address on the previous page is correct. Either correct the address and perform another search on the network by returning to the previous wizard page or select the device type if you are sure the address is correct. Device Type Standard Genetic Network Card Custom Settings... 15 14 < Back Next > Cancel- Select LPR in protocol, and give a queue name eg:LRxxx; select LPR byte enable and click "OK" to finish the port setting.

text_image
Configure Standard TCP/IP Port Monitor Port Settings Port Name: IP_192.168.1.127 Printer Name or IP Address: 192.168.1.127 Protocol Raw LPR 16 Raw Settings Port Number: 9100 LPR Settings Queue Name: LRxxxx LPR Byte Counting Enabled SNMP Status Enabled Community Name: public SNMP Device Index: 1 17 19 OK Cancel- Click "Finish" to complete TCP/IP printer setup.

text_image
Add Standard TCP/IP Printer Port Wizard Completing the Add Standard TCP/IP Printer Port Wizard You have selected a port with the following characteristics. SNMP: No Protocol: LPR, LRxxxx Device: 192.168.1.127 Port Name: IP_192.168.1.127 Adapter Type: To complete this wizard, click Finish. < Back Finish Cancel- Go to Pinter server page and check printer server status. If status shows "OK", the printer is setting up successfully.
Status
Identification
Date/Time
IP Config
Disk Utility
Maintenance
SMB Server
FTP Server
Media Server
Printer Server
BitTorrent
Printer Status
| Status | OK |
| Manufacturer | EPSON |
| Model Number | 480CX |
| Languages |
Notes: The NAS Dongle Printer server does not support GDI/Host-based printers. For some Multi Function Printers (MFP); scanning functions might not be functional probably. Please contact Printer Manufacture for detail Specifications.
9.0 Bit Torrent server
NAS Dongle supports Bit torrent download independently without using PC resource.
Maximum of 4 bit torrent downloads can be running at the same time.
- Select "Bit torrent" server, choose the "Download Path" you wish to use, then click "Apply" to save setting. (DO NOT change path setting while perform BT downloading, otherwise downloaded job will be missing).
- Server port range can be chosen from 6881 to 65535. (6881 is the default setting)
- Create a upload speed limit: 0=unlimited upload speed (4 KBps is the minimum speed), and click "set" to save setting.
NAS
Network Attached Storage

text_image
Bit Torrent Setup System ID 52333238322d312e3138011223344555a9e881c Number of the Downloads 0 Download Path admin Apply Server Port 6881 (Default:6881 Range:1025~65535) Upload Limit 0 (kB, Default:0 (unlimited)) Mail Notification Mail Setup Set SMB Server FTP Server Media Server BitTorrent Upload Your Torrent File Torrent File 浏览... Upload Download Queue 1 WAITTING 2008111.torrent Show Remove- Click "Browse", select .torrent file, and upload to the download queue.
Note: The jobs listed in the Download Queue will be removed when NAS dongle is turned off or USB storage is removed.
NAS
Network Attached Storage

text_image
Bit Torrent Setup System ID 52333238322d312e3138011223344555a9e881c Number of the Downloads n Download Path admin Server Port 6881 (Default:6881 Range:1025~65535) Upload Limit 0 (kB, Default:0 (unlimited)) Mail Notification Mail Setup Apply Set SMB Server FTP Server Media Server BitTorrent Upload Your Torrent File Torrent File 1234xxxx.torent 浏览... Upload Download Queue 1 WAITTING 1234xxxx.torent Show Remove 1234xxxx.torrent9.1 Mail Notification
After the download is successful, an email will be send to designated email address. Click "Mail setup", input SMTP server, recipient email, SMTP A/C, Password, and click "Apply" to save setting.
NAS
Network Attached Storage
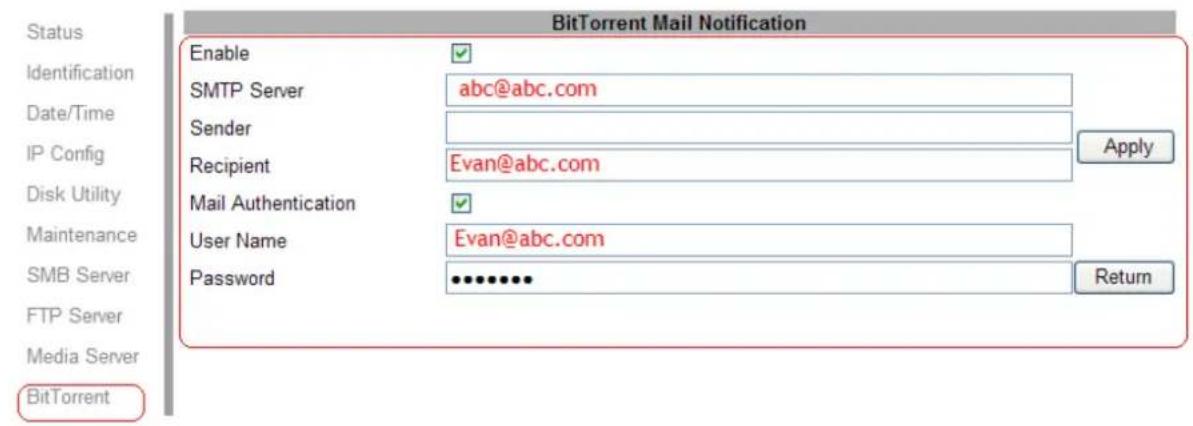
text_image
Status Identification Date/Time IP Config Disk Utility Maintenance SMB Server FTP Server Media Server BitTorrent BitTorrent Mail Notification Enable SMTP Server Sender Recipient Mail Authentication User Name Password abc@abc.com Evan@abc.com Evan@abc.com Return Apply10.0 Mac installations (Mac 10.5.4 or above)
Open Mac browser "Safari" and key-in the host name of the NAS Dongle (for example, "strage-0000"). It will detect NAS Dongle automatically.

10.1 How to setup SAMBA in Mac OS X 10.5.4
- Click "Go" on the toolbar, and select "Network" as the screenshot shown below.

text_image
Finder File Edit View Go Window Help Back ⌘! Forward ⌘! Enclosing Folder ⌘! Computer ⌘C Home ⌘H Network ⌘K iDisk Applications ⌘A Utilities ⌘U Recent Folders Go to Folder... ⌘G Connect to Server... ⌘K
text_image
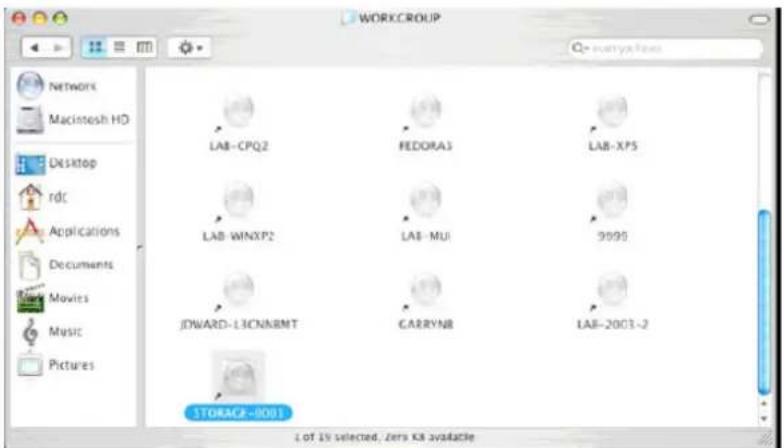
Network Macintosh HD Desktop ids Applications Documents Movies Music Pictures DOMAIN_IDC Local Servers WORKGROUP 1 of 4 selected- Double Click "WORKGROUP" (or the correct group name of NAS Dongle), you will find NAS Dongle "STORAGE-xxxx" (or the correct name of NAS Dongle).
- Click on the storage-xxxx (or the correct name of NAS Dongle).
text_image
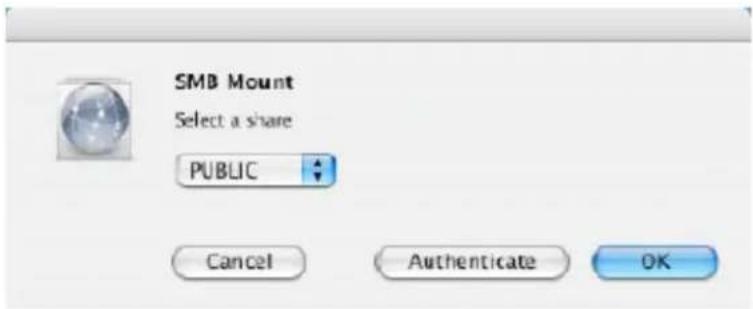
WORKGROUP NETWORK Macintosh HD Desktop rdc Applications Documents Movies Music Pictures LAB-CPQ2 FEDORA3 LAB-XP5 LAB-WINXP2 LAB-MUI 9999 JWARD-L3CNNBMT CARRYNB LAB-2003-2 STORAGE-2001 1 of 15 selected, Zero KB available- Select the folder you wish to share, and click "OK" to share the folder
text_image
SMB Mount Select a share PUBLIC Cancel Authenticate OK- Click "OK" to show the folder in the Desktop.

text_image
SMB/CIFS Filesystem Authentication Enter username and password for STORAGE-0001. Workgroup/Domain WORKGROUP Username RDC Password Add to Keychain Cancel OK11.0 How to map your NAS Dongle as a Network Drive to your computer system (Showing NAS disk drive in network).
- Press "Start" button on Windows desktop
- Press "Search"
- Select Folders
- Select Computer or people
- Select a computer on the network and a new window will appear.
- Key in the host name, (For example "storage-xxxx") in the "Computer name" column and then press "Search" button. You will see the following window.

text_image
Search Results - Computers File Edit View Favorites Tools Help Back Search Folders Norton Antivirus Search Companion X Name In Folder STORAGE-0002 (storage) Workgroup Which computer are you looking for? Computer name: storage You may also want to... Search this computer for files Search the Internet Search- Point to the "Storage-xxxx", double click the mouse. Choose the folder you wish to map, click mouse on its right button and click "Map Network Drive".

text_image
STORAGE-0002 (storage) File Edit View Favorites Tools Help Back Search Folders Search Companion Name Comments PUBLIT Open FTP Explore Search... Scan with Norton AntVirus Map Network Drive... Cut Copy Create Shortcut Which computer are you looking for? Computer name: storage You may also want to... Search this computer for files Search the Internet
text_image
Map Network Drive Windows can help you connect to a shared network folder and assign a drive letter to the connection so that you can access the folder using My Computer. Specify the drive letter for the connection and the folder that you want to connect to: Drive: Z Folder: \admin\ED_mini Browse... Example: \server\share Reconnect at login Connect using a different user name. Sign up for online storage or connect to a network server. < Back Finish CancelNote: For faster connection and usability, we recommend that you map folders which you used constantly as network drives. This creates a direct access to the shared folders on NAS from My Computer.
12.0 Q&A
Q: What is NAS Dongle default IP?
A: The default IP address for NAS Dongle is 169.254.0.1 or enter "storage" in IE bowser bar to search for it.

storage
Q: What is NAS Dongle default login name and password?
A: Our NAS Dongle default Login name: "admin", default password: "admin".
Q: Forgot my login password, How should I do?
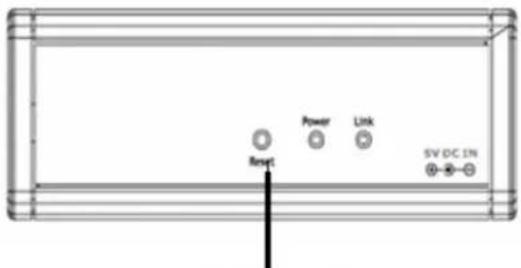
A1: By hardware:
- Press the reset button and keep that position.
- Unplug and reconnect the power.
- Wait for 30 seconds, and then release the reset button.
- NAS Dongle will go back to factory defaults.
text_image
Power Link Reset SV DC INReset button
PS: Pervious account setting and data will still remain in the NAS Dongle.
Q: Why can't I create/share folders in SMB or FTP server?
A: To avoid languages support issue, you are suggested to create/share folders with English characters only.
Q: Why can't I upload the files via LAN connection or got disconnected?
A1: Please make sure the networking is connected properly and you have the access right (read & write) for the folders.
Q: How to setup NAS Dongle to be in daylight saving time?
A: NAS Dongle does not support Daylight saving time setting.
Q: Why WinXP can not enter SMB folder with password via NAS Dongle?
A: Please update Win XP to SP2 or above. After update, please make sure if you have installed Norton Internet Security, if you do, please check with Norton service center.
Q: What Operating Systems does NAS Dongle support?
A: NAS Dongle supports Microsoft Windows 2000 / XP / Vista and Apple Macintosh OS 10.5.4 above.
Q: How do I access NAS Dongle via the Internet?
A: If your NAS Dongle is using a fixed public IP, please perform the following steps.
- Enter the management web base of NAS Dongle, and go to the FTP Server page to enable FTP Status.
- Create user account and limits of authority.
- Open Microsoft Internet Explorer or other FTP client software (recommended), and enter ftp:// NAS Dongle IP in the IP address field.
Q: Why FTP can not link to NAS Dongle or show link time out when using IE?
A: Due to IE FTP is not compatible with some Routers, you are suggested to use FTP client software to start with. If you would like to use IE FTP to link to NAS Dongle, please refer to following steps:
- Please open port 21 and 20 on Router and link to NAS Dongle.
- Open IE > Tool > Internet Options>Advance
- Click "Enable folder view for FTP site" and click "OK"
Q: Why my FTP client software can not link to NAS Dongle or fail during file transfer??
A: Due to software design, it's possible that certain FTP software is not compatible with NAS Dongle. NAS dongle is tested with most of popular FTP software such as CuteFTP or SyncQuick FTP.
Q: What is the limitation of user to login FTP and Samba server?
A:
| Samba Server User | Level Access(maximum create 16 user account, 16 folder share by one account) |
| FTP Server maximum | um create 16 user account,16 folder share by one account |
| Maximum User Login | FTP 8 User/Samba 8 User (Total 64 TCP connection at the same time) |
Q: Any limitations for NAS Dongle file name length?
A: The limitation of length of file folder is 12 bytes.
Q: What can DHCP do as well with NAS Dongle?
A: You can setup NAS Dongle as a DHCP server if there is no any other DHCP Server exists in your local network. Otherwise, NAS Dongle will automatically turn off its DHCP server function and become a DHCP client. For example, if you have installed a router with built-in (activate) DHCP Server, NAS Dongle will automatically setup itself as DHCP client.