
PSWMR40 - Sports Watch Pyle - Free user manual and instructions
Find the device manual for free PSWMR40 Pyle in PDF.

| Product Type | Sports Watch |
| Model | PSWMR40 |
| Brand | Pyle |
| Modes | Timekeeping, Chronograph, Chronograph Recall, Timer, Daily Alarm |
| Chronograph Resolution | 1/100 second |
| Chronograph Range | 99 hours, 59 minutes, 59.99 seconds |
| Max Lap Memories | 150 laps |
| Max Records | 50 records |
| Target Time Checkpoints | Max 50 |
| Timer Modes | Linked, Repeat, Single, CountUP |
| Timer Resolution | 1 second |
| Timer Range | 99 hours, 59 minutes, 59 seconds |
| Linked Timer Sets | Max 25 (each set: 2 timers) |
| Repeat Timer Max Repeats | 99 |
| CountUP Timer Range | Up to 99h 59m 59s |
| Daily Alarms | 2 |
| Hourly Chime | Yes |
| Backlight | Yes (3 seconds) |
| Dual Time Display | Yes |
| Time Format | 12/24 hour, D-M or M-D date |
| Battery | Standard watch battery (typical CR2032) |
| Water Resistance | Splash proof (not for swimming or diving) |
| Cleaning | Wipe with soft cloth |
| Storage | Dry place when not in use |
Frequently Asked Questions - PSWMR40 Pyle
User questions about PSWMR40 Pyle
0 question about this device. Answer the ones you know or ask your own.
Ask a new question about this device
Download the instructions for your Sports Watch in PDF format for free! Find your manual PSWMR40 - Pyle and take your electronic device back in hand. On this page are published all the documents necessary for the use of your device. PSWMR40 by Pyle.
USER MANUAL PSWMR40 Pyle
"Recreational Gear For The Great Outdoors"
IMPORTANT: Pack carefully in original package if possible. We are not responsible for damage incurred in returning items for repair. 2. After closing was short short, with, therefore, after unit, and the procedure
you are experiencing should be included. So, must also have a copy of the original image a print of data to purchase

"Recreational Gear For The Great Outdoors"
natural_image
Group photo of men in casual attire, no visible text or symbols

Brooklyn, NY 11201
1.805.244.567
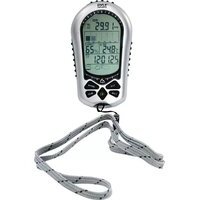
Thank you for purchasing this unique watch.
This Watch is specially designed for Marathon athletes. Although the main idea of this watch is for Marathon, this watch can also be used in other situations like running, yachting or daily use.
This watch has 5 different modes: Timekeeping mode, Chronograph mode, Chronograph Recall mode, Timer mode and Daily Alarm mode. Please check for the coming chapters for detail operations. Before start using this watch, please read the following notes:
- Read the instruction carefully before using the watch.
■ Avoid exposing your Watch to extreme conditions for an unreasonable time.
■ Avoid rough usages or severe impacts to your Watch. - Do not open the Watch's case unless by a certified service agency because the Watch contains precise electronic sensors and components.
■ Clean your Watch with a soft cloth from time to time.
■ Store your Watch in a dry place when it is not in use.
3.0 Major Function Modes

flowchart
graph TD
    A["12:36 P"] --> B["Chronograph Mode"]
    B --> C["11:30 P"]
    C --> D["Chronograph Recall Mode"]
    D --> E["TR: 0:15.00"]
    E --> F["Timer Mode"]
    F --> G["1:30 R"]
    G --> H["Daily Alarm Mode"]
    H --> I["12:36 P"]
    I --> J["Timekeeping Mode"]
    J --> K["12:24 P"]
    K --> A
2.0 Buttons and its Functions
![Light [E-L] Up/Sko [U] P 12:34:07 12:36:58 Mode [M] Start/Lip [S] Down/Reset [D]](/content/2026/06/1146197/images/970ab242ac1ceb8fc8c3c3eaeba43b69731db588baacd8e06c01e3035856f253.jpg)
Mode button [M]
■ Select between the 5 major modes.
■ Select setting items in setting display.
■ In any modes, hold down to exit to Timekeeping mode.
Start/Lap button [S]
■ Start the Chronograph / Timer
■ Take Lap records during Chronograph running.
■ Select Lap Records to be displayed
Up/Stop button [U]
■ Stop the Chronograph / Timer.
■ Change the setting value during setting.
■ Select Dual Time display in Timekeeping mode.
Down/Reset button [D]
■ Reset the Chronograph / Timer.
■ Change the setting value during setting.
Light button [EL]
■ Press to activate back-light for 3 sec.
4.0 Timekeeping Mode
Timekeeping Mode
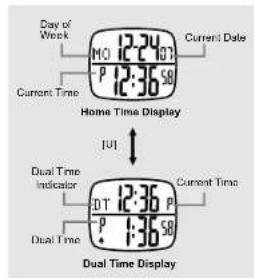
■ When Timekeeping Mode is selected, Home Time or Dual Time Display will be shown.
■ Press the [U] button to select between Home Time and Dual Time Display.
Home Time Display
■ When Home Time Display is selected, the Day of Week and current Date will be shown on the upper row. The lower row will be current time.
■ Hold down the [M] button will go to home time setting display.
Dual Time Display
■ When Dual Time Display is selected, 'DT' and current time will be shown on the upper row. The lower row will be the Dual Time
■ Hold down the [M] button will go to dual time setting display.
4.1 Timekeeping Mode - Home Time Setting

flowchart
graph TD
    A["12:30 PM"] --> B["Second"]
    B --> C["First"]
    C --> D["Minute"]
    D --> E["Hour"]
    E --> F["Year"]
    F --> G["Month"]
    G --> H["Day"]
    H --> I["Increase of decrease the setting value"]
    H --> J["Increase of decrease the setting value at a higher speed"]
    K["Beep ON/OFF"] --> L["12/24 hour Time Format"]
    L --> M["D-M/M-D Date Format"]
    M --> N["Day"]
    N --> O["Increase of decrease the setting value"]
    N --> P["Increase of decrease the setting value at a higher speed"]
Home Time Setting
■ When Home Time Display is selected, hold down the [M] button will go to home time setting display.
■ In the Setting Display, press the [M] button to select among different items.
■ Press the [U]; [D] button to reset the second when Second is selected.
■ Press the [U]/ [D] button to increase or decrease the value of Minute, Hour, Year, Month or Day.
■ Press the [U]/[D] button to change the setting of Date Format, Time Format and Beep tone.
■ Hold Down the [U]/[D] button can change at a faster speed.
■ When the setting is completed, hold down the [M] button to exit.
NOTE: When there is no key-stroke for about 1 minute, the watch will exit the Setting Display automatically.
5.0 Chronograph Mode - Target Time and Time Difference

flowchart
graph LR
    Start --> A["Start"]
    A --> B["Point A Point B"]
    B --> C["Point A"]
    C --> D["Actual Time reaching Check Points A'"]
    D --> E["Point B'"]
    E --> F["Actual Time reaching Check Points C'"]
    style Start fill:#f9f,stroke:#333
    style_TargetTime["Target Time at Check Points"] --> A["10"]
    TargetTime --> B["25"]
    ActualTime["Actual Time reaching Check Points"] --> A'[12]
    ActualTime --> B'[30]
Time Difference for Check Point A: T.D.(A) = A' - A = 12 - 10 = +2 min Time Difference for Check Point B: T.D.(B) = B' - B = 30 - 25 = +5 min
Target Time
■ Target Time is the estimated time that user will pass though a check point during exercise, for example Marathon.
■ This watch provides up to 50 Target Time for user to set for check points.
Time Difference
■ Time Difference is the difference between the actual time of reaching a checking point (Split Time) and the Target Time.
■ If the user exceeds the Target Time, the watch will give out beep sound to alert user.
■ Time Difference are dynamic calculations. Every time a target is set / updated. Time Difference of the Records will be calculated again.
NOTE: Please see chapter 5.2 for how to set Target Time.
4.2 Timekeeping Mode - Dual Time Setting
flowchart
graph TD
    A["DT 12:36 P\nP 1:36 S0"] --> B["Hold [M"]]
    B --> C["Minute"]
    C --> D["Hour"]
    D --> E["Dual Time Setting Sequence"]
    E --> F["U#ID"]
    E --> G["Hold U#ID"]
    F --> H["Increase or decrease the setting value"]
    G --> I["Increase or decrease the setting value as a higher speed"]
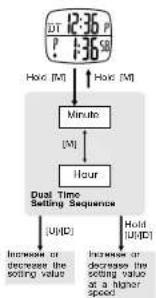
Dual Time Setting
■ When Dual Time Display is selected, hold down the [M] button will go to dual time setting display.
■ In the Setting Display, press the [M] button to select among Minute or Hour.
■ Press the [U]: [D] button to increase or decrease the value of Minute. Hour.
■ Hold Down the [U]/[D] button can change at a faster speed.
■ When the setting is completed, hold down the [M] button to exit.
NOTE: When there is no key-stroke for about 1 minute, the watch will exit the Setting Display automatically.
5.1 Chronograph Mode - Using Chronograph

flowchart
graph TD
    A["All Zero Display Running Display"] --> B["Control Time"]
    B --> C["Stop Time"]
    C --> D["Loop Time"]
    D --> E["Reset Time"]
    E --> F["Not Reset Time"]
    F --> G["Loop Time"]
    G --> H["Reset Time"]
    H --> I["Not Reset Time"]
    I --> J["Loop Time"]
    J --> K["Reset Time"]
    K --> L["Not Reset Time"]
    L --> M["Loop Time"]
    M --> N["Reset Time"]
    N --> O["Not Reset Time"]
    O --> P["Loop Time"]
    P --> Q["Reset Time"]
    Q --> R["Not Reset Time"]
    R --> S["Loop Time"]
    S --> T["Reset Time"]
    T --> U["Not Reset Time"]
    U --> V["Loop Time"]
    V --> W["Reset Time"]
    W --> X["Not Reset Time"]
    X --> Y["Loop Time"]
    Y --> Z["Reset Time"]
    Z --> AA["Not Reset Time"]
    AA --> AB["Loop Time"]
    AB --> AC["Reset Time"]
    AC --> AD["Not Reset Time"]
    AD --> AE["Loop Time"]
    AE --> AF["Reset Time"]
    AF --> AG["Not Reset Time"]
    AG --> AH["Loop Time"]
    AH --> AI["Reset Time"]
    AI --> AJ["Not Reset Time"]
    AJ --> AK["Loop Time"]
    AK --> AL["Reset Time"]
    AL --> AM["Not Reset Time"]
    AM --> AN["Loop Time"]
    AN --> AO["Reset Time"]
    AO --> AP["Not Reset Time"]
    AP --> AQ["Loop Time"]
    AQ --> AR["Reset Time"]
    AR --> AS["Not Reset Time"]
    AS --> AT["Loop Time"]
    AT --> AU["Reset Time"]
    AU --> AV["Not Reset Time"]
    AV --> AW["Loop Time"]
    AW --> AX["Reset Time"]
    AX --> AY["Not Reset Time"]
    AY --> AZ["Loop Time"]
    AZ --> BA["Reset Time"]
    BA --> BB["Not Reset Time"]
    BB --> BC["Loop Time"]
    BC --> BD["Reset Time"]
    BD --> BE["Not Reset Time"]
    BE --> BF["Loop Time"]
    BF --> BG["Reset Time"]
    BG --> BH["Not Reset Time"]
    BH --> BI["Loop Time"]
    BI --> BJ["Reset Time"]
    BJ --> BK["Not Reset Time"]
    BK --> BL["Loop Time"]
    BL --> BM["Reset Time"]
    BM --> BN["Not Reset Time"]
    BN --> BO["Loop Time"]
    BO --> BP["Reset Time"]
    BP --> BQ["Not Reset Time"]
    BQ --> BR["Loop Time"]
    BR --> BS["Reset Time"]
    BS --> BT["Not Reset Time"]
    BT --> BU["Loop Time"]
    BU --> BV["Reset Time"]
    BV --> BW["Not Reset Time"]
    BW --> BX["Loop Time"]
    BX --> BY["Reset Time"]
    BY --> BZ["Not Reset Time"]
    BZ --> CA["Loop Time"]
"NOTE: The Lap Time within the first hour will be displayed as "Minutes, Seconds, 1700 second". After then, it will be "Hours, Minutes, Seconds".
Chronograph
How to use Chronograph
Storing the Lap Records
■ This watch contains a Chronograph function which can record up to 150 Laps in 50 Records.
■ Remaining Lap memories will be shown on the upper-left before start.
■ Press the [S] button to start the Chronograph.
■ Press [S] again during running will record a Lap Time.
■ Press [U] to stop Chronograph when finish counting.
■ Press the [D] button to Reset the display to Zero and store the Lap Records. And the Memory Left counter will be reduced.
■ OR user can Hold Down the [D] button to Reset without storing any Lap Records.
5.1.1 Chronograph Mode - Time Difference Display
flowchart
graph LR
    A["Start"] --> B["Target Time at Check Points"]
    B --> C["Point 1"]
    B --> D["Point 2"]
    E["Start"] --> F["Actual Time Taken at Check Points (Split Time)"]
    F --> G["Point 1"]
    F --> H["Point 2"]

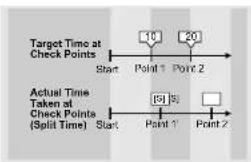
NOTE: Time Difference will only be displayed if target time is set (NOT 0:00:00) and lap no. Is less than 50.
Lap and Check Point
■ For some training purposes, user may set a Target for every check point or lap in their run.
■ When they meet the check point, they can press the [S] button to get the Lap time / Split time.
■ Besides, this watch can calculate the time difference between the Target time and the actual time at the check point.
■ From these information, user can get a briefer image of his/her performance during their run.
Lap Time Display
In the Lap Time Display, if there is a Target Time set for the Check-point, the Time Difference will also be shown on the screen.
■ The display will swap to show Lap Time and Time Difference alternatively for every 2 seconds.
5.2 Chronograph Mode - Setting the Target Time

Target Time for Check Point A: T.A. 1 = Lap 1
Target Time for Check Point B: T.A. 2 = Lap 1 + Lap 2
Overview
■ This watch provides 2 ways for user to set their Target time:
- Set Directly: User can enter the Target Time for check-points directly and the watch will calculate the Time difference for user.
- Set By Laps: User can enter the target finish time for each laps and the watch will calculate the Target Time for each check point and gives the Time Difference calculation.
IMPORTANT: Even user enter the target finish time for Laps, the Time Difference calculated is NOT for single laps. It is the accumulated Time Difference for all Laps.
5.2.1 Chronograph Mode - Setting Target Time Directly
flowchart
graph TD
    A["12:30 P"] --> B["Set Directly (TA)...<br>Set by Laps (°C)"]
    B --> C["Select Check point<br>(π1-6d)"]
    C --> D["Hour"]
    D --> E["Time"]
    E --> F["Next"]
    F --> G["Second"]
    G --> H["Month"]
    H --> I["Next"]
    I --> J["Hold July(β)"]
    D --> K["Increase or decrease the setting value<br>R=0.79"]
    K --> L["Increase or decrease the setting value of a higher space"]
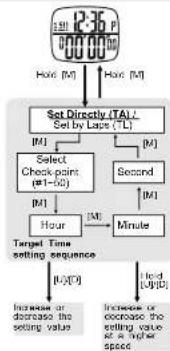
Setting Target Time Directly
■ To set Target Time, hold down the [M] button in Chronograph Mode.
■ Press the [U]/[D] button to select 'TA' (Set Directly) and press the [M] button
■ In the Setting Display, press the [U]/[D] button to select which check-point to be set.
■ Press the [M] button to confirm and go to set Hour, Minute, Second.
■ Press the [U]/[D] button to increase or decrease the value of Hour, Minute or Second. Hold Down the [U]/[D] button can change at a faster speed.
■ When the setting is completed, hold down the [M] button to exit.
NOTE: When there is no key-stroke for about 1 minute, the watch will exit the Setting Display automatically.
5.2.2 Chronograph Mode - Setting Target Time by Laps
flowchart
graph TD
    A["Set History (T): Set by Laps (TL)"] --> B["Select Laps (t=50 or -)"]
    B --> C["Hour"]
    C --> D["Target Time setting sequence"]
    D --> E["Increase or decrease the setting value"]
    D --> F["Increase or decrease the setting value at a higher speed"]
    G["Start"] --> H["100% [M"]]
    I["End"] --> J["100% [M"]]
    K["Second"] --> L["2M"]
    M["Minute"] --> N["3M"]
    O["Hold [U"]/[D]] --> P["100% [M"]]
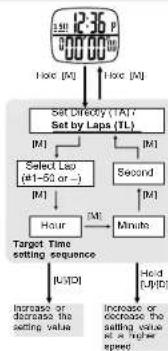
Setting Target Time By Laps
■ To set Target Time, hold down the [M] button in Chronograph Mode.
■ Press the [U]/[D] button to select 'TL' (Set by Laps) and press the [M] button to confirm.
■ In the Setting Display, press the [U]/[D] button to select which lap to be set.
■ User can set different target finish time for different Laps or select -- to apply the same target finish time to all Laps.
■ Press the [M] button to confirm and go to set Hour, Minute, Second.
- Press the [U]/[D] button to increase or decrease the value of Hour. Minute or Second. Hold Down the [U]/[D] button can change at a faster speed.
■ When the setting is completed, hold down the [M] button to exit.
NOTE: When there is no key-stroke for about 1 minute, the watch will exit the Setting Display automatically.
6.0 Chronograph Recall Mode - Recalling Lap Records
flowchart
graph TD
    A["Time Stamp of the Record"] --> B["Records Selection"]
    B --> C["Lap Recall Display"]
    D["Date Stamp of the Record"] --> E["Record Name"]
    E --> F["Swap every 2 sec"]
    F --> G["[U"][D]]
    G --> H["[S"]]
    H --> I["[M"]]
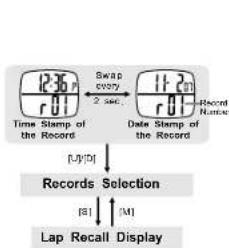
Recalling Lap Records
■ After storing a series of Lap Records, user can recall these records from this mode.
■ Each set of records will have a date and time stamp for user to identify.
■ The display will swap to show date stamp and time stamp alternatively for every 2 seconds.
■ Press [U]/[D] to select Record to be recalled.
■ Press the [S] button to go to Lap Recall Display to review the details of the selected Record. (Like Lap Time, Split Time, Total Time etc.)
■ Press the [M] button will exit the Lap Recall Display and user can select another record to be recalled.
6.2 Chronograph Recall Mode - Deleting Lap Records

flowchart
graph TD
    A["1230 r01"] --> B["Lap Records Display"]
    B --> C["Hold ID: 2 sec."]
    B --> D["Hold ID: 4 sec."]
    C --> E["delete ONE Record"]
    D --> F["delete ALL Records"]
    E --> G["Control"]
    F --> H["Hold M"]
    G --> I["Tagble YES or NO"]
Deleting one Lap Record
■ User can delete some unwanted Lap Records to free up memories.
■ Select the Record that would like to be deleted as chapter 6.0.
■ Hold down the [M] button for about 2 seconds to go to deletion display.
■ Press [U]/[D] to select YES or NO for the deletion.
■ Hold the [M] button to confirm and process. Then the watch will go back to Records Selection Display.
In Lap Records Display, hold down the [M] button for more than 4 seconds to go to 'dEL ALL' Display.
■ Press [U]/[D] to select YES or NO for the deletion.
■ Hold the [M] button to confirm and process. Then the watch will go back to Records Selection Display.
Deleting ALL Lap Records
6.1 Chronograph Recall Mode - Lap Recall Display

flowchart
graph LR
    A["0:39 Lap Time"] --> B["0:35 Lap Time"]
    B --> C["Time Difference"]
    C --> D["Last Lap"]
    D --> E["0:39 Lap Time"]
    E --> F["Maximum Lap Time"]
    F --> G["Average Lap Time"]
    G --> H["Time Difference"]
    H --> I["Last Lap"]
*NOTE Press [0] in reverse direction
Recalling Lap Records
■ After a Record is selected, press [S] will go to the Lap Recall Display.
■ Press [U]/[D] to review different Laps and also the Minimum, Maximum, Average Lap.
■ During Lap Review, press [S] will swap the display between Lap Time and Time Difference.
NOTE 1: There will be no time difference display for Minimum, Maximum and Average Lap.
NOTE 2: As the Time Difference is a dynamic calculation which depends on the Target Time set. When there is no Target Time set or the Lap number is larger than 50, there will be no Time Difference shown during recalling.
■ Press the [M] button will exit the Lap Recall Display and go back to Records Selection Display.
7.0 Timer Mode - Overview
TR: Linked Timer
CR: Repeat Timer
CS: Single Timer
CU: CountUP Timer
4 Different Operation Modes
Overview
This watch provides Timer Sets for counting. Each Timer Set contains 2 timers (A & B). When timer A is finished and then timer B start counting.
■ Besides, this watch provides 4 operation modes for different counting purpose:
- Linked Timer: When a timer set is finished counting, the next timer set will start immediately until the last timer set is finished counting.
- Repeat Timer: Similar to Linked Timer, but there is only one Timer set is counting. It repeats counting for several times which is set before start.
- Single Timer: Only one Timer set will count. When it is finished, the timer stop.
- CountUP Timer: After the timer set finished counting, it will start counting up to the preset value from zero.
NOTE: For more details of different operation modes, please refer to the coming chapters.
7.1 Timer Mode - Using Linked Timer

flowchart
graph TD
    A["Timer Set 1"] --> B["Timer Set 2"]
    B --> C["Timer Set 25"]
    C --> D["Timer B Counting"]
    D --> E["Timer A Counting"]
    E --> F["Timer B Counting"]
    F --> G["Timer Set 3"]
    G --> H["Timer Set 4"]
    H --> I["Timer Set 5"]
    I --> J["Timer Set 6"]
    J --> K["Timer Set 7"]
    K --> L["Timer Set 8"]
    L --> M["Timer Set 9"]
    M --> N["Timer Set 10"]
    N --> O["Timer Set 11"]
    O --> P["Timer Set 12"]
    P --> Q["Timer Set 13"]
    Q --> R["Timer Set 14"]
    R --> S["Timer Set 15"]
    S --> T["Timer Set 16"]
    T --> U["Timer Set 17"]
    U --> V["Timer Set 18"]
    V --> W["Timer Set 19"]
    W --> X["Timer Set 20"]
    X --> Y["Timer Set 21"]
    Y --> Z["Timer Set 22"]
    Z --> AA["Timer Set 23"]
    AA --> AB["Timer Set 24"]
    AB --> AC["Timer Set 25"]
    AC --> AD["Timer Set 26"]
    AD --> AE["Timer Set 27"]
    AE --> AF["Timer Set 28"]
    AF --> AG["Timer Set 29"]
    AG --> AH["Timer Set 30"]
    AH --> AI["Timer Set 31"]
    AI --> AJ["Timer Set 32"]
    AJ --> AK["Timer Set 33"]
    AK --> AL["Timer Set 34"]
    AL --> AM["Timer Set 35"]
    AM --> AN["Timer Set 36"]
    AN --> AO["Timer Set 37"]
    AO --> AP["Timer Set 38"]
    AP --> AQ["Timer Set 39"]
    AQ --> AR["Timer Set 40"]
    AR --> AS["Timer Set 41"]
    AS --> AT["Timer Set 42"]
    AT --> AU["Timer Set 43"]
    AU --> AV["Timer Set 44"]
    AV --> AW["Timer Set 45"]
    AW --> AX["Timer Set 46"]
    AX --> AY["Timer Set 47"]
    AY --> AZ["Timer Set 48"]
    AZ --> BA["Timer Set 49"]
    BA --> BB["Timer Set 50"]
    BB --> BC["Timer Set 51"]
    BC --> BD["Timer Set 52"]
    BD --> BE["Timer Set 53"]
    BE --> BF["Timer Set 54"]
    BF --> BG["Timer Set 55"]
    BG --> BH["Timer Set 56"]
    BH --> BI["Timer Set 57"]
    BI --> BJ["Timer Set 58"]
    BJ --> BK["Timer Set 59"]
    BK --> BL["Timer Set 60"]
    BL --> BM["Timer Set 61"]
    BM --> BN["Timer Set 62"]
    BN --> BO["Timer Set 63"]
    BO --> BP["Timer Set 64"]
    BP --> BQ["Timer Set 65"]
    BQ --> BR["Timer Set 66"]
    BR --> BS["Timer Set 67"]
    BS --> BT["Timer Set 68"]
    BT --> BU["Timer Set 69"]
    BU --> BV["Timer Set 70"]
    BV --> BW["Timer Set 71"]
    BW --> BX["Timer Set 72"]
    BX --> BY["Timer Set 73"]
    BY --> BZ["Timer Set 74"]
    BZ --> CA["Timer Set 75"]
    CA --> CB["Timer Set 76"]
    CB --> CC["Timer Set 77"]
    CC --> CD["Timer Set 78"]
    CD --> CE["Timer Set 79"]
    CE --> CF["Timer Set 80"]
Linked Timer
■ There are 25 Timer Sets in the Linked Timer. Each Timer set has to be turned ON/OFF independently.
■ The Linked Timer will count the timer sets, which are set and turned ON, one by one until the last timer set is finished counting.
Using Linked Timer
■ Press the [S] button to start the counting when Linked Timer is selected.
NOTE: Please see the chapter 7.1.1 for how to set and select Linked Timer and the chapter 7.1.2 for turn ON/OFF timer set.
■ Each time a timer finished counting, a beep sound will be given out.
■ When all counting are finished, the watch will beep for 5 seconds.
■ User can also press [U] button to stop the counting anytime.
■ When the timer is stopped, hold down the [D] button will reload the counter to the initial value.
7.1.2 Timer Mode - Turn ON/OFF Timer Sets
flowchart
graph TD
    A["ON"] --> B["OFF"]
    B --> C["Select Timer Set"]
    C --> D["Hold (S)"]
    C --> E["Hold (M)"]
    D --> F["Enable (M)"]
    E --> G["Enable (M)"]
    F --> H["Toggle ALL Timer Set ON/OFF"]
    G --> H
    H --> I["OK/OK"]
    H --> J["Select YES/NO"]
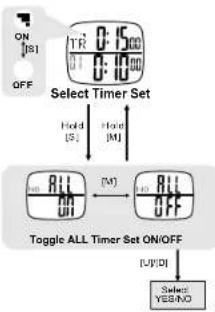
Turn ON/OFF Timer Set
■ While selecting Timer Set for setting, user can press [S] to turn ON/OFF the currently selected timer set.
Turn ON ALL Timer Set
■ User can also turn ON ALL Timer Sets by holding down the [SI] button.
■ Press the [M] button to select "ALL ON" Display.
■ Press [U]/[D] to select 'YES'/'NO' and hold down [M] to process changes. Then the watch will go back to the Timer Set Selection Display.
Turn OFF ALL Timer Set
■ User can also turn OFF ALL Timer Sets by holding down the [S] button.
■ Press the [M] button to select "ALL OFF" Display.
■ Press [U]/[D] to select 'YES'/'NO' and hold down [M] to process changes. Then the watch will go back to the Timer Set Selection Display.
7.1.1 Timer Mode - Setting Linked Timer
flowchart
graph TD
    A["Timer Display"] --> B["Select Operation Value TR (OR + CS + CU)"]
    B --> C["Selected Timer Set"]
    C --> D["Hour"]
    D --> E["Squeeze"]
    E --> F["URE"]
    F --> G["URE"]
    G --> H["URE"]
    H --> I["URE"]
    I --> J["URE"]
    J --> K["URE"]
    K --> L["URE"]
    L --> M["URE"]
    M --> N["URE"]
    N --> O["URE"]
    O --> P["URE"]
    P --> Q["URE"]
    Q --> R["URE"]
    R --> S["URE"]
    S --> T["URE"]
    T --> U["URE"]
    U --> V["URE"]
    V --> W["URE"]
    W --> X["URE"]
    X --> Y["URE"]
    Y --> Z["URE"]
    Z --> AA["URE"]
    AA --> AB["URE"]
    AB --> AC["URE"]
    AC --> AD["URE"]
    AD --> AE["URE"]
    AE --> AF["URE"]
    AF --> AG["URE"]
    AG --> AH["URE"]
    AH --> AI["URE"]
    AI --> AJ["URE"]
    AJ --> AK["URE"]
    AK --> AL["URE"]
    AL --> AM["URE"]
    AM --> AN["URE"]
    AN --> AO["URE"]
    AO --> AP["URE"]
    AP --> AQ["URE"]
    AQ --> AR["URE"]
    AR --> AS["URE"]
    AS --> AT["URE"]
    AT --> AU["URE"]
    AU --> AV["URE"]
    AV --> AW["URE"]
    AW --> AX["URE"]
    AX --> AY["URE"]
    AY --> AZ["URE"]
    AZ --> BA["URE"]
    BA --> BB["URE"]
    BB --> BC["URE"]
    BC --> BD["URE"]
    BD --> BE["URE"]
    BE --> BF["URE"]
    BF --> BG["URE"]
    BG --> BH["URE"]
    BH --> BI["URE"]
    BI --> BJ["URE"]
    BJ --> BK["URE"]
    BK --> BL["URE"]
    BL --> BM["URE"]
    BM --> BN["URE"]
    BN --> BO["URE"]
    BO --> BP["URE"]
    BP --> BQ["URE"]
    BQ --> BR["URE"]
    BR --> BS["URE"]
    BS --> BT["URE"]
    BT --> BU["URE"]
    BU --> BV["URE"]
    BV --> BW["URE"]
    BW --> BX["URE"]
    BX --> BY["URE"]
    BY --> BZ["URE"]
    BZ --> CA["URE"]
    CA --> CB["URE"]
    CB --> CC["URE"]
    CC --> CD["URE"]
    CD --> CE["URE"]
    CE --> CF["URE"]
    CF --> CG["URE"]
    CG --> CH["URE"]
    CH --> CI["URE"]
    CI --> CJ["URE"]
    CJ --> CK["URE"]
    CK --> CR["URE"]
    CR --> CS["URE"]
    CS --> CT["URE"]
    CT --> CU["URE"]
    CU --> CV["URE"]
    CV --> CW["URE"]
    CW --> CX["URE"]
    CX --> CY["URE"]
    CY --> CZ["URE"]
    CZ --> DA["URE"]
    DA --> DB["URE"]
    DB --> DC["URE"]
    DC --> DV["URE"]
    DV --> DW["URE"]
    DW --> DX["URE"]
    DX --> DW
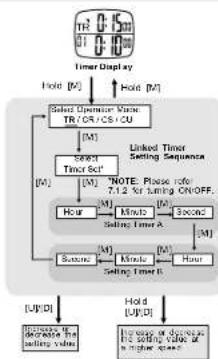
Setting Linked Timer
■ To set the Linked Timer, hold down the [M] button in Timer Display and press [U]/[D] to select Linked Timer "TR" from the 4 operation modes.
■ Press [M] to confirm and select which timer set to be edited by pressing [U]/[D] button.
NOTE: Please see the chapter 7.1.2 for more details about turning ON/OFF Timer Set.
■ Press [M] to start setting the selected timer set (Timer A and Timer B) as the adjacent diagram.
■ Press the [U]/[D] button to change the settings.
■ Hold Down the [U]/[D] button can change at a faster speed.
■ Hold down the [M] button to exit when finished setting.
NOTE: When there is no key-stroke for about 1 minute, the watch will exit the Setting Display automatically.
7.2 Timer Mode - Using Repeat Timer
flowchart
graph TD
    A["Initial Display"] --> B["Repeating Counter 50"]
    A --> C["Repeating Counter 50"]
    B --> D["Time A Counting"]
    B --> E["Time B Counting"]
    C --> F["Time A Stamped"]
    C --> G["Time B Stamped"]
    D --> H["Repeat Counter 49"]
    E --> I["Repeat Counter 49"]
    F --> J["Repeat Counter 49"]
    G --> K["Repeat Counter 49"]
    H --> L["Hold: [0"]]
    I --> M["Auto: Restart"]
    J --> N["Beep!! Sleep!"]
    K --> O["Beep!! Sleep!"]
    L --> P["CR"]
    M --> Q["CR"]
    N --> R["CR"]
    O --> S["CR"]
    P --> T["CR"]
    Q --> U["CR"]
    R --> V["CR"]
    S --> W["CR"]
    T --> X["CR"]
    U --> Y["CR"]
    V --> Z["CR"]
    W --> AA["CR"]
    X --> AB["CR"]
    Y --> AC["CR"]
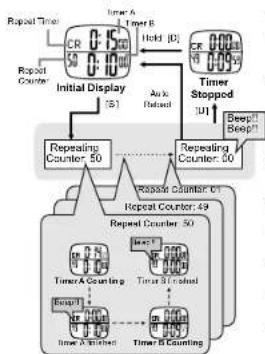
Repeat Timer
This operation mode will repeat counting the default timer set by user-defined times.
■ When the Timer Set finished counting once, the Repeat Counter will be reduced by one and start the Timer Set counting again. When the counter comes to zero, the timer stop.
Using Repeat Timer
■ Press the [S] button to start the counting when Repeat Timer is selected.
NOTE: Please see the chapter 7.2.1 for how to set and select Repeat Timer.
■ Each time a timer finished counting, a beep sound will be given out.
■ When all counting are finished, the watch will beep for 5 seconds.
■ User can also press [U] button to stop the counting anytime.
■ When the counting is stopped, hold down the [D] button will reload the counter to the initial value.
7.2.1 Timer Mode - Setting Repeat Timer

flowchart
graph TD
    A["CR 0-1500"] --> B["Select Connection Mode TR/CR/CR CU"]
    B --> C["Sensing Record Time"]
    C --> D["Hour"]
    C --> E["Second"]
    D --> F["Sating Timer A"]
    E --> G["Sating Timer B"]
    F --> H["Hold [M"]]
    G --> I["Hold [M"]]
    H --> J["Repeat Timer Setting Sequence"]
    I --> J
    J --> K["Record"]
    K --> L["+/-"]
    L --> M["Increase or decrease the setting value of the second time"]
Setting Repeat Timer
■ To set the Repeat Timer, hold down the [M] button in Timer Display and press [U]/[D] to select Repeat Timer "CR" from the 4 operation modes.
■ Press [M] to confirm and set the repeating times by pressing [U]/[D] button.
■ Press [M] to start setting the timer set (Timer A and Timer B) as the adjacent diagram.
■ Press the [U]/[D] button to change the settings.
■ Hold Down the [U]/[D] but to n can change at a faster speed.
■ Hold down the [M] button to exit when finished setting.
NOTE: When there is no key-stroke for about 1 minute, the watch will exit the Setting Display automatically.
7.3.1 Timer Mode - Setting Single Timer

flowchart
graph TD
    A["CS"] --> B["Timer Display"]
    B --> C["Hold (M)"]
    C --> D["Select Operation Mode TR1/CR2 CS/CU"]
    D --> E["M1"]
    E --> F["Hour"]
    F --> G["M2"]
    G --> H["Second"]
    H --> I["M3"]
    I --> J["Hour"]
    J --> K["M4"]
    K --> L["Second"]
    L --> M["M5"]
    M --> N["Hour"]
    N --> O["M6"]
    O --> P["Second"]
    P --> Q["M7"]
    Q --> R["Hour"]
    R --> S["M8"]
    S --> T["Second"]
    T --> U["M9"]
    U --> V["Hour"]
    V --> W["M10"]
    W --> X["Second"]
    X --> Y["M11"]
    Y --> Z["Hour"]
    Z --> AA["M12"]
    AA --> AB["Second"]
    AB --> AC["M13"]
    AC --> AD["Hour"]
    AD --> AE["M14"]
    AE --> AF["Second"]
    AF --> AG["M15"]
    AG --> AH["Hour"]
    AH --> AI["M16"]
    AI --> AJ["Second"]
    AJ --> AK["M17"]
    AK --> AL["Hour"]
    AL --> AM["M18"]
    AM --> AN["Second"]
    AN --> AO["M19"]
    AO --> AP["Hour"]
    AP --> AQ["M20"]
    AQ --> AR["Second"]
    AR --> AS["M21"]
    AS --> AT["Hour"]
    AT --> AU["M22"]
    AU --> AV["Second"]
    AV --> AW["M23"]
    AW --> AX["Hour"]
    AX --> AY["M24"]
    AY --> AZ["Second"]
    AZ --> BA["M25"]
    BA --> BB["Hour"]
    BB --> BC["M26"]
    BC --> BD["Second"]
    BD --> BE["M27"]
    BE --> BF["Hour"]
    BF --> BG["M28"]
    BG --> BH["Second"]
    BH --> BI["M29"]
    BI --> BJ["Hour"]
    BJ --> BK["M30"]
    BK --> BL["Second"]
    BL --> BM["M31"]
    BM --> BN["Hour"]
    BN --> BO["M32"]
    BO --> BP["Second"]
    BP --> BQ["M33"]
    BQ --> BR["Hour"]
    BR --> BS["M34"]
    BS --> BT["Second"]
    BT --> BU["M35"]
    BU --> BV["Hour"]
    BV --> BW["M36"]
    BW --> BX["Second"]
    BX --> BY["M37"]
    BY --> BZ["Hour"]
    BZ --> CA["M38"]
    CA --> CB["Second"]
    CB --> CC["M39"]
    CC --> CD["Hour"]
    CD --> CE["M40"]
    CE --> CF["Second"]
    CF --> CG["M41"]
    CG --> CH["Hour"]
    CH --> CI["M42"]
    CI --> CJ["Second"]
    CJ --> CK["M43"]
    CK --> CR["Hour"]
    CR --> CS["M44"]
    CS --> CT["Second"]
    CT --> CU["M45"]
    CU --> CV["Hour"]
    CV --> CW["M46"]
    CW --> CX["Second"]
    CX --> CY["M47"]
    CY --> CZ["Hour"]
    CZ --> DA["M48"]
    DA --> DB["Second"]
    DB --> DC["M49"]
    DC --> DD["Hour"]
    DD --> DE["M50"]
Setting Single Timer
■ To set the Single Timer, hold down the [M] button in Timer Display and press [U]/[D] to select Single Timer "CS" from the 4 operation modes.
■ Press [M] to confirm and start setting the Timer A and Timer B as the adjacent diagram.
■ Press the [U]/[D] button to change the timer settings.
■ Hold Down the [U]/[D] button can change at a faster speed
■ Hold down the [M] button to exit when finished setting.
NOTE: When there is no key-stroke for about 1 minute, the watch will exit the Setting Display automatically.
7.3 Timer Mode - Using Single Timer
flowchart
graph TD
    A["Single Timer"] --> B["CS"]
    B --> C["Timer A"]
    B --> D["Timer B"]
    C --> E["Initial Display [S"]]
    D --> F["Timer Stopped [U"]]
    E --> G["Timer A Counting"]
    F --> H["Timer B Finished"]
    G --> I["Timer A Finished"]
    H --> J["Timer B Counting"]
    I --> K["Timer A Final"]
    J --> L["Timer B Final"]
    M["Add/End"] --> N["Add/End"]
    O["Beep!! Beep!!"] --> P["Beep!! Beep!!"]
    Q["Ink [E"]] --> R["Ink [E"]]
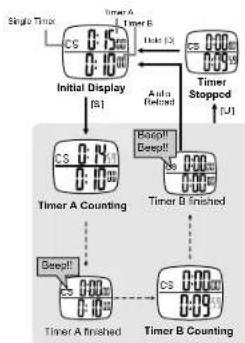
Single Timer
■ There is another operation mode which only count once, that is Single Timer.
■ Single Timer will only run the timer A and timer B once. When they all finished counting, the timer stop.
Using Single Timer
■ Press the [S] button to start the counting when Single Timer is selected.
NOTE: Please see the chapter 7.3.1 for how to set and select Single Timer.
■ When timer A finished counting, a beep sound will be given out.
■ When timer B is finished, the watch will beep for 5 seconds.
■ User can also press [U] button to stop the counting anytime.
■ When the counting is stopped, hold down the [D] button will reload the counter to the initial value.
7.4 Timer Mode - Using CountUP Timer

flowchart
graph TD
    A["Start"] --> B["Initial Display"]
    B --> C{Counter Up to Preset Value}
    C --> D["CCU"]
    C --> E["CCU"]
    D --> F["Timer A Stated"]
    E --> G["Timer B Stated"]
    F --> H["Hold (0)"]
    G --> I["Hold (0)"]
    H --> J["CU"]
    I --> K["CU"]
    J --> L["CU"]
    K --> M["CU"]
    L --> N["CU"]
    M --> O["CU"]
    N --> P["CU"]
    O --> Q["CU"]
    P --> R["CU"]
    Q --> S["CU"]
    R --> T["CU"]
    S --> U["CU"]
    T --> V["CU"]
    U --> W["CU"]
    V --> X["CU"]
    W --> Y["CU"]
    X --> Z["CU"]
    Y --> AA["CU"]
    Z --> AB["CU"]
    AA --> AC["CU"]
    AB --> AD["CU"]
    AC --> AE["CU"]
    AD --> AF["CU"]
    AE --> AG["CU"]
    AF --> AH["CU"]
    AG --> AI["CU"]
    AH --> AJ["CU"]
    AI --> AK["CU"]
    AJ --> AL["CU"]
    AK --> AM["CU"]
    AL --> AN["CU"]
    AM --> AO["CU"]
    AN --> AP["CU"]
    AO --> AQ["CU"]
    AP --> AR["CU"]
    AQ --> AS["CU"]
    AR --> AT["CU"]
    AS --> AU["CU"]
    AT --> AV["CU"]
    AU --> AW["CU"]
    AV --> AX["CU"]
    AW --> AY["CU"]
CountUP Timer
This operation mode will count up from zero to a preset value.
■ CountUP Timer will run the timer A and timer B once. After then, it will start counting up from zero. When it reaches the preset value, the timer stops.
Using CountUP Timer
■ Press the [S] button to start the counting when CountUP Timer is selected.
NOTE: Please see the chapter 7.4.1 for how to set and select CountUP Timer.
■ Each time a timer finished counting, a beep sound will be given out.
■ When timer B is finished, the watch will beep for 5 seconds and start counting up from zero.
■ When it reaches the preset value, the timer stops and beep for 5 seconds.
■ User can also press [U] button to stop the counting anytime.
■ When the counting is stopped, hold down the [D] button will reload the counter to the initial value.
7.4.1 Timer Mode - Setting CountUP Timer
flowchart
graph TD
    A["CU 0.50"] --> B["Timer Display"]
    B --> C["Hold [M"]]
    C --> D["Select Operator Motor T/O (CPU) / Cu"]
    D --> E["M1"]
    E --> F["Second [M"]]
    F --> G["Setting Count up value"]
    G --> H["M2"]
    H --> I["First [M"]]
    I --> J["Second [M"]]
    J --> K["Setting Time A"]
    K --> L["M3"]
    L --> M["Second [M"]]
    M --> N["Setting Time B"]
    N --> O["M4"]
    O --> P["CountUP® Timer Setting Sequence"]
    P --> Q["[U"]/D]
    P --> R["[J"]/D]
    P --> S["[Inlet to decrease or stop after higher speed"]
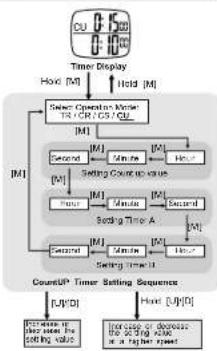
Setting CountUP Timer
■ To set the CountUP Timer, hold down the [M] button in Timer Display and press [U]/[D] to select CountUP Timer 'CU' from the 4 operation modes.
■ Press [M] to confirm and start setting the Count up value as the adjacent diagram.
■ After then, press [M] to start setting the timer set (Timer A and Timer B) as the adjacent diagram.
■ Press the [U]/[D] button to change the settings.
■ Hold Down the [U]/[D] but ton can change at a faster speed.
■ Hold down the [M] button to exit when finished setting.
NOTE: When there is no key-stroke for about 1 minute, the watch will exit the Setting Display automatically.
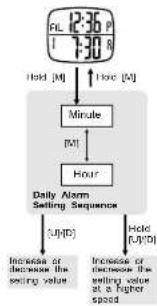
8.1 Alarm Mode - Setting Daily Alarm
flowchart
graph TD
    A["12:36 P\n7:30 A"] --> B["Hold [M"]]
    B --> C["Minute"]
    C --> D["Hour"]
    D --> E["Daily Alarm\nSelling Sequence"]
    E --> F["Increase or decrease the\seating value"]
    E --> G["Increase or decrease the\seating value at a higher\speed"]
    F --> H["U"]/D
    G --> I["Held U"]/D
Setting Daily Alarm
■ Select the target setting alarm (alarm 1 or alarm 2) by pressing [U] button in Alarm Mode display.
■ Hold down the [M] button will go to daily alarm setting display.
■ In the Setting Display, press [M] button to select among Minute or Hour.
■ Press the [U]·[D] button to increase or decrease the value of Minute. Hour.
■ Hold Down the [U]/[D] but ton can change at a faster speed.
■ When the setting is completed, hold down the [M] button to exit.
NOTE: When there is no key-stroke for about 1 minute, the watch will exit the Setting Display automatically.
8.0 Alarm Mode - Daily Alarm and Hourly Chime

flowchart
graph TD
    A["AL 12:36 P\n1 7:30 R"] --> B["Alarm 1 Display\n(U)"]
    B --> C["AL 12:36 P\n2 5:30 P"]
    C --> D["CH 12:36 P\n* 0:00"]
    D --> E["Hourly Chime Display\n(Off)"]
    E --> F["ON\n(D)"]
    E --> G["OFF"]
    H["Current Time\nStart Time"] --> I["OR ON\n(O) OFF"]
Daily Alarm
■ This watch contains 2 independent Daily Alarms.
■ Press the [D] button in their respective display to turn ON/OFF the alarm.
■ If the Alarm is ON, the watch will beep for 30 seconds when the alarm time is met.
■ This watch also provides Hourly chime function.
■ Press the [D] button in the Hourly Chime display to turn ON/OFF the chime.
■ When the Chime is ON, the watch will beep once at the hour, i.e. 1:00, 2:00, 3:00 etc.
Hourly Chime
9.0 Specifications
Timekeeping Mode
■ Hour, Minute, Second
■ Year, Month, Day, Day of Week
■ 12/24 hour time format
■ Day-Month / Month-Day date format
■ Dual time display
Chronograph Mode
■ Resolution: 1/100 second
■ Range: 99 hours, 59 minutes, 59.99 seconds
■ Maximum 150 Lap Memories
■ Target Time setting for Maximum 50 Check Points
■ Sound reminding for exceeding target time
■ Time Difference calculation between Target time and actual time
Alarm Mode
■ 2 Daily Alarm
■ 1 Hourly Chime
Chronograph Recall Mode
■ Maximum 150 Laps can be stored
■ Maximum 50 Records can be stored
■ Time and Date stamp for each record
■ Maximum, Minimum and Average Lap Time display
Timer Mode
■ 4 operation modes: Linked Timer, Repeat Timer, S In gle Timer and CountUP timer
■ Resolution: 1 second
■ Range for each timer: 99 hours, 59 minutes, 59 seconds
■ Linked Timer: Maximum 25 set (1 set consists of 2 timers) timer setting
■ Repeat Timer: Maximum 99 times repeats
■ CountUP Timer: Count Up range to 99 hours, 59 minutes, 59 seconds
- Home Time Setting
- Target Time
- Time Difference
- Dual Time Setting
- Chronograph
- How to use Chronograph
- Storing the Lap Records
- Chronograph Mode - Time Difference Display
- Lap and Check Point
- Lap Time Display
- Chronograph Mode - Setting the Target Time
- Overview
- Chronograph Mode - Setting Target Time Directly
- Setting Target Time Directly
- Chronograph Mode - Setting Target Time by Laps
- Setting Target Time By Laps
- Chronograph Recall Mode - Recalling Lap Records
- Recalling Lap Records
- Chronograph Recall Mode - Deleting Lap Records
- Deleting one Lap Record
- Deleting ALL Lap Records
- Chronograph Recall Mode - Lap Recall Display
- Timer Mode - Overview
- Linked Timer
- Using Linked Timer
- Turn ON/OFF Timer Set
- Turn ON ALL Timer Set
- Turn OFF ALL Timer Set
- Setting Linked Timer
- Repeat Timer
- Using Repeat Timer
- Setting Repeat Timer
- Setting Single Timer
- Single Timer
- Using Single Timer
- CountUP Timer
- Using CountUP Timer
- Setting CountUP Timer
- Setting Daily Alarm
- Daily Alarm
- Hourly Chime
- Specifications
- Timekeeping Mode
- Chronograph Mode
- Alarm Mode
- Chronograph Recall Mode
- Timer Mode
Brand : Pyle
Model : PSWMR40
Category : Sports Watch