
CBX-K1 - Synthesizer YAMAHA - Free user manual and instructions
Find the device manual for free CBX-K1 YAMAHA in PDF.

User questions about CBX-K1 YAMAHA
0 question about this device. Answer the ones you know or ask your own.
Ask a new question about this device
Download the instructions for your Synthesizer in PDF format for free! Find your manual CBX-K1 - YAMAHA and take your electronic device back in hand. On this page are published all the documents necessary for the use of your device. CBX-K1 by YAMAHA.
USER MANUAL CBX-K1 YAMAHA
This product, when installed as indicated in the instructions contained in this manual, meets FCC requirements. Modifications not expressly approved by Yamaha may void your authority, granted by the FCC, to use the product.
IMPORTANT:
When connecting this product to accessories and/or another product use only high quality shielded cables. Cable/s supplied with this product MUST be used. Follow all installation instructions. Failure to follow instructions could void your FCC authorization to use this product in the USA.
NOTE:
This product has been tested and found to comply with the requirements listed in FCC Regulations, Part 15 for Class "B" digital devices. Compliance with these requirements provides a reasonable level of assurance that your use of this product in a residential environment will not result in harmful interference with other electronic devices. This equipment generates/uses radio frequencies and, if not installed and used according to the instructions found in the user's manual, may cause interference harmful to the operation of other electronic devices. Compliance with FCC regulations does not guarantee that interference will not occur in all installations. If this product is found to be the source of interference, which can be determined by turning the unit "OFF" and "ON", please try to eliminate the problem by using one of the following measures:
- Relocate either this product or the device that is being affected by the interference.
- Utilize power outlets that are on different branch (circuit breaker or fuse) circuits or install AC line filter/s.
- In the case of radio or TV interference, relocate/reorient the antenna. If the antenna lead-in is 300 ohm ribbon lead, change the lead-in to co-axial type cable.
If these corrective measures do not produce satisfactory results, please contact the local retailer authorized to distribute this type of product. If you can not locate the appropriate, please contact Yamaha Corporation of America, Electronic Service Division, 6600 Orangethorpe Ave, Buena Park CA, 90620
- This applies only to products distributed by Yamaha Corporation of America.
CANADA
THIS DIGITAL APPARATUS DOES NOT EXCEED THE "CLASS B" LIMITS FOR RADIO NOISE EMISSIONS FROM DIGITAL APPARATUS SET OUT IN THE RADIO INTERFERENCE REGULATION OF THE CANADIAN DEPARTMENT OF COMMUNICATIONS.
LE PRESENT APPAREIL NUMERIQUE N'EMET PAS DE BRUITS RADIOELECTRIQUES DEPASSANT LES LIMITES APPLICABLES AUX APPAREILS NUMERIQUES DE LA "CLASSE B" PRESCRITES DANS LE REGLEMENT SUR LE BROUILLAGE RADIOELECTRIQUE EDICTE PAR LE MINISTERE DES COMMUNICATIONS DU CANADA.
This product complies with the radio frequency interference requirements of the Council Directive 82/499/EEC and/or 87/308/EEC.
This product utilizes batteries or an external power supply (adapter). DO NOT connect this product to any power supply or adapter other than one described in the manual, on the name plate, or specifically recommended by Yamaha.
This product should be used only with the components supplied or; a cart, rack, or stand that is recommended by Yamaha. If a cart, etc., is used, please observe all safety markings and instructions that accompany the accessory product.
SPECIFICATIONS SUBJECT TO CHANGE:
The information contained in this manual is believed to be correct at the time of printing. However, Yamaha reserves the right to change or modify any of the specifications without notice or obligation to update existing units.
This product, either alone or in combination with an amplifier and headphones or speaker/s, may be capable of producing sound levels that could cause permanent hearing loss. DO NOT operate for long periods of time at a high volume level or at a level that is uncomfortable. If you experience any hearing loss or ringing in the ears, you should consult an audiologist. IMPORTANT: The louder the sound, the shorter the time period before damage occurs.
NOTICE:
Service charges incurred due to lack of knowledge relating to how a function or effect works (when the unit is operating as designed) are not covered by the manufacturer's warranty, and are therefore the owners responsibility. Please study this manual carefully and consult your dealer before requesting service.
ENVIRONMENTAL ISSUES:
Yamaha strives to produce products that are both user safe and environmentally friendly. We sincerely believe that our products and the production methods used to produce them, meet these goals. In keeping with both the letter and the spirit of the law, we want you to be aware of the following:
Battery Notice:
This product MAY contain a small non-rechargeable battery which (if applicable) is soldered in place. The average life span of this type of battery is approximately five years. When replacement becomes necessary, contact a qualified service representative to perform the replacement.
This product may also use "household" type batteries. Some of these may be rechargeable. Make sure that the battery being charged is a rechargeable type and that the charger is intended for the battery being charged.
When installing batteries, do not mix old batteries with new, or with batteries of a different type. Batteries MUST be installed correctly. Mismatches or incorrect installation may result in overheating and battery case rupture.
Warning:
Do not attempt to disassemble, or incinerate any battery. Keep all batteries away from children. Dispose of used batteries promptly and as regulated by the laws in your area. Note: Check with any retailer of household type batteries in your area for battery disposal information.
Disposal Notice:
Should this product become damaged beyond repair, or for some reason its useful life is considered to be at an end, please observe all local, state, and federal regulations that relate to the disposal of products that contain lead, batteries, plastics, etc. If your dealer is unable to assist you, please contact Yamaha directly.
NAME PLATE LOCATION:
The name plate is located on the bottom of the product. The model number, serial number, power requirements, etc., are located on this plate. You should record the model number, serial number, and the date of purchase in the spaces provided below and retain this manual as a permanent record of your purchase.
Model CBX-K1
Serial No.
Purchase Date
PLEASE KEEP THIS MANUAL
Welcome to the CBX-K1
Congratulations and thank you for purchasing the Yamaha CBX-K1 MIDI Keyboard!
The CBX-K1 is a sophisticated, yet compact MIDI keyboard controller, for use with computers and MIDI music systems. It allows you to play connected tone generators and rhythm machines, and enter performance data to sequencers and computers. It features a sophisticated touch-sensitive keyboard that can be adjusted to cover the full 128-note MIDI range. It also provides a wealth of MIDI controls that allow you to send virtually any MIDI message directly from the keyboard. Moreover, the CBX-K1 has a versatile ASSIGNABLE Wheel that lets you control a wide variety of parameters on your connected tone generator or sequencer in real time. Because of its exceptionally portable size, convenient battery/AC adaptor power supply, compatibility with General MIDI (GM) and XG, and extraordinarily powerful and comprehensive MIDI control functions, the CBX-K1 is an invaluable tool — a MIDI Swiss army knife, of sorts — for all MIDI musicians and performers.
IMPORTANT The CBX-K1 does not contain an internal tone generator. In order to play sounds from the CBX-K1, you need an external tone generator, such as the Yamaha MU series or TG series tone generators.
NOTE The many MIDI functions and features of the CBX-K1 may not be supported by your particular MIDI device. Be sure to refer to the owner's manual of your particular MIDI device when using it with the CBX-K1.
Table of Contents
The CBX-K1 - What It Is and What It Can Do . . . . . 1
Precautions 2
How to Use This Manual 3
Specifications 3
Panel Controls and Terminals 4
■ Front Panel 4
Note Range of the CBX-K1 5
Rear Panel 6
- Default Settings of the CBX-K1 6
Power Supply 7
Using a Power Adaptor 7
Using Batteries 7
When to Replace the Batteries 7
Guided Tour
Setting Up Your CBX-K1 8
What You'll Need 8
Setup Examples 8
Making the Connections 9
Using the CBX-K1 - Basic Operations 10
Playing the Keyboard and Other Operations 10
Using the SHIFT-Related Functions 12
Basic Operations 13
Setting the Functions 14
Group A Operations 14
Group B Operations 16
Reference
Group A Functions 18
Group B Functions 20
ASSIGNABLE Wheel - Controller Number List 22
Troubleshooting 23
MIDI Data Format 24
MIDI Implementation Chart 26
What It Is
The CBX-K1 is a compact, highly portable 37-key MIDI keyboard, designed especially for use with computers and MIDI music systems. The CBX-K1 does not generate any sound itself, but can be used as a keyboard controller for playing sounds on a connected tone generator or rhythm machine. It's also ideal for recording to sequencers and computers. The keyboard is touch-sensitive and its octave range can be changed to cover the full 128-note MIDI range.
The true power and flexibility of the CBX-K1 is in its comprehensive MIDI controls. The CBX-K1 allows you to send virtually any type of MIDI message to connected MIDI devices. Pre-programmed commands provide easy control of basic sequencer/rhythm machine functions such as Start, Stop, Tempo and Song Select, while comprehensive program change commands let you easily select program banks and voices.
Most importantly, though, the CBX-K1 has an ASSIGNABLE Wheel that can be set for control of any controller number. This means that you can use the ASSIGNABLE Wheel to control a wide variety of parameters on your connected tone generator — such as Volume, Pan, Brightness, and the Depth of various effects — in real time. This gives you expressive control over different aspects of the sound in live performance.
The CBX-K1 is also the latest instrument in the Yamaha line to support the XG format, a new addition to the General MIDI standard. In short, XG provides for more instrument sounds and variations, and greater expressive control over voices and effects. With the use of the ASSIGNABLE Wheel on the CBX-K1, you have direct real-time control over many of these newly supported functions and parameters.
What It Can Do
Here are a few application ideas on how you can use the CBX-K1. The list below is not comprehensive, but is meant to be a general guide to the possibilities and provide a starting point or springboard for your own creative ideas and explorations.
Using With a MIDI Tone Generator
In one of the most basic setups, you can play a connected tone generator from the CBX-K1. Because it's so compact and portable, you can even use it as a hand-held keyboard for live performance.
- Using as a Second Keyboard or Dedicated MIDI Controller
The CBX-K1 is small enough to fit on top of nearly any keyboard, making it perfect as a second keyboard. Since the CBX-K1 has a MIDI IN terminal, you can connect it between your main keyboard and your tone generator, and use the extensive MIDI capabilities of the CBX-K1 for greater expressive control during your performance.
Using in a MIDI Music System
Combined with a laptop computer and a compact tone generator (like the General MIDI/XG-compatible Yamaha MU80), the CBX-K1 gives you comprehensive music making power — for recording, composing, arranging, practicing, and editing — in a portable system that's ready to go wherever you go. The CBX-K1 is an ideal addition to larger MIDI studios as well, since it provides far greater MIDI control and flexibility than nearly any other keyboard controller. Use it along side your main MIDI keyboard as a kind of MIDI Swiss army knife — sending necessary MIDI messages, working the real-time controllers, or editing already recorded sequencer tracks.
Multimedia
Since it's portable and compatible with the General MIDI and XG formats, the CBX-K1 is a natural for multimedia applications. Because of its ease of use and comprehensive functions, it's the only keyboard you'll ever need for recording and editing MIDI data on your multimedia creations.
Your CBX-K1 will give you years of reliable service if you follow the simple precautions below:
LOCATION
Keep the instrument away from locations where it is likely to be exposed to high temperatures (such as direct sunlight) or humidity. Also avoid locations which are subject to excessive dust accumulation or vibration which could damage the instrument.
USE THE CORRECT POWER ADAPTOR
Use only the recommended PA-1B or PA-3 Power Adaptor for supplying power. Use of another adaptor may cause serious damage to the instrument or the adaptor itself. Also avoid using a multipleplug adaptor; plug the adaptor directly into a wall outlet.
- MAKE SURE POWER IS OFF WHEN MAKING OR REMOIVING CONNECTIONS
To prevent damage to the instrument and other connected equipment, always turn off the power prior to connecting or disconnecting cables. Also, turn the power off when the instrument is not in use, and disconnect the power adaptor during electric storms.
- NO MEMORY BACKUP
The CBX-K1 has no internal memory backup. As a result, all settings are returned to the factory default when turning the power off.
- HANDLE THE INSTRUMENT WITH CARE
Although the instrument has been constructed to withstand the rigors of normal use for optimum sturdiness and reliability, avoid subjecting it to strong physical shocks (such as dropping or hitting it). Since the CBX-K1 is a precision-made electronic device, also avoid applying excessive force to the various controls. When moving the instrument, first unplug the power adaptor and all other cables to prevent damage to cords and jacks. Always unplug cables by gripping the plug firmly, not by pulling on the cable.
- CLEAN WITH A SOFT, DRY CLOTH
Never use solvents such as benzine or thinner to clean the instrument, since these will damage the cabinet finish or dull the keys. Wipe clean with a soft, dry cloth. If necessary, use a soft, clean, slightly moistened cloth — making sure to wipe the instrument off again with a dry cloth. Do not leave vinyl on the panel as this may stick to and discolor the surface.
ELECTROMAGNETIC INTERFERENCE
Avoid using the unit near televisions, radios or other equipment generating electromagnetic fields. Proximity to such equipment may cause the unit to malfunction, and may generate interference noise in the other appliance as well.
DO NOT OPEN THE CASE OR TRY REPAIRING THE INSTRUMENT YOURSELF
The instrument contains no user-serviceable parts. Never open the case or tamper with the internal circuitry in any way, since doing so may result in damage to the instrument. Refer all servicing to qualified Yamaha service personnel.
MIDI CABLES
When connecting the instrument to other MIDI equipment, be sure to use only high-quality cables made especially for MIDI data transmission. Also, avoid using cables longer than 15 meters, since long cables can result in data errors.
Yamaha is not responsible for damage caused by improper handling or operation.
By and large, the CBX-K1 is very easy to use and this manual is self-explanatory. However, we strongly recommend that you take time to read the manual — especially before trying some of the more sophisticated MIDI functions. Read through all of the initial sections first, then go on to the "Guided Tour" to set up your CBX-K1, learn how to use its various functions, and try out some of the practical application examples to help you become more familiar with its operations. For those who need to delve deeper, the "Reference" section provides at-a-glance information and important details on all functions.
The following conventions are used throughout this manual:
- Panel buttons and controls are indicated as they appear on the actual instrument. (For example, SHIFT and OCTAVE SHIFT).
- The functions and features assigned to the keyboard are shown like this: BANK SELECT and MIDICH.
- Unless indicated otherwise, ENTER refers to either of the ENTER keys, HEXADECIMAL ENTER or DECIMAL ENTER. However, when you wish to enter a decimal value, make sure to press DECIMAL ENTER. Likewise, when entering a hexadecimal number, make sure to press HEXADECIMAL ENTER.
- Actual MIDI data messages (in hexadecimal) are indicated as follows: <
> and < >, etc. - Operation steps are indicated as follows:
| Example | Actual Operation |
| SHIFT + START | While holding down the SHIFT button, press START (D2). |
| SHIFT + GMON → ENTER | While holding down the SHIFT button, first press GMON (F#2), then press ENTER (either HEXADECIMAL ENTER or DECIMAL ENTER). |
Specifications
- Keyboard
37 mini key keyboard (C2-C5), velocity responsive
- Functions
Basic: Octave Shift (+/- 4 octaves), Pitch Bend, Assignable control, MIDI Merge (MIDI IN)
MIDI Data: Sequencer control, MIDI clock, Bank Select, Program Change, GM System On, XG System On, GM-B Reset, Control Change, All Sound Off, Reset All Controllers, and others
Assignable Parameters: Transpose (+/- 12 semitones), MIDI Transmit Channel, Fixed Velocity, Touch Sensitivity, Device Number, Merge On/Off (each channel)
- Panel Controls and Indicators
SHIFT button, OCTAVE SHIFT buttons and lamps, PITCH Wheel, ASSIGNABLE Wheel, POWER ON/OFF switch
- Input/Output Terminals
MIDI IN, MIDI OUT, DC IN
Power Supply
Yamaha PA-3 or PA-1B AC Power Adaptor (sold separately), or six "AA" size, SUM-3, R-6 or equivalent batteries (sold separately).
Power Consumption
Approximately 35mA (with battery use); approximately 2W (with AC adaptor use).
- Dimensions (W x D x H)
509 × 155 × 55 ~mm (20-1/16" x 6-1/8" x 2-3/16")
Weight (without batteries)
1.3 kg (2 lbs., 14 oz.)
Front Panel
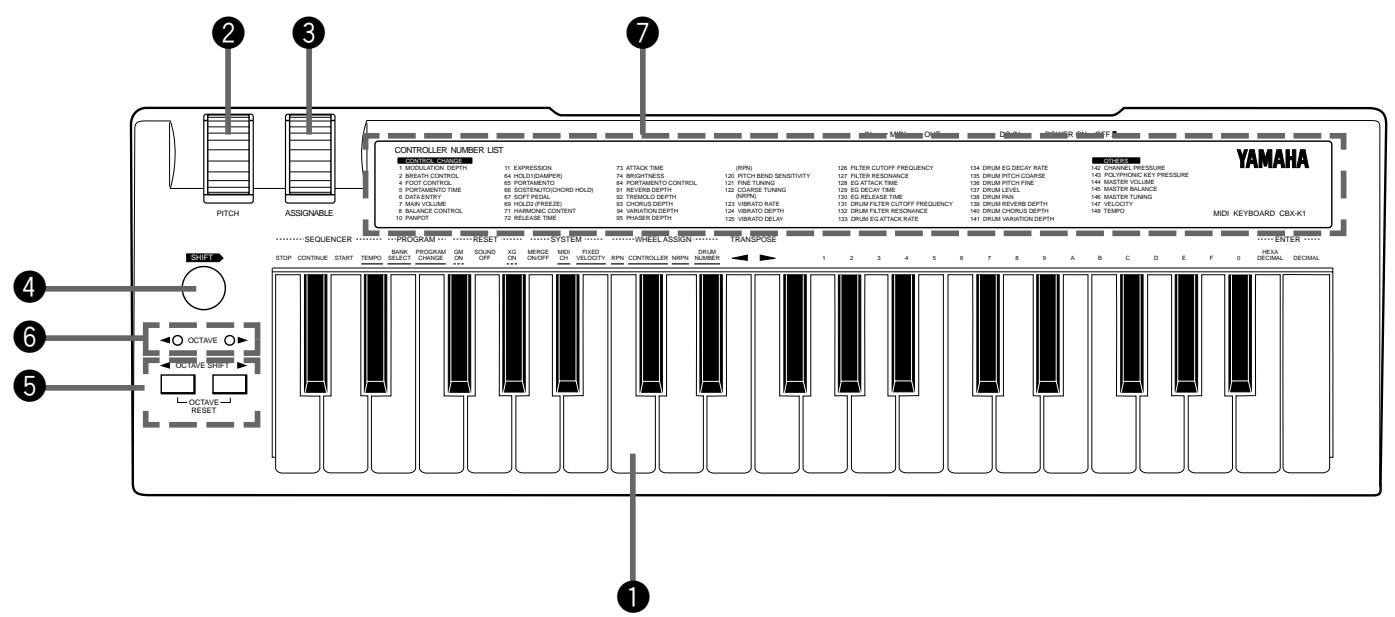
1 Keyboard
The CBX-K1 has a 37-key, 3-octave keyboard (C2 to C5), featuring initial touch (velocity) control. All note on, note off and velocity data is transmitted via the MIDI OUT terminal. When used with the SHIFT button, the keys are used for changing various settings and sending special MIDI messages. (See page 12.)
About the Functions of the CBX-K1: The functions are divided into two groups: Group A and Group B. The Group A functions are shown on the panel, above the left section of the keyboard. The Group B functions are "hidden" and are listed on pages 12 and 20. Several functions can be used by pressing only the relevant key; in other words, pressing ENTER is not necessary. These functions, such as Sequencer Stop and Start, are shown on the panel without underline. The right section of the keyboard serves as value entry and is used for those functions whose names are underlined on the panel and require value entry, such as Program Change and Tempo. Functions whose names appear with a dashed underline on the panel (for example, GM ON and XG ON) require pressing ENTER. Value entry on the CBX-K1 can be done in two number systems: Decimal and Hexadecimal. The keys labeled A through F are for Hexadecimal entry.
NOTE The normal (default) velocity range of the CBX-K1 is from 16 to 127. The range differs according to the Touch Sensitivity setting (see page 20).
2 PITCH Wheel (Pitch Bend)
This spring-loaded Wheel controls Pitch Bend. The Wheel's operation can be reversed. (See page 20.)
3 ASSIGNABLE Wheel
When the CBX-K1 is turned on, this Wheel (with center detent) is set to control Modulation Depth on the connected MIDI device. It can be set to control other functions; see pages 18 and 22 for details. The Wheel's operation can be reversed. (See page 20.)
4 SHIFT>Button
This button is used to access the "hidden" functions of the CBX-K1. Used with the OCTAVE SHIFT / OCTAVE SHIFT buttons, it allows you to step up or down through program numbers. (See page 10.) Used with the keys of the keyboard, it allows you to access the sophisticated MIDI control functions. (See page 12.)
5 OCTAVE SHIFT / OCTAVE SHIFT Buttons
These buttons are used to change the octave range of the keyboard, allowing you to play across the entire range of MIDI notes (C-2 to G8). (See page 5.) Press both of these buttons together to restore the normal octave setting (C2 to C5). With the SHIFT button, these buttons can also be used to step up or down through program numbers on the connected MIDI device. (See page 10.)
OCTAVE/OCTAVE Lamps
These lamps provide several indications:
- During normal playing conditions, these indicate the octave setting of the keyboard, up (OCTAVE▶) or down (▲OCTAVE). Both light together for the normal octave setting. When changing the octave setting, these flash to indicate the number of octaves, up or down. (See page 11.)
- When using some of the "hidden" functions, these flash when a MIDI message is transmitted or when a function is executed.
- The left lamp flashes slowly when the battery power is too low for proper operation.
- The right lamp flashes quickly when there is some kind of MIDI receive error. The lamp flashes until you turn the power off and on again, or until you set MIDI Merge to ON. (See page 24.)
CONTROLLER NUMBER LIST
This shows the controller numbers that can be used with the ASSIGNABLE Wheel. (See page 22.)
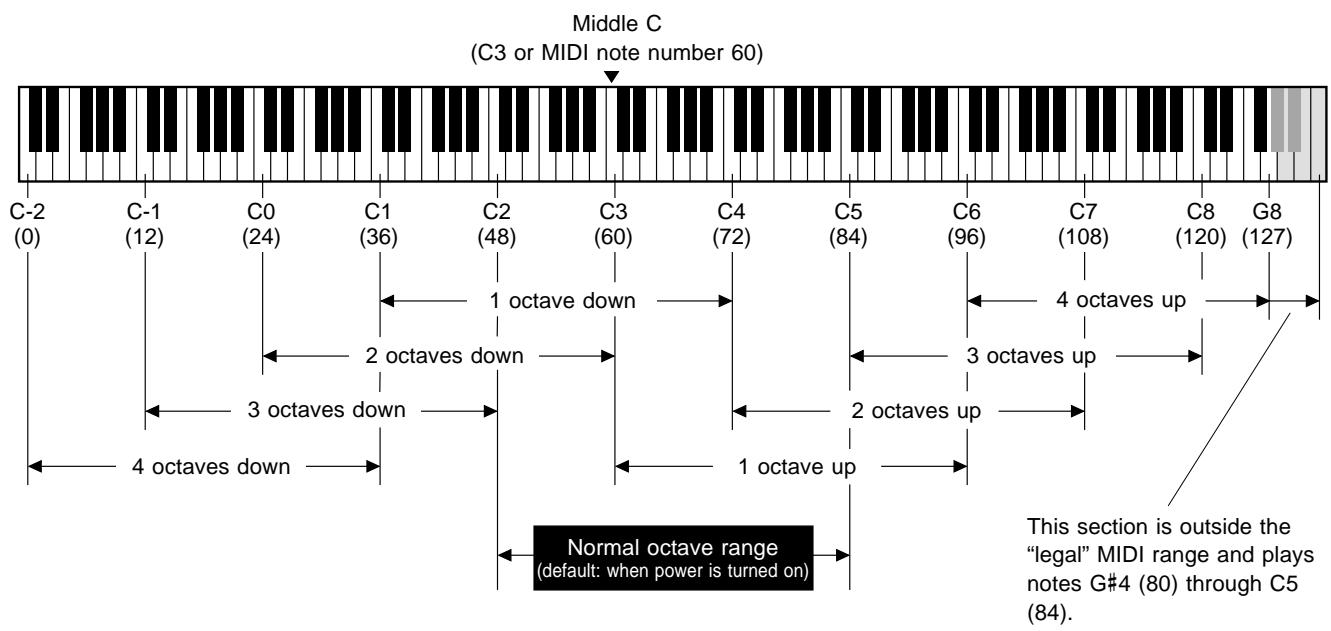
Note Range of the CBX-K1 (with Octave Shift)
Rear Panel
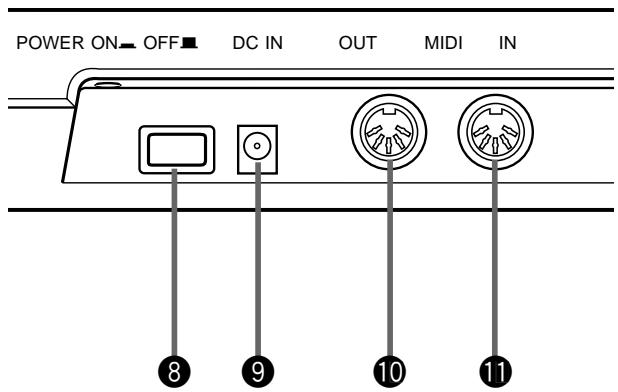
POWER Switch
Push this switch in to turn on the power. Each time the power is turned on, the CBX-K1 returns to the default condition. (See boxed section below.)
DC IN Terminal
This is for connection to an optional PA-1B or PA-3 AC power adaptor.
10 MIDI OUT Terminal
This is for connection to the MIDI IN terminal of another MIDI device (such as a MIDI tone generator, sequencer or computer that has a MIDI interface), for sending MIDI messages to that device. By using the MIDI Merge function, data received at MIDI IN can be combined with the data generated by the CBX-K1 and transmitted via this terminal.
1 MIDI IN Terminal
This is for connection to the MIDI OUT terminal of another MIDI device (such as a MIDI keyboard, sequencer or computer that has a MIDI interface), for input of that device's data. By using the MIDI Merge function, that data can be combined with the data generated by the CBX-K1 and transmitted via the MIDI OUT terminal.
Default Settings of the CBX-K1
The CBX-K1 has no internal memory backup. As a result, all settings are returned to the factory default when turning the power off. The basic factory default settings are listed below.
- MIDI transmit channel: 1
- Octave range: C2-C5
- Transpose: normal (no transposition)
- Fixed velocity: Off (keyboard is velocity sensitive)
- ASSIGNABLE Wheel: Modulation
- User-configurable Defaults:
You can change certain power-on default settings of the CBX-K1. These include:
- Reversing the PITCH Wheel and ASSIGNABLE Wheel operation. Hold down OCTAVESHIFT and turn the power on. (See page 20.)
- Reversing the MSB, LSB order. Hold down OCTAVE SHIFT▶ and turn the power on. (See page 20.)
Your CBX-K1 will run either from an optional power adaptor or batteries. Follow the instructions below according to the power source you intend to use.
NOTE Before making any connections, make sure that all equipment to be connected is turned off.
Using a Power Adaptor
Connect one end of the power adaptor (the optional) Yamaha PA-1B or PA-3) to the DC IN jack on the rear panel, and the other end to a suitable electrical outlet.
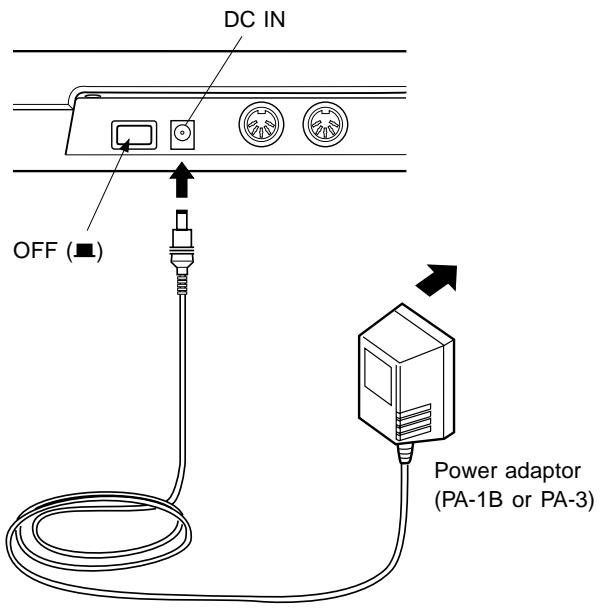
CAUTION!
■ Do not attempt to use a power adaptor other than the PA-1B or PA-3. The use of an incompatible adaptor may result in irreparable damage to the CBX-K1, and even pose a serious shock hazard.
■ Be sure to disconnect the power adaptor from the outlet when the CBX-K1 is not in use.
Using Batteries
To use the CBX-K1 on battery power, remove the battery compartment cover (as shown below) and insert six 1.5V AA size (SUM-3, R-6 or equivalent) manganese or alkaline batteries in the battery compartment. Make sure to follow the polarity indications on the bottom case.
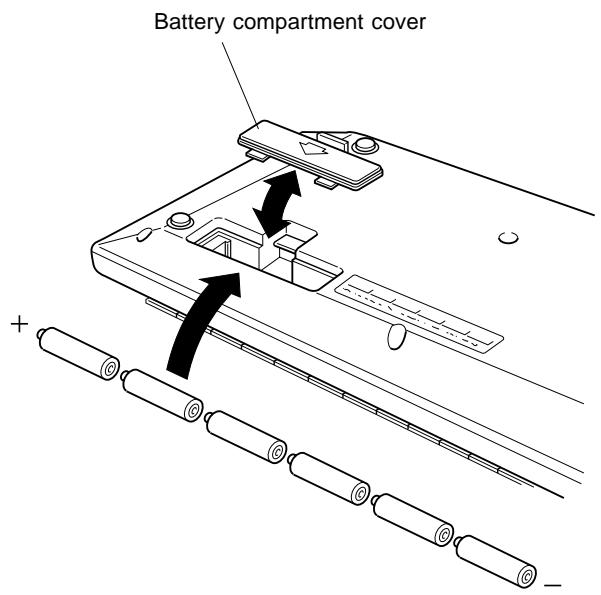
Securely replace the battery compartment cover when done installing the batteries.
When to Replace the Batteries
When the battery power runs too low to properly operate the CBX-K1, the OCTAVE lamp will flash slowly. When this happens, replace all batteries with a complete set of six new batteries of the same type.
CAUTION! ■ NEVER mix old and new batteries or different types of batteries! Also, to prevent possible damage due to battery leakage, remove the batteries from the instrument if it is not to be used for an extended period of time.
IMPORTANT ■ Turning the power off and on again resets all settings to the factory default, cancelling all user settings.
Guided Tour
When using your CBX-K1 for the first time, read through this short section of the manual. It guides you step-by-step in using many of the basic operations: setting the instrument up, connecting it properly to other equipment, and — most importantly — playing it.
Setting Up Your CBX-K1
In this introductory section, you'll learn how to set up the CBX-K1 for use in your music system. A variety of setups are covered here; read through the one that most closely matches your own setup.
What You'll Need
Since the CBX-K1 is strictly a MIDI controller and does not generate any sound by itself, you'll need other data-receiving and sound-producing equipment. Basically, you will need:
- The CBX-K1 and an optional PA-3 or PA-1B AC power adaptor (or a set of batteries).
- A MIDI device (such as a tone generator, keyboard or computer) which can receive and play back MIDI data, and at least one MIDI cable.
- (Optional) An amplifier/speaker system, preferably stereo, with proper audio connecting cables. Alternately, you can use a set of stereo headphones.
Setup Examples
NOTE The setup examples below show only the MIDI connections. The audio connections would vary according to the particular equipment you use. Refer to the owner's manuals of your other equipment for audio connection instructions.
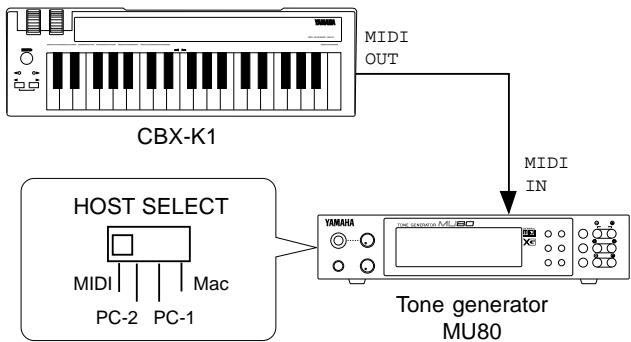
With Computer and Tone Generator
In the small MIDI system below, the CBX-K1 is connected to a computer and a single tone generator. With the proper sequencing software on the computer, the CBX-K1 can be used both for recording performance data to the computer and playing the sounds of the connected tone generator. You can also conveniently use the CBX-K1 to start and stop the sequencer.
For tone generators with a built-in MIDI interface (such as the Yamaha MU80)
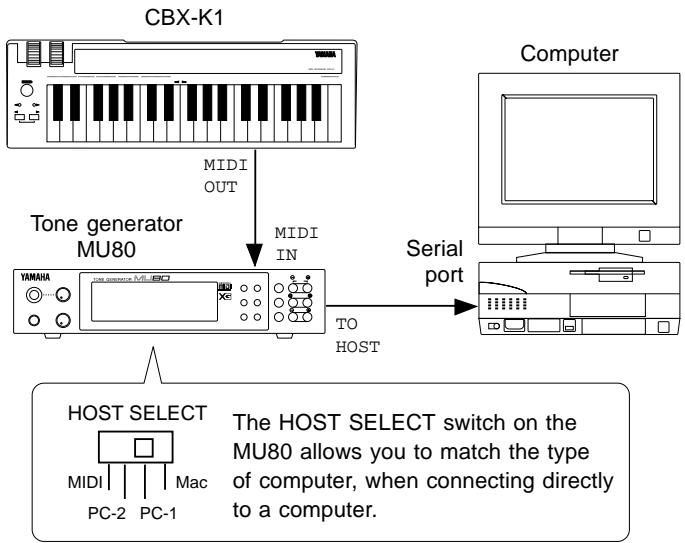
Connect the MIDI OUT terminal on the CBX-K1 to the MIDI IN terminal on the MU80. The MU80 should be connected to the proper port on the computer. (For complete connection instructions, refer to the owner's manual of your particular tone generator.)
For tone generators without a built-in MIDI interface
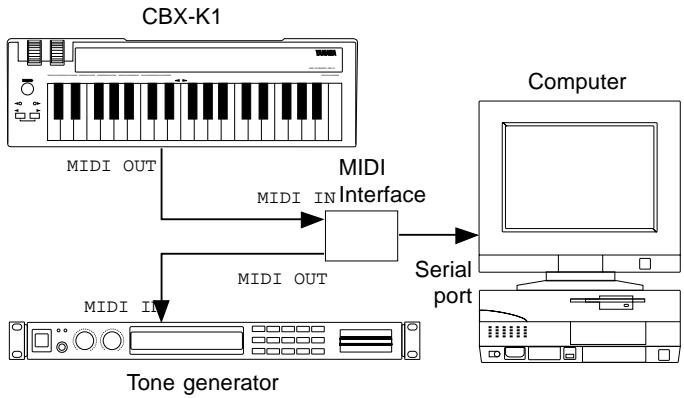
Connect the MIDI OUT terminal on the CBX-K1 to the MIDI IN terminal on the computer's MIDI interface. The tone generator should be connected to a MIDI OUT on the interface.
With Sequencer
The CBX-K1 can be used with a stand-alone sequencer, for recording and editing performance data.
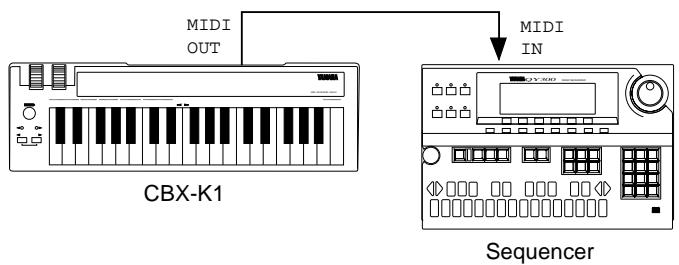
Connect the MIDI OUT terminal on the CBX-K1 to the MIDI IN terminal on the sequencer.
With Tone Generator
In the simple system below, the CBX-K1 is used to play the voices of the MU80 Tone Generator. This setup could also serve as a simple, yet powerful live performance rig, with the CBX-K1 being used as a portable, hand-held keyboard.
Connect the MIDI OUT terminal on the CBX-K1 to the MIDI IN terminal on the MU80.
With Main Keyboard and Tone Generator
In this system, the CBX-K1 effectively serves as a second keyboard. The main keyboard (in this case, the Clavinova) is used to play both its own internal sounds and the sounds of the connected multi-timbral tone generator on one channel, while the CBX-K1 is used to play the sounds of the tone generator on another channel. This lets you play two sounds at once from the Clavinova, and play a third sound from the CBX-K1.
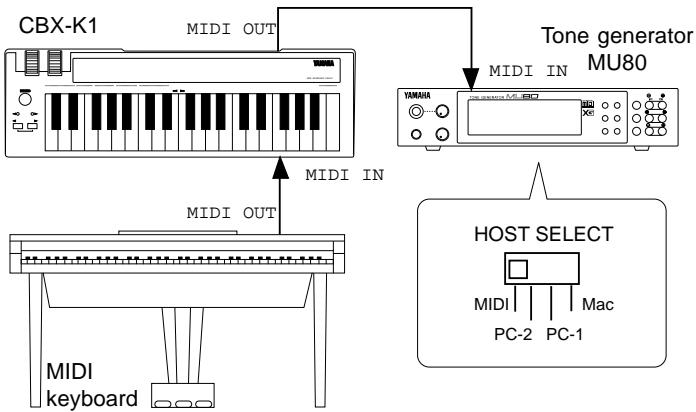
Connect the MIDI OUT terminal on the main keyboard to the MIDI IN terminal on the CBX-K1. Also connect the MIDI OUT terminal on the CBX-K1 to the MIDI IN terminal on the tone generator.
In a variation of the above setup, set the Clavinova and CBX-K1 to transmit on the same channel, and set the CBX-K1's MIDI Merge function to ON. This lets you play the tone generator from either keyboard and use the versatile MIDI functions of the CBX-K1 to control the tone generator — for example, changing the brightness of the sound in real time with the ASSIGNABLE Wheel.
NOTE When an external MIDI device is connected to the MIDI IN of the CBX-K1, the OCTAVE lamp may flash, indicating a MIDI error. This is probably due to a longer-than-normal interval between active sensing messages received from the device. To remedy this, set the MIDI Merge of the CBX-K1 to ON. (See page 24.)
Making the Connections
CAUTION! Before making any connections, make sure that all equipment to be connected is turned off.
Operation
- Connect the MIDI OUT terminal of the CBX-K1 to the MIDI IN terminal of the tone generator, sequencer or computer MIDI interface (as shown in the illustrations above).
- Make all necessary audio connections, making sure first that all level controls on those devices are set to the minimum. (Refer to the owner's manuals of the devices you are using for more information on connections.)
- Finally, turn on the power of the CBX-K1, then turn on the power of the connected equipment. (If necessary, follow the order as recommended in the owner's manuals of the devices you are using.) When turning off the power, be sure to turn off the CBX-K1 last.
Though the CBX-K1 has many sophisticated functions, it is very easy to use. All available functions can be controlled or executed by using the basic operations described in this section. (For details on individual functions, see pages 18-22.)
NOTE This introductory section assumes that the MIDI transmit channel of the CBX-K1 and the MIDI receive channel of the connected device match. When the CBX-K1 is turned on, the MIDI transmit channel is automatically set to 1. For the sake of the following sections, set the MIDI receive channel of the connected device to 1 (or Omni).
Playing the Keyboard and Other Operations
The illustration below shows how to use the basic real-time controls of the CBX-K1.
- Changing Voices (Program Change Up/Down)
You can easily step up or down through the voices (program numbers) on the connected MIDI device.
To do this, hold down SHIFT and press OCTAVE SHIFT (to advance one program number), or press OCTAVE SHIFT (to go back one program number). The LEDs quickly flash on and off when a program number message is sent. Release SHIFT to play the new voice.
When the CBX-K1 is turned on, the starting point for program change is 0. This means that when you first hold down SHIFT and press OCTAVE SHIFT, program number 1 will be selected.
NOTE Always release SHIFT before playing the CBX-K1 keyboard. Holding down SHIFT accesses the secondary or "hidden" functions, and you may inadvertently execute one of these functions by playing the keyboard while continuing to hold down SHIFT.
NOTE This function does not "wrap around." In other words, you cannot go back to program number 127 when at 0, or advance to program number 0 when at 127.
PITCH Wheel
This Wheel controls Pitch Bend on the connected MIDI device. The Wheel's maximum/minimum positions can be reversed. (See page 20.)
ASSIGNABLE Wheel
When the CBX-K1 is turned on, this Wheel is set to control Modulation Depth on the connected MIDI device. It can be set to control other functions; see page 18 for details. The Wheel's maximum/minimum positions can be reversed. (See page 20.)

- Changing the Octave Setting
You can easily change the octave range of the CBX-K1 keyboard while playing. In this way the three-octave keyboard can cover the entire range of MIDI notes, from C-2 to G8 (0-127).
To shift the keyboard up one octave, press OCTAVE SHIFT. To shift the keyboard down one octave, press OCTAVE SHIFT. When the octave is changed, the LEDs rapidly flash one, two, three or four times, according to the selected octave range. For example, when the setting is changed to two octaves below normal, the left lamp flashes twice.
Normal octave setting.

NOTE At the lowest and highest octave settings, keys outside the legal MIDI note range will repeat the center octave range.
Using the SHIFT-Related Functions
The enormous flexibility and power of the CBX-K1 is in its "hidden" or SHIFT-related functions — allowing you to send virtually any kind of MIDI message directly from the keyboard or use the ASSIGNABLE Wheel for real-time control change.
Many of the functions can be done with one or two keystrokes, while others require you to enter a number value and press one of the ENTER keys to execute the function. All functions can be accessed or executed by using one of the operations described below.

The MIDI functions can be generally divided into three types, according to their operation.
1) Holding SHIFT and pressing the function's key. For these functions, such as Sequencer Stop and Start, pressing ENTER is not necessary. These functions are shown on the panel without underline.
2) Holding SHIFT, pressing the function's key and then ENTER. These functions are indicated with a dashed underline on the panel (for example, GM ON and XG ON) and require pressing ENTER to execute.
3) Holding SHIFT, pressing the function's key, entering a value and then pressing ENTER. These functions are indicated with an underline on the panel (for example, PROGRAM CHANGE and TEMPO), and require that a value (Decimal or Hexadecimal) be entered.
In using the SHIFT-related functions, remember:
Keep holding down SHIFT until the end of the operation. If SHIFT is released in mid-operation, you'll have to start the operation all over again.
In the instructions that follow, "ENTER" refers to either of the ENTER keys, HEXADECIMAL ENTER or Decimal ENTER. In other words, this means that either key can be used, unless indicated otherwise.
NOTE The OCTAVE / OCTAVE lamps flash briefly when a function is executed or a message is sent.
- Functions Assigned to the Keyboard
| Panel Name | Group A Function | Group B Function |
| STOP | Stop | Song Select |
| CONTINUE | Continue | Song Position Pointer |
| START | Start | Reset All Controllers |
| TEMPO | Tempo | — |
| BANK SELECT | Bank Select | — |
| PROGRAM CHANGE | Program Change | — |
| GM ON | GM On | — |
| SOUND OFF | All Sound Off (each channel) | All Sound Off (all channels) |
| XG ON | XG On | GM-B Reset |
| MERGE ON/OFF | Merge On/Off (each channel) | — |
| MIDI CH | MIDI Channel | Merge On/Off (each channel) |
| FIXED VELOCITY | Fixed Velocity | Touch Sensitivity |
| RPN | Wheel Assign (RPN) | Controller Direct Data Send (RPN) |
| CONTROLLER | Wheel Assign (controller number on panel) | Controller Direct Data Send (controller number on panel) |
| NRPN | Wheel Assign (NRPN) | Controller Direct Data Send (NRPN) |
| DRUM NUMBER | Drum Number | Device Number |
| TRANSPose ▲ | Transpose Down | Wheel Invert |
| TRANSPose ▲ | Transpose Up | MSB/LSB Invert |
Basic Operations
Selecting Group A and Group B Functions
Selecting Group A Functions:
Hold down SHIFT and press the appropriate key. (See pages 14 and 18 for specific Group A functions and how to use them.)
Selecting Group B Functions:
Hold down SHIFT and press DECIMAL ENTER. The
Group B functions are available as long as you continue to hold down SHIFT. (See pages 16 and 20 for specific Group B functions and how to use them.)
Entering Values
Value entry on the CBX-K1 can be done in two number systems: Decimal and Hexadecimal. The keys labeled A through F are for Hexadecimal entry.
- Entering a decimal value:
Hold down SHIFT, press the appropriate function key, enter the desired value in decimal format, then press DECIMAL ENTER.
- Entering a hexadecimal value:
Hold down SHIFT, press the appropriate function key, enter the desired value in hexadecimal format, then press HEXADECIMAL ENTER.
Example — Setting the MIDI Transmit Channel to 12:
Decimal:
$$ \begin{array}{l}\text {S H I F T}\\rightarrow \boxed {\text {M I D I C H}} \rightarrow \boxed {1} \rightarrow \boxed {2} \rightarrow \boxed {\text {D E C I M A L E N T E R}}\end{array} $$
Hexadecimal:
$$ \begin{array}{l}\text {S H I F T}\\rightarrow \boxed {\text {M I D I C H}} \rightarrow \boxed {\text {C}} \rightarrow \boxed {\text {H E X A D E C I M A L E N T E R}}\end{array} $$
Value Entry — Some Specific Examples and Anomalies
Using DECIMAL ENTER
Examples:
^1 2 ~ENTER : results in a value of 12.
ENTER : results in a value of 10.
2 : results in a value of 210.
2 ENTER : results in a value of 102.
3 ENTER : results in a value of 310, which is ignored since it is outside the legal value range (0-255).
- Entering MSB/LSB Values with DECIMAL ENTER (3 digit bytes for MSB, 3 digit bytes for LSB; 6 digits total message). For messages beginning with zeroes, the first zeroes can be omitted.
Examples:
3 ENTER : results in a value of MSB = 000 ,LSB = 003
0 3 ENTER : results in a value of MSB = 000, LSB = 003.
1 0 0 3 ENTER : results in a value of MSB = 001, LSB = 003.
0 1 0 0 3 ENTER : results in a value of MSB = 001, LSB = 003.
- Entering MSB/LSB Values with HEXADECIMAL ENTER (2 digit bytes for MSB, 2 digit bytes for LSB; 4 digits total message). For messages beginning with zeroes, the first zeroes can be omitted.
Examples:
3 : results in a value of MSB = 00 ,LSB = 03.
0 3 ENTER : results in a value of MSB = 00, LSB = 03.
1 0 3 : results in a value of MSB = 01 ,LSB = 03
0 1 0 3 ENTER : results in a value of MSB = 01, LSB = 03.
NOTE The order of MSB and LSB entry can be reversed. (See page 20.)
■ If you inadvertently press two or more function keys while performing a function, the last pressed key has priority.
■ If, after entering a value, you press another function key before pressing ENTER, the value will be cancelled.
If you enter a value that is outside of a function's range, it will be ignored. Legal messages can be one byte in length (a value from 0-255).
Setting the Functions
This section shows by example the operations for the basic functions.
- Unless indicated otherwise, ENTER refers to either of the ENTER keys, HEXADECIMAL ENTER or
DECIMAL ENTER. However, when you wish to enter a decimal value, make sure to press DECIMAL ENTER. Likewise, when entering a hexadecimal number, make sure to press HEXADECIMAL ENTER.
Group A Operations
- Numbers 1 - 3 in the illustration correspond to the operation numbers below.
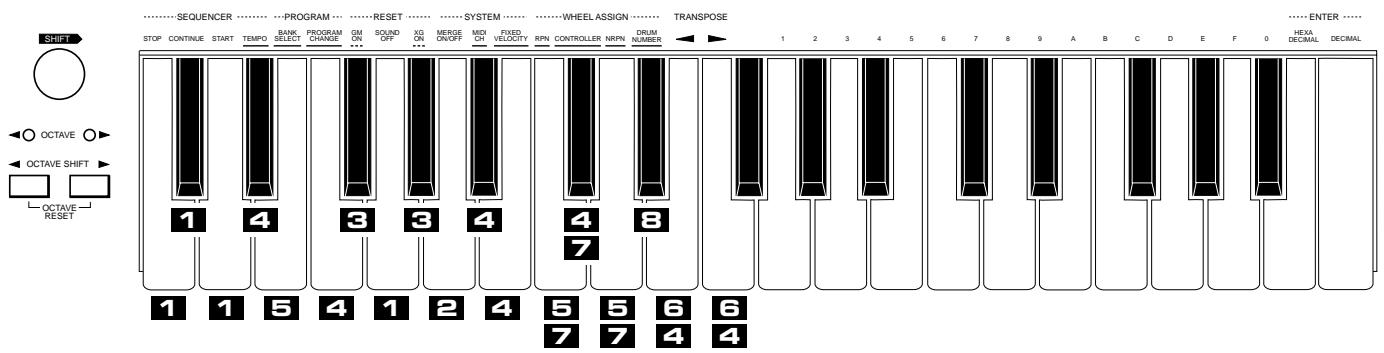
1
Sending a Simple Command
Operation: SHIFT + Function Key
Relevant Functions: Sequencer Stop/Continue/Start; Sound Off
- Example: Sending a Start command to a sequencer or rhythm machine
SHIFT+ START
You can use the STOP and CONTINUE keys in the same way, to stop the sequencer or continue playback from the stopped point.
2
Setting a Simple Command (on/off)
Operation: SHIFT + Function Key
Relevant Functions: Merge On/Off
- Example: Switching the MIDI Merge function of the CBX-K1 on or off
SHIFT MERGE ON/OFF
3
Sending a Simple Command with ENTER
Operation: SHIFT + Function Key → ENTER
Relevant Functions: GM System On; XG System On
- Example: Setting a connected tone generator to XG Mode
SHIFT + XGON → ENTER
NOTE Either ENTER key can be used for these commands.
4
Setting a Specific Value for a Function
Operation: SHIFT + Function Key Value ENTER
Relevant Functions: Tempo; Program Change; MIDI Channel; Fixed Velocity; Controller; Drum Number; Transpose Down/Up
- Example: Changing the tempo value on a sequencer or rhythm machine
SHIFT + [TEMPO] → [1] → [4] → [0] → [DECIMAL ENTER]
5
Setting a Specific Value for a Function (MSB, LSB)
Operation: SHIFT + Function Key MSB value LSB value
ENTERT
Relevant Functions: Bank Select; RPN; NRPN
- Example: Selecting a Bank of Voices on a Tone Generator
Some tone generators feature two or more banks of voices. This example shows how to use the Bank Select function to select different banks. This example also shows you how to use the functions that require entry of two values: MSB and LSB.
In this example, we'll enter a value of 012 (MSB) 034 (LSB)

NOTE Decimal values of MSB and LSB are 3 digits each (6 digits total); hexadecimal values are 2 digits each. Zeroes must be entered, unless they occur at the beginning of the value. For example, for the decimal value of 001 (MSB) 012 (LSB), the first two zeroes may be omitted, but the third must be entered. In other words, the value could be entered as 1 0 1 2 .
6
Transpose Setting
Operation: SHIFT + TRANSPOSE / TRANSPOSE
To transpose up one semitone, use the TRANSPOSE key (F3). To transpose down one semitone, use the TRANSPOSE key (E3). Each repeated pressing of the key while holding SHIFT transposes the pitch by an additional semitone. To restore the normal default transpose setting, hold down SHIFT and press both TRANSPOSE / TRANSPOSE keys simultaneously.
NOTE You can also enter transpose values directly by using operation above.
7
Setting a Specific Value for a Specific Controller
Operation: SHIFT + Function Key Controller Number ENTER Value(s) ENTER
Relevant Functions: RPN*; Controller; NRPN* Functions marked with an asterisk (^*) above require that you enter two values: an MSB (Most Significant Byte) and an LSB (Least Significant Byte).
- Example: Changing the Portamento Time of a tone generator's voice

The operation steps enclosed in brackets can be repeated or re-entered as long as SHIFT is held.
NOTE This operation assigns a controller number for the ASSIGNABLE Wheel and sends a specific value for that controller number. You can also send a specific value for the controller (in the Group B functions) without altering the controller assignment.
8
Selecting a Drum Number (when editing a specific drum number with controller numbers 131 - 141)
You can use operation 4 above to set the drum number for editing a specific drum number with controller numbers 131 - 141. However, the following operation lets you set the Drum number by playing it from the keyboard. This allows you to hear the drum sound you'll be editing, since the last note played on the keyboard determines the drum sound to be changed.
Without pressing SHIFT, find the desired drum number by sound — by pressing keys on the keyboard. Next, hold down SHIFT, press DRUM NUMBER, then ENTER. This sets the drum number to the last key pressed. Then (to set the controller number for that drum sound), hold down SHIFT and press CONTROLLER, then enter the controller number (131 through 141). This sets the Controller Number for the Drum parameter you wish to control with the ASSIGNABLE Wheel.
- Unless indicated otherwise, ENTER refers to either of the ENTER keys, HEXADECIMAL ENTER or DECIMAL ENTER. However, when you wish to enter a
decimal value, make sure to press DECIMAL ENTER. Likewise, when entering a hexadecimal number, make sure to press HEXADECIMAL ENTER.
Group B Operations
Group B function names are not shown on the panel. For the list and explanations of Group B functions, refer to pages 12 and 20.
- Numbers 9 - 14 in the illustration correspond to the operation numbers below.
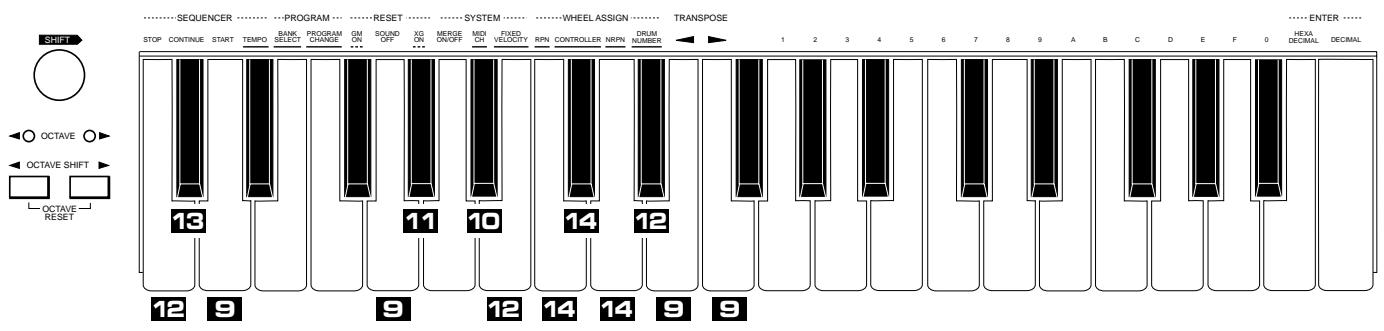
9
Sending a Simple Command
Operation: SHIFT + DECIMAL ENTER Function Key
Relevant Functions: Reset All Controllers; Sound Off (all channels); Wheel Invert; MSB/LSB Invert
- Example: Sending a Reset All Controllers command to a sequencer or tone generator
SHIFT + DECIMAL ENTER → START (Reset All Controllers)
10
Setting a Simple Command (on/off)
Operation: SHIFT + DECIMAL ENTER Function Key Value Relevant Function: Merge On/Off (each channel)
- Example: Switching the MIDI Merge function of the CBX-K1 on or off for MIDI channel 12
SHIFT + DECIMAL ENTER → MIDI CH (Merge On/Off for each channel) → C (for MIDI channel 12)
Keys 1 - and 0 correspond to MIDI channel 1- 15 and 16, respectively. Pressing each key toggles the on/ off status of each channel.
11
Sending a Simple Command with ENTER
Operation: SHIFT + DECIMAL ENTER → Function Key → ENTER
Relevant Function: GM-B Reset
12
e: Setting a connected tone generator to GM-B Reset
SHIFT + DECIMAL ENTER → XG ON (GM-B Reset) → ENTER
Setting a Specific Value for a Function
Operation: SHIFT + DECIMAL ENTER → Function Key → Value → ENTER
Relevant Functions: Song Select; Touch Sensitivity; Device Number
- Example: Changing the touch sensitivity of the CBX-K1 to 10
SHIFT DECIMAL ENTER FIXED VELOCITY (Touch Sensitivity) 1 0 ENTER
13
Setting a Specific Value for a Function (MSB, LSB)
Operation: SHIFT + DECIMAL ENTER → Function Key →
Values ENTER
Relevant Function: Song Position Pointer
Example: Changing the song position pointer setting on a sequencer to MSB = 12 , LSB = 34
SHIFT + DECIMAL ENTER → CONTINUE (Song Position Pointer) →
0 → 1 → 2 → 0 → 3 → 4 → DECIMAL ENTER
NOTE Decimal values of MSB and LSB are 3 digits each (6 digits total); hexadecimal values are 2 digits each. Zeroes must be entered, unless they occur at the beginning of the value. For the example above, the first zero may be omitted, but the second must be entered. In other words, the value could be entered as
1 2 0 3 4.
14
Setting a Specific Value for a Specific Controller
Operation: SHIFT + DECIMAL ENTER → Function Key →
Controller Number ENTER Value(s) ENTER
Relevant Functions: RPN Direct Data Send*; Controller Direct
Data Send; NRPN Direct Data Send*
Functions marked with an asterisk (^*) above require that
you enter two values: an MSB (Most Significant Byte)
and an LSB (Least Significant Byte).
- Example: Changing the Portamento Time of a tone generator's voice
SHIFT + DECIMAL ENTER → CONTROLLER → (Portamento
Time) ENTER {2} 5 ENTER}
The operation steps enclosed in brackets () can be repeated or re-entered as long as SHIFT is held.
NOTE This operation assigns a controller number for the ASSIGNABLE Wheel without altering the controller assignment.
15
Sending a Single-Byte Data Message
This function allows you to quickly and easily send a non-standard MIDI message of a single byte. The effective range of this function is from 0-255; values outside of this range will be ignored.
Operation: SHIFT + DECIMAL ENTER → Value → ENTER
Example: Sending a (decimal) value of 252
SHIFT + DECIMAL ENTER → {2 → 5 → 2 →
DECIMALENTER}
The operation steps enclosed in brackets () can be repeated or re-entered as long as SHIFT is held.
Group A Functions
Continue holding SHIFT while performing the operation steps for the desired Group A function.
For detailed explanations on the basic operations, refer to
page 14. The numbered footnotes that follow these charts provide additional details on certain operations.
| Key | Panel Name | Function | Operation Steps | Operation Examples(see page 14) |
| C2 | STOP | Stop | SHIFT+STOP | 1 |
| C#2 | CONTINUE | Continue | SHIFT+CONTINUE | 1 |
| D2 | START | Start | SHIFT+START | 1 |
| D#2 | TEMPO | Tempo | SHIFT+TEMPO→[Value]→ENTER | 4 |
| E2 | BANK SELECT | Bank Select | SHIFT+ BANK SELECT→[MSB]→[LSB]→[ENTER] | 5 |
| F2 | PROGRAM CHANGE | Program Change | SHIFT+PROGRAM CHANGE→[Value]→[ENTER] | 4 |
| F#2 | GM ON | GM On | SHIFT+GM ON→ENTER | 3 |
| G2 | SOUND OFF | All Sound Off(each channel) | SHIFT+SOUND OFF | 1 |
| G#2 | XG ON | XG On | SHIFT+XG ON→ENTER | 3 |
| A2 | MERGE ON/OFF | Merge On/Off *1(all channel) | SHIFT+MERGE ON/OFF | 2 |
| A#2 | MIDI CH | MIDI Channel | SHIFT+MDI CH→[Value]→ENTER | 4 |
| B2 | FIXED VELOCITY | Fixed Velocity | SHIFT+FIXED VELOCITY→[Value]→ENTER | 4 |
| C3 | RPN | Wheel Assign (RPN)*2 | SHIFT+RPN→[MSB]→[LSB]→[ENTER] | 57 |
| C#3 | CONTROLLER | Wheel Assign controller numberon panel)*2 | SHIFT+CONTROLLER→[Value]→ENTER | 47 |
| D3 | NRPN | Wheel Assign (NRPN)*2 | SHIFT+NRPN→[MSB]→[LSB]→ENTER | 57 |
| D#3 | DRUM NUMBER | Drum Number | Before executing the operation below, use the keyboard to selectthe desired drum sound (see page 15).SHIFT+DRUM NUMBER→ENTER | 8 |
| E3 | TRANSPose← | Transpose Down *3 | SHIFT+TRANSPOSE→··· | 64 |
| F3 | TRANSPose← | Transpose Up *3 | SHIFT+TRANSPOSE→··· | 64 |
GENERAL

General MIDI (GM)
General MIDI (GM) is a new addition to the worldwide MIDI standard. The main feature of GM is in the standardization of instrument sounds, ensuring that song data recorded in the GM format can be played back on GM-compatible tone generators of any manufacturer, and sound as the composer or programmer intended.

XG
XG is a major new enhancement to the GM format developed by Yamaha, and it provides for more instrument sounds and variations, as well as greater expressive control over voices and effects. XG-compatible instruments feature full compatibility with GM, while ensuring forward compatibility with future instruments and software.
| Explanation | Range (Hexadecimal in parentheses) | Default Setting | MIDI Code | |
| Stop command for sequencer/rhythm machine. | — | — | <<FC>> | |
| Continue command for sequencer/rhythm machine. | — | — | <<FB>> | |
| Start command for sequencer/rhythm machine. | — | — | <<FA>> | |
| Tempo entry for sequencer/rhythm machine. Setting this to 0 disables the MIDI clock transmission. When ASSIGNABLE Wheel is set to Tempo (cntrl. no. 148), this is inactive. | 0, 20-300 (0, 14-12C) (0: MIDI clock off) | 120 | <<F8>> | |
| This allows selection of voice banks on tone generators that support multiple banks. The bank select message must include both MSB and LSB values. | MSB: 000-127 (00-7F) LSB: 000-127 (00-7F) | — | <<Bn 00 msb, Bn 20 lsb, Cn pp>> | |
| This allows entry of program numbers. Stepping up or down through program numbers is also possible by holding down SHIFT and using the OCTAVE SHIFT / OCTAVE SHIFT buttons; see page 10. | 0-127 (0-7F) | 0 | <<Cn pp>> | |
| This resets the connected tone generator to General MIDI operation. WARNING: Be careful when using this, since it automatically changes whatever settings you've made on the tone generator. (Only GM-compatible tone generators respond to this message.) | — | — | <<F0 7E 7F 09 01 F7>> | |
| This turns all sounds off over the current MIDI channel. To turn all sounds off for all MIDI channels, use All Sound Off in Group B. | — | — | <<Bn 78 00>> | |
| This resets the connected tone generator to XG operation. WARNING: Be careful when using this, since it automatically changes whatever settings you've made on the tone generator. (Only XG-compatible tone generators respond to this message.) | — | — | <<F0 43 ls 4C 00 00 7E 00 F7>> | |
| When set to ON, this merges all data received at MIDI IN with the data generated by the CBX-K1. Merge can be set independently for each channel in the Group B functions. | ON, OFF | ON | — | |
| This determines the MIDI transmit channel for the CBX-K1. This should be set to match the MIDI receive channel of the connected MIDI device. | 1-16 (1-10) | 1 | — | |
| This sets a fixed velocity value for the keyboard; in other words, playing the keyboard at any strength results in a certain velocity value. When this is set to 0 (initial touch on), Touch Sensitivity can be set in the Group B functions. When ASSIGNABLE Wheel is set to Velocity (147), this is inactive. | 0, 1-127 (0, 1-7F) | 0 | — | |
| This determines the RPN (Registered Parameter Number) for the ASSIGNABLE Wheel. This function should be used for all RPN's not listed on the panel. The message must include both MSB and LSB values. | MSB: 000-127 (00-7F) LSB: 000-127 (00-7F) | — | <<Bn 64 lsb, Bn 65 msb, Bn 06 vv>> | |
| This determines the Controller Number for the ASSIGNABLE Wheel. Though not all are listed on the panel, any of the standard Control Change numbers (0 -119) can be assigned. The RPN, NRPN and Others numbers on the panel can also be assigned here. | 0-148 (0-94) | 1 | <<Bn gg vv>> | |
| This determines the NRPN (Non-Registered Parameter Number) for the ASSIGNABLE Wheel. This function should be used for all NRPN's not listed on the panel. The message must include both MSB and LSB values. | MSB: 000-127 (00-7F) LSB: 000-127 (00-7F) | — | <<Bn 62 lsb, Bn 63 msb, Bn 06 vv>> | |
| This determines the drum number for use with the drum-related controller numbers (131-141). | 0-127 (00-7F) | 0 | — | |
| This lowers the key transposition by the specified amount (in semitones). | 0-12 (0-C) | 0 | — | |
| This raises the key transposition by the specified amount (in semitones). | 0-12 (0-C) | 0 | — |
Footnotes
1 For toggle (on/off) switch functions, the OCTAVE / OCTAVE lamps blink rapidly when the function is set to ON, and flash once when it is set to OFF.
2 To send a specific value for the current control number assignment of the Wheel, hold down SHIFT, enter the desired value, and press ENTER. However, this cannot be done with controller numbers 143 (Polyphonic Key Pressure), 147 (Velocity), or 148 (Tempo).
*3 Transpose can be done in two ways: by repeatedly pressing the appropriate TRANSPOSE key or by entering the transpose value directly after pressing the appropriate TRANSPOSE key. To restore the normal transpose setting, hold SHIFT and press both TRANSPOSE / TRANSPOSE keys simultaneously.
To select the Group B functions, hold down SHIFT and press DECIMAL ENTER. Continue holding SHIFT while performing the operation steps for the desired Group B function.
For detailed explanations on the basic operations, refer to page 16. The numbered footnotes that follow these charts provide additional details on certain operations.
| Key | Panel Name | Function | Operation Steps | Operation Examples(see page 16) |
| C2 | STOP | Song Select | SHIFT+ [DECIMAL ENTER] → [STOP] → [Value] → [ENTER] | 12 |
| C#2 | CONTINUE | Song Position Pointer | SHIFT+ [DECIMAL ENTER] → CONTINUE → [MSB] → [LSB] → [ENTER] | 13 |
| D2 | START | Reset All Controllers | SHIFT+ [DECIMAL ENTER] → START | 9 |
| D#2 | TEMPO | — | — | — |
| E2 | BANK SELECT | — | — | — |
| F2 | PROGRAM CHANGE | — | — | — |
| F#2 | GM ON | — | — | — |
| G2 | SOUND OFF | All Sound Off (all channels) | SHIFT+ [DECIMAL ENTER] → SOUND OFF | 9 |
| G#2 | XG ON | GM-B Reset | SHIFT+ [DECIMAL ENTER] → XG ON → [ENTER] | 11 |
| A2 | MERGE ON/OFF | — | — | — |
| A#2 | MIDI CH | Merge On/Off(each channel)*1 | SHIFT+ [DECIMAL ENTER] → MIDICH → [Value] | 10 |
| B2 | FIXED VELOCITY | Touch Sensitivity *2 | SHIFT+ [DECIMAL ENTER] → FIXED VELOCITY → [Value] → [ENTER] | 12 |
| C3 | RPN | Controller Direct Data Send(RPN)*3 | SHIFT+ [DECIMAL ENTER] → RPN → [MSB] → [LSB] → [ENTER] →[Value] → [ENTER] | 14 |
| C#3 | CONTROLLER | Controller Direct Data Send controller numbers on panel)*3 | SHIFT+ [DECIMAL ENTER] → CONTROLLER → [Value] → [ENTER] →[Value] → [ENTER] | 14 |
| D3 | NRPN | Controller Direct Data Send(NRPN)*3 | SHIFT+ [DECIMAL ENTER] → NRPN → [MSB] → [LSB] → [ENTER] →[Value] → [ENTER] | 14 |
| D#3 | DRUM NUMBER | Device Number | SHIFT+ [DECIMAL ENTER] → DRUM NUMBER → [Value] → [ENTER] | 12 |
| E3 | TRANSPOSE← | Wheel Invert | SHIFT+ [DECIMAL ENTER] → TRANSPOSE← | 9 |
| F3 | TRANSPOSE→ | MSB/LSB Invert | SHIFT+ [DECIMAL ENTER] → TRANSPOSE→ | 9 |
| -- | Single-Byte Data Send | SHIFT+ [DECIMAL ENTER] → [Value] → [ENTER] | 15 |
About RPN and NRPN
Registered Parameter Numbers (RPN) are controllers that have been added to the MIDI specification and are common among various MIDI devices of different manufacturers. Unlike the Control Change numbers, these use messages composed of three bytes: MSB, LSB and Data Entry.
Non-Registered Parameter Numbers (NRPN) are controllers that have been created by one or more manufacturers, but have not been added to the MIDI specification.
Thus, NRPN functions may be found on some instruments and not others. The NRPN functions of the CBX-K1 support all XG-compatible devices. Unlike the Control Change numbers, these use messages composed of three bytes: MSB, LSB and Data Entry.
Other RPN or NRPN messages not provided on the panel can be transmitted using the RPN or NRPN functions in Group A and B.
| Explanation | Range (Hexadecimal in parentheses) | Default Setting | MIDI Code | |
| Song Select command for sequencer/rhythm machine. | 0-127 (0-7F) | — | <<F3 SS>> | |
| Song Position Pointer for sequencer/rhythm machine. | MSB: 000-127 (00-7F) LSB: 000-127 (00-7F) | — | <<F2 Isb msb>> | |
| This resets all MIDI controller values to their reset values (minimum or center). | — | — | <<Bn 79 00>> | |
| — | — | — | — | |
| — | — | — | — | |
| — | — | — | — | |
| — | — | — | — | |
| — | — | — | — | |
| This turns all sounds off over all MIDI channels. To turn all sounds off for one specific MIDI channel, use SOUND OFF in Group A. | — | — | <<B0 78 00, B1 78 00, ..., BF 78 00>> | |
| This performs a GM-B reset on a connected tone generator. (This affects only certain tone generators, making their operation compatible with the Yamaha TG300.) | — | — | <<F0 41 10 42 12 40 00 7F 00 41 F7>> | |
| — | — | — | — | |
| This merges all data received over the selected MIDI channel with the data generated by the CBX-K1. This function can be set independently for each channel. | ON, OFF | ON | — | |
| This determines the relative velocity sensitivity of the CBX-K1 keyboard. The lower the Touch Sensitivity value, the higher the output velocity becomes. In other words, when this is set to a value near 0, the less playing strength that is needed to get a louder sound from a connected tone generator. | 1-10 (1-A)1: easy-10: hard | 5 | — | |
| This allows you to directly send a specific value for a selected RPN controller number, without altering the current controller assignment of the ASSIGNABLE Wheel. | MSB: 000-127 (00-7F)LSB: 000-127 (00-7F)Value: 0-127 (0-7F) | — | <<Bn 64 Isb, Bn 65 msb, Bn 06 vv>> | |
| This allows you to directly send a specific value for a selected Control Change controller number, without altering the current controller assignment of the ASSIGNABLE Wheel. | Controller number:0-148 (0-94)Value: 0-127 (0-7F) | — | <<Bn gg vv>> | |
| This allows you to directly send a specific value for a selected NRPN controller number, without altering the current controller assignment of the ASSIGNABLE Wheel. | MSB: 000-127 (00-7F)LSB: 000-127 (00-7F)Value: 0-127 (0-7F) | — | <<Bn 62 Isb, Bn 63 msb, Bn 06 vv>> | |
| This determines the Device Number when independently transmitting certain messages (such as XG On and Master Tuning) to more than one connected MIDI devices. | 1-16 (1-10) | 1 | — | |
| This inverts the operation of both Wheels, for ease in playing the CBX-K1 as a hand-held keyboard. An alternate way to change this setting is to simultaneously hold down (OCTAVE SHIFT) and turn on the power. | — | Maximum value is toward rear panel. | — | |
| This inverts the MSB/LSB entry (so that LSB precedes MSB). An alternate way to change this setting is to simultaneously hold down (OCTAVE SHIFT) and turn on the power. | — | MSBa precedes LSB | — | |
| This sends a data message of a single byte. (See page 17.) | 0-255 (0-FF) | — | <<xx>> |
Footnotes
1 For toggle (on/off) switch functions, the OCTAVE lamps blink rapidly when the function is set to ON, and flash once when it is set to OFF.
2 When Fixed Velocity (in Group A) is set to a value other than 0, the Touch Sensitivity function is inactive. The following table shows the velocity range for some Touch Sensitivity settings.
| Touch Sensitivity Value | 1 (1) | 5 (5) | 10 (A) |
| Velocity Range | 32-127 (20-7F) | 16-127 (10-7F) | 1-127 (01-7F) |
*3 To send a specific value for the current control number assignment of the Wheel, hold down SHIFT, enter the desired value, and press ENTER. However, this cannot be done with controller numbers 143 (Polyphonic Key Pressure), 147 (Velocity), or 148 (Tempo).
For details on these various control numbers and whether or not your particular MIDI device supports them, refer to the owner's manual of that device.
| Controller | Data Format | MIDI Code | Direct Data Send Range (Hexadecimal in parentheses) | |
| No. | Panel Name | |||
| 1 | Modulation Depth | Control Change | <<Bn gg vv>> | 000-064-127 (00-40-7F) |
| 2 | Breath Control | Control Change | <<Bn gg vv>> | 000-064-127 (00-40-7F) |
| 4 | Foot Control | Control Change | <<Bn gg vv>> | 000-064-127 (00-40-7F) |
| 5 | Portamento Time | Control Change | <<Bn gg vv>> | 000-064-127 (00-40-7F) |
| 6 | Data Entry | Control Change | <<Bn gg vv>> | 000-064-127 (00-40-7F) |
| 7 | Main Volume | Control Change | <<Bn gg vv>> | 000-064-127 (00-40-7F) |
| 8 | Balance Control | Control Change | <<Bn gg vv>> | 000-064-127 (00-40-7F) |
| 10 | Pan | Control Change | <<Bn gg vv>> | 000-064-127 (00-40-7F) |
| 11 | Expression | Control Change | <<Bn gg vv>> | 000-064-127 (00-40-7F) |
| 64 | Hold 1 (Damper) | Control Change | <<Bn gg vv>> | 000-064-127 (00-40-7F) |
| 65 | Portamento | Control Change | <<Bn gg vv>> | 000-064-127 (00-40-7F) |
| 66 | Sostenuto (Chord Hold) | Control Change | <<Bn gg vv>> | 000-064-127 (00-40-7F) |
| 67 | Soft Pedal | Control Change | <<Bn gg vv>> | 000-064-127 (00-40-7F) |
| 69 | Hold 2 (Freeze) | Control Change | <<Bn gg vv>> | 000-064-127 (00-40-7F) |
| 71 | Harmonic Content | Control Change | <<Bn gg vv>> | 000-064-127 (00-40-7F) |
| 72 | Release Time | Control Change | <<Bn gg vv>> | 000-064-127 (00-40-7F) |
| 73 | Attack Time | Control Change | <<Bn gg vv>> | 000-064-127 (00-40-7F) |
| 74 | Brightness | Control Change | <<Bn gg vv>> | 000-064-127 (00-40-7F) |
| 84 | Portamento Control | Control Change | <<Bn gg vv>> | 000-064-127 (00-40-7F) |
| 91 | Reverb Depth | Control Change | <<Bn gg vv>> | 000-064-127 (00-40-7F) |
| 92 | Tremolo Depth | Control Change | <<Bn gg vv>> | 000-064-127 (00-40-7F) |
| 93 | Chorus Depth | Control Change | <<Bn gg vv>> | 000-064-127 (00-40-7F) |
| 94 | Variation Depth | Control Change | <<Bn gg vv>> | 000-064-127 (00-40-7F) |
| 95 | Phaser Depth | Control Change | <<Bn gg vv>> | 000-064-127 (00-40-7F) |
| 120 | Pitch Bend Sensitivity | RPN | <<Bn 64 00, Bn 65 00, Bn 06 vv>> | 000-064-127 (00-40-7F) |
| 121 | Fine Tuning | RPN | <<Bn 64 01, Bn 65 00, Bn 06 vv>> | 000-064-127 (00-40-7F) |
| 122 | Coarse Tuning | RPN | <<Bn 64 02, Bn 65 00, Bn 06 vv>> | 000-064-127 (00-40-7F) |
| 123 | Vibrato Rate | NRPN | <<Bn 62 08, Bn 63 01, Bn 06 vv>> | 000-064-127 (00-40-7F) |
| 124 | Vibrato Depth | NRPN | <<Bn 62 09, Bn 63 01, Bn 06 vv>> | 000-064-127 (00-40-7F) |
| 125 | Vibrato Delay | NRPN | <<Bn 62 0A, Bn 63 01, Bn 06 vv>> | 000-064-127 (00-40-7F) |
| 126 | Filter Cutoff Frequency | NRPN | <<Bn 62 20, Bn 63 01, Bn 06 vv>> | 000-064-127 (00-40-7F) |
| 127 | Filter Resonance | NRPN | <<Bn 62 21, Bn 63 01, Bn 06 vv>> | 000-064-127 (00-40-7F) |
| 128 | EG Attack Time | NRPN | <<Bn 62 63, Bn 63 01, Bn 06 vv>> | 000-064-127 (00-40-7F) |
| 129 | EG Decay Time | NRPN | <<Bn 62 64, Bn 63 01, Bn 06 vv>> | 000-064-127 (00-40-7F) |
| 130 | EG Release Time | NRPN | <<Bn 62 66, Bn 63 01, Bn 06 vv>> | 000-064-127 (00-40-7F) |
| 131 | Drum Filter Cutoff Frequency | NRPN | <<Bn 62 rr, Bn 63 14, Bn 06 vv>> | 000-064-127 (00-40-7F) |
| 132 | Drum Filter Resonance | NRPN | <<Bn 62 rr, Bn 63 15, Bn 06 vv>> | 000-064-127 (00-40-7F) |
| 133 | Drum EG Attack Rate | NRPN | <<Bn 62 rr, Bn 63 16, Bn 06 vv>> | 000-064-127 (00-40-7F) |
| 134 | Drum EG Decay Rate | NRPN | <<Bn 62 rr, Bn 63 17, Bn 06 vv>> | 000-064-127 (00-40-7F) |
| 135 | Drum Pitch Coarse | NRPN | <<Bn 62 rr, Bn 63 18, Bn 06 vv>> | 000-064-127 (00-40-7F) |
| 136 | Drum Pitch Fine | NRPN | <<Bn 62 rr, Bn 63 19, Bn 06 vv>> | 000-064-127 (00-40-7F) |
| 137 | Drum Level | NRPN | <<Bn 62 rr, Bn 63 1A, Bn 06 vv>> | 000-064-127 (00-40-7F) |
| 138 | Drum Pan | NRPN | <<Bn 62 rr, Bn 63 1C, Bn 06 vv>> | 000-064-127 (00-40-7F) |
| 139 | Drum Reverb Depth | NRPN | <<Bn 62 rr, Bn 63 1D, Bn 06 vv>> | 000-064-127 (00-40-7F) |
| 140 | Drum Chorus Depth | NRPN | <<Bn 62 rr, Bn 63 1E, Bn 06 vv>> | 000-064-127 (00-40-7F) |
| 141 | Drum Variation Depth | NRPN | <<Bn 62 rr, Bn 63 1F, Bn 06 vv>> | 000-064-127 (00-40-7F) |
| 142 | Channel Pressure | After Touch | <<Dn vv>> | 000-064-127 (00-40-7F) |
| 143 | Polyphonic Key Pressure | After Touch | <<An tt vv>> | — *1 |
| 144 | Master Volume | Universal Real Time Messages | <<F0 7F 04 01 II mm F7>> | 000-064-127 (00-40-7F) |
| 145 | Master Balance | Universal Real Time Messages | <<F0 7F 04 02 II mm F7>> | 000-064-127 (00-40-7F) |
| 146 | Master Tuning | Universal Real Time Messages | <<F0 43 ls 27 30 00 00 pm pl 00 F7>> | 014-064-114 (OE-40-72) *2 |
| 147 | Velocity | Others | *4 | — |
| 148 | Tempo | Others | *5 | — *3 |
MIDI Code abbreviation key
n: MIDI channel
gg: Control number
tt: Note number
s: Device number
rr: Drum number
vv: 8-bit resolution of the Wheel movement (range: 00-7F)
11 mm: 16-bit resolution of the Wheel movement (range: 0000-7FFF)
pm pl: Wheel movement data of 8-bit values are divided into two bytes (with pm = upper half of 8 bits and pl = lower half of 8 bits), converting 1-byte data into 2-byte data, each consisting of 4 bits. The upper 4 digits are given values of 0 for both pm and pl .
NOTE
Even though not all of the numbers are listed here, the ASSIGNABLE Wheel can be assigned to any of the standard Control Change numbers: 0 -119.
Footnotes
1 This applies only to the highest note played. This control number is unrelated to polyphonic key pressure after touch in the MIDI standard.
2 Data from 00-0D is converted to a value of 0E, and data from 73-7F is converted to a value of 72.
3 When Tempo is assigned to the ASSIGNABLE Wheel, the range becomes 24-278.
4 This does not output MIDI code directly, but changes the velocity of the subsequently played notes.
*5 This does not output MIDI code directly, but changes the time interval between transmitted MIDI clocks.
Even though the CBX-K1 is easy to use, it may occasionally not function as you expect it to. If that happens, check the possible problems and solutions below before assuming that the instrument is faulty.
(Problem)
(Possible Cause and Solution)
- Specific functions/messages cannot be executed or sent properly.
While holding down SHIFT in the middle of an operation, you may have inadvertently released SHIFT. Make sure to hold down SHIFT for the duration of the operation. - A certain function does not respond or work properly.
The connected MIDI device may not support the relevant function on the CBX-K1. - Incoming data is not merged.
- Make sure that Merge is set to ON. Make sure also that the Merge on/off function in Group B is set to ON for the relevant MIDI channel.
Some messages cannot be merged.
Please refer to the Merge-related Notes in the MIDI Data Format section, page 24. - Merge is inadvertently set to OFF.
- When there is some kind of MIDI receive error, Merge is automatically turned off. Please also refer to the Merge-related Notes in the MIDI Data Format section, page 24.
- When turning Merge off, the connected tone generator continues to sound.
- Please refer to the Merge-related Notes in the MIDI Data Format section, page 24.
- The connected device does not respond to MIDI clock messages, or MIDI clock messages are not sent.
- Make sure that the Tempo setting on the CBX-K1 is set to a value other than 0. Also make sure that the connected device is set properly for receiving MIDI clock messages. If another device is connected to the MIDI IN of the CBX-K1 and that device is sending the MIDI clock messages, Merge must be set to ON.
- With Merge set to ON, tempo change messages sent from an external device have no effect.
- If an external device is connected to the MIDI IN of the CBX-K1, and the CBX-K1 is sending MIDI clock messages, the external device cannot be used to send MIDI clock messages.
- Sending a bank select message also sends a program change message.
-
This is normal. The CBX-K1 automatically sends the currently set program change number together with a bank select message.
-
The RPN or NRPN controller number assigned to the ASSIGNABLE Wheel doesn't function properly.
-
The RPN or NRPN direct data send function doesn't work properly.
-
Please refer to the Merge-related Notes in the MIDI Data Format section, page 24.
- When the power is turned off and on again, the settings you made have been cancelled.
- This is normal. The CBX-K1 has no internal memory backup.
- Octave Shift function has no effect.
- Octave Shift cannot be changed while a key is being held down.
The OCTAVE lamp flashes, indicating a MIDI error. - There may be a problem with incoming Active Sensing messages. (See the Note on page 9.)
A MIDI device connected to MIDI IN may have been turned off, or the connecting MIDI cable may have been unplugged or damaged. - Make sure not to connect a MIDI cable to the MIDI IN while executing a function on the CBX-K1.
- Too much MIDI data (exceeding the receive capability of the CBX-K1) may have been received at MIDI IN.
Instead of both OCTAVE / OCTAVE lamps flashing (indicating proper execution of an operation), only the OCTAVE lamp flashes. - The battery power is too low for proper operation. Replace all batteries.
The keyboard is not touch sensitive.
Make sure that Fixed Velocity is set to 0.
The Fixed Velocity setting has no effect.
Tne Fixed Velocity setting is inactive when Velocity is assigned to the ASSIGNABLE Wheel.
The Tempo setting has no effect.
— Tne Tempo setting is inactive when Tempo is assigned to the ASSIGNABLE Wheel.
The All Sound Off function has no effect. - All Sound Off in the Group A functions only applies to the currently selected MIDI channel. Also, some tone generators may not respond to the All Sound Off message.
- The rightmost five keys of the keyboard do not sound at the expected pitch.
- When set to the highest octave range, the rightmost five keys are set to play notes G#4 (80) through C5 (84).
- Even when Touch Sensitivity is active, the effective velocity range is narrower than expected.
- Please refer to Footnote #2 on page 21 for details on velocity range.
- Some of the keys do not respond to after touch pressure when playing several notes simultaneously.
— Polyphonic Key Pressure After Touch applies only to the highest note played.
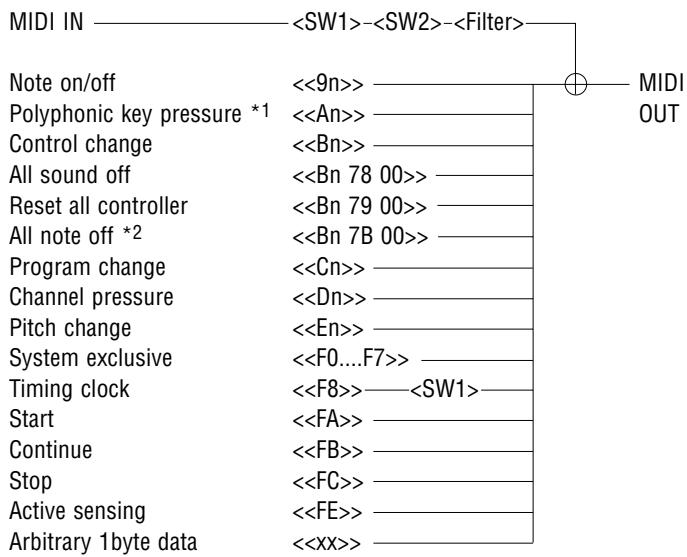
■ MIDI Reception
Merge-related Notes
MIDI messages received from an external device at MIDI IN can be merged with the data generated by the CBX-K1, and are transmitted as is from MIDI OUT. However, there are some exceptions, as listed below:
- <<F4>> , <<F5>> and any subsequent data bytes will not be merged.
- All Note Off message (<
>) will not be merged. - When the CBX-K1 is set to send <<F8>> messages, <<F8>> messages from an external device will not be merged.
- When the CBX-K1 is not set to send <<F8>> messages, <<F8>> messages from an external device can be merged.
* < < FE > > will not be merged. - When Merge is set to ON, and an <<FE>> message has not been received for over approximately 600 ms, an Active Sensing error occurs.
- With the exception of System Exclusive data, messages not conforming to the legal byte format will not be merged. System Exclusive data that doesn't conform to the legal byte format can be merged.
- If during transmission of System Exclusive messages, the messages are cut off or interrupted (for over approximately 400~ms ), a MIDI error occurs.
- When Merge is set to on, and RPN/NRPN messages are sent from both the CBX-K1 and an external device connected to MIDI IN, the resulting messages will be mixed and corrupted.
- When Merge is turned off while a key is held, a stuck note results. This is because the CBX-K1 simply turns Merge off, without changing the Note On status.
During merging of System Exclusive data, all operations from the CBX-K1 are ignored, and <<FE>> and <<F8>> messages from the CBX-K1 will be stopped. This may cause some problems, as listed below:
- Any operations executed from the CBX-K1, in the middle of a System Exclusive message (
) sent from an external device, are ignored. CBX-K1 operations that start before or end after the System Exclusive message will be incomplete. To avoid this problem, be careful not to execute operations from both the CBX-K1 and the external device at the same time. Also: - If the Merge function is not needed, turn Merge off or disconnect the MIDI cable.
- Do not operate the CBX-K1 during reception of large System Exclusive messages, such as bulk dumps.
Response of the CBX-K1 During MIDI Errors
When a MIDI reception error occurs (such as buffer full, Active Sensing, interruption of System Exclusive, etc.), the CBX-K1 responds as follows:
- Merge is set to OFF.
- The MIDI transmit/receive buffer is cleared.
- Damper Off, All Note Off, All Sound Off messages are transmitted over all channels.
- Transmission of messages (including <<FE>> and <<F8>> ) are interrupted for approximately 0.8 seconds. During this time, operations from the CBX-K1 are ignored.
- The OCTAVE lamp flashes, indicating a MIDI error.
■ MIDI Transmission
1. Transmit Condition
1 This applies only to the highest note played.
2 This is output only when a MIDI error (such as Active Sensing or buffer full) occurs.
2. Overview
Transmitted data includes messages from the CBX-K1 itself and messages from an external device connected to MIDI IN. Besides conventional MIDI messages, single byte messages can also be transmitted.
3. Transmitted Data
3.1 Channel Voice Messages
| (1) Note on/off | <<9n kk vv>> |
| n=Channel | 0-15 |
| kk=Note number | 0-127 |
| vv=Velocity | 0: note off, 1-127: note on |
| (2) Polyphonic key pressure | <<An kk vv>> |
| n=Channel | 0-15 |
| kk=Note number | 0-127 |
| vv=Pressure value | 0-127 |
-
When pressing several keys simultaneously, after touch of only the highest note number is output.
-
Though the keyboard of the CBX-K1 itself has no after touch, after touch data can be transmitted from the ASSIGNABLE Wheel when Channel pressure or Polyphonic key pressure is assigned to the Wheel.
| (3) Program change | <<Cn pp>> |
| n=Channel | 0-15 |
| pp=Program number | 0-127 |
| (4) Control change | <<Bn cc vv>> |
| n=Channel | 0-15 |
| cc=Control number | 0-119 |
| vv=Control value |
- When RPN or NRPN is assigned to the ASSIGNABLE Wheel, the MSB, LSB and data entry values are transmitted in a group each time.
| (5) Channel pressure | <<Dn cc vv>> |
| n=Channel | 0-15 |
| vv=Pressure value | 0-127 |
- Though the keyboard of the CBX-K1 itself has no after touch, after touch data can be transmitted from the ASSIGNABLE Wheel when Channel pressure or Polyphonic key pressure is assigned to the Wheel.
| (6) Pitch bend change | <<En II mm>> |
| n=Channel | 0-15 |
| II=Pitch bend value | LSB 0-127 |
| mm=Pitch bend value | MSB 0-127 |
3.2 Channel Mode Messages
| (1) All sound off | <<Bn 78 00>> |
| n=Channel | 0-15 |
| (2) Reset all controller n=Channel | <<Bn 79 00>> 0-15 |
| (3) All note off n=Channel | <<Bn 7B 00>> 0-15 |
3.3 System Exclusive Messages
(1) GM system on <
(2) XG system on <
(3) Master volume <
(4) Master balance <
(5) Master tuning <
(6) GM-B reset <
3.4 System Common Messa
(1) Song select <
(2) Song position pointer <
II=Song position pointer LSB 0-127
mm=Song position pointer MSB 0-127
3.5 System Real Time Messages
(1) Timing clock <
(2) Start <
(3) Continue <
(4) Stop <
(5) Active sensing <
3.6 Single-byte Data Transmission
(1) Single-byte data <
3.7 Others
- Running Status bytes are not used. However, incoming Running Status messages are added and transmitted.
- If the incoming Note Off messages include <<8n>> status, the <<8n>> status is merged and output as is. (The CBX-K1 transmits Note Off messages as <<9n>> status with a velocity of 0.)
| Function ... | Transmitted | Recognized | Remarks | |
| Basic Default Channel Changed | 1 1 - 16 | x x | ||
| Default Mode Messages Altered | - x * * * * * * * * * * * * * * * * * * * * * * * * * * * * * * * * * * * * * * * * * * * * * * * * * * * * * * * * * * * * * * * * * * * * * * * * * * * * * * * * * * * * * * * * * * * * * * * * * * * * | x x x x x x x x x x x x x x x x x x x x x x x x x x x x x x x x x x x x x x x x x x x x x x x x x x x x x x x x x x x x x x x x x x x x x x x x x x x x x x x x x x x x x x x x x x x x x x x x x x x x x | ||
| Note Number : True voice | 0-127 * * * * * * * * * * * * * * * * * * * * * * * * * * * * * * * * * * * * * * * * * * * * * * * * * * * * * * * * * * * * * * * * * * * * * * * * * * * * * * * * * * * * * * * * * * * * * * * * * * * / | x x x x x x x x x x x x x x x x x x x x x x x x x x x x x x x x x x x x x x x x x x x x x x x x x x x x x x x x x x x x x x x x x x x x x x x x x x x x x x x x x x x x x x x x x x x x x x x x x x | ||
| Velocity Note ON Note OFF | o 9nH,v=1-127 x 9nH,v=0 | x x x x x x x x x x x x x x x x x x x x x x x x x x x x x x x x x x x x x x x x x x x x x x x x x x x x x x x x x x x x x x x x x x x x x x x x x x x x x x x x x x x x x x x x x x x x x x x x x x | Assignable Assignable Assignable Assignable Assignable Assignable Assignable Assignable Assignable Assignable Assignable Assignable Assignable Assignable Assignable Assignable Assignable Assignable Assignable Assignable Assignable Assignable Assignable Assignable Assignable Assignable Assignable Assignable Assignable Assignable Assignable Assignable Assignable Assignable Assignable Assignable Assignable Assignable Assignable Assignable Assignable Assignable Assignable Assignable Assignable Assignable Assignable Assignable Assignable Assignable AssignableAssignable Assignable Assignable Assignable Assignable Assignable Assignable Assignable Assignable Assignable Assignable Assignable Assignable Assignable Assignable Assignable Assignable Assignable Assignable Assignable Assignable Assignable Assignable Assignable Assignable Assignable Assignable Assignable Assignable Assignable Assignable Assignable Assignable Assignable Assignable Assignable Assignable Assignable Assignable Assignable Assignable Assignable Assignable Assignable Assignable Assignable Assignable Assignable Assignable Assignablesignes:Reset | x x x x x x x x x x x x x x x x x x x x x x x x x x x x x x x x x x x x x x x x x x x x x x x x x x x x x x x x x x x x x x x x x x x x x x x x x x x x x x x x x x x x x x x x x x x x x x x x x xx x x x x x x x x x x x x x x x x x x x x x x x x x x x x x x x x x x x x x x x x x x x x x x x x x x x x x x x x x x x x x x x x x x x x x x x x x x x x x x x x x x x x x x x x x x x x x x x x x xx xx xx xx xx xx xx xx xx xx xx xx xx xx xx xx xx xx xx xx xx xx xx xx xx xx xx xx xx xx xx xx xx xx xx xx xx xx xx xx xx xx xx xx xx xx xx xx xx xx xxxx xxxx xxxxx xxxxx xxxxx xxxxx xxxxx xxxxx xxxxx xxxxx xxxxx xxxxx xxxxx xxxxx xxxxx xxxxx xxxxx xxxxx xxxxx xxxxx xxxxx xxxxx xxxxx xxxxx xxxxx xxxxx xxxxx xxxxx xxxxx xxxxx xxxxx xxxxx xxxxx xxxxx xxxxx xxxxxx xxxxx xxxxx xxxxx xxxxx xxxxx xxxxx xxxxx xxxxx xxxxx xxxxx xxxxx xxxxx xxxxx xxxxx xxxxx xxxxx xxxxx xxxxx xxxxx xxxxx xxxxx xxxxx xxxxx xxxxx xxxxx xxxxx xxxxx xxxxx xxxxx xxxxx xxxxx xxxxx xxxx× xxxxx xxxxx xxxxx xxxxx xxxxx xxxxx xxxxx xxxxx xxxxx xxxxx xxxxx xxxxx xxxxx xxxxx xxxxx xxxxx xxxxx xxxxx xxxxx xxxxx xxxxx xxxxx xxxxx xxxxx xxxxx xxxxx xxxxx xxxxx xxxxx xxxxx xxxxx xxxxx xxxxx.xxxxxxx.xxxxx.xxxxx.xxxxx.xxxxx.xxxxx.xxxxx.xxxxx.xxxxx.xxxxx.xxxxx.xxxxx.xxxxx.xxxxx.xxxxx.xxxxx.xxxxx.xxxxx.xxxxx.xxxxx.xxxxx.xxxxx.xxxxx.xxxxx.xxxxx.xxxxx.xxxxx.xxxxx.xxxxx.xxxxx.xxxxx.xxxxx.xxxxx.xxxxx.xx(xxxxx.xxxxx.xxxxx.xxxxx.xxxxx.xxxxx.xxxxx.xxxxx.xxxxx.xxxxx.xxxxx.xxxxx.xxxxx.xxxxx.xxxxx.xxxxx.xxxxx.xxxxx.xxxxx.xxxxx.xxxxx.xxxxx.xxxxx.xxxxx.xxxxx.xxxxx.xxxxx.xxxxx.xxxxx.xxxxx.xxxxx.xxxxx.xxxxx.xxxxxx.xxxxx.xxxxx.xxxxx.xxxxx.xxxxx.xxxxx.xxxxx.xxxxx.xxxxx.xxxxx.xxxxx.xxxxx.xxxxx.xxxxx.xxxxx.xxxxx.xxxxx.xxxxx.xxxxx.xxxxx.xxxxx.xxxxx.xxxxx.xxxxx.xxxxx.xxxxx.xxxxx.xxxxx.xxxxx.xxxxx.xxxxx.xxxxx.xxxx×.xxxx×.xxxx×.xxxx×.xxxx×.xxxx×.xxxx×.xxxx×.xxxx×.xxxx×.xxxx×.xxxx×.xxxx×.xxxx×.xxxx×.xxxx×.xxxx×.xxxx×.xxxx×.xxxx×.xxxx×.xxxx×.xxxx×.xxxx×.xxxx×.xxxx×.xxxx×.xxxx×.xxxx×.xxxx×.xxxx×.xxxx×.xxxx×.xxxx×(xx××.xxxx×.xxxx×.xxxx×.xxxx×.xxxx×.xxxx×.xxxx×.xxxx×.xxxx×.xxxx×.xxxx×.xxxx×.xxxx×.xxxx×.xxxx×.xxxx×.xxxx×.xxxx×.xxxx×.xxxx×.xxxx×.xxxx×.xxxx×.xxxx×.xxxx×.xxxx×.xxxx×.xxxx×.xxxx×.xxxx×.xxxx×.xxxx×.xxxx ×.xxxx×.xxxx×.xxxx×.xxxx×.xxxx×.xxxx×.xxxx×.xxxx×.xxxx×.xxxx×.xxxx×.xxxx×.xxxx×.xxxx×.xxxx×.xxxx×.xxxx×.xxxx×.xxxx×.xxxx×.xxxx×.xxxx×.xxxx×.xxxx×.xxxx×.xxxx×.xxxx×.xxxx×.xxxx×.xxxx×.xxxx×.xxxx×.xxxx×⁄x⁄x⁄x⁄x⁄x⁄x⁄x⁄x⁄x⁄x⁄x⁄x⁄x⁄x⁄x⁄x⁄x⁄x⁄x⁄x⁄x⁄x⁄x⁄x⁄x⁄x⁄x⁄x⁄x⁄x⁄x⁄x⁄x⁄x⁄x⁄x⁄x⁄x⁄x⁄x⁄x⁄x⁄x⁄x⁄x⁄x⁄x⁄x⁄x⁄x⁄X |

YAMAHA CORPORATION