DS-DA-409 - Car kit Havis - Free user manual and instructions
Find the device manual for free DS-DA-409 Havis in PDF.


| Product Type | Screen Stiffener (Car Kit for Panasonic Toughbook) |
| Brand | Havis |
| Model | DS-DA-409 (SS.X) |
| Compatible Devices | Panasonic Toughbook CF-18, CF-19, CF-28, CF-29, CF-30 |
| Material | Steel bracket, plastic clips, metal screws |
| Weight | 0.38 lbs (172 g) |
| Hardware Included | 1x Plastite screw #4 x 1 in, 1x Sheet metal screw #8 x 1.25 in flat head, 1x Screw 8-32 x 1.75 in FHCS |
| Installation Side | Left-hand (driver's) side of docking station |
| Clip Selection | Use "T" clip for tablets (CF-18/19), "L" clip for laptops (CF-28/29/30) |
| Installation Method | Attach clip to steel bracket, then mount stiffener to dock using provided screws; torque specifications included |
| Safety Warnings | Do not install in airbag deployment zone; use only in "air bag safe" area; equipment must not interfere with vehicle operation or occupant safety |
| Stylus Tether Requirement | If using stylus holder, tether stylus to a fixed part of the computing system with a tether no longer than 5 inches |
| Professional Installation Recommended | Yes, only qualified professionals should install |
| Compliance Standards | Designed with safety of use and installation in mind |
| Warranty | Refer to manufacturer |
Frequently Asked Questions - DS-DA-409 Havis
User questions about DS-DA-409 Havis
0 question about this device. Answer the ones you know or ask your own.
Ask a new question about this device
Download the instructions for your Car kit in PDF format for free! Find your manual DS-DA-409 - Havis and take your electronic device back in hand. On this page are published all the documents necessary for the use of your device. DS-DA-409 by Havis.
USER MANUAL DS-DA-409 Havis
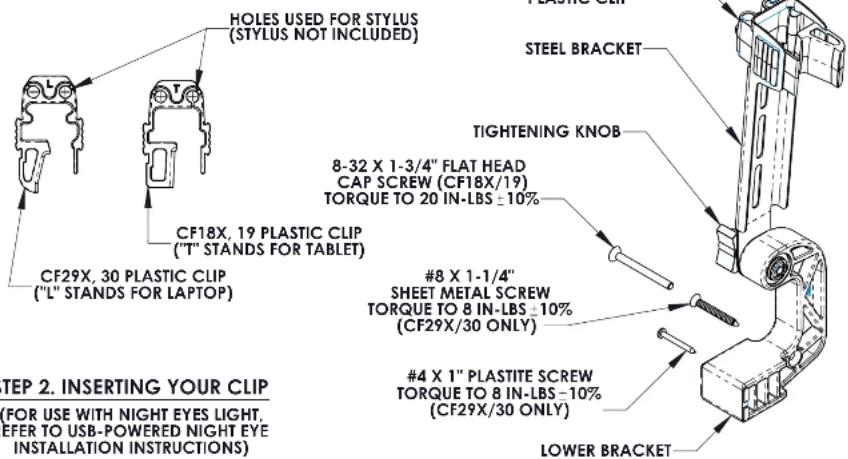
STEP 1. SELECTING YOUR CLIP
INSTALLATION INSTRUCTIONS:
SS.X MUST BE ATTACHED TO THE LEFT-HAND (DRIVER'S) SIDE OF THE DOCKING STATION:
STEP 1 - SELECTING YOUR CLIP
- IF YOU WILL BE USING THE SS.X WITH A CF-18 OR CF-19 TABLET
COMPUTER, USE THE CLIP MARKED "T" FOR TABLET.
- IF YOU WILL BE USING THE SS.X WITH A CF-28, CF-29, OR CF-30 LAPTOP COMPUTER, USE THE CLIP MARKED "L" FOR LAPTOP.
STEP 2. - INSERTING YOUR CLIP
AFTER SELECTING YOUR CLIP, INSERT THE CLIP BY HAND INTO THE STEEL BRACKET AS SHOWN: CLIP WILL SNAP INTO WINDOWS OF THE STEEL BRACKET. "BE CAREFUL NOT TO OVERBEND EITHER PIECE. THIS COULD CAUSE BREAKAGE." IF NECESSARY, USE A PAIR OF PLIERS WITH SOFT, PROTECTED JAWS AND APPLY PRESSURE IN THE LOCATIONS NOTED IN THE DIAGRAM TO ASSIST IN THE INSERTION.
STEP 3. - ATTACHING SS.X TO DOCK
REFER TO THE DIAGRAMS IN 3A AND 3B TO AID IN THIS PROCESS.
CF-18 AND CF-19 WITH "T" CLIP
REMOVE THE FLAT HEAD CAP SCREW FROM DOCK IN THE LOCATION SHOWN IN 3A. ALIGN HOLE OF LOWER BRACKET OF SS.X WITH HOLE IN SIDEMEMBER OF DOCK AND BEGIN THREADING THE 8-32 X 1-3/4" FHCS. ALIGN RIDGES OF SIDEMEMBER WITH RIDGES OF LOWER BRACKET AND TIGHTEN THE 8-32 X 1-3/4" FHCS TO 20 INCH-LBS +10%.
CF-28, CF-29, AND CF-30 WITH "L" CLIP
ALIGN COUNTER-SUNK HOLE OF THE LOWER BRACKET WITH THE COUNTER-SUNK HOLE OF THE DOCK SIDEMEMBER AS SHOWN IN 3B; INSERT #8 X 1-1/4" SCREW INTO LOWER BRACKET. TIGHTEN THE #8 X 1-1/4" SCREW TO FASTEN THE LOWER BRACKET TO THE SIDEMEMBER. NEXT, SCREW THE #4 X 1" PLASTITE SCREW THRU THE SMALL HOLE AT THE FRONT OF THE LOWER BRACKET AND INTO THE SMALL HOLE IN THE SIDEMEMBER OF THE DOCK. TIGHTEN BOTH FASTENERS TO 8 INCH-LBS +10%.
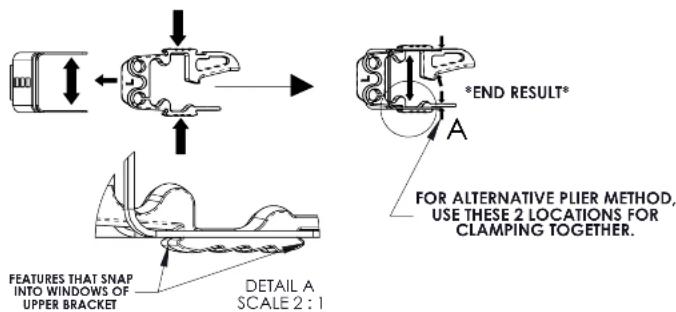
STEP 3. ATTACHING SS.X TO DOCK
| 3A | USE TO MOUNT LOWER BRACKET |
| DS.CF18X/19 SIDE MEMBER | |
| 3B | USE THESE 2 HOLES TO MOUNT LOWER BRACKET |
| DS.CF29X/30 SIDE MEMBER | |
HARDWARE KIT CONTENTS:
| DESCRIPTION | QTY. |
| PLASTITE SCREW - #4 X 1" - PAN HEAD | 1 |
| SHEET METAL SCREW - #8 - 1-1/4" L - FLAT HEAD | 1 |
| SCREW - 8-32 X 1-3/4" FHCS | 1 |
| PRODUCT I.D. | DATE |
| SS.X(DS.CF18X/19/29X/30) | 04-20-07 |
PRODUCT NAME
SCREEN STIFFENER ASSEMBLY
| LEDCO877-88-LEDCOwww.ledco.net | WEIGHT: (LBS)0.38 |
| REV. DATE01-22-08 |
DRAWING NUMBER:
SS-0018-IS-C (SHEET 1/2)
WARNING: ALL LEDCOPRODUCTS ARE DESIGNED WITH SAFETY OF USE AND INSTALLATION IN MIND. HOWEVER, IT IS THE SOLE RESPONSIBILITY OF THE OWNER/OPERATOR OF A VEHICLE USING LEDC/MOUNTING AND DOCKING EQUIPMENT, TO INSURE THAT THE EQUIPMENT IN INSTALLED SO THAT IT WILL NOT INTERFERE WITH VEHICLE OPERATION, INTERFERE WITH SAFETY DEVICES, OBSTRUCT VIEW OF DRIVING CONDITIONS, OR IN ANY WAY DEGRADE OCCUPANT SAFETY. IMPROPER INSTALLATION CAN CAUSE SERIOUS INJURY IN THE EVENT OF AN ACCIDENT. INSTALLATION SHOULD ONLY BE PERFORMED BY QUALIFIED PROFESSIONALS. COMPUTERS AND MOTION DEVICES MUST BE MOVED TO AND STOWED/SECURED IN THEIR SAFE DRIVING POSITIONS BEFORE OPERATING VEHICLE.
PRODUCT DESCRIPTION
TO BE USED IN CONJUNCTION WITH PANASONIC DS.CF18X, 19, 29X, 30 TOUGHBOOKS.
Screen Stiffener
Installation Do's and Don'ts:
Do:
1) Understand how your vehicle's airbag deploys Check with the vehicle manufacturer or call LEDCO for assistance
2) Install in an "air bag safe" zone; typically, the Left-Hand (Driver's) side of the dock.
3) If you plan to use the stylus holder in the Screen Stifferer head, connect the stylus to a fixed portion of the computing system with a tether no greater than five inches long.
Don't:
1) Mount your Screen Stiffener in front of a zone where an air bag could deploy.
2) Use the stylus holder to store items which are not properly tethered to a fixed portion of the computing system.
Ford Crown Victoria Example: Recommended Screen Stiffener Installation Zone
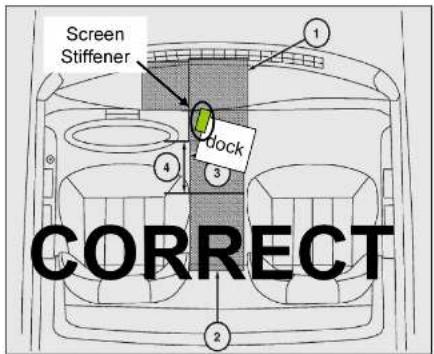
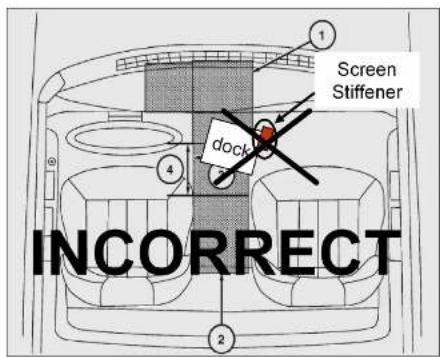
Dark gray area indicates region that is completely out of airbag deployment zone
Source - Ford Motor Company / LEDCO study
(1) Area on top of instrument panel. Equipment must not interfere with driver visibility.
(2) Area on tunnel between seats
(3) 229 mm (9 in)
(4) 305 mm (12 in)
For illustration purposes
10.4.2007
PRODUCT I.D. SS.X (DS.CF18X/19/29X/30) DATE 04-20-07
PRODUCT NAME SCREEN STIFFENER ASSEMBLY
LEDCO 877-88-LEDCO www.ledco.net WEIGHT: (LBS) REV. DATE 01-22-08
DRAWING NUMBER: SS-0018-IS-C (SHEET 2/2)
WARNING: ALL LEDCOPRODUCTS ARE DESIGNED WITH SAFETY OF USE AND INSTALLATION IN MIND. HOWEVER, IT IS THE SOLE RESPONSIBILITY OF THE OWNER/OPERATOR OF A VEHICLE USING LEDCOMOUNTING AND DOCKING EQUIPMENT, TO INSURE THAT THE EQUIPMENT IN INSTALLED SO THAT IT WILL NOT INTERFERE WITH VEHICLE OPERATION, INTERFERE WITH SAFETY DEVICES. OBSTRUCT VIEW OF DRIVING CONDITIONS, OR IN ANY WAY DEGRADE OCCUPANT SAFETY. IMPROPER INSTALLATION CAN CAUSE SERIOUS INJURY IN THE EVENT OF AN ACCIDENT. INSTALLATION SHOULD ONLY BE PERFORMED BY QUALIFIED PROFESSIONALS. COMPUTERS AND MOTION DEVICES MUST BE MOVED TO AND STOWED/SECURED IN THEIR SAFE DRIVING POSITIONS BEFORE OPERATING VEHICLE.
PRODUCT DESCRIPTION
TO BE USED IN CONJUNCTION WITH PANASONIC DS.CF18X, 19, 29X, 30 TOUGHBOOKS.
Brand : Havis
Model : DS-DA-409
Category : Car kit