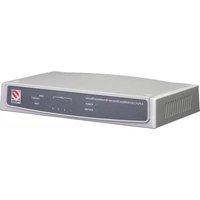
ENRTR-104-2 - Router ENCORE - Free user manual and instructions
Find the device manual for free ENRTR-104-2 ENCORE in PDF.


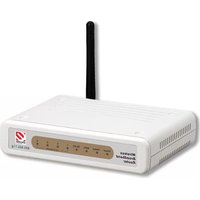
| Product Type | 4-Port Broadband Router |
| Model | ENRTR-104-2 |
| Brand | ENCORE |
| Dimensions (W x H x D) | 171 x 100 x 33 mm |
| Power Supply | DC 7.5V, 1A |
| Power Consumption | 3W (max) |
| Operating Temperature | 0° to 40°C |
| Storage Temperature | -10° to 70°C |
| Operating Humidity | 10% to 90% |
| Storage Humidity | 5% to 90% |
| Network Standards | IEEE 802.3 10BASE-T, IEEE 802.3u 100BASE-TX, ANSI/IEEE 802.3 Auto-negotiation |
| Data Transfer Rate | 10/100 Mbps (half/full duplex) |
| Number of LAN Ports | 4 x 10/100Mbps Auto-MDIX |
| Number of WAN Ports | 1 x 10/100Mbps Auto-MDIX |
| Network Cables | 10BASE-T: 2-pair UTP Cat. 3/4/5 (100m); 100BASE-TX: 2-pair UTP Cat. 5 (100m) |
| Topology | Star |
| Protocol | CSMA/CD |
| EMI Compliance | FCC Class B, CE Mark B, VCCI-II |
| Key Features | NAT, PPPoE, PPTP, DHCP Server/Client, UPnP, Virtual Server, Packet Filtering, Firewall, DMZ, MAC Cloning, DDNS, SNTP, Firmware Upgrade |
| Security | Built-in Firewall, Block WAN Ping, Client Filtering by IP/Service/Time, MAC Address Control, DMZ Host |
| Configuration | Web-based (Internet Explorer 4.0+), Quick Setup wizard |
| Maintenance and Cleaning | Clean with a dry cloth; ensure ventilation; do not place heavy objects on top |
| Spare Parts and Repairability | No user-serviceable parts; contact reseller for replacement |
Frequently Asked Questions - ENRTR-104-2 ENCORE
User questions about ENRTR-104-2 ENCORE
0 question about this device. Answer the ones you know or ask your own.
Ask a new question about this device
Download the instructions for your Router in PDF format for free! Find your manual ENRTR-104-2 - ENCORE and take your electronic device back in hand. On this page are published all the documents necessary for the use of your device. ENRTR-104-2 by ENCORE.
USER MANUAL ENRTR-104-2 ENCORE
This equipment has been tested and found to comply with the regulations for a Class B digital device, pursuant to Part 15 of the FCC Rules. These limits are designed to provide reasonable protection against harmful interference when the equipment is operated in a commercial environment. This equipment generates, uses, and can radiate radio frequency energy and, if not installed and used in accordance with this user's guide, may cause harmful interference to radio communications. Operation of this equipment in a residential area is likely to cause harmful interference, in which case the user will be required to correct the interference at his own expense.
CE Mark Warning
This is a Class B product. In a domestic environment, this product may cause radio interference, in which case the user may be required to take adequate measures.
VCCI Warning
This is a product of VCCI Class B Compliance
P/N: 2907SIS104A5000
Rev.B5-01
TABLE OF CONTENT
About This Guide .... 1
Purpose .... 1
Overview of this User's Guide .... 1
Introduction....3
Applications: 3
Features: 4
Unpacking and Setup....5
Unpacking....5
Setup....5
Hardware Installation 7
Front Panel....7
Rear Panel....8
Hardware connections 8
Connect the Internet Broadband Router....9
Check the installation 9
PC Network TCP/IP Setting.... 11
Windows 95/98/ME....11
Windows 2000 ....13
Windows XP 14
Internet Broadband Router Configuration 15
Login to the Internet Broadband Router 15
Quick Setup....16
Advance Setup 21
Technical Specifications.... 35
ABOUT THIS GUIDE
Congratulations on your purchase of this 4-port Broadband Router. This device integrates 100Mbps Fast Ethernet and 10Mbps Ethernet network capabilities in a highly flexible desktop package. It provides a complete solution for Internet surfing and office resources sharing, and it is easy to configure and operate for even non-technical users.
Purpose
This manual discusses how to install the 4-port Broadband Router.
Overview of this User's Guide
Introduction. Describes the Broadband Router and its features.
Unpacking and Setup. Helps you get started with the basic installation of the Router.
Identifying External Components. Describes the front panel, rear panel and LED indicators of the Router.
Connecting the Router. Tells how you can connect the Router to your xDSL/Cable Modem.
Technical Specifications. Lists the technical (general, physical and environmental, performance and Routers settings) specifications of the Broadband Router.
With the explosive growth of the Internet, accessing information and services at any time, day or night has become a standard requirement for most people. The era of the standalone PC is waning. Networking technology is moving out of the exclusive domain of corporations and into homes with at least two computers.
Broadband network access is also gaining ground. However, allowing more than two computers to access the Internet at the same time means less affordable, higher costs. Thus, there is a need to share one legal IP address over a single Internet connection to link the home with the Internet.
The scarcity of IP addresses and using a shared Internet connection through an Internet sharing device can solve high network access costs. All linked computers can make full use of broadband capabilities over such a device.
This device not only comes equipped with a wide range of features, but also can be installed and configured right out of the box. This device supports a simple local area network and Internet access share, offering great cost savings.
The local area network connects up home computers while also allowing any of the computers to access the Internet, share resources, or play online games—the basis of the family computing lifestyle.
Applications:
Broadband Internet access:
Several computers can share one high-speed broadband connection (LAN and WAN-Internet).
Resource sharing:
Share resources such as printers, scanners and other peripherals.
File sharing:
Exchange data, messages, and distribute files thus making good use of hard disk space.
Online gaming:
Through the local area network, online gaming and e-commerce services can be easily setup.
Firewall:
A built-in firewall function — for security and anti-hack system.
Features:
➢ High speed data transfer rate, FTP up to 40Mbps
➢ Supports NAT for share 1 IP address to all LAN user.
➢ Supports PPPoE and PPTP protocol for Dial-Up ADSL.
▶ Supports DHCP Server / Client.
➢ Supports UPnP (Universal Plug and Play).
▶ Supports virtual server mapping.
▶ Supports packet filtering.
▶ Simple Firewall protection.
- Upgradeable firmware for future function.
▶ Simple setting using Quick Setup.
▶ Easy configuration via WEB Browser.
This chapter provides unpacking and setup information for the Broadband Router.
Unpacking
Open the box of the Broadband Router and carefully unpack it. The box should contain the following items:
◆ One 4-port High Speed Broadband Router
◆ One external power adapter
◆ This User's Guide
If any item is found missing or damaged, please contact your local reseller for replacement.
Setup
The setup of the Broadband Router can be performed using the following steps:
◆ The power outlet should be within 1.82 meters (6 feet) of the Broadband Router.
◆ Visually inspect the DC power jack and make sure that it is fully secured to the power adapter.
Make sure that there is proper heat dissipation from and adequate ventilation around the Broadband Router. Do not place heavy objects on the Broadband Router.
Front Panel
The figure below shows the front panel of the Broadband Router.

flowchart
graph LR
    A["POWER"] --> B["LAN"]
    C["SYSTEM"] --> D["LAN"]
    B --> E["WAN"]
    D --> F["100M"]
    style A fill:#fff,stroke:#000
    style C fill:#fff,stroke:#000
    style B fill:#fff,stroke:#000
    style D fill:#fff,stroke:#000
    style E fill:#fff,stroke:#000
    style F fill:#fff,stroke:#000
Front Panel
POWER
This indicator lights green while the device is receiving power, otherwise, it is off.
SYSTEM
This indicator blinks green means the Internet Broadband Router is working successful. Otherwise, this indicator always on or off means the function of the Internet Broadband Router is fail.
WAN (Link/ACT)
This indicator lights green when the WAN port is connected to an xDSL/Cable modem successfully.
This indicator blinks green while the WAN port is transmitting or receiving data on the xDSL/Cable modem.
LAN (Link/ACT)
From port 1 to port 4 indicator lights green when the LAN port is connected to a 100Mbps Fast Ethernet station, if the indicator blinks green while transmitting or receiving data on the 100Mbps Fast Ethernet or 10Mbps Ethernet network.
Rear Panel
The figure below shows the rear panel of the Broadband Router.

Rear Panel
WAN
In the four port broadband router, there is an RJ-45 10/100Mbps Auto-MDIX port for the WAN that will fit the xDSL/Cable modem's specification need.
LAN (1-4)
Four RJ-45 10/100Mbps Auto-MDIX ports for connecting to either 10Mbps or 100Mbps Ethernet connections.
RESET
Use a pin-shape item to push to reset this device to factory default settings. It will be useful too when the manager forgot the password to login, but the setting will be back to default setting.
Hardware connections

flowchart
graph TD
    A["xDSL Modem"] --> B["Internet Broadband Router"]
    B --> C["PC"]
    B --> D["PC"]
    B --> E["PC"]
    B --> F["PC"]
    B --> G["PC"]
    C --> H["WAN port"]
    D --> I["LAN port"]
    E --> J["LAN port"]
    F --> K["LAN port"]
    G --> L["LAN port"]
Connect the Internet Broadband Router
- Plug in one end of the network cable to the WAN port of the 4-port Internet Broadband Router.
- Plug in the other end of the network cable to the Ethernet port of the xDSL or Cable modem.
- Use another network cable to connect to the Ethernet card on the computer system; the other end of the cable connects to the LAN port of the Internet Broadband Router. Since the Internet Broadband Router has four ports, you can connect up to four computers directly to the unit. There you do not have to buy a switch to connect these computers since one Internet Broadband Router functions both as a connection-sharing unit and as a switch.
Check the installation
The control LEDs of the Internet Broadband Router are clearly visible and the status of the network link can be seen instantly:
- With the power source on, once the device is connected to the broadband modem, the Power, CPU, LAN and WAN port link LEDs of the Internet Broadband Router will light up indicating a normal status.
- While the WAN is link up to the ADSL/Cable modem, the WAN port's Link/ACT LED will light up.
- While the LAN is link up to the computer system, the LAN port's Link/ACT LED will light up.
The network TCP/IP settings differ based on the computer's operating system (Win95/98/ME/NT/2000/XP) and are as follows.
Windows 95/98/ME
- Click on the "Network neighborhood" icon found on the desktop.
- Click the right mouse button and a context menu will be show.
- Select "Properties" to enter the TCP/IP setting screen.
- Select “Obtain an IP address automatically” on the “IP address” field.

- Select "Disable DNS" in the "DNS" field.

- Select "None" for the "Gateway address" field.

Windows 2000
Double click on the “My computer” icon on the desktop. When “My computer” window opens, open the “Control panel” and then open the “Network dialup connection” applet. Double click on the “Local area network connection” icon. Select “Properties” to enter the TCP/IP setting window.
- In the “Local area network status” window, click on “Properties.”
- In the “Local area network connection” window, first select TCP/IP setting and then select “Properties.”
- Set both "IP address" and "DNS" to Automatic configuration.

Windows XP
Point the cursor and click the right button on the “My Network Place” icon.
Select “properties” to enter the TCP/IP setting window.
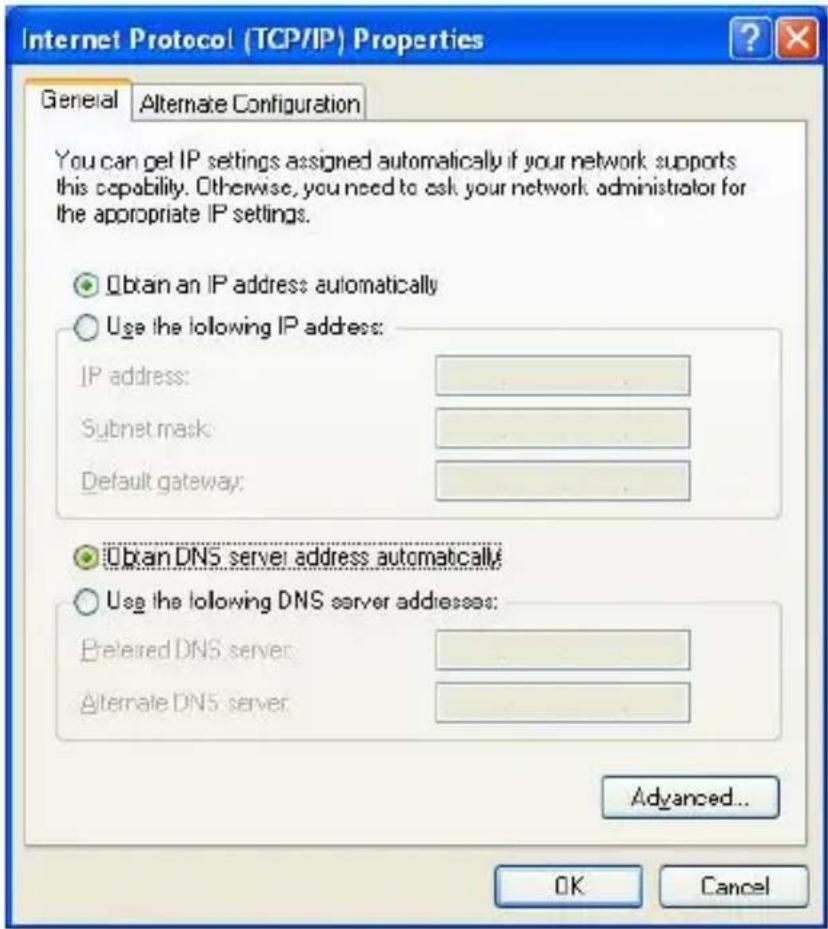
- Set "IP address" to "Obtain an IP address automatically."
- Set "DNS" to "Obtain DNS server address automatically."
First make sure that the network connections are functioning normally.
This Internet Broadband Router can be configured using Internet Explorer 4.0 or newer web browser versions.
Login to the Internet Broadband Router
Before you configure this device, note that when the Broadband Router is configured through an Ethernet connection, make sure the host PC must be set on the IP subnetwork that can be accessed by the xDSL/Cable modem. For example, when the default network address of the xDSL/Cable modem Ethernet interface is 192.168.1.x, then the host PC should be set at 192.168.1.xxx (where xxx is a number between 2 and 254), and the default subnet mask is 255.255.255.0.
- Open Internet Explorer 4.0 or above Internet browser.
- Enter IP address http://192.168.1.1 (the factory-default IP address setting) to the URL web address location.

- When the following dialog box appears, remain blank (first login) or enter the password and press Login to enter the main configuration window.

Note: If needed to set a password, then refer to the Administrator Setting.
- After entering the password, the main web page comes up, there are two choices for setting, Quick Setup or Advanced Setup, it is recommended that the beginner to use the Quick Setup, it will lead you step by step to configure the Broadband Router.

Quick Setup
In the main web page, select “Quick Setup” to specify the Time Zone and the WAN connection type: Cable modem (DHCP), Fixed IP, or Dial-up xDSL (PPPoE).
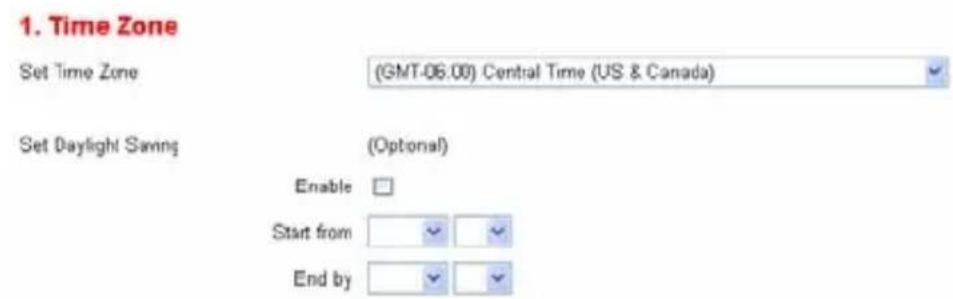
1- 1 Time Zone
To set the time zone in order to synchronize the system clock in the global through the SNTP Server.
1-2 WAN Connection Type
To select which the WAN connection type will be connected to, point the cursor to the Cable modem (DHCP), Fixed IP, or Dial-up xDSL (PPPoE) to process.
2. WAN Type
Specify the WAN connection type required by your Internet Service Provider. Specify a Cable modem, FixedIP xDSL, or PPPoE iDSL

Dynamic IP (Cable modem)
A Cable modem requires minimal configuration. When you have set up an account with your Cable provider, the Cable modem will automatically configure itself, so you probably do not need to enter anything more. However, if there is a Domain Name System (DNS) server that you would rather use, you need to specify the IP address.

Static IP (Fixed-IP xDSL)
Some xDSL Internet Service Providers may assign a fixed IP address for your Broadband Router. If you have been provided with this information, choose this option and enter the assigned IP address, subnet mask, gateway IP and DNS IP addresses for your Broadband Router.

PPPoE (Dial-Up xDSL)
If you connect to the Internet using an xDSL Modem and your ISP has provided you with a password, and Service Name, then your ISP uses PPPoE. You must choose this option and enter the required information

PPTP
If your ISP provided you the PPTP Account, PPTP Password, Host Name, Service IP Address, IP Address, Subnet Mask and the Connection ID, then your ISP uses PPTP. You have to choose this option and enter the required information.


1-2-1 Cable modem (DHCP)
To connect a cable modem with the Broadband Router, check the cable modem with the related user's guide, then the Cable modem will automatically configure itself, the Broadband Router is configured to automatically assign addresses to each PC.
Fill up the MAC Address of the network adapter when the DNS server need a certain address with the network adapter, or press the “Clone MAC Address” button to get the manager’s PC MAC Address.
Host Name
MAC Address



1-2-2 Fixed IP
If the Internet Service Providers assign a fixed IP address, choose this option and enter the assigned IP address, subnet mask, gateway IP and DNS IP addresses for your Broadband Router.

Fixed-IP xDSL
IP address assigned by your ISP

Subnet Mask

ISP Gateway Address

1-2-3 PPPoE (Dial-up xDSL)
If connected to the Internet using a PPPoE (Dial-up xDSL) Modem, the ISP will provide a Password and User Name, then the ISP uses PPPoE. Choose this option and enter the required information, if the ISP provided a Service Name, enter it in the column of the Service Name field, otherwise, leave it blank.
The dialog box in Service Name, IP Address and DNS Address must be filled up when the ISP Provider provides these information to you, if the ISP Provider provides Dynamic IP Address, then you can skip on these dialog box.
The MTU feature specifies the largest packet size permitted for network transmission. Enter the value desired, for most DSL users, it is recommended to use 1492. By default, MTU is set at 1492.
The Maximum Idle Time feature can control the connection time while user's need to save the cost of connection fee from ISP provider (default time=0, always

PPPoE (Dial-Up xDSL)

connect). Click on the Connect-on-
demand button to dial up to the ISP when only on demand, while there is a need of connecting to the ISP automatically.
1-2-4 PPTP
If connected to the Internet using a (PPTP) xDSL Modem, enter the PPTP Account Name, PPTP Password, Host Name, Service IP Address, Your IP Address, Your Subnet Mask required by your ISP in the appropriate fields. If your ISP has provided you with a Connection ID, enter it in the Connection ID field, otherwise, leave it zero.
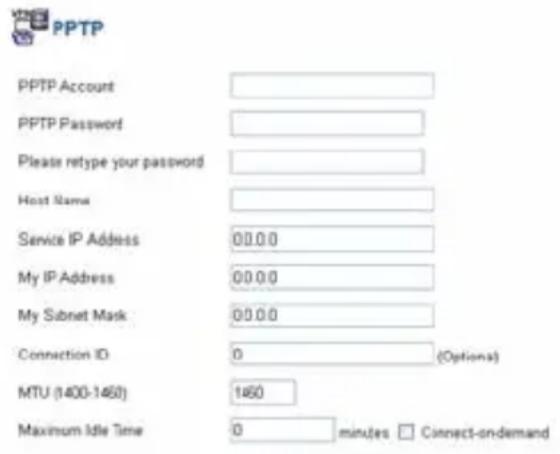
The MTU feature specifies the largest packet size permitted for network transmission. Enter the value desired, for most DSL users, it is recommended to use 1460. By default, MTU is set at 1460
The Maximum Idle Time feature can control the connection time while user's need to save the cost of connection fee from ISP provider (default time=0, always connect). Click on the Connect-on-demand button to dial up to the ISP when only on demand, while there is a need of connecting to the ISP automatically.
1-3 DNS
The Domain Name System (DNS) is the way that Internet domain names
are located and translated into Internet Protocol (IP) addresses.
Primary DNS address
Secondary DNS address

If your ISP provided at least one DNS Server IP Address, type that IP Address in the Primary DNS address fields. You can type up to another DNS Server IP Addresses. The Router will utilize these for quicker access to functioning DNS Servers.
1-4 Status
When finish configuring the Quick Setup, the Status screen will list up the connection status for the Broadband Routers' WAN/LAN interfaces, firmware and hardware version numbers, and the number of connected clients to the network.
WAN
| Connection Type | Dynamic IP |
| WAN IP | 172.16.3.184 |
| Subnet Mask | 255.255.0.0 |
| Gateway | 172.16.1.254 |
| DNS | 172.16.3.23 |
| Secondary DNS | 0.0 0.0 |
Release
Renew
LAN
| IP Address | 172.16.3.22 |
| Subnet Mask | 255.255.255.0 |
| DHCP Server | Enabled |
| Firewall | Enabled |
INFORMATION
| System Time | 2003/06/17 20:58:21 |
| System Boot Up Time | 00000 days 00:00:44 |
| Connected Clients | 1 |
| Runtime Code Version | V2.00.0001 |
| Boot Code Version | V2.00.26 |
| LAN MAC Address | 00-48-54-99-99-99 |
| WAN MAC Address | 00-48-54-99-99-9A |
Advance Setup
The Broadband Router supports advanced functions like System setting WAN setting, LAN setting, NAT Setting and Firewall setting.
2-1 System
This page includes all the basic configuration tools for the Broadband Router. Point the selections in the left side of the menu screen.

System Setting
This page includes all the basic configuration tools for the Broadband Router. The options are in the menu screen to the left.
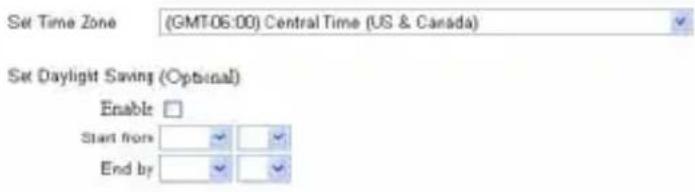
2-1-1 System Time
Connecting to a Simple Network Time Protocol (SNTP) server allows the Broadband Router to synchronize the system clock to the global Internet
through the SNTP Server. The synchronized clock in the Broadband Router is used to record the system log and control client filtering.
2-1-2 Administrator Settings
- Password Settings
Set a password to restrict management access to the Broadband Router.

● Remote Management from Internet
To manage the Broadband Router from a remote location (outside of the local network through WAN port), it must specify the IP address of the remote PC, otherwise,
leave the IP address 0.0.0.0, means all legal IP address can access the device.
Remote Management
Enable

IP Address

2-1-3 Firmware Upgrade
By upgrading a new firmware for the Broadband Router to improve functionality and performance. Enter the path and name of the upgrade file then click the APPLY button below. You will be prompted to confirm the upgrade.
While updating the firmware,
Current Firmware Version: V 1.00.0196
At the end of the upgrade, the Broadband Router may not respond to commands for as long as one minute. This is normal behavior and do not turn off Broadband Router during the time.
please wait after pressing the APPLY button, and follow the instruction on the screen, the System Light on the front panel will start blinking when the firmware upgraded successfully.
Upgrade Firmware Successfully
Your Broadband Router has successfully been upgraded.
Please wait until the system light starts blinking.
2-1-4 Configuration Tools
Use the "Backup Settings" tool to save the Broadband Router's current configuration to a file named "config.bin" on your PC. You can then use the "Restore Settings" tool to restore the saved configuration of the Broadband Router that you set before. Alternately, you can use the "Restore to Factory Defaults" tool to force the Broadband Router to perform reset and restore the original factory settings.
Restore Factory Default Configuration
Backup Settings / Restore settings
To restore the factory default settings of the Broadband Router, click on the “Restore” button.
- Backup Settings
Press the “Backup Settings” button to save the current setting in a filed “config.bin” or given filename.
- Restore Settings
To restore the backup file to the Broadband Router, enter the path and filename on the restore settings.
2-1-5 Status
Use the Status screen to see the connection status for the Broadband Routers' WAN/LAN interfaces, firmware and hardware version numbers, and the number of connected clients to the network.
WAN
| Connection Type | Dynamic IP |
| WAN IP | 172.16.3.184 |
| Subnet Mask | 255.255.00 |
| Gateway | 172.16.1.254 |
| DNS | 172.16.3.23 |
| Secondary DNS | 0.0.0.0 |


LAN
| IP Address | 172.16.3.22 |
| Subnet Mask | 255.255.255.0 |
| DHCP Server | Enabled |
| Firewall | Enabled |
INFORMATION
| System Time | 2003/06/17 20:59:21 |
| System Boot Up Time | 00000 days 00:00:44 |
| Connected Clients | 1 |
| Runtime Code Version | V2.00.0001 |
| Boot Code Version | V2.00.26 |
| LAN MAC Address | 00-48-54-99-99-99 |
| WAN MAC Address | 00-48-54-99-99-9A |
2-1-6 System Log
View any attempts that have been made to gain access to the network.

2-1-7 Reset
In the event that the Broadband Router stops responding correctly or in some way stops functioning, perform the reset function. The settings will not be changed. To perform the reset, click on the "Reset" button. The reset will be complete when the system light starts blinking.
2-2 WAN
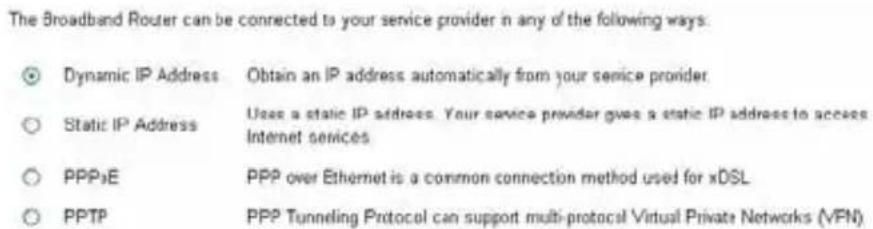
The Broadband Router can be connected to the service provider in any of the following ways: Dynamic IP Address, Static IP Address, PPPoE and PPTP.
2-2-1 Dynamic IP
The Host Name is optional, but may be required by some Service Providers. The default MAC address is set to the WAN's physical interface on the Broadband Router. If the Service Provider requires the host name, using the "Clone MAC Address" button to copy the MAC address of the Network Interface Card installed in the selected PC and replaces the WAN MAC address with this MAC address.
The road runner management is optional. If the ISP needs to run the road runner management (sometimes called Big Pond), enable it.

2-2-2 Static IP
If the Service Provider has assigned a fixed IP address, enter the assigned IP address subnet mask and gateway address provided. Click “yes” if using two or more IP addresses.

2-2-3 Dial-up xDSL (PPPoE)
If connected to the Internet using a Dial-up xDSL (PPPoE) Modem, the ISP will provide a Password and User Name, and then the ISP uses PPPoE. Choose this option and enter the required information, if the ISP provided a Service Name, enter it in the column of the Service Name field, otherwise, leave it blank.
The dialog box in Service Name, IP Address and DNS Address must be filled up when the ISP Provider provide these information to you, if the ISP Provider provides Dynamic IP Address, then you can skip on these dialog box.
The MTU feature
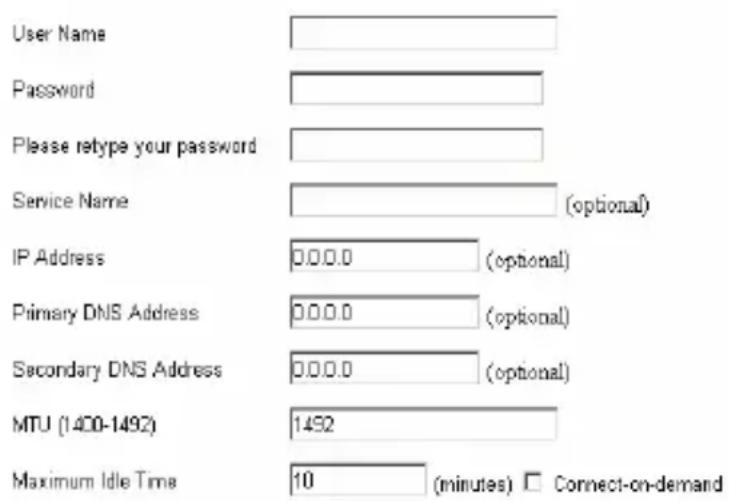
specifies the largest packet size permitted for network transmission. Enter the value desired, for most DSL users, it is recommended to use 1492. By default, MTU is set at 1492.
The Maximum Idle Time feature can control the connection time while user's need to save the cost of connection fee from ISP provider (default time=0, always connect). Click on the Connect-on-demand button to dial up to the ISP when only on demand, while there is a need of connecting to the ISP automatically.
2-2-4 PPTP
If connected to the Internet using a (PPTP) xDSL Modem, enter the PPTP Account Name, PPTP Password, Host Name, Service IP Address, Your IP Address, Your Subnet Mask required by your ISP in the appropriate fields. If your ISP has provided you with a Connection ID, enter it in the Connection ID field, otherwise, leave it zero.

The MTU feature specifies the largest packet size permitted for network transmission. Enter the value desired, for most DSL users, it is recommended to use 1460. By default, MTU is set at 1460
The Maximum Idle Time feature can control the connection time while user's need to save the cost of connection fee from ISP provider (default time=0, always connect). Click on the Connect-on-demand button to dial up to the ISP when only on demand, while there is a need of connecting to the ISP automatically.
2-2-5 DNS
The Domain Name System (DNS) is the way that Internet domain names are located and translated into Internet Protocol (IP) addresses.
If your ISP provided at least one DNS Server IP Address, type that IP Address in the Primary DNS address fields. You can type up to another DNS Server IP Addresses. The Router will utilize these for quicker access to functioning DNS Servers.

2-2-6 Dynamic DNS
Dynamic DNS (Domain Name Service) is a method of keeping a domain name linked to a changing (dynamic) IP address. With most Cable and DSL connections, you are assigned a dynamic IP address and that address is used only for the duration of that specific connection. With the device, you can setup your DDNS service and the device will automatically update your DDNS server every time it receives a different IP address.
You need to use the "Enable Wildcard" option, either in your client or in the web form. This will cause *.yourhostname.dyndns.org to point to the same IP address as yourhostname.dyndns.org.
□ Use A Dynamic DNS Service
Service Provider
Host Name
User Name
Password
□ Use Wildcards
Service Status
www.dyndns.org



Dynamic DNS Disable...
2-3 LAN
To configure the LAN's IP Address and DHCP Service setting.
2-3-1 LAN Settings
The default value is 192.168.1.1 for the IP address and 255.255.255.0 for the Subnet Mask. And you can also change the value for your needs.

To enable the DHCP server for dynamic IP address allocation to the clients PCs, click the “Enable”. The client can get the IP Addresses from a range from IP Pool Starting Address to IP Pool Ending Address; also, you can change the IP Pool range value.
The Lease Time is the amount of time a network user will be allowed connection to the Router with their current dynamic IP address. Enter the amount of time, in hours, days or weeks, which the user will be “leased” this dynamic IP address.
You can enter your local domain name in the Local Domain Name fields.
2-3-2 DHCP Client List
The DHCP client list allows you to see which clients are connected to the Barricade via IP address, host name, and MAC address.
| IP Address | Host Name | MAC Address |
| 192.168.1.2 | PM-NB | 00-D0-59-08-0D-B8 |
2-4 NAT
Network Address Translation (NAT) allows multiple users at the local site to access the Internet through a single public IP address. NAT can also prevent hacker attacks by mapping local addresses to public addresses for key services such as the Web or FTP.
2-4-1 Special Application
Some applications require multiple connections, such as Internet gaming, video conferencing, Internet telephony and others. These applications cannot work when Network Address Translation (NAT) is enabled. When users send this type of request to your network via the Internet, the Router will forward those requests to the appropriate PC. If you need to run applications that require multiple connections, specify the port normally associated with an application in the "Trigger Port" field, select the protocol type as TCP or UDP, then enter the public ports associated with the trigger port to open them for inbound traffic.
- TCP (Transmission Control Protocol) - A method (protocol) used along with the Internet Protocol (Internet Protocol) to send data in the form of message units between computers over the Internet. While IP takes care of handling the actual delivery of the data, TCP takes care of keeping track of the individual units of data (called packets) that a message is divided into for efficient routing through the Internet.
- UDP (User Datagram Protocol) - A communications method (protocol) that offers a limited amount of service when messages are exchanged between computers in a network that uses the Internet Protocol (IP). UDP is an alternative to the TCP and, together with IP, is sometimes referred to as UDP/IP. Like the Transmission Control Protocol, UDP uses the Internet Protocol to actually get a data unit (called a datagram) from one computer to another. Unlike TCP, however, UDP does not provide the service of dividing a message into packets (datagrams) and reassembling it at the other end. Specifically, UDP doesn't provide sequencing of the packets that the data arrives in. This means that the application program that uses UDP must be able to make sure that the entire message has arrived and is in the right order. Network applications that want to save processing time because they have very small data units to exchange (and therefore very little message reassembling to do) may prefer UDP to TCP.
Example:
| ID | Trigger Port | Trigger Type | Public Port | Public Type | Comment |
| 1 | 28800 | UDP | 2300-2400, | 47624 | MSN GameZone |
| 2 | 28800 | UDP | 2300-2400, | 47624 | MSN GameTCP Zone |
| 3 | 6112 | UDP | 6112 | UDP | Battle.net |
| Trigger Port | Trigger Type | Public Port | Public Type | Enabled | |
| 1. | 28000 | ○TCP ◎UDP | 2300-2400, 47624 | ○TCP ◎UDP | ☑ |
| 2. | 26900 | ○TCP ◎UDP | 2300-2400, 47624 | ○TCP ◎UDP | ☑ |
| 3. | 6112 | ○TCP ◎UDP | 6112 | ○TCP ◎UDP | ☑ |
| 4. | ○TCP ◎UDP | ○TCP ◎UDP | ☐ |
2-4-2 Virtual Server
Configure the Broadband Router as a virtual server to allow the Router to watch outgoing data for specific port numbers. The IP address of the computer that sends the matching data is remembered by the Router, so that when the requested data returns through the Router, the data is pulled back to the proper computer by way of IP address and port mapping rules such as the Web or FTP at the local site via public IP addresses can be automatically redirected to local servers configured with private IP addresses. In other words, depending on the requested service (TCP/UDP port number), the Broadband Router redirects the external service request to the appropriate server.
Example:
| ID | Server | IP | Mapping | Port | Type | Comment | |
| 1 | 192.168.2.20 | 80 | TCP | Web | Server | ||
| 2 | 192.168.2.12 | 20 | TCP | FTP | Server | ||
| 3 | 192.168.2.12 | 21 | TCP | FTP | Server | ||
| 4 | 192.168.2.28 | 23 | TCP | Telnet | Server | ||
| Mapping Ports | Server IP | Enabled | |
| 1. | 80 | 192. 168. 1. 20 | |
| 2. | 20 | 192. 168. 1. 12 | |
| 3. | 21 | 192. 168. 1. 12 | |
| 4. | 23 | 192. 168. 1. 28 | |
| 5. | 192. 168. 1. |
2-5 Firewall
The Broadband Router provides extensive firewall protection by restricting connection parameters to limit the risk of hacker attack, and defending against a wide array of common hacker attacks.
The Broadband Router provides packet filtering rules by restricting service ports, IP address or MAC address. However, for applications that require unrestricted access to the Internet, configure a specific client/server as a demilitarized zone (DMZ).
2-5-1 Block WAN Ping
When the "Block WAN Ping" activated, it is causing the public WAN IP address on the Broadband Router not to respond to ping commands. Pinging public WAN IP addresses is a common method used by hackers to test whether the WAN IP address is valid and supports a network.
2-5-2 Client Filtering
To block a certain client PCs accessing the Internet based on time.
You can filter Internet access for local clients based on IP addresses, application types, (i.e., HTTP port), and time of day.
For example, this screen shows that clients in the address range 192.168.2.50-99 are permanently restricted from using FTP (Port 21), while clients in the address range 192.168.2.110-119 are blocked from browsing the Internet (port 80) from Monday to Friday and from 0:00AM to 11:00 PM.
Example:

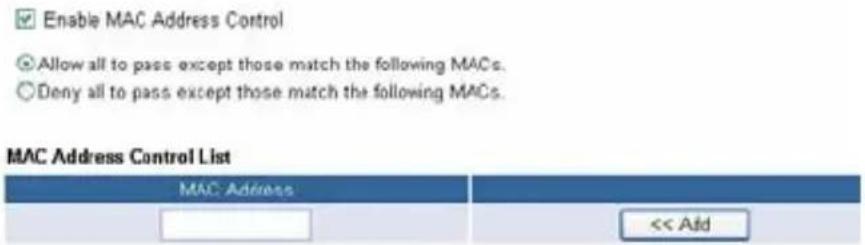
2-5-3 MAC Control
You can block certain client PCs accessing the Internet based on MAC addresses.
2-5-4 DMZ (Demilitarized Zone)
If a local client PC cannot run an Internet application properly from behind the NAT firewall, open the client up to unrestricted two-way Internet access by defining a virtual DMZ Host.
Enable
IP Address of Virtual DMZ Host

-
- 1.
| General | |
| Standards IEEE | 802.3 10BASE-T EthernetIEEE 802.3u 100BASE-TX Fast EthernetANSI/IEEE 802.3 Auto-negotiation |
| Protocol | CSMA/CD |
| Data Transfer Rate | Ethernet: 10Mbps (half duplex), 20Mbps (full-duplex)Fast Ethernet: 100Mbps (half duplex), 200Mbps (full- duplex) |
| Topology | Star |
| Network Cables | 10BASET: 2-pair UTP Cat. 3,4,5 (100 m), EIA/TIA- 568 100-ohm STP (100 m)100BASE-TX: 2-pair UTP Cat. 5 (100 m), EIA/TIA-568 100-ohm STP (100 m) |
| Number of Ports | LAN: 4 x 10/100Mbps Auto-MDIX Fast Ethernet portWAN: 1 x 10/100Mbps Auto-MDIX Fast Ethernet port |
| Physical and Environmental | |
| DC inputs DC | 7.5V 1A |
| Power Consumption | 3W (Max) |
| Temperature | Operating: 0° ~ 40°C, Storage: -10° ~ 70°C |
| Humidity Operating | 10% ~ 90%, Storage: 5% ~ 90% |
| Dimensions 17 | 1 x 100 x 33 mm (W x H x D) |
| EMI: FCC Class B, CE Mark B, VCCI-II | |

- CE Mark Warning
- VCCI Warning
- TABLE OF CONTENT
- ABOUT THIS GUIDE
- Purpose
- Applications:
- Broadband Internet access:
- Resource sharing:
- File sharing:
- Online gaming:
- Firewall:
- Features:
- Unpacking
- Setup
- Front Panel
- POWER
- SYSTEM
- WAN (Link/ACT)
- LAN (Link/ACT)
- Rear Panel
- WAN
- LAN (1-4)
- RESET
- Hardware connections
- Connect the Internet Broadband Router
- Check the installation
- Windows 95/98/ME
- Windows 2000
- Windows XP
- Login to the Internet Broadband Router
- Quick Setup
- 1- 1 Time Zone
- 1-2 WAN Connection Type
- WAN Type
- Dynamic IP (Cable modem)
- Static IP (Fixed-IP xDSL)
- PPPoE (Dial-Up xDSL)
- PPTP
- 1-2-1 Cable modem (DHCP)
- 1-2-2 Fixed IP
- Fixed-IP xDSL
- 1-2-3 PPPoE (Dial-up xDSL)
- 1-2-4 PPTP
- 1-3 DNS
- 1-4 Status
- Release
- Renew
- Advance Setup
- 2-1 System
- System Setting
- 2-1-1 System Time
- 2-1-2 Administrator Settings
- - Password Settings
- Remote Management
- 2-1-3 Firmware Upgrade
- Upgrade Firmware Successfully
- 2-1-4 Configuration Tools
- 2-1-5 Status
- 2-1-6 System Log
- 2-1-7 Reset
- 2-2 WAN
- 2-2-1 Dynamic IP
- 2-2-2 Static IP
- 2-2-3 Dial-up xDSL (PPPoE)
- 2-2-4 PPTP
- 2-2-5 DNS
- 2-2-6 Dynamic DNS
- □ Use A Dynamic DNS Service
- 2-3 LAN
- 2-3-1 LAN Settings
- 2-3-2 DHCP Client List
- 2-4 NAT
- 2-4-1 Special Application
- 2-4-2 Virtual Server
- 2-5 Firewall
- 2-5-1 Block WAN Ping
- 2-5-2 Client Filtering
- 2-5-3 MAC Control
- 2-5-4 DMZ (Demilitarized Zone)
Brand : ENCORE
Model : ENRTR-104-2
Category : Router