
VL-FAN1BX - Doorbell PANASONIC - Free user manual and instructions
Find the device manual for free VL-FAN1BX PANASONIC in PDF.


| Product Type | Wireless Door Chime |
| Model | VL-FAN1BX |
| Brand | Panasonic |
| Dimensions (Receiver) | Approx. 105 x 85 x 30 mm |
| Dimensions (Transmitter) | Approx. 70 x 25 x 20 mm |
| Weight (Receiver) | Approx. 150 g |
| Weight (Transmitter) | Approx. 50 g |
| Power Source (Receiver) | Plug-in AC adapter (included) |
| Power Source (Transmitter) | 1 x 3V CR2032 lithium battery (included) |
| Range | Up to 150 meters (open area) |
| Number of Melodies | 16 selectable chimes |
| Volume Levels | Adjustable (4 levels) |
| Frequency | 433 MHz |
| Weatherproof | Transmitter is weather-resistant (IP44) |
| Number of Transmitters Supported | Up to 4 |
| LED Indicator | Yes, on receiver |
| Mounting | Wall mountable (receiver and transmitter) |
| Maintenance | Wipe with dry cloth; avoid water and solvents |
| Safety | For indoor use only (receiver); low voltage |
| Spare Parts | Battery CR2032, AC adapter (model: KX-AC2) |
| Repairability | Battery replacement by user; other repairs by qualified service |
| General Information | Designed for residential use; complies with FCC/IC |
Frequently Asked Questions - VL-FAN1BX PANASONIC
User questions about VL-FAN1BX PANASONIC
0 question about this device. Answer the ones you know or ask your own.
Ask a new question about this device
Download the instructions for your Doorbell in PDF format for free! Find your manual VL-FAN1BX - PANASONIC and take your electronic device back in hand. On this page are published all the documents necessary for the use of your device. VL-FAN1BX by PANASONIC.
USER MANUAL VL-FAN1BX PANASONIC
Operating Instructions
Model No. VL-FAN1BX

Thank you for purchasing a Panasonic Repeater.
This unit is an accessory unit for Panasonic Wireless Video Intercom System. You must register this unit to the main monitor station before using.
Please read these Operating Instructions before using the unit and save for future reference.
Important Information
Important safety instructions .... 3
Additional safety information 4
For best performance .... 5
- Before using .... 5
- Location/avoiding noise....5
- Environment 5
- Installation 6
●While in use....6 - Tapping....7
- Using near medical equipment....7
Product names used in these Operating Instructions .... 7
Introduction
Included items 8
Feature highlights 9
Preparation
Location of controls 10
- Indicators....11
Installation
Registering the repeater to the main monitor station (REGISTRATION/CANCELLATION) 12
- Registering the repeater (REGISTRATION).... 12
- To stop using the repeater (CANCELLATION).... 13
Installing the repeater 14
Wall-mounting 15
Help
Troubleshooting 16
Cleaning 17
Resetting to the default settings 17
General Information
Technical data about this product 18
Important safety instructions
1) Read these instructions.
All the safety and operating instructions should be read before the appliance is operated.
2) Keep these instructions.
The safety and operating instructions should be retained for future reference.
3) Heed all warnings.
All warnings on the appliance and in the operating instructions should be adhered to.
4) Follow all instructions.
All operating and use instructions should be followed.
5) Do not use this apparatus near water.
For example, near a bathtub, wash bowl, kitchen sink, or laundry tub, in a wet basement, or near a swimming pool, and the like.
6) Clean only with dry cloth.
Do not use liquid cleaners or aerosol cleaners. Use a dry cloth for cleaning.
7) Do not block any ventilation openings.
Install in accordance with the manufacturer's instructions.
Slots and Openings in the cabinet are provided for ventilation and to ensure reliable operation of the product and to protect it from overheating. The openings should never be blocked by placing the product on a bed, sofa, rug, or other similar surface.
8) Do not install near any heat sources such as radiators, heat registers, stoves, or other apparatus (including amplifiers) that produce heat.
This product should not be placed in a built-in installation such as a bookcase or rack unless proper ventilation is provided or the manufacturer's instructions have been adhered to.
9) Protect the power cord from being walked on or pinched particularly at plugs, convenience receptacles, and the point where they exit from the apparatus.
10) Only use attachments / accessories specified by the manufacturer.
11) Unplug this apparatus during lightning storms or when unused for long periods of time.
This will prevent damage to the product due to lightning and power-line surges.
12) Refer all servicing to qualified service personnel. Servicing is required when the apparatus has been damaged in any way, such as power-supply cord or plug is damaged, liquid has been spilled or objects have fallen into the apparatus, the apparatus has been exposed to rain or moisture, does not operate normally, or has been dropped.
SAVE THESE INSTRUCTIONS
Additional safety information
- Use only the power source marked on the unit. If you are not sure of the type of power supplied to your home, consult your dealer or local power company.
- Use only the specified AC adaptor.
- Do not tamper with the plug.
- Make sure the plug is securely inserted.
- Do not touch the plug with wet hands.
- Do not place objects on the power cord. Install the unit where no one can step or trip on the cord.
- To reduce the risk of electric shock, do not disassemble this unit. Take the unit to an authorized service center when service is required. Opening or removing covers may expose you to dangerous voltages or other risks. Incorrect reassembly can cause electric shock when the unit is subsequently used.
- Unplug this unit from power outlets and refer servicing to an authorized service center when the following conditions occur:
A. If smoke rises, or an unaccustomed noise or smell is discharged from the unit.
B. If metal objects have been dropped inside the unit.
9. Do not make any wiring connections when the power supply is turned on.
10. Never install wiring during a lightning storm.
11. Do not connect the AC adaptor other than the specified voltage.
12. Do not connect the AC adaptor to any terminal other than the one specified.
13. The AC adaptor is used as the main disconnect device. Ensure that the power outlet is installed near the product and is easily accessible.
14. Never touch the inside of the unit.
15. Be sure to install the unit as specified to endure the mass.
16. If the wiring is underground, do not make any connections underground.
17. WARNING - To reduce the risk of fire or electric shock, do not expose this apparatus to rain or moisture.
18. WARNING - Unplug this unit from power outlets if it emits smoke, an abnormal smell or makes unusual noise. These conditions can cause fire or electric shock. Confirm that smoke has stopped and contact an authorized service center.
For best performance
Before using
- It is prohibited to disassemble or modify this unit. Contact the dealer where you purchased this unit for repairs.
- When power fails, this unit cannot be used.
Location/avoiding noise
- This unit uses radio waves to communicate with the devices to be relayed. For maximum distance and noise-free operation, we recommend the following:
- Placing the unit away from electrical appliances such as: TVs, personal computers, microwave ovens, or wireless LAN appliances.
Environment
- Keep the unit away from electrical noise generating devices, such as fluorescent lamps and motors.
- The unit should be kept away from excessive smoke, dust, high temperature and vibration.
● The unit should not be exposed to direct sunlight. - Do not place heavy objects on top of the unit.
- When you leave the unit unused for a long period of time, unplug it from the power outlet.
- The unit should be kept away from heat sources such as heaters, kitchen stoves, etc. It should not be placed in rooms where the temperature is less than 0 °C or greater than 40 °C. Damp basements should also be avoided.
- The maximum calling distance (approx. 100 m) may be shortened when the unit is used in the places:
- Where there are following obstacles between this unit and the main monitor station or the sub monitor station:
• Metal doors or metal shutters. - Heat insulation including aluminium foil.
- Concrete walls or walls made of galvanized iron sheet.
- When using this unit on the different floor or house in the same grounds where the main monitor station has been installed.
• Multiple walls of any sort.
- Operating near 2.4 GHz electrical appliances may cause interference. Move away from the electrical appliances.
Important:
- When you move the unit from a cold place to a warm place, wait a little while to let the unit adapt to the change in environment before connection or use. In this case, condensation such as the formation of dew may occur, resulting in error or malfunction.
Installation
- If there are no obstacles between this unit and the main monitor station, you can install the unit within about 100 m from the main monitor station. (Usage area varies depending on the location where the unit is installed. Install the unit in the locations where the STATUS indicator lights in green (page 14).)

While in use
- If there are no obstacles between this unit and the sub monitor station, the sub monitor station can be used within about 100 m of this unit.
(Usage area varies depending on the location where the unit is installed.) - In places where the radio signal from the main monitor station is stronger, the main monitor station directly communicates with the sub monitor station without relaying through the repeater. (In this case, the IN USE indicator may not light up.)
In places where the radio signal from the main monitor station is stronger, the main monitor station communicates with the sub monitor station without relaying through the repeater.
In places where the radio signal from the repeater is stronger, the main monitor station communicates with the sub monitor station by relaying through the repeater. (The IN USE indicator lights in green.)

Tapping
This unit uses digital wireless technology so that a call is rarely intercepted. However, calls may be tapped by a third party because the unit also communicates using radio waves.
- “Tapping” means that the other party intercepts a radio message intentionally or accidentally by using a receiver.
Using near medical equipment
- Consult the manufacturer of any personal medical devices, such as pacemakers or hearing aids, to determine if they are adequately shielded from external RF (radio frequency) energy. (The unit operates in the frequency range of 2.4 GHz to 2.48 GHz, and the power output level can range from 0.03 to 0.175 watts.) Do not use the unit in health care facilities if any regulations posted in the area instruct you not to do so. Hospitals or health care facilities may be using equipment that could be sensitive to external RF (radio frequency) energy.
Product names used in these Operating Instructions
For plain explanation, the product names used in these Operating Instructions are described as follows.
| Product figure |  |  |
| Description in these Operating Instructions (Product name) | Main monitor station (Main monitor) | Sub monitor station (Wireless monitor) |
Included items
① ② ③


④ ⑤ ⑥


| No. Item Quantity Notes | |||
| 1 | Repeater 1 ---- | ||
| 2 | AC adaptor 1 Cord length: Approx. 3 m | ||
| 3 | AC cord 1 Cord length: Approx. 1.8 m | ||
| 4 | Wood screws 2 For wall-mounting | ||
| 5 | Washers 2 For wall-mounting | ||
| 6 | Registration number sticker 1 ---- | ||
Feature highlights
If the sub monitor station is away from the main monitor station or there are the following obstacles between them, the radio signal weakens. In this case, sound cuts in and out, and moreover “OUT OF RANGE” is displayed on the sub monitor station as it cannot be used. The repeater strengthens the radio wave signal and extends the range of use which may resolve these problems when it is installed between the main monitor station and the sub monitor station.
Possible obstacles:
- Metallic door or shutter
- Heat insulator including aluminium foil
- Concrete wall or wall made of galvanized iron sheet
- When using the sub monitor station on the different floor or house in the same grounds where the main monitor station has been installed.
● Multiple walls of any sort.
The registration to the main monitor station is required (page 12).
You can only register the repeater to one main monitor station at a time.
![graph TD A["Main monitor station"] --> B["Sub monitor station"] B --> C["Repeater"] C --> D["Remote device"]](/content/2026/05/1144347/images/16fb12aabbcac6c275251874762f40392d76b782a1be4190835bc3e19bf9126d.jpg)
- Above illustration is for example purposes.
Location of controls
Front View / Right side view

Rear view

① Antenna
- Transmitter/Receiver of radio waves.
② [PROGRAM] button
- Press to register to the main monitor station.
③ Indicators
● Show the status of this unit and the radio signal level (page 11).

④ DC IN jack
- Connect the AC adaptor.
⑤ [FACTORY DEFAULT RESET] button
- Press to reset the settings of this unit to their default settings (page 17).
Indicators
The indicators show the status of this unit and radio wave signals as follows.
| Indicator Status | |||
POWER Green,  | on The power is turned on. | ||
 | Light off The power is turned off. | ||
| STATUS Green |  | hing While registering to the main monitor station. | |
 — — | Light off This unit has not been registered to the main monitor station. | ||
 | Green, light on | Strong Shows the radio signal status from the main monitor station.● Take notice of this indicator when installing (page 14).Weak | |
 | Amber, light on | ||
 | Red, light on | ||
 | Red, flashing Out of radio wave range so you cannot install the repeater here. | ||
IN USE Green, I  | on Repeater is relaying radio waves. | ||
 | Light off Repeater is not relaying radio waves. | ||

: Light on

Flashing

: Light off
Registering the repeater to the main monitor station (REGISTRATION/CANCELLATION)
To use the repeater, the registration to your main monitor station is required.
- The repeater can only be registered to one main monitor station at a time.
Registering the repeater (REGISTRATION)
1 Connect the AC cord to the AC adaptor, then connect the AC cord to a power outlet installed nearby the main monitor station.
• The POWER indicator lights in green.
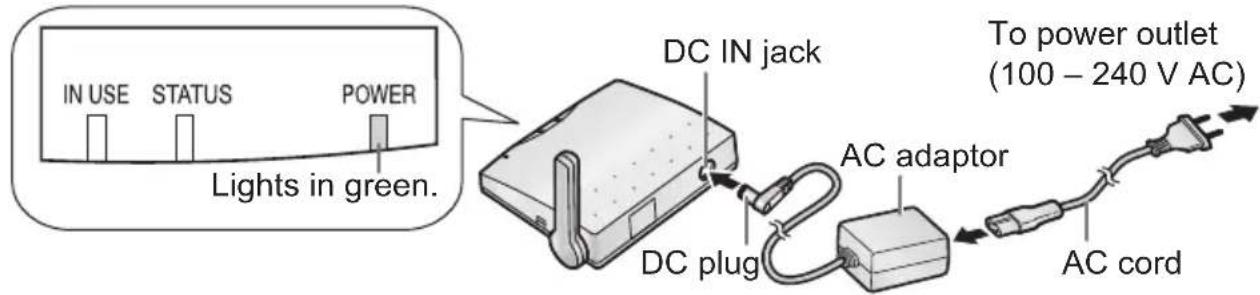
2 Perform the registration operations using the main monitor station.
- Read "Setting a repeater" in the Operating Instructions included with the wireless video intercom system.
3 Press and hold [PROGRAM] on the repeater for about 3 seconds within 2 minutes after completing the main monitor station operations.
- The STATUS indicator flashes in green and then lights up in green after completing the registration.
(Depending on the radio signal status, the indicator may light in amber or red, or flash in red instead of lighting in green.)
![IN USE STATUS POWER Flashing in green. Lights in green. Panasonic VL-FAN1 NUE 1273 POWER [PROGRAM] PROGRAM](/content/2026/05/1144347/images/4c6d77419c5fba748efce9a4804e5602fd70b4a127ca15bc76c76ba4266f815b.jpg)
4 Attach the included registration number sticker on the repeater.
Registration number sticker (Example: 1st. repeater)

5 Disconnect the AC adaptor and place the repeater in the desired location.
- Even if you disconnect the AC adaptor, the registration to the main monitor station is not canceled.
To stop using the repeater (CANCELLATION)
1 Perform the cancellation operations using the main monitor station.
- Read "Setting a repeater" in the Operating Instructions included with the wireless video intercom system. (There are no repeater operations included.)
Note:
- Disconnect the AC adaptor from the canceled repeater in order to avoid malfunction.
- You can reset the settings of the repeater to their default settings (page 17).
Installing the repeater
After completing the registration to the main monitor station, install the repeater.
- Refer to "For best performance" on page 5.
1 Connect the AC cord to the AC adaptor, then connect the AC cord to the power outlet.
• The POWER indicator lights in green.
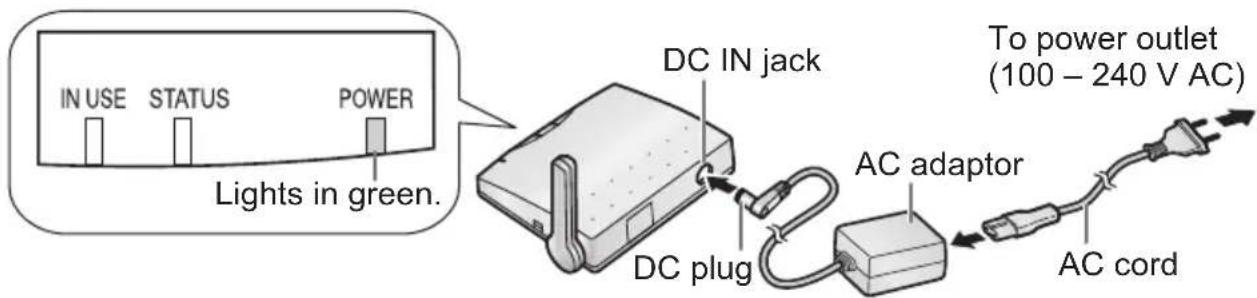
2 Confirm the STATUS indicator.
- The STATUS indicator shows the radio signal status. Install the repeater in a location where the indicator lights in green.
| STATUS indicator | Status | |
| Lights in green. | Strong | Able to install the repeater. |
| Lights in amber. |  | • In places where the indicator lights in amber or red, calls may be interrupted or disconnected. |
| Lights in red. Weak | Out of range | Unable to install the repeater. Change the location. |
| Flashing in red. | ||
3 Install the repeater.
Note:
- It is recommended that you install the repeater in a location where the STATUS indicator lights in green although you can install it in other places where the indicator lights in amber or red.
- Use only the included Panasonic AC adaptor PQLV202.
Wall-mounting
You can mount the repeater on the wall with the included wood screws and washers. Mount the repeater on a wall (pillar) where the wood screws can be firmly fixed.
1 Drive the wood screws with washers into the wall (pillar).
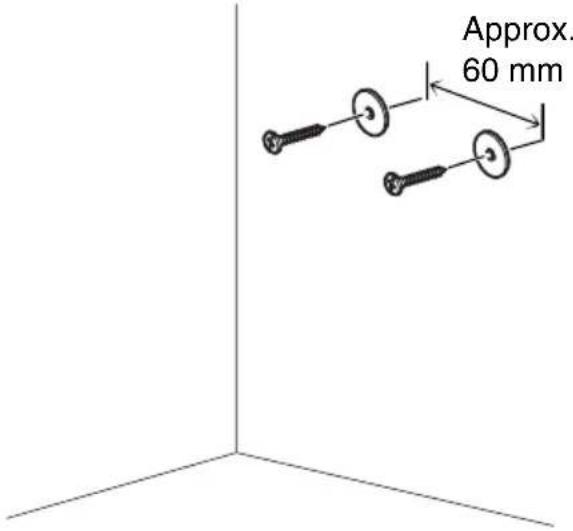
2 Mount onto the wall, directing the wood screws into the slots on the repeater, and slide the repeater down until it is secure.
- About 140 mm of space above the washers is required for raising the antenna.

Important:
- Do not mount the repeater on walls made of plasterboard, ALC (Autoclaved Lightweight aerated Concrete panel), concrete block, or plywood of 18 mm or less in thickness.
Troubleshooting
Indicator
| Problem Cause & Solution Page | ||
| The POWER indicator is turned off. | ● The power is not turned on. Connect the AC adaptor. | 14 |
| The STATUS indicator is turned off. | ● The repeater has not been registered. Register it to the main monitor station. | 12 |
| The STATUS indicator is flashing in red. | ● The power of the main monitor station is not turned on. Turn it on.● The repeater is out of range. Install it in a location where the STATUS indicator lights in green. | —14 |
| The IN USE indicator lights in green. | ● The repeater is relaying radio waves. | — |
| The IN USE indicator is turned off when using the sub monitor station. | ● The sub monitor station is being used in a place where the radio signal is stronger from the main monitor station than the repeater. (This is not malfunction.) | 6 |
Others
| Problem Cause & Solution Page | ||
| Can I register the repeater to another main monitor station? | ● You cannot register one repeater to two or more main monitor stations. To register to another main monitor station, another repeater is needed. | — |
| Can I locate the repeater in a place where the STATUS indicator does not light in green? | ● You can install the repeater in a location where the STATUS indicator lights in amber or red, but sound cuts in and out, or calls may be disconnected. We recommend a location where the indicator lights in green. | 14 |
| Can I locate the repeater outdoors? | ● Do not install the repeater outdoors. | — |
| The repeater does not improve the radio signal. | ● The STATUS indicator lights in amber or red, or is flashing in red. Reinstall the repeater in a location where the indicator lights in green.● The repeater has been installed near the main monitor station. In this location, the repeater cannot work effectively because the sub monitor station receives radio waves from only the main monitor station. Reinstall it in a location near to where the sub monitor station is used. | 146 |
Cleaning
When cleaning this unit, disconnect the AC adaptor from the power outlet.
Clean the repeater with a soft, dry cloth.

Important:
- Do not use anything containing alcohol, polish powder, powder soap, benzine, thinner, wax, petroleum, or boiling water.
Also do not spray with insecticide, glass cleaner, or hair spray. This could cause a change in color or quality.
Resetting to the default settings
If you want to stop using the repeater or reset it to the default settings, press [FACTORY DEFAULT RESET] on the bottom.
1 Press [FACTORY DEFAULT RESET] for about 3 seconds using a pointed object such as a ball-point pen.
• The STATUS indicator turns off.

2 Perform the cancellation operations using the main monitor station.
- Read "Setting a repeater" in the Operating Instructions included with the wireless video intercom system.
Note:
- The registration to the main monitor station is also canceled. To use the repeater again, register it to the main monitor station.
Technical data about this product
Power supply: AC adaptor (100 – 240 V AC, 50/60 Hz) (12.0 V DC, 750 mA)
Current consumption: Standby: Approx. 0.05 A During operation: Approx. 0.08 A
Dimensions: Approx. height 27 mm x width 101 mm x depth 82 mm Approx. height 69.5 mm x width 101 mm x depth 82 mm (when raising the antenna)
Mass (Weight): Approx. 85 g
Operating environment: 0 °C to 40 °C, Up to 90% RH (Relative Humidity) non condensing
Frequency: 2.402 GHz – 2.481 GHz
Index
A AC adaptor 8, 12, 14
AC cord 8, 12, 14
Antenna 10
C Cancellation 13
Cleaning 17
D DC IN jack 10, 12, 14
P POWER indicator .....10, 11, 12, 14
【PROGRAM】button 10, 12
R Registration 12
Registration number sticker ..... 8, 13
Resetting to the default settings .... 17
S STATUS indicator .....6, 10, 11, 12, 14
T Technical data 18
Troubleshooting 16
For your future reference
Date of purchase
Serial number (found on the bottom of the unit)
Dealer's name and address
Dealer's telephone number
Attach your sales receipt here.
Panasonic Communications Co., Ltd.
1-62, 4-chome, Minoshima, Hakata-ku, Fukuoka 812-8531, Japan
Copyright:
- This material is copyrighted by Panasonic Communications Co., Ltd., and may be reproduced for internal use only. All other reproduction, in whole or in part, is prohibited without the written consent of Panasonic Communications Co., Ltd.
© 2006 Panasonic Communications Co., Ltd. All Rights Reserved.

- OPERATING INSTRUCTIONS
- IMPORTANT INFORMATION
- INTRODUCTION
- PREPARATION
- INSTALLATION
- HELP
- GENERAL INFORMATION
- IMPORTANT SAFETY INSTRUCTIONS
- SAVE THESE INSTRUCTIONS
- ADDITIONAL SAFETY INFORMATION
- FOR BEST PERFORMANCE
- BEFORE USING
- LOCATION/AVOIDING NOISE
- ENVIRONMENT
- IMPORTANT
- WHILE IN USE
- TAPPING
- USING NEAR MEDICAL EQUIPMENT
- PRODUCT NAMES USED IN THESE OPERATING INSTRUCTIONS
- INCLUDED ITEMS
- FEATURE HIGHLIGHTS
- POSSIBLE OBSTACLES
- LOCATION OF CONTROLS
- ① ANTENNA
- ② [PROGRAM] BUTTON
- ③ INDICATORS
- ④ DC IN JACK
- ⑤ [FACTORY DEFAULT RESET] BUTTON
- INDICATORS
- REGISTERING THE REPEATER TO THE MAIN MONITOR STATION (REGISTRATION/CANCELLATION)
- REGISTERING THE REPEATER (REGISTRATION)
- TO STOP USING THE REPEATER (CANCELLATION)
- NOTE
- INSTALLING THE REPEATER
- WALL-MOUNTING
- TROUBLESHOOTING
- CLEANING
- RESETTING TO THE DEFAULT SETTINGS
- TECHNICAL DATA ABOUT THIS PRODUCT
- INDEX
- FOR YOUR FUTURE REFERENCE
- ATTACH YOUR SALES RECEIPT HERE
- PANASONIC COMMUNICATIONS CO., LTD
- COPYRIGHT
Brand : PANASONIC
Model : VL-FAN1BX
Category : Doorbell