
CY-DAB2000N - Car Radio PANASONIC - Free user manual and instructions
Find the device manual for free CY-DAB2000N PANASONIC in PDF.


| Product Type | DAB Tuner Unit |
| Brand | Panasonic |
| Model | CY-DAB2000N |
| Power Supply | DC 12 V (11 V - 16 V), negative ground |
| Current Consumption | Less than 1 A |
| Dimensions (W x H x D) | 178 x 25 x 130 mm |
| Weight | 0.7 kg |
| Frequency Range Band III | 174 - 240 MHz (CEPT 5A - 13F) |
| Frequency Range L-Band | 1452 - 1492 MHz (CEPT LA - LW) |
| Usable Sensitivity Band III | -97 dBm (BER 1 x 10^-4) |
| Usable Sensitivity L-Band | -95 dBm (BER 1 x 10^-4) |
| Audio Output Level | 2 Vrms |
| Signal to Noise Ratio | 100 dB (at 1 kHz, 0 dB) |
| Stereo Separation | 90 dB (at 1 kHz) |
| Preset Memory | Up to 18 services (6 per band) |
| DAB PTY Search | Yes, with programmable types |
| Announcement Standby | Yes, with selectable types and languages |
| DAB-RDS Link | Yes, with adjustable link level |
| Remote Control | Yes, included (battery CR2025) |
| Supplied Accessories | Operating instructions, remote control, battery, hardware, antenna, DIN cord, cleaning kit |
Frequently Asked Questions - CY-DAB2000N PANASONIC
User questions about CY-DAB2000N PANASONIC
0 question about this device. Answer the ones you know or ask your own.
Ask a new question about this device
Download the instructions for your Car Radio in PDF format for free! Find your manual CY-DAB2000N - PANASONIC and take your electronic device back in hand. On this page are published all the documents necessary for the use of your device. CY-DAB2000N by PANASONIC.
USER MANUAL CY-DAB2000N PANASONIC
natural_image
Exterior view of a silver memory drive unit (no visible text or symbols)Digital Audio Broadcasting (DAB) Tuner
CY-DAB2000N
Operating Instructions

- Please read these instructions carefully before using this product and save this manual for future use.
- Bitte lesen Sie diese Bedienungsanleitung vor der Verwendung dieses Produktes aufmerksam durch und bewahren Sie sie danach für spätere Nachschlagzwecke sorgfältig auf.
- Prière de lire ces instructions attentivement avant d'utiliser le produit et garder ce manuel pour l'utilisation ultérieure.
- Leest u deze instructie alstublieft zorgvuldig door voor u dit product in gebruik neemt en bewaar deze handleiding voor later gebruik.
- Läs igenom denna bruksanvisning noga innan produkten tas i bruk. Spara bruksanvisningen för framtida behov.
- Si prega di leggere attentamente queste istruzioni prima di usare questo prodotto e di conservare questo manuale per usi futuri.
- Lea con atención estas instrucciones antes de utilizar el producto y guarde este manual para poderlo consultar en el futuro.
Contents
Page
Features of the DAB Tuner Unit 4
What is DAB? 6
Precautions / Components 7
System Diagram 8
Remote Control Preparation.... 9
Preparations for DAB Reception 10
Power and Source 10
Volume Setting.... 11
Basic Operation 10
How to Tune in to a Desired Program .... 12
Inhaltsverzeichnis
Seite
Ensemble Selection.... 13
Service Selection.... 14
Service Component Selection 15
Display Switching 16
Preset Memory 17
Advanced Operation.... 20
Selecting by DAB PTY(Program Type).... 18
Announcement Standby 20
DAB Function Setting 21
Entering the DAB Function Menu 21
Announcement Volume Adjustment 22
DAB-RDS Link Selection 23
Frequency-CEPT Selection 24
Announcement Language Selection.... 25
Announcement Selection.... 26
DAB Link Level Selection 27
RDI Output Selection.... 28
Installation 29
Preparations 29
Installing the DAB Tuner Unit 30
Installing the Antenna 31
Routing the the Antenna Cord 33
Electrical Connections 34
Troubleshooting 36
Fuse.... 37
Maintenance 37
Specifications 37
Features of the DAB Tuner Unit
The DAB tuner unit (CY-DAB2000N) enables you to receive your favorite programs with interference-free reception and with a tonal quality equivalent to that of compact discs. Retuning is not necessary and it is easy to select programs and services. The DAB tuner unit (CY-DAB2000N) also has other useful functions as described below.
Desired Display
The display switch function makes it possible to display your desired item such as an ensemble label, service label, service component label, etc. as selected. (→Page 16)
Desired Service Type Selection
News, rock music, or other type of service can be searched for using the DAB PTY (Program Type) function. (→Page 18, 19)
Language Selection
Any of seven languages - English, German, Spanish, Swedish, Italian, French, Dutch - can be selected for DAB PTY (Program type) display and announcements. (→Page 18, 25)
Desired Services Memory
Up to 18 desired services can be easily saved in the memory and called up from it by using the pre-set memory function. (→Page 17)

Desired Announcements Interruption
The source you are now listening to can be interrupted to listen to your desired announcement (news or traffic information, for example).
(→Page 20, 26)

natural_image
Interior view of a car showing dashboard, steering wheel, and musical notes (no text or symbols)Text Information Display
Text information which is broadcast alongside a radio program can be displayed on the screen by scrolling. (→Page 16)
Automatic Link to a Service in Good Reception
When reception of the received service have become poor, it is possible to switch to an identical service in other ensemble or an identical program in RDS station. (→Page 23, 27)
Summary Description of DAB
DAB stands for Digital Audio Broadcasting. DAB uses 'Multiplex' system which carries several radio programs and data information in one frequency block (bandwidth of 1.536 MHz)
DAB services are broadcast on the following wavebands.
BandⅢ: 174 - 240 MHz (CEPT 5A - 13F)
L-Band : 1452 - 1492 MHz (CEPT LA - LW)
Ensemble
Each DAB station has a frequency block, which is called ensemble.
Service
A DAB program is called service. One ensemble consists of two or more services.
Service Component
A service may have a sub-program called secondary service component, while a main program is called primary service component. Each DAB service may have two or more secondary service components.

flowchart
graph TD
    A["Ensemble"] --> B["Service"]
    A --> C["Service"]
    B --> D["Primary Service Component"]
    C --> E["Primary Service Component"]
    C --> F["Secondary Service Component"]
    C --> G["Secondary Service Component"]
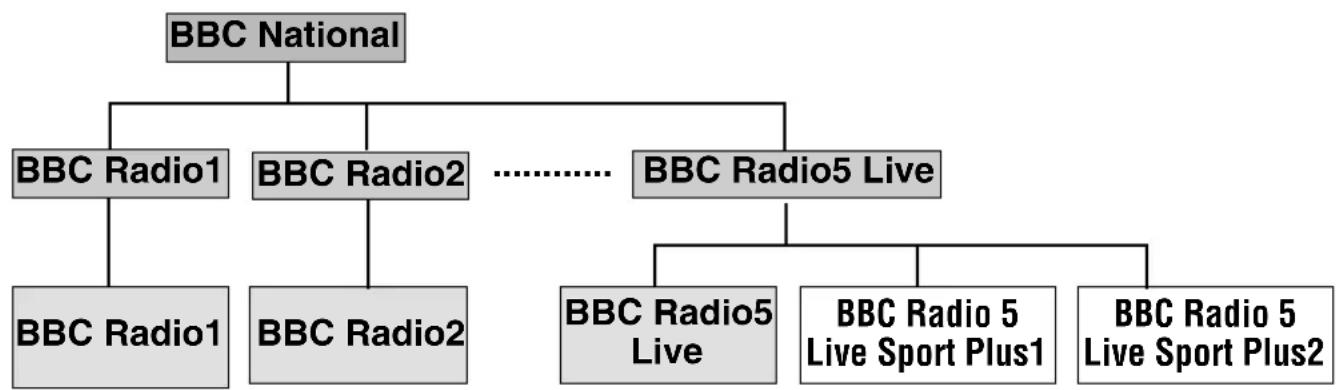
Example: BBC Radio in United Kingdom
flowchart
graph TD
    A["BBC National"] --> B["BBC Radio1"]
    A --> C["BBC Radio2"]
    A --> D["BBC Radio5 Live"]
    B --> E["BBC Radio1"]
    C --> F["BBC Radio2"]
    D --> G["BBC Radio5 Live"]
    G --> H["BBC Radio 5 Live Sport Plus1"]
    G --> I["BBC Radio 5 Live Sport Plus2"]
Precautions / Components
Panasonic welcomes you to their constantly growing family of electronic products owners.
We endeavor to give you the advantages of precise electronic and mechanical engineering, manufactured with carefully selected components, and assembled by people who are proud of the reputation their work has built for our company. We know this product will bring you many hours of enjoyment, and after you discover the quality, value and reliability we have built into it, you too will be proud to be a member of our family.
Precautions
Car Washing
To avoid electrical shorts which may cause fire, or other damage, do not expose this product to water or excessive moisture.
Car Ventilation
If your car is parked for several hours in direct sunlight, the temperature inside the car may become very high. It is advisable to drive the car and give the interior a chance to cool down before switching the unit on.
Power Supply
This product is designed to be used in a car having a 12-Volt negative ground battery system.
Service
This product is made of precision parts. Do not attempt to disassemble or adjust any parts. For repair, please consult your nearest authorized Panasonic Service Center.
Note: The preset memory is cleared to return to the original factory setting when the power connector or battery is disconnected.
The DAB tuner unit must be connected to a head unit (CD/Cassette Receiver, DVD Player/receiver, etc.).
All the descriptions given this manual are based on the assumption that the DAB tuner unit (CY-DAB2000N) is connected to the CD receiver (CQ-DRX900N).
Components
- Operating Instructions....1
- Supplied Hardware....1 set (→ page 29)
- Remote Control....1
- Lithium Battery (CR2025) ....1
- Warranty Card....1
System Diagram
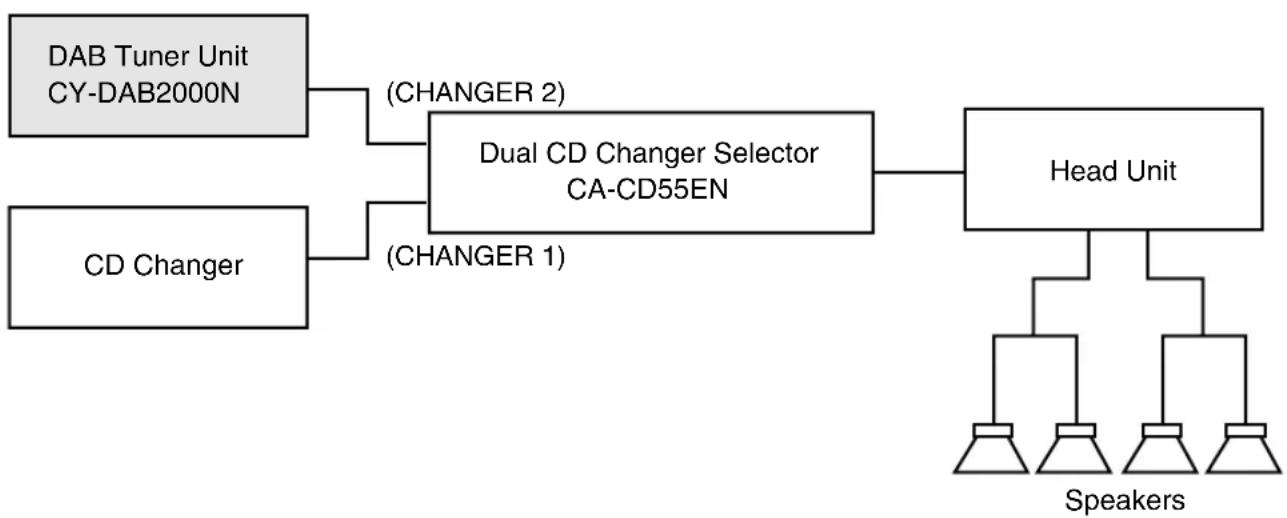
- It is assumed that the DAB tuner unit (CY-DAB2000N) is connected to a head unit before use. The connectable head units include the DVD player/receiver (CQ-DVR909N), cassette receiver (CQ-FRX920N) and CD receiver (CQ-DRX900N) mentioned in this manual. (As of August 2000.) For other head units connectable to the DAB tuner unit, consult the store where you purchased the product.
- If you are connecting both a CD changer and the DAB tuner unit (CY-DAB2000N) to a head unit, the optional dual CD changer selector (CA-CD55EN) is necessary.
- When using the dual CD changer selector, connect the DAB tuner unit (CY-DAB2000N) to CHANGER 2 on the dual CD changer selector side.
Example 1

flowchart
graph LR
    A["DAB Tuner Unit<br>CY-DAB2000N"] --> B["Head Unit"]
    B --> C["Speakers"]
flowchart
graph LR
    A["DAB Tuner Unit<br>CY-DAB2000N"] -->| (CHANGER 2) | B["Dual CD Changer Selector<br>CA-CD55EN"]
    C["CD Changer"] -->| (CHANGER 1) | B
    B --> D["Head Unit"]
    D --> E["Speakers"]
Remote Control Preparation
Battery Installation
- Remove the battery holder.
Take hold of the holder at position B and pull it out by pushing position A in the direction shown by the arrow.
- Install the battery on the battery holder.
Set a new battery properly with its (+) side facing up as shown in the figure.
- Insert the battery holder.
Push in the battery holder back into its original position.

Battery Notes
Remove and dispose of the old battery immediately. Battery Information:
●Battery Type: Panasonic lithium battery (CR2025)
●Battery Life: Approximately 6 months under normal use (at room temperature)
Caution: Improper use of the battery may cause overheating and an explosion, causing injuries or resulting in a fire. Battery leakage may damage the unit.
- Do not disassemble or short the battery. Do not throw a battery into a fire.
- Keep batteries away from children to avoid the risk of accidents.
- Dispose of used batteries in accordance with local regulations.
Preparations for DAB Reception
Power and Source
To receive DAB (Digital Audio Broadcasting), switch the head unit (CD receiver CQ-DRX900N in this manual) on and select the DAB mode.
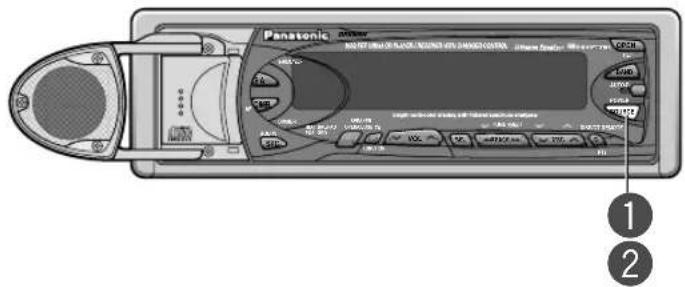
The examples of display and button names in the descriptions of operation are those of the CD receiver (CQ-DRX900N).

1
Turn the ignition key to the ACC or ON position.
Power ON: Press [SOURCE] (POWER).
Power OFF: Press and hold [SOURCE] (POWER) again for more than 2 seconds.
The DAB indicator lights if the DAB tuner is connected.

2
Press [SOURCE] to select the DAB mode.
When DAB mode is selected, the DAB indicator blinks.


flowchart
graph TD
    A["Radio"] --> B["CD Player"]
    B --> C["CD Changer"]
    C --> D["AUX In"]
    D --> E["DAB"]
    style A fill:#f9f,stroke:#333
    style B fill:#ccf,stroke:#333
    style C fill:#cfc,stroke:#333
    style D fill:#fcc,stroke:#333
    style E fill:#cff,stroke:#333
Note: The mode change sequence varies from one head unit to another. For details, refer to the operating instructions for the head unit in use.
Volume Setting
The volume can be adjusted on the DAB remote control. It is also possible to temporarily mute the receiver.


Volume
Press [∧VOL] or [∨VOL] to increase or decrease the volume.
Setting Range : 0 to 40
VOLUME 22

Mute
Press [MUTE] to mute the sound completely.
Press [MUTE] again to cancel.

Note: For more information about the volume and mute function, see the operating instructions for the head unit in use.
Basic Operation
How to Tune in to a Desired Program
The following procedure is how to tune in to your desired program. Please refer to the corresponding page for each setting method.

flowchart
graph TD
    A["Ensemble"] --> B["Service"]
    A --> C["Service"]
    B --> D["Primary Service Component"]
    C --> E["Primary Service Component"]
    C --> F["Secondary Service Component"]
    style A fill:#f9f9f9,stroke:#333
    style B fill:#e6f7ff,stroke:#333
    style C fill:#e6f7ff,stroke:#333
    style D fill:#e6f7ff,stroke:#333
    style E fill:#e6f7ff,stroke:#333
    style F fill:#e6f7ff,stroke:#333
There are 3 steps to tune in to your desired program.

Ensemble Selection(→Page 13)
At first, select the ensemble (=frequency block) which is composed of several services. When ensemble is received, the first of its service's primary service component is broadcast. There are two methods to select a ensemble. One is selecting by CEPT, the other is selecting by frequency.

Service Selection(→Page 14)
Select the service from the received ensemble. With one touch action, you can choose the service easily and listen to the its primary service component.

Service Component Selection(→Page 15)
When the service now received has secondary service component, you can switch to the secondary service component to listen to.
Example: Tuning in to BBC Radio 5 Live Sports Plus 1.

Select BBC National


Select BBC Radio 5 Live


Select BBC Radio 5 Live Sports Plus 1

Ensemble Selection
Select your desired ensemble.


Manual Tuning
The CEPT or frequency goes up or down step by step each time [>] or [<] is pressed. (On the head unit, press [TUNE∧] or [TUNE∨].)

(When CEPT display is selected. 1 step = 1 ensemble)

(When frequency display is selected. 1 step = 16 kHz)
Note: For the instructions for setting CEPT display or frequency display, see page 24.

Seek Tuning
The receiver begins search for a receivable ensemble when [>] or [<] is pressed and held for more than 0.5 second, then release. (On the head unit, press and hold [TUNE∧] or [TUNE∨] for more than 0.5 seconds, then release.)
Notes:
- If frequency display is selected, it takes a long time because the frequency changes 16 kHz at a time.
- When a ensemble is received, the first of its services is selected and that service's primary service component is broadcast.

What is an Ensemble?
Each DAB station has a frequency block, which is called ensemble.

What is the CEPT?
The CEPT is a frequency band table allocated to each region of Europe, and represents the frequency block for a package of services in a simple combination of alphanumeric characters. Band III: 5A - 13F L-Band : LA - LW
Service Selection
Select a desired service from the ensemble received.
![POWER SOURCE 1 2 RAND 3 4 VOL REPSCAN TA 5 6 FUNCTION SEL BAND MTU E PTY DISP Panasonic Car Audio / DAB [∧], [∨] button Panasonic RUNS RUNS RUNS RUNS RUNS RUNS RUNS RUNS RUNS RUNS RUNS RUNS RUNS RUNS RUNS RUNS RUNS RUNS RUNS RUNS RUNS RUNS RUNS RUNS RUNS RUNS RUNS RUNS RUNS RUNS RUNS RUNS RUNS RUNS](/content/2026/05/1144276/images/00b2d995193bd6cd144023045026aa7950a7de82926fdbddfbe38af1f92e8621.jpg)
Press [∧] or [∨] (opposite direction) to select your desired service. (On the head unit, press [DISC∧] or [DISC∨] (opposite direction).)
Example
BBC RI
BBC R2
BBC R3
Notes:
- When a service is received, the service label is displayed.
- When a service is received, its primary service component is broadcast.

What is a Service?
A DAB program is called service. One ensemble consists of two or more services.
Service Component Selection
If the service now received has secondary service components, a primary service component can be switched to a secondary service component.
![POWER SOURCE 1 2 RAND 3 4 VOL REPSCAN TA SEL FUNCTION BAND PTY MUTE DISP Panasonic Car Audio / DAB [∧], [∨] button Panasonic [DISC∧], [DISC∨] button](/content/2026/05/1144276/images/81a10fc8f05a8edd117b4c9f282ea223f646b51c2d9462189048f5f31caa8003.jpg)
Press and hold [] or [] for more than 1 second to select a secondary service component.
(On the head unit, press and hold [DISC∧] or [DISC∨] for more than 1 second.)
Example

flowchart
graph TD
    A["BBC R5"] --> B["BBC R5LS1"]
    B --> C["BBC R5LS2"]
    C --> A
Notes:
- If there is no service component label when you switch the service component, 'PRIMARY' or 'SECONDARY' is shown for 5 seconds, then is switched to the service label.
- When the secondary service component broadcast is over, you will be automatically back to primary service component.

What is a Service Component?
A service may have a sub-program called secondary service component, while a main program is called primary service component. Each DAB service may have two or more secondary service components.
Display Switching
When ensemble is received, your desired item can be set and displayed on the display.
![POWER SOURCE 1 2 RAND 3 4 VOL REPSCAN 5 6 TA SEL FUNCTION BAND MUTE PTY DISP Panasonic Car Audio / DAB [DISP] button Panasonic DIPERT [DISP] (DISP) button D (DISP) button](/content/2026/05/1144276/images/c89fb9149595f4c37ac4d290b30775adf80085d35461d4d43c3810b9559fe39b.jpg)
Press [DISP] to switch the display as follows. (On the head unit, press [D] (DISP).)

flowchart
graph TD
    A["SERVICE"] --> B["SERVICE COMP"]
    B --> C["DYNAMIC LABE"]
    C --> D["DAB1 12A"]
    D --> E["ENSEMBLE"]
    E --> F["Ensemble Label"]
    G["DAB1 10:46"] --> H["Clock Display"]
    I["Dot Spectrum Analyzer Display"] --> J["ENSEMBLE"]
    K["Service Label (Default)"] --> L["Service Component Label"]
    M["Dynamic Label"] --> N["CEPT or Frequency Display"]
Notes:
- If a service component has no service component label or dynamic label, switching to service component label and dynamic label is not possible.
- Service label, service component label, and ensemble label are displayed after showing SERVICE, SERVICE COMP, and ENSEMBLE first.
- Dot Spectrum Analyzer Display is not available to some head units (CQ-DVR909N, etc.).
Caution: For safety, do not watch the scroll display of the dynamic label while driving.

What is a Dynamic Label?
Dynamic label is to display text information sent with a service component. Text information includes information on the service component received, for example, which can be scrolled for viewing.
Preset Memory
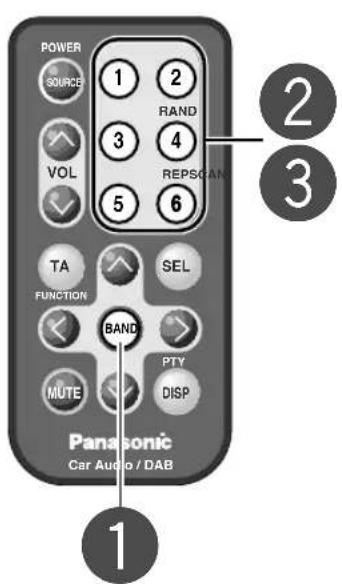
Up to 18 services (6 per band) can be stored in the memory as desired. ② and ③ can be set only with the remote control supplied with the DAB tuner unit.
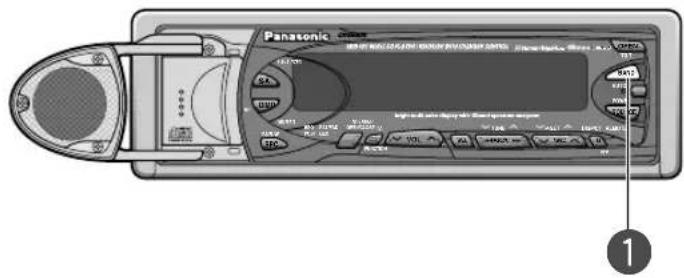
Caution: To ensure safety, never attempt to preset stations while you are driving.
Note: There are 3 bands to store 18 services (6 per band), and ensemble can be received in each band in the same way.
1
Press [BAND] to change the display as follows:

flowchart
graph LR
    A["DAB1"] --> B["5A"]
    B --> C["DAB2"]
    C --> D["12B"]
    D --> E["DAB3"]
    E --> F["LA"]
2
(1) Tune the service you wish to preset.
(2) Press and hold one of the preset buttons [1] to [6] for more than 2 seconds until it blinks. The service for the button pressed is preset in the memory. (Only on the remote control supplied with the DAB tuner unit.)

flowchart
graph LR
    A["BBC R2"] --> B["→"]
    B --> C["BBC R2"]
    C --> D["1"]
3
Press a preset button between [1] and [6], to select the desired preset service. (Only on the remote control supplied with the DAB tuner unit.)
Note: You can change the memory presetting by repeating the above steps.
Poor Reception of Preset Services (SID Seek)
If any of the preset services has poor reception, press its preset button again. The seek function will be activated using SID (Service Identification code) to tune in to an identical service with better reception with another ensemble.
SID SEEK
Note: When the preset service is received in good receiving condition, this function is invalid.
Advanced Operation
Selecting by DAB PTY (Program Type)
Your desired type of service can be searched for, using PTY (Program Type) code.


1 Press and hold [DISP] for more than 2 seconds to switch PTY display mode on or off. (On the head unit, press and hold [D] (PTY) for more than 2 seconds.) When PTY ON mode is selected, the PTY indicator lights, indicating that the following steps can be taken.
SPEECH PTV AF current service's program type
2 Press [DISP] to change the PTY display language as follows. (On the head unit, press [D] (PTY).)

flowchart
graph LR
    A["English"] --> B[" "]
    B --> C["Spanish"]
    C --> D["Swedish"]
    D --> E["Italian"]
    E --> F["FrenchDutch"]
    F --> G[" "]
    G --> A
3 Press [>] or [<] (opposite direction) to change the program type as follows. (On the head unit, press [TRACK▶▶] or [TRACK◀◀] (opposite direction).)
| SPEECH | MUSIC | News | Affairs | Info | Sport | Educate | |||||||
| Drama | Culture | Science | Varied | Pop M | Rock M | Easy M | |||||||
| Light M | Classics | Other M | Weather | Finance | Children | Social | |||||||
| Religion | Phone In | Travel | Leisure | Jazz | Country | Nation M | |||||||
| Oldies | Folk M | Document | SPEECH |
4 Select a desired program and press [BAND]. Seek will start to tune in to a service broadcasting the selected program type.
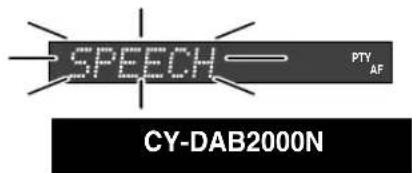
Selecting by DAB PTY (Program Type)

PTY Preset
Program types are stored in memory under preset numbers 1 to 6 as shown in the table below.
To tune in the desired program type, call one of the preset numbers 1 to 6 by pressing [1] to [6] on the DAB remote control. (Also you can press [∧] or [∨] on the DAB remote control. On the head unit, press [∧P.SET] or [∨P.SET].)
| Preset No. | Program Type Display | ||
| 1 | News | News 1 | News |
| 2 | Speech | SPEECH 2 | Affairs / Info / Educate / Drama / Cultures/ ScienceVaried / Weather / Finance / Children / SocialReligion / Phone In / Travel / Leisure / Document |
| 3 | Sport | Sport 3 | Sport |
| 4 | Pop. Music | Pop M 4 | Pop M |
| 5 | Classic Music | Classics 5 | Classics |
| 6 | Other Music | MUSIC 6 | Rock M / Easy M / Light M / Other M / Jazz / CountryNation M / Oldies / Folk M |

PTY Search
If a preset call is not possible, search the program type service as follows.
- Select a program type by calling the preset number. The preset program type appears on the display for 5 seconds.
- Press [BAND] to tune in the desired program type service.

PTY Preset Change
- Select a program type.
POP M
- Press and hold a desired preset number button [1] to [6] for more than 2 seconds. (Only on the remote control supplied with DAB tuner unit.)

Note: The PTY preset memory is interlocked with DAB and RDS. If the PTY preset memory is rewritten in DAB mode, the RDS preset memory will also be rewritten the same way.
Advanced Operation _(continued)
Announcement Standby
The source you are now listening to can be interrupted when an announcement of the selected type and language is broadcast.


Note: All announcements are initially set to OFF. After setting a desired announcement to ON, set the receiver in the state of announcement standby. For details, see Announcement Selection on page 26.
1
Press [TA] to set the receiver in the state of announcement standby.
(On the head unit, press [•] (TA).)
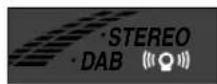
The announcement standby indicator lights.
When the announcement is broadcast, the service label of the service that broadcast the announcement is shown on the display.
When the announcement broadcast is over, you will be automatically switched back to the source you were listening to before.
2
Press [TA] again to release the announcement standby. (On the head unit, press [-] (TA) again.)
The announcement standby indicator goes out.
Notes:
- Announcement standby setting is possible in the DAB mode only.
- It is not possible to change the source during an announcement is broadcast. Press [TA] to stop the announcement broadcast.
●A language for announcements can be selected. For the instructions for language selection, see page 25.
●The volume can be adjusted for receiving announcements. For details, see Announcement Volume Adjustment on page 22.

Alarm Announcement
An alarm announcement is broadcast interrupting the source you are listening to regardless of the setting of desired announcements and of announcement standby. When an alarm announcement is broadcast, the service label of the alarm station is shown on the display.
Entering the DAB Function Menu
After entering the DAB function menu, select the desired function setting mode.


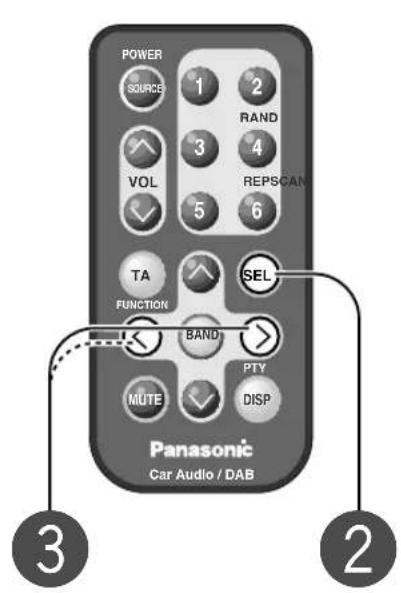
The DAB function menu is selected when [TA] is pressed and held for more than 2 seconds while in the DAB mode.
(On the head unit, press and hold [•] (TA) for more than 2 seconds.)
2 The mode changes as follows each time [SEL] is pressed.

flowchart
graph TD
    A["TA VOL SEL"] --> B["LINK MODE"]
    B --> C["DISPLAY SEL"]
    C --> D["LANGUAGE SEL"]
    D --> E["ANNOUNCE SEL"]
    E --> F["DAB LEVEL"]
    F --> G["RDI OUT SEL"]

    H["Announcement volume adjustment.....(→Page 22)"] --> I["DAB-RDS link selection.....(→Page 23)"]
    I --> J["Frequency-CEPT selection.....(→Page 24)"]
    J --> K["Announcement language selection.....(→Page 25)"]
    K --> L["Announcement selection.....(→Page 26)"]
    L --> M["DAB link level selection.....(→Page 27)"]
    M --> N["RDI output selection.....(→Page 28)"]
Announcement Volume Adjustment
Adjust the volume for receiving announcements.


1 Press [SEL] in the DAB function menu and select "TA VOL SEL".
TA VOL SEL
Adjust the volume for announcement using [VOL∧] or [VOL∨].
Setting Range: 0 to 40
Default: VOLUME 20
TA VOLUME 20
Listening to Announcement Only
You can listen only to DAB announcements with other sources muted.
- Adjust the TA volume to the desired level.
- Set regular volume level to 0. (For regular volume adjustment, refer to page 11 Volume Setting.)
Note: To listen to a source other than Announcements, turn the regular volume back to the desired level.
DAB-RDS Link Selection
If the reception of the selected service has become poor, the same service in an other ensemble can be automatically searched for and tuned in to. It is also possible to search for a corresponding RDS station presenting the same program and tune in to that station.
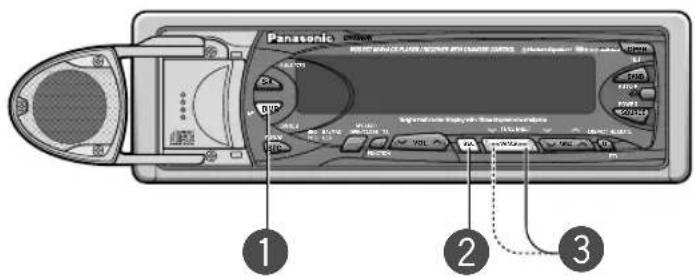
Press and hold [DIMR] (AF) for more than 2 seconds to switch AF on or off.
AF on: Link is available. (Default)
AF off: Link is not available.

Note: Switching AF on or off varies from one head unit to another. For details, refer to the operating instructions for the head unit in use.
Press [SEL] in the DAB function menu and select "LINK MODE".
LINK MODE
3 Press [>] or [<] to select DAB or RDS. (On the head unit, press [TRACK▶▶] or [TRACK◀◀].) Default: LINK DAB → DAB
LINK DAB\*DAB
The same program is searched for from DAB only.
LINK DAB÷RDS
The same program is searched for from both DAB and RDS.
Note: If the same DAB service can be received in good condition when the tuner is linked to an RDS station, the DAB is received in preference to the RDS.
Frequency-CEPT Selection
A selected frequency may be shown by either of the two types of display. CEPT display which shows the frequency block of a package of services, or frequency display for frequency up/down at 16 kHz intervals.


1 Press [SEL] in the DAB function menu and select "DISPLAY SEL".
DISPLAY SEL
Press [>] or [<] to select either CEPT display or frequency display.
(On the head unit, press [TRACK▶▶] or [TRACK◀◀].)
Default: DISPLAY CEPT
DISPLAY CEPT ← → DISPLAY FREQ
Example
DAB1 12A
(CEPT) (Frequency)
Announcement Language Selection
The language for announcements can be selected. For example, if you want to listen to only German and French, turn the two languages, German and French, ON, and turn the others, English, Spanish, Swedish, Italian, Dutch OFF.

1 Press [SEL] in the DAB function menu and select "LANGUAGE SEL". LANGUAGE SEL
2 Press [>] or [<] (opposite direction) to select a language.
(On the head unit, press [TRACK▶▶] or [TRACK◀◀] (opposite direction).)

flowchart
graph TD
    A["ENGLISH ON"] --> B["GERMAN ON"]
    B --> C["SPANISH ON"]
    C --> D["SWEDISH ON"]
    D --> E["ITALIAN ON"]
    F["DUTCH ON"] --> A
    G["FRENCH ON"] --> F
3 To set the desired language, press [∧] or [∨] to choose ON or OFF. (On the head unit, press [DISC∧] or [DISC∨].) Default: All languages ON

Announcement Selection
The type of announcements can be selected. For example, if you want to listen to traffic and weather information, turn the “TRAFFIC” and “WEATHER” ON, and turn the others, “TRANS”, “WARNING”, “NEWS”, “EVENT” and “SP EVENT” OFF.
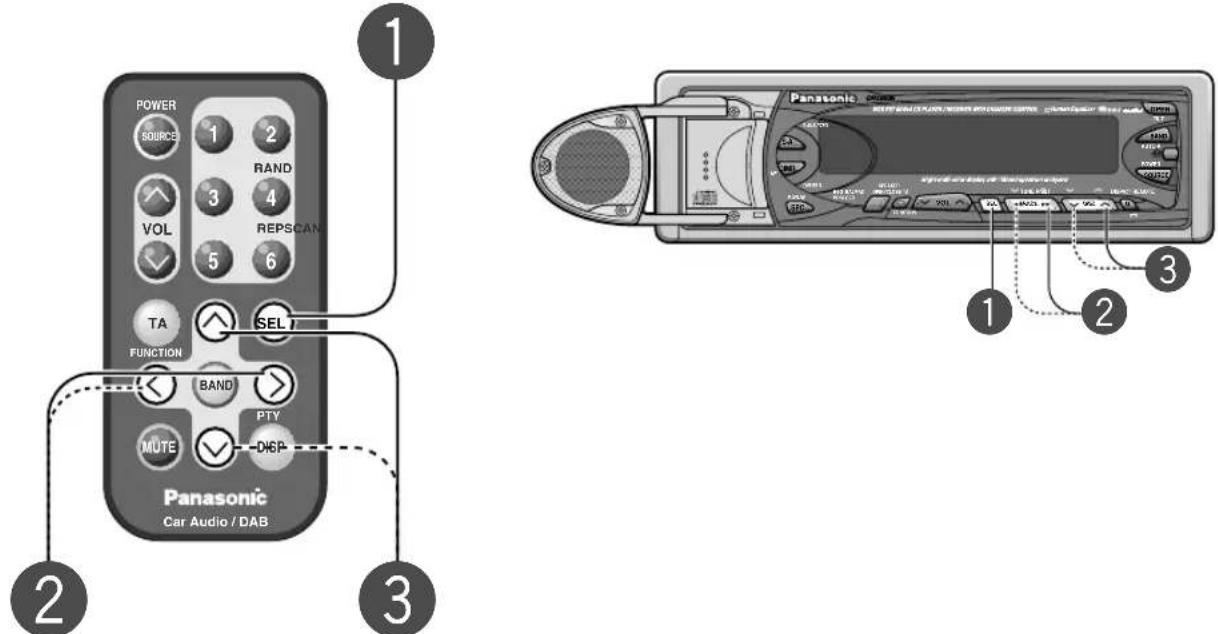
1 Press [SEL] in the DAB function menu and select "ANNOUNCE SEL". ANNOUNCE SEL
2 Press [>] or [<] (opposite direction) to select an announcement type. (On the head unit, press [TRACK▶▶] or [TRACK◀◀] (opposite direction).)

flowchart
graph LR
    A["TRAFFIC OFF"] --> B["TRANS OFF"]
    B --> C["WARNING OFF"]

flowchart
graph TD
    A["SP EVENT OFF\nInformation about unforseeable events"] --> B["EVENT OFF"]
    C["NEWS OFF\nLatest news"] --> D["WEATHER OFF"]
    B <--> D
Information about all kinds of events Weather Information
3 To set the desired announcement type, press [∧] or [∨] to choose ON or OFF. (On the head unit, press [DISC∧] or [DISC∨].)
Default: All announcements OFF
- When a desired announcement type is set to ON and switched to the standby state, the selected announcement can be listened to, interrupting the source now received. For details, see page 20.
●A language can be selected for announcements. For details, see page 25.
DAB Link Level Selection
You can set a link level to an RDS station when the received signals have become too weak during DAB reception. (This applies to cases where LINK DAB RDS has been set in the DAB-RDS Link Selection method described on page 23.)


1 Press [SEL] in the DAB function menu and select "DAB LEVEL". DAB LEVEL
2 Press [>] or [<] to select a DAB link level. (On the head unit, press [TRACK▶▶] or [TRACK◀◀].) Default: LINK LEVEL 1
What is DAB LINK LEVEL?
DAB link level means linkage level to an RDS station when the received signals become weak.
With level 1 it is relatively easy for you to link to an RDS station because it uses link information from DAB signal and the identification code assigned to each program of DAB and RDS stations.
With level 2 it is less easy than level 1 for you to link to an RDS station because it uses only link information from DAB signal.
In some areas, programs may be different even though their identification code is the same. If level 1 is set, therefore, it is possible that you might listen to a program different from your choice. If you are in such areas, select level 2.
DAB Function Setting _(continued)
RDI Output Selection
Information received from DAB can be output through the selection of DAB data service. (For use in case of future system upgrade)


1 Press [SEL] in the DAB function menu and select "RDI OUT SEL". RDI OUT SEL
2 Press [>] or [<] (opposite direction) to select RDI output. (On the head unit, press [TRACK▶▶] or [TRACK◀◀] (opposite direction).) Default: RDI OFF

flowchart
graph TD
    A["RDI OFF"] --> B["Data Service Program Service"]
    B --> C["Feedback Loop"]

What is RDI?
RDI stands for Receiver Data Interface. RDI is digital data output format for DAB. It is possible to provide digital data and audio information to external equipment using RDI OUT connector on the DAB tuner unit.
Preparations
- Before starting with the installation, connect the antenna, speaker and head unit, then check your DAB receiving condition.
- Disconnect the cable from the negative (−) battery terminal (see caution below).

natural_image
Illustration of a hand using a tool to adjust or install a battery component (no text or symbols present)Caution: Do not disconnect the battery terminals of a car with a trip or navigational computer since all user settings stored in memory will be lost. Instead take extra care with installing the unit to prevent shorts.
Installation Precautions
This product should be installed by a professional installer, if possible.
In case of difficulty, please consult your nearest authorized Panasonic Service Center.
- This system is to be used only in a 12-volt, DC battery system (car) with negative ground.
- Follow the electrical connections carefully (→Page 34, 35). Failure to do so may result in damage to the unit.
- Connect the power lead after all other connections are made.
- Be sure to connect the battery lead (yellow) to the positive terminal (+) of the battery or fuse block (BAT) terminal.
- Insulate all exposed wires to prevent short circuiting.
- Secure all loose wires after installing the unit.
- Please carefully read the operating and installation instructions of the respective equipment before connecting it to this unit.
Supplied Hardware
| No. | Item | Diagram | Q'ty |
| 1 | Power Connector |  | 1 |
| 2 | DIN Cord (5 m) | 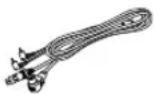 | 1 |
| 3 | Velcro Tape |  | 2 |
| 4 | Tapping Screw with Washers(ø5 mm x 16 mm) |  | 4 |
| No. | Item | Diagram | Q'ty |
| 5 | Antenna (Antenna Cord 6 m) |  | 1 |
| 6 | Cleaning Kit |  | 1 |
| 7 | Cord Clamp |  | 5 |
| 8 | Hexagonal Wrench |  | 1 |
| 9 |  | 1Wa |
Installing the DAB Tuner Unit
Cautions:
- We strongly recommend you to wear gloves for installation work to protect yourself from injuries.
● Never mount the DAB tuner unit in any of the following locations to avoid damage due to overheating; - Near the heater port.
- Places like the dashboard or rear deck, where it may be exposed to direct sunlight.
- Do not mount the DAB tuner unit near the door, where it could be exposed to rain.
Mounting with Velcro Tape

Attach the seal side of the Velcro Tape to the DAB tuner unit, then mount the unit on the carpet.
Note: Some carpet materials may not be suitable for this mounting method. In this case, please contact your nearest authorized Panasonic Service Center for service.
Mounting with Tapping Screws
Caution: You run the risk of interfering with the mounting or causing damage by drilling into the gas tank, a wiring harness, or other component.

Drill 3.5 mm diameter holes to the chassis.
- Choose a place to mount the DAB tuner unit, and drill four holes 3.5 mm in diameter in the car body.
- Make cross-cuts at the corresponding points in the carpet using a knife.
- Tighten the tapping screws with washer.

natural_image
Hand holding a pen writing on a dotted sheet with scattered dots and a dashed-line diagram showing plus signs (no text or symbols present)Note: Apply an anticorrosive to the holes and tapping screws.
Installing the Antenna
Cautions:
- For information on where to install the antenna, call your nearest Panasonic Service Center.
- Be sure to use the antenna supplied with the DAB tuner (CY-DAB2000N).
- Select a point for antenna installation so that the antenna will not stick out of the car body. Otherwise, the antenna could hit pedestrians, possibly causing an accident.
- Install the antenna so it will not be damaged when the trunk is opened.
●Install the antenna more than 20 cm away from other antennas. - If a ski carrier, for example, is mounted on the roof, install the antenna as far away from the ski carrier as possible.
- Do not use the cleaner for other than the specified purpose. Keep the cleaner out of reach of children so they will not accidentally drink it.
Installing the Antenna
- Carefully clean the antenna mounting surface using the cleaning kit. When the cleaner liquid has dried white, wipe the surface with a dry cloth.
- Loosen the screws with a hexagonal wrench (Fig. A).
- Peel the paper from the antenna base, then mount the antenna on the trunk lid (Saloon type car).
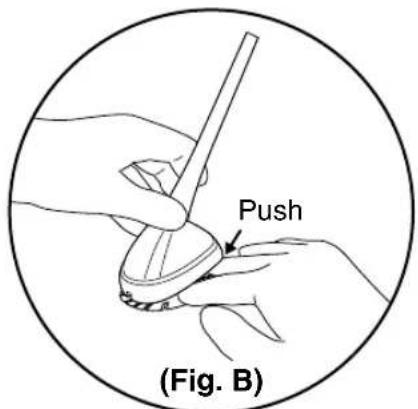
- After mounting it, push the mounted joint with your fingers so the antenna fits close to the car body (Fig. B).
- After pushing it, retighten the screws securely.


Notes:
●To make it more adhesive, dry the mounting place well before attaching the antenna.
- If the surface temperature of the mounting place is low (less than 20 degrees), heat it with a drier, for example.
- After attaching the antenna, do not drive in the rain, do not expose it to water and do not pull out the antenna within 24 hours.
Installing the Antenna
Cautions:
- If your garage has a low ceiling, remove the antenna from your car before entering to avoid breakage of the antenna.
- Be sure to remove the antenna before cleaning your car in a car wash.
- Do not apply paint or wax to the antenna because such a substance may adversely affect the sensitivity of the antenna. Remove snow, if it covers the antenna, because it may also lower the antenna sensitivity.
●Tighten the antenna rod securely because a loose rod may lower the sensitivity. - Keep the screws tightened securely while the antenna is in use.
Removing the Antenna Temporarily
- Remove the screws using a hexagonal wrench.
- Remove the antenna from the base.

Routing the Antenna Cord
Cautions:
- Route the antenna cord so it will not be stepped on or be pinched by the door, etc., then fasten it with clamps.
- Route the antenna cord so that, when the seats are moved back and forth, it will not be damaged. Then, fasten it with clamps.
● Exercise due care in passing the antenna cord through the trunk to prevent rainwater from entering.

- Pull the antenna cord through the clearance in the trunk lid into the interior of the car.
- Route the cord through the watertight rubber, and stick the watertight rubber to the trunk lid at a point where the weather strip on the body comes in contact with the trunk lid.
- When the cord is inside, fasten it to the car body with clamps.

Electrical Connections
Cautions:
●This unit is designed for use in a car having a 12-volt negative ground battery system.
●To prevent damage to the unit, be sure to follow the connection diagram below.
- Be sure to insulate any exposed wires to prevent short circuiting with the car chassis. Bundle all cables, and prevent cable terminals from touching any metal parts.
- Keep the cover on the RDI OUT when it is not in use. (For use in case of future system upgrade)
System Example: Connecting a Head Unit
Combination: CD/cassette receiver (CQ-DRX900/FRX920N)
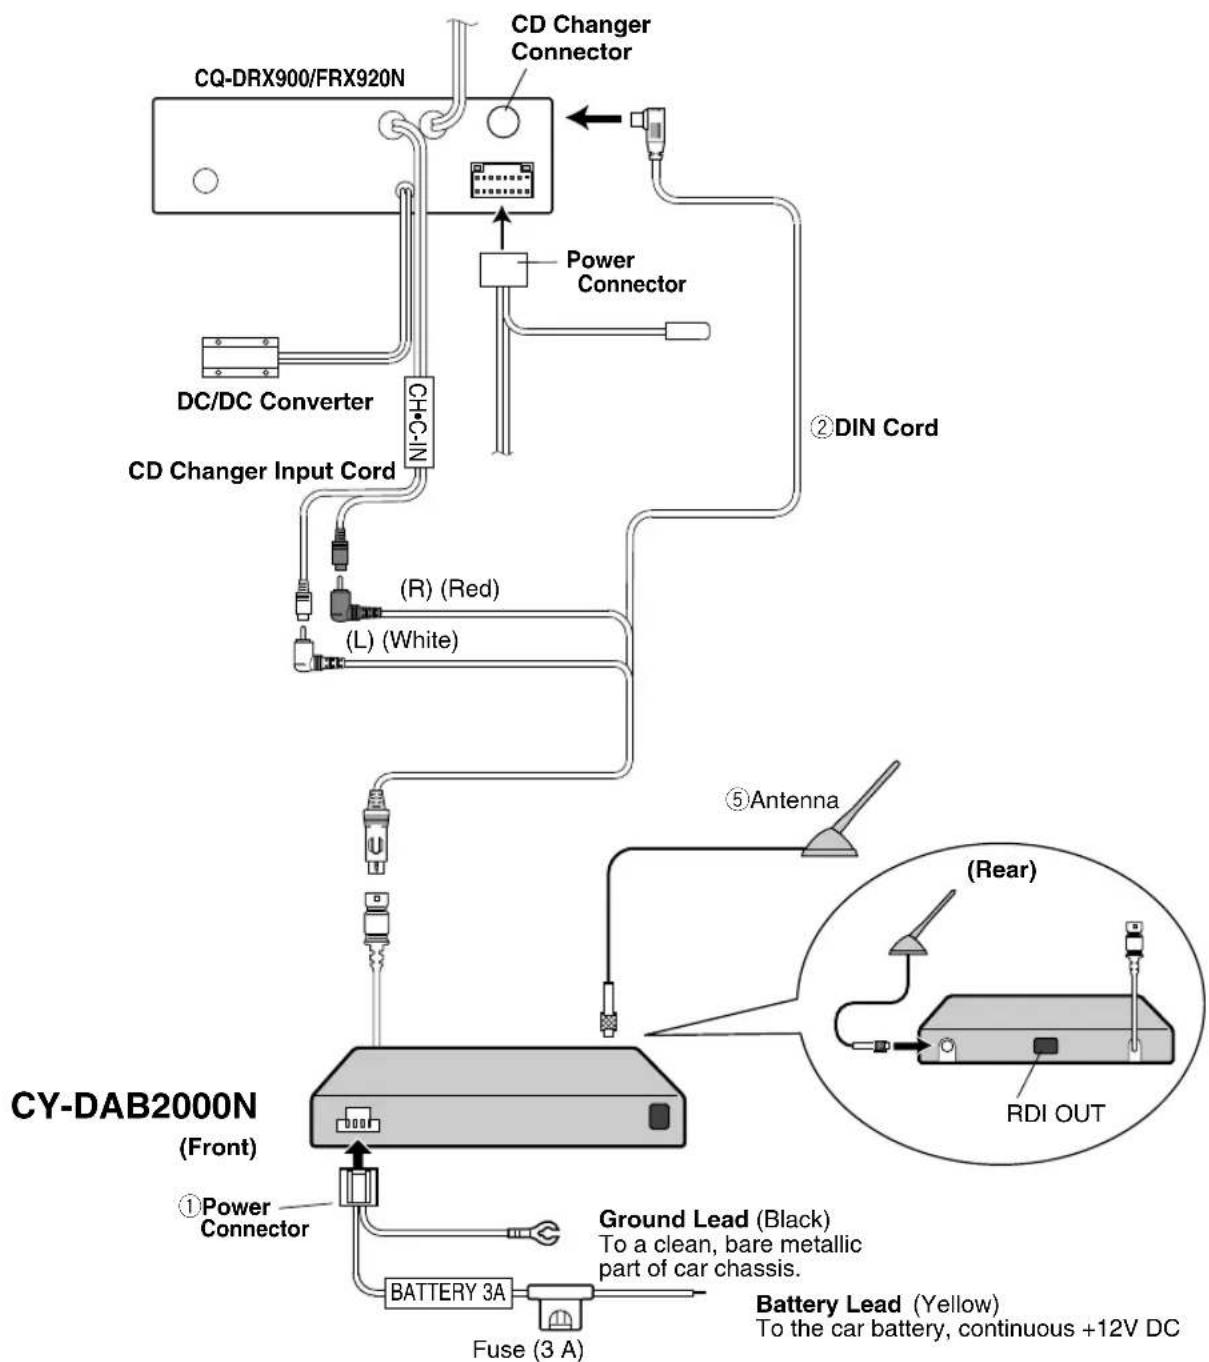
flowchart
graph TD
    A["CQ-DRX900/FRX920N"] --> B["CD Changer Connector"]
    B --> C["DC/DC Converter"]
    B --> D["CD Changer Input Cord"]
    D --> E["CHC-IN"]
    E --> F["(R) (Red)"]
    E --> G["(L) (White)"]
    F --> H["Ground Lead (Black)"]
    G --> I["(Rear)"]
    I --> J["RDI OUT"]
    H --> K["Battery Lead (Yellow)"]
    J --> L["Battery 3A"]
    L --> M["Fuse (3 A)"]
    M --> N["①Power Connector"]
    N --> O["CY-DAB2000N (Front)"]
    O --> P["②DIN Cord"]
    P --> Q["⑤Antenna"]
System Upgrade Example: Connecting a Head Unit and CD changer
Combination: CD/cassette receiver (CQ-DRX900/FRX920N), CD changer (CX-DP9061EN)
- To connect a CD changer and DAB tuner to the head unit, the optional dual CD changer selector (CA-CD55EN) is necessary.
- When using the dual CD changer selector, connect the DAB tuner unit (CY-DAB2000N) to CHANGER 2 on the dual CD changer selector side.

flowchart
graph TD
    A["Ground Lead"] --> B["Fuse (3.15A)"]
    B --> C["BATTERY"]
    C --> D["Extension Cord (DIN/BATT/RCA/GND)"]
    D --> E["CD Text recognizable CD Changer CX-DP9061EN"]
    E --> F["DIN Cord"]
    F --> G["DUAL CD Changer Selector"]
    G --> H["CA-CD55EN"]
    H --> I["Dual Changer Output Cord"]
    I --> J["CDChanger 2 Connection Cord"]
    J --> K["②DIN Cord"]
    K --> L["CY-DAB2000N"]
    L --> M["⑤Antenna"]
    M --> N["BATTERY 3A"]
    N --> O["Fuse (3 A)"]
    O --> P["Battery Lead (Yellow) To the car battery, continuous +12V DC"]
    P --> Q["Ground Lead (Black) To a clean, bare metallic part of car chassis."]
    Q --> R["RCA Cord (Supplied to CA-CD55EN)"]
    R --> S["CQ-DRX900/FRX920N"]
    S --> T["DIN Cord (Supplied to CA-CD55EN)"]
    T --> U["DC/DC Converter"]
    U --> V["Power Connector"]
    V --> W["Dual Changer Control Cord (Brown w/white stripe)"]
    W --> X["TWIN CD•C-CONT"]
    X --> Y["CD Changer Connector"]
    Y --> Z["DIN Cord (Supplied to CA-CD55EN)"]
    Z --> AA["DUAL CD Changer Selector"]
    AA --> AB["CA-CD55EN"]
    AB --> AC["DUAL CHanger Output Cord"]
    AC --> AD["CDChanger 1 Connection Cord"]
    AD --> AE["DIN Cord (Supplied to CA-CD55EN)"]
    AE --> AF["DUAL CD Changer Selector"]
    AF --> AG["DIN Cord (Supplied to CA-CD55EN)"]
Troubleshooting
Preliminary Steps
Check and take steps as described in the tables below.
If You Suspect Something Wrong
Immediately switch the power off.
Disconnect the power cable and check that there is neither smoke nor heat from the unit before asking for repairs. Never try to repair the unit yourself because it is dangerous to do so.
Caution:
Do not use the unit in case of a malfunction.
Do not use the unit in a irregular condition, for example, without sound, or with smoke or foul smell, as this can cause a fire or an electric shock. Immediately stop using it and call the store where you purchased it.
Tuner
| Trouble | StepCause | |
| DAB cannot be received. | Wiring is wrong. | Correctly connect the cables as shown in Electrical Connections. |
| Fuse is burnt. | Call the store where you purchased the unit, or your nearest service station (see attached sheet) and ask for fuse replacement. | |
| Outside of reception area | Set the tuner unit for linkage to RDS station. | |
| DAB indicator does not light. | DAB tuner is connected to CHANGER 1 on dual CD changer selector. | Connect DIN cord to CHANGER 2 on the dual CD changer selector. |
| Noise in audio | DAB signals are too weak. | Set the tuner unit for linkage to RDS station. |
| Antenna sensitivity is too low. | Check the antenna if it is correctly installed. | |
| No sound | Supplied DIN cord is connected to AUX-IN. | Connect the supplied DIN cord to CD changer input cord. |
| Switched to a different program | DAB link level 1 is selected. | Select DAB link level 2. |
| Preset station is reset | Battery cable is not correctly connected. | Connect the battery cable to the terminal that is always live. |
■Remote Control
| StepCauseTrouble | ||
| Buttons are invalid for operation. | Battery polarity (+) (−) is reversed. | Insert the battery correctly. |
| Wrong battery Check the battery. | ||
| Battery is empty. | Replace the battery. | |
| Remote control is pointing in the wrong direction. | Direct the remote control at REMOTE (sensor) on the head unit's panel. |
Use fuses of the same specified rating (3 A). Using different substitutes or fuses with higher ratings, or connecting the unit directly without a fuse, could cause fire or damage to the unit.
If the replacement fuse fails, contact your nearest authorized Panasonic Service Center.
Maintenance
Your product is designed and manufactured to ensure the minimum of maintenance. Use a soft cloth for routine exterior cleaning. Never use benzine, thinner, or other solvents.
Specifications
General
Power Supply : DC 12 V (11 V - 16 V), Test Voltage 14.4 V, Negative Ground
Current Consumption : Less than 1 A
Dimensions : 178 (W) x 25 (H) x 130 (D) mm
Weight : 0.7 kg
DAB
Frequency Range
Band III: 174 - 240 MHz (CEPT 5A - 13F)
L-Band : 1,452 - 1,492 MHz (CEPT LA - LW)
Usable Sensitivity
Band III : -97 dBm (BER 1 x 10 ^-4 )
L-Band: -95 dBm (BER 1 x 10 ^-4 )
Output : 2 Vrms
Signal to Noise Ratio : 100 dB (at 1 kHz 0 dB)
Stereo Separation : 90 dB (at 1 kHz)
Note: Specifications and the design are subject to possible modification without notice due to improvements.
Matsushita Electric Industrial Co., Ltd.
Central P.O. Box 288, Osaka 530-91, Japan
- CY-DAB2000N
- Operating Instructions
- Contents
- Inhaltsverzeichnis
- Features of the DAB Tuner Unit
- Desired Display
- Desired Service Type Selection
- Language Selection
- Desired Services Memory
- Desired Announcements Interruption
- Text Information Display
- Automatic Link to a Service in Good Reception
- Summary Description of DAB
- Ensemble
- Service
- Service Component
- Precautions / Components
- Precautions
- Car Washing
- Car Ventilation
- Power Supply
- Components
- System Diagram
- Example 1
- Remote Control Preparation
- Battery Installation
- Battery Notes
- Preparations for DAB Reception
- Power and Source
- 1
- 2
- Volume Setting
- Volume
- Mute
- Basic Operation
- How to Tune in to a Desired Program
- Ensemble Selection(→Page 13)
- Service Selection(→Page 14)
- Service Component Selection(→Page 15)
- Ensemble Selection
- Select your desired ensemble.
- Manual Tuning
- Seek Tuning
- Notes:
- What is an Ensemble?
- What is the CEPT?
- Service Selection
- Example
- What is a Service?
- Service Component Selection
- What is a Service Component?
- Display Switching
- What is a Dynamic Label?
- Preset Memory
- 3
- Poor Reception of Preset Services (SID Seek)
- SID SEEK
- Advanced Operation
- Selecting by DAB PTY (Program Type)
- PTY Preset
- PTY Search
- PTY Preset Change
- Advanced Operation _(continued)
- Announcement Standby
- Alarm Announcement
- Entering the DAB Function Menu
- Announcement Volume Adjustment
- Listening to Announcement Only
- DAB-RDS Link Selection
- LINK MODE
- LINK DAB\*DAB
- LINK DAB÷RDS
- Frequency-CEPT Selection
- Announcement Language Selection
- Announcement Selection
- DAB Link Level Selection
- What is DAB LINK LEVEL?
- DAB Function Setting _(continued)
- RDI Output Selection
- What is RDI?
- Preparations
- Installation Precautions
- Installing the DAB Tuner Unit
- Cautions:
- Mounting with Velcro Tape
- Mounting with Tapping Screws
- Installing the Antenna
- Removing the Antenna Temporarily
- Routing the Antenna Cord
- Electrical Connections
- System Example: Connecting a Head Unit
- System Upgrade Example: Connecting a Head Unit and CD changer
- Troubleshooting
- Preliminary Steps
- If You Suspect Something Wrong
- Caution:
- Maintenance
- Specifications
- General
- DAB
Brand : PANASONIC
Model : CY-DAB2000N
Category : Car Radio