
CQ-5200U - Car Radio PANASONIC - Free user manual and instructions
Find the device manual for free CQ-5200U PANASONIC in PDF.

| Type | High Power CD Player / Receiver |
| Brand | Panasonic |
| Model | CQ-5200U |
| Dimensions (W x H x D) | 178 x 50 x 150 mm (7 x 1-15/16 x 5-7/8 inches) |
| Weight | 1.44 kg (3 lbs 3 oz) |
| Power Supply | 12 V DC (11-16 V), negative ground |
| Current Consumption | Less than 2.5 A (CD mode) |
| Maximum Power Output | 37 W × 4 channels at 400 Hz |
| RMS Power Output | 18 W per channel into 4 Ω (40-30,000 Hz, 3% THD) |
| Speaker Impedance | 4 Ω (4-8 Ω acceptable) |
| Radio Bands | AM, FM1, FM2, Weather Band |
| FM Sensitivity | 12 dBf (1.1 μV/75 Ω, S/N 30 dB) |
| CD Player | 1-bit MASH DAC, 32x oversampling |
| CD Frequency Response | 20-20,000 Hz (±1 dB) |
| Signal-to-Noise Ratio (CD) | 85 dB |
| Tone Control | Bass: ±12 dB at 100 Hz; Treble: ±12 dB at 10 kHz |
| Loudness | Tone Enhancement (Loudness) for low/medium volume |
| Wired Remote Control | Compatible (sold separately, model CA-RC350U) |
| Alarm Clock | 12-hour, with volume selection and auto-off after 90 seconds |
| Anti-Volume-Blast | Slowly raises volume when power is restored |
| Fuse | Included (replace with correct rating) |
| Dismounting Pins | Included for removal |
| Safety | Laser product (Class 1), complies with FCC Part 15 |
| Cleaning | Use soft cloth; no benzine, thinner, or solvents |
Frequently Asked Questions - CQ-5200U PANASONIC
User questions about CQ-5200U PANASONIC
0 question about this device. Answer the ones you know or ask your own.
Ask a new question about this device
Download the instructions for your Car Radio in PDF format for free! Find your manual CQ-5200U - PANASONIC and take your electronic device back in hand. On this page are published all the documents necessary for the use of your device. CQ-5200U by PANASONIC.
USER MANUAL CQ-5200U PANASONIC
High Power CD Player / Receiver with Changer Control High Power CD Player / Receiver
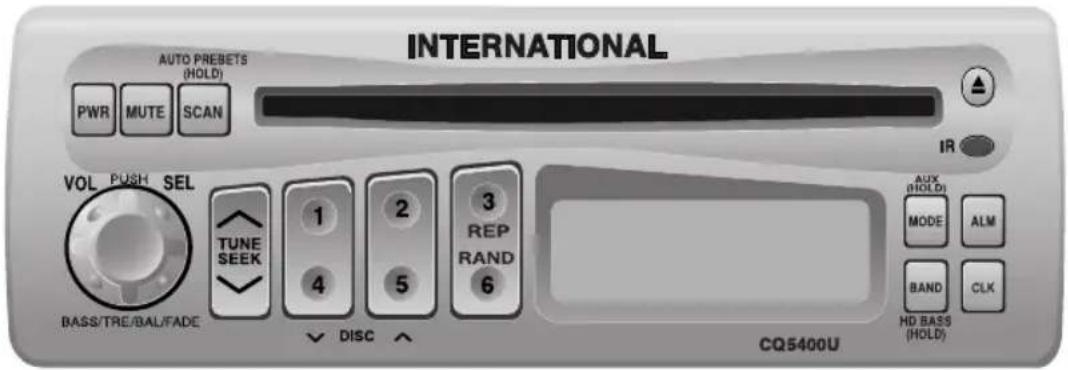
CQ-5400U/5200U Operating Instructions
Panasonic welcomes you to our ever growing family of electronic product owners. We know that this product will bring you many hours of enjoyment. Our reputation is built on precise electronic and mechanical engineering, manufactured with carefully selected components and assembled by people who take pride in their work. Once you discover the quality, reliability, and value we have built into this product, you too will be proud to be a member of our family.
□ Use This Equipment Safely
When Driving
Keep the volume level low enough to be aware of road and traffic conditions.
When Vehicle Washing
Do not expose the equipment, including the speakers and CDs, to water or excessive moisture. This could cause electrical shorts, fire, or other damage.
When Parked
Parking in direct sunlight can produce very high temperatures inside your vehicle. Give the interior a chance to cool down before switching the unit on.
Use the Proper Power Supply
This equipment is designed to operate off a 12 volt, negative ground battery system (the normal system in a North American vehicle.)
Use Authorized Servicenters
Do not attempt to disassemble or adjust this precision equipment. Please refer to the Servicenter list included with this product for service assistance.
Protect the Compact Disc Mechanism
Avoid inserting any foreign matters to the slot of the compact disc.
Failure to observe this may cause malfunction due to precise mechanism of this unit.
Notes:
- CQ-5400U can be connected to an optional CD changer (CX-DP801EUC, etc.) and an wired remote control unit (CA-RC350U). CQ-5200U can be connected to an wired remote control unit (CA-RC350U).
- For connection and operation for CD changer and wired remote control unit, refer to the operating instructions of that units.
- A wireless remote control unit (CA-RC500U) is optional (only for CQ-5400U).
Note: This operating instruction manual is for two models CQ-5400U and CQ-5200U.
The differences between these models are mentioned below. All illustrations throughout this manual represent model CQ-5400U unless otherwise specified.
| Features\Model | CQ-5400U | CQ-5200U |
| Wired remote control | Yes | Yes |
| Wireless remote control | Yes | None |
| AUX-IN | Yes | None |
| CD changer control | Yes | None |
| S.HDB/LOUD | S HDB | LOUD |
| preamp-out | Yes | None |
Find the model number and serial number on either the back or bottom of the unit. Please record them in the space below and retain this booklet as a permanent record of your purchase to aid in identification in case of theft.
MODEL NUMBER SEGA-5400M3260U
DATE PURCHASED FROM
Contents
Use This Equipment Safely Page 2
Laser Products ......Page 4
Part 15 of the FCC Rules ......Page 4
Power and Sound Controls ....5
How to adjust the volume, mute, balance, and tone for best listening

☐ Radio Basics....8
Mode selection, manual and automatic tuning, band selection, preset stations

□ Compact Disc Player Basics....11
Play, repeat, random and scan
□ CD Changer Basics....13
Play, repeat, random and scan, error messages.
Note: CD changer controls are applicable to units with optional CD changer unit (sold separately).
□ Clock Basics....15
Setting the time, selecting the clock display, alarm operation
8:00
□ Installation Guide ....18
Step-by-step procedures, electrical connections
Troubleshooting 23
Troubleshooting tips, where to get service help

Specifications 26
☐ Laser Products (This page describes the standard in the United States only.)
Caution:
This product utilizes a laser.
Use of controls or adjustments or performance of procedures other than those specified herein may result in hazardous radiation exposure.
Laser products:
Wave Length 780 nm
Laser Power No hazardous radiation is emitted with safety protection.
- Label indications and their locations

Certification Label
Product complies with DHHS Rules 21 CFR, Subchapter J in effect as of date of manufacture.
Matsushita Electric (Taiwan) Co., Ltd.
Taipei, Taiwan
MANUFACTURED
Identification Label
Model No.
CQ-5400U
| 12V 4~8Ω10A | FM75Ω |
Manufactrued by Matsushita Electric (Taiwan) Co., Ltd. Taipei Taiwan Made in Taiwan
Serial No.
This device complies with Part 15 of the FCC Rules. Operation is subject to the condition that this device does not cause harmful interference.
Part 15 of the FCC Rules
This unit has been manufactured under the Part 15 of the FCC Rules.
Do not attempt to make any changes or modifications to this unit.
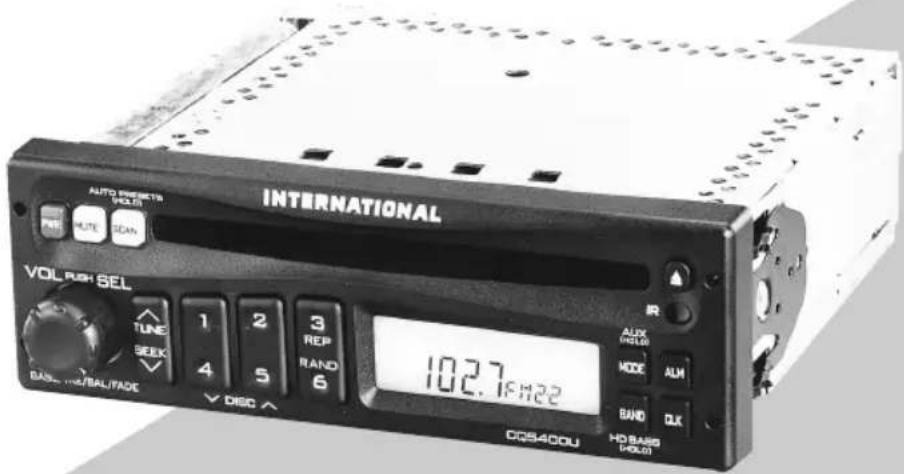
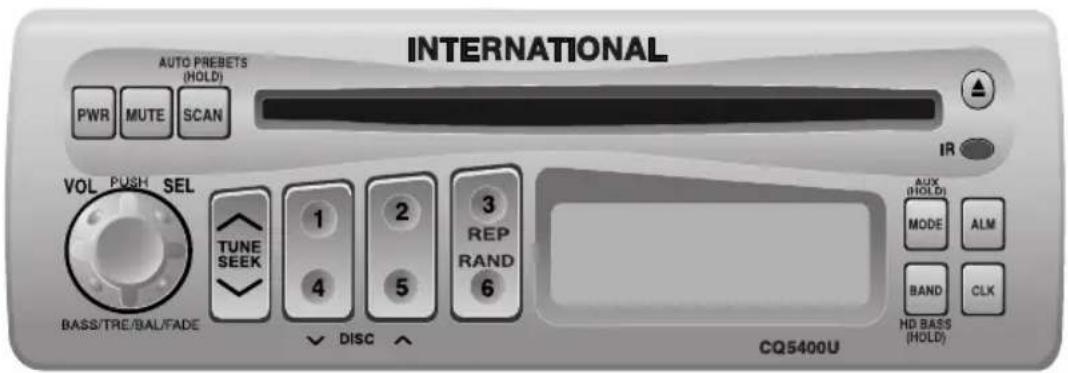
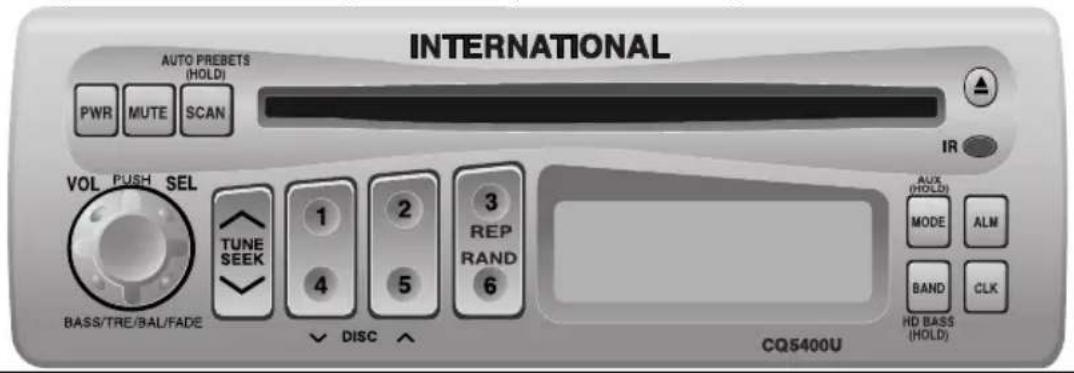
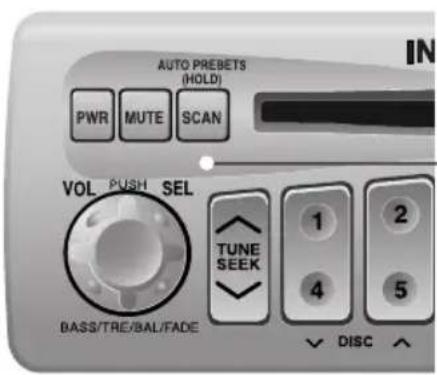
Power and Sound Controls
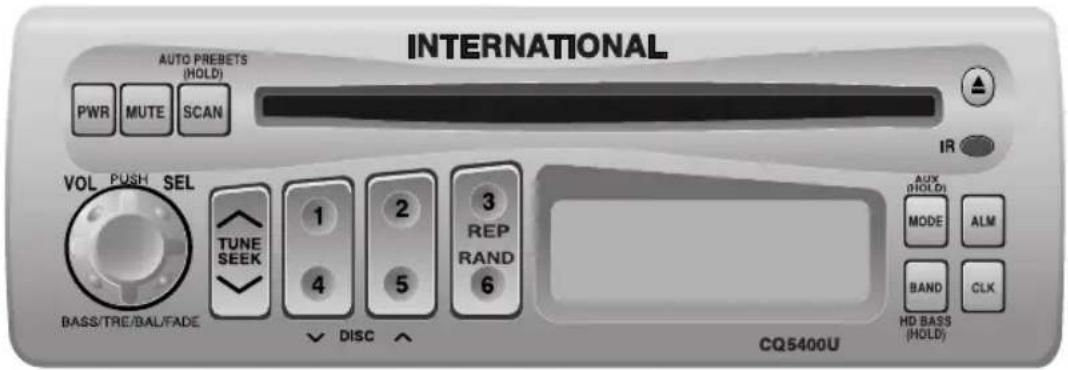

Power
If the vehicle is not running yet, turn the key in the ignition until the accessory indicator lights.
Press [PWR] to switch on the power.
Volume
- Press the knob to select the volume mode and then turn it clockwise or counterclockwise to increase or decrease the volume.

- Turn the knob clockwise or counterclockwise more than 0.5 seconds to change the numeric level in sequence.
Anti-Volume-Blast Circuit
This unit has a safety function which slowly raises volume level when power is switched back on after it is turned off at a specific level (20) or higher.
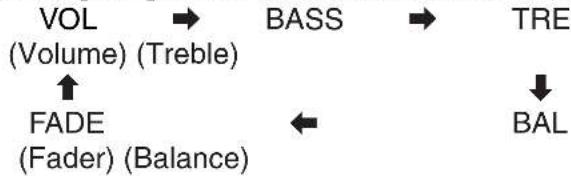
Changing Audio Modes
Press this knob [SEL] to change the audio mode as follows.
flowchart
graph TD
    A["VOL (Volume) (Treble)"] --> B["BASS"]
    B --> C["TRE"]
    D["FADE (Fader) (Balance)"] --> E["←"]
    E --> F["BAL"]
Bass and Treble
Press the knob to select the BASS (TREBLE) mode and then turn it clockwise or counterclockwise to increase or decrease the bass/treble level.

Power and Sound Controls (continued)
Balance
Press the knob to select the BALANCE mode and then turn it clockwise or counterclockwise to shift the sound volume to the right or left speakers.
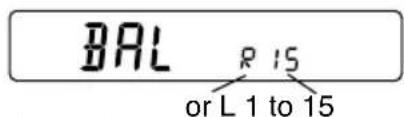

(R: Right, L: Left)
Fader
Press the knob to select the FADER mode and then turn it clockwise or counterclockwise to shift the sound volume to the front or rear speakers.
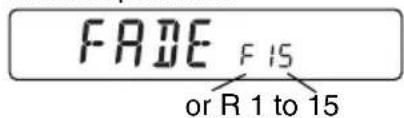

(F: Front, R: Rear)
Note: In the audio mode (BASS/TRE/BAL/FADE), the display will be back to regular operation mode with no operation for more than 5 seconds (2 seconds in the VOL mode).
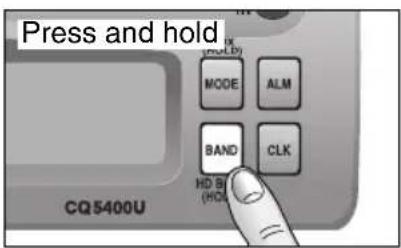
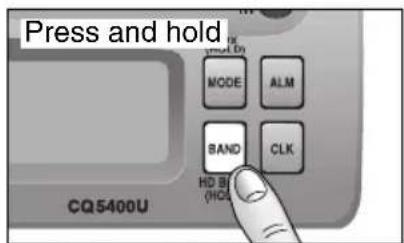
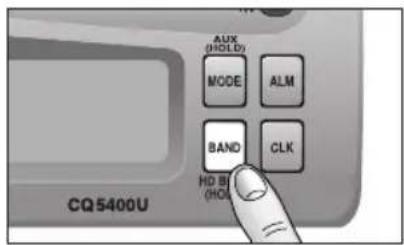
S•HDB (Super High Definition Bass) (Only for CQ-5400U)
Especially for rock music, the bass-sound will be more powerful.
- Press and hold [BAND] (S•HDB) for more than 2 seconds to be able to listen to high-definition bass.

- Press and hold [BAND] (S•HDB) for more than 2 seconds to return to the normal tone.
Tone Enhancement (Loudness)
(Only for CQ-5200U)
- Press and hold [BAND] (LOUD) for more than 2 seconds to enhance bass and treble tones when listening at low or medium volume.

- Press and hold [BAND] (LOUD) for more than 2 seconds again to deactivate when listening at higher volumes.
Power and Sound Controls (continued)
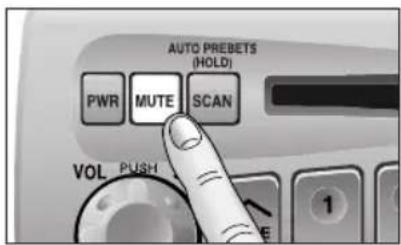
Mute
- Press [MUTE] to mute the sound completely.

- Press [MUTE] again to cancel.
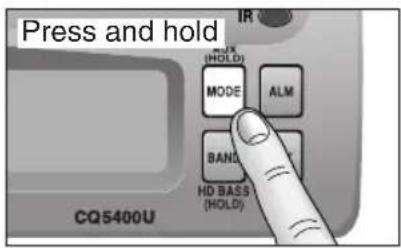
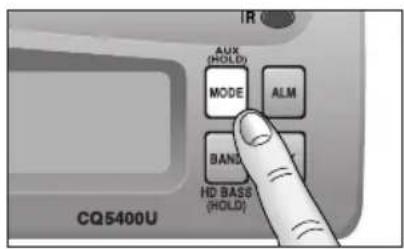
Selecting Auxiliary Source
(Only for CQ-5400U)
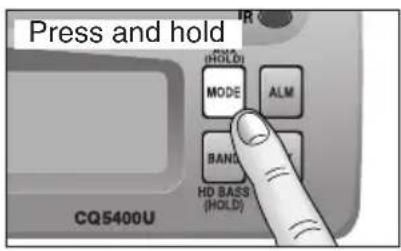
① Press and hold [MODE] (AUX) for more than 2 seconds to select AUX Input mode.
AUX
② Connect the auxiliary equipment (any other appropriate equipment) to AUX IN Connector.
Canceling AUX Input mode
Press [MODE] (AUX) to resume the previous mode.
Radio Basics
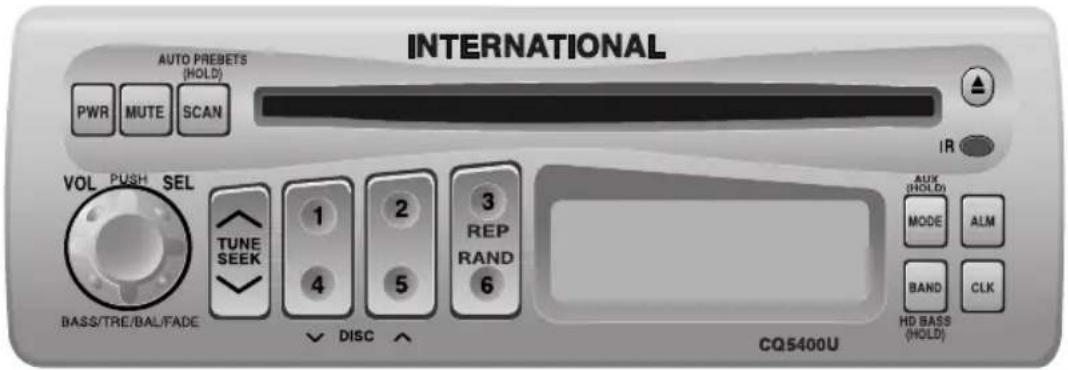

Mode Selection
Press [MODE] to change the operation mode as follows.
Radio → CD → CD changer (when connected)


(Press and hold [MODE] for more than 2 seconds.)
AUX (only for CQ-5400U)
To change to the tuner mode
In case of CD changer mode or CD mode, press [MODE].
Selecting a Band
Press [BAND] to change the band setting as follows.

flowchart
graph LR
    FM1 --> FM2 --> W/B --> AM
    W/B --> FM2
    FM2 --> W/B
    W/B --> AM
    style W/B fill:#f9f,stroke:#333
    style FM1 fill:#ccf,stroke:#333
    style FM2 fill:#cfc,stroke:#333
    style W/B fill:#fcc,stroke:#333
    style AM fill:#ffc,stroke:#333
"ST" indicator lights during reception of an FM stereo broadcast.
102.7FM23
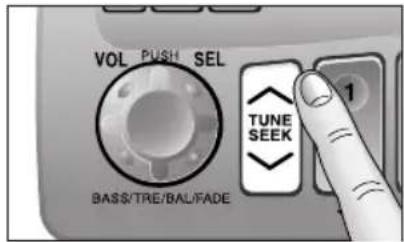
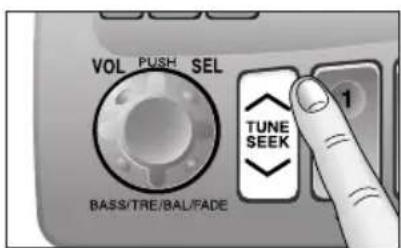
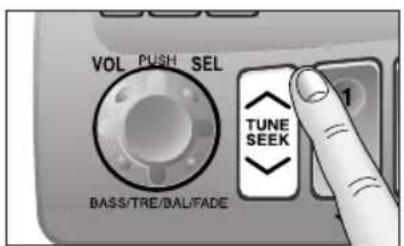
Manual Tuning
Press [TUNE ∧] or [TUNE ∨] to tune in a higher or lower frequency.
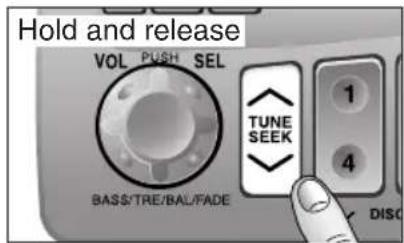
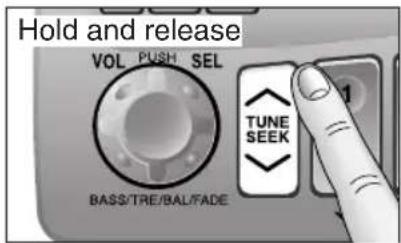
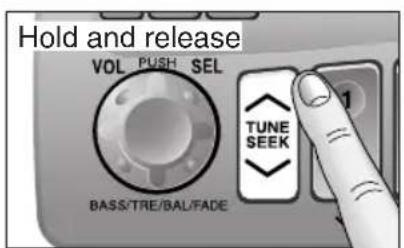
Seek Tuning
Press and hold [SEEK ∧] or [SEEK ∨] for more than 0.5 seconds, then release it.
Seeking will automatically stop when a signal of the next broadcast station is received.
Station Preset
FM1, FM2 and AM can save maximum 6 stations each in their preset station memories.
Caution: To ensure safety, never attempt to preset stations while you are driving.
flowchart
graph TD
    A["CQ5400U"] --> B["AUX (HOLD)"]
    B --> C["MODE"]
    C --> D["ALM"]
    D --> E["BAND"]
    E --> F["CLK"]
    F --> G["HD BI (HOLD)"]
    G --> H["VOL PUSH SEL"]
    H --> I["TUNE SEEK"]
    I --> J["BASS/TRE/BAL/FADE"]
    J --> K["①"]
    K --> L["②"]
    L --> M["③"]
    M --> N["④"]
    N --> O["⑤"]
    O --> P["⑥"]
    P --> Q["DISC ↑"]
    Q --> R["③"]
    R --> S["CQ5400U"]
    S --> T["AUX (HOLD)"]
    T --> U["MODE"]
    U --> V["ALM"]
    V --> W["BAND"]
    W --> X["CLK"]
    X --> Y["HD BI (HOLD)"]
    Y --> Z["①"]
    Z --> AA["②"]
    AA --> AB["③"]
    AB --> AC["PWR MUTE SCAN"]
    AC --> AD["VOL PUSH SEL"]
    AD --> AE["①"]
    AE --> AF["②"]
    AF --> AG["③"]
    AG --> AH["④"]
    AH --> AI["⑤"]
    AI --> AJ["⑥"]
    AJ --> AK["DISC ↑"]
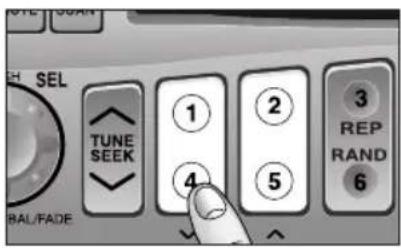
Manual Station Preset
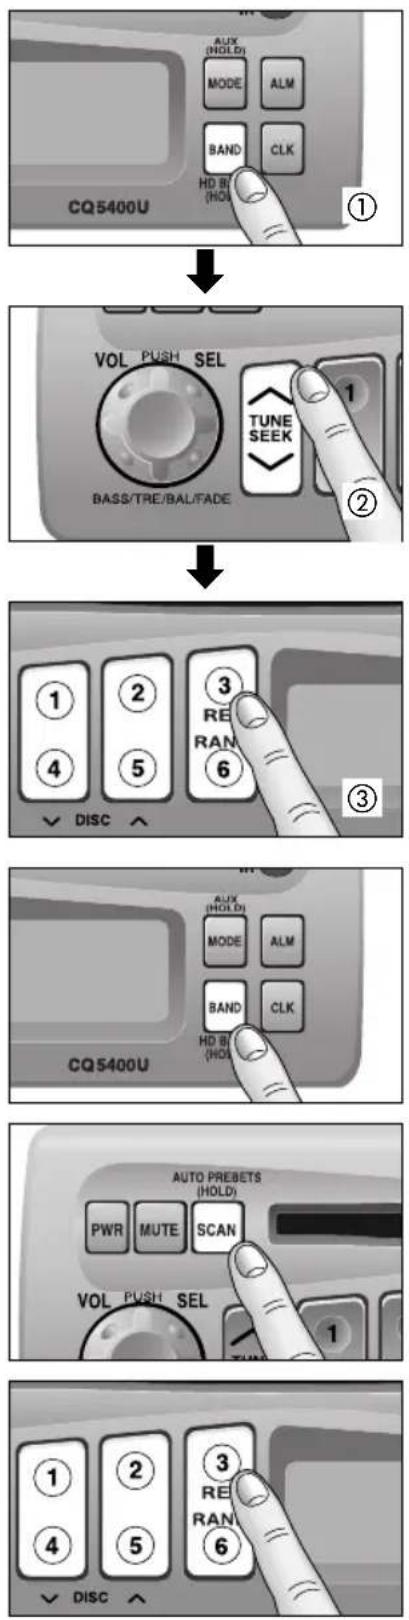
① Press [BAND] to select a desired band.
② Use manual or seek tuning to find a station which is to be preset in the memory.
③ Press and hold one of the preset buttons [1] to [6] until the display blinks once.

Note: You can change the memory setting by repeating the above procedure.
Auto Station Preset
Select a band and press and hold [SCAN] (AUTO PRESETS) for more than 2 seconds.
- The 6 strongest available stations will be automatically saved in the memory on preset buttons [1] to [6].
- Once set, the preset stations are sequentially scanned for 5 seconds each.
Notes:
- In the case of Auto Station Preset, only FM2 is available for FM stations. (FM1 is not available.)
- Auto Station Preset is not activated in a Weather Band.
- The stations manually preset on the Selected band will be deleted.
Tuning in a Preset Station
Press the corresponding preset buttons [1] to [6] to tune in a preset station.
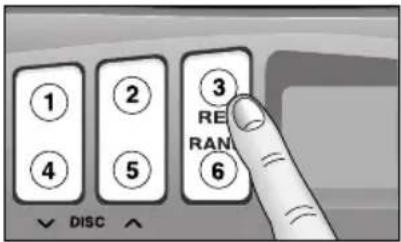
Tuning in a Weather Band Station
Press any of the buttons [1] to [6] to tune in the station preset by the previous page.
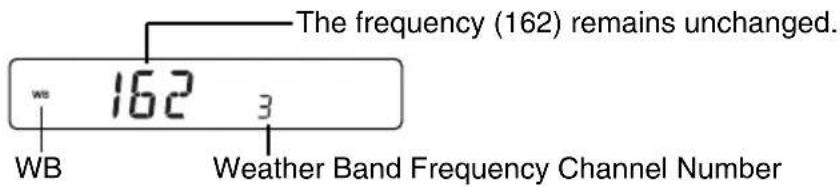
Note: The weather band (CH1-6) has been preset in advance. CH7 is selected by pressing [∧] or [∨].
Weather Band Stations
National Weather Radio Broadcasts from over 380 locations throughout the U.S. on seven VHF/FM frequencies.
Tune to weather band to receive continuous weather information 24 hours a day on one of the following frequencies.
- 162.550 MHz
2.162.400 MHz - 162.475 MHz
- 162.425 MHz
5.162.450 MHz
6.162.500 MHz
7.162.525 MHz
Occasionally the frequency of an existing or planned station must be changed because of unexpected radio frequency interference with adjacent NOAA Weather Radio Stations and/or with other Government or Commercial Operations within the area. If you have a question concerning NOAA Weather Radio, please contact your nearest National Weather Service Office.
Compact Disc Player Basics
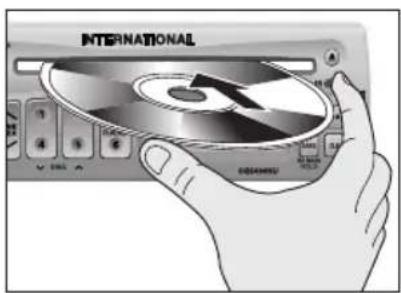
Disc Insert
Insert the disc and play starts automatically.
"LOAD" will be displayed until the disc is loaded. Play starts from the first track.
Caution: Do not use irregularly-shaped (heart-shaped, octagon etc.) CD. Failure to observe this may cause malfunction.
Note: While the disc is in the deck, " indicator lights.

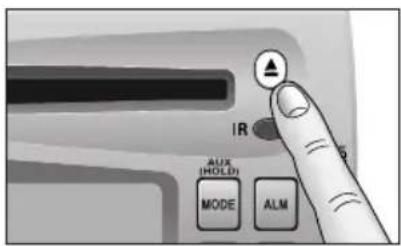
Disc Ejection
Press [▲] to stop CD play, and the disc will be quietly ejected from the CD slot. (During disc ejection, "EJ" will be displayed.)

Track Selection
- Press [∧] once to go to the next track.
- Press [√] once to play from the beginning of the track you are listening to. Press twice to play the previous track.
- Press repeatedly to skip the desired number of tracks.

Track Search
- Press and hold [] or [] for more than 0.5 seconds to activate fast forward or reverse.
- Release [∧] or [∨] to resume the regular CD play.

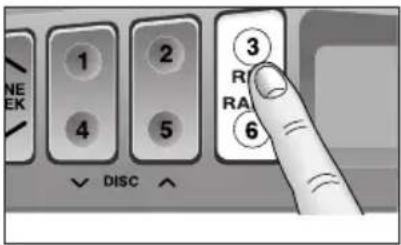
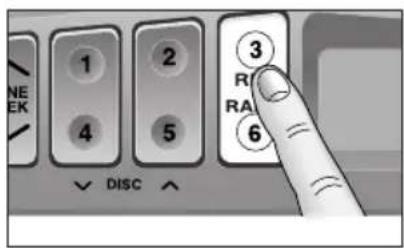
Track Repeat
- Press [3 REP] to repeat the current selection.
REPEAT
- Press [3 REP] again to cancel.
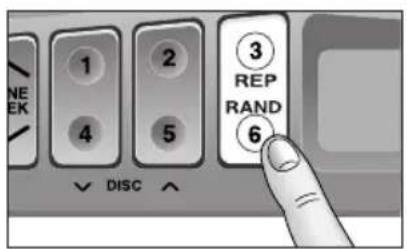
Random Selection
- Press 6 RAND. A random selection of music is played from all available tracks.
RANDOM
- Press 6 RAND again to cancel.
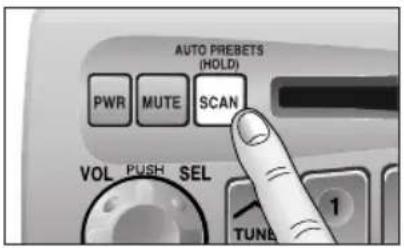
Track Scan
- Press [SCAN]. The display will blink and the first 10 seconds of each track on the disc play in order.
001 ; Disc
- Press [SCAN] again to cancel.
CD Changer Basics (Only for CQ-5400U)
Note: CD changer functions are designed for an optional CD changer unit.
Starting the CD Changer
Once the CD changer has been connected, press [MODE] to change to the CD changer mode. when a disc magazine is inserted, CD play starts automatically.

Disc Selection
Press [4] (√ DISC) or [5] (DISC ∧) to select a disc in descending or ascending order.

Then, the selected disc will start to play from the first track.
Note: The number of discs you can load the CD changer with is specific to each model.
Track Selection
- Press [∧] to advance to the next track.
- Press [V] to start play from the beginning of the track now playing.
- Press [] or [] repeatedly to skip the desired number of tracks.
Track Search
- Press and hold [] or [] for more than 0.5 seconds to activate fast forward or reverse.
- Release [∧] or [∨] to resume regular CD changer play from the released position.
Track Repeat
- Press [3 REP] to repeat the current selection. "REPEAT" indicator lights.
REPEAT
- Press [3 REP] again to cancel.

Random Selection
- Press 6 RAND. A random selection of music is played from all available discs/tracks.
RANDOM
- Press 6 RAND again to cancel.
Note: The Random mode will stop and the disc select function will operate once the [] DISC or DISC [] is pressed.
Track Scan
- Press [SCAN]. The display blinks and the first 10 seconds of each track on the discs play in sequence.
- Press [SCAN] again to cancel.
☐ Error Display Messages
| Appears on the display when the compact disc is dirty or inverted. Selects the next available compact disc. | |
| E2 | Appears on the display when compact disc is scratched. Selects the next available compact disc. |
| E3E | Appears on the display when the CD changer stops operating for some reason. Please turn off the vehicle engine (ACC off) and remove the fuse from yellow lead for 1 minute. Then reinstall the fuse. |
| 0000 | Appears on the display when there is no disc in the magazine. |
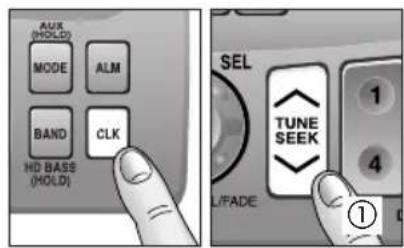
Clock Basics (The clock system is 12-hours.)
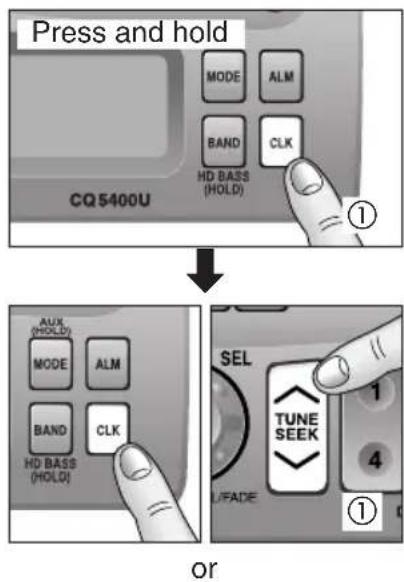
Initial Time
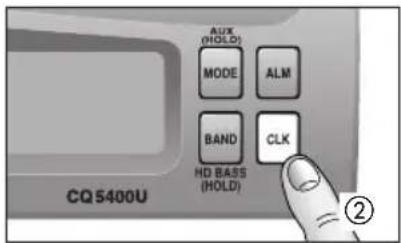
① Press and hold [CLK] until you have set the time, "AM 12:00" blinks, and the time setting mode is activated.
Press [V] to set the hour.
Press [∧] to set the minute.
(Hold [V] or [^] to change numbers rapidly.)
② Once the time has been set, release [CLK].
Note: When the clock is not set yet, "SET" is displayed.
Time Reset
When you want to reset the time, repeat steps ① to ② above.
Clock Display
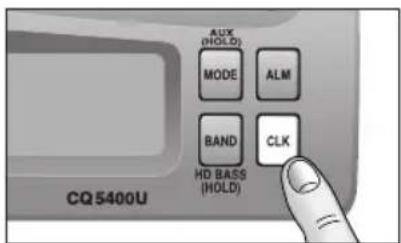
Press [CLK] to display the current time.
After a few seconds, current time returns on the display.
Note: The current time will be displayed at all the time even the power of the radio is turned off.

Alarm Time Setting
① Press and hold [ALM] until you have set the alarm time, "AM 12:00" blinks, and the alarm time setting mode is activated.
Press [V] to set the hour.
Press [∧] to set the minute.
(Hold [∨] or [∧] to change numbers rapidly.)
② When you have set the alarm time, release [ALM].
Note: When the alarm is not set yet, "AM 12:00" is displayed.
Alarm Time Reset
When you want to reset the alarm time, repeat steps ① to ② above.
Alarm Operation
- Alarm is switched to ON or OFF each time [ALM] is pressed.
- When the alarm is switched to ON, the alarm sound will activate at the set alarm time.
Turning off the Alarm Sound
The alarm sound will turn off automatically after 90 seconds. Otherwise, press [ALM] once.
Alarm output Volume Selection
You can select ALARM VOL 1 (or VOL 2) by pressing [ALM] in sequence and the display will show as follows.

flowchart
graph LR
    A["ALARM TIME (display 3 seconds)"] --> B["ALM VOL 1 (display 2 seconds)"]
    B --> C["ALM VOL 2 (display 2 seconds)"]
    C --> D["OFF"]
    D --> E["ALM VOL 1"]
Cautions:
- Be careful not to set wrong alarm time, otherwise, the alarm may sound while driving.
- If the alarm is set, be sure to check the set alarm time by pressing and holding [ALM] for more than 2 seconds.
- If volume is set at "0" step, the output volume will be muted. (Even when ALARM is acting.)
If abnormal Operation appears
Reset Switch
Use a unflexible thin stick to press this switch in the hole. The initial settings will resume and all electronic memory settings previously registered will be lost.

WARNING
This installation information is designed for experienced installers and is not intended for non-technical individuals. It does not contain warnings or cautions of potential dangers in attempting to install this product.
Any attempt to install this product in a motor vehicle by anyone other than qualified installer could cause damage to the electrical system and could result in serious personal injury or death.
Overview
This equipment should be installed by a professional. However, if you plan to install this unit yourself, your first step is to decide where to install it. The instructions in these pages will guide you through the remaining steps: (Please refer to "WARNING" statement above).
- Identify and label the vehicle wires.
- Connect the vehicle wires to the wires of the power connector.
• Install the unit in the dash. - Check the operation of the unit.
If you do encounter problems, please consult your nearest professional installer.
Caution: This unit will operate with a 12 volt DC negative ground auto battery system only. Do not attempt to use it in any other system. Doing so could cause serious damage.
Before you begin installation, look for the following items included in the packing with your unit.
- Installation Hardware ..... Needed for in-dash installation
Installation Hardware
| No. | Item | Diagram Qty | |
| 1 | Mounting Collar | 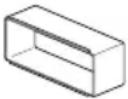 | 1 |
Installation Procedures
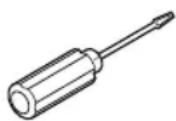
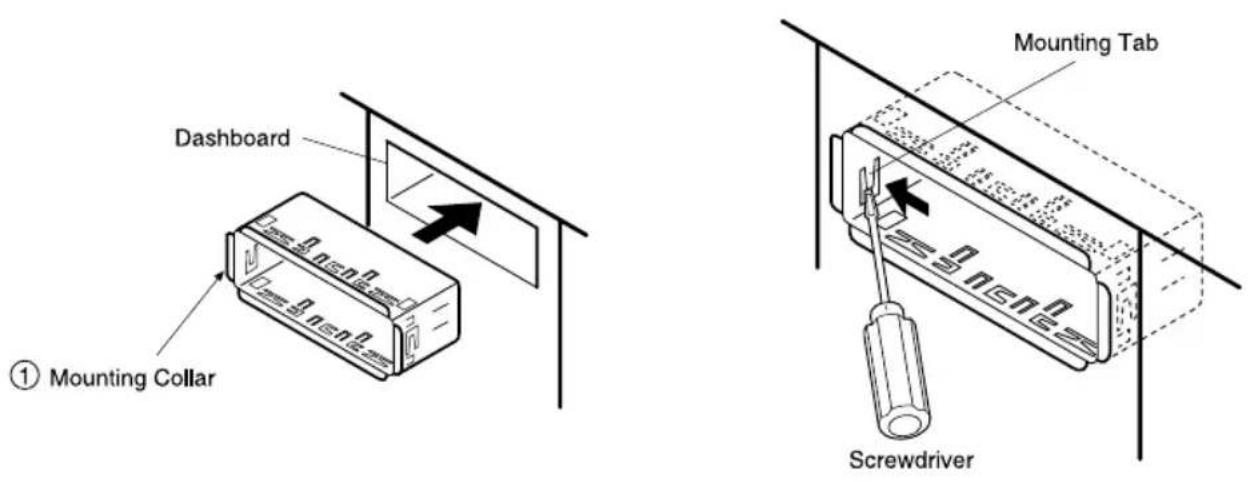
- When bending the mounting tab of the mounting collar with a screwdriver, be careful not to injure your hands and fingers.
- We strongly recommend you to wear gloves for installation work to protect yourself from injuries.
Note: Disconnect the cable from the negative (−) battery terminal.
1. Secure the Mounting Collar ①.
Insert Mounting Collar ① into the vehicle's dashboard, and bend mounting tabs out with a screwdriver.
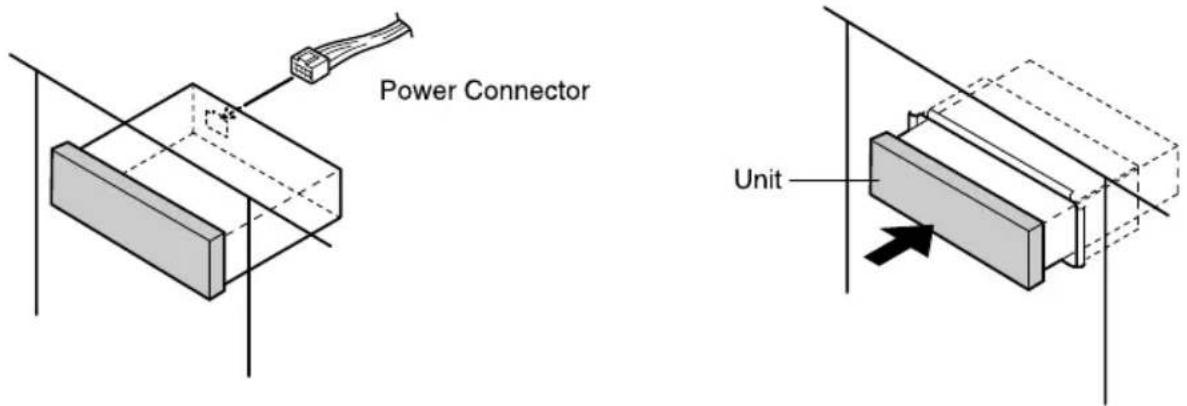
2. Secure the rear of the unit.
a) Insert Power Connector to the unit.
b) Check the electrical connection by referring to this operating instructions.
c) Insert the unit into Mounting Collar ① and push it in until "click" is heard.
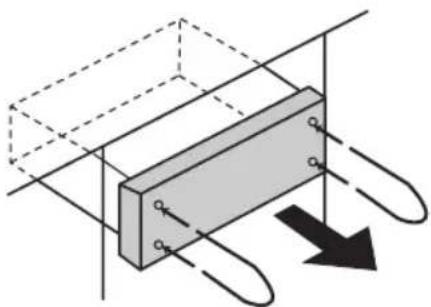
To remove the unit from the vehicle's dashboard
Insert Dismounting Pins and pull both pins.
natural_image
Pure technical diagram of a mechanical component with no text, numbers, or symbolsDimounting Pin (U-shaped)
Note: Do not lose Dismounting Pins. They will be needed to remove the unit from the vehicle's dashboard.
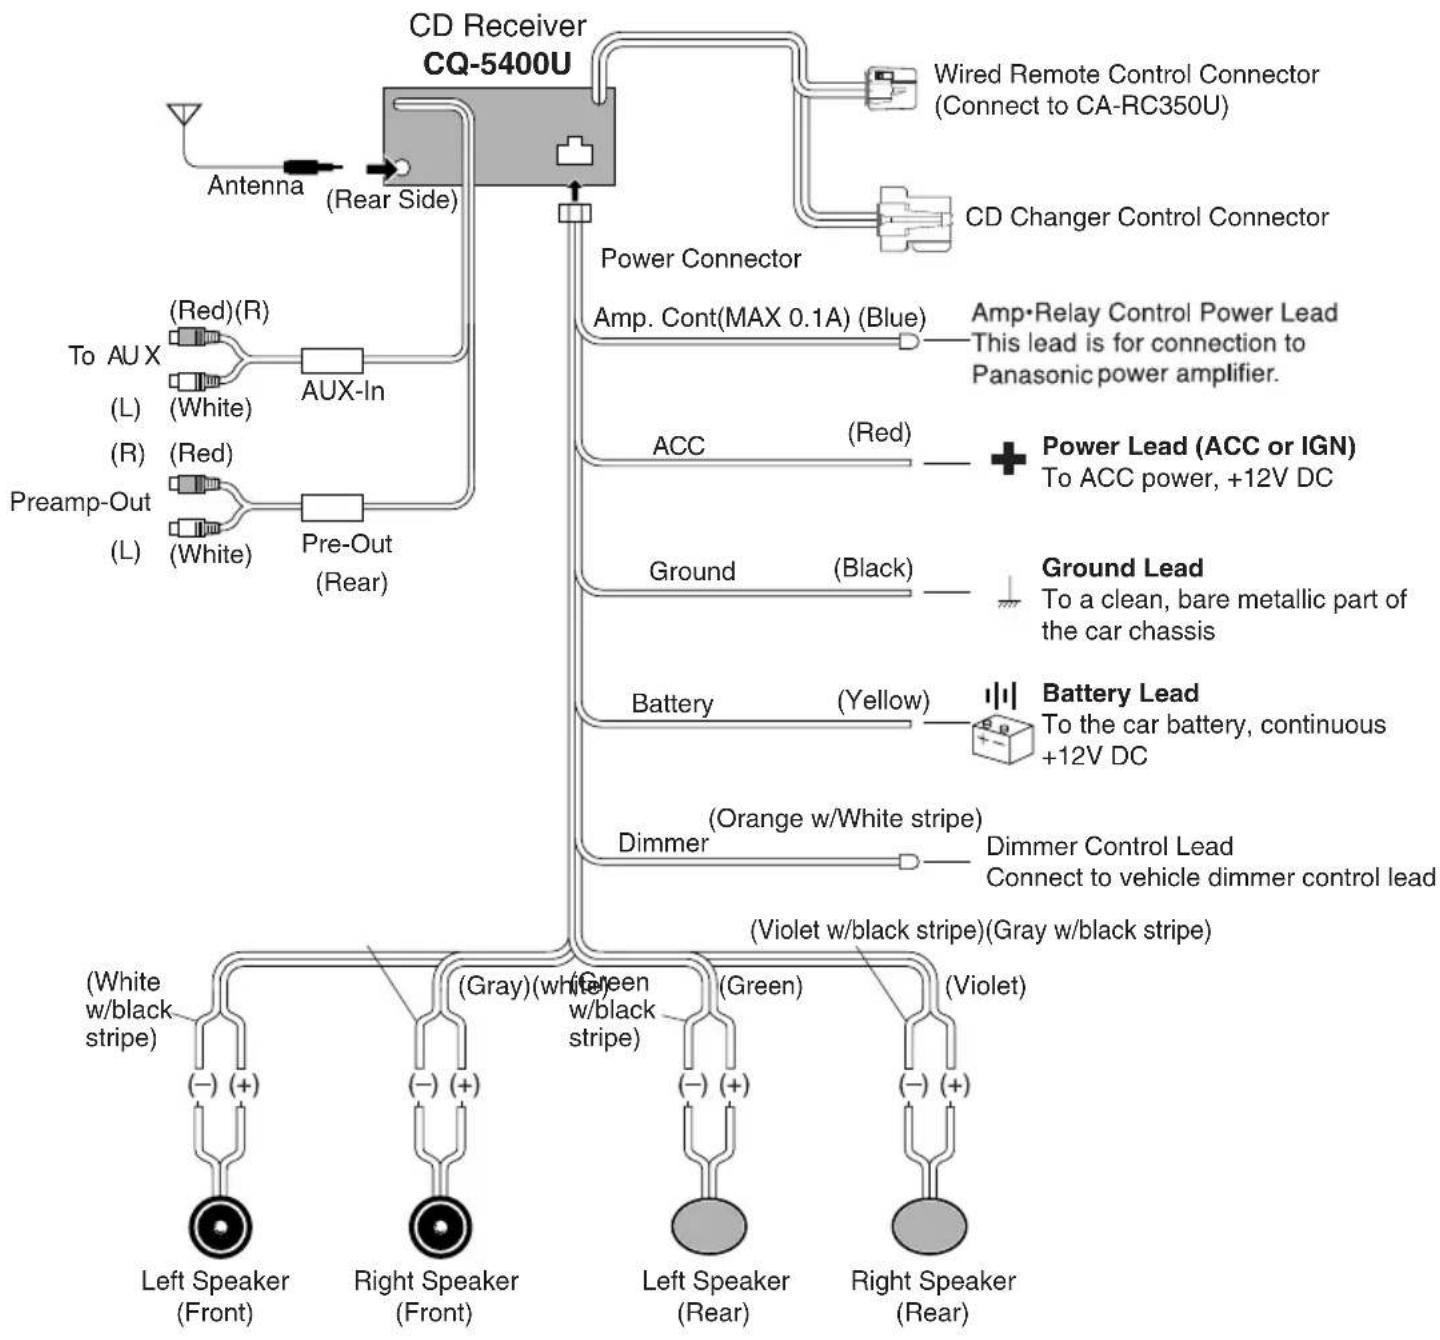
Electrical Connections
(only for CQ-5400U)
Cautions:
● This product is designed to operate with a 12-volt negative ground battery system.
- To prevent damage to the unit, be sure to follow the connection diagram below.
- Do not insert the power connector into the unit until the wiring is completed.
- Be sure to insulate any exposed wires from a possible short-circuit from the vehicle chassis. Bundle all cables and keep cable terminals free from touching any metal parts.
flowchart
graph TD
    A["CD Receiver CQ-5400U"] --> B["Antenna (Rear Side)"]
    A --> C["Power Connector"]
    A --> D["Amp. Cont(MAX 0.1A) (Blue)"]
    A --> E["ACC (Red)"]
    A --> F["Ground (Black)"]
    A --> G["Battery (Yellow)"]
    A --> H["Dimmer (Orange w/White stripe)"]
    A --> I["Dimmer Control Lead Connect to vehicle dimmer control lead"]
    A --> J["(Violet w/black stripe)(Gray w/black stripe)"]
    A --> K["(Green w/black stripe)"]
    A --> L["(White w/black stripe)"]
    A --> M["(White w/white stripe)"]
    A --> N["(Red) (R)"]
    A --> O["(L) (White)"]
    A --> P["(R) (Red)"]
    A --> Q["(L) (White)"]
    A --> R["AUX-In"]
    A --> S["(Red) (R)"]
    A --> T["(L) (White)"]
    A --> U["(R) (Red)"]
    A --> V["(L) (White)"]
    A --> W["(Red) (R)"]
    A --> X["(L) (White)"]
    A --> Y["(Red) (R)"]
    A --> Z["(L) (White)"]
    A --> AA["(Red) (R)"]
    A --> AB["(L) (White)"]
    A --> AC["(Red) (R)"]
    A --> AD["(L) (White)"]
    A --> AE["(Red) (R)"]
    A --> AF["(L) (White)"]
    A --> AG["(Red) (R)"]
    A --> AH["(L) (White)"]
    A --> AI["(Red) (R)"]
    A --> AJ["(L) (White)"]
    A --> AK["(Red) (R)"]
    A --> AL["(L) (White)"]
    A --> AM["(Red) (R)"]
    A --> AN["(L) (White)"]
    A --> AO["(Red) (R)"]
    A --> AP["(L) (White)"]
    A --> AQ["(Red) (R)"]
    A --> AR["(L) (White)"]
    A --> AS["(Red) (R)"]
    A --> AT["(L) (White)"]
    A --> AU["(Red) (R)"]
    A --> AV["(L) (White)"]
    A --> AW["(Red) (R)"]
    A --> AX["(L) (White)"]
    A --> AY["(Red) (R)"]
Electrical Connections
(only for CQ-5200U)
Cautions:
- This product is designed to operate with a 12-volt negative ground battery system.
- To prevent damage to the unit, be sure to follow the connection diagram below.
- Do not insert the power connector into the unit until the wiring is completed.
- Be sure to insulate any exposed wires from a possible short-circuit from the vehicle chassis. Bundle all cables and keep cable terminals free from touching any metal parts.

flowchart
graph TD
    A["Antenna"] --> B["CD Receiver CQ-5200U"]
    B --> C["Power Connector"]
    C --> D["ACC (Red)"]
    C --> E["Ground (Black)"]
    C --> F["Battery (Yellow)"]
    C --> G["Dimmer (Orange w/White stripe)"]
    D --> H["Power Lead (ACC or IGN) To ACC power, +12V DC"]
    E --> I["Ground Lead To a clean, bare metallic part of the vehicle chassis"]
    F --> J["Battery Lead To the vehicle battery, continuous +12V DC"]
    G --> K["Dimmer Control Lead Connect to vehicle dimmer lead"]
    L["(White w/black stripe)"] --> M["Left Speaker (Front)"]
    N["(Gray)(white w/black stripe)"] --> O["Right Speaker (Front)"]
    P["(Green)"] --> Q["Left Speaker (Rear)"]
    R["(Violet)"] --> S["Right Speaker (Rear)"]
Troubleshooting
Maintenance
Your product is designed and manufactured to ensure a minimum of maintenance. Use a soft cloth for routine exterior cleaning. Never use benzine, thinner, or other solvent.
□ When Something Doesn't Work
Check the charts on page 22 for possible causes and solutions to any problem you might be experiencing. Some simple checks or minor adjustments may eliminate the problem.
Product Servicing
If the suggestions in the charts do not solve the problem, we recommend that you take it to your nearest authorized PASC Servicenter. The unit should be serviced only by a qualified technician.
Error Display Messages
| E1 | Appears on the display when the compact disc is dirty or inverted. The disc is ejected automatically. But, the disc may be ejected automatically, even if this error message is not displayed. |
| E2 | Appears on the display when compact disc is scratched. The disc is ejected automatically. But, the disc may be ejected automatically even if this error message is not displayed. |
| E3 | Appears on the display when the compact disc stops operating for some reason. Please turn off the vehicle engine (ACC off) and remove the fuse from yellow lead for 1 minute or more. Then reinstall the fuse. |
Troubleshooting Tips
| PROBLEM | POSSIBLE CAUSE | PROBABLE SOLUTION |
| Unit does not turn on. | Dead vehicle batteryIgnition or ACC is not on.Bad power line connection | Charge vehicle battery.Turn ignition to On or ACC.Check connections. |
| Radio has static. | Antenna not hooked upClose to high power lines | Hook up antenna.Move away from high power lines. |
| Radio memory buttons do not work. | Not holding buttons down long enough | Press and hold buttons for more than 2 seconds. |
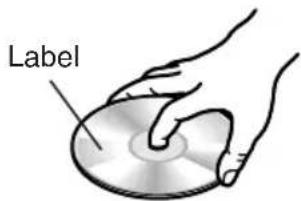
| No sound can be heard even if the disc is properly loaded. | The compact disc is inverted. | Insert the disc with label side facing up. |
| The compact disc is dirty. | Try to clean the compact disc by instructions of disc cleaning. | |
| The temperature inside the vehicle is more than 140°F (60°C) | Give the interior a chance to cool down before using the unit. | |
| Excessive moisture | Wait for a while before using the unit. | |
| Wiring connection is not properly done. | Confirm all wiring connection such as power cord, speaker cords, etc. | |
| Volume control is at "minimum" position. | Adjust the volume control to the proper level. | |
| Fuse of amplifier is blown out. | Replace the fuse with the correct rating. | |
| Sound distorted due to vibration | Installing method is bad. | Fix the unit securely. |
| Inverted sound (Left/Right connections.) | The speaker cords are inverted. | Check the speaker cords. |
| No sound from front or rear speakers | The fader control is set on the wrong position. | Adjust the fader control of the unit correctly. |
| Sound distorted due to vibration | The compact disc may be defective. | Try to replace the disc with another one. |
| The compact disc is dirty. | Try to clean the compact disc by instructions of disc cleaning. | |
| A compact disc is sometimes ejected. (Display shows "E1", an error message.) | The pickup lens is dirty. | Clean the lens. (Use CD lens cleaning disc.) |
Notes on Compact Discs
- Dirt, dust, scratches and bending of disc will cause misoperation. Handle discs with care.
- Do not place stickers or make scratches on disc.
- Do not bend discs.
- Disc should always be kept in the case when not in use to prevent from damaging.
-
Do not place discs in the following places:
-
Direct sunlight
- Dirty, dusty and damp areas
- Near vehicle heaters
- Seats and dashboard
- Do not use irregularly-shaped (heart-shaped, octagon etc.) CD. Failure to observe this may cause malfunction.
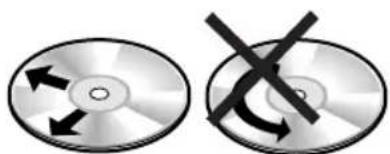
Disc Cleaning
Use a dry soft cloth to wipe the surface. If the disc is quite dirty use a soft cloth slightly dampened in isopropyl (rubbing) alcohol. Never use solvents such as benzine, thinner, conventional record cleaner, or mopper as the may mar the surface of the disc.


natural_image
Illustration of two hands holding a curved object with a cross mark, no text or symbols presentDo not bend.
natural_image
Two optical discs with directional arrows indicating rotation or dislocation (no text or symbols)Wipe the disc from center to outside direction.
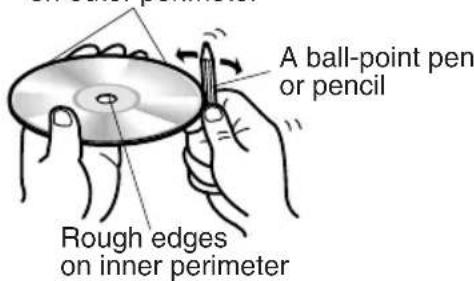
Caution for use of a new Disc
A new disc may have rough edges on its inner and outer perimeter. If a disc with rough edges is used, proper setting will not be possible and the CD player will not play the disc. Therefore, remove the rough edges in advance by using a ball-point pen or pencil as shown on the right. To remove the rough edges, press the side of the pen or pencil against the inner and outer perimeter of the disc.
Rough edges on outer perimeter
General
Power Supply : 12 V DC (11V-16V) Test Voltage 14.4V, Negative ground
Maximum Power Output : 37 W × 4 channels at 400 Hz, Volume Control maximum
Power Output : 18 W per channel into 4 ohms, 40 to 30,000Hz at 3% THD.
Tone Action : Bass; ± 12 dB at 100 Hz
Treble; ± 12 dB at 10 kHz
Current Consumption : Less than 2.5 A (CD mode, 0.5 W 4-speaker)
Speaker Impedance : 4 Ω (4-8 Ω acceptable)
Dimensions (W × H × D) : 7" × 1-15/16" × 5-7/8" (178 × 50 × 150 mm)
Weight : 3 lbs. 3 oz. (1.44 k g)
AM Radio
Frequency Range : 530-1,710 kHz
Useable Sensitivity : 28 dB/μV (25 μV/ S/N 20 dB)
FM Stereo Radio
Frequency Range : 87.9-107.9 MHz
Useable Sensitivity : 12 dBf. (1.1 μV / 75Ω, S/N 30 dB)
50 dB Quienting Sensitivity : 17 dBf. (1.8 μV / 75Ω)
Frequency Response : 30-15,000 Hz ± 3 dB
Alternate Channel Selectivity : 75 dB
Stereo Separation : 35 dB at 1,000 Hz
Signal/Noise Ratio : 70 dB (Mono)
Weather Band Radio
Frequency Range : 162.40-162.55 MHz
Useable Sensitivity : 3 dB/μV (S/N 20 dB)
Signal/Noise Ratio (40 dB/μV) : 50 dB
CD Player
Sampling Frequency : 32 times oversampling
DA Converter : MASH•1 bit/4 DAC System
Error Correction System : Panasonic Super Decoding Algorithm
Pick-Up Type : 1-beam
Light Source : Semiconductor laser
Wavelength : 780 mm
Frequency Response : 20 - 20,000 Hz (±1 dB)
Signal to Noise Ratio : 85 dB
Total Harmonic Distortion : 0.01% (1 kHz)
Wow and Flutter : Below measurable limits
Channel Separation : 75 dB
*Above specifications comply with EIA standards.
Note: Specifications and design are subject to modification without notice due to improvements in technology.
Panasonic Consumer Electronics
Company, Division of Matsushita Electric Corporation of America
One Panasonic Way, Secaucus,
New Jersey 07094
- CQ-5400U/5200U Operating Instructions
- □ Use This Equipment Safely
- When Driving
- When Vehicle Washing
- When Parked
- Use the Proper Power Supply
- Use Authorized Servicenters
- Protect the Compact Disc Mechanism
- Notes:
- Contents
- Caution:
- Laser products:
- Certification Label
- Identification Label
- Part 15 of the FCC Rules
- Power and Sound Controls
- Power
- Volume
- Anti-Volume-Blast Circuit
- Changing Audio Modes
- Bass and Treble
- Power and Sound Controls (continued)
- Balance
- Fader
- S•HDB (Super High Definition Bass) (Only for CQ-5400U)
- Tone Enhancement (Loudness)
- (Only for CQ-5200U)
- Mute
- Selecting Auxiliary Source
- (Only for CQ-5400U)
- Canceling AUX Input mode
- Radio Basics
- Mode Selection
- To change to the tuner mode
- Selecting a Band
- Manual Tuning
- Seek Tuning
- Station Preset
- Manual Station Preset
- Auto Station Preset
- Tuning in a Preset Station
- Tuning in a Weather Band Station
- Weather Band Stations
- Compact Disc Player Basics
- Disc Insert
- Disc Ejection
- Track Selection
- Track Search
- Track Repeat
- Random Selection
- Track Scan
- CD Changer Basics (Only for CQ-5400U)
- Starting the CD Changer
- Disc Selection
- Clock Basics (The clock system is 12-hours.)
- Initial Time
- Time Reset
- Clock Display
- Alarm Time Setting
- Alarm Time Reset
- Alarm Operation
- Turning off the Alarm Sound
- Alarm output Volume Selection
- Cautions:
- If abnormal Operation appears
- Reset Switch
- WARNING
- Overview
- Installation Procedures
- Secure the Mounting Collar ①.
- Secure the rear of the unit.
- To remove the unit from the vehicle's dashboard
- Electrical Connections
- Troubleshooting
- Maintenance
- □ When Something Doesn't Work
- Product Servicing
- Notes on Compact Discs
- Disc Cleaning
- Caution for use of a new Disc
- General
- AM Radio
- FM Stereo Radio
- Weather Band Radio
- CD Player
Brand : PANASONIC
Model : CQ-5200U
Category : Car Radio