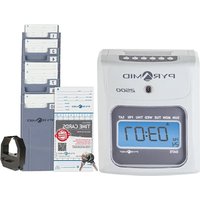
TTEZEK - Access Control System Pyramid Time Systems - Free user manual and instructions
Find the device manual for free TTEZEK Pyramid Time Systems in PDF.

| Product Type | Access Control System |
| Brand | Pyramid Time Systems |
| Model | TTEZEK |
| Dimensions (LxWxH) | 200 x 150 x 80 mm |
| Weight | 1.2 kg |
| Power Supply | 12V DC, 1A |
| Display | LCD with backlight |
| Keypad | Alphanumeric keypad |
| Card Reader | 125kHz EM/Prox |
| Biometric | Fingerprint sensor (optional) |
| User Capacity | 1000 users |
| Log Capacity | 100,000 events |
| Communication | USB, Ethernet, RS485 |
| Temperature Range | -10°C to 50°C |
| Humidity | 10% - 90% non-condensing |
| Mounting | Wall mount |
| Enclosure | Metal, vandal-resistant |
| Functions | Time tracking, access control, attendance reporting |
| Maintenance | Wipe with dry cloth, no water |
| Safety | Overcurrent protection, tamper switch |
| Spare Parts | Power adapter, mounting kit, screws |
| Warranty | 1 year |
| Certifications | CE, FCC |
Frequently Asked Questions - TTEZEK Pyramid Time Systems
User questions about TTEZEK Pyramid Time Systems
0 question about this device. Answer the ones you know or ask your own.
Ask a new question about this device
Download the instructions for your Access Control System in PDF format for free! Find your manual TTEZEK - Pyramid Time Systems and take your electronic device back in hand. On this page are published all the documents necessary for the use of your device. TTEZEK by Pyramid Time Systems.
USER MANUAL TTEZEK Pyramid Time Systems
Copyright © 2017 Pyramid Time System, LLC
Portions of this program Copyright © 1991-2005 Microsoft Corp.
Warning: This computer program is protected by copyright law and international treaties. Unauthorized reproduction or distribution of this program, or any portion of it may result in severe civil and criminal penalties, and will be prosecuted to the maximum extent possible under law.
END-USER LICENSE AGREEMENT FOR TIMETRAX™ TIME RECORDER & SOFTWARE MANAGER
IMPORTANT-READ CAREFULLY: This Pyramid Time Systems, LLC. End-User License Agreement (“EULA”) is a legal agreement between You (either an individual person or a single legal entity, who will be referenced to in this EULA as “You”) and Pyramid Time Systems, LLC. TimeTrax™ Time Clock & Software Manager that accompanies this EULA, including any associated media, printed materials and electronic documentation (the “TimeTrax™ software”). The TimeTrax™ software also includes any software updates, add-on components, web services and/or supplements that Pyramid Time Systems LLC may provide to You or make available to You after the date You obtain Your initial copy of the TimeTrax™ software to the extent that such items are not accompanied by a separate license agreement or terms of use. By installing, copying, downloading, accessing or otherwise using the TimeTrax™ software. You agree to be bound by the terms of this EULA. If You do not agree to the terms of this EULA, do not install, access or use the TimeTrax™ software; in which event the original purchaser may, however, return it to the place of purchase within thirty days of the date of original purchase for a full refund.
TIMETRAX™ SOFTWARE LICENSE
The TimeTrax™ software is protected by intellectual property laws and treaties. The TimeTrax™ software is licensed, not sold.
1) GRANT OF LICENSE. This Section of the EULA describes Your general rights to install and use the TimeTrax™ software. The license rights described in this section are subject to all other terms and conditions of this EULA.
General License Grant to Install and Use TimeTrax™ software. You may install and use one copy of the TimeTrax™ software on a single computer.
Redistributable File(s). Notwithstanding the terms of this EULA to the contrary, certain of the executable files of the TimeTrax™ software may be redistributed by You to the extent required for the permitted operation of the application(s) software installation code created by You while using the TimeTrax™ software. The redistributable file(s) are limited to those specifically identified as "Redistributable" in the media, printed materials, and "online" or electronic documentation accompanying the particular embodiment of the TimeTrax™ software.
2) DESCRIPTION OF OTHER RIGHTS AND LIMITATIONS. Limitations on Reverse Engineering, Decompilation, and Disassembly. You may not modify, reverse engineer, decompile, or disassemble the TimeTrax™ software, except and only to the extent that such activity is expressly permitted by applicable law notwithstanding this limitation. The TimeTrax™ software is licensed as a single product. Except with respect to the redistributables, its component parts may not be separated for use on more than one computer.
Not for Resale Software. If the TimeTrax™ software is labelled "Not for Resale" or "NFR" or "Evaluation Copy" or "30 Day Complimentary," then, notwithstanding other sections of the EULA, You may not use the TimeTrax™ software for commercial purposes nor sell, or otherwise transfer it for value. Commercial purposes include the use of the TimeTrax™ software to create publicly distributed computer software.
No rental, leasing or commercial hosting. You may not rent, lease, lend or provide commercial hosting services to third parties with the TimeTrax™ software.
Software Transfer. You may permanently and wholly transfer all of Your rights under this EULA, provided You (a) retain no copies (whole or partial), (b) permanently and wholly transfer any and all of The TimeTrax™ software (including all component parts, the media and printed materials, any upgrades, this EULA, and, if applicable, the Certificate of Authenticity) to the recipient, and (c) the recipient first agrees to abide by all of the terms of this EULA. If the TimeTrax™ software is an upgrade, any transfer must include any and all prior versions of the
TimeTrax™ software and any and all of your rights therein, if any.
Support Services. Pyramid Time Systems, LLC may provide you with support services related to the TimeTrax™ software (“Support Services”). The provision and use of Support Services is governed by the Pyramid Time Systems, LLC policies and programs described in the TimeTrax™ software reference guide and/or in “online” documentation. Any supplemental software code provided to You as part of the Support Services shall be considered part of the TimeTrax™ software and subject to the terms and conditions of this EULA. With respect to technical information You provide to Pyramid Time Systems, LLC as part of the Support Services. Pyramid Time Systems, LLC may use such information for its business purposes, including for product updates and development.
Termination. Without prejudice to any of Pyramid Time Systems, LLC's other rights, Pyramid Time Systems, LLC may terminate the EULA if You fail to comply with the terms and conditions of this EULA. In such event, You must destroy any and all copies of the TimeTrax™ software and all of its component parts.
3) UPGRADES and SUBSCRIPTION. If the TimeTrax™ software is labeled or otherwise identified by Pyramid Time Systems, LLC as an “upgrade” or “subscription,” You must be properly licensed to use a product identified by Pyramid Time Systems, LLC as being eligible for the upgrade in order to use the TimeTrax™ software. TimeTrax™ software, labeled or otherwise identified by Pyramid Time Systems, LLC as an upgrade, replaces and/or supplements the product that formed the basis for Your eligibility for such upgrade. You may use the resulting upgrade product only in accordance with the terms of this EULA. If the TimeTrax™ software is an upgrade of a component of a package of software programs that You licensed as a single product, the TimeTrax™ software may be used and transferred only as part of that single product package and may not be separated for use on more than one computer.
4) COPYRIGHT AND TRADEMARKS
All title, trademarks and copyrights in and pertaining to the TimeTrax™ software, the accompanying printed materials, and any copies of the TimeTrax™ software, are owned or licensed by Pyramid Time Systems, LLC or its affiliated Companies. The TimeTrax™ software is protected by copyright and trademark laws and international treaty provisions. You may make one copy of the TimeTrax™ software for back-up and archival purposes. You may not copy the printed materials accompanying the TimeTrax™ software.
You may not remove, modify or alter any Pyramid Time Systems, LLC copyright or trademark notice or the Pyramid Time Systems, LLC name from any part of the TimeTrax™ software, including but not limited to any such notices contained in the physical and/or electronic media or documentation, in the Pyramid Time Systems, LLC Setup Wizard dialogue or “about” boxes, in any of the runtime resources and/or in any web-presence or web-enabled notices, code or other embodiments originally contained in or otherwise created by the TimeTrax™ software.
5) DUAL-MEDIA SOFTWARE. You may receive the TimeTrax™ software in more than one medium. Regardless of the type or size of the medium, You receive. You may use only that one medium that is appropriate for Your single computer. You may not use or install the other medium on another computer, including but not limited to portable computers under the exclusive control of the registered developer. You may not loan, rent, lease or otherwise transfer the other medium to another user, except as part of the permanent transfer (as provided above) of the TimeTrax™ software.
6) U.S. GOVERNMENT RESTRICTED RIGHTS. The TimeTrax™ software and documentation are provided with RESTRICTED RIGHTS. Use, duplication, or disclosure by the U.S Government is subject to restrictions as set forth in subparagraph C (1) (ii) of the Rights in Technical Data and Computer Software clause at DFARS 252.227-7013 or subparagraphs (c) (1) and (2) of the Commercial Computer Software Restricted Rights at 48 CFR 52.227-19, as applicable. Manufacturer is Pyramid Time Systems, LLC, 45 Gracey Avenue, Meriden, CT 06451, USA. 7) APPLICABLE LAW. This EULA is governed by the laws of the State of Connecticut. Should You have any questions concerning this EULA, or if You desire to contact PYRAMID TIME SYSTEMS for any reason, please contact the Pyramid Time System distributor serving you or write: PYRAMID TIME SYSTEMS, 45 Gracey Avenue, Meriden, CT 06451, or e-mail customersupport@ptitime.com, or call Toll Free 1.888.479.7264.
8) LIMITED WARRANTY. Pyramid Time Systems, LLC warrants that (a) the TimeTrax™ software will, for a period of ninety (90) days from the date of purchase perform substantially in accordance with Pyramid Time Systems, LLC's
written materials accompanying it, and (b) any Support Services provided by Pyramid Time Systems, LLC shall be substantially as described in applicable written materials provided to You by Pyramid Time Systems, LLC.
CUSTOMER REMEDIES. In the event of any break of warranty or other duty owed by Pyramid Time Systems, LLC, Pyramid Time System LLC's and its suppliers' entire liability and Your exclusive remedy shall be at Pyramid Time Systems, LLC's option, either (a) return of the price paid by You for the TimeTrax™ software (not to exceed suggested U.S. retail price) if any, (b) repair or replacement of the defective TimeTrax™ software has resulted from accident, abuse, or misapplication. Any replacement TimeTrax™ software will be warranted for the remainder of the original warranty period or thirty (30) days, whichever is longer.
NO OTHER WARRANTIES. TO THE MAXIMUM EXTENT PERMITTED BY APPLICABLE LAW, PYRAMID TIME SYSTEMS, LLC AND ITS LAWYERS DISCLAIM ALL OTHER WARRANTIES AND CONDITIONS, EITHER EXPRESS OR IMPLIED, INCLUDING, BUT NOT LIMITED TO IMPLIED WARRANTIES OR MERCHANTABILITY, FITNESS FOR A PARTICULAR PURPOSE, TITLE AND NON-INFRINGEMENT, WITH REGARD TO THE TIMETRAX™ SOFTWARE AND THE PROVISION OF OR FAILURE TO PROVIDE SUPPORT SERVICES, THE LIMITED WARRANTY GIVES YOU SPECIFIC LEGAL RIGHTS. YOU MAY HAVE OTHERS WHICH VARY FROM STATE/JURISDICTION TO STATE/JURISDICTION. Some states ad
jurisdictions do not allow disclaimers of or limitations on the duration of an implied warranty, so the above limitation may not apply to You. To the extent implied warranties may not be entirely disclaimed but implied warranty limitations are allowed by applicable law. Implied warranties on the TimeTrax™ software, if any, are limited to ninety (90) days.
9) LIMITATION OF LIABILITY. TO THE MAXIMUM EXTENT PERMITTED BY APPLICABLE LAW, IN NO EVENT SHALL PYRAMID TIME SYSTEMS, LLC OR ITS SUPPLIERS BE LIABLE FOR ANY SPECIAL, INCIDENTAL, INDIRECT, OR CONSEQUENTIAL DAMAGES WHATSOEVER (INCLUDING, WITHOUT LIMITATION, DAMAGES FOR LOSS OF BUSINESS PROFITS, BUSINESS INTERRUPTION, LOSS OF BUSINESS INFORMATION, OR ANY OTHER PECUNIARY LOSS) ARISING OUT OF THE USE OF OR INABILITY TO USE THE TIMETRAX™ SOFTWARE OR THE PROVISION OF OR FAILURE TO PROVIDE SUPPORT SERVICES, EVEN IF PYRAMID TIME SYSTEMS, LLC HAS BEEN ADVISED OF THE POSSIBILITY OF SUCH DAMAGES, IN ANY CASE, PYRAMID TIME SYSTEMS, LLC'S ENTIRE LIABILITY UNDER ANY PROVISION OF THIS EULA SHALL BE LIMITED TO THE AMOUNT YOU ACTUALLY PAD TO PYRAMID TIME SYSTEMS, LLC FOR THE TIMETRAX™ SOFTWARE OR SERVICE THAT DIRECTLY CAUSED THE DAMAGE. BECAUSE SOME STATES AND JURISDICTIONS DO NOT ALLOW THE EXCLUSION OR LIMITATION OF LIABILITY, THE ABOVE LIMITATION MAY NOT APPLY TO YOU.
Pyramid Time Systems, LLC
45 Gracey Avenue
Meriden, CT 06451
pyramidtimesystems.com

text_image
PYRAMID™©2017 Pyramid Time Systems, LLC. All rights reserved. (12/12)
TABLE OF CONTENTS
TABLE OF CONTENTS 5
PRODUCT OVERVIEW....6
UPGRADES....7
ACCESSORIES....7-8
CUSTOMER SUPPORT....8
WARRANTY 8
CONNECT TERMINAL 9-10
MOUNT TERMINAL....11
SOFTWARE REQUIREMENTS 12
DOWNLOADING TIMETRAX™ SOFTWARE 13
SETUP....13
COMPANY....14
DEPARTMENT 15
PAY CLASS....15-18
PAY TYPE....19-21
SHIFT/MEAL 22-26
SCHEDULE 27
ROUNDING....28-30
OVERTIME 30-32
IMPORT FROM V4 32
EMPLOYEE GROUP....33-34
EMPLOYEE PROFILE 34-36
FINGER SCAN REGISTRATION (TTELITEEK) 37
TERMINATION REASON 38
JOB CODE 38-39
ADMINISTRATION 40
USER ACCOUNTS....40-41
TIME CARD SETTINGS 41
BACKUP 42
CLOCK 43
AUTOMATIC PUNCH DOWNLOAD.... 43
UN-ASSIGNED CARDS 43
BELL SCHEDULE....43-44
HARDWARE MANAGER....45-46
ADD DEVICE (TIME CLOCK) 46-47
TIME CARD 48-51
GLOBAL SPECIAL PAY 51-52
REPORTS....52-54
EXPORTS 54-55
DOWNLOAD PAYROLL 56
ADP 56
FIDELITY 57-58
GENERIC 58
HEARTLAND 59
PAYCHEX PREVIEW 60
PAYCHOICE....61
QUICKBOOKS 62-67
USING TIME CLOCK 68-70
DIAGNOSTIC MODE 71
UPGRADES....71
TROUBLESHOOTING 71
PRODUCT OVERVIEW
Thank you for choosing a TimeTrax™ Time Clock System.
TimeTrax™ empowers business with essential employee time tracking tools to manage, report & export employee time & attendance. With TimeTrax™ Time Clock System, employees can simply punch In and Out using a swipe card (TTEZ, TTEZEK, PSDLAUBKK), proximity badge (PPDLAUBKN & TTPROXEK), or finger (TTELITEEK).
TimeTrax™ Time & Attendance software interfaces with time clock series terminals to automatically calculate payroll including time-&-a-half, double time, special Saturday, Sunday or 7th day overtime work rules. This comprehensive software suite includes editing, payroll periods, special pay categories, global or select employee groups up to 24 analytical reports & exporting to most major payroll providers.
Please read through this Software Reference Guide or refer to TimeTrax™ Help for detailed information.
FEATURES
| TimeTraxTM | TTEZ | TTEZEK | PPDLAUBKN | PSDLAUBKK | TTPROXEK | TTELITEEK |
| Platform | Magnetic Swipe | Magnetic Swipe | Proximity | Magnetic Swipe | Proximity | Biometric |
| Connectivity | Serial | Ethernet | Ethernet | Ethernet | Ethernet | Ethernet |
| Base Employees^1 | 25 | 50 | 50 | 50 | 50 | 50 |
| Max. Employees | 500 | 500 | 500 | Unlimited | Unlimited | Unlimited |
| Reports | 24 | 24 | 24 | 24 | 24 | 24 |
| Pay Class | 1 | 1 | 1 | Unlimited | Unlimited | Unlimited |
| Employee Groups | 4 | 4 | 4 | Unlimited | Unlimited | Unlimited |
| Pay Types | 7 | 7 | 7 | Unlimited | Unlimited | Unlimited |
| Features | Job Code Upgrade | Job Code Upgrade | Job Code Upgrade | |||
| Pay Periods | Weekly, Bi-Weekly, Semi-Monthly or Monthly | |||||
| Automatic OT Calc. | Optional | |||||
| Rounding | 0,5,6,10 or 15 minutes | |||||
| Automatic Lunch | Breaks - Optional upgrade | |||||
| Exporting | Most Major Payroll Providers | |||||
^1 Punches are automatically downloaded into the software. Employee software upgrades, additional swipe cards (TTEZ, TTEZEK, PSDLAUBKK), proximity cards & key fobs (TTPROXEK, PPDLAUBKN) and terminals sold separately.
UPGRADES

Employee Upgrade

Software
Support Plans

Job Code Upgrade
To add employees or enhance software capabilities, software upgrades are available. When you are ready to take it to the next level, visit pyramidtimesystems.com or contact our customer support team at 888.479.7264, 8am-5pm EST, Mon-Fri, to easily upgrade your software.
ACCESSORIES
TIMETRAX™ TTEZ, TTEZEK, PSDLAUBKK: ACCESSORIES
| ITEM # | DESCRIPTION |
| TTEZET | TimeTraxTM EZ Swipe Terminal (EZEK Only) |
| PSDLAUBTN | TimeTraxTM ELITE Swipe Terminal |
| 41302 | Replacement Cards (1-25) |
| 41303 | Swipe Cards (26-50) |
| 41304 | Swipe Cards (51-100) Higher #'s available upon request. |
TIMETRAX™ PPDLAUBKN & TTPROXEK : ACCESSORIES
| ITEM # | DESCRIPTION |
| PPDLAUBTN | TimeTraxTM EZ Prox Terminal |
| TTPROXET | TimeTraxTM ELITE Prox Terminal |
| 42454 | Proximity Badges (15pk) |
| 42468 | Proximity Fobs (5pk) |
TIMETRAX™ TTELITEEK : ACCESSORIES
| ITEM # | DESCRIPTION |
| TTELITEET | TimeTraxTM ELITE Bio Terminal |
CARD/BADGE RACKS & HOLDERS
| ITEM # | DESCRIPTION |
| 500-12 | 12 Pocket Card/Badge Rack |
| 500-24 | 24 Pocket Card/Badge Rack |
| 500-4 | 40 Pocket Card/Badge Rack |
| 42968 | Badge Holder & Lanyard (25pk) |
ACCESSORIES
BELL RINGERS, BELLS & HORNS
| ITEM # | DESCRIPTION |
| 5300 | 24-Volt Single Zone Bell Ringer |
| 41361 | TimeTraxTM Sync 6in 24-Volt DC Bell |
| 41392 | TimeTraxTM Sync 8in 24-Volt DC Bell |
| 41362 | TimeTraxTM Sync 24-Volt Signalling Horn |
CUSTOMER SUPPORT
○ TimeTrax™ Help
Click "Help" from main toolbar to access index of help topics, or click "F1" for help on a specific screen.
- Troubleshooting
For answers to Frequently Asked Questions, please refer to pyramidtimesystems.com/SUPPORT
○ Online & Email Support
① Visit pyramidtimesystems.com
② Click "Support" under the RESOURCES tab for customer support info.
③ Refer to FAQs or “Customer Support” under the RESOURCES tab.
④ Click Chat on home page.
⑤ Email customersupport@ptitime.com.
⑥ View setup videos under Resources/Support
○ Phone Support
Customer Support is available by calling 888.479.7264, 8am-5pm EST, Mon-Fri.
WARRANTY & EXTENDED TECHNICAL
Pyramid Time Systems provides TimeTrax™ software technical support for a period of 90 days from the date of purchase. Extended technical support contracts may be purchased separately by calling Customer Support at 888.479.7264, 8am-5pm EST, Monday-Friday.
Your terminal has a 1 year manufacturer's warranty from the date of purchase. Proof of purchase is required to activate your warranty and support contract.
CONNECT TERMINAL
IMPORTANT: Please write down serial # located on back of terminal before connecting. Please install and mount TTEZ, TTEZEK, PPDLAUBKN, PSDLAUBKK, TTPROXEK or TTELITEEK Terminal before installing TimeTrax™ software. Once your clocks have been connected, you will need to mark them as active in the software under Clock/Hardware Manager before your clock will pick up date & time.
text_image
Diagram showing cable connection to a device with labeled components and zoomed-in views① Connect Ethernet cable into Ethernet port located in compartment on back of terminal.
② Connect Power Supply into Power port located in compartment on back of terminal.
③ Route the cables through channel at base of terminal.
④ Mount terminal (see instructions p.).
⑤ Plug free end of Ethernet cable into network jack, router or switch.
6 Plug free end of Power supply into outlet.
TTEZ Serial(USB) Connection instructions.
text_image
Diagram showing cable installation steps with labeled components and wiring connections① Connect the RJ45 cable into USB port located in the back of terminal.
② Connect the RS232 Serial Adaptor to RJ45 cable.
③ Connect power supply into power port located in compartment on back of terminal.
4 Route the cables through channel at base of terminal.
⑤ Mount terminal (see instructions next page).
⑥ Plug free end of USB cable into USB port on computer.
⑦ Plug free end of Power supply into outlet.
MOUNT TERMINAL
natural_image
Technical line drawing of an open electrical panel with internal components and wiring (no text or symbols)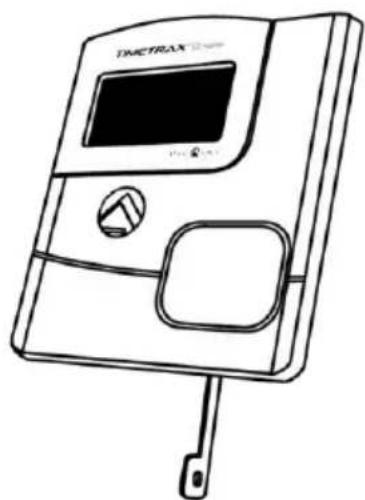
natural_image
Line drawing of a Timetraux appliance with control panel and handle (no text or symbols)① Hold mounting bracket flush against wall with cable access cutout towards floor. Note: The bottom of bracket should be approximately 45 inches from floor. Allow for 6ft long cable.
② Level bracket and mark four screw holes close to corner tabs.
③ Drill holes as marked and insert included anchors if needed.
④ Screw mounting bracket to wall with included screws.
⑤ Drill hole centered in rectangular opening of bracket for cables. The hole should be large enough to route cables through wall.
⑥ Push terminal onto mounting bracket aligning four tabs on bracket with four matching slots on back of terminal. Be sure to write down the terminal serial number before mounting.
⑦ Slide terminal downward until locking tab clicks into place. When properly mounted, terminal cannot be slid up and off bracket without using included wall bracket release key to disengage locking tab.
To detach terminal.
① Hold wall bracket release key with pointed end up & diagonally cut side away from you.
② Insert key into narrow slot located on bottom of terminal to right of cable access cutout.
③ Push key all the way up into slot. The key will slide easily into the last 12 inch until some resistance from locking tab is felt.
④ With key fully pushed into slot, slide the terminal up and off mounting bracket.
SOFTWARE REQUIREMENTS
Please verify system meets ALL requirements listed below. Do not install TimeTrax™ software if system does not meet minimum requirements.

natural_image
Icon showing a computer monitor and tower on a black circular background (no text or symbols)Single User installation, Local Area Network (LAN) only
TimeTrax™ Time & Attendance software should not be installed on server PC's. Pyramid Time Systems does not support the use of TimeTrax™ software on a server PC.

text_image
DHCPDHCP enabled network

natural_image
Windows logo icon with stylized 'W' and 'TM' text, enclosed in a black circle (no additional symbols or text)Windows 8 or above
All Windows updates must be installed prior to software installation

natural_image
Black circular icon with a white abstract document or profile symbol (no text or numbers)User Profile with Admin rights when Installing the software

text_image
EnglishRegional settings & hardware input in English
DOWNLOAD TIMETRAX™ SOFTWARE

Please see the quick start guide that came with your clock kit for instructions on downloading the software.

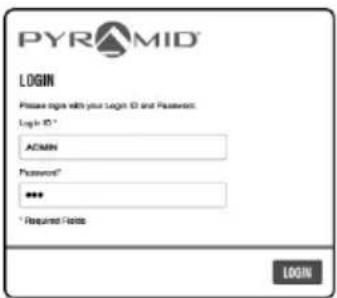
text_image
PYRAMID LOGIN Please sign with your Login ID and Password: Login ID * ADMIN Password* *** * Required Files LOGINEnter Login ID "ADMIN". Enter Password "PTI" (case sensitive). Click "LOGIN".

You are now ready to start the setup for your software. Please go to pyramidtimesystems.com and go to resources/support to view our step by step setup videos.
SETUP
To begin using TimeTrax™ Time and Attendance Software, click "Setup" from main toolbar. Below is a list of optional and mandatory set up items.
○ Company*
- Department
○ Pay Class*
○ Pay Type
○ Shift/Meal
- Schedule
○ Rounding
○ Overtime
○ Employee Group*
○ Employee Profile*
- Termination Reason (additional options available with upgrade)
○ Job Code (available with upgrade only)
*Required for system set up.
COMPANY
- Click "Setup" on toolbar, and select "Company" from drop down menu to begin entering information. TimeTrax™ software is limited to one company only.
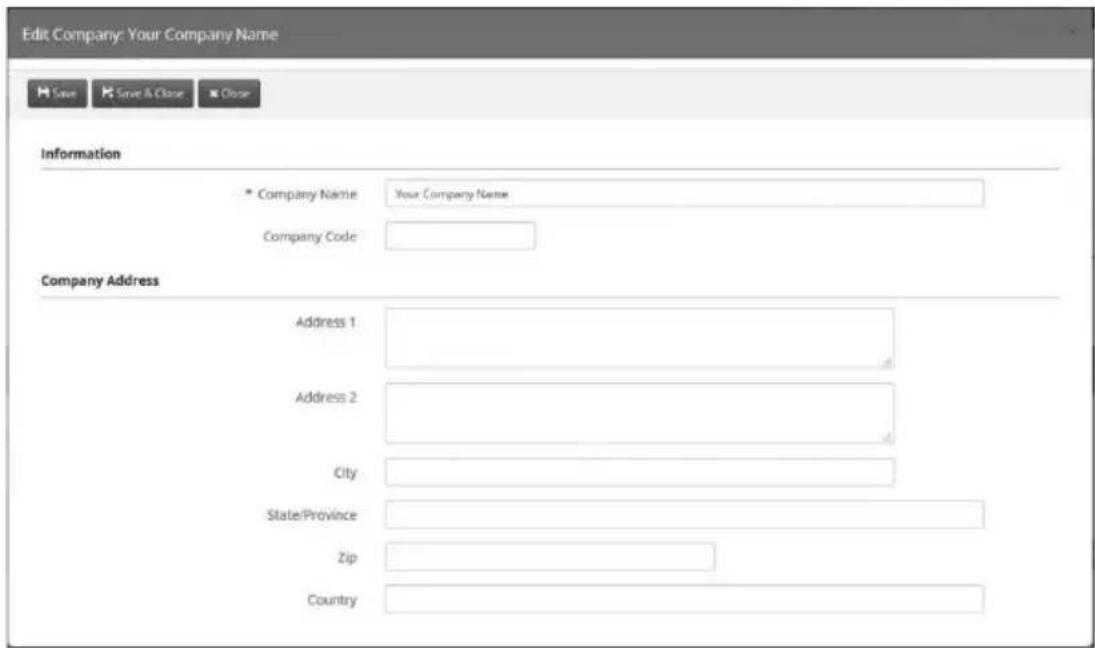
text_image
Edit Company: Your Company Name Save Save & Close Close Information * Company Name Your Company Name Company Code Company Address Address 1 Address 2 City State/Province Zip Country○ Company Name*
Enter company name.
○ Company Code
Use this option if your payroll provider requires a company code for payroll export. The company code is a unique code of alphanumeric and special characters to identify the company.
○ Company Address
Enter company address.
2. Click "Save & Close".
DEPARTMENT
Departments are specific areas or divisions an employee is generally assigned to. An unlimited number of departments can be entered, but only one department may be assigned to each employee profile. Click “Setup” on toolbar, and select “Department” from drop down menu. A default department is predefined. Click “Edit” icon in each row to edit default information.
Add Department
- Click "Add Department" to begin.
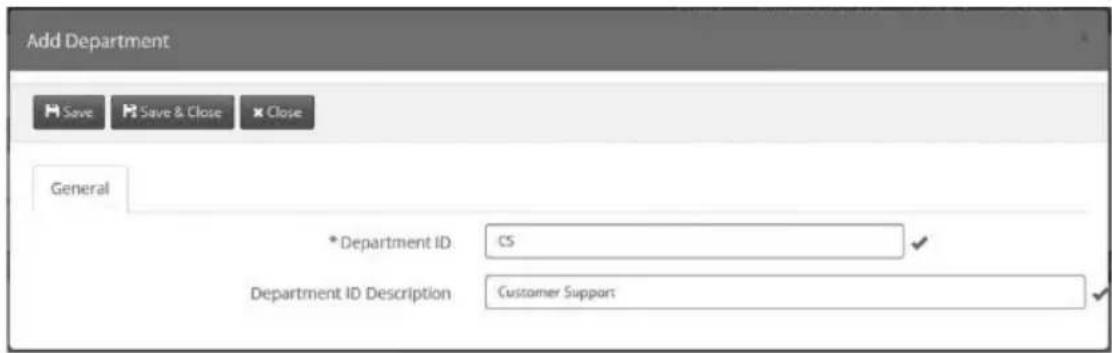
text_image
Add Department Save Save & Close Close General *Department ID CS Department ID Description Customer SupportGeneral
○ Department ID*
Enter unique department ID. The department ID may be used as a search filter selection in the software.
- Department ID Description
Enter a department ID description.
- Click "Save & Close".
Delete Department
Click "Delete" icon in corresponding row. A department (including default department) may not be deleted if associated with a Job Code or Employee Profile.
PAY CLASS\*
Pay Class defines Pay Periods (weekly, bi-weekly, monthly, semi-monthly). ^1 Click “Set Up” on toolbar, and select “Pay Class” from drop down menu. A default Pay Class is predefined. Click “Edit” icon in corresponding row to edit default information. Be sure you have carefully checked all options under “Pay Period Setup” before using the software.
Add Pay Class
- Click "Add Pay Class" to begin.
text_image
Add Pay Class Save Save & Close Close General Pay Periods *Pay Class ID WKLY Pay Class ID Description WEEKLY Pay Period Setup Weekly Bi-Weekly Monthly Semi-Monthly * Pay Period starts on Sunday * Work Week starts on Sunday * Pay Period and Work Week starts at 10:00 PMGeneral
o Pay Class ID\*
Enter unique Pay Class ID. The Pay Class ID may be used as a search filter selection in the software.
o Pay Class ID Description
Enter a Pay Class ID description.
Pay Period\*
- Select "Weekly", "Bi-Weekly", "Monthly" or "Semi-Monthly".
o Weekly
Pay Period starts on*
Select day of the week pay period starts on.
Work Week starts on*
Automatically defaults to same day as pay period start day and cannot be changed.
Pay Period and Work Week starts at*
Enter time of day the software will reset for new pay period. ^2 It is recommended the time entered is two hours before the first shift start time to accommodate early arrivals.

^1 EZ software is limited to one Pay Class rule. Elite software has unlimited Pay Class rules but only one Pay Class rule may be associated with each Employee Group. ^2 If a company has three shifts, there may be instances when an employee punches “In” prior to the reset time and punches “Out” after the reset time. If this occurs, the software will associate the “Out” punch with the “In” punch from the previous cycle.
o Bi-Weekly
Pay Period starts on\*
Select day/date pay period starts on.
Work Week starts on\*
This value may differ from pay period start on day/date and defines when weekly overtime calculations are reset. Overtime may be accrued to the next pay period for hourly employees.
Pay Period and Work Week starts at\*
Enter time of day the software will reset for new pay period. ^2 It is recommended the time entered is two hours before the first shift start time to accommodate early arrivals.
o Monthly
Pay Period starts on\*
Select date the pay period starts on.
Work Week starts on\*
This value may differ from pay period start on day/date and defines when weekly overtime calculations are reset. Overtime may be accrued to the next pay period for hourly employees.
Pay Period and Work Week starts at\*
Enter time of day the software will reset for new pay period. ^2 It is recommended the time entered is two hours before the first shift start time to accommodate early arrivals.
o Semi-Monthly
Pay Period starts on\*
Select the two dates the pay period starts on every month. There must be at least 10 days between the two dates selected for the month.
Work Week starts on\*
This value may differ from pay period start on day/date and defines when weekly overtime calculations are reset. Overtime may be accrued to the next pay period for hourly employees.
Pay Period and Work Week starts at\*
Enter time of day the software will reset for new pay period. ^2 It is recommended the time entered is two hours before the first shift start time to accommodate early arrivals.
2. Click "Save & Close".

If a company has three shifts, there may be instances when an employee punches "In" prior to the reset time and punches "Out" after the reset time. If this occurs, the software will associate the "Out" punch with the "In" punch from the previous cycle.
Pay Period
Displays list of all pay periods for current and previous year. Pay periods for the following year will not populate until after the first pay period of the New Year.
Edit Pay Class
To edit a Pay Class click “Edit” icon in corresponding row. If you have a pay class already associated with punches on a time card, you will not be able to edit the pay class. You must change the pay class instead.
o Changing a Pay Class with associated punches
A Pay Class with an active Employee Group and associated punches may not be changed unless the current, previous and two prior pay periods are approved. When approving, start with the oldest pay period and work your way back to the current. Upon approval, changes are permitted, and subsequent time cards will reflect the new pay period. Manual payroll adjustments may be required. Approved Pay periods may be viewed in Pay Class Change Report.
Deleting Pay Class
A Pay Class may not be deleted if it is associated with an Employee Group, Employee Profile or Time Card. To delete a Pay Class, click "Delete" icon in corresponding row.
^1 For EZ customers, additional Pay Types are available for purchase by contacting Customer Support at 888.479.7264 Ext. 1, 8am-5pmEST, M-F.
PAY TYPE
Pay Type defines the multiplier used to calculate employee hours (i.e. Overtime rate is 1.5x). Click “Setup” on toolbar, and select “Pay Type” from drop down menu. Seven default Pay Types have been predefined. To edit Pay Types, refer to Edit Pay Type section.
REG Regular
OT15 Overtime 1.5x
OT2 Overtime Double Time
VAC Vacation
SICK Sick Time
Holiday Holiday
Other Other (Other Pay Type may be edited or deleted)
Add Pay Type
- To begin, click "Add Pay Type".
text_image
Add Pay Type Save Save & Close Close General * Pay Type ID PR Pay Type ID Description PERSONAL TIME Category Code * Apply As Regular Overtime Special Pay * Rate Modifier 1.00 Pay Type Details Monetary Amount Hours Credit Towards OvertimeGeneral
o Pay Type ID*
Enter unique Pay Type ID. The Pay Type ID may be used as a search filter selection in the software.
o Pay Type ID Description
Enter a Pay Type ID description.
o Category Code
Use this option if your payroll provider requires a category code for payroll export. This information should be entered according to the payroll provider's specification.
o Apply As
Select “Regular”, “Overtime” or “Special Pay” (i.e. Holiday, Vacation etc.) to identify how the entered Pay Type should be applied.
Regular
Populates 1x rate multiplier and “Hours” under Pay Type Details to be credited toward overtime.
Overtime
Select rate multiplier (i.e. 1.5x) to be applied. Automatically populates "Hours" under Pay Type Details.
Special Pay
Populates 1x rate multiplier. Select "Monetary Amount" or "Hours" under Pay Type Details.
o Rate Modifier
Identifies the rate at which Pay Type is paid (i.e. Time and a half is rate multiplier 1.5). Certain Pay Types have a predefined multiplier that cannot be edited.
o Pay Type Details
Monetary Amount
Allows dollar amount to be entered when Pay Type is selected in the Time Card screen under Special Pay.
Hours
Credit Toward Overtime
Select this option to submit Special Pay as hours to be applied to weekly overtime.
2. Click "Save & Close".
Edit Pay Types
Click “Edit” icon in corresponding row. Pay Type ID and Category Code may be edited for all Pay Types. “Credit Toward Overtime” may also be edited for Pay Types applied as Special Pay. Edits are immediately applied and will only impact unapproved pay periods. There are seven default Pay Types as follows:
REG Regular
OT15 Overtime 1.5x
OT2 Overtime Double Time
VAC Vacation
SICK Sick Time
Holiday Holiday
Other Other (Other Pay Type may be edited or deleted)
Delete Pay Type
A Pay Type may not be deleted if it is associated with an Overtime Rule, Employee Group, Employee Profile or Time Card. To delete a Pay Type, click “Delete” icon in corresponding row. Some predefined Pay Types may not be deleted. Please refer to Edit Pay Types for a list.
SHIFT/MEAL
Shift identifies a time frame during which an employee or group of employees must clock In/Out. This section also defines paid and unpaid Meals and whether punches are required. Click “Setup” on toolbar, and select “Shift/Meal” from drop down menu. Break options are available for purchase by contacting Customer Support at 888.479.7264 Ext. 1, 8am-5pmEST, M-F.
ADD SHIFT/MEAL
1. Click "Add Shift"
text_image
Add Shift/Meal Save Save & Close Close General Shift Details Meal *Shift ID 1ST Shift ID Description 1st ShiftGeneral
o Shift ID*
Enter unique Shift ID. The shift ID may be used as a search filter selection in the software.
o Shift ID Description
Enter Shift ID description
text_image
Add Shift/Meal Save Save & Close Close General Shift Details Meal * Shift Start 5:00 AM * Shift End 2:00 PM Enable Grace Periods Grace Period Before Shift Start 1 (Mins) Grace Period After Shift Start 1 (Mins) Grace Period Before Shift End 1 (Mins) Grace Period After Shift End 0 (Mins)Shift Details
o Shift Start/Shift End*
Enter time frame employees will start clocking In/Out (i.e. 5:00am - 2:00pm)
o Enable Grace Periods
Grace Periods identify the number of minutes allowed before and after a shift, so no warning is generated on the Employee Time Card. Below is the list of warnings that the system will generate on the Employee Time Card screen:
Shift In Late
Shift In Early
Shift Out Late
Shift Out Early
Shift Over Duration
Shift Under Duration
Meal (Lunch)
- Select meal rule:
No Meal
Paid Meal, Punch Required
Paid Meal, No Punch Required
Un-paid Meal, Punch Required
Un-paid Meal, No Punch Required
o Paid Meal, Punch Required
Employee is paid for meals, and is required to clock Out/In for meals.
Example A: Meal allowed anytime between 11:30am and 1:30pm
An employee's entire meal (Out/In) must take place during the specified time frame between 11:30am and 1:30pm. It is recommended the time interval is greater than the actual duration of the meal. If punches occur outside of the time frame, they will not be considered meal punches.
Example B: Meal duration is 00:30 (hr:min), with 5(min) grace
The employee meal is 30 mins with a 5 minute grace time. Meals less than 25 minutes or more than 35 minutes will generate a warning (Meal Under Duration or Meal Over Duration) on the Employee Time Card screen. Employees are paid only for the allowed meal duration.
Example C: If duration between Out/In punch exceeds 01:00 (hr:min), it will not be recorded as a meal punch.
A meal that exceeds 1 hour will not be recorded as a meal punch and will generate a message on the employees Time Card screen as “Missed Meal”. If an employee fails to punch Out/In for a meal, a “Missed Meal” message will also display on the Time Card. Adjust employee punches on the time card as needed.
o Paid Meal, No Punch is required
Employee is paid for meals, and is not required to clock Out/In for meals. For this option, if a meal punch occurs, hours may need to be adjusted accordingly
o UnPaid Meal, Punch Required
Employee is not paid for meals, but is required to clock Out/In for meals.
Example A: Meal allowed anytime between 11:30am and 1:30pm
For this example, an employee's entire meal (Out/In) must take place during the specified time frame between 11:30am and 1:30pm. It is recommended the time interval is greater than the actual duration of the meal. If punches occur outside of the time frame, they will not be considered meal punches.
Example B: Meal duration is 00:30 (hr:min), with 5(min) grace
The employee meal is 30 minutes with a 5 minute grace time. Meals less than 25 minutes or more than 35 minutes will generate a warning (Meal Under Duration or Meal Over Duration) on Employee Time Card screen.
Example C: If duration between Out/In punch exceeds 01:00 (hr:min), it will not be recorded as a meal punch.
A meal that exceeds 1 hour will not be recorded as a meal punch and will generate a message on the Employees Time Card screen as “Missed Meal”. If an employee fails to punch Out/In for a meal, a “Missed Meal” message will also display on the Time Card. Adjust employee punches on the time card as needed.
o UnPaid Meal, No Punch is required
This option allows you to set a specific time an employee or group of employees must work before applying an automatic meal deduction.
Example A: Auto deduction of meal if employee works more than 07:00 (hr:min).
Employee must work 7 hours before a meal deduction occurs. If employee works less than 7 hours there will be no meal deduction.
Example B: Auto meal deduction duration 00:30 (hr:min)
30 minutes is automatically deducted if employee works more than 7 hours. Deduction will appear on employee time card under Punch Info Column as an "Automatic Meal Deduction". 30-minute deduction will also appear under In/Out Column. Adjust employee punches on time card as needed.
Break 1&2 ^1
1. Select break rule:
No Break
Paid Break, Punch Required Paid Break, No Punch Required Un-Paid Break, Punch Required Un-paid Break, No Punch Required

^1 Break options are available for purchase by contacting Customer Support at 888.479.7264 Ext. 1, 8am-5pmEST, M-F.
o Paid Break, Punch Required
Employee is paid for breaks, and is required to clock Out/In for breaks.
Example A: Break allowed anytime between 09:30am and 11:30am
An employee's entire break (Out/In) must take place during the specified time frame between 09:30am and 11:30am. It is recommended the time interval is greater than the actual duration of the break. If punches occur outside of the time frame, they will not be considered break punches
Example B: Break duration is 00:10 (hr:min), with 2(min) grace
The employee break is 10 minutes with a 2 minute grace time. Breaks less than 7 minutes or more than 13 minutes will generate a warning (Break Under Duration or Break Over Duration) on Employee Time Card screen. Employees are paid only for the allowed break duration.
Example C: If duration between Out/In punch exceeds 00:30 (hr:min), it will not be recorded as a break punch.
A break that exceeds 30 minutes will not be recorded as a break punch and will generate a message on the employees Time Card screen as “Missed Break”. If an employee fails to punch Out/In for a break, a “Missed Break” message will also display on the Time Card. Adjust employee punches on the time card as needed.
o UnPaid Break, No Punch Required
This option allows you to set a specific time an employee or group of employees must work before applying an automatic break deduction.
Example A: Auto deduction of break if employee works more than 07:00 (hr:min)
Employee must work 7 hours before a break deduction occurs. If employee works less than 7 hours there will be no break deduction.
Example B: Auto Break duration 00:10 (hr:min)
10 minutes is automatically deducted if employee works more than 7 hours.
Deduction will appear on employee time card under Punch Info Column as
"Automatic Break Deduction". 10-minute deduction will also appear under In/Out Column. Adjust employee punches on time card as needed.
2. Click "Save & Close".
EDIT/DELETE SHIFT/MEAL
Click “Edit/Delete” icon in corresponding row. Edits and deletions are immediately applied and will only impact unapproved pay periods
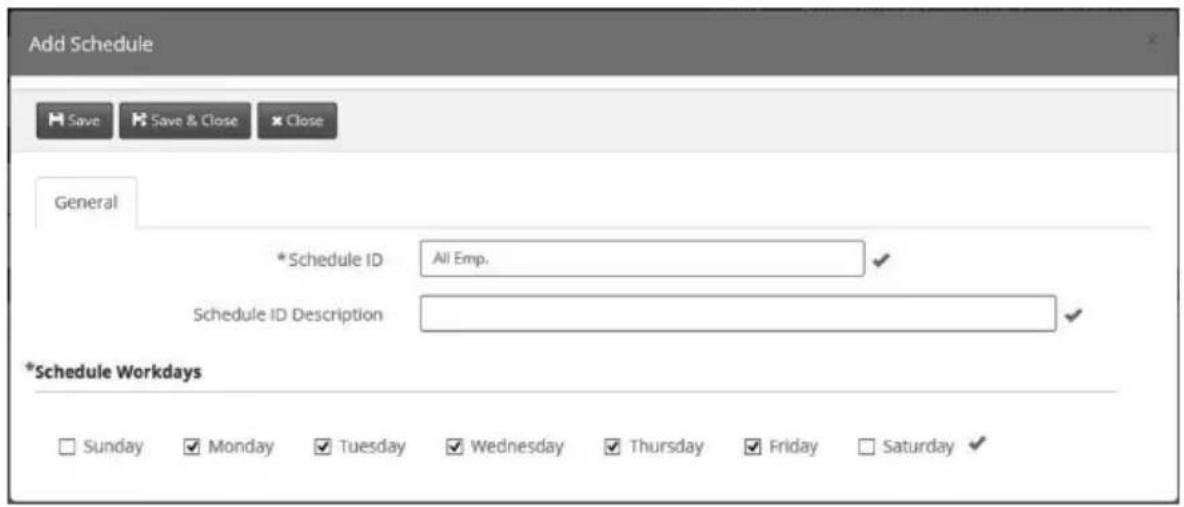
SCHEDULE
Designated workdays for an employee or employee group. Used to show absence on the time card and to generate attendance reports. Click "Setup" on toolbar, and select "Schedule" from drop down menu.
ADD SCHEDULE
- Click "Add Schedule"
text_image
Add Schedule Save Save & Close Close General *Schedule ID All Emp. Schedule ID Description *Schedule Workdays Sunday Monday Tuesday Wednesday Thursday Friday SaturdayGeneral
o Schedule ID*
Enter unique Schedule ID. The Schedule ID may be used as a search filter selection in the software.
o Schedule ID Description
Enter Schedule ID Description.
- Schedule Workdays
Select days of week assigned to an employee or group of employees. Days that are scheduled but are not worked will generate an “Absent” message on the Employee Time Card.
- Click "Save & Close"
EDIT/DELETING SCHEDULES
Click "Edit/Delete" icon in corresponding row. Edits and deletions are immediately applied and will only impact unapproved pay periods.
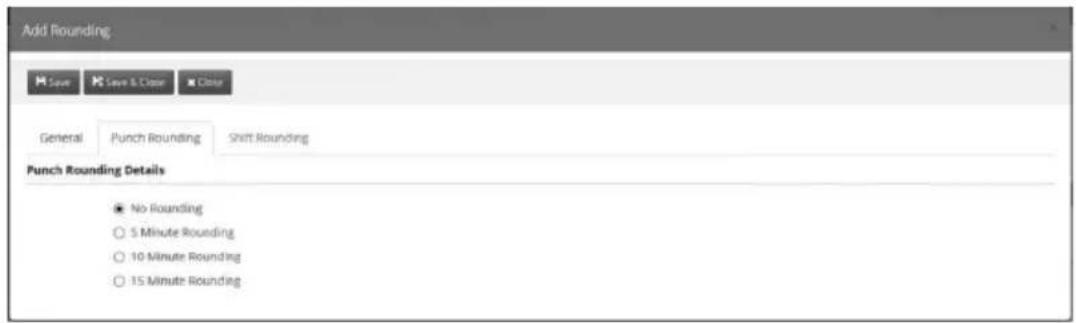
ROUNDING
Simplifies payable time calculations by rounding punch times. Click "Setup" on toolbar, and select "Rounding" from drop down menu.
Standard Punch Rounding
Rounds all punches using 5, 10, or 15 minute interval options.
Custom Rounding 1
Rounds all punches based on user-defined perimeters.
Shift Rounding 2
Rounds only the first and last punches of the day.
ADD ROUNDING
- Click "Add Rounding"
General
o Rounding ID*
Enter unique Rounding ID. The Rounding ID may be used as a search filter selection in the software.
o Rounding ID Description
Enter Rounding ID Description.
Punch Rounding
Punch rounding rules apply to all punches on Employee Time Card.
text_image
Add Rounding Save Save & Clear Delete General Punch Rounding Shift Rounding Punch Rounding Details No Rounding 5 Minute Rounding 10 Minute Rounding 15 Minute RoundingPunch Rounding
o No Rounding (default)
Calculations based on actual punch In/Out times.
o 5 Minute Rounding
Rounds punches 2 minutes before or 3 minutes after to nearest 5-minute increment.
Example: 7:02 punch rounds to 7:00, 7:03 punch rounds to 7:05.
o 10 Minute Rounding
Rounds punches 5 minutes before or 5 minutes after to nearest 10-minute
increment. Example: 7:04 punch rounds to 7:00, 7:06 punch rounds to 7:10.

^1 Custom Rounding available as upgrades by contacting Customer Support at 888.479.7264, 8AM-5PMEST, M-F. ^2 Shift Rounding available as an upgrade for TTEZ by contacting Customer Support at 888.479.7264, 8am-5pmEST, M-F.
ROUNDING Cont.
- 15 Minute Rounding (7/8 rule) Rounds punches 7 minutes before or 8 minutes after to nearest 15 minute increment.
Example: 7:07 punch rounds to 7:00, 7:08 punch rounds to 7:15.
o Custom Rounding (requires upgrade) ^1 Rounds punches based on defined interval (minutes) and break point within interval. Example: If 20 minute (interval) with break point of 10, than 7:09 punch rounds 7:00, 7:11 punch rounds to 7:20.
Do Not Apply Rounding to Meal If selected, no rounding will apply to Out/In punches for meal (lunch).
Do Not Apply Rounding to Break If selected, no rounding will apply to Out/In punches for breaks.
2. Click "Save & Close"
Shift Rounding ^2
Shift Rounding only applies to the first and last punch of the day.
o Apply Punch Rounding (default)
Applies punch rounding rules selection to the first and last punch of the day.
o 5 Minute Rounding
Rounds first and last punch 2 minutes before or 3 minutes after to nearest 5-minute increment.
Example: 7:02 punch rounds to 7:00, 7:03 punch rounds to 7:05.
o 10 Minute Rounding Rounds first and last punch 5 minutes before or 5 minutes after to nearest 10-minute increment. Example: 7:04 punch rounds to 7:00, 7:06 punch rounds to 7:10.
o 15 Minute Rounding (7/8 rule) Rounds first and last punch 7 minutes before or 8 minutes after to nearest 15 minute increment. Example: 7:07 punch rounds to 7:00, 7:08 punch rounds to 7:15.
0 Variable Rounding Rounds punches before and after shift start and shift end time. Example: If Variable Rounding is set to 00:30 minutes before 8:00am and 00:02 minutes after 8:00 am, than 7:45 punch is rounded to 8:00 and 8:02 punch is rounded to 8:00. If Variable Rounding is set to 00:30 minutes before 4:30pm and 00:02 after 4:30pm, than 4:15 punch is rounded to 4:30 and 4:32 punch is rounded to 4:30.

^1 Custom Rounding available as upgrades by contacting Customer Support at 888.479.7264, 8AM-5PMEST, M-F. ^2 Shift Rounding available as an upgrade for TTEZ by contacting Customer Support at 888.479.7264, 8am-5pmEST, M-F.
ROUNDING Cont.
Custom Rounding (requires upgrade) ^1
Rounds punches based on defined interval (minutes) and break point within interval. Example: if 20 minute (interval) with break point of 10, than 7:09 punch rounds 7:00, 7:11 punch rounds to 7:20.
3. Click "Save & Close"
Edit/Deleting Rounding
Click "Edit/Delete" icon in corresponding row. Edits and deletions are immediately applied and will only impact unapproved pay periods.
OVERTIME
Overtime is the amount of time worked in addition to regular scheduled working hours. Click "Setup" on toolbar, and select "Overtime" from drop down menu.
Daily Overtime
Paid if employee reaches a certain amount of hours within a day (i.e. 8:00 hours)
Weekly Overtime
Paid if employee reaches a certain amount of hours within a week (i.e. 40:00 hours)
Consecutive Day Overtime (7thDay Rule)
Paid if employee works a certain number of consecutive days
Special Day Overtime
Day of week selected to qualify for overtime pay
ADD OVERTIME
- Click "Add Overtime"
General
Overtime ID\*
o Enter unique Overtime ID. The Overtime ID may be used as a search filter selection in the software.
o Overtime ID Description
Enter Overtime ID Description.
Daily Overtime
o Overtime Level
Select level to apply overtime for hours worked in a day.
o Pay Type
Select Pay Type associated with selected overtime rule.
o Rate Modifier
Populates based on selected Pay Type.
o Pay After (hours)
Enter total hours employee must work before overtime is applied.

^1 Custom Rounding available as upgrades by contacting Customer Support at 888.479.7264, 8AM-5PMEST, M-F.
OVERTIME Cont.
Weekly Overtime
o Overtime Level
Select level to apply overtime for hours worked in a week.
o Pay Type
Select Pay Type associated with selected overtime rule. ^1
o Rate Modifier
Populates based on selected Pay Type.
o Pay After (hours)
Enter total hours employee must work before overtime is applied.
Consecutive Day Overtime
o Overtime Level
Select level to apply overtime for hours worked in a consecutive day.
o Pay After (days)
Enter total days required before overtime can be applied.
o Rate Modifier
Populates based on selected Pay Type.
o Pay After (hours)
Enter total hours on Consecutive Day employee must work before overtime is applied.
Special Day Overtime
-
Day Select day of week to qualify for overtime pay.
o Overtime Level Select level to apply overtime for Special Day.
o Pay Type Select Pay Type associated with selected overtime rule ^1 .
o Rate Modifier Populates based on selected pay type.
o Pay After (hours) Enter total hours employee must work on Special Day before overtime can be applied.
o Prior Hours Required (Hrs : Mins) Enter total prior hours an employee must work before overtime is applied. -
Click "Save & Close".

If a Pay Type needs to be adjusted, cancel and click "Setup" then "Pay Type". To Adjust Pay Type, click "Edit" icon in corresponding row.
Edit/Deleting Overtime
Click "Edit/Delete" icon in corresponding row. Edits and deletions are immediately applied and will only impact unapproved pay periods.
IMPORT DATA FROM TIMETRAX™ VERSION 4 \*\*THIS SECTION PERTAINS TO PRE-EXISTING TIMETRAX™ CUSTOMERS ONLY\*\*
Enables existing TimeTrax™ software users to import Employees and associated Employee Groups into the new TimeTrax™ Version 5.0 software. Company and Pay Class rules must be setup prior to import. Be sure all Pay Period information under Pay Class is correct before importing.
- Click "Administration" on toolbar and select "Import V4 Employee Information".
- Click "Choose File", locate Pyramid.mdb file, and double click (file is normally located in C:\Users\Public\Documents\Pyramid\TimeTrax folder.)
- Click "Import".
- Click "Submit".
Once import is complete, a message will appear indicating number of records successfully imported, and if there are any issues to be addressed.
Note: If approvals have been done please follow instructions below for pulling over the pyramid archive file.
- Click "Administration" on toolbar and select "Import V4 Archived Information".
- Click "Choose File", locate PyrArchive.mdb file, and double click (file is normally located in C:\Users\Public\Documents\Pyramid\TimeTrax folder.)
- Click "Import".
Employee punch data for the last few pay periods may be imported with Emergency Punch Download. This action retrieves all punch data stored on the time clock.
- Click the F2 on your keyboard
- Choose the clocks you want to download from.
- Click the red "Emergency Download" Button.
Note: After successfully importing all files from V4 TO V5, Pyramid strongly recommends that V4 be uninstalled from the Control Panel, Program and Features list ie. TimeTrax Elite or TimeTrax EZ.
EMPLOYEE GROUP\*
An Employee Group defines an employee or groups of employees with same rules in common. Click "Set Up" on toolbar, and select "Employee Group" from drop down menu. A default Employee Group is predefined. Click "Edit" icon in each row to edit default information.
Add Employee Group
- Click "Add Employee Group".
General
o Employee Group ID*
Enter unique Employee Group ID. The Employee Group ID may be used as a search filter selection in the software.
- Employee Group ID Description
Enter Employee Group ID Description.
Select Rules
Select set of rules for this specific Employee Group. Each rule may be modified; see Edit Employee Group for more information.
o Pay Class*
From drop down menu, select Pay Class ID to be applied.
o Pay Type*
From drop down menu, select Pay Type ID to be applied.
o Missed Punch Assumed After*
Maximum hours employee can work without punching Out before the system assumes employee forgot to punch Out. NOTE: TimeTrax™ will reflect a Missed Punch in the employee Time Card and the next punch will automatically record as an IN punch.
o Shift
From drop down menu, select Shift ID to be applied.
o Schedule
From drop down menu, select Schedule ID to be applied.
o Rounding
From the drop down menu, select Rounding ID to be applied.
o Overtime
From the drop down menu, select Overtime ID to be applied.
2. Click "Save & Close".
Edit Employee Group
Click "Edit" icon in corresponding row. If attempting to edit an Employee Group with associated punches on an employee time card, edits are not allowed.
EMPLOYEE GROUP\* Cont.
Changing an Employee Group with associated punches
An active employee group with associated punches may not be changed unless the current, previous and two prior pay periods are approved. Upon approval, changes are permitted, and subsequent time cards will reflect the new pay period. Manual payroll adjustments may be required. All approved Pay periods may be viewed in Archive Reports.
Click "Delete" icon in corresponding row. Employee Groups associated with an Employee Profile cannot be deleted.
EMPLOYEE PROFILE
Enter employees and required data.
In "Setup" screen, click "Employee Profile" or click "Employee Profile" on vertical menu bar. All TimeTrax™ Time Clock Systems include 50 employees (with the exception of the TTEZ serial-25 employees). To purchase employee upgrades, contact Customer Support at 888.479.7264 Ext. 1, 8am-5pmEST, M-F.
Add Employee
- To begin, click "Add Employee".
General
- Employee ID* Enter a unique Employee ID. Be sure to verify with Payroll Provider if specific Employee ID is required for export.
o Name* Enter Employee First Name, Middle Initial (optional) and Last Name.
o Department* Select Department or default Department.
Job Code This feature is only available with Job Code upgrade purchase. ^1
o Supervisor Select if this employee is a supervisor. This will add a user account for this employee under “Supervisor” for software Log In purposes.
Supervisor Card # This feature is enabled if employee is selected as a supervisor and using one of the following time clock models; PSDLAUBKK, TTPROXEK or TTELITEEK. The supervisor must enter a Supervisor Card Number up to 8 digits (may not start or end in zero). This # allows supervisor to manually enter an employee IN/OUT punch on keypad, or register finger scans. (TTELITEEK Biometric Time Clock only).

^1 For more information on Job Codes, refer to Job Codes. ^2 For more information on registering fingerprints, refer to Fingerprint Registration (TTELITEEK Biometric Time Clock o
EMPLOYEE PROFILE Cont.
To clock an employee In/Out as a supervisor using keypad, follow these steps:
- Press F4 on keypad and enter supervisor number.
- “ID#” displays on time clock screen.
- Input employee card number and press "Enter".
o Card#
Click "Add Card". New Employee Card displays on screen. Enter swipe card number, proximity badge number or key fob # depending on the type of clock you are using. If you are using the Elite Bio clock, you can create your own # up to 8 digits long. Click "Save". To enable keypad punches see Hardware Manager under Clocks.
Swipe Card #

Prox Badge #

Key Fob #

Biometric #
To re-assign a card number previously assigned to another employee, the original card holder must be inactive and terminated on the Employee Profile screen and 3 full pay periods must have passed since they left. Once you have done this, remove the card # from the employee profile of the person who has left. This will prevent transfer of punches from old employee to new employee. Now you are able to reassign the card # to the new employee.
o Pick Profile Image
Click "Pick Profile Image" to add employee photo (one photo per employee).
Employment Status
Enter the following information:
o Employee Status* (defaults to Active)
If "inactive" is selected, all available time cards will no longer be visible ^1
o Hire Date
o Re-Hire Date
o Employee Termination
o Termination Date ^2
o Termination Reason ^3
o Eligible for Re-Hire ^2
EMPLOYEE PROFILE Cont.
RULES
Changing an Employee Group with associated punches
Changing from one Employee Group to another Employee Group with a different Pay Class is not allowed, unless the current, previous and two prior pay periods are approved. Upon approval, changes are permitted, and subsequent time cards will reflect the new pay period. All approved Pay periods may be viewed in Archive Reports.
Rule Summary
All rules associated with selected Employee Group are displayed under Rule Summary.
PERSONAL
o Compensation "Hourly" or "Salary"
- View Pay History
View compensation details with the effective start date
o Address Details
o Personal Information
EMERGENCY CONTACT
NOTES
Click "Add Note". Notes are tagged with log-in user information and can only be edited/deleted by same user.
- Click "Save & Close".
Edit Employee Profile
Click “Edit” icon in corresponding row. Changes are reflected immediately and impact unapproved pay periods only.
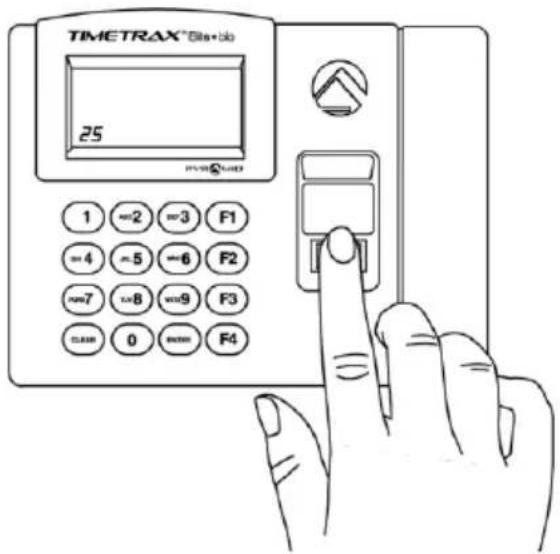
REGISTERING AN EMPLOYEE ON THE TIMETRAX™ ELITE BIO (TTELITEEK)
Before registering an employee finger scan on time clock, verify time clock "Status" as "Online" under "Clock/Hardware Manager". You will also need to set the Supervisor on the Employee Profile Screen with a Supervisor ID ^1 . Each employee must also be set up with a unique card# on their Employee Profile screen ^2 . You will need both of these numbers to register employee at the Time Clock.
Now you are ready to register employee fingerprints.
Supervisor must register employee on each time clock terminal they will be using.
At the clock:
- Press F4 key.
"SUPER ID" displays on screen. - Enter Supervisor ID.
- Press "Enter".
- User ID displays on the screen.
- Press F4
- Enter employee card number and press "Enter".
-
Place Finger displays on screen.
Have employee place finger on scanner.
SCAN SUCCESSFUL displays on screen.
Employee registration is complete. -
"Enroll Another?" displays on screen.
If you don't want to enter another employee, press "Clear".
To register another employee press "Enter"
"User ID" displays on screen.
Enter next employee card number and press "Enter".
Return to Step 5.
text_image
TIMETRAX®8bit+80 25 1 ==2 ==3 F1 ==4 ==5 ==6 F2 ==7 ==8 ==9 F3 0 =000 F4Note: If you make an error during any steps, press "Clear" and return to Step 1.
Deleting a Finger Scan from time clock.
To delete finger scan from time clock, delete the employee card# on Employee Profile associated with finger scan.

^1 Refer to Employee Profile section for more information on entering user with supervisor privileges. ^2 When adding an employee in Employee Profile, enter a card number associated with employee finger scan.
TERMINATION REASON ^1
There are two predefined Termination Reasons, Voluntary and Involuntary. If you have purchased additional Termination Reasons upgrade, click "Setup" on toolbar, and select "Termination Reason". Once Termination Reasons are entered, they are available for selection in Employee Profile screen.
Add Termination Reason
- Click "Add Termination Reason".
General
o Termination Reason ID*
Enter unique Termination Reason ID. The Termination Reason ID may be used as a search filter selection in the software.
o Termination Reason ID Description Enter Termination Reason Description.
- Click "Save & Close".
Edit Termination Reasons
Click "Edit" icon in corresponding row.
Delete Termination Reasons
Click "Delete" icon in corresponding row. Deletion is not allowed if Termination Reason is associated with an Employee Profile.
JOB CODE (available with upgrade)
Job Code records time spent on a job for tracking purposes. If the Job Code feature is purchased after TimeTrax™ software is already in use, a predefined Job Code is automatically generated for all previously entered Departments. If you add additional departments after the purchase of job codes, you must set up a job code for the new department. Click “Setup” on toolbar, and select “Job Code” from drop down menu. More than one Job Code may be associated per department. Once Job Codes are entered, a Job Code must be associated with employee on the Employee Profile screen.
Add Job Codes
o Click "Add Job Codes".
text_image
Add Job Code General * Job Code ID 455 Job Code ID Desorption CUSTOMER SERVICE * Clocked Job # 10 * Department INDIRECT LABOR + CUSTOMER SER
^1 To purchase additional Termination Reasons, contact Customer Support at 888.479.7264 Ext. 1, 8am -5pmEST, M-F.
JOB CODE cont.
General
o Job Code ID\*
Enter unique Job Code ID. The Job Code ID may be used as a search filter selection in the software.
o Job Code ID Description
Enter Job Code ID Description.
o Clocked Job#
Enter unique Clocked Job number (up to 4 digits) to be used at time clock.
o Department\*
Enter associated Department.
2. Click "Save & Close".
Enable Job Codes Entry at Clock
- Click "Clock" on main menu and select "Hardware Manager" from drop down menu.
- Click "Edit" for each time clock where Job Codes will be used.
- Check "Enable Job Code entry at the clock" box.
- Click "Save and Close".
To Use Job Code at Clock
When punching IN, the time clock will display, "Job Code?. Follow rules below to determine if a Job Code should be entered at the time clock:
When punching into their own department, the employee will punch IN, then press "Enter" after "Job Code?" is displayed. This punch is associated with the employee's "default" department.
When switching between departments, the employee enters a new Job Code after "Job Code?" is displayed. The employee is now punched into the new department, and out of the previous department.
When punching OUT for breaks, lunch or at the end of the day, the employee will enter the Job Code for the department they are punching out of.
Edit Job Codes
To edit a Job Code, click "Edit" icon in corresponding row. Changes are reflected immediately and only impact unapproved pay periods.
Delete Job Codes
To delete a Job Code, click "Delete" icon in corresponding row. Deletion is allowed only if the Job Code is not associated with an Employee Profile.
ADMINISTRATION
The Administration feature is used to set up user accounts, change system time card settings and set the automatic system backups. Click “Administration” on main menu screen, then select from options.
USER ACCOUNTS
Create unlimited User Login accounts for anyone requiring access to the System. Each User account is only associated with one User Type. A user account is automatically generated for every employee entered into the system. To allow software access to a user, simply edit their user account and enter Login information. Click “Administration” from top tool bar and select “User Account” from drop down menu.
Add User Accounts
- Click "Add User Accounts".
text_image
Add User Save Save & Close Close General *Select User Type Employee Supervisor Admin Select Employee KNOX, TIANA Enable login for the user Yes NoGeneral
Enter information for User Login. Only the System Administrator may select associated permissions and create user accounts.
o Select User Type
Employee Permissions
You can give them access to view their own time card and reports.
Supervisor Permissions
You can give access to specific departments. You can give access to view and edit the time cards and access to download punches.
System Administrator Permissions
Allows full Access.
o Select Employee
If "Employee" is selected, a list of all employees within software will be available.
USER ACCOUNTS Cont.
o Enable Login for the user Select "Yes" or "No"
o Login ID Enter Login
o Login Password Enter required password. Click "Save and Close"
Supervisor Access
List all Departments to be associated with defined Supervisor or User Type. Check "Select" to attach Department to the user.
- Select "Yes" or "No" if this Supervisor can:
- “Edit Time Card”, for selected department. - “Show Punch Download” allows supervisor to download time clock punches.
- Click "Save & Close".
Edit/Delete User Accounts
All accounts, other than System Administrator, may be edited or deleted. To Edit/Delete any user accounts, click "Edit/Delete" icon in corresponding row. System will only allow User Name and Password to be changed from the System Administrator account.
TIME CARD SETTINGS
Additional options for Employee Time Card. Click "Administration" from toolbar, and select "Time Card Settings" from drop down menu.
- Filter Punches Closer Than Eliminates duplicate punches within user-defined time. (i.e. If employee accidentally punches In or Out twice, filter will automatically omit the second punch within defined time frame. 90 seconds is recommended).
o Time Display Format Select "12 Hour" (AM/PM) or "24-Hour Military".
o Display Format For Calculated Times Select "Minutes" or "Minutes in Hundredths" (i.e. 8:30 minutes=8.50 hundredths).
o Preferred Time Zone Choose time zone.
- Click "Save & Close".
BACKUP
Allows user to enter destination for database backups. To avoid losing any data due to PC crash, it is recommended that you back up your data on an external drive like a USB flash drive. Backups are automatic when the user logs out and TimeTrax™ will retain the last 3 days of backup.
Please use the following format example below when using a flash drive F:TimeTrax backup.
CLOCK
To access Clock features, click "Clock" and select an option from drop down menu.
o Bell Schedule1
o Hardware Manager
AUTOMATIC PUNCH DOWNLOAD
As your employees punch on the time clock, these punches are automatically downloaded. Your clocks must be marked as active in Hardware Manager and must be online for this process to work. Downloaded punches are matched with the Employee Card # and are visible on Employee Time Card. Punches that cannot be associated with an employee will display as “Unassigned Cards”.
UNASSIGNED CARDS
Cards that contain downloaded punches not associated with an Employee Profile or deleted cards previously assigned to an Employee Profile.
- Click "Unassigned Cards" icon from vertical tool bar.
- The “Process Unassigned Cards” screen displays. Punches may be deleted or assigned to appropriate employee by selecting an employee under “Assign To” drop down list. This screen will provide card# and punch count. To access specific punch details associated with the unassigned card, click the arrow located to the left of the corresponding card number. If employee is not listed, add the employee on the profile screen, then enter unassigned card #.
BELL SCHEDULE
TimeTrax™ Elite time clock models PSDLAUBKK, TTPROXEK, TTELITEEK, accommodate bell scheduling for standard start/end and break/lunch times. Bells are programmed to ring at a specific time to notify employees, up to 300 bell events. Bell ringing hardware and bells are available for purchase at pyramidtimesystems.com or by contacting Customer Support at 888.479.7264 Ext. 1, 8am-5pmEST, M-F.
Click "Clocks" from toolbar and select "Bell Schedule" from drop down menu.
Add Bell Schedule
- Click "Add Bell Schedule".
General
o Bell Schedule ID*
Enter unique Bell Schedule ID. The Bell Schedule ID may be used as a search filter selection in the software.
o Bell Schedule ID Description
Enter Bell Schedule Description.

^1 Displays if using Elite Series time clocks (PSDLAUBKK, TTPROXEK, TTELITEEK)
Add Bell Event
- Click "Add Bell Event".
o Ring Time*
Use up/down arrows to choose what time bells ring.
o Ring Duration*
Select length of time bells ring from drop down list.
o Select Days*
Check the days of the week bells ring.
- Click "Save & Close" on Add Event Screen.
- Click "Save & Close" on Bell Schedule Screen. If more than one Bell Schedule is needed, repeat steps above. Only one bell schedule may be active at a time.
Save Bell Schedule to the Device
Once Bell Schedules are created, they are saved to the time clock.
- Click "Save Bell Schedule", and choose Bell Schedule to save from drop down menu.
- Select time clock to save the Bell Schedule to and click "Save Bell Schedule".
Edit Bell Schedule
Click "Edit" icon in corresponding row.
HARDWARE MANAGER
Click “Clock” from toolbar and select “Hardware Manager” from drop down menu. To begin, mark your clock as Active on this screen. This will allow you to make changes and push date and time settings to your time clocks and retrieve punches.
Hardware manager lists all time clocks and devices connected to the network or directly to the computer hosting the software. Time Clock on same network but different subnets (a division within same network) may need to be added. Please refer to "Add Device
Global Settings (Ethernet Time Clock models only)
This feature provides settings automatically configured for any Ethernet time clock discovered by the software. If any time clocks require different options, use “Custom Settings” by clicking “Edit” for each specific time clock.
- Click "Global Setting" to configure options as follows:
o Time Source
o NTP Lookup
o Time Zone
o Daylight Saving Time
o Time Format
Time Settings
o Time Source NTP is checked by default and recommended.
If "NTP" (Network Time Protocol) is checked, the time clock will receive time from one of several predefined public NTP time servers listed in the software.
o NTP Lookup
NTP Lookup Frequency. 24 hours is the default and recommended. Enter time frequency for time clocks to request NTP Server time.
o NTP Servers
Allows user to select or add alternative NTP Servers. Only those servers added may be edited or deleted. To add NTP Server, click "Add NTP Server" and enter requested information.
o Time Zone
Select time zone in which the time clocks are located. If time clocks are located in different time zones, select custom settings for each time clock.
o Daylight Saving
Select DST setting corresponding to selected time zone. If time clocks are located in different time zones with different DST settings, select custom settings.
o Time Format
Time clocks are formatted to AM/PM (regular time). To choose military time, check "Display Time in Military Format". If all time clocks are not using the same time format, select "Custom Settings".
HARDWARE MANAGER Cont.
Keypad Punches (Elite clocks only)
Allows employees to punch in on the keypad of the clock.
You can set keypad limits to only give certain people access.
2. Click "Save & Close".
USB Clock Settings
Configures Time Settings on USB time clocks connected directly to PC running TimeTrax™ software. USB clocks always use custom settings and pick up the time and date directly from your PC. USB clocks are automatically marked as active in the hardware manager.
ADD DEVICE (Time Clock)
This option is used if time clock is on a different subnet or offline in Hardware Manager. By entering an IP Address, the software searches for the time clock and populates additional information once the time clock is discovered. To find the IP address of an Elite Clock, hit F1 and the number 4 key on your clock. To find the IP address of non-Elite clocks, unplug the clock from power and then plug it back in. The IP address will scroll across the screen. Click Add Device and enter the IP Address and hit search. If the clock is discovered, click on SAVE. USB clocks do not have an IP address.
Edit Device
- Click "Edit" icon in corresponding row. (USB time clocks model TTEZ USB may not be edited).
o Device Name
Enter a unique device name. Even if a time clock has Global or Custom setting, the individual device name may still be edited.
o Custom Settings
If specific settings are needed for one device only, select "Custom Settings".
Settings
Time Settings
Defines time source from which this time clock will receive time.
o Time Source
NTP is the default and recommended.
If “NTP” (Network Time Protocol) is checked, the time clock will receive time from one of several predefined public NTP time servers listed in the software.
o NTP Lookup
NTP Lookup Frequency. 24 hours is the default and recommended.
Enter time frequency for this time clock to request NTP Server time.
NTP Servers
Allows user to select or add alternative NTP Servers. Only those servers added may be edited or deleted. To add NTP Server, click "Add NTP Server" and enter requested information.
o Time Zone
Select time zone in which this time clock is located.
o Daylight Saving Tab
Select DST setting corresponding to selected time zone.
o Time Format
Select to display military time format for selected time clock. Clocks are automatically formatted to use AM/PM (regular time).
o Keypad Punch Limits
Un-Supervised Punch Limits
Check “Allow un-supervised keypad entry” if employee is allowed to use keypad. Enter lower and upper range of Employee Numbers allowed to use keypad.
Any numbers outside this range are not allowed to use keypad. If all employees are allowed to use keypad, set lower limit at "1" and upper limit as "99999999".
Job Codes 1
Check "Enable Job Codes" if you have purchased them to track time on specific Jobs.
2. Click "Save".
Delete Device
Before you can delete a device, it must be offline.
To delete a time clock, click "Delete" icon in corresponding row.

^1 Job Codes available as upgrade for Elite Time Clock customers only, by contacting Customer Support at 888.479.7264 Ext.1, 8am-5pmEST, M-F.
TIME CARD
Provides employee punch data, including a snapshot of rules assigned to each employee. View options for employee hours are as follows:
o Punch Details
o Payroll Details
o Filtered Punches
- To access Employee Time Card screen, click "Time Card" icon located on left vertical toolbar or within Employee Profile screen by selecting, "Edit Time Card".
Punch Details
Provides active employee punch data which may be edited, inserted or deleted for all (current, previous, 2 prior) unapproved pay periods. Approved pay periods must be “Un-Approved” to allow changes. Pay periods automatically close after third prior pay period and are available under Archive Reports. It is recommended to approve Time Cards for tracking purposes and exporting to a Payroll Provider.
Each punch status is color-coded as follows:
Black Time clock punches
Green Inserted punches, edited punches, punch comments and corrected Job Codes
Red (x) Deleted time clock punches or invalid Job Codes entered at time clock
Pink Special Pay
Blue Missed punches and Punch Info column
Yellow Shift overrides
Add Punch
Allows manual punch entry to employee time card. Click “Add Punch” or right click on date in In/Out column and select “Insert” to Add Punch. Enter the following data:
Punch Date*
Punch Time*
Time Zone
Department ID*
Job Code (available with upgrade)
Punch Comment (can also be accessed by right-clicking on punch and choosing "comment")
Added punches are shown in “green” on Time Card screen. If employee forgets to clock In/Out, a blue “Missed” message displays in place of punch. To manually enter missed punch, click “Missed” message and add punch information. TimeTrax™ recalculates day and pay period totals after punch is added. Punches may only be added if pay period is not closed (past 3rd prior pay period) and not approved. If an error occurs when adding a punch, delete and re-enter punch.
- Click "Save & Close".
Adding Punches with different Job Codes
If “Added Punch” has a different Job Code then previous punch, TimeTrax™ generates an Out punch for the previous job, and an In punch for the new job codes.
Edit Punch
Edits are performed by double-clicking the punch. The “Edit Punch” screen will display. Punches may only be edited if pay period is not closed (past 3rd prior pay period) and not approved. TimeTrax™ does not allow modifications to be made to Date or Time Zone settings if punches were downloaded from time clock. If these items need to be modified, delete and re-enter punch.
Delete Punch
To delete a punch, right-click punch and select “Delete Punch”. Punches may only be deleted if pay period is not closed (past 3rd prior pay period) and not approved. Deleted time clock punches are indicated by a red “x” and remain visible. Once a punch is deleted, hours are recalculated.
Click "Save & Close".
Special Pay
To enter Special Pay for single employee, right-click on day and select “Add” and “Special Pay”. Special Pay may also be accessed from top toolbar by clicking “Special Pay” and “Add Special Pay”. To enter Special Pay for multiple employees, applied to current, previous or two prior pay periods, refer to “Global Special Pay”. Enter the following data:
Date Range\*
Select "Yes" to apply Special Pay to more than one consecutive day. Select "No" to apply Special Pay to single day only.
Date\*
If "Yes" is selected for Date Range, select the consecutive days to "Apply the Special Pay". Hours entered for Date Range must be for single day (i.e. 8:00 hours). The software automatically duplicates 8 hours to each day within Date Range.
Pay Type\*
Select Pay Type, Vacation, Other.
Hours or Amount (\$)\*
Enter hours (within a single day) or amount associated with Special Pay.
Comments
Enter a comment.
Click "Save & Close".
To view a listing of Special Pay applied to pay period, click "Special Pay" on top toolbar. Special Pay can either be Edited or Deleted from list.
Shift Overrides
Use Shift Overrides when a specific employee is required to work a different shift on specific days within pay period. All rules associated with new shift will apply to employee.
- To enter Shift Override for specific day, right-click the day, select "add" and select "Add Shift Override". Shift Override may also be accessed by clicking "Shift Override" on Time Card screen. Enter the following information:
Date\*
Select date the Shift Override applies to.
Shift\*
Select shift to apply to selected date.
2. Click "Save & Close".
To view a list of Shift Overrides for pay period, click “Shift Override”. Shift Overrides may be edited or deleted from list. Shift Overrides are displayed under “Punch Info” column on Time Card screen.
Approve/Approve & Go Next
Employee time cards should be approved at close of each pay period for punch confirmation and export purposes. The time card must be approved prior to exporting to Payroll Provider. Upon time card approval, the status will change to “Approved”, and the “Approved By” populates with user name.
Time cards may not be modified unless “Un-Approved”. “Approve & Go Next” approves current employee and proceed to next employee time card for approval. TimeTrax™ does not allow current pay period to be approved until all prior pay periods (previous and 2 prior) are approved. Pay periods past the “3rd prior” mark are automatically archived, whether or not they are approved, and may not be edited.
Pay Details
Provides total of regular, overtime and special pay hours worked, including dollar amount. Dollar amount is calculated if employee hourly rate is entered in Employees Profile and/or dollar amount is entered using Special Pay.
Filtered Punches
Displays duplicate punches filtered for selected employee. To activate “Filtered”, click “Administration” from top tool bar and select “Time Card Settings” from drop down menu. Refer to “Time Card Settings”.
GLOBAL SPECIAL PAY
Distributes Special Pay to multiple employees. Select from the following:
Payroll Selection
Select Pay Class and Pay Period.
Employee Selection
Select All Employees, Employees by Group or Employees by Dept.
Special Pay Details
- Date Range Select "Yes" to apply Special Pay to more than one consecutive day. Select "No" to apply Special Pay to single day only.
o Date If "Yes" is selected for Date Range, select the consecutive days to "Apply the Special Pay". Hours entered for Date Range must be for single day (i.e. 8:00 hours). The software automatically duplicates 8 hours to each day within Date Range.
o Pay Type Select Pay Type, Vacation, Other.
Hours or Amount (\$) Enter hours (within a single day) or amount associated with Special Pay.
o Comments Enter a comment.
Do not give Special Pay to employees hired less than Enter days employee must work before special pay can be applied. A hire date must be entered on Employee Profile.
Click "Process Special Pay".
REPORTS
Reports
TimeTrax™ Time and Attendance software generates 24 reports. To access reports, click "Reports", then select report from menu. Reports may also be accessed by clicking "Reports" from left vertical toolbar.
Detail Payroll Report
Combines Payroll Summary Report and Time Card Report with Comments, if selected
Employee Punch Report
Date, Punch In/Out and Punch Information
Hourly Summary Report
Employee #, Employee Name, Total Hours Worked, Regular Hours, Overtime Hours
Payroll Summary Report
Pay Type, Applied As, Hourly Rate, Rate Modifier, Hours, and Amount
Time Card Report
Individual punches, Department, Special Pay, Comments, if selected, Regular and Overtime running totals, and Punch Information
EMPLOYEE INFORMATION REPORTS
Attendance Report
Absent and Missed Punches for selected Pay Period
Birth Date Report
Employee Name, Birthday, Department and Employee Group
Emergency Contact Report
Employee Name, Emergency Contact, Department and Employee Group
Employee Card Report
Employee Name, Card Number, Card Type, Department and Employee Group
Employee Seniority Report
Employee Name, Employee ID, Hire Date and Days Employed
Employee Detail Report
General and Personal information from Employee Profile
Hire Date Report
Employee Name, Hire Date, Re-Hire Date, Department and Employee Group
REPORTS Cont.
Phone Directory Report
Employee Name, Home Phone, Cell Phone, Work Phone, Department and Employee Group
Supervisor Card Report
Employee Name, Supervisor Card #, Department and Employee Group
Termination Report
Employee Name, Termination Date, Termination Reason, Employee Status, Department and Employee Group
DEPARTMENT REPORTS
Department Hours Report
Department ID, Department Description, Regular, Overtime, other and Subtotals
Department List Report
Department ID and Department Description
ARCHIVE REPORTS
Detail Payroll Report
Combines Payroll Summary Report with Time Card Report
Employee Punch Report
Date, Punch In/Out and Punch Information
Hourly Summary Report
Employee #, Employee Name, Total Hours Worked, Regular Hours, Overtime Hours
Payroll Summary Report
Pay Type, Applied As, Hourly Rate, Rate Modifier, Hours, and Amount
Time Card Report
Individual punches, Department, Special Pay, Comments, if selected, Regular and Overtime running totals and Punch Information
Department Hours Report
Department Description, Department ID, Regular Hours, Overtime (1.5), Overtime (2), Other and Subtotals
Attendance Report
Absent and Missed Punches for selected dates
JOB CODE REPORTS
Job Codes Reports are available with Job Code upgrade purchase. To purchase, contact Customer Support at 888.479.7264 Ext. 1, 8am-5pmEST, M-F.
Time Card with Job Codes Report (Included in Archive Report list)
Individual punches, Job Code ID, Clocked Job #, Special Pay, Comments, if selected, Regular and Overtime running totals and Punch Information
Job Code Hours by Department (Included in Archive Report list)
Department, Clock Job #, Job Code ID, Hours and Totals
Job Code by Employee
Employee Name, Job Code ID, Clock Job # and Department
Job Code List Report
Job Code ID's, Job Code Descriptions, Clock Job Number and Department
ARCHIVE V4 REPORT
Archive V4 Report
All approved data imported by TimeTrax Version 4 customers.
Report Options
Upon selecting a report, the system will provide reporting options as follows:
o Pay Class
Select to include Inactive and Terminated Employees
Include Comments
o Pay Period or Date Start/End Selection (for Archive Reports only)
o Employee Selection
Select All Employees in Selected Pay Class or specific employees
Select Employees by Group
Employees by Department
Click "Run Report". Once report is generated, "Export As" enables reports to be opened in selected file format.
EXPORT
Sends payroll data to listed payroll provider. Please verify information required by your Payroll Provider before processing an export. Below is a list of supported Payroll Providers:
o ADP
o Fidelity
o Generic Text
o Heartland
o PayChex Preview
o PayChoice
o ProData Evolution
o Intuit QuickBooks
Payroll
To access Payroll, click "Export" from top tool bar, then select "Payroll" from drop down menu. Payroll may also be accessed by clicking "Payroll" icon on vertical tool bar.
Payroll Selection
Select Pay Class and Pay Period to be exported
Employee Selection
Pay Class
Employee Groups
Department
Employee names are populated for export based on selections. To remove employee from export, un-select employee name.
o Export
Export Format
Select Payroll Provider from drop down menu. All time cards for pay period must be approved prior to export to Payroll Provider.
Setup Export
Select for initial export. Enter all information required by Payroll Provider.
Click "Save & Close".
Run Export
Recommended only if Setup Export completed and required data is entered for Payroll Provider.
DOWNLOAD PAYROLL
Provides a list of all created export files which can be selected for download.
Click "Export".
ADP Export Setup
Click "Payroll" icon from left tool bar. Enter the following data to generate an Export:
Payroll Selection
Select Pay Class and Pay Period
Employee Selection
Select Employees by Pay Class, Employee Group or Department
Export To
Select "ADP" from drop down menu and click "Setup Export"
Please consult with ADP for information needed to properly generate an Export. Time Cards for specified pay period must be "Approved" before Exporting to Payroll Provider.
text_image
ADP Payroll Options Save Save & Close Close Header Visible Delimiter Comma Quoted- Select "Header Visible".
- Choose "Comma", "Semi-Colon" or "Tab" for Delimiter.
- Select "Quoted".
- Click "Save & Close".
- Click "Run Export".
- Click "Export" from top toolbar.
- Click "Download Payroll". The Download Payroll screen provides a list of files for selection to download to a specified location.
Fidelity Export Setup
Click "Payroll" icon from left tool bar. Enter the following data to generate an Export:
Payroll Selection
Select Pay Class and Pay Period
Employee Selection
Select Employees by Pay Class, Employee Group or Department
Export To
Select "Fidelity" from drop down menu and click "Setup Export"
Please consult with Fidelity for information needed to properly generate an Export. Time Cards for specified pay period must be "Approved" before Exporting to Payroll Provider.
text_image
Fidelity Payroll Options Save Save & Close Close Header Visible Delimiter Comma Quoted Regular Hours REG WK Overtime 1.5 Hours OT15 WK Overtime 2.0 Hours OT15 WK Vacation Hours VAC Sick Hours SICK Holiday Hours Holiday Bereavement Hours Other Jury Duty Other- Select "Header Visible".
- Choose "Comma", "Semi-Colon" or "Tab" for Delimiter.
- Select "Quoted".
- Click "Regular Hours Code".
- Click "Overtime Hours Code".
- Click "Double Time Hours Code".
- Click "Vacation Hours Code".
- Select "Sick Hours Code".
-
Select "Holiday Hours Code".
-
Select "Bereavement Hours Code".
- Select "Jury Duty Hours Code".
- Click "Save & Close".
- Click "Run Export".
- Click "Export" from top toolbar.
- Click "Download Payroll". The Download Payroll screen provides a list of files for selection to download to a specified location.
Generic Export Setup
Click "Payroll" icon from left tool bar. Enter the following data to generate an Export:
Payroll Selection
Select Pay Class and Pay Period
Employee Selection
Select Employees by Pay Class, Employee Group or Department
Export To
Select "Generic" from drop down menu and click "Setup Export"
Time Cards for specified pay period must be "Approved" before exporting.
text_image
Generic Text Payroll Options Save Save & Close Close Header Visible ✓ Delimiter Comma ✓ Quoted □- Select "Header Visible".
- Choose "Comma", "Semi-Colon" or "Tab" for Delimiter.
- Select "Quoted".
- Click "Save & Close".
- Click "Run Export".
- Click "Export" from top tool bar.
- Click "Download Payroll". The Download Payroll screen provides a list of files for selection to download to a specified location.
Heartland Export Setup
Click "Payroll" icon from left tool bar. Enter the following data to generate an Export:
Payroll Selection
Select Pay Class and Pay Period
Employee Selection
Select Employees by Pay Class, Employee Group or Department
Export To
Select "Heartland" from drop down menu and click "Setup Export"
Please consult with Heartland for information needed to properly generate an Export. Time Cards for specified pay period must be "Approved" before Exporting to Payroll Provider.
text_image
Heartland Payroll Options Save Save & Close Close Export Hours- Select "Hours" or "Pay" for Export.
- Click "Save & Close".
- Click "Run Export".
- Click "Export" from top tool bar.
- Click "Download Payroll". The Download Payroll screen provides a list of files for selection to download to a specified location.
PayChex Preview Export Setup
Click "Payroll" icon from left tool bar. Enter the following data to generate an Export:
Payroll Selection
Select Pay Class and Pay Period
Employee Selection
Select Employees by Pay Class, Employee Group or Department
Export To
Select "PayChex Preview" from drop down menu and click "Setup Export"
Please consult with PayChex Preview for information needed to properly generate an Export. Time Cards for specified pay period must be "Approved" before Exporting to Payroll Provider.
text_image
PayChex Preview Payroll Options Save Save & Close Close Export Hours- Select "Hours" or "Pay" for Export.
- Click "Save & Close".
- Click "Run Export".
- Click "Export" from top tool bar.
- Click "Download Payroll". The Download Payroll screen provides a list of files for selection to download to a specified location.
PayChoice Export Setup
Click "Payroll" icon from left tool bar. Enter the following data to generate an Export:
Payroll Selection
Select Pay Class and Pay Period
Employee Selection
Select Employees by Pay Class, Employee Group or Department
Export To
Select "PayChoice" from drop down menu and click "Setup Export"
Please consult with PayChoice for information needed to properly generate an Export. Time Cards for specified pay period must be "Approved" before Exporting to Payroll Provider.

text_image
PayChoice Payroll Options Save Save & Close Close Export Hours- Select "Hours" or "Pay" for Export.
- Click "Save & Close".
- Click "Run Export".
- Click "Export" from top tool bar.
- Click "Download Payroll". The Download Payroll screen provides a list of files for selection to download to a specified location.
Intuit QuickBooks® Requirements
o Intuit QuickBooks ^® and TimeTrax ^™ must be installed on same computer.
o Intuit QuickBooks Premier, Pro® or Enterprise.
o User must be administrator on the PC, TimeTrax™ and Intuit QuickBooks®.
o Intuit QuickBooks ^® must be in single user mode.
o All employees require an Employee ID in Intuit QuickBooks®.
Before exporting employees you must set up Company, Pay Class and Employee Groups in TimeTrax™ and a Payclass must be attached to Employee Group.
QUICKBOOKS® SETUP
Prior to initial export of payroll data into Intuit QuickBooks ^® , the following steps must be completed in QuickBooks ^® . If setup is complete, please proceed to page 60 for Export information.

text_image
Preferences My Preferences Company Preferences You can manage all applications that interact with this QuickBooks company file here. Don't allow any applications to access this company file Notify the user before running any application whose certificate has expired APPLICATIONS THAT HAVE PREVIOUSLY REQUESTED ACCESS TO THIS COMPANY FILE ALLOW ACCESS : APPLICATION NAME: Properties... Remove Reauthorize Learn about applications that integrate with QuickBooks OK Cancel Help Default Also See: General Service Connection Calendar Checking Desktop View Finance Charge General Integrated Applications Items & Inventory Jobs & Estimates Multiple Currencies Payments Payroll & Employees Reminders Reports & Graphs Sales & Customers Sales Tax Search Send Forms Service Connection Spelling Tax: 1099 Time & Expenses- To allow TimeTrax™ access to QuickBooks®, open QuickBooks®, click "Edit" and select "Preferences" from drop down menu.
- Click "Integrated Applications".
- Click "Company Preferences".
- Check "Notify the User before running any application whose certificate has expired".
- Click "OK".
- To turn on "Time Tracking" in QuickBooks® for all employees, click "Edit" and select "Preferences" from drop down menu.
- Click "Time Tracking" or "Time & Expenses".
QUICKBOOKS® SETUP
text_image
Preferences Calendar Checking Desktop View Finance Charge General Integrated Applications Items & Inventory Jobs & Estimates Multiple Currencies Payments Payroll & Employees Reminders Reports & Graphs Sales & Customers Sales Tax Search Send Forms Service Connection Spelling Tax: 1099 Time & Expenses My Preferences Company Preferences TIME TRACKING Do you track time? Yes No First Day of Work Week Monday Mark all time entries as billable INVOICING OPTIONS Track reimbursed expenses as income Mark all expenses as billable Default Markup Percentage 0.0% Default Markup Account OK Cancel Help Default Also See: General Sales and Customers Jobs and Estimates- Click "Company Preferences".
- Under "Do you track time?" Select "Yes".
- Select "First Day of Work Week" from drop down menu
- Click "OK".
To turn on "Time Tracking" for specific employees, double click on Employee from the Employee Center screen.
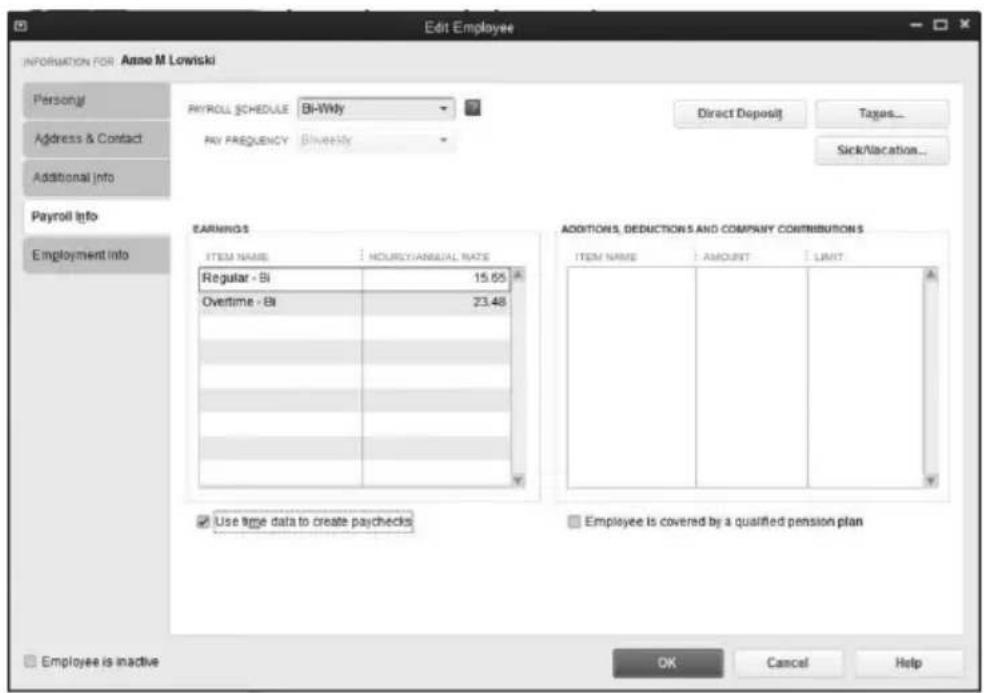
text_image
Edit Employee INFORMATION FOR Anne M Loviski Personal Address & Contact Additional Info Payroll Info Employment Info PAYROLL SCHEDULE BI-Wlly PAY FREQUENCY Bivestly Direct Deposit Tages... Sick/Location... EARNINGS ITEM NAME HOURLY/ANNUAL RATE Regular - Bi 15.65 Overtime - Bi 23.48 Use time data to create paychecks ADDITIONS, DEDUCTIONS AND COMPANY CONTRIBUTIONS ITEM NAME AMOUNT LIMIT Employee is covered by a qualified pension plan OK Cancel Help- Click "Payroll Info" tab.
QUICKBOOKS® SETUP
- Check "Use time data to create pay checks". This box must be checked for employees whose hours will be exported into QuickBooks®.
- Click "OK". Repeat process for all employees listed in QuickBooks®.
TimeTrax™/QuickBooks® Interface Setup
- To Sync/Export hours into Quickbooks ^® , open QuickBooks program. Click on QB Interface icon.
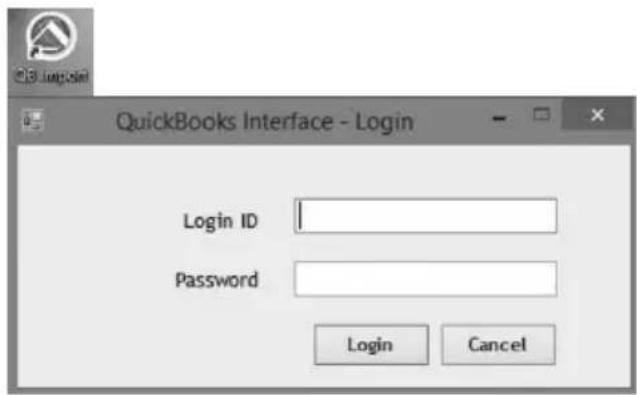
text_image
QuickBooks Interface - Login Login ID Password Login Cancel- Open TimeTrax™ and enter Login ID "ADMIN".
- Enter Password "PTI".
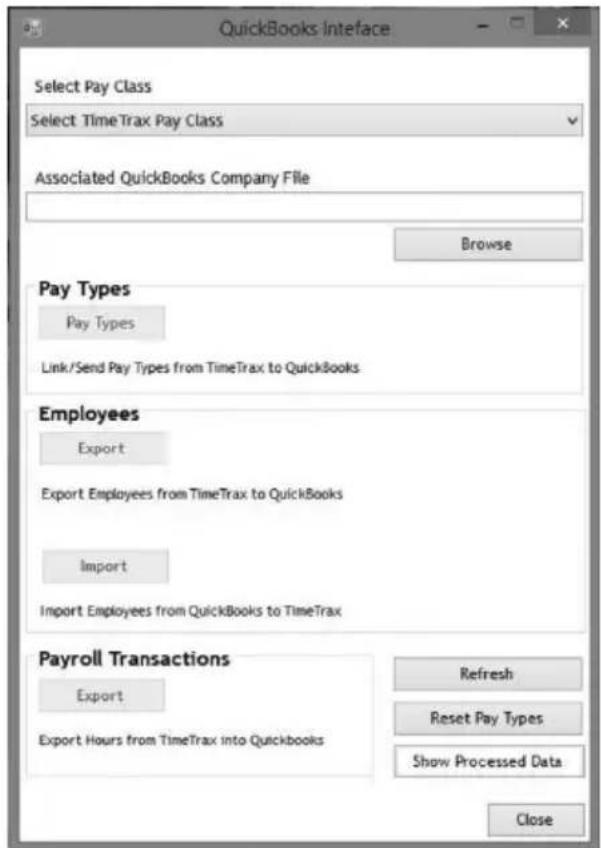
text_image
Select Pay Class Select TimeTrax Pay Class Associated QuickBooks Company File Browse Pay Types Pay Types Link/Send Pay Types from TimeTrax to QuickBooks Employees Export Export Employees from TimeTrax to QuickBooks Import Import Employees from QuickBooks to TimeTrax Payroll Transactions Export Export Hours from TimeTrax into Quickbooks Refresh Reset Pay Types Show Processed Data CloseQUICKBOOKS® SETUP
- "Select Pay Class" from drop down menu.
- "Select Pay Type".
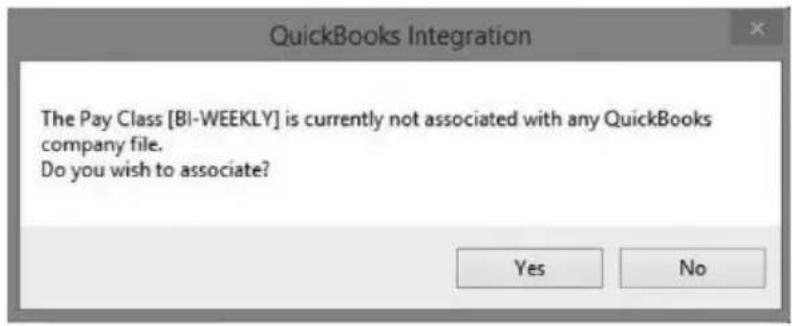
text_image
QuickBooks Integration The Pay Class [BI-WEEKLY] is currently not associated with any QuickBooks company file. Do you wish to associate? Yes No- Click "Yes" on QuickBooks® Integration screen. This will associate the "Selected Pay Class" with the QuickBooks® company file.
- Verify Integration Requirements are completed and click "Continue".
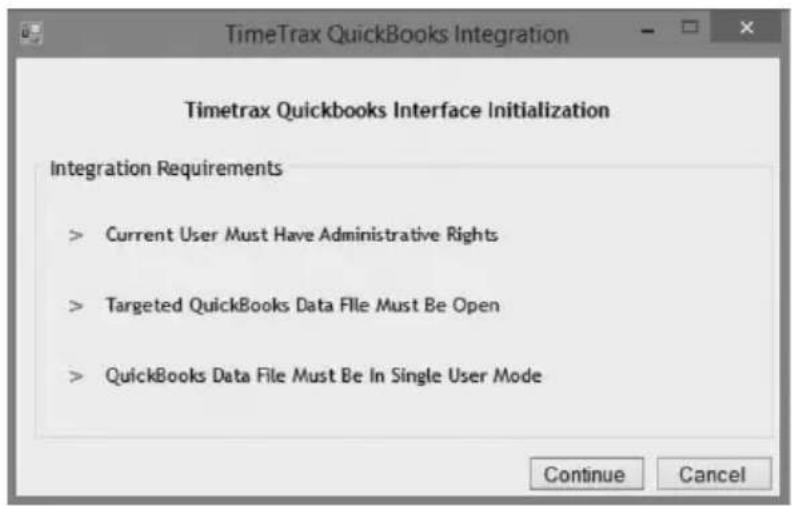
text_image
TimeTrax QuickBooks Integration Timetrax Quickbooks Interface Initialization Integration Requirements > Current User Must Have Administrative Rights > Targeted QuickBooks Data File Must Be Open > QuickBooks Data File Must Be In Single User Mode Continue Cancel
Data exported is associated with "TimeTrax® Integration screen. This will associate the "Selected Pay Class" with the QuickBooks® company file.
QUICKBOOKS® SETUP
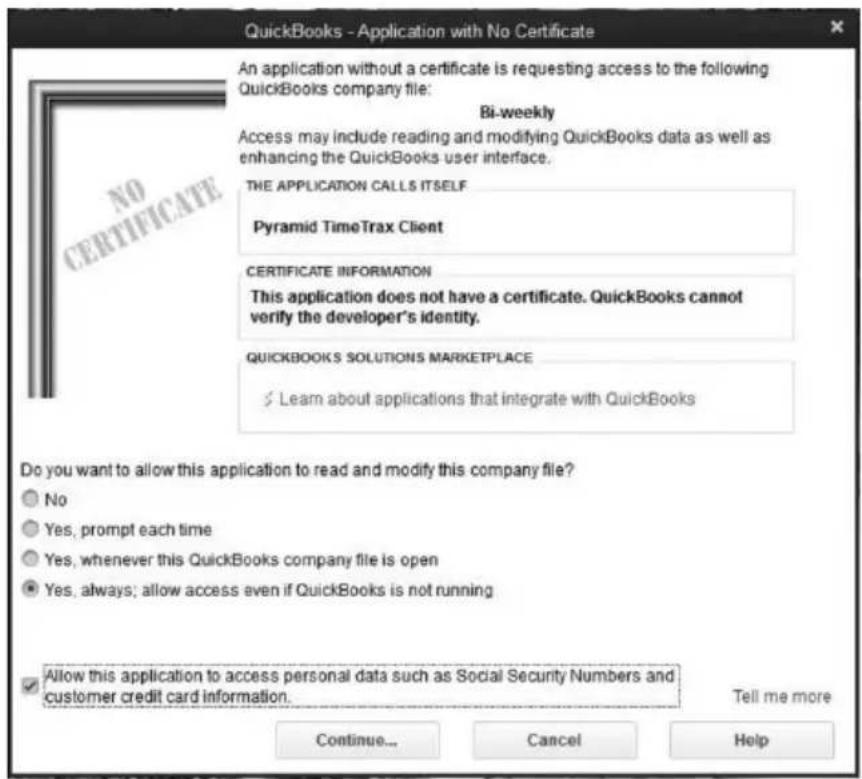
text_image
QuickBooks - Application with No Certificate An application without a certificate is requesting access to the following QuickBooks company file: Bi-weekly Access may include reading and modifying QuickBooks data as well as enhancing the QuickBooks user interface. THE APPLICATION CALLS ITSELF Pyramid TimeTrax Client CERTIFICATE INFORMATION This application does not have a certificate. QuickBooks cannot verify the developer's identity. QUICKBOOKS SOLUTIONS MARKETPLACE Learn about applications that integrate with QuickBooks Do you want to allow this application to read and modify this company file? No Yes, prompt each time Yes, whenever this QuickBooks company file is open Yes, always; allow access even if QuickBooks is not running Allow this application to access personal data such as Social Security Numbers and customer credit card information. Tell me more Continue... Cancel Help- Click "Yes, Always allow access even if QuickBooks is not running".
- Login as "Select User" (multi-user for QB option only)
- Check "Allow this application to access personal data such as Social Security Numbers and customer credit card information".
- Click "Continue".
- Click "Yes" to confirm.
- Click "Done" on Access Confirmation screen
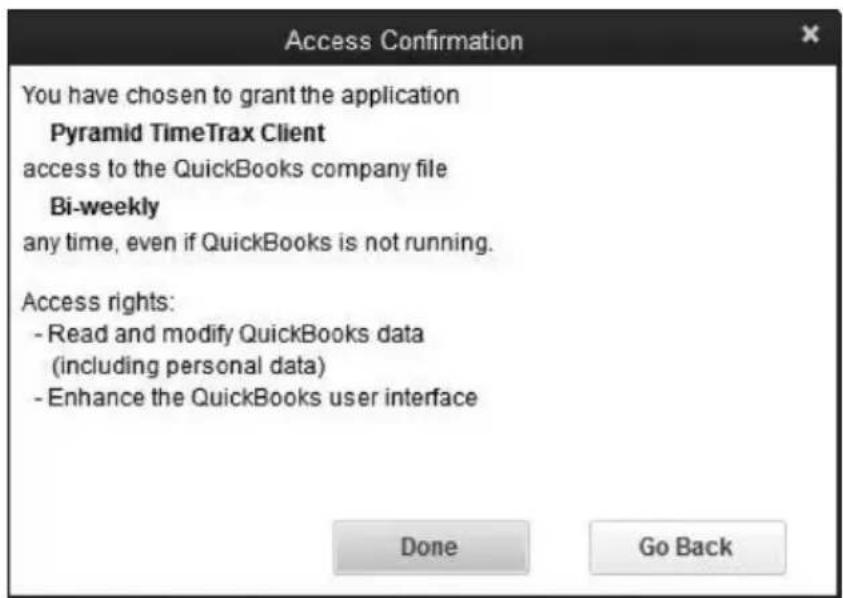
text_image
Access Confirmation You have chosen to grant the application Pyramid TimeTrax Client access to the QuickBooks company file Bi-weekly any time, even if QuickBooks is not running. Access rights: - Read and modify QuickBooks data (including personal data) - Enhance the QuickBooks user interface Done Go BackQUICKBOOKS® SETUP
QUICKBOOKS® INTERFACE
- “Pay Types” To choose an option to send new TimeTrax™ Pay Types to QuickBooks® or to associate Pay Types used in TimeTrax™ with existing Item Names used in QuickBooks® ^1 .
- Click "Process" to export Pay Types.
- Click "OK".
- Select option to either "Export new employees from TimeTrax™ to QuickBooks®" or "Import employees from QuickBooks® into TimeTrax™". We recommend that you import your employees from Quickbooks to TimeTrax.
- Click "Process" to export Employees.
QUICKBOOKS® EXPORT (in TimeTrax™)
- Click "Payroll" icon on left tool bar.
- Select "Pay Class" and "Pay Period".
- Select Employees by Pay Class, Employee Groups or Department.
- Select "QuickBooks®" from drop down menu.
- Click "Run Export". Click "OK".
- Click "QB Interface" icon on desktop and Log Into TimeTrax™ using, Login ID: "Admin" and Password "PTI". Reselect Pay Class.
- Under "Payroll Transactions" click, Export TimeTrax™ hours into QuickBooks®. QB SDK doesn't accept monetary amounts. It only accepts hours.
- Click "Process" to export Worked Hours.
- Click "OK".

USING SWIPE CARD TIME CLOCK
TTEZ, TTEZEK, PSDLAUBKK
Swipe card in the swipe channel from top to bottom.
If employee card number is successfully read, the time clock terminal will beep and the card number will be displayed briefly on terminal screen.
Employee punches generated from swipe card are stored within the terminal. Punches are automatically downloaded into the software every few minutes as long as the clock has been marked as active under Clocks/Hardware Manager.
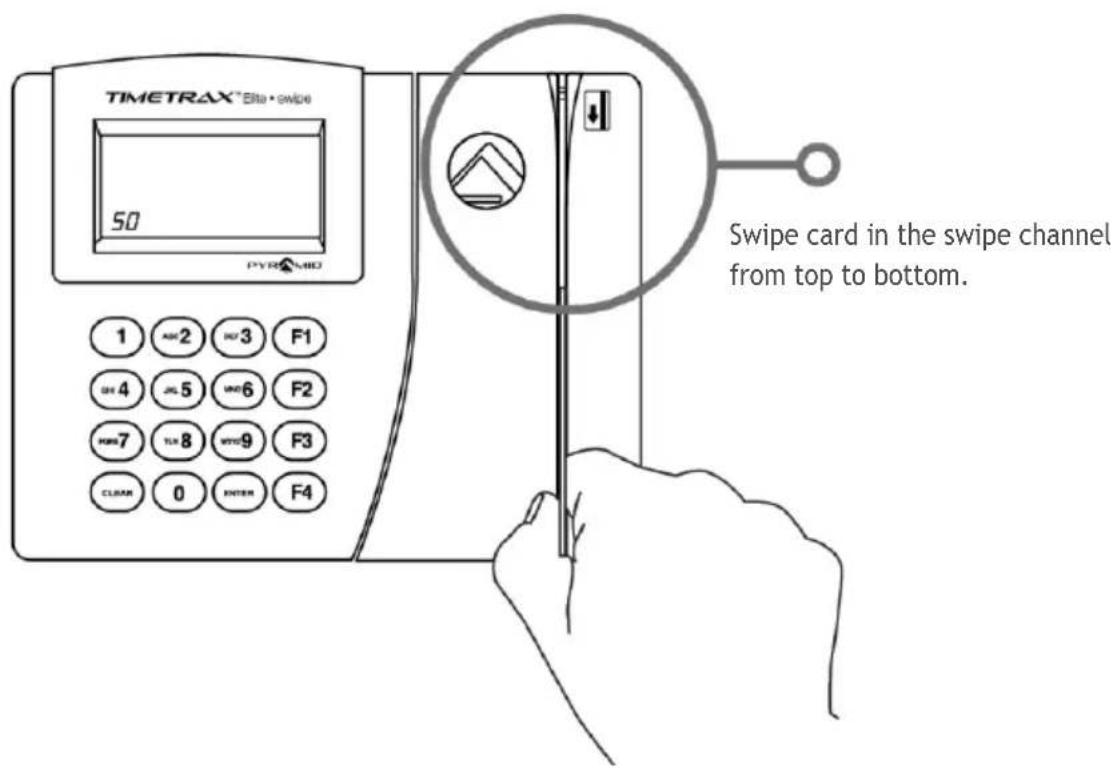
text_image
TIMETRAX™ EBI • SWIDE 50 PYRKMBO 1 A42 2 H43 F1 GH 4 JL 5 W46 F2 KWH 7 TLX 8 WYD 9 F3 CLAM 0 ENTER F4 Swipe card in the swipe channel from top to bottom.USING PROXIMITY TIME CLOCK
PPDLAUBKN, TTPROXEK
Wave prox badge within two inches of target area.
If employee badge number is successfully read, the time clock terminal will beep and the badge number will be displayed briefly on terminal screen.
Punches are automatically downloaded into the software every few minutes as long as the clock has been marked as active under Clocks/Hardware Manager.
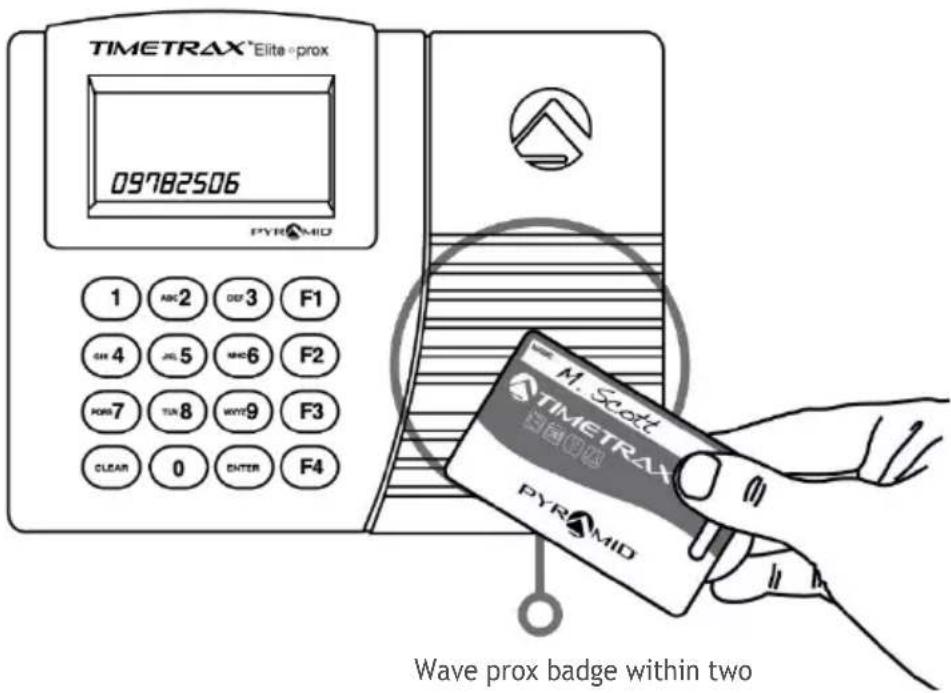
text_image
TIMETRAX®Elite-prox 09782506 PYRAMID 1 ABC 2 DEF 3 F1 GK 4 JGL 5 AMC 6 F2 HOS 7 TUR 8 WHITE 9 F3 CLEAR 0 ENTER F4 M. SCOT TIMETRAX® PYRAMID Wave prox badge within twoWave prox badge within two inches of the target area.
USING BIOMETRIC TIME CLOCK
TTELITEEK
IMPORTANT: Before using time clock, please register employee finger scans at the terminal. To access instructions, click "Help" from main toolbar, or click "F1" for help on a specific screen. Please reference "FINGERSCAN REGISTRATION (TTELITEEK) section.
Place finger on red lit finger pad.
If employee finger scan is successfully read, the red light will briefly go out, the time clock terminal will beep and the employee number will be displayed on terminal screen.
Employee punches generated from finger scans are stored within the terminal.
Punches are automatically downloaded into the software every few minutes as long as the clock has been marked as active under Clocks/Hardware Manager.
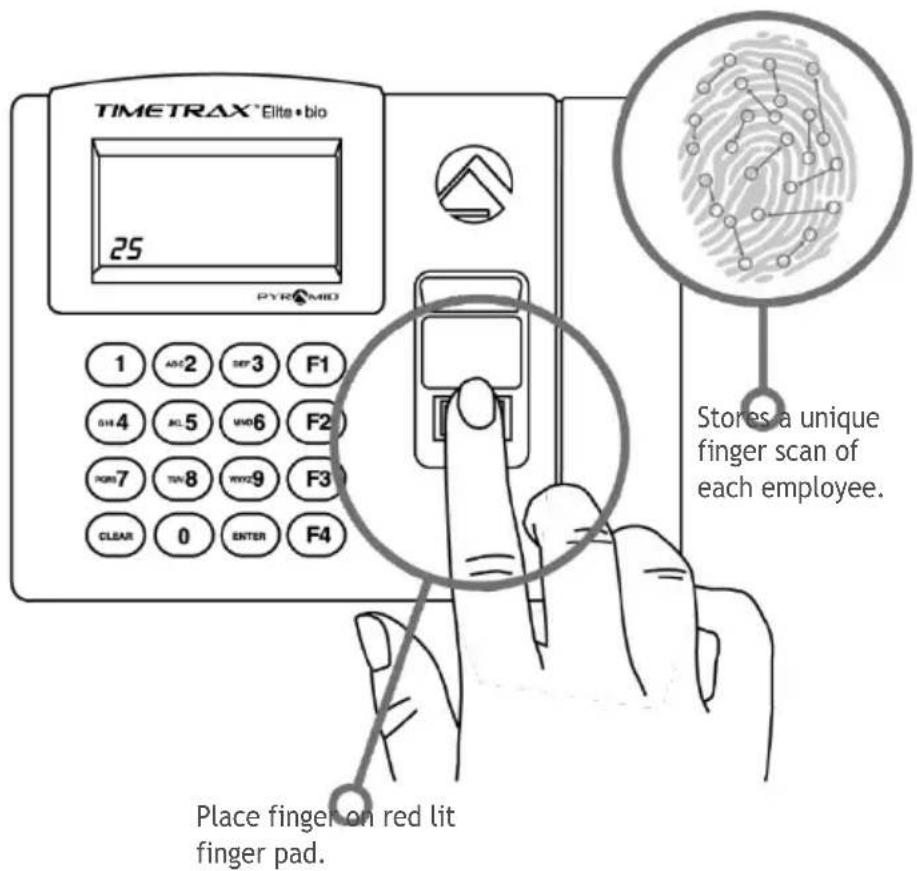
text_image
TIMETRAX®Elite • bio 25 PYRAMID 1 AM 2 SEP 3 F1 SH 4 AL 5 UND 6 F2 SND 7 TIN 8 WTO 9 F3 CLEAR 0 ENTER F4 Place finger on red lit finger pad. Stores a unique finger scan of each employee.DIAGNOSTIC MODE - TIMETRAX ELITE TERMINALS
For troubleshooting purposes, you may use the diagnostic mode on the TimeTrax™ terminals to gather the following information (PSDLAUBKK, TTPROXEK, TTELITEEK)
F1 + 1 KEYS: Displays firmware version
F1 + 2 KEYS: Displays the user defined terminal name
F1 + 3 KEYS: Displays the MAC address of the terminal
F1 + 4 KEYS: Displays the IP address of the terminal
F1 + 5 KEYS: Displays the uptime or the time that the unit has been running without loss of power
F1 + 6 KEYS: Displays the number of punches that have not been downloaded
UPGRADES
Features
Displays standard and upgrade features available for purchase. Contact Customer Support at 888.479.7264, 8am-5pmEST, M-F or visit pyramidtimesystems.com, to easily upgrade software features.
Employee Count
Displays total number of employee licenses and number of active employees. Contact Customer Support at 888.479.7264 Ext. 1, 8am-5pmEST, M-F or visit pyramidtimesystems.com, to easily increase employee count.
TROUBLESHOOTING
For troubleshooting information, visit pyramidtimesystems.com or call Customer Support at 888.479.7264 Ext. 1, 8am-5pmEST, M-F.
SIMPLE: SMART®

CONTACT US:
For more information, visit pyramidtimesystems.com or call our technical support team at 888.479.7264 during regular business hours: 8am-5pm EST, Monday-Friday.