
P25W v2 - Laptop GIGABYTE - Free user manual and instructions
Find the device manual for free P25W v2 GIGABYTE in PDF.


| Product Type | Laptop (Notebook) |
| Brand | GIGABYTE |
| Model | P25W v2 |
| Processor | Intel Core (varies by configuration) |
| Display | 15.6-inch (approximate) |
| Memory | Up to 32 GB DDR3 (2 slots) |
| Storage | 1x 2.5" SATA HDD/SSD + 1x mSATA SSD |
| Optical Drive | DVD±RW (optional Blu-ray) |
| Graphics | NVIDIA GeForce GTX (varies by configuration) |
| Ports | 1x VGA, 1x HDMI, 1x eSATA/USB Combo, 2x USB 3.0, 1x Ethernet, 1x Headphone, 1x Microphone, 1x SD Card Reader |
| Wireless | 802.11 b/g/n, Bluetooth 4.0 |
| Webcam | 1.3 MP (approximate) |
| Audio | Stereo speakers + Woofer, 2 microphones |
| Battery | Removable lithium-ion, capacity varies (approx. 4400 mAh) |
| Power Adapter | AC adapter, 120W (approximate), DC-in on left side |
| Keyboard | Backlit keyboard |
| Hotkeys | Fn+ F1-F12 for sleep, Wi-Fi, brightness, display toggle, touchpad, speaker, volume, Bluetooth, webcam, etc. |
| Operating System | Windows 7/8/8.1 (preinstalled on some models) |
| Software | GIGABYTE Smart Manager, Smart Setup, Smart Recovery |
| Dimensions | Approximately 38.0 x 26.0 x 3.5 cm |
| Weight | Approximately 2.7 kg |
Frequently Asked Questions - P25W v2 GIGABYTE
User questions about P25W v2 GIGABYTE
0 question about this device. Answer the ones you know or ask your own.
Ask a new question about this device
Download the instructions for your Laptop in PDF format for free! Find your manual P25W v2 - GIGABYTE and take your electronic device back in hand. On this page are published all the documents necessary for the use of your device. P25W v2 by GIGABYTE.
USER MANUAL P25W v2 GIGABYTE
natural_image
Two black and a yellow gigabyte laptop models displayed against a dark background (no text or symbols visible on the devices themselves)Congratulations on your purchase of the GIGABYTE Notebook!
This Manual will help you to get started with setting up your notebook. For more detailed information, please visit our website at http://www.gigabyte.com. All specifications are subject to the manufacturer's configuration at the time of shipping and may change without prior notice, written or otherwise.
Using GIGABYTE Notebook for the First Time
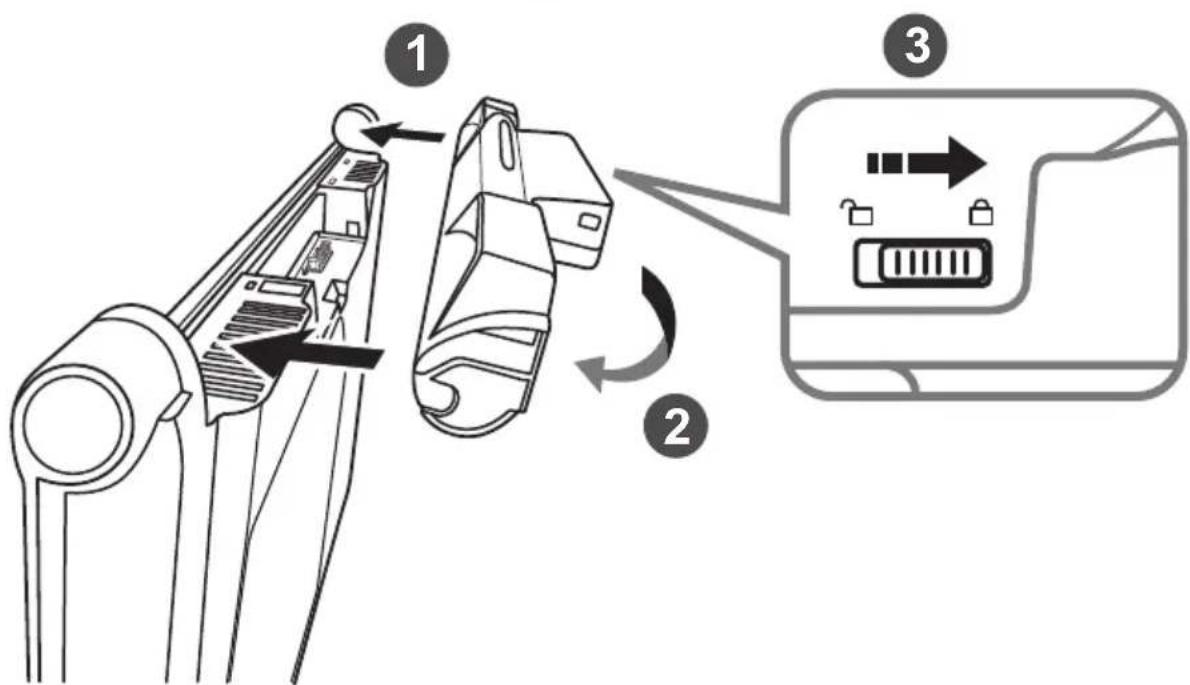
To install the battery please follow these steps:
1 Target the battery's direction into the tenon-mortise.
2 Circulate the battery downwards until hearing the "snap" sound to lock the battery.
3 Remember to slide the switch to the "Lock" position.
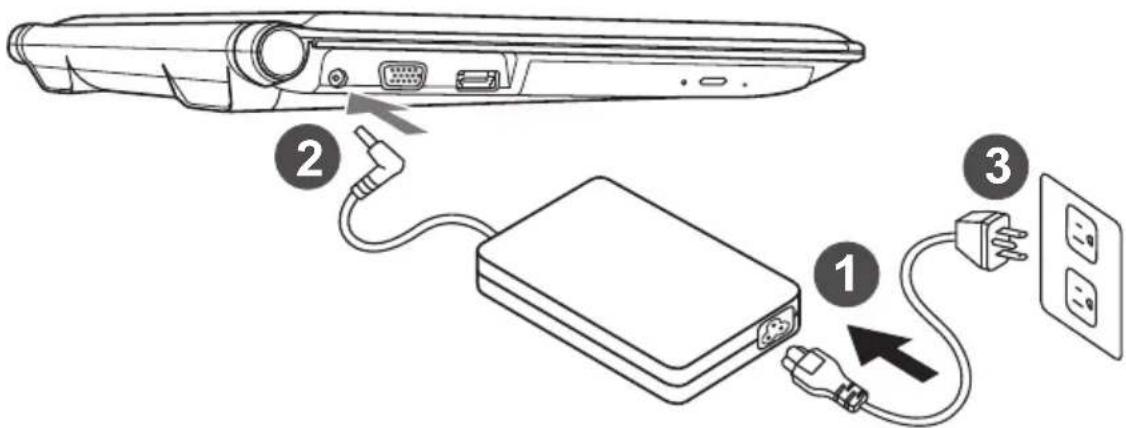
1 Connect the power cord to the AC adapter.
2 Connect the AC adapter to the DC-in jack on the left side of the notebook.
3 Connect the power cord to the power outlet.
natural_image
Line drawing of a laptop with a hand inserting a cable into the screen (no text or symbols)Switching on the Power :
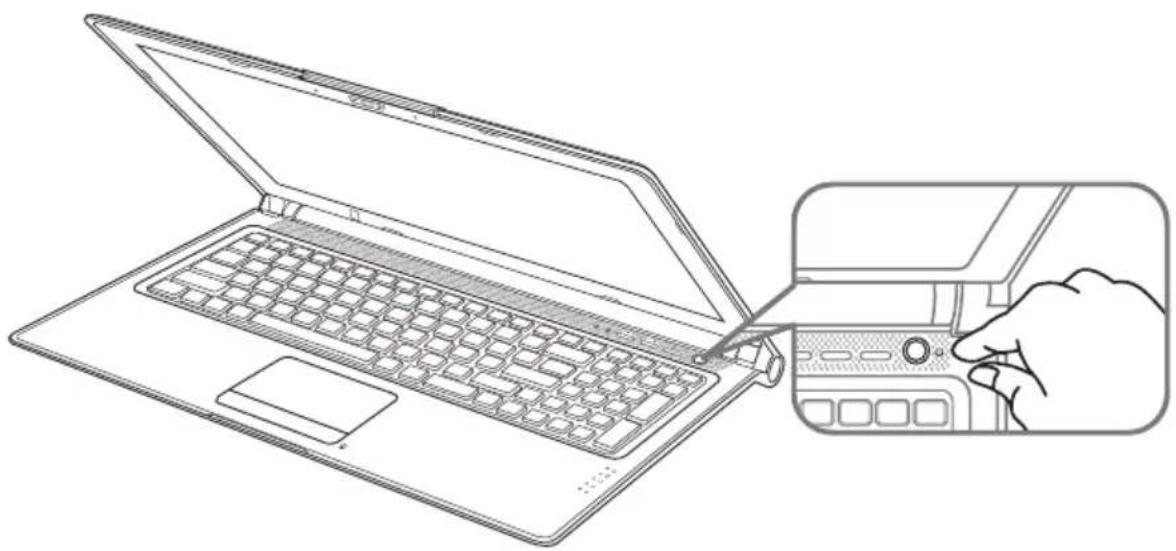
After you turn on the Notebook for the very first time, do not turn it off until the operating system has been configured. Please note that the volume for the audio will not function until Windows ® Setup has completed.
Booting Up the Notebook for the First Time :
Depending on your configuration, the Microsoft ^® Windows ^® Boot Screen will be the first screen that you will see as the notebook starts up. Follow the on-screen prompts and instructions and enter your personal information to complete the setup of the Windows ^® Operating System.
Top & Front View
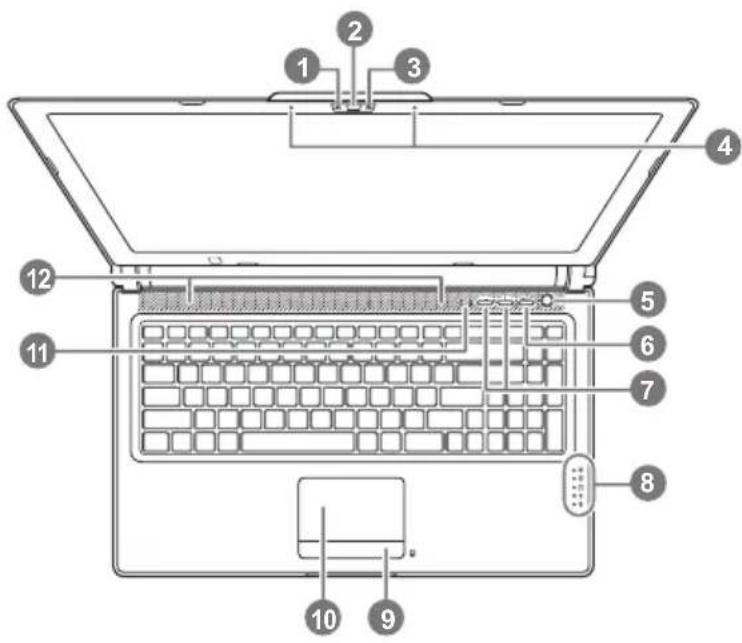
Left View
1 Webcam Status LED indicator
2 Webcam
3 Light sensor
4 Microphone x 2
5 Power Button
6 Smart + Button ①
7 Volume Setting
8 LED Indicators ②
9 Battery Indicator Button ③
10 TouchPad
11 Num Lock & Caps Lock Indicator
12 Stereo speakers
① To call out smart manager function.
- Smart Setup: Under off condition, Push "Smart ^+ " to enter "Smart Setup" menu in off mode. You can choose BIOS Setup Utility, Smart Recovery in the setup menu.
- Smart Manager: In Windows® Mode Press "Smart" button to initiate "Smart Manager".
② Power Status LED
Battery Status LED
HDD Status LED
Wireless Lan Status LED
Bluetooth Status LED
③ The LED indicators will show the battery capacity status when battery is inserted in power off mode. 5 indicator lights on indicates that the battery capacity is 100%. Only 1 indicator light on indicates that the remaining battery capacity is 20%.
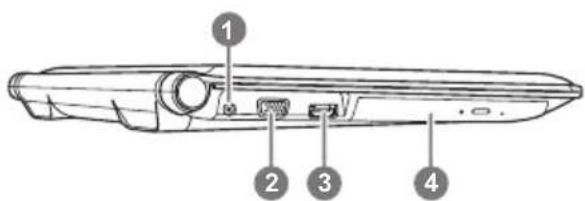
1 DC-in Jack
2 External Display (VGA) Port
3 eSATA/USB Combo
4 Optical Disc Drive
Right View
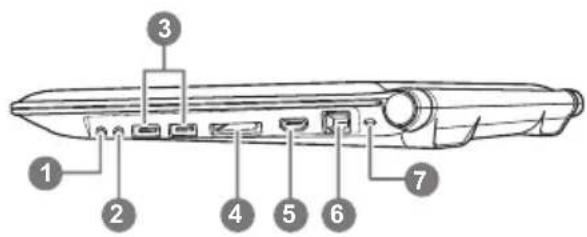
1 Microphone Jack
2 Headphone Jack
3 USB Port x 2
4 Secure Digital Card Reader
5 HDMI Port
6 Ethernet Port
7 Kensington Lock Slot
Rear & Bottom View
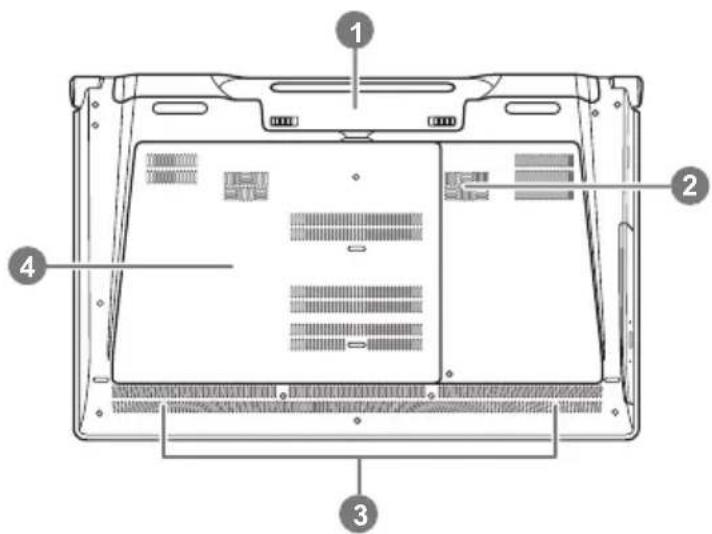
1 Battery Bay
2 Woofer Speaker
3 Stereo Speakers
4 Hard Disk Bay/Memory Bay
Hotkeys
The computer employs hotkeys or key combinations to access most of the computer's controls like screen brightness and volume output. To activate hotkeys, press and hold the
| Hotkey | Function Description | |
Fn+F1 | Sleep Put the computer in Sleep mode. | |
Fn+F2 | Wireless LAN Enables/disable the Wireless LAN function. | |
Fn+F3 | Brightness Down Decrease the screen brightness. | |
Fn+F4 | Brightness Up Increase the screen brightness. | |
Fn+F5 | Display Toggle | Switch display output between the display screen, external monitor (if connected) and both. |
Fn+F6 | Touchpad Toggle Turn the internal touchpad on and off. | |
Fn+F7 | Speaker Toggle Turn the speaker on and off. | |
Fn+F8 | Volume Down Decrease the sound volume. | |
Fn+F9 | Volume Up Increase the sound volume. | |
Fn+F10 | N/A There is no function for this model. | |
Fn+F11 | Bluetooth Enable/disable the Bluetooth function. | |
Fn+F12 | Webcam Turn the internal webcam on and off. | |
Fn+▲▼◀▶  | Playback Media Playback control. | |
Fn+Esc | Screen Toggle | Turn the screen on and off. |
Fn+Escape | ODD Tray Quit | To quit the ODD tray instantly. |
| Fn+Space | KeyboardBacklight Toggle | Turn the keyboard backlight on and off. |
⑤ This function is limited to the keyboard which has backlight.
GIGABYTE Software Application
■ GIGABYTE Smart Manager
You can activate GIGABYTE Smart Manager by double clicking on the shortcut icon on the desktop if the machine you purchased has the operation system built-in. GIGABYTE Smart Manager is an icon-based control interface, enabling users to intuitively access common system setup as well as GIGABYTE exclusive utilities. Please be noted that the GIGABYTE Smart Manager interface, icons, utilities and software versions may vary based on the purchased models. Please operate GIGABYTE Smart Manager according to the actual version built-in.
■ GIGABYTE Smart Setup
During the off mode, press Smart ^+ Button to enter "Smart Setup" menu. You can choose BIOS Setup Utility, Smart Recovery, and other functions in this setup menu.
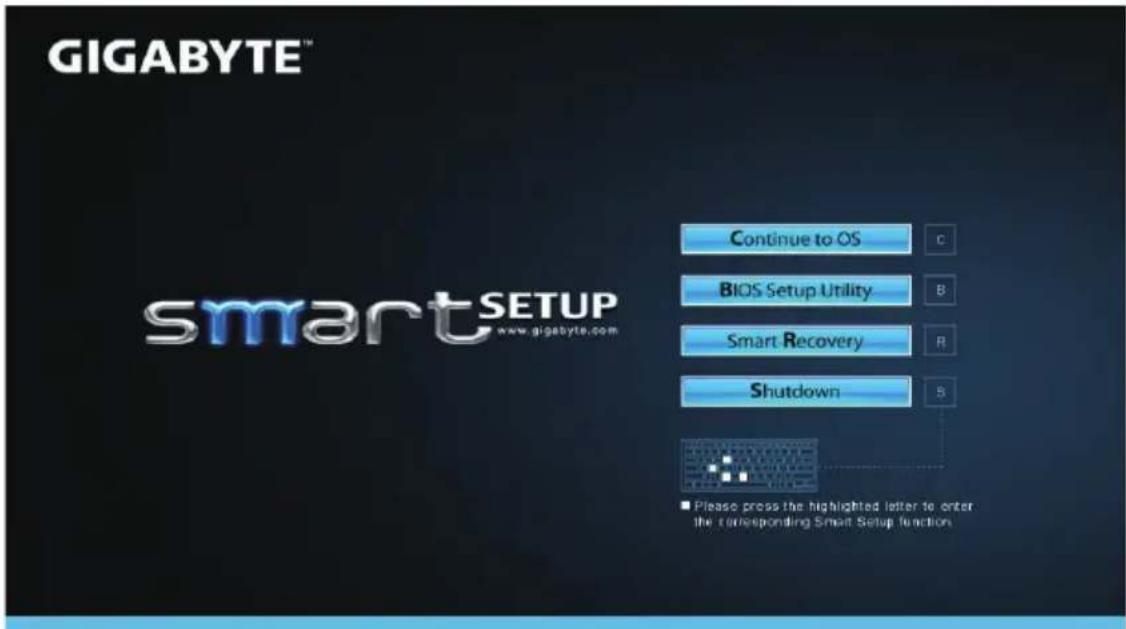
Press"Continue to OS" button to enter operating system.
Continue to OS
Press"BIOS Setup Utility" button to enter BIOS setup utility.
BIOS Setup Utility
Press"Smart Recovery" button to enter GIGABYTE Smart Recovery.
Smart Recovery
Press"Shutdown" button to shutdown the system.
Shutdown
Installing the HDD on P25

CAUTION
● Supplied Items: Buffer Bracket*1
- Please remove the power cord and battery first, and Follow the Step 1\~4 for installing the HDD.
1
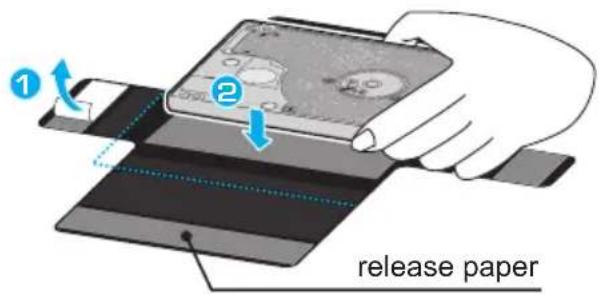
• Take off the labeled release paper and place the HDD within the dotted lines marked in blue.
2
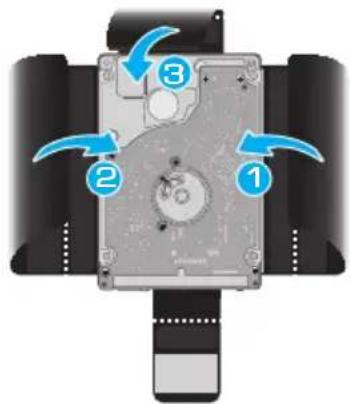
- Fold the Mylar as shown in the picture and ensure that the Mylar covers the HDD from all sides.
3
natural_image
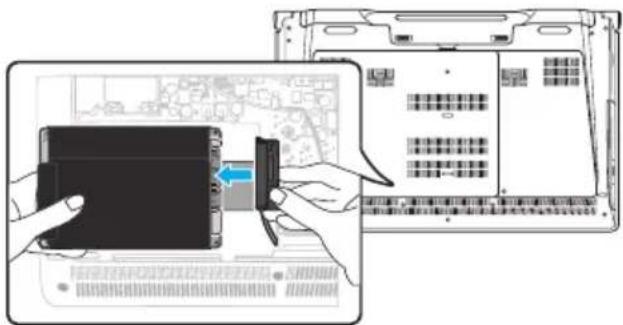
Illustration of hands inserting a device into a laptop keyboard (no text or symbols visible)- Open the back cover of the laptop and connect the SATA Bus with HDD/SSD.
4
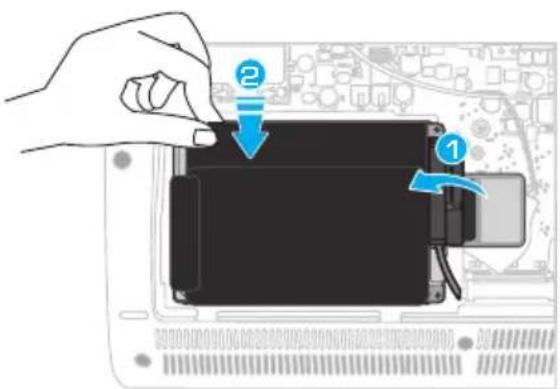
- Once connected – stick label over the Connector to ensure the HDD/SSD does not slip out of the package.
- Place the HDD/SSD into the slot until securely placed.
- Put the back cover on and fasten the screws. Your laptop is now ready with the latest additional storage.
Installing a 2nd mSATA SSD on P25

CAUTION
- Please remove the power cord and battery first, and Follow the Step 1\~3 for installing the SSD.
1
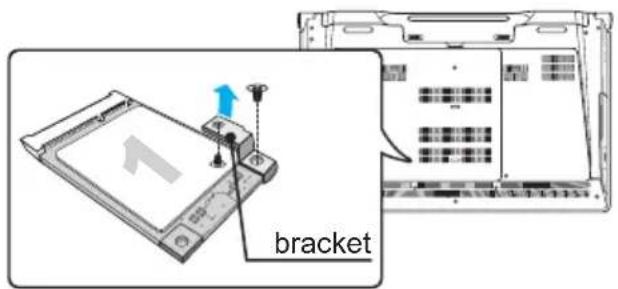
- Open the back cover or get the accessory kit bag in the box, you can find one mSATA SSD bracket and two screws inside.
- Unfasten the screw and bracket from the mSATA SSD. Leave the mSATA SSD in its slot.
2
natural_image
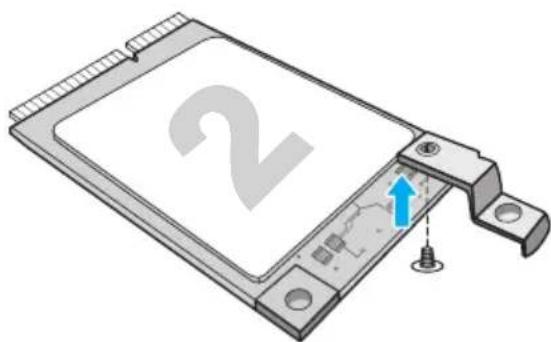
3D diagram of a mechanical component with a blue arrow indicating a specific feature, no text or symbols present.- Fasten the mSATA bracket onto the 2nd mSATA SSD as shown.
3
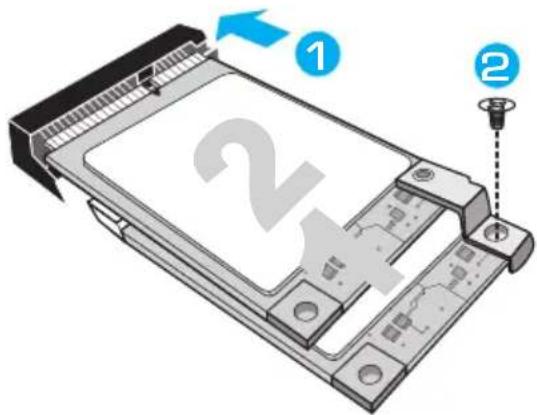
- Insert 2nd mSATA SSD with bracket.
- Push the mSATAs lightly until the bracket falls in place and aligns with the Motherboard. Fasten both mSATA SSDs onto the motherboard with the screw.

CAUTION
- GIGABYTE will take no responsibility for any customer induced damages during installing. We suggest that you send your notebook to an authorized GIGABYTE service center if any question. Making any charges depends on local conditions. Website: http://www.gigabyte.com/index.aspx
Setup Your System for RAID 0/1

WARNING
- Please backup your data before you build and run RAID 0/1 on your system.
● RAID 1 needs two storage drives of the same specification and capacity in your laptop.
● RAID 0 needs two storage drives of the same specification in your laptop. Different capacity is acceptable.
1
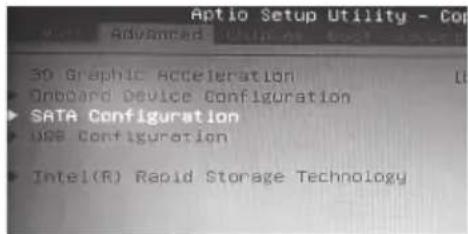
- Press F2 when computer starts to Enter BIOS setup utility.
- Go to Advanced > SATA configuration.
2
![DATA Mode Selection [ANDC] Serial ATA Part 0 Software Preserve Serial ATA Part 1 Software Preserve Serial ATA Part 2 Software Preserve Serial ATA Part 3 Software Preserve Serial ATA Part 4 Software Preserve Serial ATA Part 5 Software Preserve Empty unknown Empty unknown Empty unknown Empty DATA MODE Selection ID: ANGC RAID](/content/2026/05/1141968/images/cccf0801a2a73f47185ba4826fdaa34d7a859de1ba7f9284e5cb5ea69692e07f.jpg)
- Change "SATA Mode selection" from "AHCI" to "RAID".
- Press F10 to save and exit. The system will restart automatically.
3
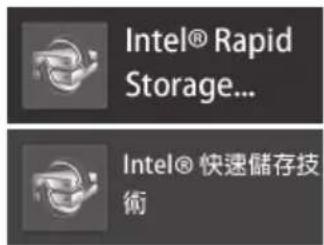
- Once the system restarts. Go to "All Apps" found at the bottom of the screen on Windows 8 and execute Intel Rapid Storage program.
4
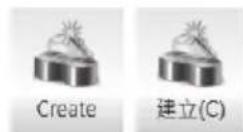
- You will see the Intel Rapid Storage Technology Screen, Click> Create.
5
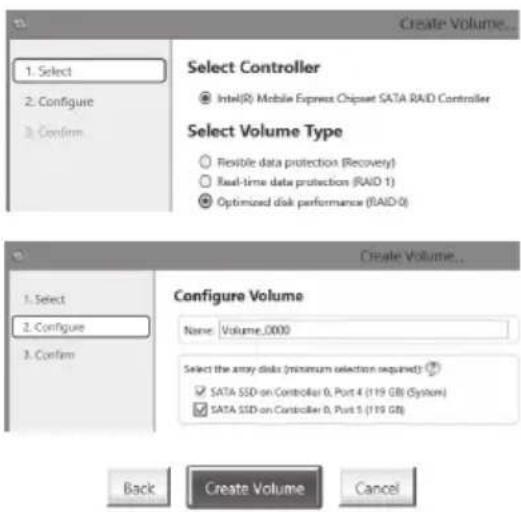
- Under Select Volume Type choose Optimized disc performance (RAID 0/1), Click > NEXT.
- Under Configure Volume you may set Name to your preferred name and select both controllers.
- Click > Next. You will see Confirm Volume Creation. Click > Create volume.
- Wait until the system migration is complete and restart the laptop.
Smart USB Backup Guide (Original: Recovery Image USB)

WARNING
● You can backup original recovery image through this application in case of losing by device damage.
- You can backup original recovery image to USB disk and restore the system if any storage system replacement with the recovery USB disk.
● Before you restore the system through the recovery USB disk, please make sure that you have already made the backup of your data.
● Please DO NOT shut down or un-plug the system when performing backup through recovery USB disk.
1
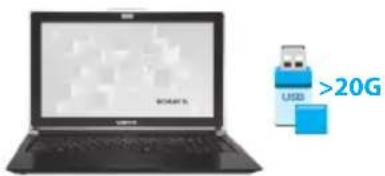
- Please plug in the USB disk which is at least 20GB in capacity to make the original image (backup the data in USB first. All data will be eliminated during the creation of recovery USB disk)
2

- Insert the driver disk to your optical drive and run the install of "Smart USB Backup" (for none-ODD model, please use USB ODD device or download from http://www.gigabyte.com
3
- Run the "Smart USB Backup" after finishing the install.
4
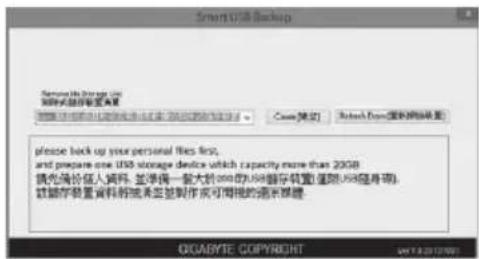
- Select your USB disk from the drop-down list and start to create the recovery USB disk.
5
- The window will pop out when the creation of recovery disk is done.
- Please press F12 on starting the system when you need to restore the system. Select "boot from recovery USB disk" and the system will be restored.
- The time needed for restore will be around 30 mins(time needed may vary by USB disk model).
Recovery Guide
System Recovery (Restore your laptop operating system)
When something is going wrong with the laptop operating system, the storage of the laptop has a hidden partition containing a full back up image of the operating system that can be used to restore the system to factory default settings.

Note
- If the storage has been switched or the partition deleted, the recovery option will no longer be available and a recovery service will be needed.
- The recovery function is only available on devices with O/S preinstalled. Devices with DOS do not have the recovery function.
Launch System Recovery
The system recovery feature is preinstalled before the laptop is shipped from the factory. The option menu allows you to launch the Windows recovery tool to reinstall the operating system to factory default.
The brief introduction below will show you how to start the recovery tool and restore your system.

All ready to go
Make sure your PC is plugged in. This will take a few minutes.
Windows 7 Recovery Guide
1
Turn off and restart the laptop.
2

During the laptop turn on process, press and hold F9 key to launch the tool.
3
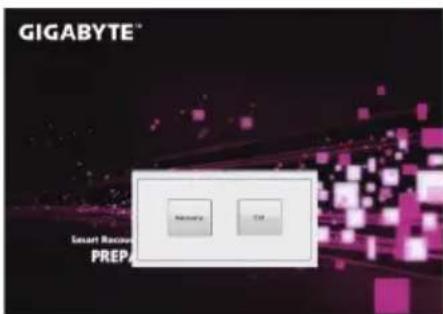
The recovery will be activated and you will see the option buttons on the window. Click on "Recovery" to start it.

Caution
Once the "Recovery" is selected, your personal data and files will be deleted after the laptop starts restoring, and the operating system will be reset to factory default settings.
4
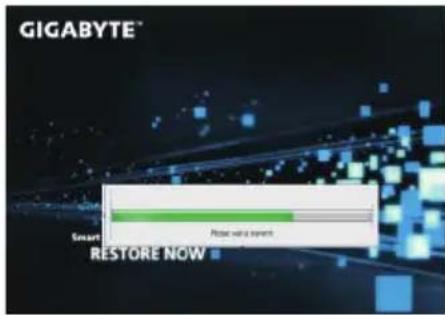
A progress indicator bar will show on the window when the recovery process is running. Please make sure the AC-adapter is plugged in and do not turn off the laptop.
5

Reboot the laptop after the system recovery is complete.
Windows 8 Recovery Guide
1
Turn off and restart the laptop.
2
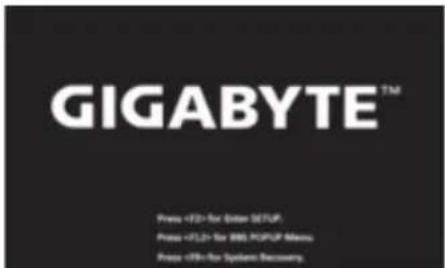
During the laptop turn on process, press and hold F9 key to launch the tool.
3
![Choose your keyboard layout • U3 • Albertian • Avable [000] • Acable [000] • Acable [001] A21971 • Armless Custom [Legacy] • Armless Phenetic • Armless Typewriter • Armless Windmill (Lapac) • Acquemase - INSCRIP • Aspt-CyRILs • Aspt Latin See more keyboard layouts](/content/2026/05/1141968/images/107bac0543035ad38de95342676c7145dd0dfab549566236bb97e27a974dab55.jpg)
Choose your keyboard layout. You can press "See more keyboard layouts" to see next page of languages.
4

Choose "Troubleshoot" to enter the recovery settings.
(Also you can choose "Continue" to exit recovery system and continue to Windows 8 for files or data backup.)

There are two options for system recovery
- Refresh your PC
You can refresh your laptop to improve the system stability without losing your files. - Reset your PC
If you want to remove all of your files, you can reset your PC completely.
Caution: All personal data and files will be lost.
5

Choose "Refresh your PC"
[Click on "Next"] > [Choose a target operating system.] > [Click on "Windows 8"].] > [Click on "Refresh" to execute recovery function.]

Here are what will happen
- Your files and personalization settings won't be changed.
- Your PC settings will be restored to factory default settings.
- Apps from Windows Store will be kept.
- Apps you installed from discs or websites will be removed.
- A list of removed apps will be saved on your desktop.

■choose "Reset your PC"
[Click on "Next"] > [Choose a target operating system.] > [Click on "Windows 8"].] > [Choose an option to recover your system]
▶ Just remove my files
Only personal data and files will be removed, but computer settings will be kept.
▶ Fully clean the drive
The drive will be completely restored to factory default settings. It takes more time. > [Click on "Reset" to execute recovery function.]

Here are what will happen
- All of your personal files and apps will be removed.
- Your PC settings will be restored to factory default settings.

Advanced options

System Restore
Use a restore point recorded on your PC to restore Windows.

System Image Recovery
Recover Windows using a specific system image file.

Automatic Repair
Fix problems that keep Windows from loading.

Command Prompt
Use the Command Prompt for advanced trobleshooting.

UEFI Firmware Settings
Change settings in your PC's UEFI firmware.
Windows 8.1 Recovery Guide
1 Turn off and restart the laptop.
2
During the laptop turn on process, press and hold F9 key to launch the tool.
3

Choose "Troubleshoot" to enter the recovery settings. (Also you can choose "Continue" to exit recovery system and continue to Windows 8.1 for files or data backup.)

There are two options for system recovery
- Refresh your PC You can refresh your laptop to improve the system stability without losing your files.
- Reset your PC If you want to remove all of your files, you can reset your PC completely. Caution: All personal data and files will be lost.
4

- Choose "Refresh your PC"
Choose an account to continue.

Here are what will happen
- Your files and personalization settings won't be changed.
- Your PC settings will be restored to factory default settings.
- Apps from Windows Store will be kept.
- Apps you installed from discs or websites will be removed.
- A list of removed apps will be saved on your desktop.

■ choose "Reset your PC"
▶ Just remove my files
Only personal data and files will be removed, but computer settings will be kept.
▶ Fully clean the drive
The drive will be completely restored to factory default settings. It takes more time. > [Click on "Reset" to execute recovery function.]

Here are what will happen
- All of your personal files and apps will be removed.
- Your PC settings will be restored to factory default settings.

■ Advanced options

System Restore
Use a restore point recorded on your PC to restore Windows.

System Image Recovery
Recover Windows using a specific system image file.

Automatic Repair
Fix problems that keep Windows from loading.

Command Prompt
Use the Command Prompt for advanced trobleshooting.

UEFI Firmware Settings
Change settings in your PC's UEFI firmware.

Startup Settings
Change Windows Startup behavior.
Appendix
■ Warranty & Service :
Warranty and service and related information please refer to the warranty card or GIGABYTE service website as the below link:
http://www.gigabyte.com/support-downloads/technical-support.aspx
■ FAQ:
FAQ (Frequent Asked Questions) please refer to the below link: http://www.gigabyte.com/support-downloads/faq.aspx
- Congratulations on your purchase of the GIGABYTE Notebook!
- Using GIGABYTE Notebook for the First Time
- To install the battery please follow these steps:
- Switching on the Power :
- Booting Up the Notebook for the First Time :
- Top & Front View
- Left View
- Right View
- Rear & Bottom View
- Hotkeys
- GIGABYTE Software Application
- ■ GIGABYTE Smart Manager
- ■ GIGABYTE Smart Setup
- Installing the HDD on P25
- CAUTION
- Installing a 2nd mSATA SSD on P25
- 1
- 2
- 3
- Setup Your System for RAID 0/1
- WARNING
- 4
- 5
- Smart USB Backup Guide (Original: Recovery Image USB)
- Recovery Guide
- System Recovery (Restore your laptop operating system)
- Note
- Launch System Recovery
- All ready to go
- Windows 7 Recovery Guide
- Windows 8 Recovery Guide
- There are two options for system recovery
- Choose "Refresh your PC"
- Here are what will happen
- ■choose "Reset your PC"
- ▶ Just remove my files
- ▶ Fully clean the drive
- Advanced options
- System Restore
- System Image Recovery
- Automatic Repair
- Command Prompt
- UEFI Firmware Settings
- Windows 8.1 Recovery Guide
- - Choose "Refresh your PC"
- ■ choose "Reset your PC"
- ■ Advanced options
- Startup Settings
- Appendix
- ■ Warranty & Service :
- ■ FAQ:
Brand : GIGABYTE
Model : P25W v2
Category : Laptop