AMW10US - Solar panel TARGUS - Free user manual and instructions
Find the device manual for free AMW10US TARGUS in PDF.

| Product Type | Portable Solar Panel |
| Brand | Targus |
| Model | AMW10US |
| Power Output | 10W (max) |
| Output Ports | 1x USB-A (5V/2A) |
| Solar Cell Type | Monocrystalline |
| Dimensions (Folded) | 280 x 210 x 30 mm (approx.) |
| Dimensions (Unfolded) | 560 x 420 x 5 mm (approx.) |
| Weight | 0.8 kg (approx.) |
| Material | Polyester fabric with solar cells |
| Water Resistance | IPX4 (splash resistant) |
| Compatible Devices | Smartphones, tablets, power banks |
| Accessories Included | Carabiner clips, USB cable |
| Maintenance | Wipe with damp cloth; avoid abrasive cleaners |
| Safety Features | Short circuit protection, overcharge protection |
| Repairability | Non-repairable by user; contact support |
| Warranty | 1 year limited warranty |
Frequently Asked Questions - AMW10US TARGUS
User questions about AMW10US TARGUS
0 question about this device. Answer the ones you know or ask your own.
Ask a new question about this device
Download the instructions for your Solar panel in PDF format for free! Find your manual AMW10US - TARGUS and take your electronic device back in hand. On this page are published all the documents necessary for the use of your device. AMW10US by TARGUS.
USER MANUAL AMW10US TARGUS
Visit our Website at www.targus.com Features and specifications subject to change without notice. © 2007 Targus Group International, Inc. and Targus, Inc.
AMW10US / 410-0085-001B
FCCCEc N2953
rechargeable wireless desktop mouse

USER GUIDE
PMS Black 30%

PMS Black 100%
TARGUS 5-BUTTON RECHARGEABLE WIRELESS MOUSE
Introduction
Congratulations on your purchase of the Targus 5-button Rechargeable Wireless Mouse. This mouse offers a charge cable to ensure continuous use without power interruption and an extension seat that allows connectivity for the receiver and the charge cable. The 4th & 5th buttons are pre-programmed to provide Internet Back-ward and Internet Forward under Windows ^® 2000/XP.
Package Contents
- Wireless Rechargeable Mouse
- USB Receiver
• 2 AA NiMH Rechargeable Batteries - USB Extension Seat
- USB Charge Cable
- User Guide
System Requirements
Hardware
- USB version 1.1 or 2.0 interface
OperatingSystem
- Windows ^ 2000/XP
- Windows Vista ^TM
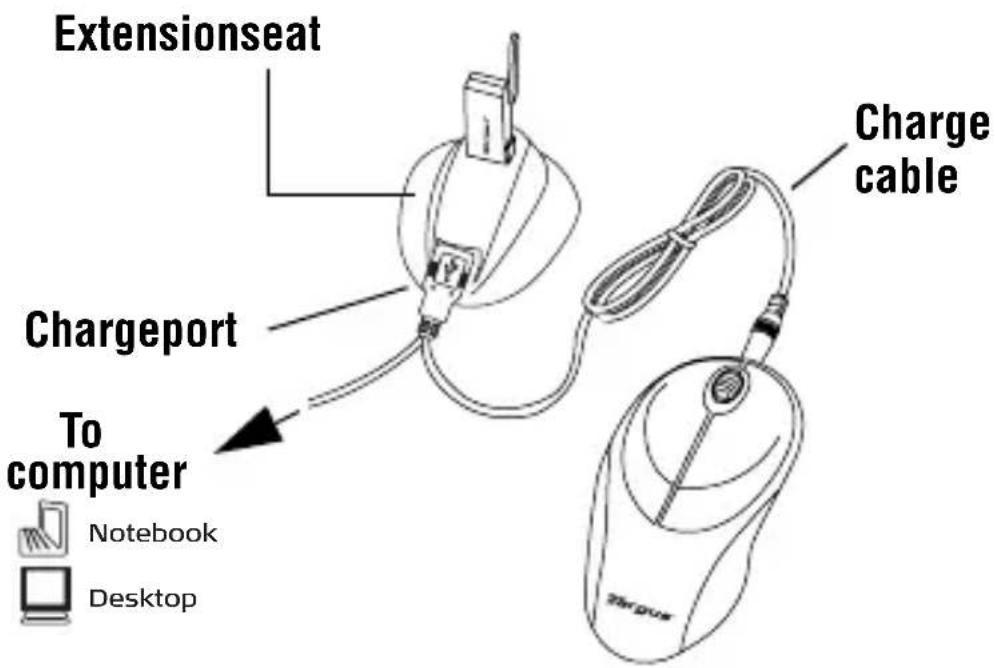
Using the Extension Seat
An extension seat is provided to minimize interference from other wireless devices. This extension seat allows you to place the receiver closer to your mouse while in use.
1 Connect the extension seat to an available USB port on your Desktop PC or Notebook.
2 Plug the receiver into the USB port labeled 'receiver' located at the top of the seat.
3 Connect the USB end of the charge cable to the port labeled 'charge' on the extension seat.
text_image
Extensionseat Chargeport To computer Notebook Desktop Charge cableYour computer's operating system automatically detects the new hardware and begins installing the appropriate drivers.
4 If applicable, follow any on-screen instructions to complete the driver installation.
FOR BEST RESULTS, YOU SHOULD CHARGE THE MOUSE VIA THE SUPPLIED USB CHARGE CABLE FOR AT LEAST 8 HOURS BEFORE USING IT. SEE "CHARGING THE MOUSE" ONPAGE7.
Installing the Batteries
1 Remove the battery cover from the bottom of the mouse by pressing the tab located on the bottom and lifting it off.
2 2 AA NiMH rechargeable batteries are included. Insert the supplied batteries, making sure that the positive (+) and negative (-) ends of each battery match the polarity indicators inside the battery housing.

WARNINGS:U SE ONLY HEAVY-DUTY NIMH BATTERIES. NEVER USE ALKALINEIFYOUINTENDTOUSETHERECHARGINGFEATURE .
AVOIDMIXINGNEWANDUSEDBATTERIESINADEVICE.
3 Slide the battery cover back into position until it "clicks" firmly into place.
The optical sensor, located on the bottom of the mouse, glows red.
Charging the Mouse
Connect the charge cable to the charge port on the supplied extension seat and plug the extension seat cable to the USB port on your computer.

text_image
Extensionseat Chargeport To computer Notebook Desktop Charge cable4 Connect the other end of the charge cable to the mouse as shown.
5 Alternatively, you can connect the supplied charge cable's USB connector directly into an available USB port on your computer.

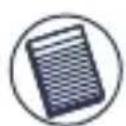
NOTE: TO CONTINUOUSLY CHARGETHEMOUSEVIATHEUSBCHARGECABLE YOURCOMPUTERMUSTBEONANDAWAKE.FORBESTRESULTS, TURNOFF YOURCOMPUTER'S POWERMANAGEMENTFEATUREWHILECHARGINGTHE MOUSE.
Operating Notes for Wireless Mice with Recharging Feature via USB Cable
-
Charge the mouse for at least 8 hours before using it. And please make sure only rechargeable batteries (the ones that come with your product) are used.
-
Your computer needs to stay powered on for the mouse to charge. Follow these steps to prevent your computer from going in to Standby or Hibernate:
a) Click "Start"
b) Click "Control Panel"
c) Click "Performance and Maintenance" (Skip in Classic View)
d) Click "Power Options"
e) Make sure "System Standby:" and "System Hibernates:" under "Plugged in" are set to "Never"
-
If you use your notebook computer's LCD monitor, please do not close the lid. (Please ignore this step if you use an external monitor with your notebook lid closed.)
-
If your mouse does not respond after a period of inactivity, please wake it up by pressing one of the buttons on the mouse or moving the mouse around.
text_image
Power Options Properties Advanced Settings Beepa/Alarms Suspend/Hibemate Options Power Scheme Alarms Power Meter Advanced Hibemate Select the power scheme with the most appropriate settings for this computer. Note that changing the settings below will modify the selected scheme. Power schemes High System Performance Save As... Delete Settings for High System Performance power scheme When computer is: Plugged in Running on betterise Turn off monitor: Never After 1 hour Turn off hard disks: Never After 20 mins System standby: Never After 1 hour System hibemates: Never Never OK Cancel ApplySynchronization
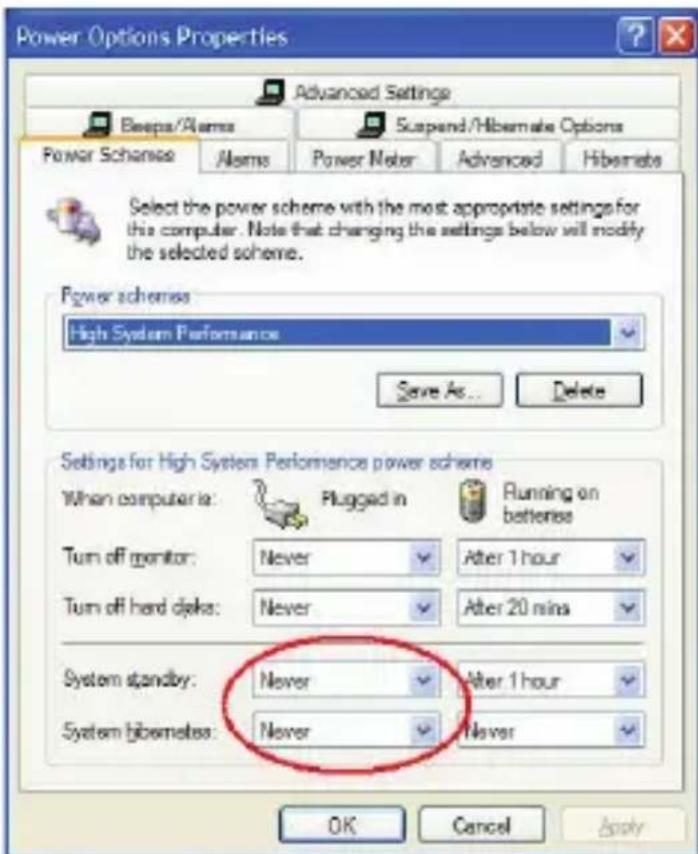
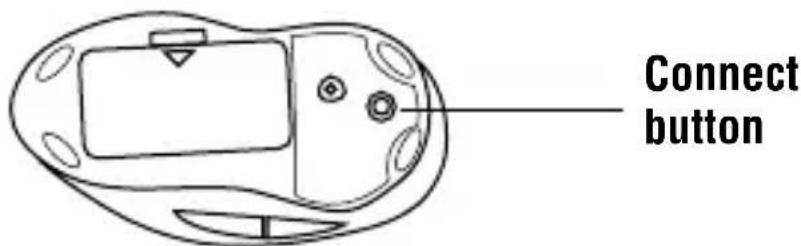
Make sure that your computer is turned on and has detected the USB receiver before you synchronize.
1 Press and release the connect button on the receiver.
natural_image
Line drawing of a USB device with a labeled connector (no text or symbols)Connect button
2 Press and release the connect button located on the bottom of the mouse.
text_image
Connect buttonThe receiver's status light flashes while it scans the identification codes. When synchronized the status light stops flashing. This process must be completed within a few seconds or the steps will need to be repeated.
After successfully synchronizing, you are ready to use the mouse.

NOTE: Y OUMUSTSYNCHRONIZEEVERYTIMEYOUCHANGETHE BATTERIES.
4th & 5th Buttons

text_image
InternetBackward InternetForwardOperating Hints
For optimal performance and RF reception:
- For instances where the PC is positioned under a desk or other places that might impede wireless connectivity, use of the extension seat is recommended. (See the diagram on page 7.)
- Avoid using the mouse on a metal surface. Metals, such as iron, aluminum or copper, shield the radio frequency transmission and may slow down the mouse's response time or cause the mouse to fail temporarily.
- The mouse will enter a suspend mode at the same time your computer does. Click any mouse button to wake it.
- If your computer has a metal case that contains aluminum or magnesium, use the mouse to the side. The display panel may interfere with the radio frequency
signal if you use the mouse directly in front of the computer.
- Never use the mouse on a glass or mirrored surface as these surfaces will cause the mouse to fail temporarily.
- To maximize battery life, use the mouse on a light colored surface. Dark surfaces cause the mouse's light emitter diode (LED) light to glow brighter, which causes the battery to discharge more rapidly.
Comfortable Usage
Research suggests that physical discomfort and injury to nerves, tendons, and muscles may be related to repetitive motion, an improperly set up work area, incorrect body posture, and poor work habits.
To reduce the risk of injury, follow these precautions:
- Stand, stretch, and move around several times every hour.
- Switch hands while performing tasks. Use shortcut keys to avoid repetitive or awkward mouse movements.
- Relax your shoulders and keep your elbows at your sides. Adjust the keyboard's position so that you don't have to stretch to reach it.
- Adjust your position so that you don’t have to bend your wrists to type; avoid placing your wrists on a sharp edge.
If you feel discomfort or numbness in your hands, wrists, arms, shoulders, neck, or back while typing, consult a qualified medical professional.
Troubleshooting
Whatdoldoifthemousedoesnotwork?
- Make sure that the polarity of the battery is correct. The positive (+) and negative (-) ends of the battery must match the positive (+) and negative (-) connections in the battery housing.
- The battery may need recharging. See “Charging the Mouse” on page 7.
- Check that the receiver's USB connector is firmly attached to the USB port on your computer or to the extension seat, and that the extension seat's cable is connected to your PC.
- Make sure you have established a communication link between the mouse and its receiver. See “Synchronization” on page 8.
Whenlusethemouse,otherwirelessdevices workmoreslowlyorfailtemporarily-what shouldIdo?
- The mouse may cause interference with any cordless, radio-based device that operates at 27 MHz, such as a telephone, baby monitor, or toy. To reduce interference, move the mouse's receiver and the base unit of the affected device as far away from each other as possible.
Whatdoldoiftheresponsetimeofthemouse issloworthemouseintermittentlystops working?
- Increase the distance between the mouse’s receiver and the rest of your computer equipment. Use the USB extension seat if necessary.
- Increase the distance between the mouse’s receiver and the base units of other wireless devices.
- Turn off any wireless devices and their base units that are near the mouse’s receiver.
- If you are using the mouse on a metal surface, move it and the receiver to a non-metal surface. Metals, such as iron, aluminum or copper, shield the radio frequency transmission and may slow down the mouse's response time or cause the mouse to fail temporarily.
Technical Support
For technical questions, please visit:
US Internet: www.targus.com/support.asp
Australia Internet: www.targus.com.au
Email: infoaust@targus.com
Telephone: 1800-641-645
New Zealand Telephone: 0800-633-222
Product Registration
Targus recommends that you register your Targus accessory shortly after purchasing it. Go to:
http://www.targus.com/registration.asp. You will need to provide your full name, email address, phone number, and company information (if applicable).
Warranty
Targus warrants this product to be free from defects in materials and workmanship for one year. If your Targus accessory is found to be defective within that time, we will promptly repair or replace it. This warranty does not cover accidental damage, wear and tear, or consequential or incidental loss. Under no conditions is Targus liable for loss of, or damage to a devices nor loss of, or damage to, programs, records, or data; nor any consequential or incidental damages, even if Targus has been informed of their possibility. This warranty does not affect your statutory rights.
Regulatory Compliance
This device complies with Part 15 of the FCC Rules. Operation is subject to the following two conditions: (1) This device may not cause harmful interference, and (2) This device must accept any interference received, including interference that may cause undesired operation.
FCC Statement Tested to Comply
This equipment has been tested and found to comply with the limits of a Class B digital device, pursuant to Part 15 of the FCC Rules. These limits are designed to provide reasonable protection against harmful interference in a residential installation. This equipment generates, uses, and can radiate radio frequency energy and if not installed and used in accordance with the instructions, may cause harmful interference to radio communications. However, there is no guarantee that interference will not occur in a particular installation. If this equipment does cause harmful interference to radio or television reception, which can be determined by turning the equipment off and on, the user is encouraged to try to correct the interference by one or more of the following measures:
- Reorient or relocate the receiving antenna;
- Increase the separation between the equipment and receiver;
- Connect the equipment into an outlet on a circuit different from that to which the receiver is connected;
- Consult the dealer or an experienced radio/TV technician for help.
Changes or modifications not authorized by the party responsible for compliance could void the user's authority to operate this product.
Declaration of Conformity
Hereby, Targus, declares that this device is in compliance with the essential requirements and other relevant provisions of Directive 1999/5/EC.
Microsoft, Windows, and Windows Vista are either registered trademarks or trademarks of Microsoft Corporation in the United States and/or other countries. All trademarks and registered trademarks are the properties of their respective owners. All rights reserved. Features and specifications subject to change without notice. © 2007, Targus Group International, Inc. and Targus, Inc., Anaheim, CA 92806 USA.