
AEBK08FB - Electronic accessory Aluratek - Free user manual and instructions
Find the device manual for free AEBK08FB Aluratek in PDF.

| Product Type | E-Book Reader |
| Brand | Aluratek |
| Model | Libre Touch (AEBK08FB) |
| Display | 7-inch TFT LCD, 800x480 pixels, high resolution touch screen |
| Operating System | Android 1.5 |
| WiFi | 802.11 b/g |
| Internal Memory | 2 GB |
| Expandable Memory | MicroSD card up to 16 GB |
| Battery Life | Reading up to 8 hours; Music up to 10 hours (backlight off) |
| Charging | DC 5V, 1.2A; Full charge ~6 hours |
| Dimensions | 202.8 x 124.7 x 12.4 mm (approx) |
| Weight | 280 g (approx) |
| Supported E-book Formats | ePub, PDF, TXT, FB2 (non-DRM) |
| Supported Audio Formats | MP3, WMA, WAV, OGG, AAC (non-DRM) |
| Supported Video Formats | RM/RMVB, AVI, MKV (xvid/h.264), MPG, MP4, 3GP, DAT, MOV, FLV (non-DRM) |
| Supported Photo Formats | JPG, BMP, GIF, PNG |
| Connectivity | Micro USB 2.0 High Speed, 3.5mm audio jack, MicroSD card slot |
| Speaker | Built-in stereo speaker |
| DRM Support | Adobe DRM for ePub and PDF |
| Safety Standards | FCC Part 15 Class B, CE compliant |
| Maintenance | Clean screen with soft cloth; avoid abrasives; store in provided case |
| Disposal | Dispose separately from household waste; recycle as electronic equipment |
| Repairability | Battery replacement by authorized service provider only |
Frequently Asked Questions - AEBK08FB Aluratek
User questions about AEBK08FB Aluratek
0 question about this device. Answer the ones you know or ask your own.
Ask a new question about this device
Download the instructions for your Electronic accessory in PDF format for free! Find your manual AEBK08FB - Aluratek and take your electronic device back in hand. On this page are published all the documents necessary for the use of your device. AEBK08FB by Aluratek.
USER MANUAL AEBK08FB Aluratek
FCC Information and Copyright
This equipment has been tested and found to comply with limits for a Class B digital device, pursuant to Part 15 of the FCC rules. These limits are designed to provide reasonable protection against harmful interference in residential installations. This equipment generates, uses, and can radiate radio frequency energy, and if not installed and used in accordance with the instructions, may cause harmful interference to radio communications. However, there is no guarantee that interference will not occur in a particular installation.
The vendor makes no representations or warranties with respect to the contents here and specially disclaims any implied warranties of merchantability or fitness for any purpose. Further the vendor reserves the right to revise this publication and to make changes to the contents here without obligation to notify any party beforehand. Duplication of this publication, in part or in whole, is not allowed without first obtaining the vendor's approval in writing.
The content of this instruction manual is subject to be changed without notice and we will not be responsible for any mistakes found in this manual. All the brand and product names are trademarks of their respective
Safety Precautions

This symbol means that the unit complies with European safety and electrical interference directives.
On Battery
- Charge the battery only in temperature that ranges from 0 to 35 degree Celsius.
- Do not charge reader if the battery is found damaged or leaking.
On Operation
- Never subject reader to extremes of light, temperature, moisture or vibration.
- Do not use or store the reader in a location subject to:
A. Extremely high temperatures, such as inside a sun-heated car
B. Direct sunlight
C. High humidity or places with corrosive substances
D. Sub-zero conditions, especially during winter
On the MicroSD card
- If a MicroSD card is inserted and the reader does not respond, please take out the MicroSD card and insert again.
- To prevent loss of data or damage to the reader, do not remove the MicroSD card or turn off reader while it is writing or reading data.
- Make sure the MicroSD card is unlocked before writing or deleting data on the MicroSD card.
- Backup your files and data before formatting the MicroSD card. Please format the MicroSD card using FAT32.
Contents
FCC INFORMATION AND COPYRIGHT......I
SAFETY PRECAUTIONS...... II
CONTENTS ....III
CHPATER 1 BASICS...... 1
BUTTON DESCRIPTIONS......ERROR! BOOKMARK NOT DEFINED.
PACKET LIST 2
POWER ON AND OFF THE READER....2
HOME SCREEN..ERROR! BOOKMARK NOT DEFINED.
MAIN MENU....ERROR! BOOKMARK NOT DEFINED.
TOUCH SCREEN OR BUTTONSERROR! BOOKMARK NOT DEFINED.
ONSCREEN KEYBOARD ...... ERROR! BOOKMARK NOT DEFINED.
CONNECTING TO THE INTERNET....5
CHARGING THE READER....7
IMPORTING CONTENTS .....ERROR! BOOKMARK NOT DEFINED.
CHAPTER 2 STARTING TO USE THE READER .... 9
READING BOOKS......ERROR! BOOKMARK NOT DEFINED.
PLAYING MUSIC ERROR! BOOKMARK NOT DEFINED.
WATCHING VIDEOS ...... ERROR! BOOKMARK NOT DEFINED.
VIEWING PHOTOS......ERROR! BOOKMARK NOT DEFINED.
USING THE WEB BROWSER ..ERROR! BOOKMARK NOT DEFINED.
E-MAIL......ERROR! BOOKMARK NOT DEFINED.
MORE APPLICATIONS......ERROR! BOOKMARK NOT DEFINED.
IMPORTING DRM CONTENT....32
MANAGEMENT OF THIRD PARTY APPLICATIONS ......35
CHAPTER 3 SETTINGS .... 33
Wi-Fi SETTING. ERROR! BOOKMARK NOT DEFINED. SOUND AND DISPLAY......ERROR! BOOKMARK NOT DEFINED.
SECURITY AND LOCATION .... ERROR! BOOKMARK NOT DEFINED.
APPLICATIONS MANAGEMENT......ERROR! BOOKMARK NOT DEFINED.
SD CARD & INTERNAL MEMORY...ERROR! BOOKMARK NOT DEFINED.
DATE & TIME ...ERROR! BOOKMARK NOT DEFINED.
REGION AND TEXT ......ERROR! BOOKMARK NOT DEFINED.
TOUCH SCREEN CALIBRATION......ERROR! BOOKMARK NOT DEFINED.
MEDIA LIBRARY UPDATE.....ERROR! BOOKMARK NOT DEFINED.
DELETE THE AUTHORIZED INFORMATION ...... ERROR!
BOOKMARK NOT DEFINED.
ABOUT THE LIBRE TOUCH ...ERROR! BOOKMARK NOT DEFINED.
CHAPTER 4 TROUBLESHOOTING .... 35
CHAPTER 5 APPENDIX......36
MAINTENANCE .ERROR! BOOKMARK NOT DEFINED. PRODUCT SPECIFICATIONS ..ERROR! BOOKMARK NOT DEFINED.
DISPOSAL AND RECYCLING INFORMATION ...... ERROR! BOOKMARK NOT DEFINED.
The Libre Touch is an e-book reader with touch-screen display that supports WIFI function and third-party software.
Button Descriptions
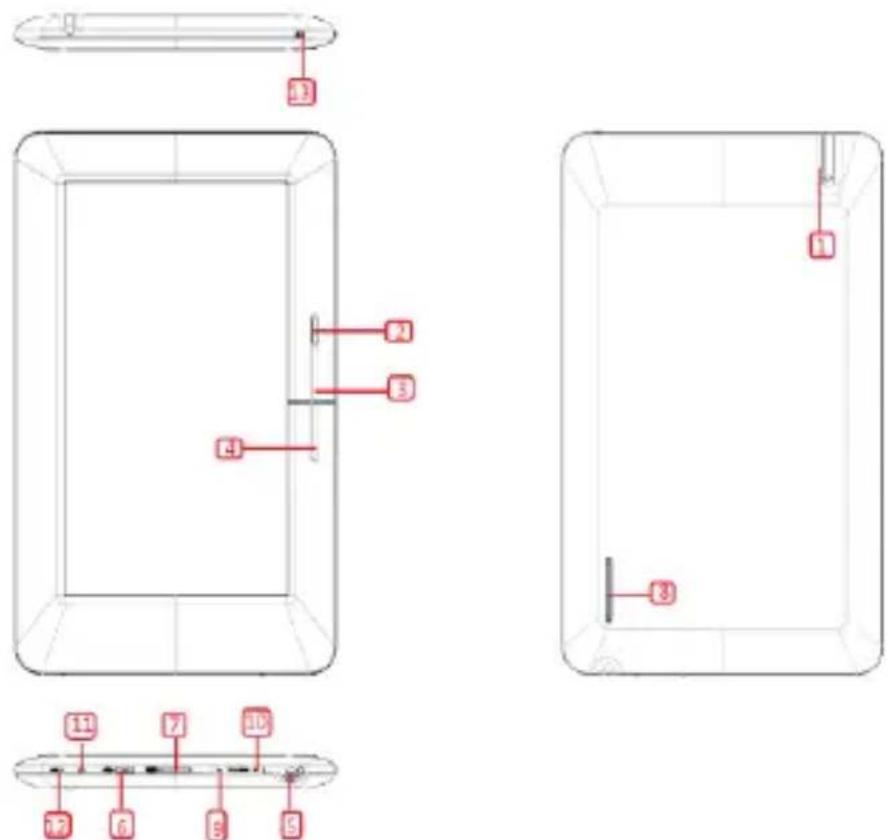
1 Power button – Press and hold for 3 seconds to turn on/off; press and hold for 6 seconds to reset
2 Return button – Press once to return to previous menu: press and hold to return to Home screen
3 Previous pg button – Press to turn to previous page
4 Next pg button – Press to turn to next page
5 Headphone jack
6 Micro USB port – For data transfer and emergency charging
7 MicroSD cart slot – Supports MicroSD cards
8 Speaker – A speaker for audio playback; do not block this area during music playing
9 Volume key + - Press to increase the volume
10 Volume key – Press to decrease the volume
11 LED indicator – Red light flashes to indicate low battery; a
blue light will flash to indicate reader activity; while the reader is charging, the red light remain on; when fully charged, blue light will remain on.
12 Built-in microphone
Package Content
- Libre Touch eBook reader
- USB cable
- Power Adapter
- Quick Start Guide
- Warranty/Registration Card
Power On and Off the Reader
- Press and hold the Power button for 3 seconds to turn the reader on.
- It may take a moment for the reader to turn on and load.
- To turn off the Reader, press and hold the power button until a "Power off" dialog box appear. Press Power off to confirm.
Home Screen
When the reader is turned on, it will display the Home screen,
- Press my time to return to the Home screen.
- Tap any icon on the Home screen to get started.
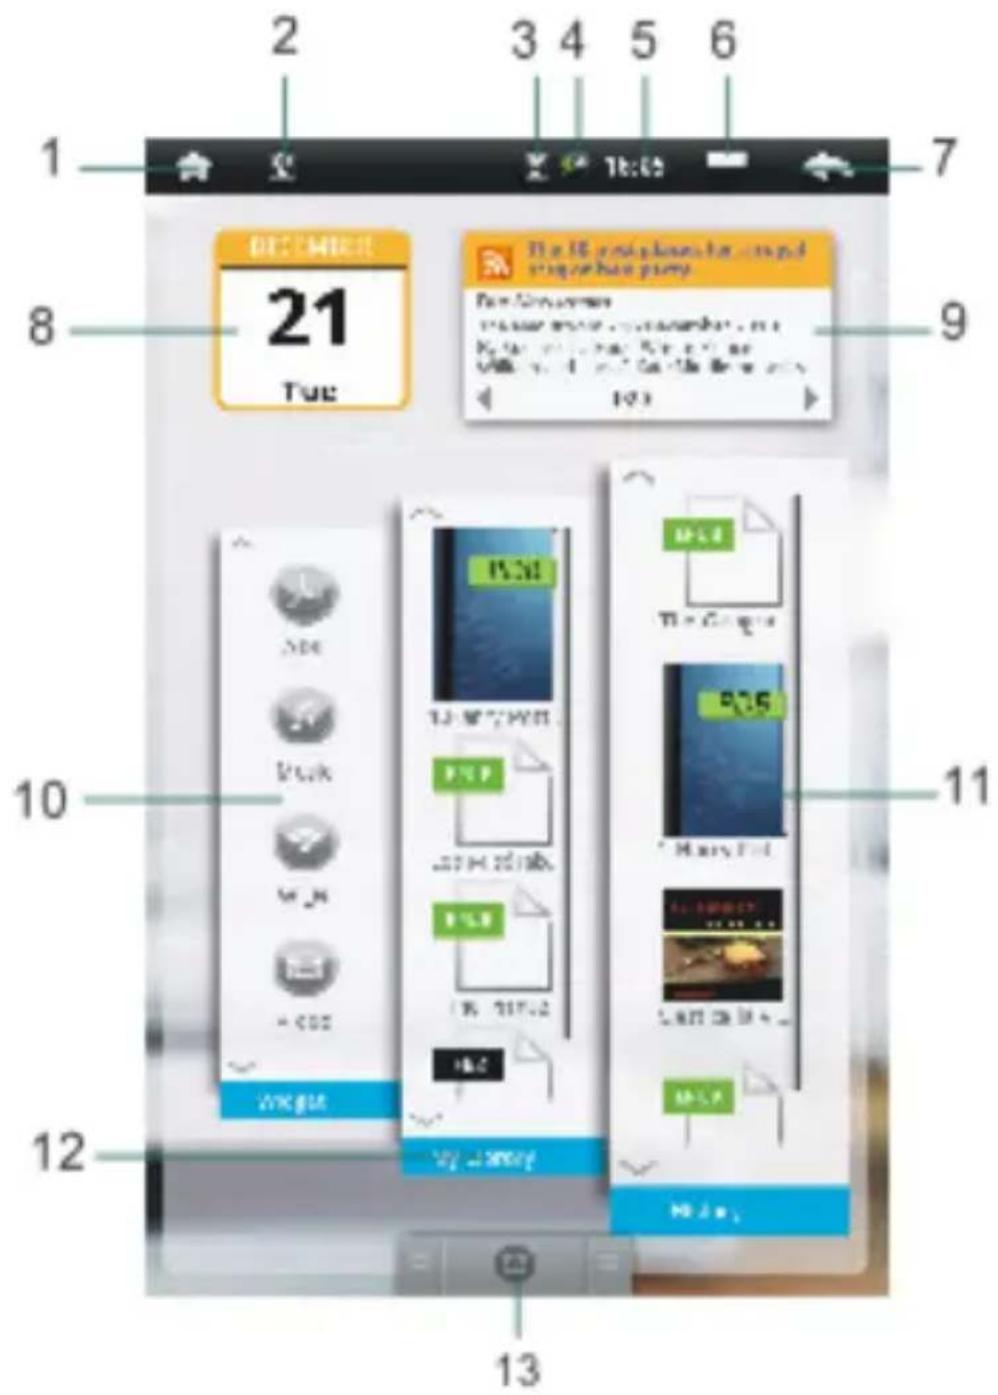
- Home button—Press to return to the home screen.
- USB connection —Show USB connection status.
- WIFI display
- Battery Indicator
- Time display
- Options menu
- Return button
- Calendar
- RSS News Feed
- Shortcut menus for the applications
- Reading history
- Ebook library
- Main Menu
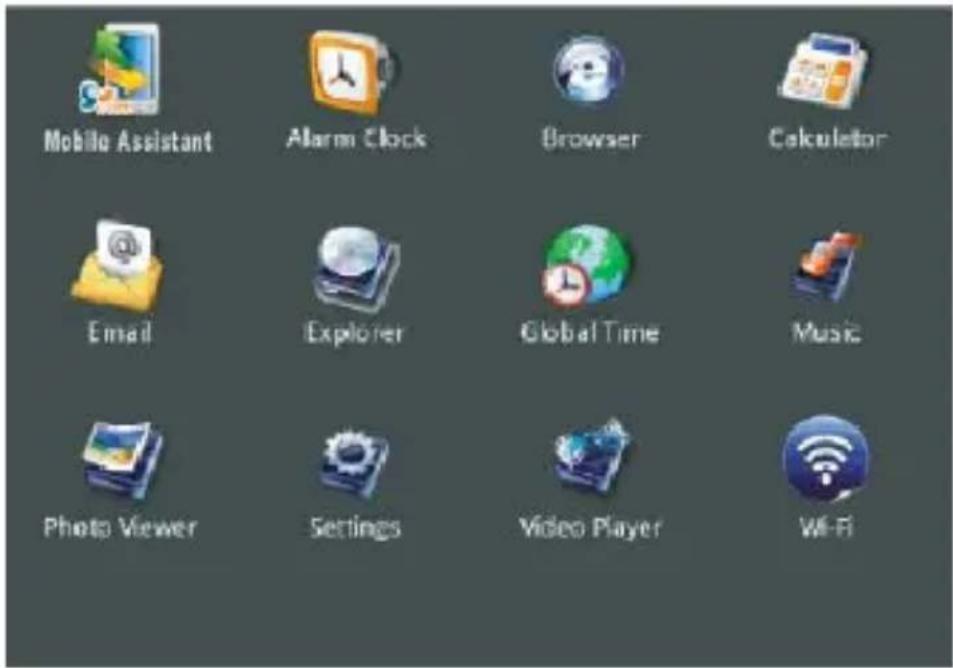
Press to show all built-in or third-party applications, such as music player, photo viewer, Wi-Fi function and so on. You can manually install other third party applications. Tap the Main Menu tab on the Home screen to display all options.
Main Menu
Shows all application icons, tap the button to show the Main Menu.
Touch screen or buttons
Open an application: Tap an icon.
- Tap
anytime to return to previous screen. - Tap
anytime to return to Home screen. - Tap
anytime to display Option Menu.


Scrolling
Drag up or down to scroll. On some screens such as webpages, you can also scroll side to side.
Onscreen keyboard
Use the onscreen keyboard as shown below to enter text, such as text messages, or web addresses.
Tap a text field to bring up the keyboard.
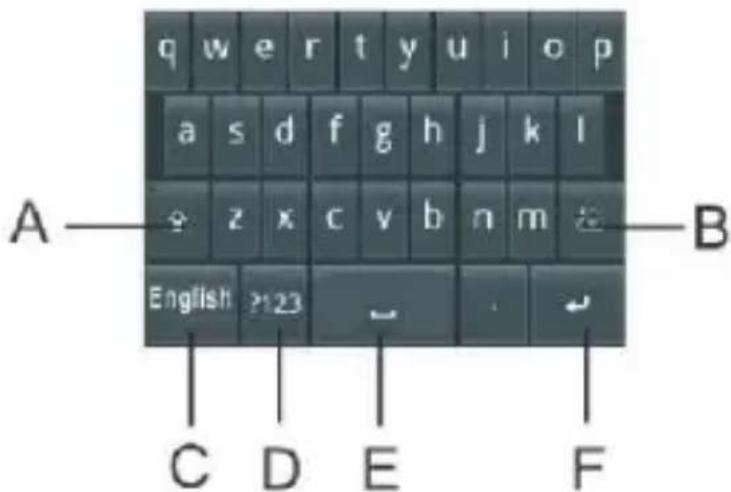
A: Shift key
B: Backspace key
C: Input method
D: Numeric/symbols key
E: Space key
F: Enter key
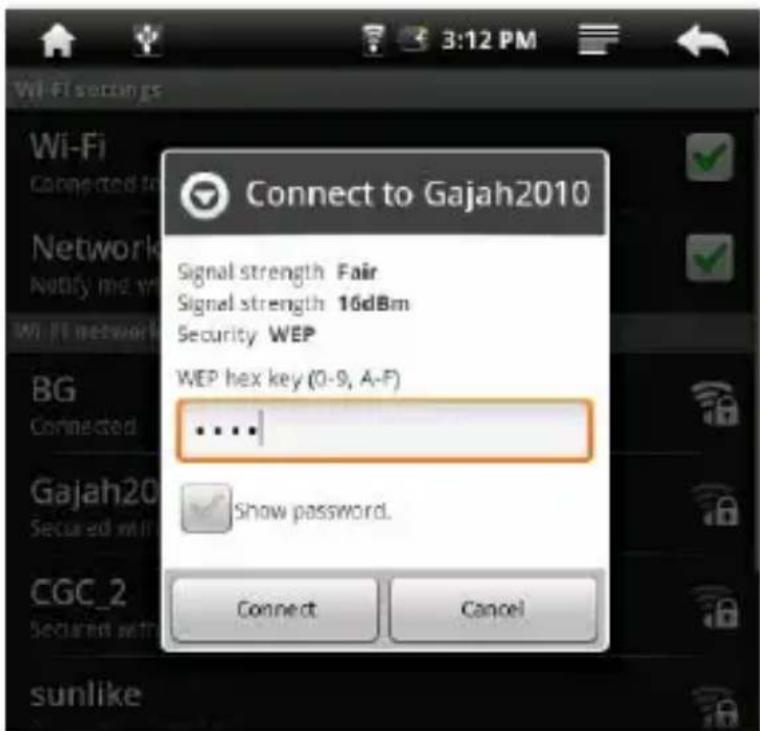
Connecting to the Internet
Libre Touch can join available Wi-Fi networks and connect to the Internet.
Turn on Wi-Fi: From Home screen, open the Main Menu and choose Wi-Fi.
Join a Wi-Fi network: Select from a list of available Wi-Fi networks. If necessary, enter a password and tap Connect button. (networks that require a password appear with a lock icon).
Once you've joined a Wi-Fi network manually, your Libre Touch will automatically connect to that network whenever the network is in range.
Changing Screen orientation
You can change screen orientation to either portrait or landscape by rotating the unit. The screen rotates will automatically rotate and adjust to fit the screen.

natural_image
Close-up of daisies with yellow centers and white flowers, showing a blue arrow pointing to a green background (no text or symbols)Charging the Reader
- You need to charge the Libre Touch prior to using it for the first time or when battery power is low.
- Charge the reader using the Power adapter (output 5V, 1.2A).
- You may also charge the Libre Touch through the PC using the USB cable. However, the method might not fully charge the Libre Touch due to the low output current available from PC's USB port.
- Please turn the Libre Touch to standby mode to shorten the charging process.
- It will take about 6 hours to fully charger the reader in Standby mode (LCD off)
- When the Power adapter cable is connected to the reader for charging, the reader will enter into Standby mode after
remains idle for 60 seconds. Press the Power button to wake the Libre Touch from Standby mode.
- The battery status is displayed at the top of the screen

flowchart
graph LR
    A["Battery Full"] --> B["Battery Low"]
    B --> C["Battery Low"]
    C --> D["Battery Low"]
    style A fill:#f9f,stroke:#333
    style B fill:#f9f,stroke:#333
    style C fill:#f9f,stroke:#333
    style D fill:#f9f,stroke:#333
    subgraph Charging
        E["Charging Symbol"]
    end
Importing content
From Computer
- The Libre Touch supports USB Mass Storage Device function.
- To import content (ebooks, video, audio, photo, etc.) onto the Libre Touch, connect it to your PC via the supplied USB cable.
- Upon successful connection to your PC, the Libre Touch will enter USB mode and all operations will be halted.
- Go to "My Computer" on your PC, double-click on the removable device icon representing on the Libre's internal memory to view its contents.
From memory card
This unit supports any brand of MicroSD card up to 16GB.
To insert a Memory card:
Insert the card correctly with its lable facing up until it clicks into the place. You may damage the card and the reader if MicroSD card is not inserted correctly.
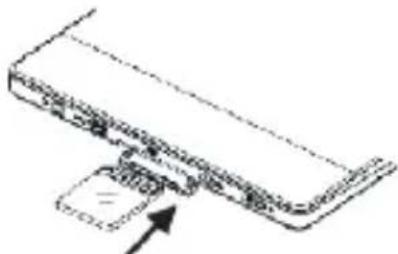
natural_image
Simple line drawing of a device with an arrow pointing to a component (no text or symbols)- To remove the MicroSD card, push the MicroSD card until it clicks and it will eject from the card slot.
- When a MicroSD card is inserted in or ejected from the Libre Touch, it may take few seconds for the Libre Touch to update the content.
- Please avoid inserting or ejecting the MicroSD card when other operation is running as this may cause the system to hang.
- Do not remove the MicroSD card if the content inside the card is being played. This will halt the operation of the reader and cause the reader to restart.
- If the system is not responding, press and hold the
button for 6 seconds to reset and turn it off.
Limitations with NTFS file system:
- If a MicroSD card is formatted with an NTFS file system, books on the MicroSD card are not recognized by ADE when connected to PC.
- Direct copy of files from internal memory to card is not supported.
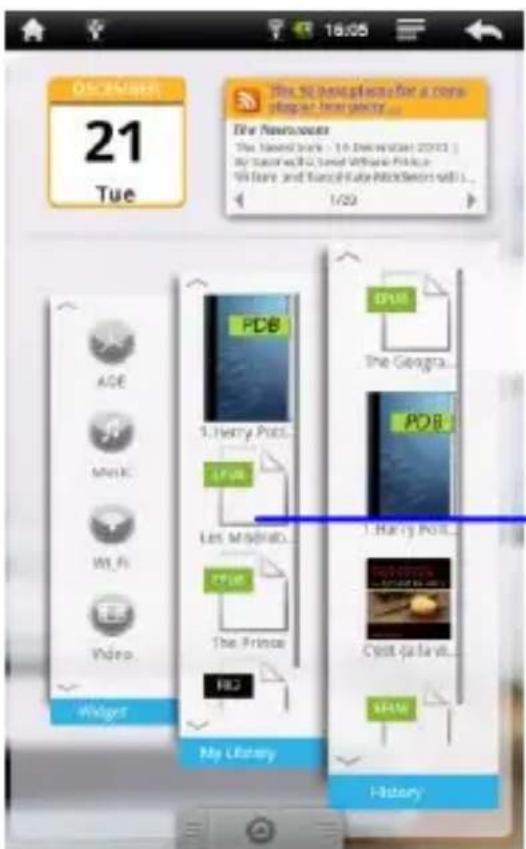
Reading Books
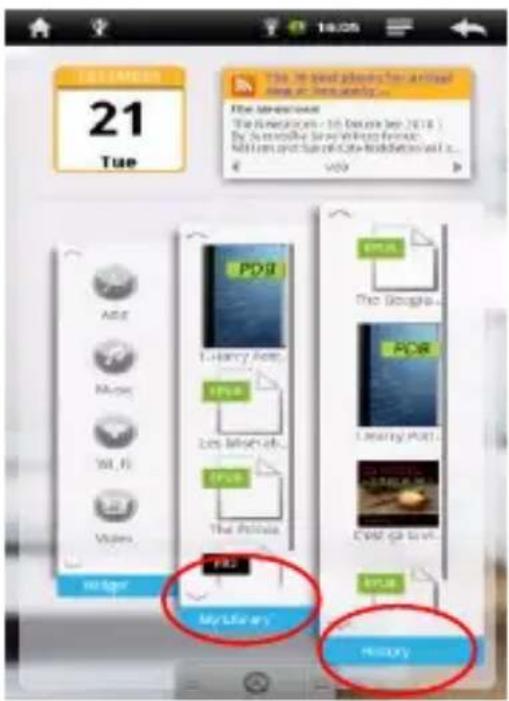
- On the Home screen, tap on the ebook icon to start reading.
- You can also tap the ^ or √ button to scroll the list of e-books
- Tap History to view your recently read e-book, tap My Library to view all e-books.
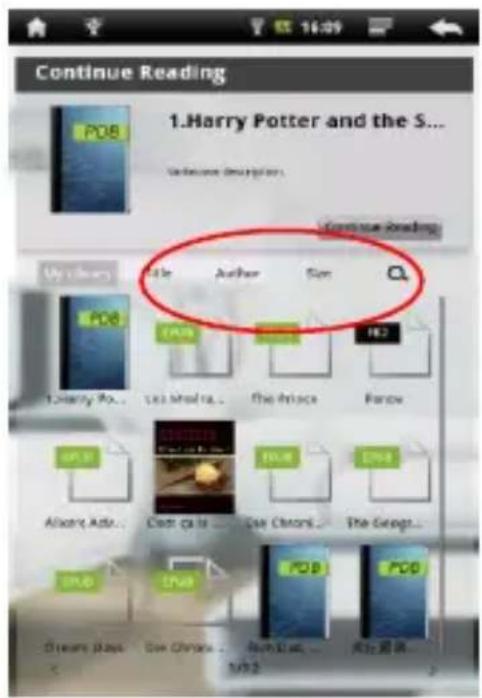
Browsing by category
You can browse the e-books list by different sorting method, such as author, title, and file size.
- Tap History or My Library to enter into ebook list screen.
- Tap on the tab to choose a sorting method.

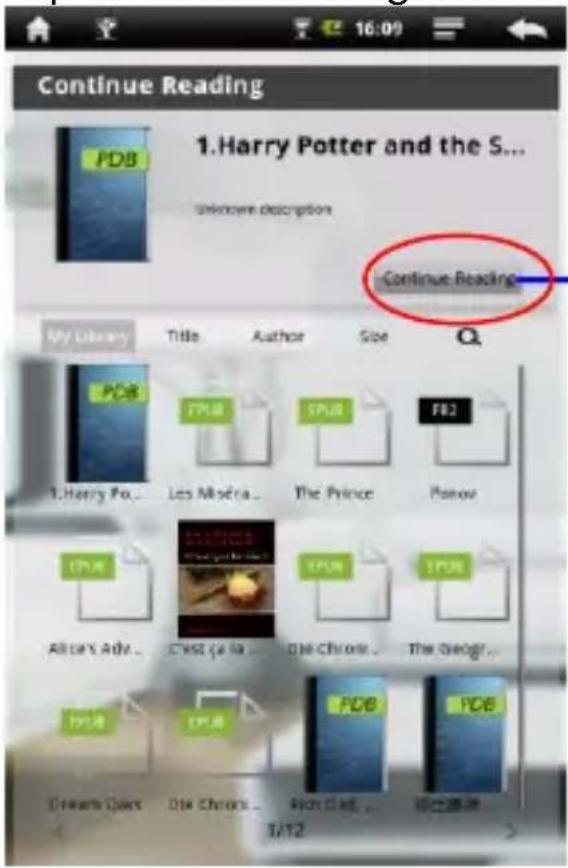
Continue Reading
Tap Continue Reading to read e-books:
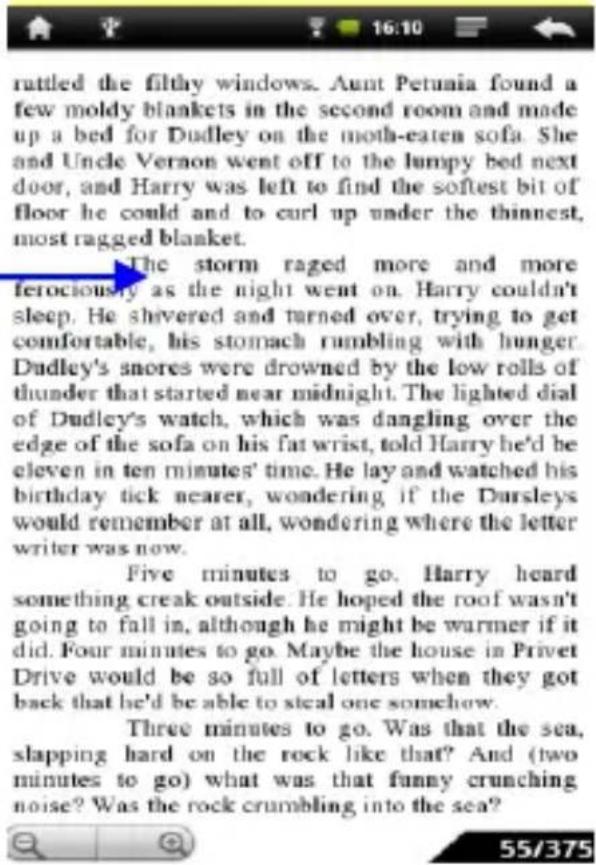
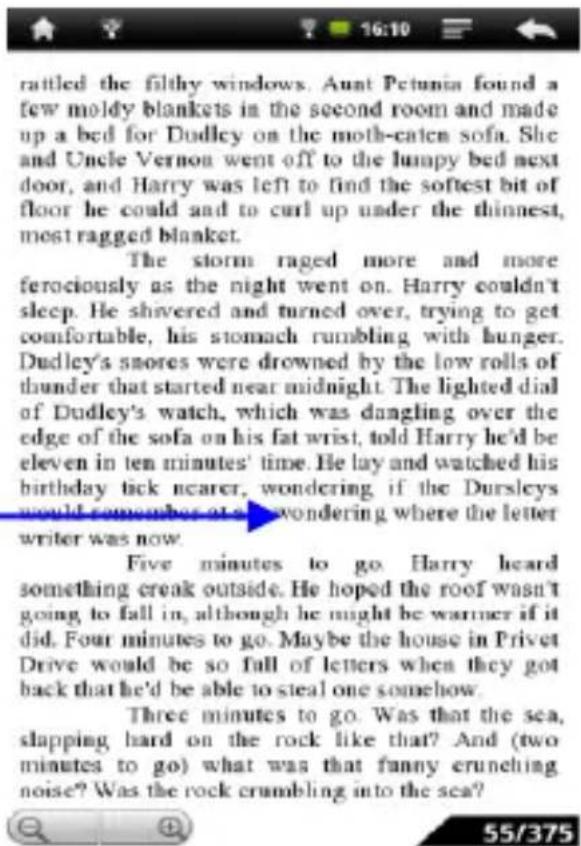
Page turning
On reading page screen, slide your finger from left to right or right to left to turn the page. You may also tap the left or right side of the page to turn to the next or previous page.
Zooming In/Out
- Zooming buttons on the lower left corner of the page to enlarge page image (available on ePub & PDF ebooks only).
- Tap Zoom+ or Zoom- to Zoom in/Zoom out.
Using Option Menu in Reading
While reading, tap the


| Font Size | Go To |
| Bookmarks | BookInfo |
Change font size
Tap to adjust the font size.
Skip page :
- On the options menu, tap Go To to skip to a specific page,
- Enter the page number and tap OK to go to the desired specific page.
to skip to a specific page,
OK to go to the desired
Using Bookmarks
Tap Bookmarks to show, add, or delete bookmarks.
View book information
Tap to display book information, including Title, Author, and publication date.


Playing Music
Playing songs
1) In the song list, slide your finger up and down to scroll list of songs.
2) Tap the selected songs to start playback
Controlling Song Playback
| Pause or play songs. | Tap  |
| Play previous or next song | Tap  |
| Rewind or fast forward | Press and hold  |
| Skip to any point in a song | Tap anywhere or Drag the playhead on the progress bar |
| Adjust the volume level. | Drag the volume slider  or use the buttons on the bottom of Libre Touch. or use the buttons on the bottom of Libre Touch. |
| Change loop play mode | Tap  |
| Change Sound effects. | Tap  |
Chapter 2: Getting Started
| Display the lyrics and ID3 information | Tap  |
| Add the current song to the playlist | Tap  |
| To return to the Media Library | Tap  |
Additional control
• To set a customized sound effects, Tap

- To search the related information about the song from the Internet, tap on the ID3 information bar
Using Playlists:
Use the playlist to manage the songs in the unit.
In the media library, tap 📄 to show playlist screen
Create playlists
1) In the media library, tap

to add a new playlist.
2) Tap on the right to edit the new playlist, and you can start to add songs into the playlist.
3) Tap your desired songs and a check mark will appear to the left of the songs.
4) After selecting all the songs to be added, tap to complete the addition. And the list will be created.
Edit List:
You can edit an existing list to add or remove songs from a playlist.
1) In the media library, tap the

ton to show playlist. .
2) Tap the button on the right to choose the desired playlist to be edited. Check marks will appear next to selected songs in the playlist.
3) To remove songs in the playlist, tap on the song to remove the check mark.
4) Tap the button

finish editing the playlist.
Delete list:
1) In the media library, tap the

button to show the playlist.
2) Tap the desired playlist to be deleted, and tap the right.

button on
Note: You can not delete the Recently Played playlist.
Watching Videos
Playing videos
- In the Video mode, see all the video files stored in the memory card and on Libre's internal memory.
- To view the video list, slide your finger up and down to scroll through the list.
- Tap to select a video file for playback.

natural_image
Animated bear holding a fire with flames and a green hat, standing on water (no text or symbols)Controlling Video Playback
During video playback, tap on the screen to show the toolbar.
Chapter 2: Getting Started
| Pause or play video | Tap  |
| Play previous or next chapter | Tap  |
| Rewind or fast forward | Press and hold  |
| Skip to any point in a video | Tap anywhere or drag the playhead on the progress bar |
| Adjust the volume level | Drag the volume slider or use the buttons on the bottom of Libre Touch |
| Adjust screen brightness | Tap  |
| Set the screen aspect ratio | Tap  |
| Display video menu | Tap  |
| Return to the video browser screen | Tap  |
Additional control
To set a bookmark in the current playback position, tap "Add Bookmark", the new bookmark will replace the old bookmarks. It allows you to continue playing from beginning or the bookmark The video will defaults to play from the beginning.
To delete a bookmark, tap the 📄 on the upper right to display the Playback menu, select "Remove Bookmark".
Notice:
Video player does not support subtitle file, you cannot load the subtitle file to be displayed on the current video, unless the video itself is with the subtitles.
Using video Playback menu
- Play from the beginning (this will delete any bookmark)
- Delete bookmark
- Help
- Repeat: Single, Repeat One or Repeat all
- Return: return to the previous page
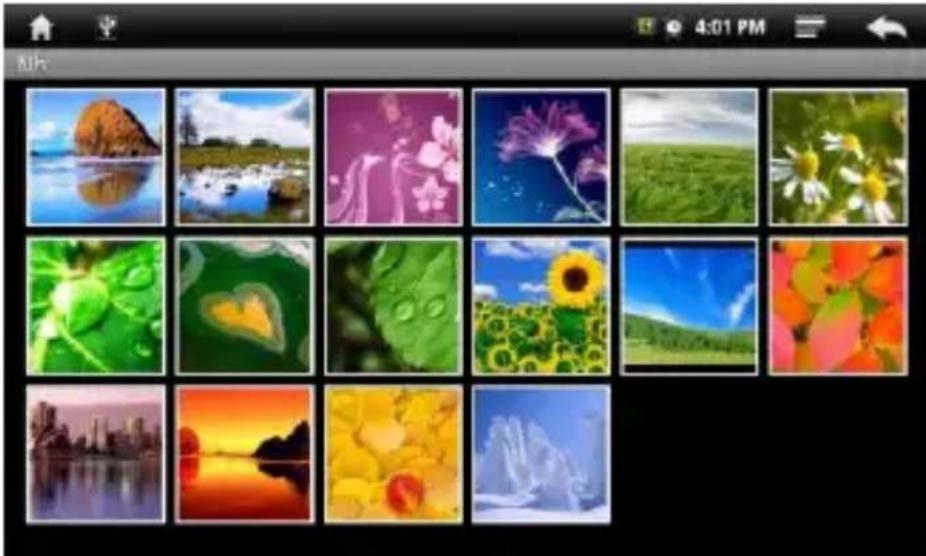
Viewing Photos

Open the Main Menu and tap on the "Photo Viewer" button to view photos.
Thumbnail View
When you open the Photo Viewer, small thumbnail images will appear of the photos on the Libre Touch. Tap on the thumbnail image to view the photo in the full screen view.
natural_image
Grid of 20 colorful nature photos including mountains, flowers, sunflowers, and city skyline, displayed in a mobile app interface (no text or symbols on the images themselves).Start to View photo
Tap on the screen to show or hide the control bar.
Controlling the Photo Viewer

natural_image
Close-up of a green leaf with water droplets, captured in a photo editing interface (no text or symbols on the leaf itself)| Start / stop slide show | Tap |  |
| View the previous / next photo | Tap |  |
| Rotate the photo by 90 degrees clockwise/ counterclockwise | Tap |  |
| Adjust brightness | Tap |  |
| Zoom In or Zoom Out | Tap |  |
| Return to thumbnail View | Tap |  |
Note: In Zoom in or Zoom Out mode, slide your finger up and down to move photo.
- After opening the Browser, tap to display options menu, then tap "Go" to bring up the address field.
- Tap the address field (on the left side of the title bar, then type theweb address and tap "Go".
- Tap on a link listed on the search results to open a webpage.
- Slide your finger up and down to scroll left and right on the page.
- To return to the previous page, tap the button.
NOTICE: Browser start page always defaults to Google home page.
 |  |  |
| Go | Bookmarks | New window |
 |  |  |
| Refresh | Forward | More |
Bookmarks
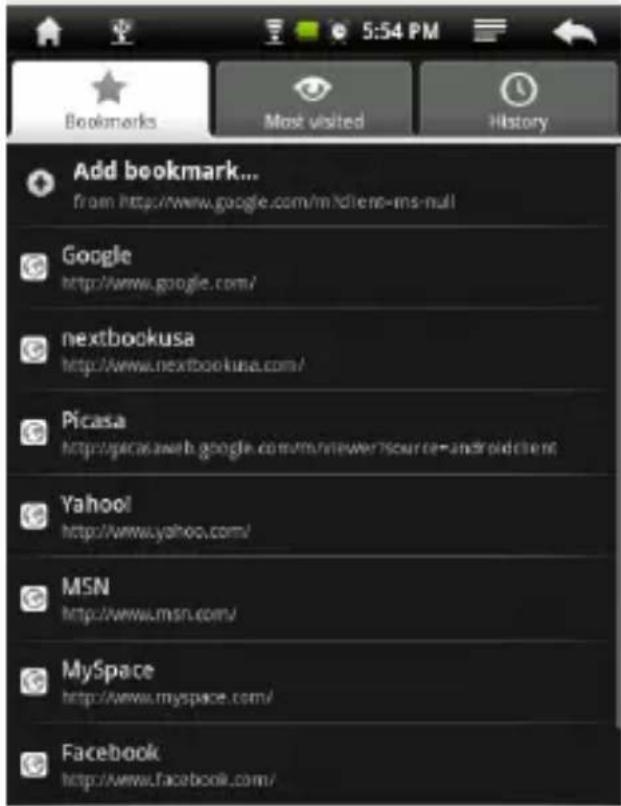
1) Bookmarks:
Lists all current bookmarks; tap a bookmark to open the page. You can edit, rename or delete bookmarks. On the bookmark screen, select the “Add Bookmark” button to add new
bookmarks. Tap the Menu button to take last visited webpage as bookmark.
2) Most visited sites: Tap to display a list of the most frequently visited websites.
3) History: Tap to access the history list. Tap the button to Clear the history list.
New Window:
Tap "Windows" to open a new window. If you currently have multiple windows open, tap on Windows to display up to four
windows. Tap on one of the small windows to enlarge to full screen mode. Tap the "X" button to close a window.
Refresh/Stop
Tap the "Refresh" to refresh on the current page, tap "Stop" to stop loading the current page.
Forward
Tap forward to go to the next visited webpage.
More
View more available options (Find on page, Select text, Page information, Download and Settings)
natural_image
Email icon with envelope and @ symbol (no text or symbols beyond the icon)Setting Up Email Accounts
Prior to the use of e-mail, send and receive messages you need to set up the mailbox account.
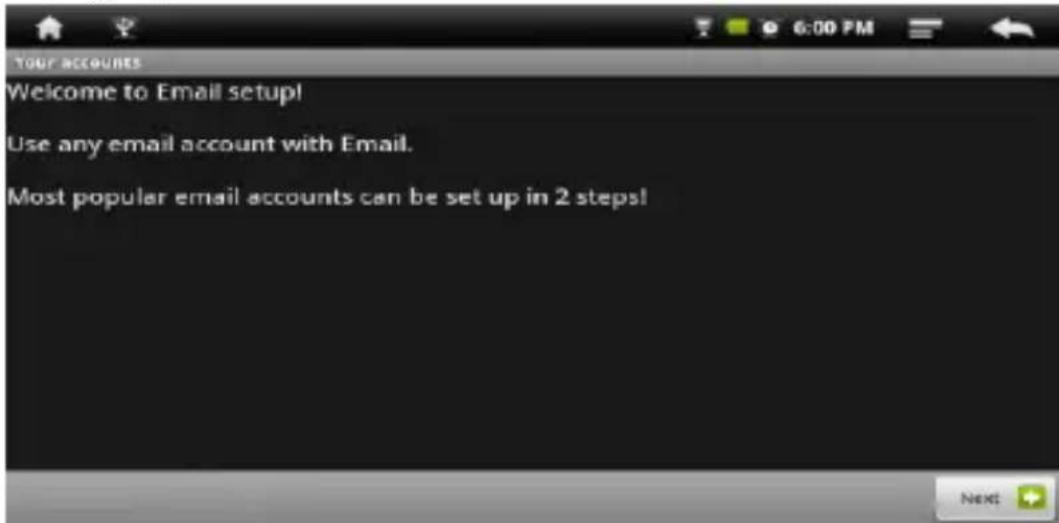
- You can use Libre Touch to receive or send e-mail. In Main menu, tap the "Email." button
- You will be prompted to set mail account, tap "Next" to begin to setting.
- Enter your email address and password, tap "Next" to continue.
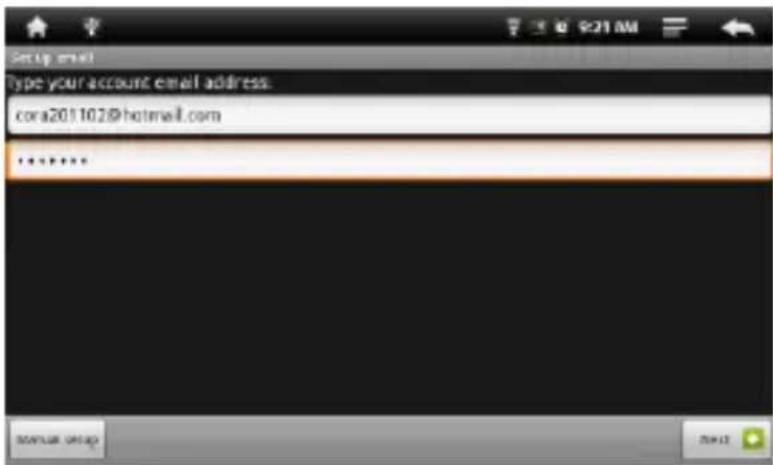
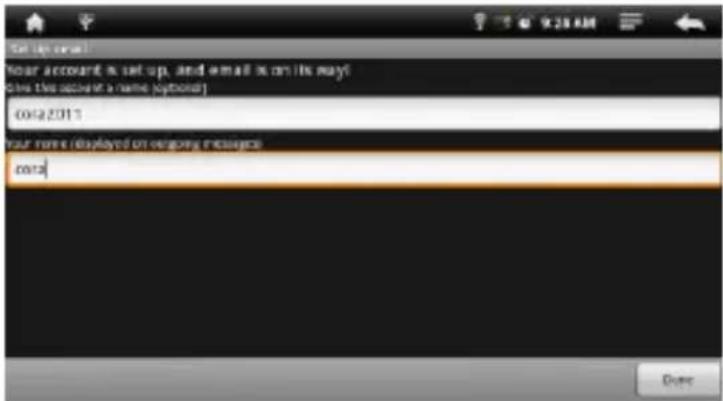
- Set mail P03/IMAP server, you can obtain the required information from your network administrator. Tap "Next" to continue, it will take a moment for the system to check the server settings, if you set successfully, the system will prompt "your account is set up, you can use it!"
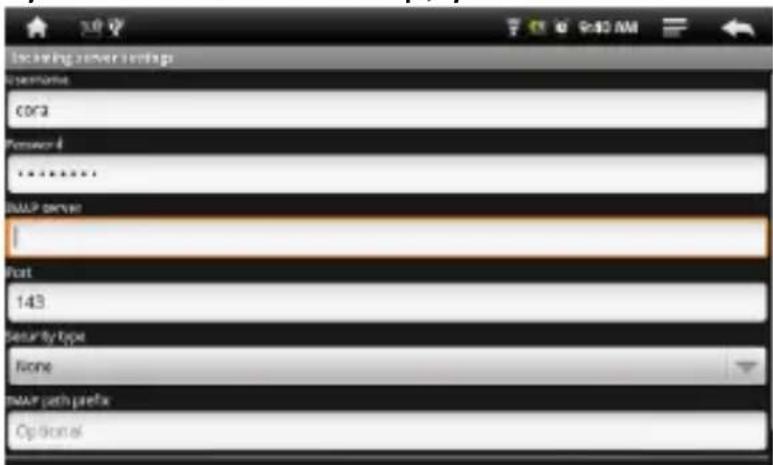
- Enter your name to be displayed, then tap "Finish", the system will go to your Inbox, then you can read your e-mail.
Search Mail
- In the mailbox, you can slide your finger up and down to scroll list.
- You can tap to open the mail you want to read.
- On the mail list, press and hold on the mail until it pops up a menu. You can select open, reply, forward, delete and other operations on the menu.
Mail menu
In the mail list, tap the button to display a mail menu.
- Refresh: Refresh Mail
- Write: Write a new mail
- Accounts: Browse all e-mail accounts
- Account Settings: Set the mail account
Delete mail account
You can add your mail account to remove from this unit.
- In the email, tap the button to display a mail menu.
- Press and hold on the mail until it pops up a menu.
- Tap the "Delete Account" button, then tap "OK" button.
Notice:
You can set multiple mail accounts, each time you open a mail, the system will automatically jump to the default account.
More Applications
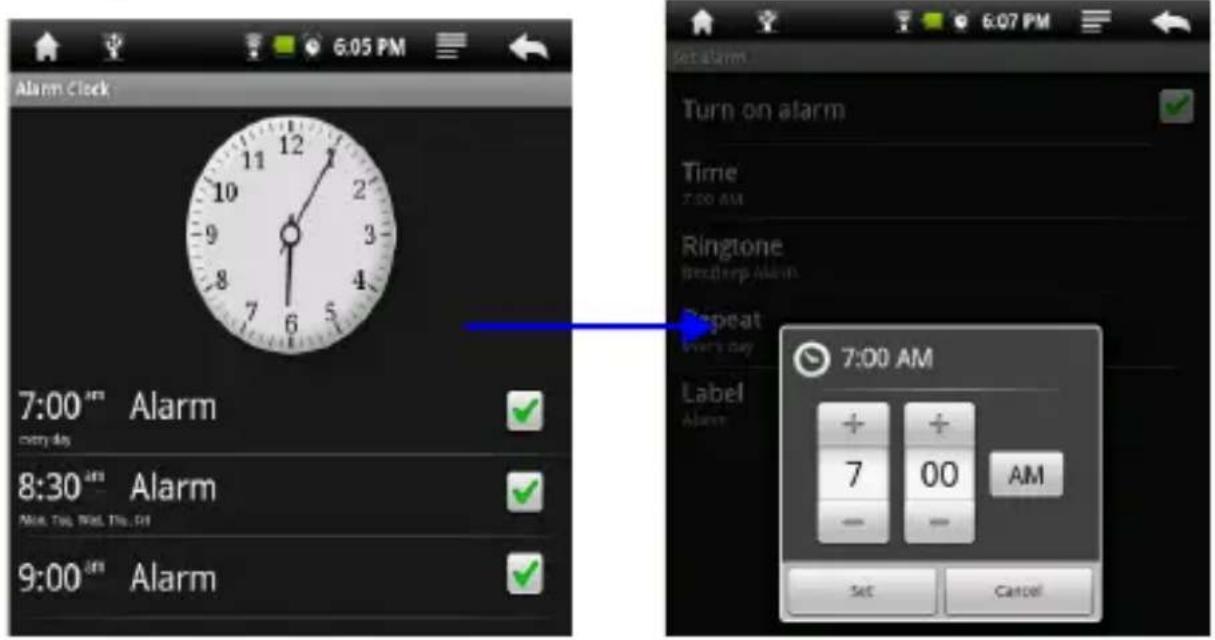
Alarms

Set multiple alarms. Set each alarm to repeat on days you specify, or to sound only once.
On the Home screen, tap the button to display the applications, then tap Alarm Clock icon to start clock alarm setting.
Set an alarm:
1 On clock setting screen, tap the button to display clock menu, tap "Add alarm" to start to alarm setting.
2 Adjust any of the following settings:
To set the alarm time, tap + or + button to adjust the desired hours and minutes. Then tap the Set button to confirm.
To set the alarm to repeat on certain days, tap Repeat, choose the days and then click OK.
To choose the ringtone that sounds when the alarm goes off, tap Ringtones.
To give the alarm a description, tap Label. The label will be displayed when the alarm sounds.
If at least one alarm is set and turned on, appears in the Libre Touch status bar at the top of the screen.
Turn an alarm on or off: tap a set Alarm and tap "Turn on alarm" to check or uncheck the alarm. If an alarm is turned off, it will not sound again unless you turn it back on.
If an alarm is set to sound only once, it turns off automatically after it sounds. You can turn it on again to reenable it.
Change settings for an alarm: tap the desired alarm to be changed.
Delete an alarm: tap Alarm to enter into Alarm setting screen, then tap the button to show the "Delete alarm" button.
Tap Delete alarm button to delete the alarm setting.
Calculator
Using the Calculator

From the Home Screen, tap button to bring up Main Menu.
Then tap the Calculator icon to use calculator function.
Tap numbers and functions in Calculator just as you would with a standard calculator.
CLEAR button: Tap CLEAR to erase any displayed numbers.
File Explorer
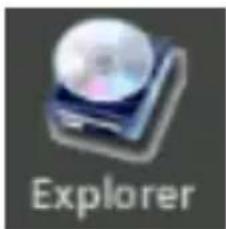
natural_image
Illustration of a CD or DVD device with the word 'Explorer' below it (no other text or symbols)- From Home Screen, tap button to bring up the Main Menu. Then tap the Explorer button to view the Explorer menu.
- To select, tap Internal Memory or SD card memory to view the contents of each memory source.
- To open a file or folder, tap on the file or folder.
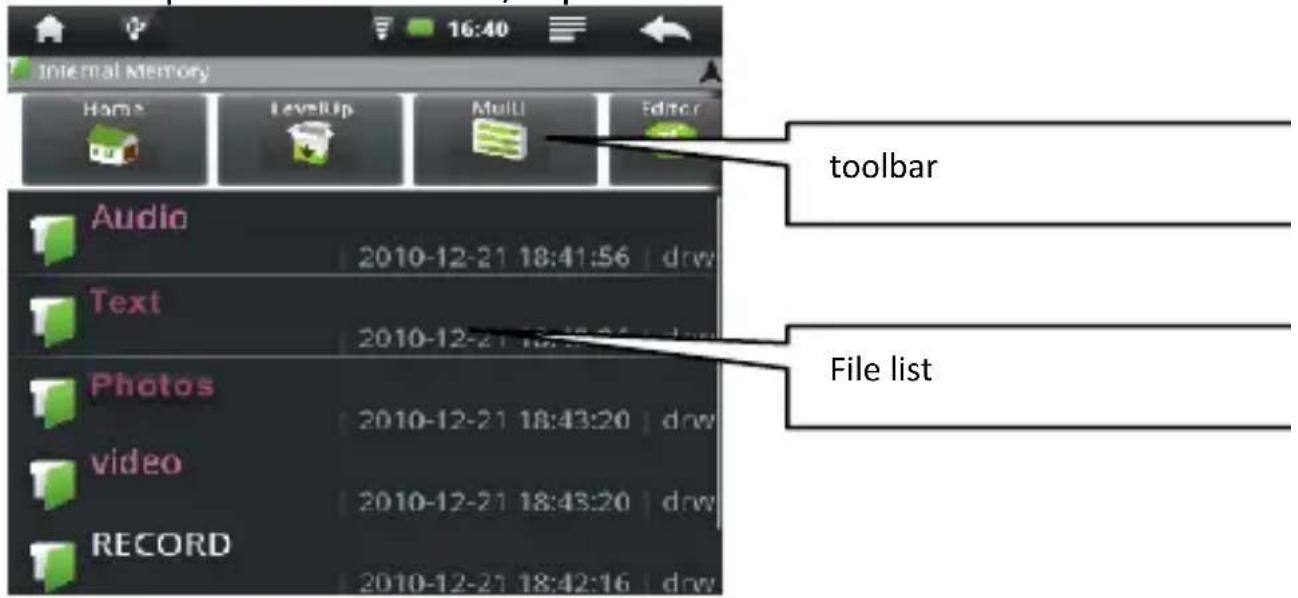
Tool bar

A: Home screen: return to Explorer Home screen
B: Level Up: return to the previous directory.
C: Multi: choose more than one item
D: Editor: Copy, Delete, Move, Paste or Rename a file or folder
E: Back: return to previous directory
F: Next: go to next directory
Browse a file or folder
You can slide your finger down the list of files to scroll through the list to select the file.
Tap the "Button to return to the previous folder.
Tap the Back button to return to parent directory,
Tap the button to the next directory.
Tap the button or the button to return to the Home screen.
File menu
Tap Editor to show file menu.
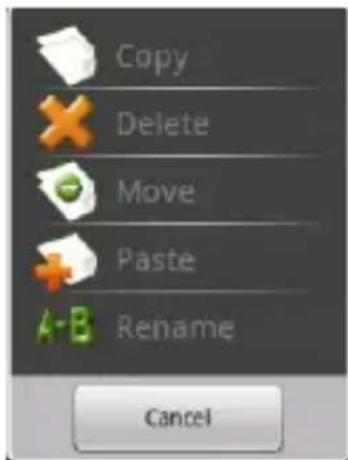
Copy / move the file or folder
In the file list, touch and hold your finger on the desired file or folder to be moved or copied until Editor File menu appears.
1) Select "Move" or "Copy".
2) Locate the target folder that you want to put the selected file or folder.
3) Touch and hold your finger on the target folder until the Editor File Menu appears and then tap Paste.
Delete a file or folder
In the file list, touch and hold your finger on the desired file or folder to be deleted until the Editor File Menu appears.
1) Select Delete and a dialog box will ask you to confirm that you wish to delete the file.
2) Select "delete" to confirm the deletion, or select "Cancel".
Rename the file or folder
In the file list, touch and hold your finger on the desired file or folder to be renamed, until Editor File menu appears.
1) Select "Rename"
2) Tap the file name area and use virtual keyboard to enter a new file name.
3) Tap OK button to complete the rename operation.
Select multiple folders:
You can select multiple files or folders at the same time.
On the Tool bar, select "Multi" and then tap all of the desired files or folders the will be highlighted in purple. On the last selected file or folder you selected, touch it again and hold your finger on the file folder until the Editor File menu appears.
1) Select Copy, Delete or Move.
2) Follow the directions detailed previously for each option.
Note: it may take longer time to paste files/folder with big file size.
Importing DRM Content
The Libre Touch supports Adobe DRM content in the form of ebooks in Adobe's ePub and PDF format. Adobe Digital Editions (ADE) is required to manage your ebook purchases by transferring and authorizing them to open on your Libre Touch.
Installing Adobe Digital Editions (ADE) on your PC/Mac
- Adobe Digital Editions is a free application that you can download from Adobe's website at the following link: http://www.adobe.com/products/digitaleditions/Install the application onto your PC/Mac and follow the instructions of the installer program.
First time users are required to setup an Adobe ID and password during the installation process, as illustrated below:
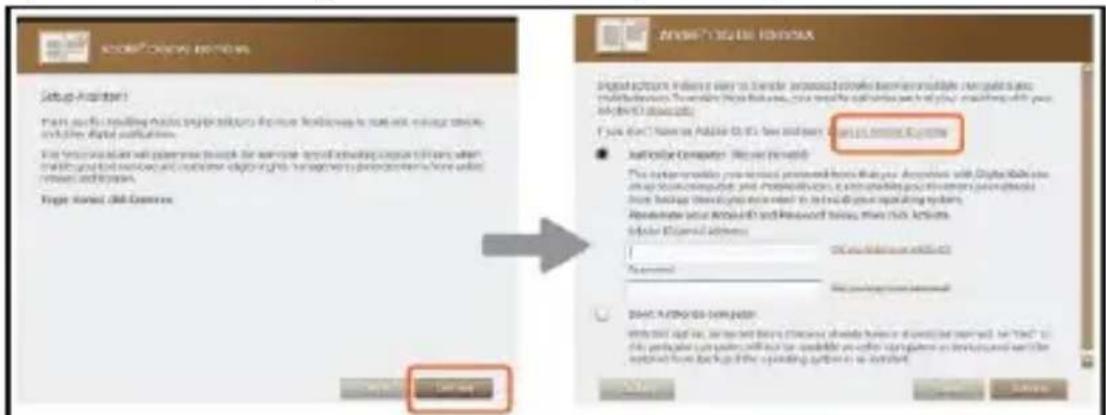
- Enter your email address and complete the online form as instructed.
Authorizing PC/Mac and Libre Touch
- Upon registration, return to the ADE program window. Enter the username and password to activate your Adobe account.
- After activation, connect the Reader to PC/Mac. ADE will detect your Libre Touch and you will be prompted to authorize device.
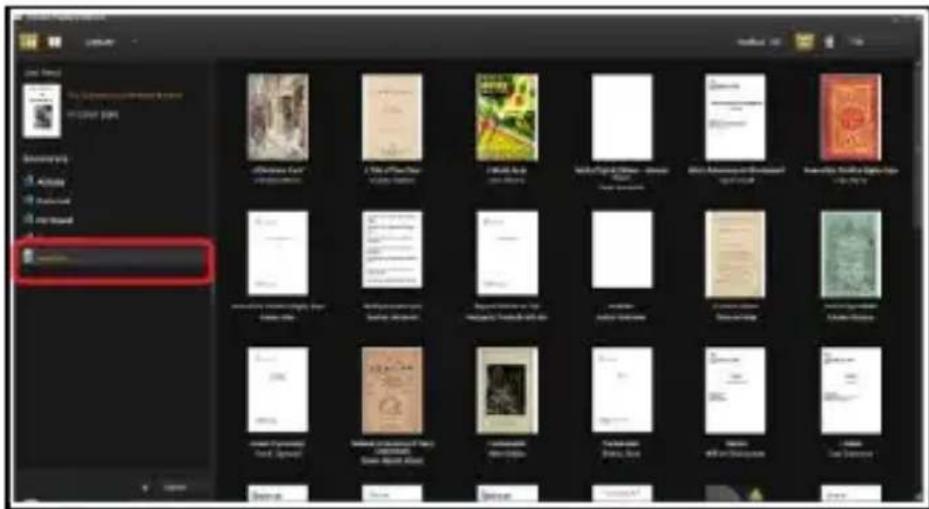
- After authorization, your Libre Touch will appear as a small icon in ADE program window under Bookshelves, as shown below. Clicking on the icon will display the ebooks contained on your Libre Touch as icons on the right-side of the ADE window.
- You can now start purchasing and downloading ePub and PDF ebooks from online eBook stores that support ADE.
- Your purchased and downloaded ebooks will be stored in a folder titled My Digital Editions in My Documents on your PC.
Transferring ebooks from your PC/Mac to your Libre Touch
- Please make sure that you are in ADE's Library View by clicking on the icon on the top left corner of the program window that looks like 3 books standing next to each other.
- The ebooks saved to your ADE Library will appear as icons on the right-side of the program window.
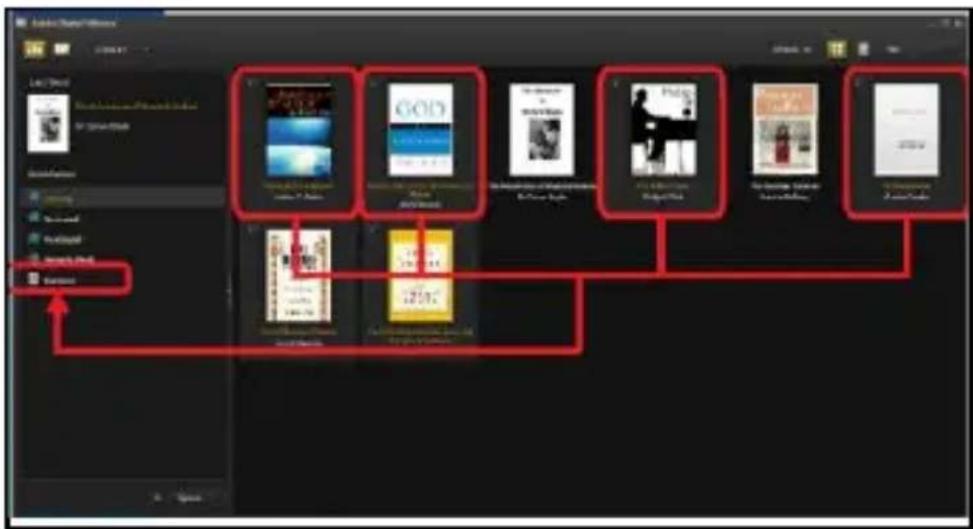
- Select the icon of the ebook you wish to transfer and drag & drop the icon of the selected ebook on top of the icon of your Libre Touch, as illustrated below.
Notes for using ADE
Each Adobe ID supports only 6 devices, this include your Libre Touch and your PC/Mac.
When your Libre Touch is restored to its default settings, ALL DRM activation records and data (including your purchased ebooks) will be erased from the Libre Touch. You will be required to authorize your Libre Touch again.
If the number of device authorizations associated with your Adobe ID has exceeded 6 devices, you may receive the following error message:
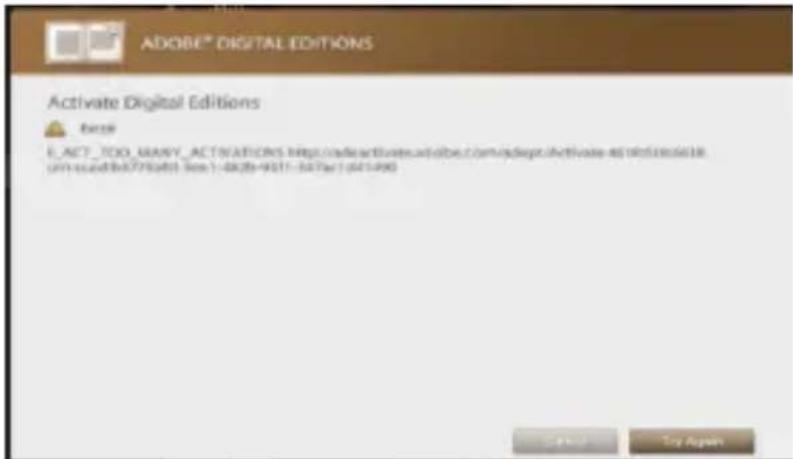
You may request an extension of the number of device authorizations from Adobe. If you have not exceeded the number of device authorizations, you may submit a request to reset the number of device authorizations. Go to http://www.adobe.com/support/digitaleditions/ and submit a web case to Adobe's support. You will be required to enter your Adobe ID and password to submit a web case.
Management of third-party applications
The Libre Touch supports some third-party applications (such as MSN, etc.) that you can install or uninstall for the system.
Download and install the application
- You can download the application from your computer to Libre Touch or directly from the Libre Touch browser.
- Copy the download application directly to Libre Touch (Note: The system only supports XXX.APK format).
- Disconnect Libre Touch from the computer.
- Go to Settings menu, select "Application", then tap on "unknown sources" allow the installation of non-Market applications.
-
Use Explorer to find the path where the installation files are located and then tap to start the installation.
-
Upon completion, you will see the Applications installed.
Uninstall application
- Tap the Main menu, then tap "Settings" to display setting screen.
- Tap Applications and then "Manage applications".
- Select the application you want to uninstall and then tap the Uninstall button.
These setting items allow you to customize applications on your Libre Touch, set the date and time, configure your network connection, and enter other preferences for the unit.
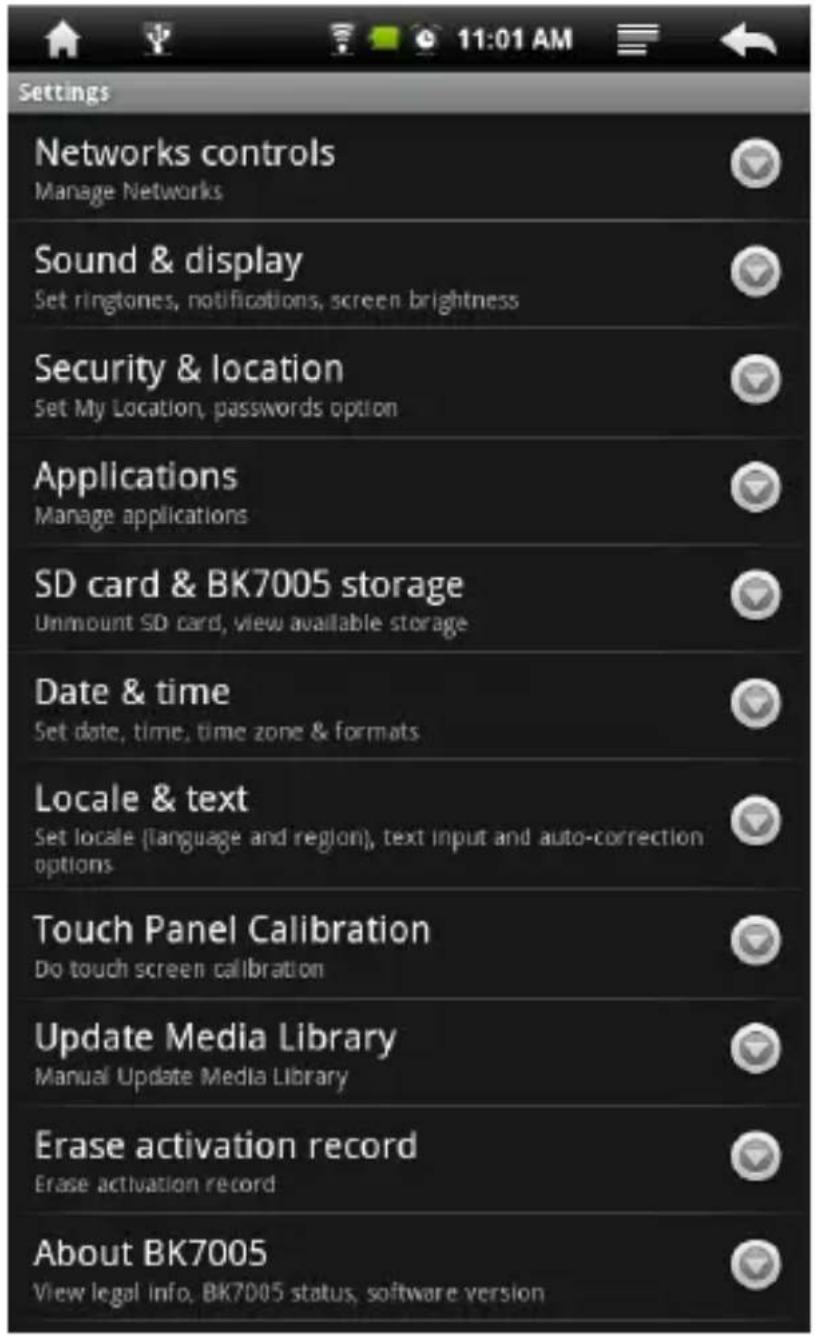
From the Main Menu, choose Settings, then tap the desired items to be configured to display the Setting screen.
Network/Wi-Fi Setting
The Network controls allow you turn Wi-Fi on and join Wi-Fi networks.
Turn on Wi-Fi: Tap Wi-Fi to turn it on.
Join a Wi-Fi network: Tap on Wi-Fi Settings, select a network. If necessary, enter a password and tap Connect button (networks that require a password appear with a lock icon).
Once you have joined a Wi-Fi network manually, the Libre Touch will automatically connect to it whenever the network is in range. If more than one previously used network is in range, the Libre Touch joins the last network used. When the Libre Touch is connected to a Wi-Fi network, the Wi-Fi icon at the top of the screen shows connection strength.
Sound and display
Allows you to set alert ringtones, volume, display option and standby mode.
Security and location
Allows you to set your network location and password for security purposes.
Applications
Manage the applications installed on Libre Touch, including unknown source applications, and installed applications.
SD card & internal storage
Allows you to format SD card memory and restore to default factory settings, you can also view the memory status of SD card and internal storage.
Date & Time
Allows you to set date, clock, time zone and display format.
Note: Time zone setting is needed to calculate the expiry duration for borrowed ebooks.
Region and text
Allows you to set region and language, text input and auto-correction.
Touch screen calibration
Carefully press and hold finger on the center of target briefly. Repeat as the target around the screen to calibrate touch screen.
Update Media Library
Update media library manually.
Erase Activation record
Allows you to delete the authorized information.
About the Libre Touch
Displays the information about the Libre Touch, such as product number, software version and so on.
If the Libre Touch does not function as it is expected, please try the following steps.
The Libre Touch is not responding or can't be turned on.
- Reset the reader by pressing and holding the power button for 6 seconds. The reader will be forced shutdown if it is on and you are required to restart the reader again.
- Battery has been fully depleted. Please charge the reader via the USB cable or USB AC Adapter.
Battery Life seems short
- The operating temperature is below 5 °C. this is due to the characteristics of battery and not a malfunction
- The battery is not used for prolonged period. Please recharge the battery of the reader again
- The battery is not fully charged. Please charge the reader for 4 hours.
- The battery needs to be replaced. Please consult Aluratek's Service Support Department.
The reader cannot be operated during USB connection
- The reader cannot be operated while it is connected to PC.
- Eject the reader from computer to resume operation.
- To use the reader while charging, click on the [Safely Remove Hardware] button located in the system tray to disconnect data connection with computer. After the reader is safely removed, computer will only charge the reader and you can now resume normal operation.
Touch screen problem
If the touchscreen does not respond, use the "calibrate the touch screen" function to calibrate the screen.
Maintenance
- If the reader gets wet, turn it off immediately. Wait for reader to dry completely before turning on again.
- Clean the screen with a soft cloth; be careful not to wipe it with anything abrasive. When carrying your reader in bag, keep reader in the protecting case supplied to avoid scratches
- If reader needs service, please consult Aluratek's Service Support Department through the contact information provided in the warranty card. Faulty service may void the warranty.
Product Specifications
Display
7 inch TFT-LCD Display, 800x480 pixels High resolution touch screen
Wifi
802.11 b/g
Operating System
Android 1.5
Storage memory
Built in memory: 2GB Supports MicroSD up to 16GB
Media File Format supported
Ebook: epub, pdf, txt*, fb2*
Audio*: mp3, wma, wav, ogg, aac
Photo: jpg, bmp, gif, png
Video*: rm/rmvb, avi, mkv (xvid/h.264), mpg, mp4, 3gp, dat, mov, flv
Connectivity
Data transfer: Micro USB 2.0 High Speed
Audio: 3.5mm audio jack
Storage: MicroSD Card
Miscellaneous
Built in stereo speaker
Clock / Date
Real time battery indication
Battery life
Reading – up to 8 hours
Music – up to 10 hours (with backlight off)
Charging
Power: DC 5.0V, 1.2A
Duration: 6 hours (approx)
Minimum system requirement (USB Mass Storage)
Windows: 98, 2K, XP, Vista, 7
Mac: 10.0 and above
Linux
Physical properties
Dimension: 202.8 X 124.7 X 12.4mm (approx)
Weight: 280g (approx)
(* Non-DRM only)
Design and specifications are subject to change without prior notice
Disposal and Recycling Information
Your Libre Touch must be disposed of properly according to local laws and regulations.
Because this product contains a battery, it must be disposed of separately from household waste. When your Libre Touch reaches its end of life, contact your local authorities to learn about recycling options.
Battery Replacement:
The Libre Touch's rechargeable battery must only be replaced by an authorized service provider.

This symbol on the product or in the instruction means that your electrical or electric equipment should be disposed at the end of its life separately from your household waste. There are separate collection systems for recycling in the EU, For more information, please contact the local authority or your retailer where you purchased the product.

- FCC Information and Copyright
- Safety Precautions
- On Battery
- On Operation
- On the MicroSD card
- Contents
- FCC INFORMATION AND COPYRIGHT......I
- SAFETY PRECAUTIONS...... II
- CONTENTS ....III
- CHPATER 1 BASICS...... 1
- CHAPTER 2 STARTING TO USE THE READER .... 9
- CHAPTER 3 SETTINGS .... 33
- Button Descriptions
- Package Content
- Power On and Off the Reader
- Home Screen
- Main Menu
- Touch screen or buttons
- Scrolling
- Onscreen keyboard
- Connecting to the Internet
- Changing Screen orientation
- Charging the Reader
- Importing content
- From Computer
- From memory card
- To insert a Memory card:
- Limitations with NTFS file system:
- Reading Books
- Browsing by category
- Continue Reading
- Page turning
- Zooming In/Out
- Using Option Menu in Reading
- Change font size
- Skip page :
- Using Bookmarks
- View book information
- Playing Music
- Playing songs
- Controlling Song Playback
- Chapter 2: Getting Started
- Additional control
- Using Playlists:
- Create playlists
- Edit List:
- Delete list:
- Watching Videos
- Playing videos
- Controlling Video Playback
- Notice:
- Using video Playback menu
- Viewing Photos
- Thumbnail View
- Start to View photo
- Controlling the Photo Viewer
- Bookmarks
- New Window:
- Refresh/Stop
- Forward
- More
- Setting Up Email Accounts
- Search Mail
- Mail menu
- Delete mail account
- More Applications
- Alarms
- Calculator
- File Explorer
- Tool bar
- Browse a file or folder
- File menu
- Copy / move the file or folder
- Delete a file or folder
- Rename the file or folder
- Select multiple folders:
- Importing DRM Content
- Installing Adobe Digital Editions (ADE) on your PC/Mac
- Authorizing PC/Mac and Libre Touch
- Transferring ebooks from your PC/Mac to your Libre Touch
- Notes for using ADE
- Management of third-party applications
- Uninstall application
- Network/Wi-Fi Setting
- Sound and display
- Security and location
- Applications
- SD card & internal storage
- Date & Time
- Region and text
- Touch screen calibration
- Update Media Library
- Erase Activation record
- About the Libre Touch
- The Libre Touch is not responding or can't be turned on.
- Battery Life seems short
- The reader cannot be operated during USB connection
- Touch screen problem
- Maintenance
- Product Specifications
- Display
- Wifi
- Operating System
- Storage memory
- Media File Format supported
- Disposal and Recycling Information
Brand : Aluratek
Model : AEBK08FB
Category : Electronic accessory