
DGE-500SX - Uncategorized D-LINK - Free user manual and instructions
Find the device manual for free DGE-500SX D-LINK in PDF.

User questions about DGE-500SX D-LINK
0 question about this device. Answer the ones you know or ask your own.
Ask a new question about this device
Download the instructions for your Uncategorized in PDF format for free! Find your manual DGE-500SX - D-LINK and take your electronic device back in hand. On this page are published all the documents necessary for the use of your device. DGE-500SX by D-LINK.
USER MANUAL DGE-500SX D-LINK
Rev. 01 (September, 1999)
6DGE500SX.01
Printed in Taiwan

RECYCLABLE
Trademarks
Copyright 1999 D-Link Corporation.
Contents subject to change without prior notice.
D-Link is a registered trademark of D-Link Corporation/D-Link Systems, Inc.
All other trademarks belong to their respective proprietors.
Copyright Statement
No part of this publication may be reproduced in any form or by any means or used to make any derivative such as translation, transformation, or adaptation without permission from D-Link Corporation/D-Link Systems Inc., as stipulated by the United States Copyright Act of 1976.
Limited Warranty
Hardware:
D-Link warrants each of its hardware products to be free from defects in workmanship and materials under normal use and service for a period commencing on the date of purchase from D-Link or its Authorized Reseller and extending for the length of time stipulated by the Authorized Reseller or D-Link Branch Office nearest to the place of purchase.
This Warranty applies on the condition that the product Registration Card is filled out and returned to a D-Link office within ninety (90) days of purchase. A list of D-Link offices is provided at the back of this manual, together with a copy of the Registration Card.
If the product proves defective within the applicable warranty period, D-Link will provide repair or replacement of the product. D-Link shall have the sole discretion whether to repair or replace, and replacement product may be new or reconditioned. Replacement product shall be of equivalent or better specifications, relative to the defective product, but need not be identical. Any product or part repaired by D-Link pursuant to this warranty shall have a warranty period of not less than 90 days, from date of such repair, irrespective of any earlier expiration of original warranty period. When D-Link provides replacement, then the defective product becomes the property of D-Link.
Warranty service may be obtained by contacting a D-Link office within the applicable warranty period, and requesting a Return Material Authorization (RMA) number. If a Registration Card for the product in question has not been returned to D-Link, then a proof of purchase (such as a copy of the dated purchase invoice) must be provided. If Purchaser's circumstances require special handling of warranty correction, then at the time of requesting RMA number, Purchaser may also propose special procedure as may be suitable to the case.
After an RMA number is issued, the defective product must be packaged securely in the original or other suitable shipping package to ensure that it will not be damaged in transit, and the RMA number must be prominently marked on the outside of the package. The package must be mailed or otherwise shipped to D-Link with all costs of mailing/shipping/insurance prepaid. D-Link shall never be responsible for any software, firmware, information, or memory data of Purchaser contained in, stored on, or integrated with any product returned to D-Link pursuant to this warranty.
Any package returned to D-Link without an RMA number will be rejected and shipped back to Purchaser at Purchaser's expense, and D-Link reserves the right in such a case to levy a reasonable handling charge in addition mailing or shipping costs.
Software:
Warranty service for software products may be obtained by contacting a D-Link office within the applicable warranty period. A list of D-Link offices is provided at the back of this manual, together with a copy of the Registration Card. If a Registration Card for the product in question has not been returned to a D-Link office, then a proof of purchase (such as a copy of the dated purchase invoice) must be provided when requesting warranty service. The term "purchase" in this software warranty refers to the purchase transaction and resulting license to use such software.
D-Link warrants that its software products will perform in substantial conformance with the applicable product documentation provided by D-Link with such software product, for a period of ninety (90) days from the date of purchase from D-Link or its Authorized Reseller. D-Link warrants the magnetic media, on which D-Link provides its software product, against failure during the same warranty period. This warranty applies to purchased software, and to replacement software provided by D-Link pursuant to this warranty, but shall not apply to any update or replacement which may be provided for download via the Internet, or to any update which may otherwise be provided free of charge.
D-Link's sole obligation under this software warranty shall be to replace any defective software product with product which substantially conforms to D-Link's applicable product documentation. Purchaser assumes responsibility for the selection of appropriate application and system/platform software and associated reference materials. D-Link makes no warranty that its software products will work in combination with any hardware, or any application or system/platform software product provided by any third party, excepting only such products as are expressly represented, in D-Link's applicable product documentation as being compatible. D-Link's obligation under this warranty shall be a reasonable effort to provide compatibility, but D-Link shall have no obligation to provide compatibility when there is fault in the third-party hardware or software. D-Link makes no warranty that operation of its software products will be uninterrupted or absolutely error-free, and no warranty that all defects in the software product, within or without the scope of D-Link's applicable product documentation, will be corrected.
D-Link Offices for Registration and Warranty Service
The product's Registration Card, provided at the back of this manual, must be sent to a D-Link office. To obtain an RMA number for warranty service as to a hardware product, or to obtain warranty service as to a software product, contact the D-Link office nearest you. An address/telephone/fax/e-mail/Web site list of D-Link offices is provided in the back of this manual.
LIMITATION OF WARRANTIES
IF THE D-LINK PRODUCT DOES NOT OPERATE AS WARRANTED ABOVE, THE CUSTOMER'S SOLE REMEDY SHALL BE, AT D-LINK'S OPTION, REPAIR OR REPLACEMENT. THE FOREGOING WARRANTIES AND REMEDIES ARE EXCLUSIVE AND ARE IN LIEU OF ALL OTHER WARRANTIES. EXPRESSED OR IMPLIED, EITHER IN FACT OR BY OPERATION OF LAW, STATUTORY OR OTHERWISE, INCLUDING WARRANTIES OF MERCHANTABILITY AND FITNESS FOR A PARTICULAR PURPOSE. D-LINK NEITIHER ASSUMES NOR AUTHORIZES ANY OTHER PERSON TO ASSUME FOR IT ANY OTHER LIABILITY IN CONNECTION WITH THE SALE. INSTALLATION, MAINTENANCE OR USE OF D-LINK'S PRODUCTS.
D-LINK SHALL NOT BE LIABLE UNDER THIS WARRANTY IF ITS TESTING AND EXAMINATION DISCLOSE THAT THE ALLEGED DEFECT IN THE PRODUCT DOES NOT EXIST OR WAS CAUSED BY THE CUSTOMER'S OR ANY THIRD PERSON'S MISUSE, NEGLECT, IMPROPER INSTALLATION OR TESTING, UNAUTHORIZED ATTEMPTS TO REPAIR, OR ANY OTHER CAUSE BEYOND THE RANGE OF THE INTENDED USE, OR BY ACCIDENT, FIRE, LIGHTNING OR OTHER HAZARD.
LIMITATION OF LIABILITY
IN NO EVENT WILL D-LINK BE LIABLE FOR ANY DAMAGES, INCLUDING LOSS OF DATA, LOSS OF PROFITS, COST OF COVER OR OTHER INCIDENTAL, CONSEQUENTIAL OR INDIRECT DAMAGES ARISING OUT THE INSTALLATION, MAINTENANCE, USE, PERFORMANCE, FAILURE OR INTERRUPTION OF A D- LINK PRODUCT, HOWEVER CAUSED AND ON ANY THEORY OF LIABILITY. THIS LIMITATION WILL APPLY EVEN IF D-LINK HAS BEEN ADVISED OF THE POSSIBILITY OF SUCH DAMAGE.
IF YOU PURCHASED A D-LINK PRODUCT IN THE UNITED STATES, SOME STATES DO NOT ALLOW THE LIMITATION OR EXCLUSION OF LIABILITY FOR INCIDENTAL OR CONSEQUENTIAL DAMAGES, SO THE ABOVE LIMITATION MAY NOT APPLY TO YOU.
Introduction
Thank you for choosing the D-Link DGE-500SX Giga-Ether adapter for PCI Bus-equipped personal computers. The DGE-500SX is ideal for speeding up data transfers for network servers and other computers, such as those used for video-conferencing, that send and/or receive large amounts of data. The DGE-500SX also includes the newest networking technologies, such as VLAN and multicasting support, that use network bandwidth more efficiently and further help the card maximize data throughput.
System Requirements
The host computer or server using the DGE-500SX needs to meet the following minimum requirements:
- Processor – Pentium-class CPU or higher
• Memory – 32MB RAM (Linux only), all other NOSs require 64 MB RAM - PCI slot - 32- or 64-bit PCI Local Bus Slot Rev. 2.1 or later (please refer to the motherboard User's Guide)
- BIOS – Latest BIOS (Contact the PC manufacturer or BIOS manufacturer's website to verify)
- Network connection – an IEEE 802.3z-compliant gigabit switch, modular switch port or buffered repeater
- Operating System – One of the following:
Windows 95 (OSR2)
Windows 98
Windows NT 4.0 (Service Pack 5)
Windows NT 2000 Beta 3
Linux OS Kernel v2.0/2.2
Novell Netware v3.12, Support Pack 312PTD
Novell Netware v3.2
Novell Netware v4.11, Support Pack 5
Novell Netware v4.2
Novell Netware v5.0
Gigabit Ethernet Technology
Gigabit Ethernet is an extension of IEEE 802.3 Ethernet utilizing the same packet structure, format, and support for CSMA/CD protocol, full duplex, and management objects, but with a tenfold increase in theoretical throughput over 100Mbps Fast Ethernet and a one hundred-fold increase over 10Mbps Ethernet. Since it is compatible with all 10Mbps and 100Mbps Ethernet environments, Gigabit Ethernet provides a straightforward upgrade without wasting a company's existing investment in hardware, software, and trained personnel.
The increased speed and extra bandwidth offered by Gigabit Ethernet is essential to coping with the network bottlenecks that frequently develop as computers and their busses get faster and more users use applications that generate more traffic. Upgrading key components, such as your backbone and servers to Gigabit Ethernet can greatly improve network response times as well as significantly speed up the traffic between your subnets.
Gigabit Ethernet enables fast optical fiber connections to support video conferencing, complex imaging, and similar data-intensive applications. Likewise, since data transfers occur 10 times faster than Fast Ethernet, servers outfitted with Gigabit Ethernet NIC's are able to perform 10 times the number of operations in the same amount of time.
In addition, the phenomenal bandwidth delivered by Gigabit Ethernet is the most cost-effective method to take advantage of today and tomorrow's rapidly improving switching and routing internetworking technologies. And with expected advances in the coming years in silicon technology and digital signal processing that will enable Gigabit Ethernet to
eventually operate over unshielded twisted-pair (UTP) cabling, outfitting your network with a powerful 1000Mbps-capable backbone/server connection creates a flexible foundation for the next generation of network technology products.
The DGE-500SX
Speed
The DGE-500SX transmits and receives data at one gigabit per second (1Gbps or 1000Mbps). Its full-duplex (only) operation mode enables it to transmit and receive data simultaneously, effectively doubling the amount of data being handled and giving it an actual top speed of 2Gbps. This huge amount of throughput can be used to connect highly active or bandwidth-hogging computers and servers directly to your network either through a switch port on your backbone, or through a departmental switch. The DGE-500SX also includes very large (96 KB) data buffers designed to significantly increase network performance by virtually eliminating buffer overruns.
PCI Interface
The DGE-500SX attaches to the host computer via the fast and efficient PCI bus. The host PCI slot can be either 32- or 64-bit, and should be compliant with PCI v2.1 or later. Make sure the host computer has a 64-bit PCI bus in order to take advantage of the full-duplex speed enhancement.
In addition, the DGE-550SX uses the following advanced features to maximize the utilization of the PCI bus and reduce overhead on the system CPU:
- Bus Master technology - the NIC masters the PCI bus, freeing the CPU from PCI bus management duties.
- Direct Memory Access (DMA) – enables the NIC to write directly to the system memory, freeing the CPU from many memory management duties.
- Burst transfers – full bandwidth packet bursting across the PCI bus increases the throughput for small packets by coalescing transfers.
- Memory buffers - Dual transmit and receive FIFO buffers allow for simultaneous reading and writing of data.
VLAN
The DGE-500SX supports IEEE 802.1Q VLAN tagging and filtering at the chip level, and works with any IEEE 802.1Q compliant switch. The IEEE 802.1Q standard describes a methodology by which packets of data going through networking devices can be inserted with, or stripped of, VLAN identification information. VLANs can increase the efficiency and provide extra security for your network.
Product Features
Designed for versatility and performance, the DGE-500SX adapter provides the following features:
-
Fully compliant with IEEE 802.3z 1000BASE-SX Gigabit Ethernet standards and IEEE 802.3 Ethernet standards.
• Plug-and-Play installation.
• Maximum 1Gbps (1000Mbps) transmit and 1Gbps receive for a total of 2Gbps data throughput.
• Full-duplex operation only.
• PCI v2.2 compliant. -
Operates in a 32- or 64-bit, 33/66 MHz PCI Bus slot. A 32-bit PCI Bus at 33Mhz supports 1Gbps throughput, a 64-bit PCI Bus at 33Mhz supports 2Gbps.
• PCI Bus Master greatly reduces the load on the CPU, freeing it for other tasks.
• Supports IEEE 802.1Q VLAN specifications, with memory for up to 16 VLANs.
• Multi-mode SC Optical Fiber connector for network cable connection.
Cable lengths up to 220 meters using 850nm 62.5/125 fiber optic cable.
Cable lengths up to 500 meters using 850nm 50/125 fiber optic cable.
- Built-in 96K buffers reduce memory transfer overhead and optimize operating bandwidth, throughput, and network data integrity.
- Level-One LXT1001GMAC (Gigabit Ethernet MAC) controller containing a built-in 64 bit, 33 MHz PCI interface.
• Four LED indicators: Full Duplex, Link and Transmit / Receive, 1000Mbps.
- Driver ^+ support for:
√ Windows 95 (NDIS3) √ Windows 98 (NDIS5)
√ Windows NT 4.0 (NDIS4) √ Windows NT 2000 Beta 3 (NDIS5)
√ Linux OS Kernel v2.0/2.2 √ Netware v4.11/4.2/5.0
Installation
Unpacking
CAUTION:
Under ordinary circumstances, a DGE-500SX card will not be affected by static charge as may be received through your body during handling of the unit. However, there are special circumstances where you may carry an extraordinarily high static charge, and possibly damage the card and/or your computer. It is good practice to eliminate all static electricity by touching a ground (an unpainted metal area of your computer chassis, for example) before performing any installations.
Open the shipping carton and carefully remove all items. In addition to this User's Guide, ascertain that you have:
• One DGE-500SX Giga-Ether Adapter Card.
• One DGE-500SX Software CD-ROM.
Installing the Adapter
- Shut down the computer, unplug its power cord, and remove the chassis cover.
- Insert the contact edge of the DGE-500SX card into the connector of any available PCI Bus Master expansion slot. Press the card firmly into the connector such that the card's contacts are fully seated in the connector.
- Install the bracket screw which secures the card to the computer chassis.
- Replace the computer's chassis cover.
- Reconnect the computer's power cord, and switch computer power on. If the BIOS section of your computer's boot program is Plug-and-Play compliant, then at power-up the BIOS will automatically configure any newly installed DGE-500SX adapter.
NOTE: Due to a fault in some Plug-n-Play BIOS programs, it happens occasionally that a newly installed adapter is assigned an Interrupt Number which is already assigned to another device. In such a case, the conflict of Interrupt Number will cause faults in the behavior of both devices. Then it is necessary to run the CMOS Setup utility, and manually assign a non-conflicting Interrupt Number.
Connecting the Network Cable
Multimode (62.5/125 m or 50/125 m) fiber cabling with an IEEE recommended SC connector is required for the adapter. Use either one duplex SC connector, or two simplex SC connectors, and observe the correct relationship between the receive (Rx) and transmit (Tx) ports on the adapter and switch. The Tx port on the switch should connect to the Rx port on the adapter. Likewise, the Rx port on the switch should connect to the Tx port on the adapter. If there is a need to monitor the adapter's faceplate LEDs, make sure the rear of the PC or workstation is accessible and leave sufficient clearance for cabling and service.
Software Installation
Windows NT v4.0
- Make sure the network adapter has been installed in your computer, boot it up, and start Windows NT 4.0.
- Open "My Computer" → "Control Panel" → "Networks".
- Select "Add adapter" → "Have disk".
- Type the following: A: \ (where A: is the floppy drive) OR D: \ (where D: is the CD drive).
- Select "D-Link DGE-500SX Giga-Ether Adapter" (see below).
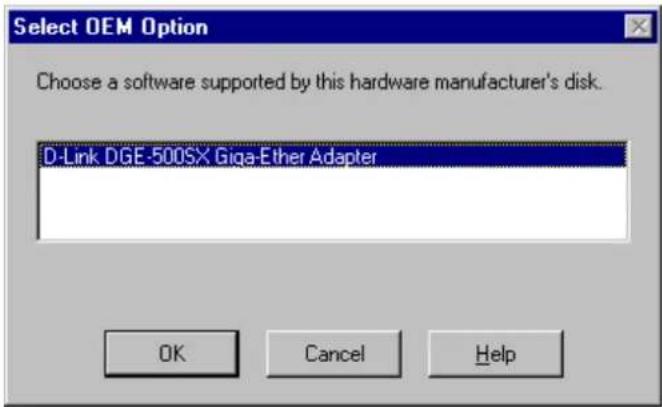
- Click "OK" and Windows NT 4.0 will copy the files from the driver disk.
- After the file has been copied, click "Properties" and modify the DGE-500SX configuration (see below).
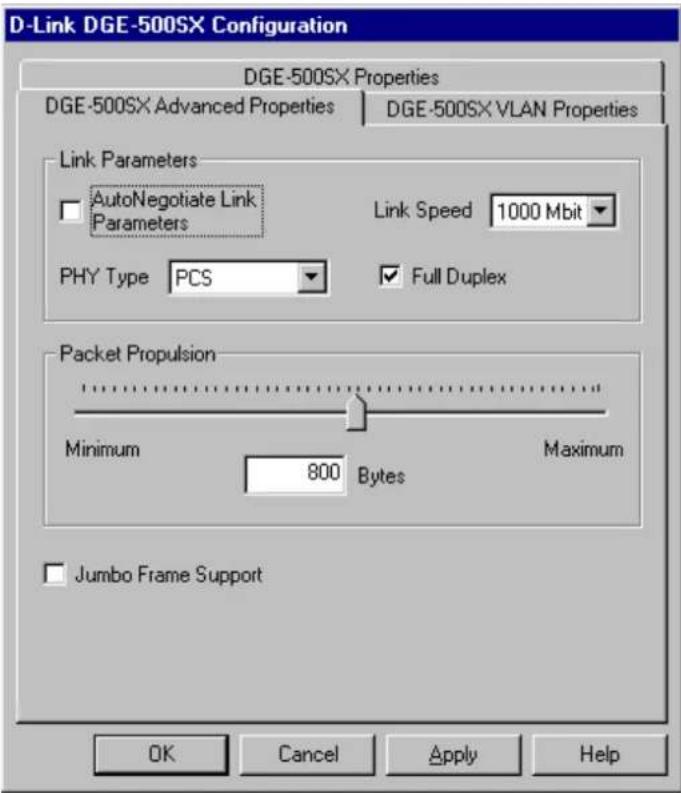
-
Click "OK" after making the configuration setting changes. Windows NT 4.0 will then ask you to reboot the PC. Select "YES".
-
Restart the computer.
NetWare Server 5.0
The following is for the initial installation from the install menu. Skip this section if it is not your first time using the install menu.
- Start the NetWare Server by typing in the following commands:
CD \NWSERVER
SERVER
- After booting up, type the following command:
NWCONFIG
- Select "Driver Options" → "Configure network drivers" → "Select a driver" (see below).
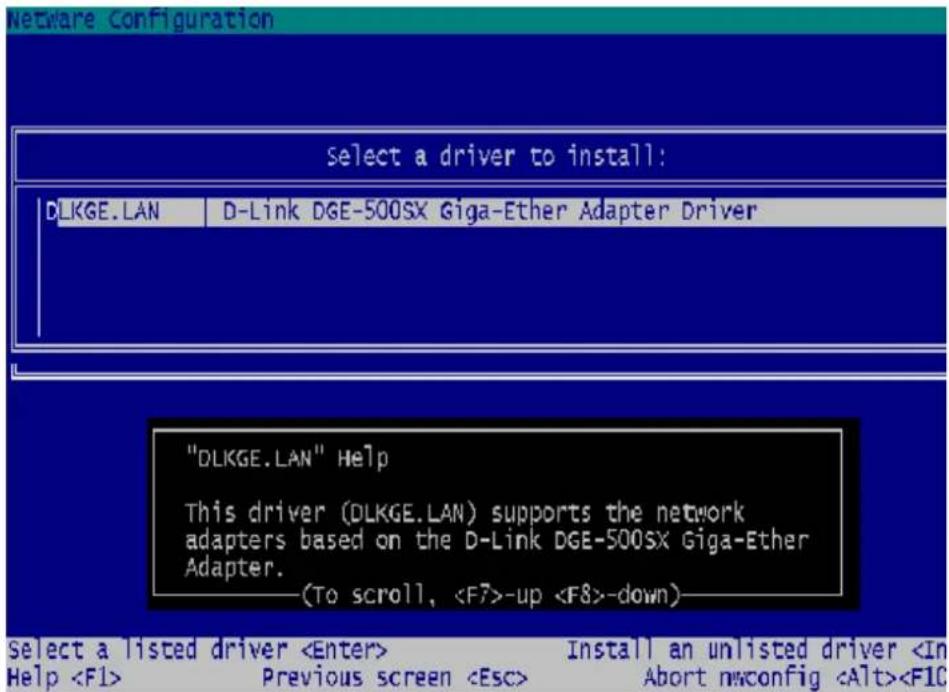
NWCONFIG
3. SelectLOAD C:\NWSERVER\NBI.NLM
LOAD C:\NWSERVER\MSM.NLM
LOAD C:\NWSERVER\ETHERTSM.NLM
LOAD C:\NWSERVER\DLKGE SLOT=1 FRAME=Ethernet_802.3
NAME=DLKGE_1_E83
BIND IPX DLKGE_1_E83 NET=xxxx
LOAD C:\NWSERVER\DLKGE SLOT=1 FRAME=Ethernet_802.2
NAME=DLKGE_1_E82
BIND IPX DLKGE_1_E82 NET=xxxx
LOAD C:\NWSERVER\DLKGE SLOT=1 FRAME=Ethernet_II
NAME=DLKGE_1_EII
BIND IPX DLKGE_1_EII NET=xxxx
LOAD C:\NWSERVER\DLKGE SLOT=1 FRAME=Ethernet_SNAP
NAME=DLKGE_1_ESP
BIND IPX DLKGE_1_ESP NET=xxxx
Parameters supported by the DLKGE.LAN driver
SLOT 1 - Forces the driver to search for the specified card. FULLDUPLEX - The FULL-DUPLEX parameter causes the DLKGE to operate in full-duplex mode. When operating in full-duplex mode, the DLKGE can simultaneously transmit and receive packets. AUTONEGOTIATE - The AUTO-NEGOTIATE parameter causes the DLKGE to auto negotiate the duplex mode and link speed with the device being connected. TXDMATHRESHOLD - The TXDMATHERESHOLD determines the I/O method used to move transmit packets from host memory to the DLKGE memory. The valid range for the TXDMATHRESHOLD is 0 - 1514. the default value is 800. DISABLERXIP - Disables the DLKGE TCP/IP Receive Packet checksum support. By default, the DLKGE will perform TCP/IP checksum verification on received packets in hardware if the operating system supports this capability. Due to the large number of Network Operating Systems (NOSs) supported, detailed driver# software installation instructions are given in README.TXT files on the DGE-500SX Software Diskette/CD-ROM. Review the root directory README for overview information. For detailed installation instructions see the README and referenced instruction files in the subdirectory corresponding to your network operating system.Troubleshooting
If you experience any problems with the adapter, first confirm that the appropriate driver is loaded; that the proper grade of cable is employed for the network connection; and that the switch it is connected to is properly qualified for the application (such as 1000BASE-SX). The DGE-500SX Adapter features four LED indicators: \- FDX Steady green indicates the adapter is operating in Full-Duplex mode. • 1000M The LED indicator lights green when a 1000 Mbps device is connected to the adapter. \- Link Steady green indicates good linkage between the DGE-500SX and its supporting server or switch. • TX/RX Flashing green indicates activity (transmitting or receiving) within the adapter.Specifications
Jumperless Hardware Media interface: Optical Fiber Transceiver SC Connector EMI Certifications: - FCC Class B • CE Certification Class B • VCCI Class B and C-Tick Host interface: PCI Bus (Bus Master) I/O base address assigned by Plug and Play system Interrupt Number Assigned by Plug and Play system Physical Dimensions: 16.2 x 9.5 cm Environment: • Storage: -5^ to 55^ , ( 23^ to 131^ ) • Operating: 0^ to 50^ C, ( 32^ to 122^ F) • Humidity: 5% to 95% non-condensing • Power Consumption: 7.8WAUSTRALIA D-LINK AUSTRALASIA
Unit 16, 390 Eastern Valley Way, Roseville, NSW 2069, Australia TEL: 61-2-9417-7100 FAX: 61-2-9417-1077 TOLL FREE: 1800-177-100 (Australia), 0800-900900 (New Zealand) WEB: www.dlink.com.au E-MAIL: info@dlink.com.auCANADA D-LINK CANADA
2180 Winston Park Drive, Oakville, Ontario L6H 5W1 Canada TEL: 1-905-829-5033 FAX: 1-905-829-5223 WEB: www.dlink.ca FTP: ftp.dlinknet.com E-MAIL: techsup@dlink.caCHILE
D-LINK SOUTH AMERICA
Isidora Goyeneches #2934 of.702, Las Condes, Santiago, Chile TEL: 56-2-2323185 FAX: 56-2-2320923 WEB: www.dlink.clCHINA D-LINK CHINA
15th Floor, Science & Technology Tower, No. 11, Baishiqiao Road, Haidian District, Beijing 100081 China TEL: 86-10-68467106-9 FAX: 86-10-68467110 WEB: www.dlink.co.cnDENMARK D-LINK DENMARK
Naverland 2, DK-2600 Glostrup, Copenhagen, Denmark TEL:45-43-969-040 FAX:45-43-424-347 WEB: www.dlink.dkEGYPT
D-LINK MIDDLE EAST
7 Asaem Ebn Sabet Street, Heliopolis Cairo, Egypt TEL: 202-2456176 FAX: 202-2456192 WEB: www.dlink-me.comFRANCE D-LINK FRANCE
Le FLORILEGE #2, Allee de la Fresnerie 78330 Fontenay Le Fleury France TEL: 33-1-3023-8688 FAX: 33-1-3023-8689 WEB: www.dlink-france.fr E-MAIL: info@dlink-france.frGERMANY D-LINK GERMANY
Bachstr. 22, D/65830 Kriftel Germany TEL: 49-(0)6192-97110 FAX: 49-(0)6192-971111 WEB: www.dlink.de BBS: 49-(0)6192-9711 98 (ISDN) INFO: 00800-7250-0000 (toll free) HELP: 00800-7250-4000 (toll free)INDIA D-LINK INDIA
Plot No.5, Kurla-Bandra Complex Rd. Off Cat Rd. Santacruz (E). Bombay - 400 098 India TEL: 91-22-6526578 FAX: 91-22-6528476 WEB: www.dlink.india.comITALY D-LINK ITALY
Via Nino Bonnet No. 6, 20154 Milano, Italy TEL: 39-2-2900-0676 FAX: 39-2-2900-1723 E-Mail: dlink@tin.itJAPAN D-LINK TOKYO
10F, 8-8-15 Nishi-Gotanda, Shinagawa-ku, Tokyo 141 Japan TEL: 81-3-5434-9678 FAX: 81-3-5434-9868 WEB: www.d-link.co.jpSINGAPORE D-LINK INTERNATIONAL
1 International Business Park, #03-12 The Synergy, Singapore 609917 TEL: 65-774-6233 FAX: 65-774-6322 WEB: www.dlink.intl.com E-MAIL: info@dlink.com.sgSWEDEN D-LINK SWEDEN
World Trade Centre P. O. Box 70396, 107 24 Stockholm Sweden TEL: 46-8-700-6211 FAX: 46-8-219-640 E-MAIL: info@dlink.seTAIWAN D-LINK TAIWAN
2F, No. 119 Pao-Chiao Rd, Hsin-Tien, Taipei, Taiwan TEL: 886-2-2910-2626 FAX: 886-2-2910-1515 WEB: www.dlinktw.com.twU.K. D-LINK EUROPE
D-Link House, 6 Garland Road, Stanmore, London HA7 1DP U.K. TEL: 44-181-235-5555 FAX: 44-181-235-5500 WEB: www.dlink.co.uk E-MAIL: info@dlink.co.ukU.S.A. D-LINK U.S.A.
53 Discovery Drive, Irvine, CA 92618 USA TEL: 1-949-788-0805 FAX: 1-949-753-7033 WEB: www.dlink.com E-MAIL: tech@dlink.com- Trademarks
- Copyright Statement
- Limited Warranty
- Hardware:
- Software:
- D-Link Offices for Registration and Warranty Service
- LIMITATION OF WARRANTIES
- LIMITATION OF LIABILITY
- Introduction
- System Requirements
- Gigabit Ethernet Technology
- The DGE-500SX
- Speed
- PCI Interface
- VLAN
- Product Features
- Installation
- Unpacking
- CAUTION:
- Installing the Adapter
- Connecting the Network Cable
- Software Installation
- Windows NT v4.0
- NetWare Server 5.0
- NWCONFIG
- Parameters supported by the DLKGE.LAN driver
- Troubleshooting
- Specifications
- AUSTRALIA D-LINK AUSTRALASIA
- CANADA D-LINK CANADA
- CHILE
- D-LINK SOUTH AMERICA
- CHINA D-LINK CHINA
- DENMARK D-LINK DENMARK
- EGYPT
- D-LINK MIDDLE EAST
- FRANCE D-LINK FRANCE
- GERMANY D-LINK GERMANY
- INDIA D-LINK INDIA
- ITALY D-LINK ITALY
- JAPAN D-LINK TOKYO
- SINGAPORE D-LINK INTERNATIONAL
- SWEDEN D-LINK SWEDEN
- TAIWAN D-LINK TAIWAN
- U.K. D-LINK EUROPE
- U.S.A. D-LINK U.S.A.
Brand : D-LINK
Model : DGE-500SX
Category : Uncategorized