9H.J5W77.14X - Video projector BENQ - Free user manual and instructions
Find the device manual for free 9H.J5W77.14X BENQ in PDF.

User questions about 9H.J5W77.14X BENQ
0 question about this device. Answer the ones you know or ask your own.
Ask a new question about this device
Download the instructions for your Video projector in PDF format for free! Find your manual 9H.J5W77.14X - BENQ and take your electronic device back in hand. On this page are published all the documents necessary for the use of your device. 9H.J5W77.14X by BENQ.
USER MANUAL 9H.J5W77.14X BENQ
Network Projector Operation Guide
Table of contents
Preparation....3
Connecting the projector with your computer .... 3
Wired connection.... 3
Wireless connection (for selective models).... 4
QPresenter 7
Minimum system requirements....7
Downloading QPresenter......7
Installing QPresenter 7
For PC 7
For MAC 8
Using QPresenter....8
Controlling the projector remotely through a web browser ....... 11
Using the web control lock....18
Projecting computer screen contents 20
One projector displaying one computer screen....20
One projector displaying screens of up to 4 computers....20
Up to 8 projectors displaying one computer screen....21
Up to 255 projectors displaying one computer screen (for selective models)....21
Using the USB cable to display computer content (for selective models) 22
Supported Resolutions....22
Using the Projection Login Code....22
Using the USB Camera (for selective models)....23
PJLink Commands.... 24
Preparation
Your BenQ projector is equipped with the wired and/or wireless network function. You can manage and control the projector from one or more remote computers using a web browser when they are properly connected to the same local area network. You can also sent the contents of your computer to the projector for projection using the QPresenter.
Connecting the projector with your computer
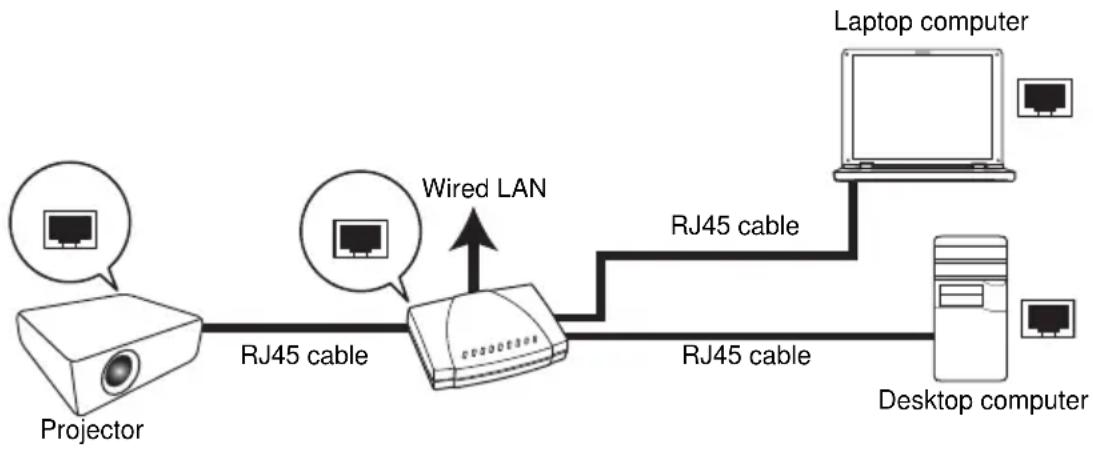
Wired connection
flowchart
graph LR
    A["Projector"] -->|RJ45 cable| B["Wired LAN"]
    C["Laptop computer"] -->|RJ45 cable| B
    D["Desktop computer"] -->|RJ45 cable| B
If you are in a DHCP environment:
I. Take a RJ45 cable and connect one end to the RJ45 LAN input jack of the projector and the other end to the RJ45 port on your Ethernet or router.
2. Do one of the following:
- Press NETWORK SETTING on the remote control. The Network Settings page is displayed.
-
Press MENU/EXIT and then press ◀/▶ until the SYSTEM SETUP: Advanced menu is highlighted. Press ▼ to highlight Network Settings and press MODE/ENTER. The Network Settings page is displayed.
-
Highlight Wired LAN and press MODE/ENTER.
- Make sure the Status is Connect.
- Press ▼ to highlight DHCP and press ◀/▶ to select On.
- Press ▼ to highlight Apply and press MODE/ENTER.
- Re-enter the Network Settings > Wired LAN page. The IP Address, Subnet Mask, Default Gateway, and DNS settings will be displayed. Note down the IP address displayed in the IP Address row.

If the IP Address still does not appear, contact your ITS administrator.
If you are in a non-DHCP environment:
I. Repeat steps 1-4 above.
- Press ▼ to highlight DHCP and press ◀/▶ to select Off.
-
Contact your ITS administrator for information on the IP Address, Subnet Mask, Default Gateway, and DNS settings.
-
Press ▼ to select the item you want to modify and press MODE/ENTER.
- Press / to move the cursor and the press / to enter the value.
- To save the settings, press MODE/ENTER. If you do not want to save the settings, press MENU/EXIT.
- Press ▼ to highlight Apply and press MODE/ENTER.
After the above steps, your projector is now connected to your local area network and ready to be accessed by any computer on the same local area network.
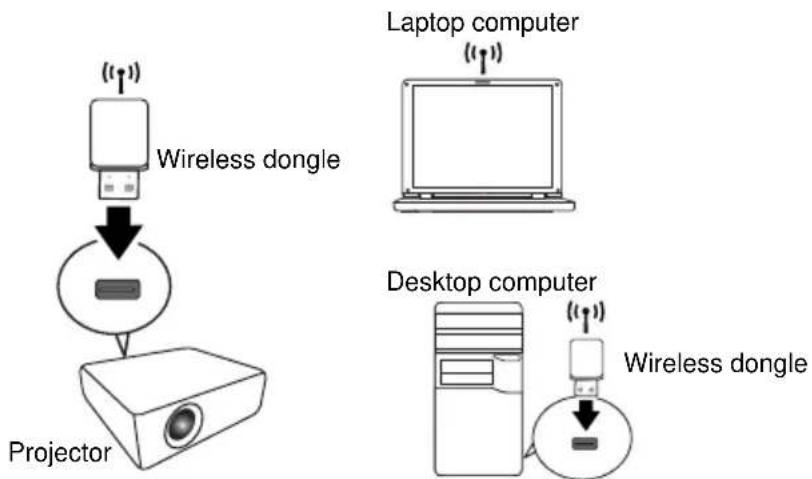
Wireless connection (for selective models)
I. Plug a BenQ wireless dongle (optional) to the USB Type A connector on the projector.
2. Do one of the following:
- Press NETWORK SETTING on the remote control. The Network Settings page is displayed.
-
Press MENU/EXIT and then press ◀/▶ until the SYSTEM SETUP: Advanced menu is highlighted. Press ▼ to highlight Network Settings and press MODE/ENTER. The Network Settings page is displayed.
-
Highlight Wireless LAN and press MODE/ENTER.
- Make sure the Status is Connect.
- Make sure the SSID Display is On.
- Make sure the SSID information is displayed. The default SSID is "NetworkDisplay".
- Press ▼ to highlight Connection Mode and press ◀/▶ to select AP or Infrastructure.
- Press ▼ to highlight Apply and press MODE/ENTER.
Depending on the Connection Mode you selected, there are two ways to continue:
In the AP mode
The projector is able to operate as a wireless LAN access point, which is the default setting of the projector. In this mode, the projector establishes a wireless LAN which allows computers to connect to this specific wireless LAN.
I. Make sure the BenQ wireless dongle (optional) is plugged to the USB Type A connector on the projector.
2. Press SOURCE to display the source bar and select Network Display to access the SSID. The default SSID is "NetworkDisplay".
3. Search for this wireless LAN by the projector's SSID from your computer.
- Click "Connect" in your wireless network connection window.
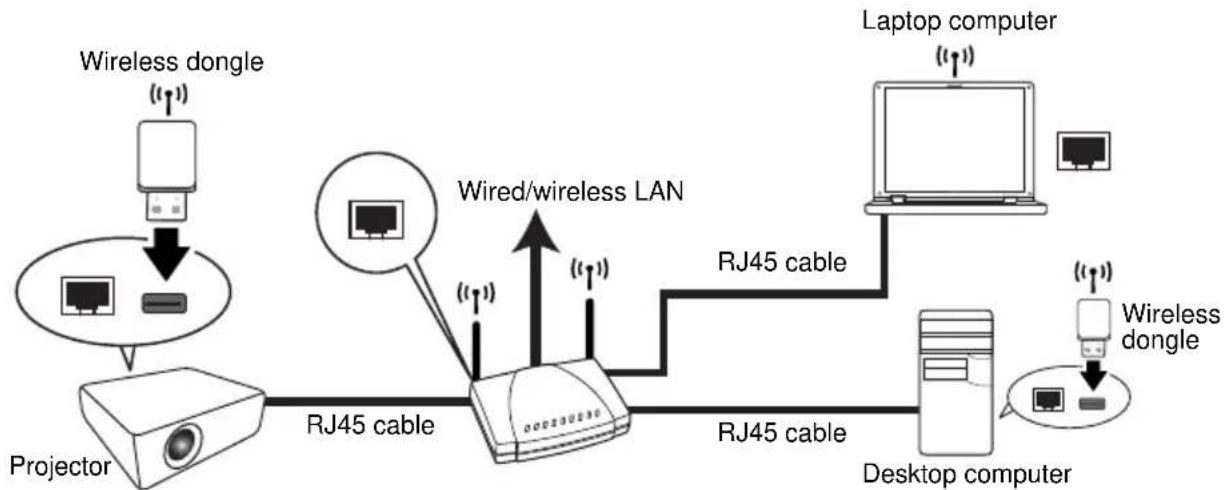
In the Infrastructure mode
flowchart
graph TD
    A["Projector"] -->|RJ45 cable| B["Wired/wireless LAN"]
    C["Laptop computer"] -->|RJ45 cable| B
    D["Desktop computer"] -->|RJ45 cable| B
    E["Wireless dongle"] -->|RJ45 cable| B
    F["Wireless dongle"] -->|RJ45 cable| B
    G["Wireless dongle"] --> H["Projector"]
    I["Wireless dongle"] --> J["Projector"]
    K["Projector"] --> L["Projector"]
    M["Projector"] --> N["Projector"]
    O["Projector"] --> P["Projector"]
In this mode, the projector is connected to the local area network wirelessly and ready to be accessed by any computer on the same local area network.
I. Connect both the RJ45 cable to the RJ45 port and wireless dongle to the USB port of the projector.
2. Make sure the projector is connected to the local area network through wired connection. See "Wired connection" on page 3 for detail.
3. Enter the address of the projector in the address bar of your browser and press Enter.

- Open the Admin page of the Projector Network Display System and log in.

See page 16 for details.
- Go to the Wireless LAN page and change the Connection mode to Infrastructure mode.
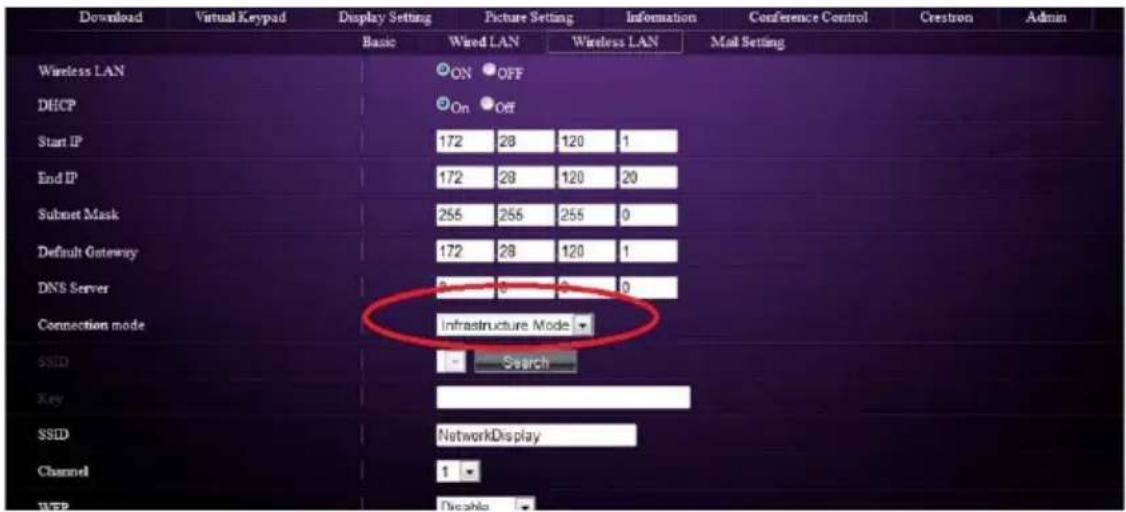
- Click Search in the SSID row to list all the available wireless access points. Click the desired SSID in the Search result list and click Apply.
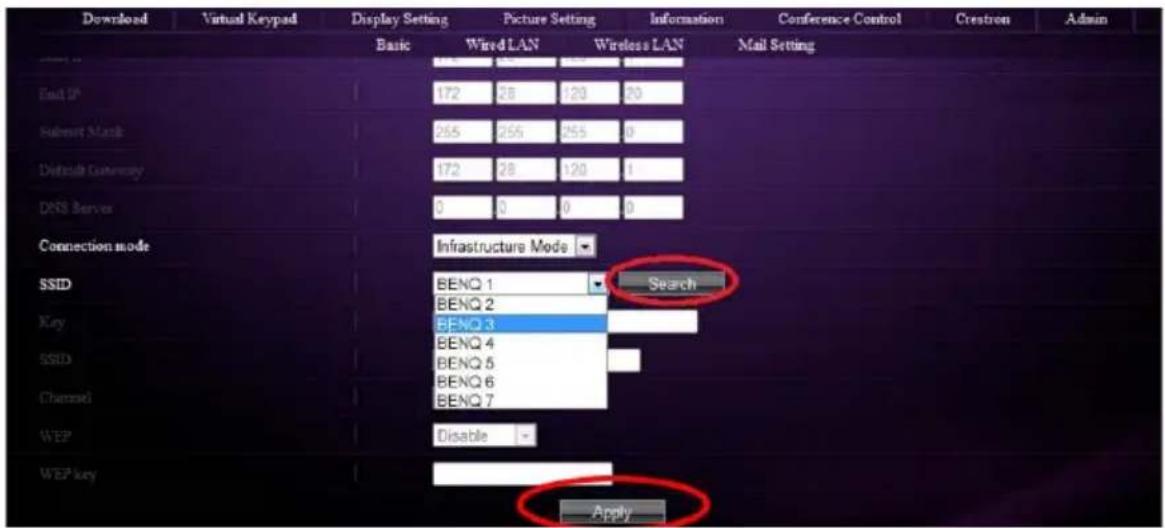
-
Disconnect the RJ45 cable from the computer.
-
Select the same SSID from your computer.
-
Open QPresenter and search for the correct projector and click Connect.
QPresenter
QPresenter is an application running on the host PC. It helps connect your computer to an available network projector and transfer the desktop contents and/or audio signal to the network projector via local network connection.
Minimum system requirements
- Supported OS: Windows® XP 32 bit/64 bit, Windows® 2003, Windows® 7 32 bit/64 bit, Mac OS 10.5 and Mac OS 10.6.
- CPU: Intel Pentium 4, 3.0G CPU (for I:1audio output through projector's speaker), Core2 Duo 2.40GHz CPU (for broadcasting function)
- Memory: 1 GB (for 1:laudio output through projector's speaker) or 2GB (for broadcasting function)
• Free HDD space: 32 MB or more - Web browser: Internet Explorer version 7 or 8 (Java Plug-in should be installed and JavaScript should be enabled.)

BenQ does not guarantee the compatibility in respective user environments. Different PC/notebook may have different compatibility results.
Downloading QPresenter
There are several ways to do it:
- From the projector

The projector also provides QPresenter for Mac computers. If you are using a Mac computer, the projector automatically provides Mac version of the QPresenter for you to download.
i. Connect the computer to the projector. See "Connecting the projector with your computer" on page 3 for detail.
ii. Enter the address of the projector in the address bar of your browser and press Enter.

iii. Open the Admin page of the Projector Network Display System.
iv. Click the Download icon.
• From the user manual CD (for selective models)
i. Insert the user manual CD that comes with your projector into your CD-ROM drive.
ii. Download QPresenter-Broadcast.setup.
- From BenQ.com
i. Please go to your local BenQ.com to download the latest version of QPresenter.
Installing QPresenter
For PC
I. When the download is complete, click the exe file.
2. Click "Next" to continue.
3. Click "I agree" to agree the License Agreement.
4. Click "Next" to install the component.
- Click "Next" to confirm the installation path.
- Set user name and password of Qpresenter and then click "Next".
- Click "Install" to complete the process.
For MAC
- When the download is complete, click the dmg file.
- Double-click the file, and this will mount the disk image called QPresenter.
- Double-click the disk image "QPresenter" in order to view the contents.
Using QPresenter
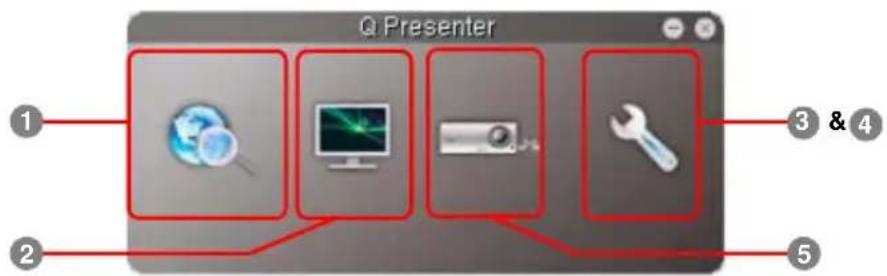
I. The Search page allows you to search and connect to a projector.
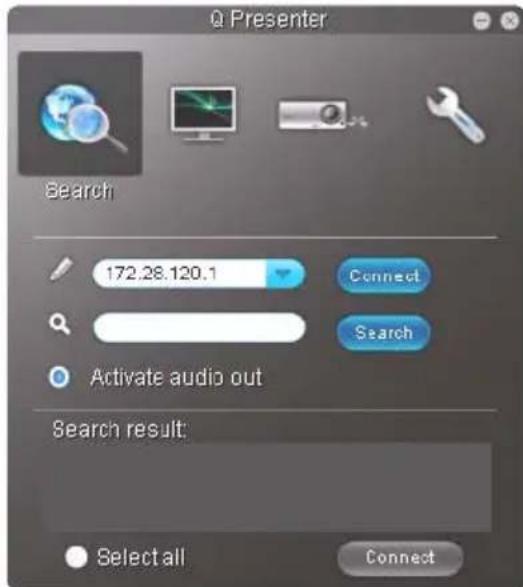
- To connect to a projector, type the projector IP address and click Connect.
• To search for projectors, simply click Search to list all the projectors on the same local area network. Click the desired projectors in the Search result list, and click Connect. You can also type a desired projector name and click Search.
• To play sound through the projector speaker, simply click Activate audio out.

Mac version of the QPresenter does not support this function.
- The Special Feature page provides some advanced functions to manage the projected images.
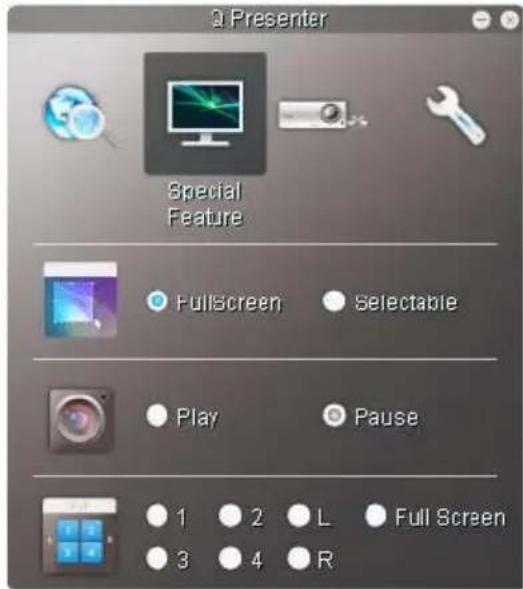
• To display a full screen, click Full Screen.
• To display a partial screen, click Selectable. A square appears on your screen. You can adjust its size and place it where you want to project.

This function is not available when audio out is activated.
• To pause projection, click Pause.
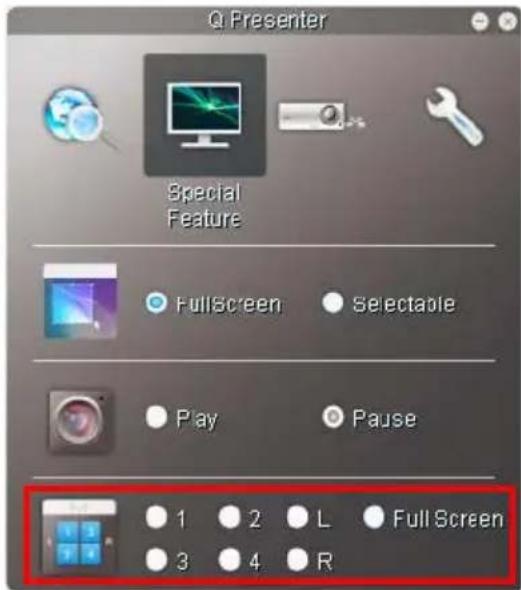
- If there are multiple computers connected to the projector, you can decide a display location by clicking 1, 2, 3, 4, L, R, or Full Screen.
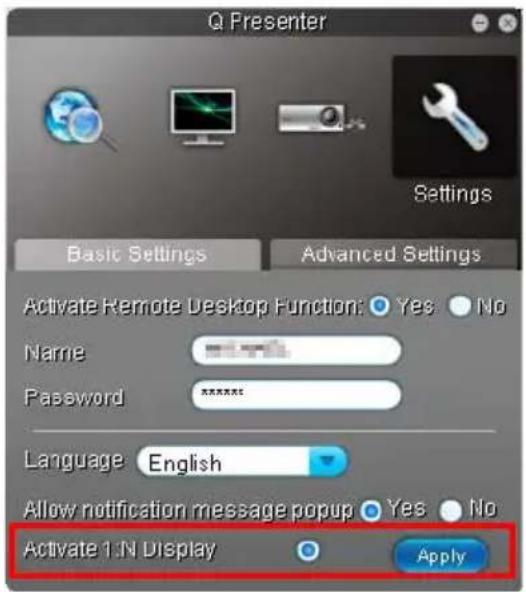
- The Basic Settings page allows you to configure QPresenter.
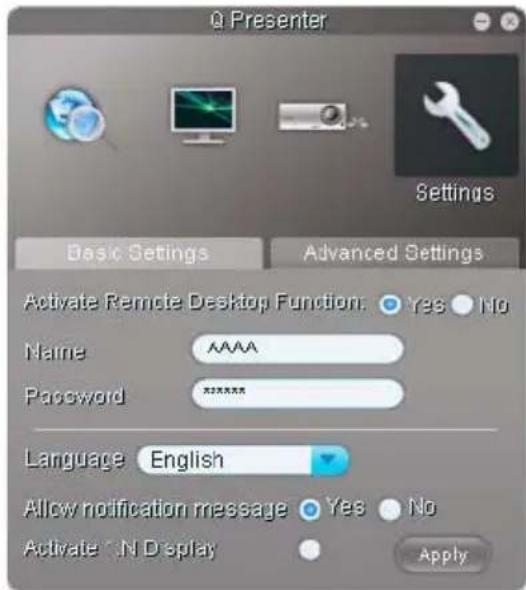
• To activate Remote Desktop function, click Yes. Type the name and password for your computer. Go to the projector OSD menu SYSTEM SETUP: Advanced > Network Settings > Remote Desktop, and enter Account (the name for your computer) and Password, and highlight Connect, press MODE/ENTER.
- The QPresenter only accepts up to 8 characters consisting of English capitalized letters and digits 0-9 for the name, full 6 digits consisting of 1 to 4 for the password.
• To change the QPresenter interface language, click the down arrow to reveal a drop-down list and select a desired language. Click Apply.
• To allow notification messages to appear, click Yes. Click Apply.
• To display your computer screen on multiple projectors, click Activate I:N Display. Click Apply. It can display up to 8 projectors at the same time.
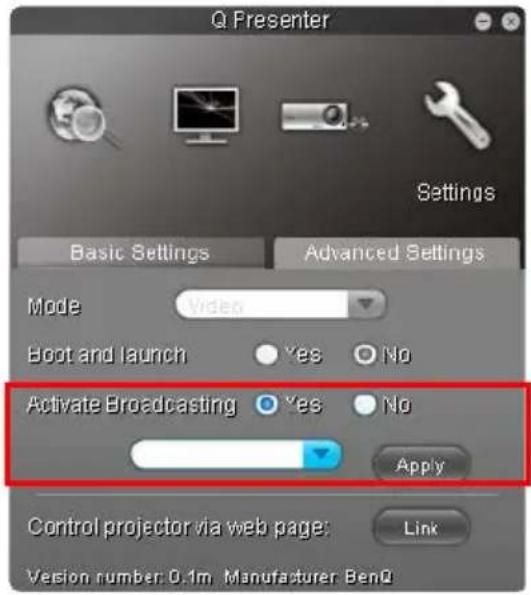
- The Advanced Settings page allows you to configure QPresenter.
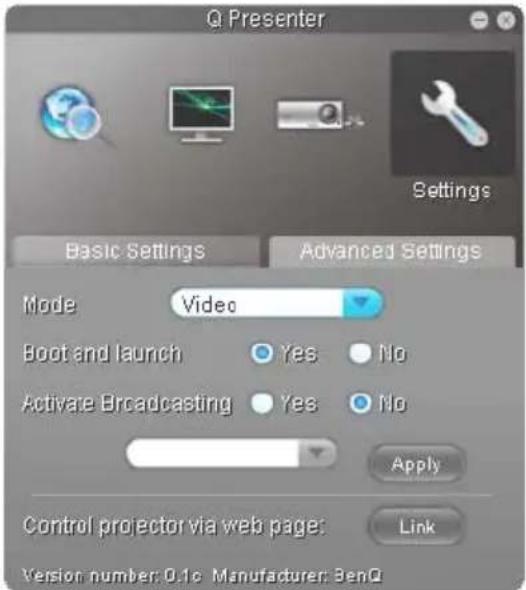
- To display still pictures, click the down arrow to reveal a drop-down list and select Graphic. Click Apply. To display video clips, click the down arrow to reveal a drop-down list and select Video. Click Apply. Graphic mode: worse image quality but faster transmission speed. Video mode: better image quality but slower transmission speed. However, the actual transmission speed was determined by the network traffic at that time.
• To adjust the capture rate, move the slide bar. The network bandwidth may also affect the performance.
- To launch QPresenter when your computer operating system is started, click Yes for Boot and launch. Click Apply.
- To utilize the broadcasting function, see "Up to 255 projectors displaying one computer screen (for selective models)" on page 21 for details.
• To link to the Projector Network Display System web page, click Link.
5. Disconnect
To disconnect from the projector(s), click the Disconnect icon.

- Be sure to turn off other virtual network control programs before using QPresenter.
- Firewall in the PC must be switched off to allow QPresenter and USB Display to work.
- Wireless keyboard mouse combo is not supported by Pixelworks currently.
Controlling the projector remotely through a web browser
This function is not available when the broadcasting function is activated.
Once you have the correct IP address for the projector and the projector is on or in standby mode, you can use any computer that is on the same local area network to control the projector.
• Make sure you are using Microsoft Internet Explorer version 7.0 or 8.0.
• The screenshots in this manual are for reference only, and may differ from the actual design.
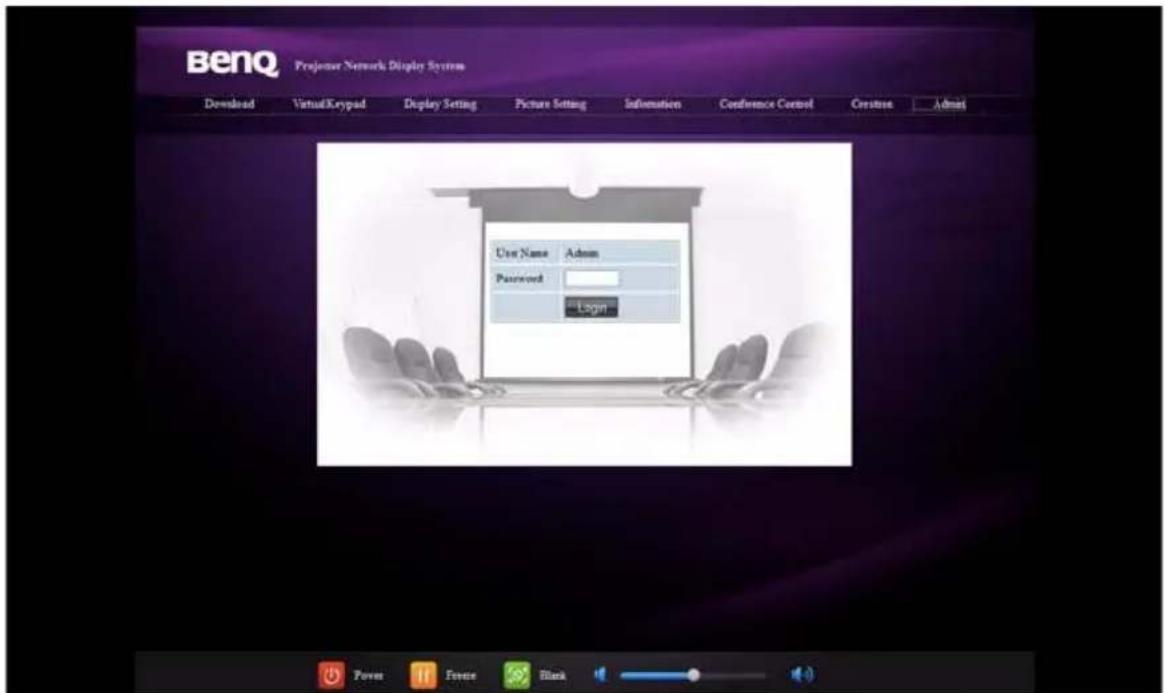
I. Enter the address of the projector in the address bar of your browser and press Enter.

- The main page of the Projector Network Display System appears. This web page provides access to a variety of functions with a simple click.

-
Click Download to save QPresenter software on your computer. See "Installing QPresenter" on page 7 for details.
-
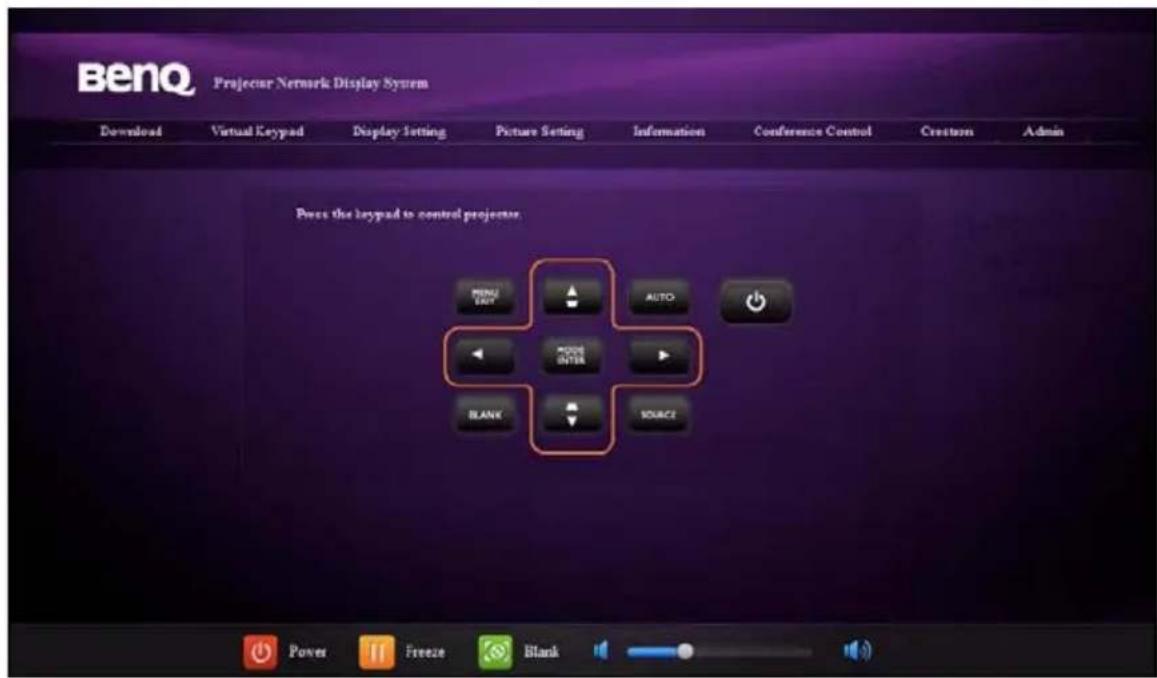
The Virtual Keypad page displays a virtual keypad with which you can control the projector as if using the physical keypad on the projector. See the chapter "Controls and functions" in the user manual for how to operate it.
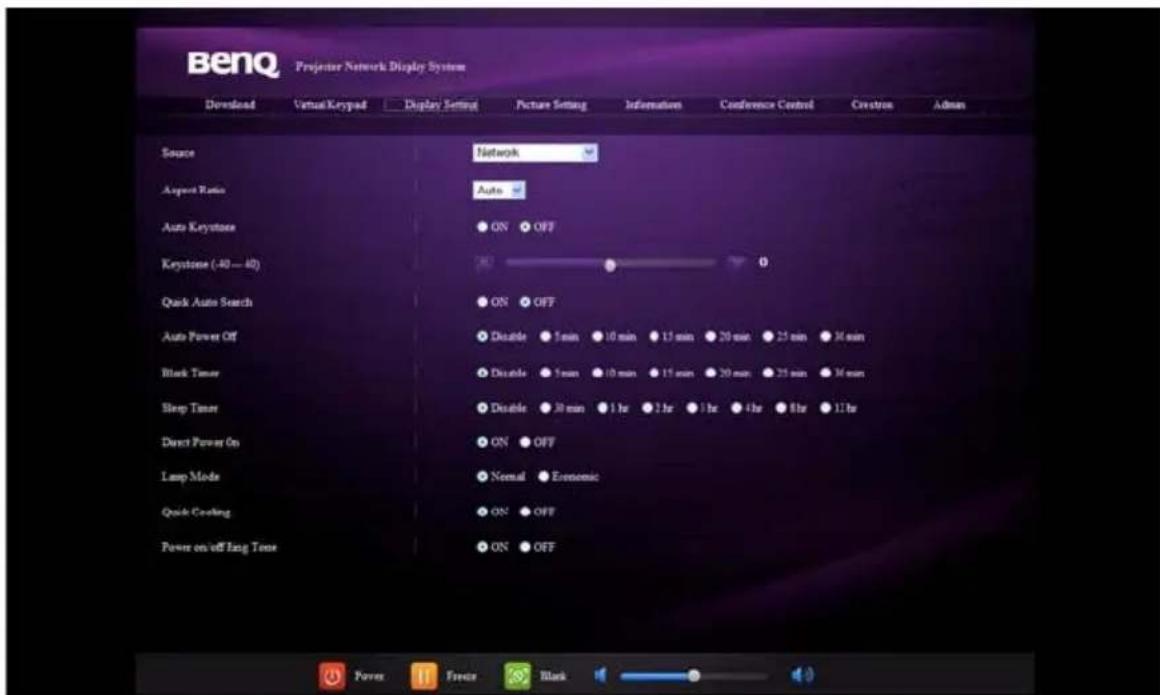
- The Display Setting page provides some selective OSD menu items necessary for controlling the projector or adjusting the projected pictures. See the chapter "Menu operation" in the user manual for how to use them.
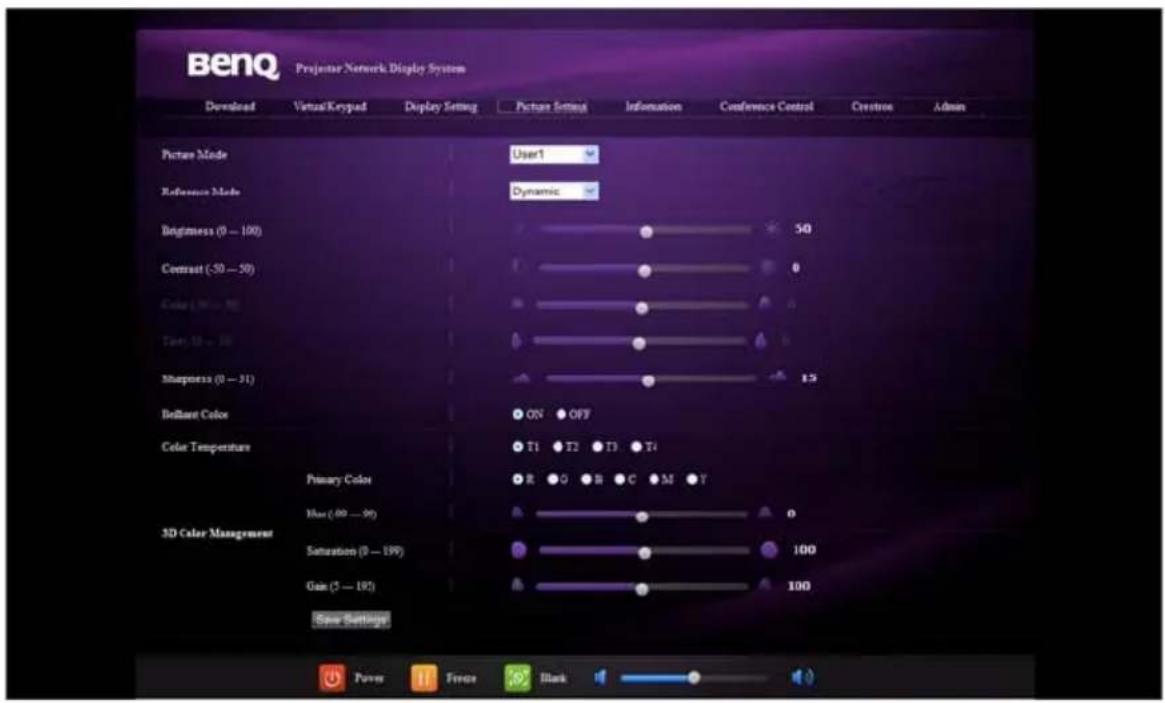
- The Picture Setting page provides all the OSD menu items in the PICTURE menu for adjusting the projected pictures. See the chapter "Menu Operation" in the user manual for how to use them.
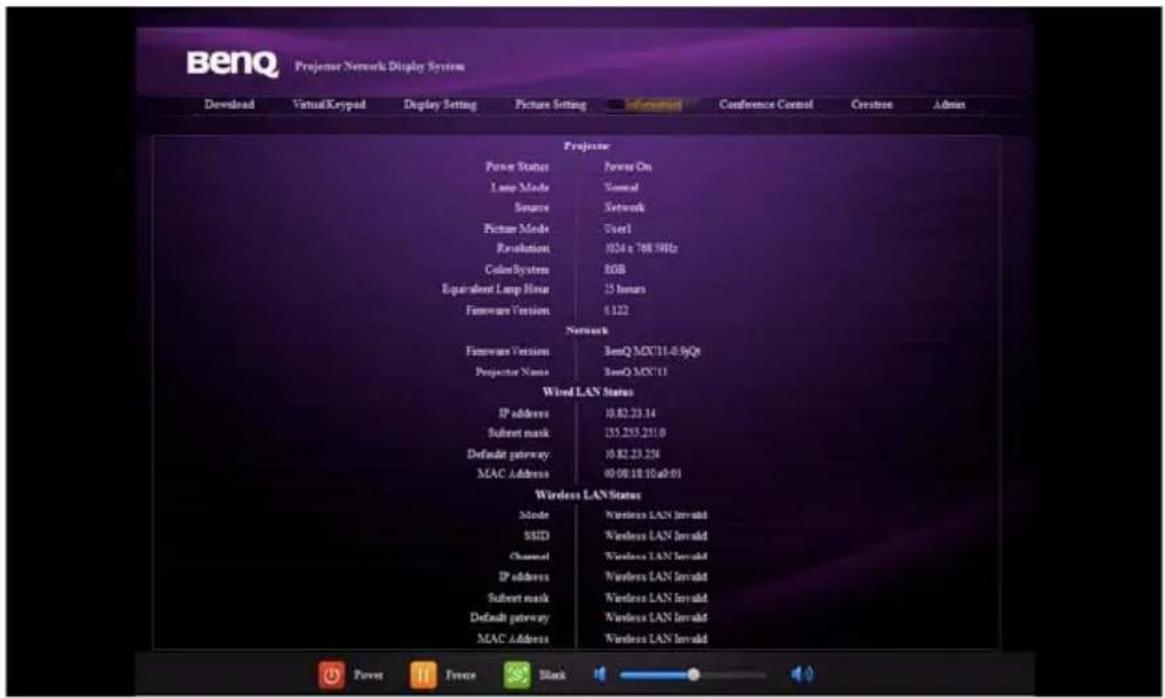
- The Information page displays the information about the projector status, network status.
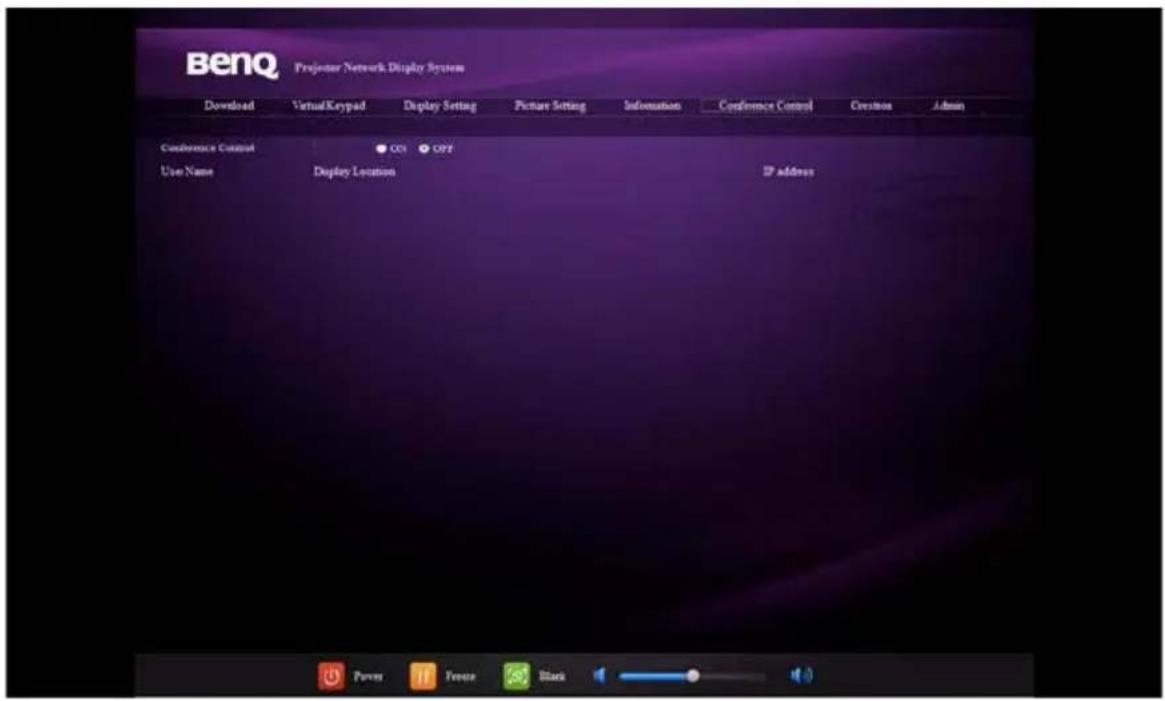
- The Conference Control page allows you to control the display location in the same IP address when there are multiple users connecting to the projector.
- The Crestron (eControl) page displays the Crestron eControl user interface. The eControl page provides a variety of virtual keys to control the projector or adjust the projected pictures.

i. These buttons function the same as the ones on the OSD menus or remote control. See the chapter "Controls and functions" in the user manual for details.
ii. To switch input source, click your desired signal.
iii. The software is available in multiple languages.

The Menu button can also be used to go back to previous OSD menu, exit and save menu settings.
The tools page allows you to manage the projector, configure the LAN control settings and secure access of remote network operation on this projector.
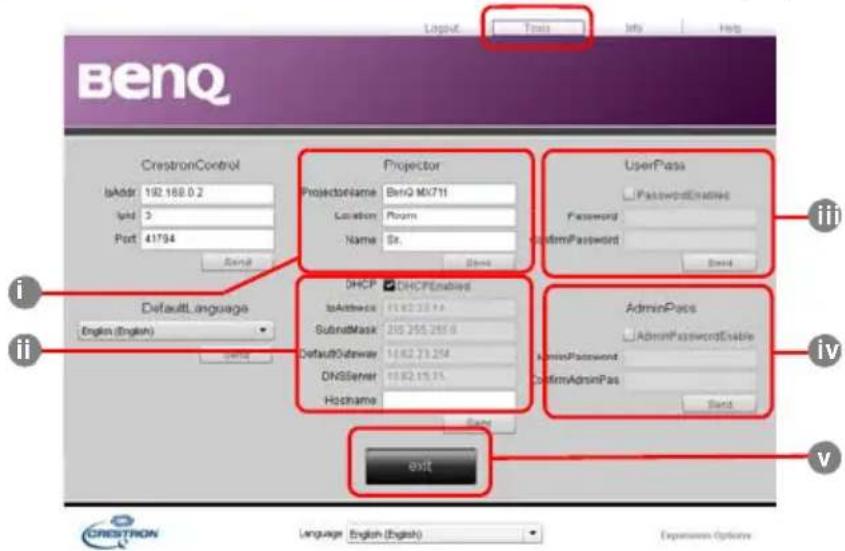
i. You can name the projector, keep track of its location and the person in charge of it.
ii. You can adjust the Network Settings.
iii. Once set, access to the remote network operation on this projector has been password-protected.
iv. Once set, access to the tools page has been password-protected.

After making the adjustments, press the Send button and the data will be saved in the projector.
v. Press exit to go back to the remote network operation page.
The info page displays the information and status of this projector.
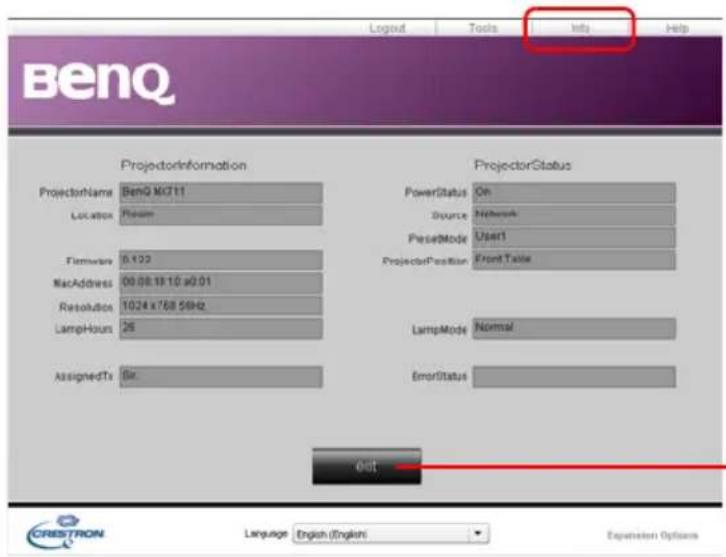
Press Exit to go back to the remote network operation page.
For more information, visit http://www.crestron.com & www.crestron.com/getroomview.
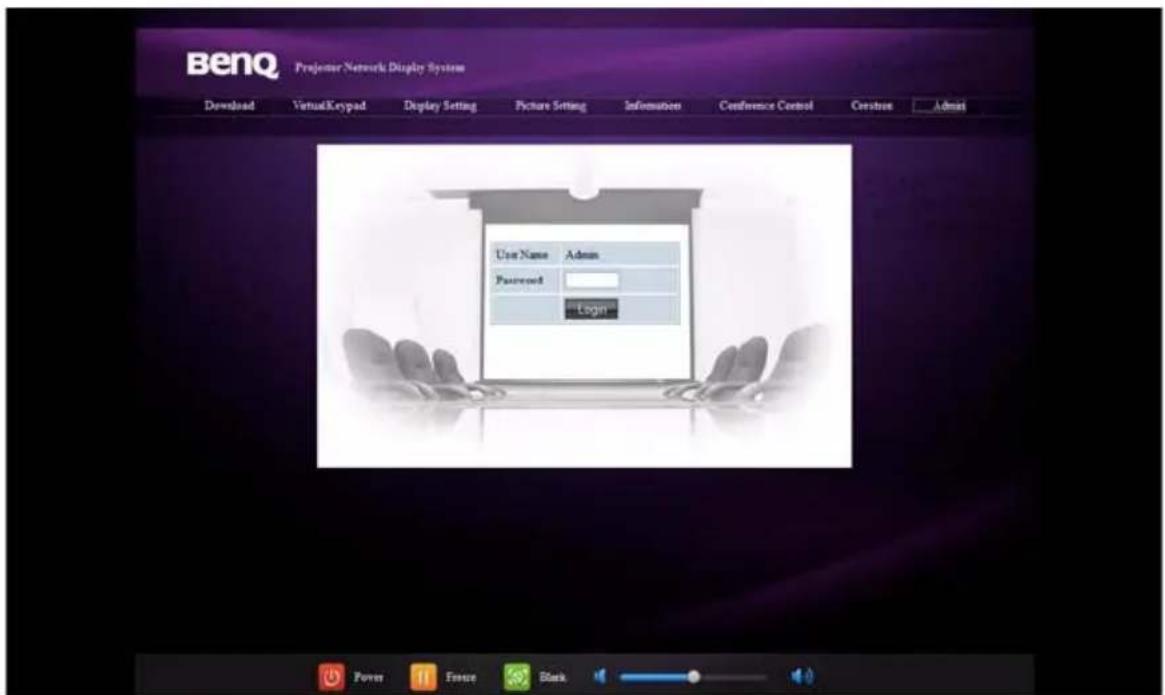
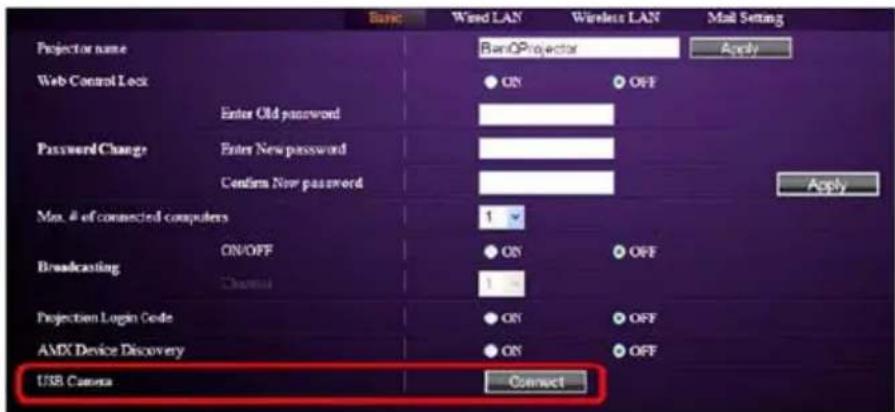
- To have access to the Admin page, you need to enter a password. The page provides more network settings. The default password is "0000". If you want to change the password, enter the Basic page.
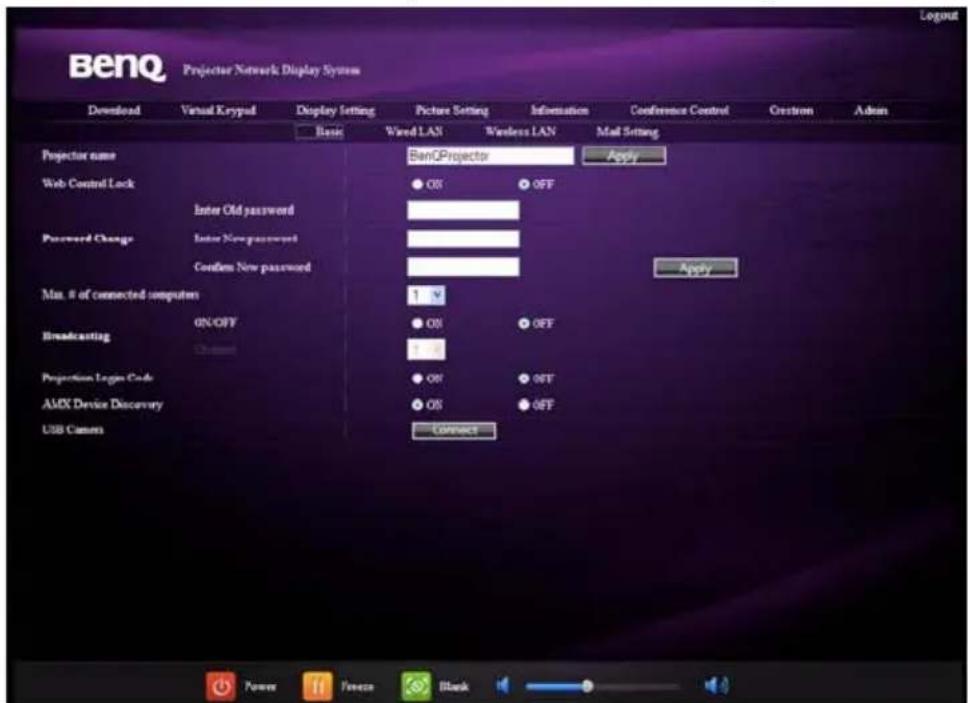
The Basic page allows you to change the password and set the maximum number of connected computers. The number of connected computer may affect the network display performance. You can also adjust the Broadcasting, Projection Log In Code, AMX Device Discovery and USB Camera settings here.
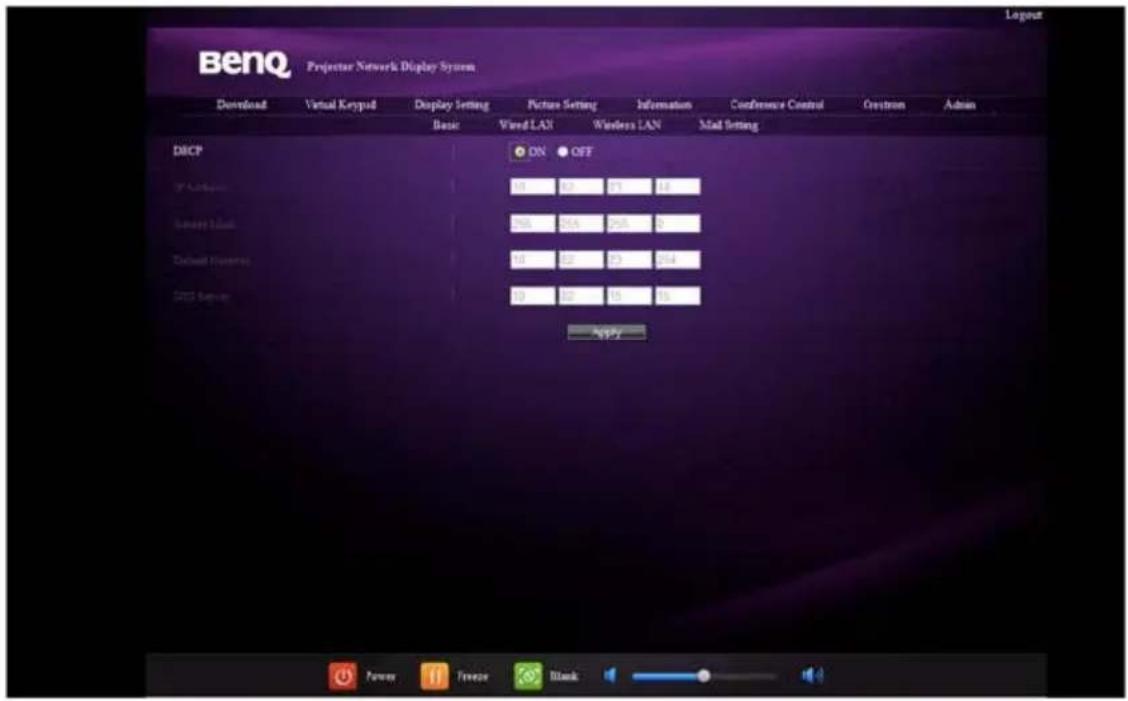
The Wired LAN page allows you to adjust the Wired LAN settings.
Only WEP encryption is supported.

The Wireless LAN page allows you to adjust the Wireless LAN settings.
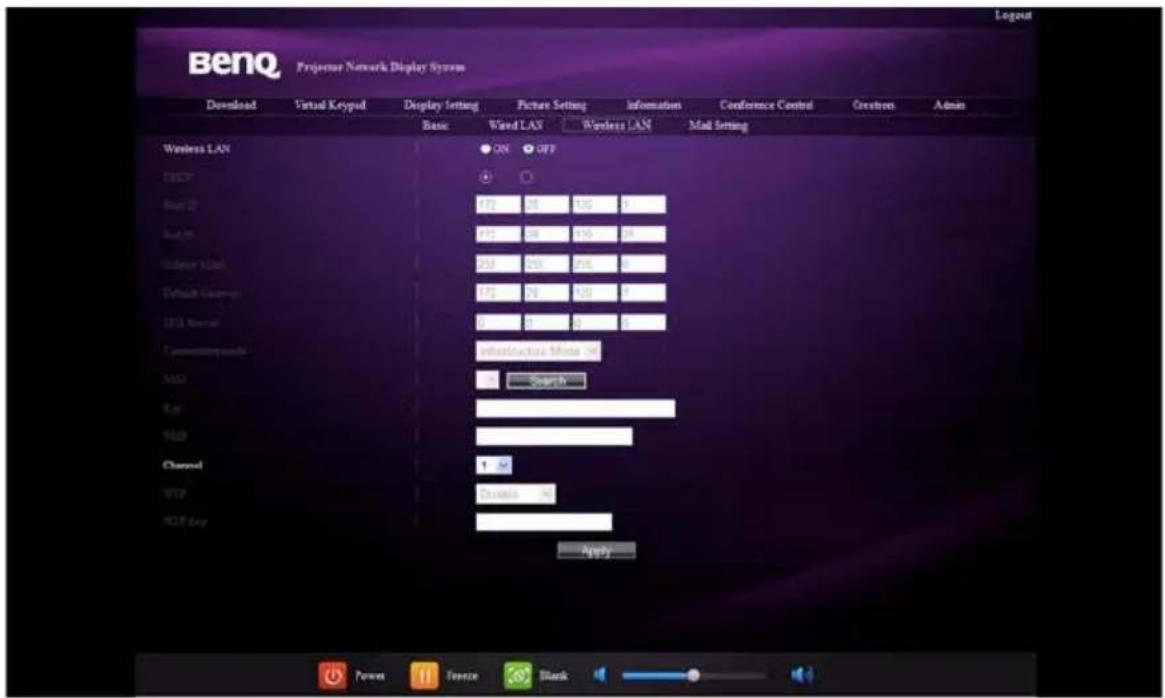

The maximum length for SSID is 16 bytes. Please use different SSID when more than two projectors are connecting through wireless LAN.
The Mail page allows you to send alert e-mail to your ITS administrator.
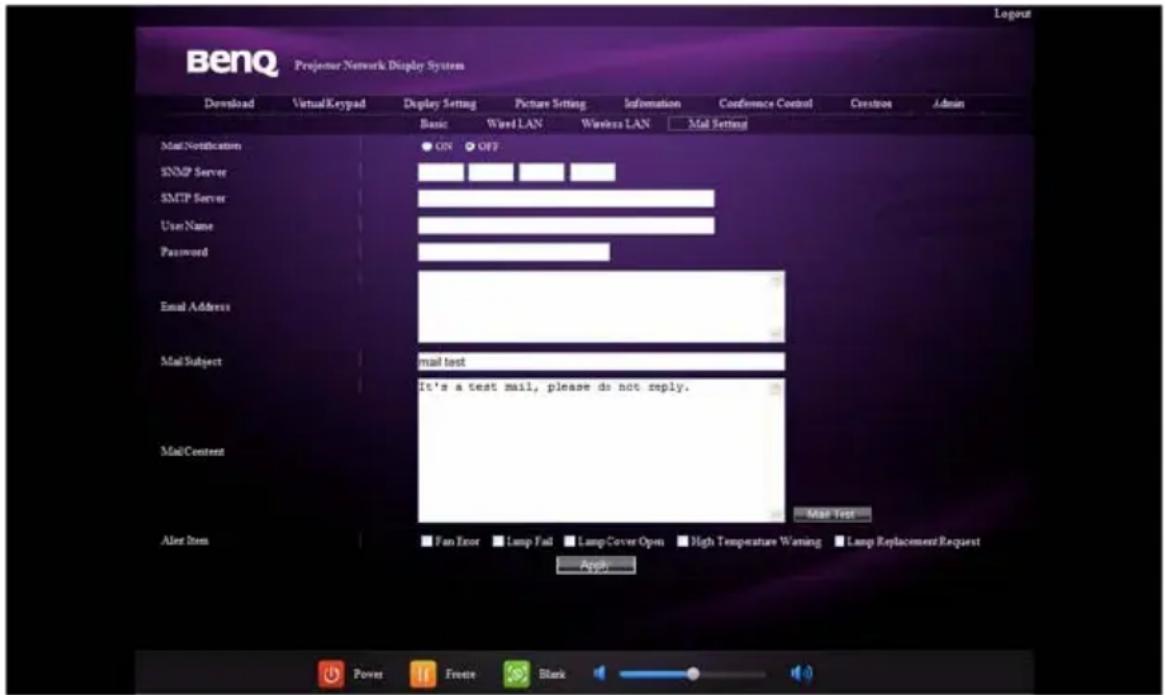

You can first try the Mail Test function to check if the Alert Mail works.
II. These quick buttons are always provided on the web page for you to operate the projector.

Using the web control lock
This function is designed to prevent unauthorized people from maliciously changing the projector settings through the Projector Network Display System.
To enable the function:
I. After your computer is connected to the projector, enter the address of the projector in the address bar of your browser and press Enter.
2. Go to the Admin page of the Projector Network Display System.
3. Enter the current password.
4. Click ON in the Web Control Lock row.
The next time someone connects to this projector, the Projector Network Display System page provides limited functions.
To disable the function:
I. Go to the Admin page of the Projector Network Display System.
2. Enter the current password.
3. Click OFF in the Web Control Lock row.
You can also use the OSD menu to toggle this function:
I. Go to the SYSTEM SETUP: Advanced > Security Settings > Change Security Settings menu after opening the OSD menu system. Press MODE/ENTER. The message "INPUT PASSWORD" appears. Enter the current password.
- If the password is correct, the OSD menu returns to the Security Settings page. Press ▼ to highlight Web Control Lock and press ◀/▶ to select On or Off.
Projecting computer screen contents
One projector displaying one computer screen
-
Connect the computer to the projector. See "Connecting the projector with your computer" on page 3 for detail.
-
Make sure QPresenter is downloaded and installed. See "Downloading QPresenter" on page 7 and "Installing QPresenter" on page 7 for detail.
-
Open QPresenter by clicking the icon.
-
Type the projector IP address and click Connect. Or you can search for projectors, simply click Search to list all the projectors on the same local area network. Click the desired projector in the Search result list, and click Connect. You can also type a desired projector name and click Search.
-
To play sound through the projector speaker, simply click Activate audio out.
One projector displaying screens of up to 4 computers
The projection screen can be divided into four parts for simultaneous projection of the screen contents of all four connected computers.
I. Connect each computer to the projector. See "Connecting the projector with your computer" on page 3 for detail.
-
Make sure QPresenter is downloaded and installed. See "Downloading QPresenter" on page 7 and "Installing QPresenter" on page 7 for detail.
-
Open QPresenter by clicking the icon.
-
Type the projector IP address and click Connect. Or you can search for projectors, simply click Search to list all the projectors on the same local area network. Click the desired projector in the Search result list, and click Connect. You can also type a desired projector name and click Search.
- Once connected, open the Special Feature page of QPrensenter and decide a display location by click 1, 2, 3, 4, L, R or Full Screen.
Up to 8 projectors displaying one computer screen
I. Connect the projectors to the same local area network through wired connection or wireless connection in the Infrastructure mode. See "Connecting the projector with your computer" on page 3 for detail.
-
Connect your computer to the same local area network.
-
Make sure QPresenter is downloaded and installed. See "Downloading QPresenter" on page 7 and "Installing QPresenter" on page 7 for detail.
-
Open QPresenter by clicking the icon.
-
Go to Settings > Basic Settings menu.
-
Click Activate I:N Display and click Apply.
Up to 255 projectors displaying one computer screen (for selective models)
This is the Broadcasting function which allows your computer to send screen content to up to 255 projectors as long as they are on the same local area network and same channel.

• The function requires special version of the QPresenter. Please download it from your User Manuel CD.
- This function is only available when the Network Display source is selected.
• The minimum system requirement for your computer is Intel Core 2 Duo 2.4GHz CPU, 2G DDR.
I. Connect the projectors to the same local area network through wired connection.
- Selecting a certain channel for each projector.
i. Go to the SYSTEM SETUP: Advanced > Network Settings menu after opening the OSD menu system. Press MODE/ENTER.
ii. Press ▼ to highlight Broadcasting and press ◀/▶ to select On.
Or
i. Open the Projector Network Display System and go to the Basic page.
ii. Click ON in the Broadcasting row and select a channel using the drop-down list.
-
On your computer, make sure QPresenter is downloaded and installed. See "Downloading QPresenter" on page 7 and "Installing QPresenter" on page 7 for detail.
-
Open QPresenter by clicking the icon.
-
Go to Settings > Advanced Settings.
-
Click Yes in the Activate Broadcasting row.
-
Select the same channel in the drop-down list and click Apply.
Using the USB cable to display computer content (for selective models)
I. Take a USB cable and connect one end to your computer and the other end to the USB mini B port on the projector.
-
Press SOURCE and select USB Display in the source bar.
-
Go to My Computer on you PC and double-click the BenQ QPresenter icon.
-
The projector automatically displays the content in your computer.
Supported Resolutions
The projected computer screen will be automatically rescaled to 1024 x 768.
Using the Projection Login Code
This function is designed to ensure network display through the correct projector. To toggle this function:
- Go to the SYSTEM SETUP: Advanced > Network Settings menu after opening the OSD menu system. Press MODE/ENTER.
- Press ▼ to highlight Projection Log In Code and press ◀/▶ to select On or Off.
When this function is on, the projector generates a random 4-digit code in the upper right corner when you switch the source to Network Display. You need to key in this 4-digit code in the QPresenter when connecting to the projector.
Using the USB Camera (for selective models)

- This function is not available when the broadcasting function is activated.
• Make sure you are using Microsoft Internet Explorer version 7.0 or 8.0.
I. Plug the USB camera to the projector's USB Type A port. For supported USB camera list, visit http://www.ideasonboard.org/uvc/#footnote-1. - Open the Projector Network Display System and log in.
- Go to the Basic page and click Connect in the USB Camera row. Images captured by the USB camera will be displayed in a pop out page.
PJLink Commands
This projector supports standard protocol PJLink for projector control. Supported commands are as below.

The below supported commands may vary depending on different models.
| Command Description Parameter | ||
| POWER OFF Power control. 0 = Power Off | ||
| POWER ON Power control. 1 = Power On | ||
| Power? Query the power status. 0 = Power Off | 1 = Power On2 = Cooling down3 = Warm up | |
| INPT Input switch command. 11 = VGA1 | 12 = VGA221 = SVideo22 = CVBS31 = HDMI51 = CARD_READER52 = LAN DISPLAY53 = USB DISPLAY42 = Speaker Volume Up43 = Speaker Volume Down44 = Microphone Volume Up45 = Microphone Volume Down46 = Freeze47 = Change picture mode | |
| INPT? | Query the current input switch status. | |
| AVMT | Mute control. | 10 = Video mute off11 = Video mute on20 = Audio mute off21 = Audio mute on30 = Video & Audio mute off31 = Video & Audio mute on |
| AVMT? Query the current mute status. | ||
| LAMP? | Query the number of lamp hours. | Lamp hour |
| INST? | Query the list which enables input switch. | Return"11 12 21 22 31 51 52 53" |
| NAME? | Query the projector name. | Return "Digital Projector" |
| INF0? | Query resolution information. | Return "Education Series" |
| INF1? | Query the maker name. | Return "BenQ" |
| INF2? | Query the model name. | Return model name as below,"Actual model name" |
| CLSS? | Query class information. Return "Version" | |
| ERST? Query the error status Error Status | ||
| GET ALL Query all status Return all "?" items | ||