
SC-C50EB - Loudspeaker TECHNICS - Free user manual and instructions
Find the device manual for free SC-C50EB TECHNICS in PDF.


| Product Type | Wireless Speaker System |
| Brand | Technics |
| Model | SC-C50EB |
| Dimensions (W x H x D) | 375 mm x 220 mm x 197 mm |
| Weight | Approx. 5.9 kg |
| Power Supply | AC 220-240 V, 50/60 Hz |
| Power Consumption | 42 W |
| Standby Power Consumption | 0.2 W (Network Standby Off) |
| Amplifier Output | Front (L/R): 20 W + 20 W, Center: 20 W, Subwoofer: 40 W |
| Speaker Configuration | 2-way front (6.5 cm woofer, 1.6 cm tweeter) + 12 cm subwoofer |
| Bluetooth Version | 4.2 |
| Bluetooth Profiles | A2DP, AVRCP |
| Bluetooth Codec | AAC, SBC |
| Wi-Fi Standard | IEEE 802.11a/b/g/n/ac (2.4/5 GHz) |
| Wired Network | LAN (100BASE-TX/10BASE-T) |
| USB Port | USB-A (DC 5V, 500 mA, FAT16/32, NTFS) |
| Audio Inputs | AUX (3.5 mm stereo), Optical digital (LPCM) |
| Supported Audio Formats (USB/LAN) | MP3, AAC, WAV, FLAC, AIFF, ALAC, DSD |
| Control App | Technics Audio Center (iOS/Android) |
| Streaming Services | Chromecast built-in, AirPlay, Spotify Connect |
| Smart Assistant | Google Home compatible |
| Sound Calibration | Space Tune (Auto) |
| Firmware Update | Via internet or USB |
| Operating Temperature | 0°C to +40°C |
| Operating Humidity | 35% to 80% RH (no condensation) |
| Cleaning | Use soft cloth; avoid solvents |
| Safety | Do not expose to liquids; ensure ventilation |
Frequently Asked Questions - SC-C50EB TECHNICS
User questions about SC-C50EB TECHNICS
0 question about this device. Answer the ones you know or ask your own.
Ask a new question about this device
Download the instructions for your Loudspeaker in PDF format for free! Find your manual SC-C50EB - TECHNICS and take your electronic device back in hand. On this page are published all the documents necessary for the use of your device. SC-C50EB by TECHNICS.
USER MANUAL SC-C50EB TECHNICS
natural_image
Modern minimalist living room interior with sofa, coffee table, and large round table under dramatic lighting (no text or symbols visible)Basic Operating Instructions
Wireless Speaker System
SC-C50
Music is borderless and timeless, touching people's hearts across cultures and generations.
Each day the discovery of a truly emotive experience from an unencountered sound awaits.
Let us take you on your journey to rediscover music.
Rediscover Music™/Technics
Delivering the Ultimate Emotive Musical Experience to All
At Technics we understand that the listening experience is not purely about technology but the magical and emotional relationship between people and music.
We want people to experience music as it was originally intended and enable them to feel the emotional impact that enthuses and delights them.
Through delivering this experience we want to support the development and enjoyment of the world's many musical cultures. This is our philosophy.
With a combination of our love of music and the vast high-end audio experience of the Technics team, we stand committed to building a brand that provides the ultimate emotive musical experience by music lovers, for music lovers.
Director
Michiko Ogawa

Thank you for purchasing this product.
Please read these instructions carefully before using this product, and save this manual for future use.
- About descriptions in these operating instructions
- Pages to be referred to are indicated as "⇒ ∞".
– The illustrations shown may differ from your unit.
- A more detailed operating instruction is available in "Operating Instructions" (PDF format). To read it, download it from the website. www.technics.com/support/
- You will need Adobe Reader to browse or print "Operating Instructions" (PDF format). You can download and install a version of Adobe Reader that you can use with your OS from the following website. http://www.adobe.com/products/acrobat/readstep2.html

Sales and Support Information
Customer Communications Centre
• For customers within the UK: 0333 222 8777
• For customers within Ireland: 01 447 5229
- Monday–Friday 9:00 am – 5:00 pm, (Excluding public holidays).
- For further support on your product, please visit our website: www.technics.com/uk/
Table of contents
Safety precautions 05
| Installation 07 | |
| Control reference guide 08 | |
| Used | Connections 09 |
| Network settings 10 | |
| Available input sources 14 | |
| Using Bluetooth® 15 | |
| Streaming music over the network 16 | |
| Licenses 17 | |
| Specifications 18 | |
Accessories
AC mains lead (1)
K2CT3DR00009

- The smartphone on the cover page is not supplied with this unit.
- Product numbers provided in these operating instructions are correct as of July 2018.
• These may be subject to change. - Do not use AC mains lead with other equipment.
Warning
Unit
- To reduce the risk of fire, electric shock or product damage,
- Do not expose this unit to rain, moisture, dripping or splashing.
- Do not place objects filled with liquids, such as vases, on this unit.
- Use the recommended accessories.
- Do not remove covers.
- Do not repair this unit by yourself. Refer servicing to qualified service personnel.
- Do not let metal objects fall inside this unit.
- Do not place heavy items on this unit.
AC mains lead
- To reduce the risk of fire, electric shock or product damage,
- Ensure that the power supply voltage corresponds to the voltage printed on this unit.
- Insert the mains plug fully into the socket outlet.
- Do not pull, bend, or place heavy items on the lead.
- Do not handle the plug with wet hands.
- Hold onto the mains plug body when disconnecting the plug.
- Do not use a damaged mains plug or socket outlet.
- The mains plug is the disconnecting device. Install this unit so that the mains plug can be unplugged from the socket outlet immediately.
- Ensure the earth pin on the mains plug is securely connected to prevent electrical shock.
- An apparatus with CLASS I construction shall be connected to a mains socket outlet with a protective earth connection.
Caution
Unit
- Do not place sources of naked flames, such as lighted candles, on this unit.
- This unit may receive radio interference caused by mobile telephones during use. If such interference occurs, please increase separation between this unit and the mobile telephone.
- This unit is intended for use in moderate and tropical climates.
- Do not put any objects on this unit. This unit becomes hot while it is on.
Placement
- Place this unit on an even surface.
- To reduce the risk of fire, electric shock or product damage,
- Do not install or place this unit in a bookcase,
built-in cabinet or in another confined space. Ensure this unit is well ventilated.
- Do not obstruct this unit's ventilation openings with newspapers, tablecloths, curtains, and similar items.
- Do not expose this unit to direct sunlight, high temperatures, high humidity, and excessive vibration.
Caution for AC Mains Lead
(For the AC mains plug of three pins)
For your safety, please read the following text carefully.
This appliance is supplied with a moulded three pin mains plug for your safety and convenience.
A 3-ampere fuse is fitted in this plug.
Should the fuse need to be replaced please ensure that the replacement fuse has a rating of 3-ampere and that it is approved by ASTA or BSI to BS1362.
Check for the ASTA mark or the BSI mark on the body of the fuse.
If the plug contains a removable fuse cover you must ensure that it is refitted when the fuse is replaced.
If you lose the fuse cover the plug must not be used until a replacement cover is obtained.
A replacement fuse cover can be purchased from your local dealer.
Before use
Remove the connector cover.
How to replace the fuse
The location of the fuse differ according to the type of AC mains plug (figures A and B). Confirm the AC mains plug fitted and follow the instructions below. Illustrations may differ from actual AC mains plug.
- Open the fuse cover with a screwdriver.
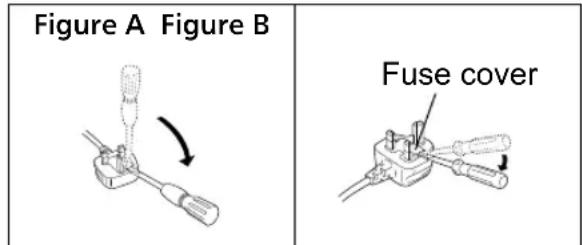
- Replace the fuse and close or attach the fuse cover.

Panasonic Corporation, a company having its registered office of 1006, Oaza Kadoma, Kadoma City, Osaka 571-8501, Japan, automatically collects personal data such as IP address and/or Device ID from your device as soon as you connect it to the Internet. We do this to protect our customers and the integrity of our Service as well as to protect the rights or property of Panasonic.
You have a right of access, rectification and objection to in certain circumstances, a right of erasure, restriction of processing, data portability and a right to object to other forms of processing. If you wish to exercise any of the above rights and/or wish to know more about the processing of your personal data in this context, please refer to the full text of our privacy policy displayed at the support page of your device, http://panasonic.jp/support/global/cs/audio/, http://www.technics.com/support/ or contact our customer communications/support number or address described in the Pan European Guarantee included in your device box to send you the full text of our privacy policy.
Disposal of Old Equipment
Only for European Union and countries with recycling systems
This symbol on the products, packaging, and/or accompanying documents means that used electrical and electronic products must not be mixed with general household waste.
For proper treatment, recovery and recycling of old products, please take them to applicable collection points in accordance with your national legislation.
By disposing of them correctly, you will help to save valuable resources and prevent any potential negative effects on human health and the environment.
For more information about collection and recycling, please contact your local municipality. Penalties may be applicable for incorrect disposal of this waste, in accordance with national legislation.
CE
Declaration of Conformity (DoC)
Hereby, "Panasonic Corporation" declares that this product is in compliance with the essential requirements and other relevant provisions of Directive 2014/53/EU.
Customers can download a copy of the original DoC to our RE products from our DoC server: http://www.ptc.panasonic.eu
Contact to Authorised Representative:
Panasonic Marketing Europe GmbH, Panasonic Testing Centre, Winsbergring 15, 22525 Hamburg, Germany
| Type of wireless | Operating Frequency | Maximum Power (EIRP) |
| WLAN 2412 - 2472 MHz | 5180 - 5320 MHz | 20 dBm |
| 5500 - 5700 MHz | 20 dBm | |
| Bluetooth® | 2402 - 2480 MHz 10 dBm |
5.15 - 5.35 GHz band is restricted to indoor operations only in the following countries.
| AT | BE | BG | CZ | DK | EE | FR | DE | IS | IE | IT |
| EL | ES | CY | LV | LI | LT | LU | HU | MT | NL | NO |
| PL | PT | RO | SI | SK | TR | FI | SE | CH | UK | HR |
Product Identification Marking is located on the bottom of the unit.
Installation
Turn off all the equipment before connection and read the appropriate operating instructions. Be sure to raise this unit when moving, and do not drag this unit.
Notes on the speakers
These speakers do not have magnetic shielding. Do not place them near TV, PC or other equipment easily influenced by magnetism.
- Playing music at high volumes for a long period can cause damage to the system and shorten the life of the system.
• Decrease the volume in the following conditions to prevent damage. - When playing distorted sound
- When adjusting the sound quality
- When turning on/off this unit
For optimum sound effects
The quality and volume of the bass sound, sound localisation performance, sound ambience, etc. will change depending on the installation location of this unit, listening position, room conditions, and other factors. Refer to the information below when installing this unit.
Determining the installation location
- Place this unit on a flat safe surface.
Adjusting the distances between this unit and the wall
- If you install this unit close to a wall or a corner, the bass sound will be more powerful, however, if the unit is too close to it, sound localisation performance and sound ambience may deteriorate.
Adjusting with the Space Tune function
You can adjust the sound quality automatically according to the installation location (near the wall or the corner of the room).
① Press and hold [▶]/for 5 seconds.
• "Space Tune (Auto)" is displayed.
② Press [▶] again while "Space Tune (Auto)" is displayed.
- A test tone outputs quite big while the measurement is in progress.
- When the adjustment is complete, "Success" is displayed.
- To cancel the adjustment in the middle, press [→].
Unit care
Pull out the AC mains lead from the socket before maintenance. Clean this unit with a soft cloth.
- When dirt is heavy, wring a wet cloth tightly to wipe the dirt, and then wipe it with a soft cloth.
- Do not use solvents including benzine, thinner, alcohol, kitchen detergent, chemical wiper, etc. Doing so may cause the exterior case to be deformed or the coating to come off.
Using "Technics Audio Center"
If you install the dedicated app "Technics Audio Center" (free of charge) on your tablet/smartphone, you can stream music files from the device on your network to this unit and configure the settings of sound quality, etc.
For details, visit: www.technics.com/support/
Firmware updates
Occasionally, Panasonic may release updated firmware for this unit that may add or improve the way a feature operates. These updates are available free of charge.
- Update via Internet (⇒ 10)
- For details of the update via USB flash memory, refer to the following website.
www.technics.com/support/firmware/
To dispose of or transfer this unit
Before disposing of or transferring this unit, be sure to erase all the recorded information by restoring the settings to factory default. To restore the settings to factory default, press and hold both [• DIMMER/-INFO] and [∅/I simultaneously for 5 seconds or longer while the unit is on. The unit restarts automatically, and all the settings are restored to factory default.
- Before you dispose of or transfer this unit to a third party, be sure to log out of your music streaming services accounts to prevent unauthorised use of your accounts.
This unit (front/top)

01 [b]/Standby/on switch
Press to switch the unit from on to standby mode or vice versa. In standby mode, the unit is still consuming a small amount of power.
02 Adjust volume
• 0 (min) to 100 (max)
03 Display
Input source, etc. are displayed.
04 [★] Favourite
You can register your favourite station or playlist (USB, Podcasts, Spotify, etc.), and call them.
- You can register up to 9 favourite stations or playlists. To register, press and hold [★] until "Memorised" is displayed while a station tuned in or music is being played back. Then, the station or music is automatically registered to an unused number from 1 to 9.
05 [-/II] Play/Pause
06 ☐] Switch the input source
07 Built-in microphone
08 Product identification marking (Bottom of this unit)
• The model number is indicated.
This unit (rear)

09 [•DIMMER/-INFO]
Adjust the brightness of illumination of the display and bottom of the unit.
- When the display is turned off, it will light up for a few seconds only when you operate this unit. Before the display turns off, "Display Off" will be displayed for a few seconds.
- Press [•DIMMER/-INFO] repeatedly to switch the brightness.
- Press and hold [• DIMMER/-INFO] to display the network status or settings. The displayed items are changed by pressing [• DIMMER/-INFO] repeatedly. (The brightness does not change during this period.)
10 USB-A terminal (DC 5 V... 500 mA)
You can play back music stored on the connected USB device using the dedicated app "Technics Audio Center" (free of charge) on your tablet/smartphone ( 09). For details, visit:
www.technics.com/support/
- If a USB device is connected, [•DIMMER/-INFO] is difficult to press. Remove the USB device as necessary.
11 LAN terminal ( 11)
12 Optical digital input terminal
You can connect a CD player, etc. with optical digital audio cable (not supplied) and play back music. ( 09)
13 AUX IN terminal
You can connect a portable audio player, etc. with an analogue audio cable ( 3.5 mm) (not supplied) and play back music. ( 09)
14 AC IN terminal ( ) ( 09)
Connecting analogue audio output device

Portable audio player, etc.
Note
- When enjoying video contents with this function, the video and audio output may not be synchronised.
Connecting digital audio output device
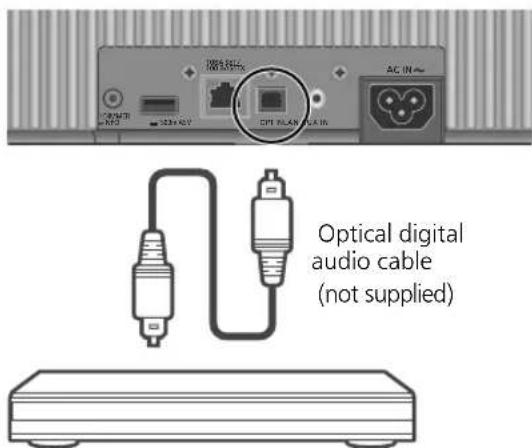
CD player, etc.
Note
- When enjoying video contents with this function, the video and audio output may not be synchronised.
Connecting USB device
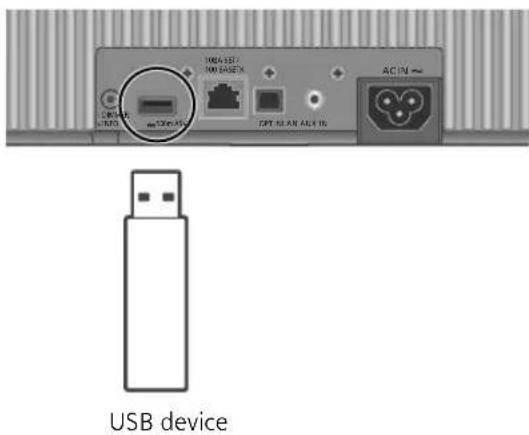
AC mains lead connection
Connect only after all other connections are completed.

• Use only the supplied AC mains lead.
- Do not connect the AC mains lead until all other connections are complete.
- Insert the plugs of the cables to be connected all the way in.
• Do not bend cables at sharp angles.
- Wireless LAN (Wi-Fi setting may start when this unit is turned on. If you stop the Wi-Fi setting, press [ ]To keep the Wi-Fi setting, start the "Google Home" app and follow the on-screen instructions. (⇒ 11)
Note
- This unit consumes a small amount of AC power ( 18) even when the unit is in standby mode. Remove the plug from the main electrical outlet if you will not be using the unit for an extended period of time. Place the unit so the plug can be easily removed.
You can stream online music services or music files from your smartphone/tablet to this unit.
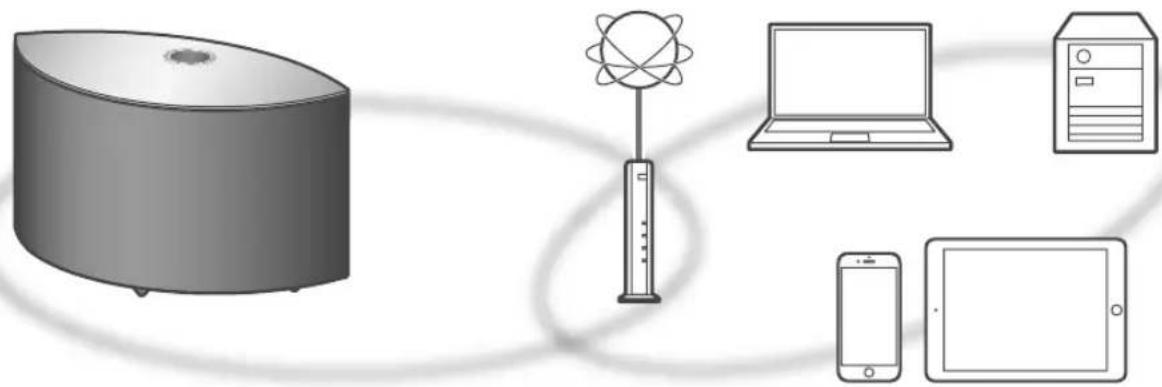
This unit can be connected to a router using a LAN cable or built-in Wi-Fi ^® .
For a stable connection to the network, a wired LAN connection is recommended.
Preparation
If you install the "Google Home" app on your smartphone/tablet, you can set up a connection using the application.
- When using the Chromecast-enabled apps to play music on this unit (⇒ 16), set up a connection using the "Google Home" app.
- Make sure that the Wi-Fi function is activated on your smartphones/tablet.
1 Install the "Google Home" app on your smartphone/tablet.
- To download the "Google Home" app, visit: https://www.google.com/cast/setup/

2 Connect your smartphone/tablet to the same network as this unit before setting.
Note
- After turning on this unit, it may take some time until this unit is activated. - If "Firmware update is available" is displayed after the network connection is set up, the firmware for this unit is available. Press and hold [▶/II] for 5 seconds or longer to start the update.
- The progress is displayed as "Updating □ %" while updating. ("□ stands for a number.)
- When the update has finished successfully, "Success" is displayed. Turn this unit off and on.
- “” blinks while the network connection is not established. When the network connection is established, “” disappears.
The network setting using the "Google Home" app may be available while " ✉" blinks. Start the "Google Home" app and follow the on-screen instructions. (⇒ 13)
Wired LAN connection

Broadband router, etc.
1 Disconnect the AC mains lead.
2 Connect this unit to a broadband router, etc. using a LAN cable.
3 Connect the AC mains lead to this unit. ( 09)
4 Press[1] to turn this unit on.
5 (To use the Chromecast-enabled apps with this unit (⇒ 16))
Make sure to set up a connection using "Google Home" app on your smartphone/tablet.
Note
- While the AC mains lead is disconnected, the LAN cable must be connected or disconnected.
- Use category 7 or above straight LAN cables (STP) when connecting to peripheral devices.
- Inserting any cable other than a LAN cable in the LAN port can damage the unit.
- Even when the Wi-Fi function is set to "On", the wired LAN function is activated while a LAN cable being connected. ("") disappears.)
Wireless LAN connection
■Preparation
① Disconnect the AC mains lead.
② Disconnect the LAN cable.
③ Place this unit as close to the wireless router as possible.
④ Connect the AC mains lead to this unit. ( 09)
Note
- The setting will be cancelled after the set time limit. In that case, try the setting again.
- “” disappears when the Wi-Fi setting is complete.
- To cancel this setting in the middle, press [→] or turn the unit to standby mode.
Network setting for the first time using the "Google Home" app
1 Press [∅/l] to turn this unit on.
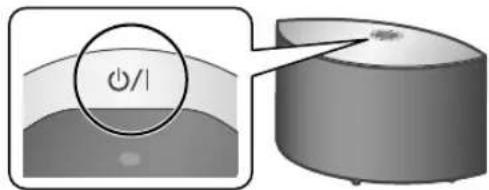
- "Wi-Fi Setup" starts blinking.
![TECHNICS SC-C50EB - Press [∅/l] to turn this unit on. - 2](/content/2026/05/1136764/images/de4b14762f9add975f361d60bd3069bc28f9c09ca29950dd3e9d0680912c3303.jpg)
2 Start the "Google Home" app and follow the on-screen instructions.
Note
- This unit will be displayed as "Technics-SC-C50-****" if the device name is not set. ("****" stands for characters unique to each set.)
- You can check your network information (SSID, MAC address and IP address) from the "Google Home" app or "Technics Audio Center" app.
- Some items on the "Google Home" app are irrelevant to this unit.
- When this unit is turned off and on before the Wi-Fi setting is complete, "Wi-Fi Setup" is displayed again. Perform the Wi-Fi setting or set the Wi-Fi function to "Off" so that it is not displayed thereafter. To switch the Wi-Fi function between "On" and "Off", press [→] to cancel the Wi-Fi setting in the middle, press and hold the volume [—] on the top and [• DIMMER/-INFO] on the rear of this unit for approx. 5 seconds.
• For other connection methods (⇒ 12)
Setting the network from the setup menu
1 Press and holds[] on the top and [• DIMMER/-INFO] on the rear of this unit.
2 Connection methods (WPS/WPS PIN/Wi-Fi Setup) are displayed in turn.
• The display changes every 5 seconds.

- If your wireless broadband router supports the WPS (Wi-Fi Protected Setup™) push button (Using the WPS button)

- If your wireless broadband router support the WPS PIN code method (Using the WPS PIN code)

- When using the "Google Home" app to set up a connection (Using the "Google Home" app)
3 Release[] and [• DIMMER/-INFO] while the selected connection method is displayed.
Note
- When using the Chromecast-enabled apps to play music on this unit (⇒ 16), set up a connection using the "Google Home" app.
■Using the WPS button "WPS"
(When not using the Chromecast-enabled apps with this unit)
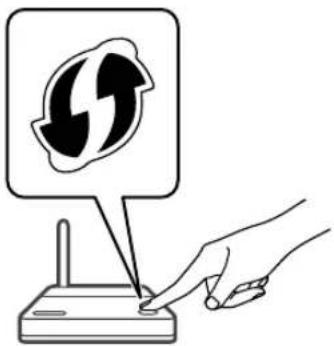
If your wireless router supports WPS, you can set up a connection by pressing the WPS button.
- A compatible wireless router may have the WPS identifier mark.
- Complete the settings within 2 minutes while "WPS" is displayed.
1 After "WPS" is displayed, press the WPS button on the wireless router.
Example:
natural_image
Illustration of a hand pressing a button on a router with a circular arrow symbol above (no text or labels)- When the connection is established, "Success" is displayed.
- "Fail" may be displayed if the connection was not complete. Try this method again from the setup menu. If "Fail" is still displayed, try other methods.
2 Press [▶/II] to exit the setting.
■Using the WPS PIN code "WPS PIN"
(When not using the Chromecast-enabled apps with this unit)
If your wireless router supports WPS, you can set up a connection by entering the WPS PIN code.
- For details on how to enter the PIN code, refer to the operating instructions of the wireless router.
- Complete the settings within 2 minutes while "WPS PIN" and the PIN code are displayed.
1 Enter the PIN code into the wireless router from PC, etc.
- When the connection is established, "Success" is displayed. - "Fail" may be displayed if the connection was not complete. Try this method again from the setup menu. If "Fail" is still displayed, try other methods.
2 Press▶[11] to exit the setting.
Note
- Depending on a router, other connected devices may temporarily lose their connection.
- For details, refer to the operating instructions of the wireless router.
■Using the "Google Home" app
"Wi-Fi Setup"
(When using the Chromecast-enabled apps with this unit)
You can set up a connection using the "Google Home" app.
1 Start the app and follow the on-screen instructions.
2 Press▶[11] to exit the setting.
Note
- This unit will be displayed as "Technics-SC-C50-****" if the device name is not set. ("****" stands for characters unique to each set.)
- You can check your network information (SSID, MAC address and IP address) from the "Google Home" app or "Technics Audio Center" app.
- Some items on the "Google Home" app are irrelevant to this unit.
To use Chromecast-enabled apps
When using the Chromecast-enabled apps to play music on this unit, you need to set up a network connection using "Google Home" app. When the network has been set up with another method, try the setting again with the following procedure.
1 Press and holds[ ] on the top and [• DIMMER/-INFO] on the rear of this unit.
- The displayed connection method is switched every 5 seconds.
2 When "Wi-Fi Setup" is displayed, release [→] and [• DIMMER/-INFO].
- "Wi-Fi Setup" starts blinking.
3 Proceed to "Using the "Google Home" app".
natural_image
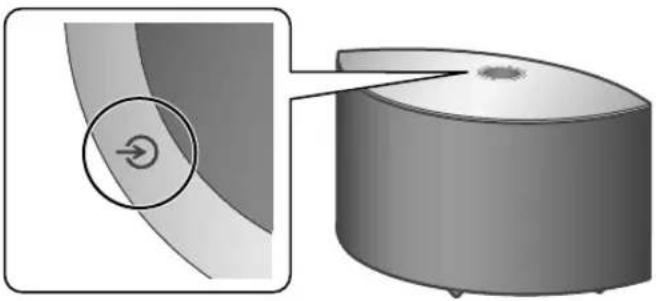
Diagram showing a curved object with a circular arrow and a circular arrow icon, connected to a cylindrical container (no text or symbols)1 Pres∅[i] to turn this unit on.
2 Press[] repeatedly to select the input source.
• Each input source can be played back with this unit (see below).
- Some inputs can be available when using "Google Home" or "Technics Audio Center" (free of charge). For details, visit:
www.technics.com/support/
- Complete the network settings. (⇒ 10)

Using the auxiliary input
You can connect a portable audio player, etc. with an analogue audio cable ( 3.5 mm) (not supplied) and play back music. ( 09)
- Start playback on the connected device.
Using digital audio output device
You can connect a CD player, etc. with optical digital audio cable (not supplied) and play back music. ( 09)
- Start playback on the connected device.

Using Bluetooth®
You can listen to the sound from the Bluetooth® audio device from this unit wirelessly. (⇒ 15)
- Start playback on the Bluetooth® device.

Using USB device
You can play back music stored on the connected USB device.
- Use the dedicated app "Technics Audio Center" (free of charge) to play back.


Playing Internet Radio and Podcasts
Using the free app "Technics Audio Center", you can play an internet radio by setting this unit as a speaker for the internet radio.
- Use the dedicated app "Technics Audio Center" (free of charge) to play back.
Chromecast built-in
Using Chromecast-enabled apps
This unit has the Chromecast built-in. You can stream music files from your device (smartphone, tablet, etc.) with Chromecast-enabled apps and select this unit as the output speaker. ( 16)
- For detailed information of Chromecast-enabled apps, visit: g.co/cast/apps

Using music streaming services (Spotify, etc.)
You can play music from music streaming services, such as Spotify etc. by setting this unit as a speaker.
- For music streaming services supported by this unit, visit: www.technics.com/support/

Streaming music files on network devices
You can stream music files from the device on your network to this unit by using the free app "Technics Audio Center". ( 16)

Using AirPlay
You can play back music stored on iOS device, etc. using AirPlay.

natural_image
Illustration of a curved device connected to a smartphone, labeled 'Bluetooth® device' (no other text or symbols)Pairing a Bluetooth device
- Turn on this unit, Bluetooth device and place the device near this unit.
• Turn on the Bluetooth feature of the device.
1 Press [→] repeatedly to select "∅".
• “ ” blinks at 1 second interval.
- “blinks per second and this unit tries to connect to the last connected Bluetooth® device. After the connection is complete, proceed to step 4.
2 Press and hold[ ].
- "⑧" blinks at 1 second interval and this unit enters the registration standby state.
3 Open the Bluetooth connection screen, etc. on the Bluetooth® device, and select "Technics-SC-C50-****".
- ***" stands for numbers unique to each set.
- If the device name is set on the "Google Home" app, the set name is displayed.
4 Play music by operating the Bluetooth® device.
Note
- If prompted for the passkey, input "0000".
- You can register up to 8 devices with this unit. If a 9th device is paired, the device that has not been used the longest will be replaced.
Listening to music stored on a Bluetooth® device
- If a Bluetooth device is already connected, disconnect it.
1 Press [→] repeatedly to select "⊗".
- “③” blinks per second and this unit will automatically try to connect to the last connected Bluetooth® device. After the connection is complete, proceed to step 3.
2 Open the Bluetooth connection screen, etc. on the Bluetooth® device, and select "Technics-SC-C50-****".
3 Play music by operating the Bluetooth® device.
Note
- Refer to the operating instructions of the Bluetooth® device for details.
- This unit can only be connected to one device at a time.
- The Bluetooth device will be disconnected if a different audio source is selected.
Listening to music using Chromecast-enabled app

natural_image
Illustration of a portable electronic device with a thermometer and two separate devices (no text or symbols)This unit is compatible with Chromecast-enabled apps. For detailed information of Chromecast-enabled apps, visit: g.co/cast/apps
Preparation
- Complete the network settings. ( 10)
- Make sure that the network is connected to the Internet.
• Install a Chromecast-enabled app on your device (smartphone, tablet, etc.). - Connect the device to the network currently used at home.
1 Start the Chromecast-enabled app on your device (smartphone, tablet, etc.).
- The input source is automatically switched to "Chromecast built-in".
2 Play back the music.
Not all music streaming services are available in all countries/regions. Registration/subscription may be required, or fees may be charged to use music streaming services. Services are subject to change or be discontinued. For details, visit an individual music streaming service's website.
Important notice:
Before you dispose of or transfer this unit to a third party, be sure to log out of your music streaming services accounts to prevent unauthorised use of your accounts.
Streaming music files on network devices
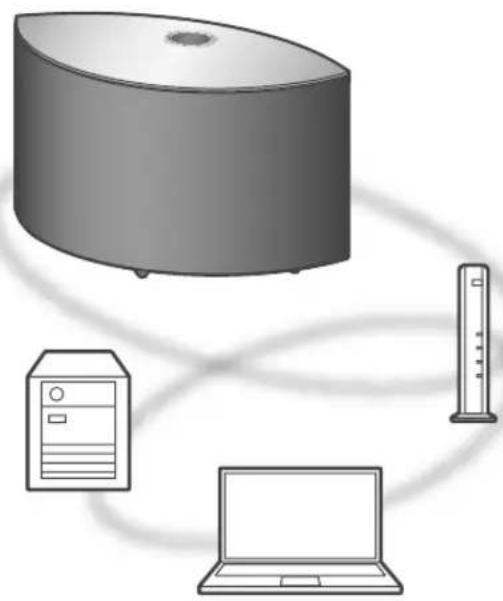
natural_image
Illustration of a desktop computer setup with monitor, tower, and laptop connected by cables (no text or symbols)You can stream music files from the device on your network to this unit by using the free app "Technics Audio Center".
Preparation
- Complete the network settings. ( 10)
- Connect the following devices to the same network as this unit.
- Device with "Technics Audio Center" app installed
- Device containing music source
1 Install the free app "Technics Audio Center" on your smartphone, tablet, etc.
- Download and install the app from the website below. www.technics.com/support/
2 Start the app "Technics Audio Center".
• Always use the latest version of the app.
3 Select this unit as the output speaker.
4 Select a music source.
5 Select a music file.


The Wi-Fi CERTIFIED™ Logo is a certification mark of Wi-Fi Alliance®.
The Wi-Fi Protected Setup™ Logo is a certification mark of Wi-Fi Alliance ®.
"Wi-Fi®" is a registered trademark of Wi-Fi Alliance®.
"Wi-Fi Protected Setup™", "WPA™", and "WPA2™" are trademarks of Wi-Fi Alliance®.

Works with Apple AirPlay
Use of the Works with Apple badge means that an accessory has been designed to work specifically with the technology identified in the badge and has been certified by the developer to meet Apple performance standards.
Apple and AirPlay are trademarks of Apple Inc., registered in the U.S. and other countries.
Google, Google Home, Android, Google Play, Chromecast, Chromecast built-in and other related marks and logos are trademarks of Google LLC.
Windows is a trademark or a registered trademark of Microsoft Corporation in the United States and other countries.
Windows Media and the Windows logo are trademarks or registered trademarks of Microsoft Corporation in the United States and/or other countries. This product is protected by certain intellectual property rights of Microsoft Corporation and third parties. Use or distribution of such technology outside of this product is prohibited without a license from Microsoft or an authorized Microsoft subsidiary and third parties.
Mac and OS X are trademarks of Apple Inc., registered in the U.S. and other countries.
The Bluetooth ^® word mark and logos are registered trademarks owned by the Bluetooth SIG, Inc. and any use of such marks by Panasonic Corporation is under license. Other trademarks and trade names are those of their respective owners.
DSD is a trademark of Sony Corporation.
FLAC Decoder
Copyright (C) 2000, 2001, 2002, 2003, 2004, 2005, 2006, 2007, 2008, 2009 Josh Coalson Redistribution and use in source and binary forms, with or without modification, are permitted provided that the following conditions are met:
- Redistributions of source code must retain the above copyright notice, this list of conditions and the following disclaimer.
- Redistributions in binary form must reproduce the above copyright notice, this list of conditions and the following disclaimer in the documentation and/or other materials provided with the distribution.
- Neither the name of the Xiph.org Foundation nor the names of its contributors may be used to endorse or promote products derived from this software without specific prior written permission.
THIS SOFTWARE IS PROVIDED BY THE COPYRIGHT HOLDERS AND CONTRIBUTORS
"AS IS" AND ANY EXPRESS OR IMPLIED WARRANTIES, INCLUDING, BUT NOT LIMITED TO, THE IMPLIED WARRANTIES OF MERCHANTABILITY AND FITNESS FOR A PARTICULAR PURPOSE ARE DISCLAIMED.
IN NO EVENT SHALL THE FOUNDATION OR CONTRIBUTORS BE LIABLE FOR ANY DIRECT, INDIRECT, INCIDENTAL, SPECIAL, EXEMPLARY, OR CONSEQUENTIAL DAMAGES (INCLUDING, BUT NOT LIMITED TO, PROCUREMENT OF SUBSTITUTE GOODS OR SERVICES; LOSS OF USE, DATA, OR PROFITS; OR BUSINESS INTERRUPTION) HOWEVER CAUSED AND ON ANY THEORY OF LIABILITY, WHETHER IN CONTRACT, STRICT LIABILITY, OR TORT (INCLUDING NEGLIGENCE OR OTHERWISE) ARISING IN ANY WAY OUT OF THE USE OF THIS SOFTWARE, EVEN IF ADVISED OF THE POSSIBILITY OF SUCH DAMAGE.
The Spotify software is subject to third party licenses found here:
www.spotify.com/connect/third-party-licenses
GENERAL
| Power supply | AC 220 V to 240 V, 50/60 Hz |
| Power consumption | 42 W |
| Power consumption in standby mode (Network Standby Off) | 0.2 W |
| Power consumption in standby mode (Network Standby On with Wireless LAN) | 2.0 W |
| Power consumption in standby mode (Network Standby On with Wired LAN) | 2.0 W |
| Dimensions (W×H×D) | 375 mm × 220 mm × 197 mm |
| Mass Approx. 5.9 kg | |
| Operating temperature range | 0 °C to +40 °C |
| Operating humidity range | 35 % to 80 % RH (no condensation) |
AMPLIFIER SECTION
| Output power | Front speaker (L/R):20 W + 20 W(1 kHz, T.H.D. 1.0 %,8 Ω, 20 kHz LPF)Front speaker (Center):20 W(1 kHz, T.H.D. 1.0 %,8 Ω, 20 kHz LPF)Subwoofer:40 W(100 Hz, T.H.D. 1.0 %,4 Ω, 20 kHz LPF) |
PEAKER SECTION
Front speaker (L/C/R)
| Type 2 way, 2 speaker (Closed) |
| Woofer 6.5 cm × 1/ch, Cone type |
| Tweeter 1.6 cm × 1/ch, Dome type |
Subwoofer
| Type | 1 way, 1 speaker (Bass reflex) |
| Subwoofer 12 cm × | 1, Cone type |
Bluetooth® SECTION
| Bluetooth® system specification | Bluetooth® Ver.4.2 |
| Wireless equipment classification | Class 2 (2.5 mW) |
| Supported profiles A2DP, AVRCP | |
| Supported codec AAC, SBC | |
| Frequency band | 2.4 GHz band FH-SS |
| Operating distance | Approx. 10 m Line of sight*1 |
*1: Prospective communication distance Measurement environment: Temperature 25 °C/ Height 1.0 m Measure in "Mode1"
TERMINALS SECTION
| USB | Type A ConnectorUSB 2.0 High-SpeedDC 5 V 500 mAUSB Mass Storage ClassFile system:FAT16, FAT32, NTFS |
| Support Memory Capacity | 2 TB (max) |
| Maximum number of folders (albums) | 800 |
| Maximum number of files (songs) | 8000 |
| Ethernet interface | LAN(100BASE-TX/10BASE-T) |
| AUX Input | Stereo, φ3.5 mm Jack |
| Digital Input | Optical digital input(Optical terminal) |
| Format support | LPCM |
Vi-Fi SECTION
| Standard | IEEE802.11a/b/g/n/ac |
| Frequency band | 2.4 GHz band5 GHz band |
| Security | WPA2TM,Mixed mode WPA2TM/WPATM |
| WPS version | Version 2.0 |
- The WLAN feature of this product shall exclusively be used inside buildings.
■File format
This unit supports the following file formats.
- This unit does not support the playback of copy-protected music files.
- Playback of all files in formats supported by this unit is not guaranteed.
- Playback of a file in a format not supported by this unit may cause choppy audio or noise. In such cases, check to see if this unit supports the file format.
- This unit does not support VBR (Variable Bit Rate) playback.
- Some of the connected devices or servers may be capable of converting files in formats not supported by this unit and output them. For details, refer to the operating instructions for your devices or servers.
- File information (sampling frequency, etc.) shown by this unit and playback software may differ from each other.
Optical digital input
| Format support Sampling frequency | Bit rate/Number ofquantisation bits | |
| LPCM | 32/44.1/48/88.2/96 kHz | 16/24 bit |
USB-A
| File format | Extension | Sampling frequency | Bit rate/Number of quantisation bits |
| MP3 | .mp3 | 32/44.1/48 kHz | 16 to 320 kbps |
| AAC | .m4a/.aac | 32/44.1/48/88.2/96 kHz | 16 to 320 kbps |
| WAV | .wav | 32/44.1/48/88.2/96/176.4/192/352.8/384 kHz | 16/24/32 bit |
| FLAC | .flac | 32/44.1/48/88.2/96/176.4/192/352.8/384 kHz | 16/24 bit |
| AIFF | .aiff | 32/44.1/48/88.2/96/176.4/192/352.8/384 kHz | 16/24/32 bit |
| ALAC | .m4a | 32/44.1/48/88.2/96/176.4/192/352.8/384 kHz | 16/24 bit |
| DSD | .dff/.dsf | 2.8/5.6/11.2 MHz |
LAN (DMR)*
| File format | Extension | Sampling frequency | Bit rate/Number of quantisation bits |
| MP3 | .mp3 | 32/44.1/48 kHz | 16 to 320 kbps |
| AAC | .m4a/.aac | 32/44.1/48/88.2/96 kHz | 16 to 320 kbps |
| WAV | .wav | 32/44.1/48/88.2/96/176.4/192/352.8/384 kHz | 16/24/32 bit |
| FLAC | .flac | 32/44.1/48/88.2/96/176.4/192/352.8/384 kHz | 16/24 bit |
| AIFF | .aiff | 32/44.1/48/88.2/96/176.4/192/352.8/384 kHz | 16/24/32 bit |
| ALAC | .m4a | 32/44.1/48/88.2/96/176.4/192/352.8/384 kHz | 16/24 bit |
| DSD | .dff/.dsf | 2.8/5.6/11.2 MHz |
*: Whether or not each music file can be played back over your network is determined by the network server even if the format of the file is listed above. For example, if you are using Windows Media Player 11, not all music files on the PC are playable. You can play back only those added to the library of Windows Media Player 11.
Note
- Specifications are subject to change without notice.
• Mass and dimensions are approximate.
Headquarter Address:
Panasonic Corporation
Kadoma, Osaka, Japan
Importer for Europe:
Panasonic Marketing Europe GmbH
Panasonic Testing Centre
Winsbergring 15, 22525 Hamburg, Germany
EU
Panasonic Corporation
Web Site: http://www.panasonic.com
En
TQBM0282-1
M0718TK1088
- Basic Operating Instructions
- Delivering the Ultimate Emotive Musical Experience to All
- Sales and Support Information
- Customer Communications Centre
- Table of contents
- Accessories
- Warning
- Unit
- AC mains lead
- Caution
- Placement
- Caution for AC Mains Lead
- Before use
- How to replace the fuse
- Disposal of Old Equipment
- Only for European Union and countries with recycling systems
- CE
- Declaration of Conformity (DoC)
- Installation
- Notes on the speakers
- For optimum sound effects
- Determining the installation location
- Adjusting the distances between this unit and the wall
- Adjusting with the Space Tune function
- Unit care
- Using "Technics Audio Center"
- Firmware updates
- To dispose of or transfer this unit
- [b]/Standby/on switch
- Adjust volume
- Display
- [★] Favourite
- [-/II] Play/Pause
- ☐] Switch the input source
- Built-in microphone
- Product identification marking (Bottom of this unit)
- [•DIMMER/-INFO]
- USB-A terminal (DC 5 V... 500 mA)
- LAN terminal ( 11)
- Optical digital input terminal
- AUX IN terminal
- AC IN terminal ( ) ( 09)
- Connecting analogue audio output device
- Note
- Connecting digital audio output device
- Connecting USB device
- AC mains lead connection
- Preparation
- Install the "Google Home" app on your smartphone/tablet.
- Connect your smartphone/tablet to the same network as this unit before setting.
- Wired LAN connection
- Wireless LAN connection
- ■Preparation
- Press [∅/l] to turn this unit on.
- Start the "Google Home" app and follow the on-screen instructions.
- ■Using the WPS button "WPS"
- ■Using the WPS PIN code "WPS PIN"
- Press▶[11] to exit the setting.
- ■Using the "Google Home" app
- To use Chromecast-enabled apps
- Using the auxiliary input
- Using digital audio output device
- Using Bluetooth®
- Using USB device
- Playing Internet Radio and Podcasts
- Chromecast built-in
- Using Chromecast-enabled apps
- Using music streaming services (Spotify, etc.)
- Streaming music files on network devices
- Using AirPlay
- Pairing a Bluetooth device
- Listening to music stored on a Bluetooth® device
- Listening to music using Chromecast-enabled app
- Start the Chromecast-enabled app on your device (smartphone, tablet, etc.).
- Play back the music.
- Important notice:
- Install the free app "Technics Audio Center" on your smartphone, tablet, etc.
- Start the app "Technics Audio Center".
- Works with Apple AirPlay
- FLAC Decoder
- ■File format
Brand : TECHNICS
Model : SC-C50EB
Category : Loudspeaker