
TX 103 - Cordless phone TELEFUNKEN - Free user manual and instructions
Find the device manual for free TX 103 TELEFUNKEN in PDF.
| Product type | DECT cordless phone with answering machine and Bluetooth |
| Brand | TELEFUNKEN |
| Model | TX 103 |
| Technology | DECT (radio frequency between base and handset) |
| Range | Up to 300 meters outdoors (without obstacles) |
| Talk time | Up to 12 hours |
| Standby time | Up to 160 hours |
| Base power supply | Included AC adapter |
| Handset power supply | Rechargeable NiMH battery (included) |
| Number of supported handsets | Up to 6 (base + additional handsets) |
| Bluetooth functions | Pair up to 4 devices (GSM or headset), simultaneous connection of 2 devices, GSM directory copy |
| Phonebook | 200 contacts on fixed line + up to 4 GSM directories (1500 contacts each) |
| Caller ID | Yes (compatible with operators offering this service), displays name and/or number |
| Integrated answering machine | Up to 14 minutes recording, voice menu, remote access |
| Hands-free | Yes (speakerphone integrated in handset) |
| Intercom | Yes, communication between handsets |
| 3-way conference | Yes (2 handsets + external call or fixed line + GSM) |
| Care and cleaning | Disconnect before cleaning, use a lint-free cloth without liquid or aerosol |
| Safety | Do not use near water, during storms or gas leaks; respect battery polarity; use only supplied accessories |
| Spare parts and repairability | Rechargeable battery, AC adapter and telephone cord replaceable; contact TELEFUNKEN after-sales service (05 45 60 82 51) |
| Warranty | 12 months from purchase date (parts and labor) |
Frequently Asked Questions - TX 103 TELEFUNKEN
User questions about TX 103 TELEFUNKEN
0 question about this device. Answer the ones you know or ask your own.
Ask a new question about this device
Download the instructions for your Cordless phone in PDF format for free! Find your manual TX 103 - TELEFUNKEN and take your electronic device back in hand. On this page are published all the documents necessary for the use of your device. TX 103 by TELEFUNKEN.
USER MANUAL TX 103 TELEFUNKEN
TELEFUNKEN TX 100 Bluetooth
MODE D'EMPLOI
USERGUIDE
MODELES TX 101 - 102 - 103 - 151 - 152 - 153
MODELS TX 101 - 102 - 103 - 151 - 152 - 153
TELEFUNKEN TX100 Bluetooth® Series

English user guide. 40
The Bluetooth® word mark and logos are owned by Bluetooth SIG, Inc. and any use of such marks by SOPEG is under license.
TELEFUNKEN Licensed by TELEFUNKEN Licenses GmbH
Digital cordless telephone with answering system and BLUETOOTH® wireless technology
This telephone has been designed for ease of use. Please read the instructions and keep it handy for future reference. If you have any problems with your phone, refer to the Help section of this User Guide.
The name TX 1^** refers to all versions of TX101/102/103/151/152/153 in this guide.
This is a non-binding document subject to modifications in the event of missprint (mktg 0109)
Introduction to your TELEFUNKEN TX 1** Digital Cordless Telephone with Bluetooth and Answering Machine
Bluetooth - Pair up to four Bluetooth enabled devices (Mobile phones or headsets) with the telephone base.
Phonebook – Lets you store up to 200 contact numbers for easy dialing for home line Download phonebook –You can download up to four mobile phone phonebooks (phonebooks) to your TELEFUNKEN TX 1^** system via Bluetooth wireless technology.
Each downloaded phonebook can store up to 1,500 entries.
Caller ID lets you see who's calling. Your phone stores details of the last 50 callers in a Calls list. Answering machine, with up to 14 minutes digital recording time and helpful voice prompts.
IMPORTANT
This equipment requires electricity to work. You will not be able to make any telephone calls when the power fails.
Alternative arrangements should be made to access emergency services in times of power failure.
This User Guide provides you with all the information you need to get the most from your phone. Before you make your first call, you will need to set up your phone. Follow the simple instructions on the next few pages.
Hearing aid?
Please note that like all other DECT cordless phones, the TX 1^** works by sending radio signals between the base and handset and these signals may, in some cases, cause a low level humming noise.
Got everything?
The package contains the following items:
- TELEFUNKEN TX 1** handset
- TELEFUNKEN TX 1** answering machine base unit
- AC power adaptor for the base
- Telephone line cord
- Telephone adaptor plug
- 1 NiMH rechargeable battery pack
- Wall mount bracket
If you have purchased a TELEFUNKEN TX 1** Multi-handset pack you will also have the following for each additional handset:
- TELEFUNKEN TX 1** handset
- TELEFUNKEN TX 1^** charger
- 1 NiMH rechargeable battery pack
- AC power adaptor (for the charger)
TABLE OF CONTENTS
IMPORTANT SAFETY INSTRUCTIONS 43
1 GETTING STARTED 43
A. LOCATION 43
B. SETTING UP 43
C. BATTERY 44
D.WALL MOUNTING. 45
E. SETTING UP FOR MULTIPLE PACKS 45
F. USING YOUR TELEFUNKEN TX1** PHONE ON A BROADBAND ADSL LINE? 46
2 GETTING TO KNOW YOUR PHONE 46
A. HANDSET 46
B. HANDSET DISPLAY 47
C. DISPLAY ICONS 47
D. ANSWERING SYSTEM 48
E. LED DISPLAY 48
F. NAVIGATING THE MENUS 49
3 BLUETOOTH 49
A. INTRODUCING BLUETOOTH 49
B. GLOSSARY OF TERMS 49
C. PAIRING AND CONNECTING A MOBILE PHONE 50
D. PAIRING AND CONNECTING A HEADSET 51
E. PAIRED DEVICES 52
F. ACTIVE DEVICES 52
G.CHANGEPIN 54
H. DOWNLOAD PHONEBOOK 54
4 USING THE PHONE 55
A. MAKE, ANSWER OR END A HOME CALL 55
B. MAKE, ANSWER OR END A MOBILE CALL 55
C. USING A BLUETOOTH HEADSET 57
D. HOLD FUNCTION 57
E. MUTE FUNCTION 58
F. HANDSFREE 58
G. REDIAL 58
H. RINGERS 59
I. CHAIN DIALING 59
5PHONEBOOK 60
A. STORE A NUMBER ENTRY IN THE HOME PHONEBOOK 60
B. REVIEW A PHONEBOOK ENTRY 61
C. DIAL AN ENTRY 61
D. EDIT A PHONEBOOK ENTRY 61
E. DELETE A PHONEBOOK ENTRY 62
F. REMOVE A DOWNLOADED PHONEBOOK (DOWNLOADED PHONEBOOKS ONLY) 62
G. SET THE COUNTRY CODE FOR HOME & DOWNLOADED PHONEBOOK 62
H. SECURITY PIN FOR DOWNLOADED PHONEBOOK 62
I. SET UP PABX 62
6 SETTINGS 63
A. HANDSET SETTINGS 63
B. BASE SETTINGS 64
C. CALLER ID 65
D. VIEW CALL DETAILS 65
E. PROVIDER SERVICES 66
7 ANSWERING MACHINE 67
A. USING THE ANSWERING MACHINE FROM THE HANDSET 67
B. ANNouncement 68
C. ANSWER MACHINE SETTINGS 68
D. REMOTE ACCESS 70
E. USING THE ANSWERING MACHINE AT THE BASE 70
8 ADDITIONAL HANDSETS (MULTI HANDSET PACKS ONLY) 71
A. CALL ANOTHER HANDSET 71
B. 3-WAY CONFERENCE HOME OR MOBILE CALL 72
C. REGISTER AN ADDITIONAL HANDSET 72
9 HELP 73
10 WARRANTY 75
IMPORTANT SAFETY INSTRUCTIONS
When using your telephone equipment, basic safety precautions should always be followed to reduce the risk of fire, electric shock and injury, including the following:
Read and understand all the instructions.
Follow all warnings and instructions marked on the product.
Unplug this product from the wall outlet before cleaning.
Do not use liquid or aerosol cleaners. Use a damp cloth for cleaning.
Do not use this product near water (for example, near a bath tub, kitchen sink, swimming pool).
Do not overload wall outlets and extension cords as this can result in the risk of fire or electric shock.
Unplug this product from the wall outlet and contact TELEFUNKEN under the following conditions:
- When the power supply cord or plug is damaged or frayed.
- If the product does not operate normally by following the operating instructions.
- If the product has been dropped and the outer casing has been damaged.
- If the product exhibits a distinct change in performance.
Avoid using a telephone during an electrical storm.
There may be a remote risk of electric shock from lightning.
Do not use the telephone to report a gas leak in the vicinity of the leak.
Use only the supplied NiMH (Nickel Metal Hydride) battery pack.
The operation periods for the handsets are only applicable with the default battery capacity
The use of other battery types or non rechargeable battery/primary mobile can be dangerous.
These may cause interference and/or unit damage.
TELEFUNKEN will not be held liable for damage arising from such noncompliance.
Use only the AC power adaptors supplied with this product.
Please ensure that the polarity plug is inserted correctly.
Do not immerse the battery pack in water, and do not place them in a fire.
Telephone receivers produce magnetic fields that can attract small metallic objects such as pins or staples.
To avoid injury, do not place the handset where such objects can be picked up.
1 GETTING STARTED
A. Location
Make sure it is at least 1 meter away from other electrical appliances to avoid interference. Your TELEFUNKEN TX 1^** works by sending radio signals between the handset and base. The strength of the signal depends on where you locate the base. Putting it as high as possible ensures the best signal.
The maximum range between the base station and the handset is approximately 300 meters.
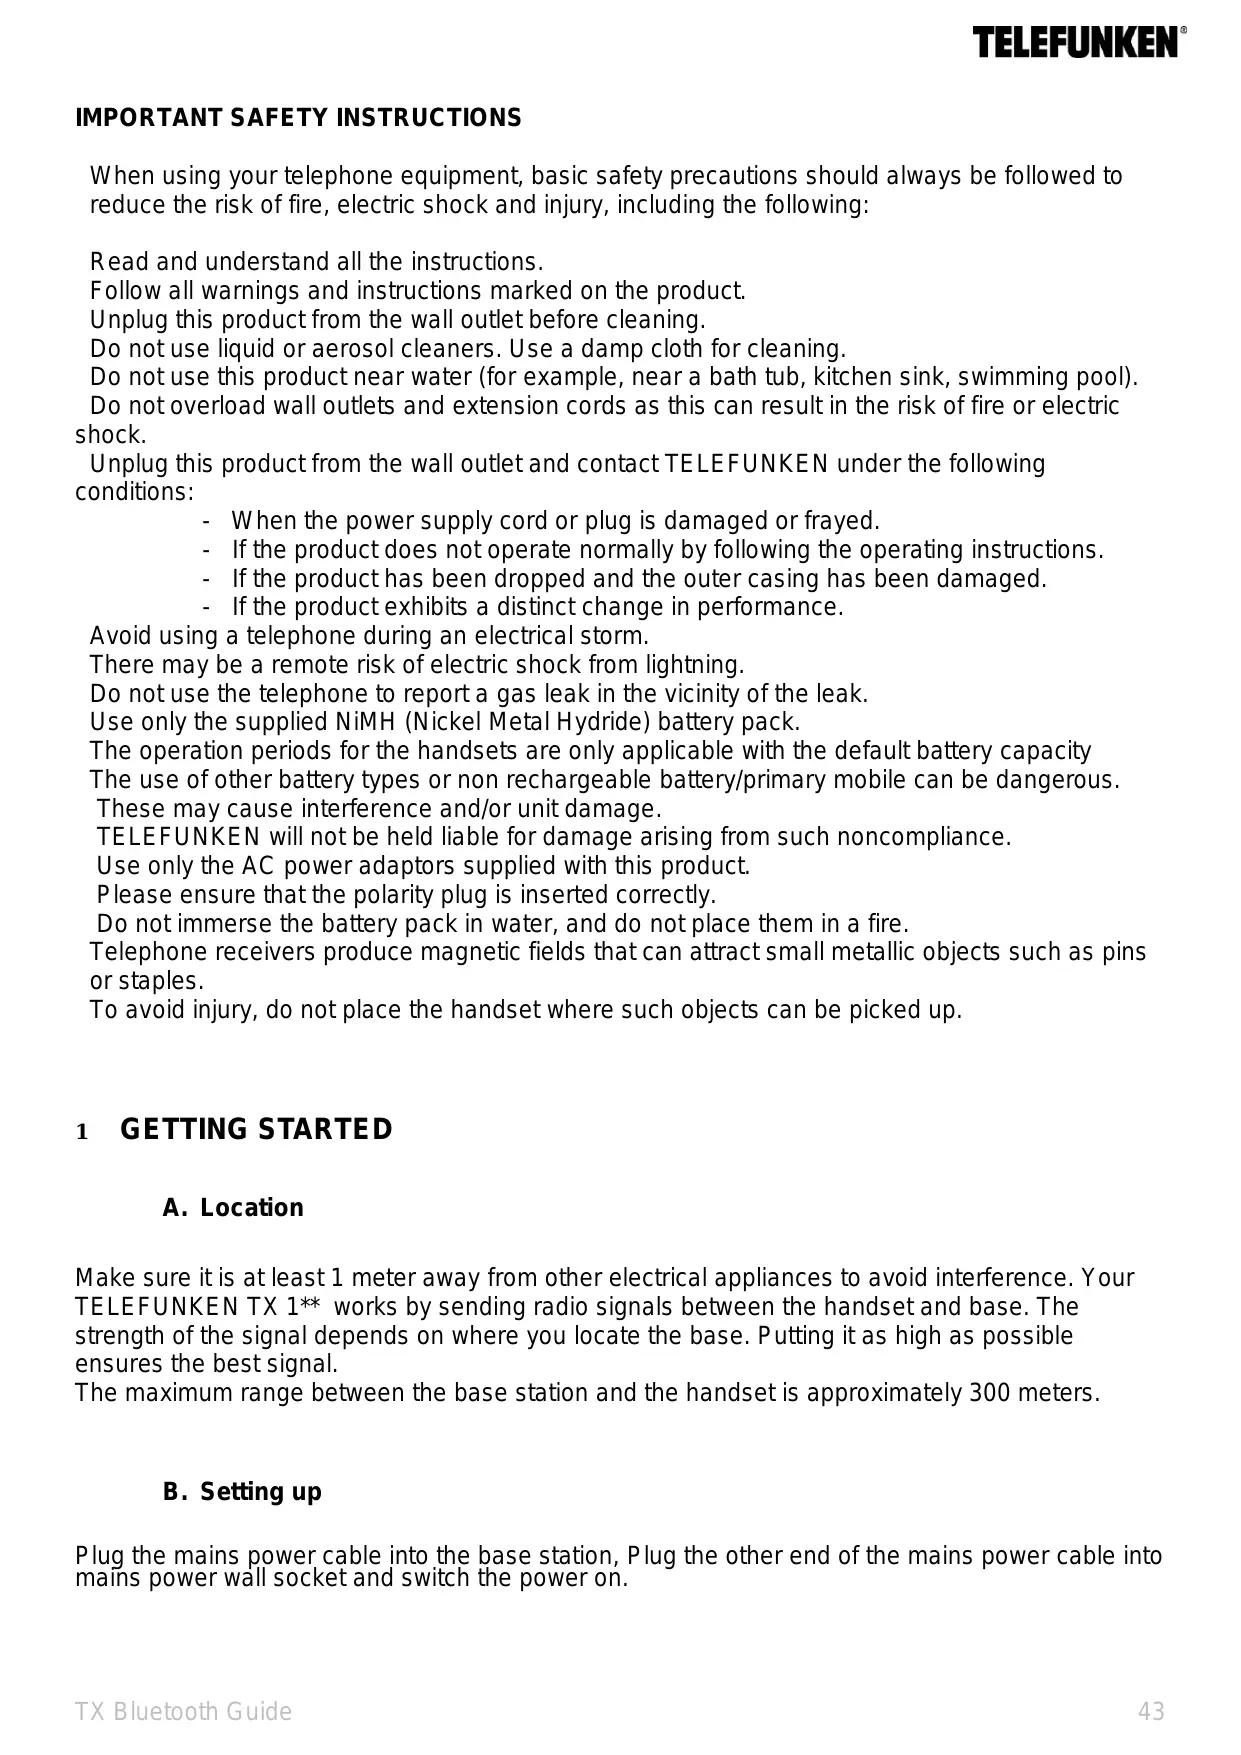
B. Setting up
Plug the mains power cable into the base station, Plug the other end of the mains power cable into mains power wall socket and switch the power on.
Note: Ensure power cord is fed through slot on base so unit sits flush with the desk
C. Battery
①
②
③
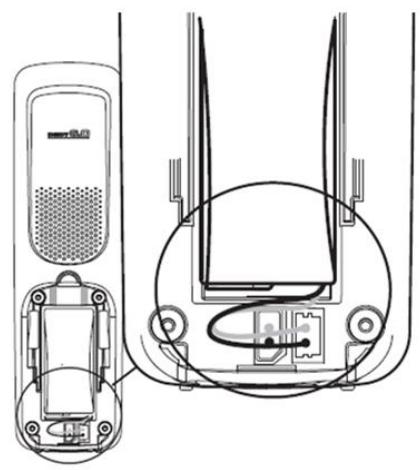
(4)
Place the handset on the base to charge for at least 24 hours. When the handset is fully charged the
When the battery pack is fully charged, plug one end of the telephone line cord into the base station and the other end into the telephone wall socket.
Note: Ensure the line cord is fed through the slot on the base so unit sits flush with the desk.
D. Wall mounting
Your TELEFUNKEN TX 1^ is designed to mount on a standard wall mounting plate. Attach the wall mount bracket to your TX 1^ base and attach to your wall mount plate.
WARNING
Do not place your TELEFUNKEN TX 1^** in the bathroom or other humid areas.
IMPORTANT
The base station must be plugged into the mains power socket at all times. Do not connect the telephone line until the handset is fully charged. Only use the power supply, telephone cables and NiMH battery pack supplied with the product
E. Setting up for multiple packs
If you have purchased a TELEFUNKEN TX 1** multiple packs, you will need to prepare additional handsets and chargers for use.
For each additional handset and charger
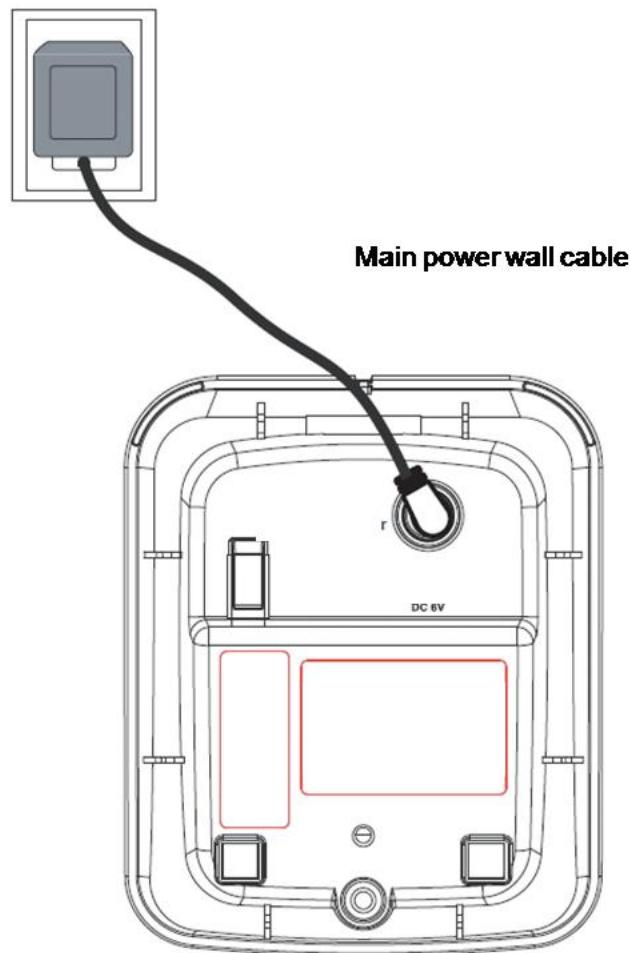
Main power wall socket
Plug the mains power cable into the charger base, plug the other end into the mains power wall socket and switch the power on.
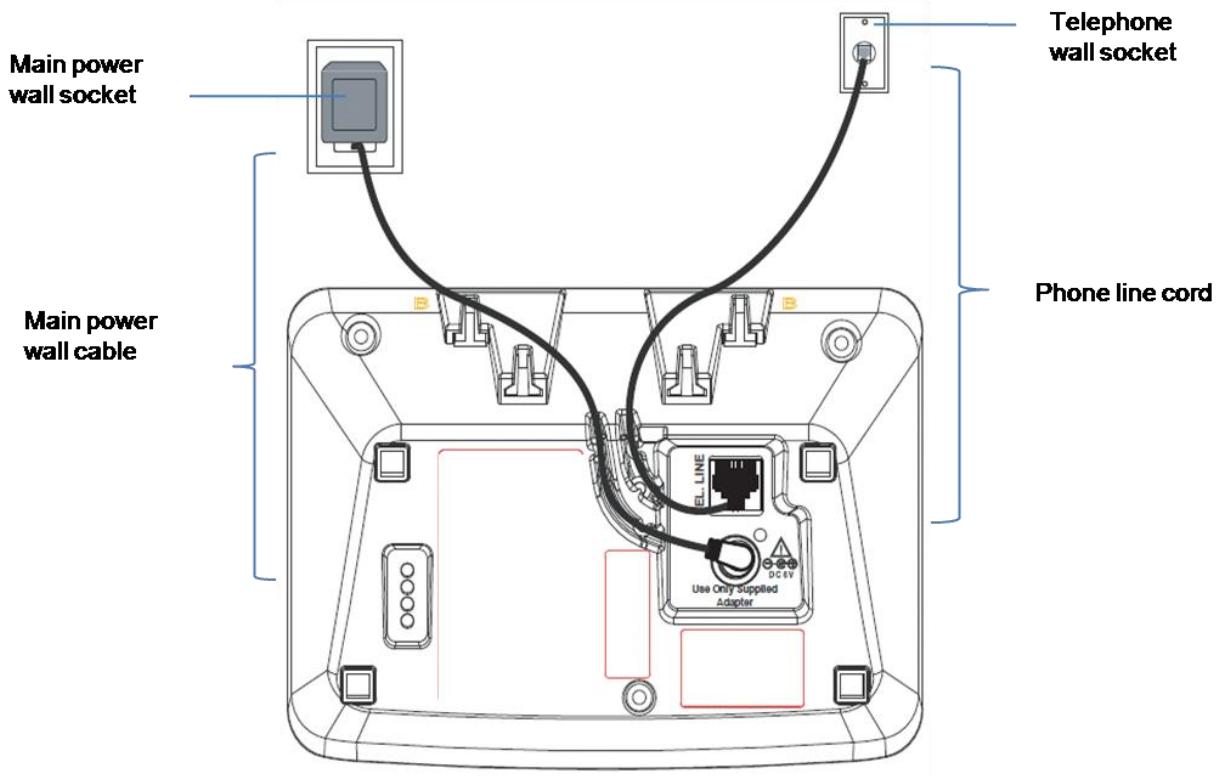
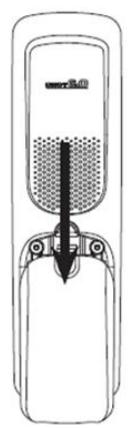
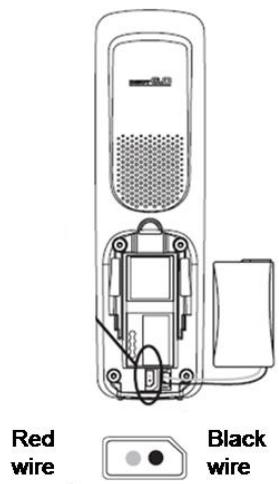
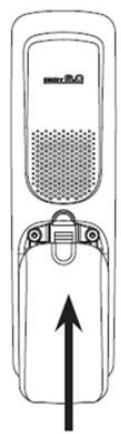
To fit the NiMH battery pack into the handset, slide out the battery compartment cover. Place the supplied rechargeable battery pack in the battery compartment, with the battery connector plugged in, as shown above. Slide the battery compartment cover back
Place the handset on the base to charge for at least 24 hours. When the handset is fully charged the
6. Using your TELEFUNKEN TX1** phone on a Broadband ADSL line?
If this product is to be used on a broadband ADSL line, then you must ensure that it is connected via an ADSL filter. Using this product on a Broadband line without an ADSL filter may cause problems with this product and your Broadband service.
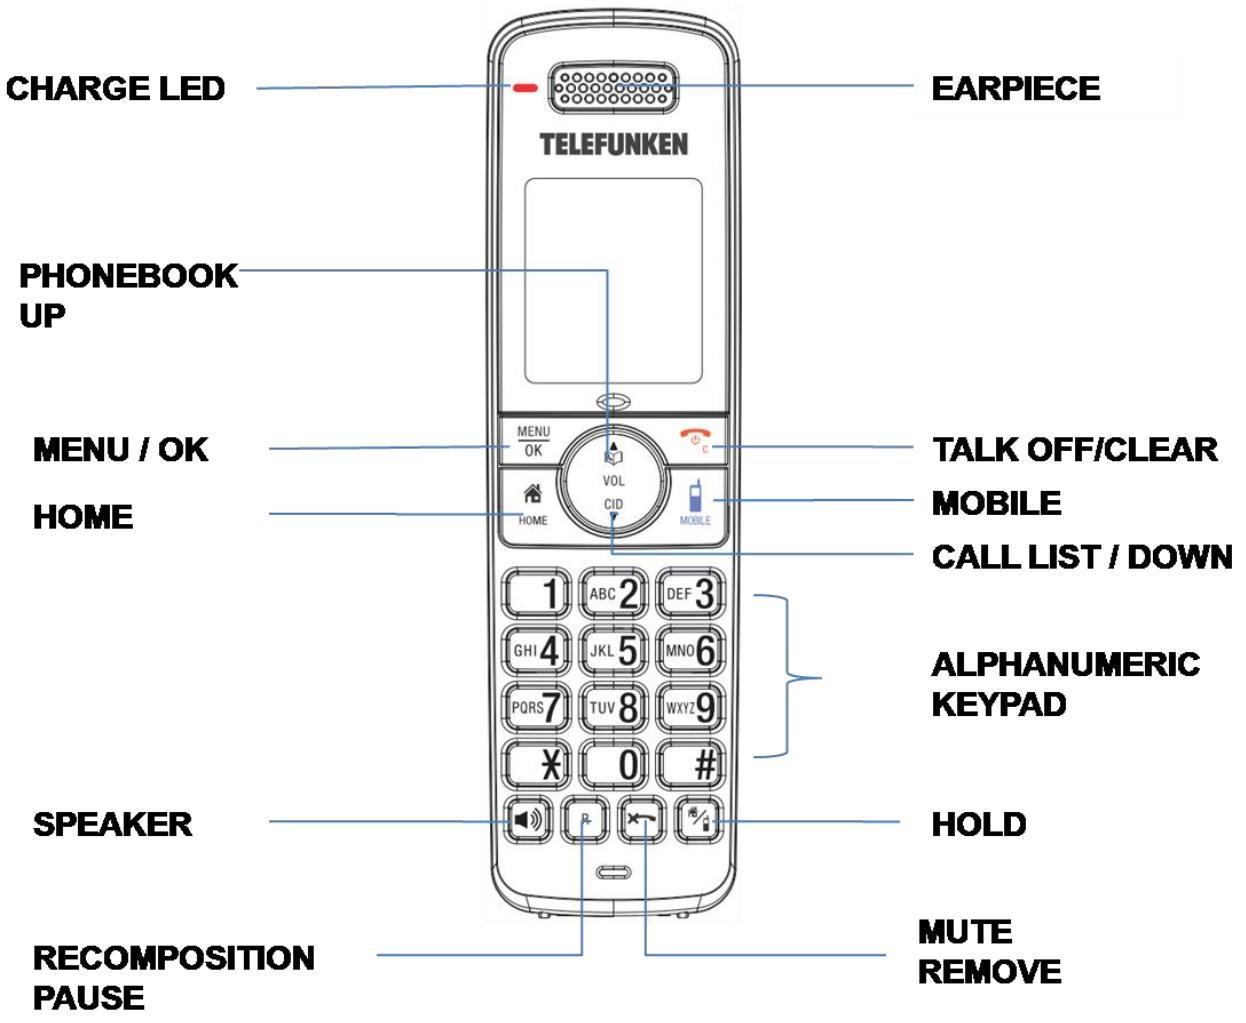
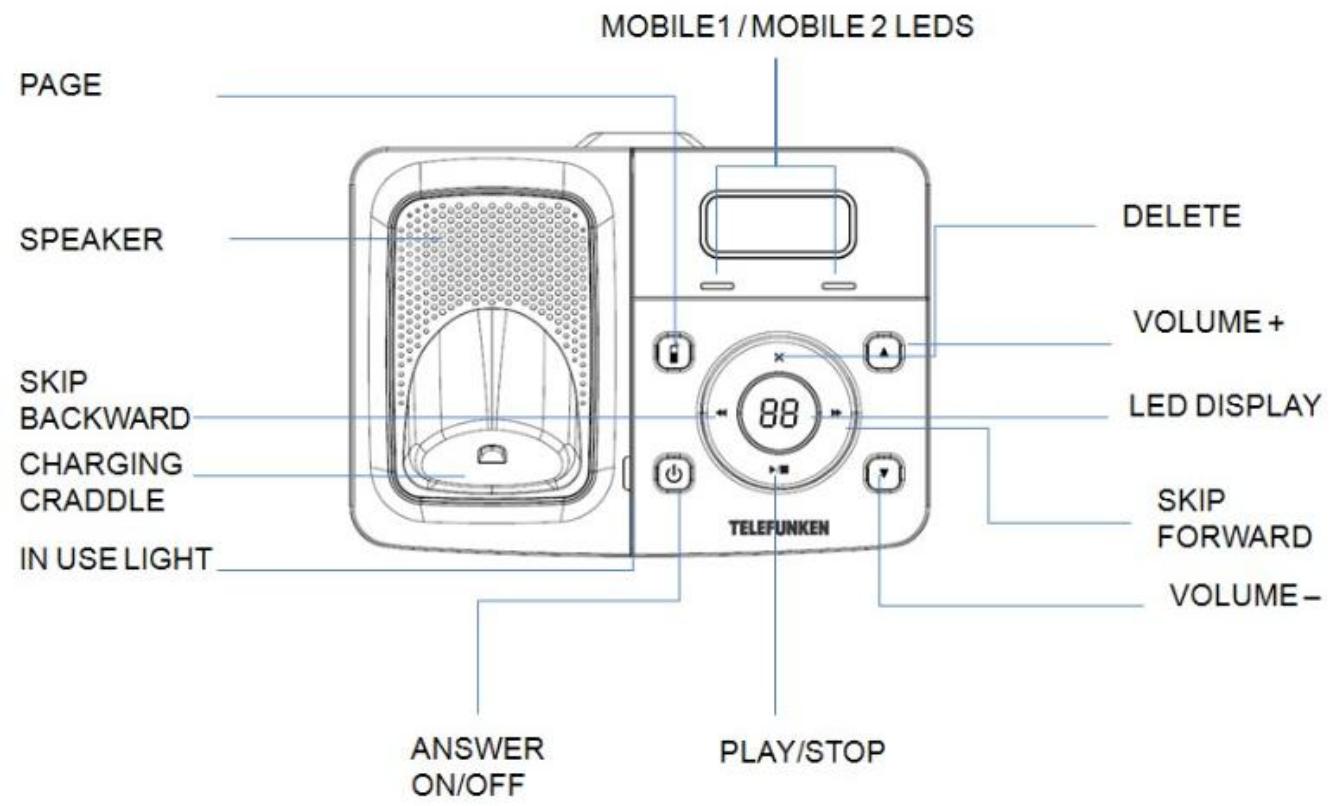
2 GETTING TO KNOW YOUR PHONE
A. Handset
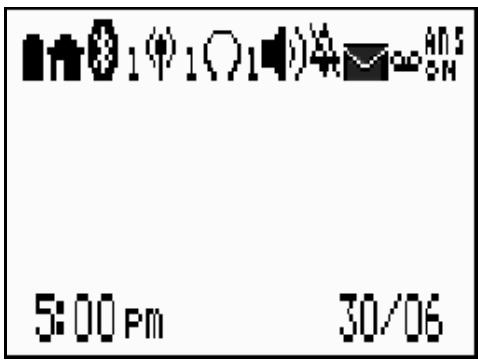
C. Display icons
Icons can be On (visible), Flashing or off (not visible):
| Bluetooth devices | Home line - Steady when the home line is in use or there is an incoming home call. | |
| 12 | MOBILE line - Steady when the mobile line is in use or there is an incoming mobile call. | |
| 12 | Bluetooth connected device(s) - indicates that there are Bluetooth connected devices on the active devices list. | |
| X Z | Bluetooth disconnected device(s) - indicates that there are Bluetooth disconnected devices on the active devices list. | |
| 12 | Wireless Bluetooth headset - Steady when a wireless Bluetooth headset is in use on the home line. | |
| Messages | On when new voicemail received from the local telephone provider. | |
| ANS ON | On when answering machine is turned on. | |
| ON | On when new answering machine message is received. | |
| Sound | On when speaker phone is in use. | |
| ON | On when the HOME, MOBILE1 & MOBILE2 ringers are OFF. Flashing when one or two of the HOME, MOBILE1, or MOBILE2 ringers are OFF. | |
| MUTE | On when the handset microphone is disabled during the call. | |
| Battery | Fully charged | |
| 1/2 charged | ||
| 1/3 charged | ||
| Flashing- Battery need charging | ||
| Animation in cycle. Battery is charging. | ||
D. Answering system
E. LED Display
| Display | Description |
| -- | When answering machine is OFF and no new TAM messages received. |
| 0F/XX | Flashing XX alternatively with OF: Answering machine is OFF and there are XX new voice messages received where XX is from 01 to 59. |
| 0n->XX | When answering machine is ON where XX is number of messages in TAM memory. |
| 00 | Steady: No voice messages in TAM. |
| XX | Flashing: There are XX new voice messages received where XX is from 01 to 59. |
| ZZ | Steady: There are ZZ old voice messages kept in the TAM memory (no new voice messages). |
| XX/FF | Flashing XX alternatively with FF: There are XX new voice messages received where XX is from 01 to 59 and the TAM memory is full. |
| FF | Flashing FF: TAM memory is full and there are no new messages, only old messages are kept in TAM memory. |
| --/XX | Flashing XX alternatively with --: Time is not set and there are XX new voice messages received where XX is from 01 to 59. |
| -- | Flashing --: Time is not set and there are old voice messages kept in the TAM memory only (no new voice messages). |
| XX | Steady: Playing the current XX incoming message. |
| A1 | Steady: Playing the current outgoing message (OGM). |
| XX/An | Flashing XX alternatively with An: XX new incoming message is now recording. An denotes that the incoming message recording is in progress. |
| rA | Flashing: Remote access is in progress. |
F. Navigating the menus
- Press MENU/OK to open the main menu.
- Press UP/DOWN to move through the available options.
- Press MENU/OK to select a menu option or TALKOFF/CLEAR to return to the previous screen, or press and hold TALKOFF/CLEAR to return to standby mode.
3 BLUETOOTH®
A. Introducing Bluetooth®
Your new TELEFUNKEN TX 1** telephone system with Bluetooth® wireless technology has the following features:
- Pair up to four Bluetooth® enabled devices (mobile phones or headsets) with the telephone base.
- Connect a maximum of two mobile phones to make and receive mobile calls. Only one mobile phone can be active on a call at a time.
. Connect a Bluetooth enabled headset for making and receiving home calls.
Conference mobile and home calls.
. Make and receive calls using your mobile phone plan with your cordless system handsets.
IMPORTANT INFORMATION
After plugging in the telephone base, wait at least 20 seconds before connecting a Bluetooth device. Refer to the user's manual of your Bluetooth enabled mobile phone or headset for more information about how that device uses Bluetooth connectivity.
- Bluetooth wireless technology operates within a short range (up to 30 feet) from the telephone base. Keep connected mobile phones and headset within this range.
If your mobile phone has poor reception in your home, TELEFUNKEN TX 1^ cannot improve the reception. However, if there is a location in your house with better reception, you can leave your mobile phone at that location while you use TELEFUNKEN TX 1^ mobile line. In order for this to work, the telephone base must be within 30 feet of the mobile phone.
- Charge your mobile phone while it is connected to the telephone base. Your mobile phone's battery pack discharges faster while it is connected to the telephone base via Bluetooth wireless technology.
Monitor your mobile phone's usage, because minutes may be deducted from your mobile plan for the duration of all mobile calls.
Refer to the Bluetooth setup section to learn how to set up your Bluetooth device. Refer to the Using the phone section on how to operate your Bluetooth devices with your new TX 1** telephone system with Bluetooth wireless technology.
B. Glossary of terms
Below are some terms used in this user's manual to help you become familiar with using your Bluetooth devices and your new TELEFUNKEN TX 1** telephone system.
Active devices
Bluetooth enabled devices, paired and connected to the telephone base. A maximum of two paired devices (two mobile phones, or one mobile phone and one headset) can be connected to the telephone base, but only one can be on a call at a time.
Bluetooth mobile phone
Refers to a mobile bluetooth enabled mobile telephone.
Mobile line
The telephone line associated with your mobile phone service.
On your TX 1** handset, press mobile to use the mobile line.
Connected
A Bluetooth enabled device can only be used when it is connected to the TX 1^** base.
Disconnected
A diagonal line appears across devices 1 and/or 2 when the corresponding Bluetooth enabled device is disconnected from the telephone base.
Discoverable mode
Before a Bluetooth enabled device can be paired, it must be set to this mode.. Depending on the manufacturer, this mode is sometimes referred to as Find Me or Visibility.
Home line
Your conventional telephone land line.
On your TELEFUNKEN TX 1^** handset, press HOME to use the home line.
Paired devices
Bluetooth enabled devices (mobile phone or headset) that have shared registration information with the telephone base. A total of four Bluetooth enabled devices can be paired with the telephone base; however, only two paired devices can be connected to the base at a time.
Pairing
Sometimes refers to as bonding. The process of sharing registration information between two Bluetooth enabled devices. Your Bluetooth enabled mobile phone or headset must first be paired to the telephone base in order to use it with this cordless phone system.
PIN
By default, the PIN is 0000 for the telephone base and for most Bluetooth devices. PIN information must be exchanged between Bluetooth devices before they can be used. This is also known as a Passkey or Passcode.
Bluetooth setup
To use a Bluetooth enabled mobile phone with your TELEFUNKEN TX 1**, you must first pair and connect your Bluetooth device(s) with the telephone base. All TX 1** handsets can be used to make or answer calls on the mobile phone line.
Bluetooth wireless technology operates within a short range. When you pair a Bluetooth mobile phone or Bluetooth headset to the telephone base, move closer to the telephone base to maintain sufficient signal strength.
C. Pairing and connecting a mobile phone
Before you begin, make sure that :
- You have mobile coverage
-
Your mobile phone is Bluetooth enabled and not connected to any other Bluetooth device (laptop, headset...). Refer to your mobile phone User's Manual to learn how to search for or add new Bluetooth devices.
-
In standby mode, press MENU/OK and select Bluetooth.
- Select Add mobile.
-
Place your Bluetooth enabled mobile phone next to base and confirm by Menu/OK
-
If there are already four devices on the paired devices list, the display shows Maximum of 4 devices can be paired and prompts you to replace an existing paired device.
- The screen displays Please set your mobile phone to search for devices, then press again MENU/OK.
- If a device is already connected to the telephone base, the screen displays Connected device will be temporarily disconnected. Press MENU/OK to temporarily disconnect the device and continue the pairing process.
- Press MENU/OK to set the telephone base to discoverable mode.
- Then, promptly turn on the Bluetooth feature of your mobile phone and search for or add new devices.
- Once your mobile phone finds TELEFUNKEN TX 1^** , press the appropriate key on your mobile phone to continue the pairing process.
-
Enter the PIN of the telephone base (the default PIN is 0000) into your mobile phone to continue the pairing process.
-
When a device is successfully connected, the handset displays Paired with mobile and then Mobile setup completed Device connected.
-
When you already have two active devices connected, the handset shows Maximum of 2 devices can be connected. You are prompted to replace an existing device on the active devices list;
Note: The pairing process may take up to one minute. If the pairing process fails, try again.
The steps for the pairing process may vary for different mobile phones. If this happens, follow the prompts on your mobile phone and your TELEFUNKEN TX 1** to complete the pairing process.
If you put the handset back in the telephone base or charger while pairing, the process discontinues and the handset returns to idle mode.
Auto connection
When a device is successfully paired with the telephone base but not connected, the handset displays
Mobile setup completed Device not connected and then
Auto-connect function enabled Press OK. You can press MENU/OK to exit. You can also connect a device manually).
D. Pairing and connecting a headset
Before you begin, make sure that your Bluetooth enabled headset is not connected to any other Bluetooth device. Refer to your headset User's Manual to learn how to search for or add new Bluetooth devices.
- In standby time. Press MENU/OK and choose Bluetooth.
- Select Add headset.
- Place Bluetooth headset next to base. Press Menu/OK.
- If there are already four devices on the paired devices list, the screen displays Maximum of 4 devices can be paired and prompts you to replace an existing paired device
- Press MENU/OK. The screen displays Please set your headset to discoverable mode, then press OK.
- If a device is already connected to the telephone base, the screen displays Connected device will be temporarily disconnected. Press MENU/OK to temporarily disconnect the device and continue the pairing process.
- Set your headset to discoverable mode (refer to the User's Manual of your headset).
- Press MENU/OK to search for your headset.
- Once the telephone base finds your headset, press MENU/OK
-
Enter the PIN of your headset (the PIN for most Bluetooth devices is 0000), then press MENU/OK.
-
When the handset displays Headset A paired to base. Connect now? Press OK, then press MENU/OK on the handset.
-
When you already have two devices on the active devices list, the handset shows Maximum of 2 devices can be connected. You are prompted to replace an existing headset on the active devices list
-
When you already have one headset on the active devices list, the handset shows Only 1 headset can be connected. You are prompted to replace the headset on the active devices list
-
When a device is successfully connected, the handset displays Headset setup completed Device connected and the corresponding status icon (Mobile1 or Mobile 2). Note: The pairing process may take up to one minute. If the pairing process fails, try again. If you put the handset back in the telephone base or charger while pairing, the process discontinues and the handset returns to idle mode.
Auto connection
When a device is successfully paired with the telephone base but not connected, the handset displays Headset setup completed Device not connected and then Auto-connect function enabled Press OK. You can press MENU/OK to exit. You can also connect a device manually.
E. Paired devices
All paired devices are stored on the Paired devices list.
Up to four devices (one headset only) can be paired with the telephone base.
To use a paired device, it must be connected and on the active devices list.
Once you have paired a device with the telephone base, you do not need to repeat the pairing procedure
again unless you delete the device from the paired devices list.
Note: Only the first 15 characters of the device name are shown on the paired devices list.
Rename a paired device
You can change the name of a paired device on the paired devices list.
- In standby mode, Press MENU/OK and choose Bluetooth
- Select Paired devices,
- Select the device you want to rename
- Select Rename and Press MENU/OK
- The screen displays ENTER NEW NAME.
- Use the keypad to edit the name
- Press MENU/OK to confirm. The handset displays Device renamed.
Remove a paired device
If you want to add another Bluetooth device and you already have the maximum of four devices on the paired devices list, you must first delete a device from the paired devices list.
- In standby mode, Press MENU/OK and select Bluetooth
- Select Paired devices,
- Select the device you want to remove
- Select Remove paired.
- The screen displays Remove device from paired list? Press Menu/OK to confirm
- The handset displays Device removed from paired list.
F. Active devices
Only devices on the active devices list can establish a Bluetooth connection with the telephone base. Although two paired devices can be connected to the telephone base, only one Bluetooth mobile phone or a headset can be on a call at a time.
Note: When adding, removing, or replacing a Bluetooth device on the active devices list, all
connected devices are temporarily disconnected until the procedure is complete. It may take up to two minutes to reconnect.
Review the active devices list
- In standby mode, Press MENU/OK and choose Bluetooth
- Select Active devices,
- You can review the Active devices with UP/DOWN
Connect/disconnect an active device
While in the active devices menu, you may connect or disconnect your active device.
- In standby mode, Press MENU/OK and choose Bluetooth.
- Select Active devices.
- Select the device you wish to connect/disconnect
- Press MENU/OK to select Connect or Disconnect
- Press MENU/OK to confirm. The handset displays Device connected/Device disconnected.
Replace an active device
You can replace an active device with a device on the paired devices list even if you already have two devices on the active devices list.
- In standby mode, Press MENU/OK and choose Bluetooth.
- Select Paired devices.
- Select a device.
- Select Connect.
- Confirm by MENU/OK. The handset display Maximum of 2 devices can be connected and then Replace an existing active device with mobile? Press Menu/OK.
- Select the device to be replaced, then press MENU/OK.
- The handset displays Device removed from active devices list and then Connecting Mobile Phone A to the base...
- Depending on your MOBILE phone settings, you may need to press a key on your MOBILE phone to confirm the connection. When you successfully replace and connect an active device with a paired device, the handset displays Device connected.
Add an active device
You can have a maximum of two devices on the active devices list.
- In standby mode, Press MENU/OK then choose Bluetooth.
- Select Active devices.
- Select Empty position
- Select Add.
- Select a device from the paired devices list.
- Press MENU/OK.
- The handset displays Device added to active list and then Connecting Mobile Phone B to the base... If there are no paired devices to add, the handset displays All paired devices are devices already connected.
- Depending on your mobile phone settings, you may need to press a key on your mobile phone to confirm the connection. When you successfully add and connect an active device, the handset displays Device connected.
Remove an active device
You can remove an active device from the active devices list.
- In standby mode, press MENU/OK and choose Bluetooth.
- Select Active devices,
- Select the desired device.
- Select Remove active.
-
Press MENU/OK.
-
The handset displays Device removed from active list.
Note: Even though the active device is removed from the active devices list, it is still on the paired devices list
G. Change PIN
You are required to enter a PIN when establishing a Bluetooth connection.
The default Pin of your telephone base is 0000.
- In standby mode, press MENU/OK and choose Bluetooth.
- select Change PIN,
- The display shows ENTER NEW PIN and the existing PIN.
- Use the keypad to enter a new four-digit code.
- Press MENU/OK to save.
H. Download phonebook
You can download up to four mobile phone phonebooks (phonebooks) to your TELEFUNKEN TX 1^ telephone system via Bluetooth wireless technology. Each downloaded phonebook can store up to 1,500 entries with up to 30 digits for each phone number and 15 characters for each name. Before downloading the phonebook, make sure the mobile phone is paired to your TELEFUNKEN TX 1^ and on the active devices list.
Place your mobile phone next to the telephone base when you download a mobile phone phonebook to your TELEFUNKEN TX1**
To download a mobile phone phonebook
- In standby mode, press MENU/OK and choose Bluetooth.
-
Select Download dir.
-
If there is no MOBILE phone paired to the system, the handset displays No mobile device paired.
-
PressOK to add mobile.
-
Select a device, then confirm by MENU/OK.
- If the selected device is on the paired devices list but not on the active devices list, the handset displays No mobile on active devices list. Press OK to add.
- If the selected device is on the active devices list but disconnected, the handset displays Not connected. Place it next to the base to connect mobile. Press OK.
-
If the selected device's phonebook has already been downloaded to the TX 1^** phone before, the handset displays Mobile Phone A Last update: MM/DD/YY To continue, press OK.
-
If you press MENU/OK to continue the download process, the stored phonebook for that particular mobile phone is erased and replaced with the current mobile phone phonebook.
- Press MENU/OK to confirm.
-
If you have edited the downloaded entries those changes are lost.
-
If you already have four downloaded phonebooks, the handset displays Memory is full. Replace current phonebook? Press OK when you try to download another mobile phone phonebook.
-
Press MENU/OK and the system prompt you to replace an existing phonebook.
-
Press UP/DOWN to select one of the following options:
-
Phone memory - download all contacts stored in your phone memory.
-
SIM card only - download all contacts stored in your SIM card.
- Phone and SIM - download all contacts stored in both your phone memory and SIM card.
When the downloading process is complete, the handset displays Download ended Total #XXXX entries saved
Press MENU/OK or OFF to return to the download phonebook menu.
Note:
Certain mobile phones do not support SIM card download. In this case, transfer the contacts from your SIM card to your mobile phone memory first, then download them from your mobile phone memory. For more information on how to transfer contacts from your SIM card to your mobile phone memory, see the user's manual of your mobile phone.
When downloading the phonebook from your Bluetooth enabled mobile phone, some data may not transfer. For example, if you have HOME, MOBILE and WORK numbers for a particular contact, the three categories may not transfer to your TX 1^**
Interruption of phonebook download
The following events do not affect the download
- You receive or make call on the home line
- You place the handset in the telephone base or charger
- You access to the mobile phone menu features
- The handset battery pack become depleted or the handset loses connection with the telephone base.
Note: During the download process, do not attempt to make changes to your mobile phone phonebook.
The phonebook's download can be interrupted by the following events :
- The mobile phone receives a call in the same time
- The telephone base loses power
Note : In these cases you will need to download the phonebook again
4 USING THE PHONE
A. Make, answer or end a home call
To make a home call:
Press HOME or SPEAKER then enter the telephone number. You can also enter the telephone number first
To answer a home call:
When you receive a home call, the phone rings. The display will show the caller's number if available or the caller's name if it matches an entry in the phonebook.
Press HOME or SPEAKER to answer an incoming home call.
To end a home call
Press OFF or put the handset in the telephone base or charger.
B. Make, answer or end a mobile call
You can connect a maximum of two Bluetooth enabled mobile phones to the telephone base, but only one mobile phone can be used on a mobile call at a time. All TX 1** handsets can be used to make or answer calls on the mobile phone line.
To make a mobile call:
Enter the telephone number.
Then press MOBILE to make a mobile call if you have only one mobile phone connected to the telephone base. If you have two mobile phones connected to the telephone base, the telephone system prompts you to select a mobile phone before you make a mobile call.
To answer a mobile call:
Press MOBILE.
Note: You can also use your mobile phone to answer the call. If you answer with your mobile phone, it disconnects from the telephone base.
To end a mobile call:
Press OFF or put the handset in the telephone base or charger.
Answer a mobile call while on a home call
If you are on a home call and you receive an incoming mobile call, you hear a beep and 1 or 2 displays on the handset you are using. The telephone base and all other handsets ring.
To answer the incoming mobile call:
Press MOBILE on the handset. The home call is automatically placed on hold and all other handsets display Home call on hold and Mobile line in use alternately.
To end the mobile call:
Press OFF on the handset. The home line is still on hold. All handsets display Home call on hold.
To resume the home call on hold:
Press HOME on the handset.
Answer a home call while on a mobile call
If you are on a mobile call and you receive an incoming Home call, you hear a beep and displays on the handset you are using. The telephone base and all other handsets ring.
Press OFF on the handset. The mobile call is automatically placed on hold and all other handsets display Mobile call on hold and Home line in use alternately.
To end the home call:
Press OFF on the handset. The mobile line is still on hold. All handsets display Mobile call on hold.
To resume the mobile call on hold:
Press MOBILE on the handset.
Note:
If you have turned on your answering system and you do not answer the incoming home call, the call is answered by your answering system.
If you make or answer a home call on a handset, you can transfer the call to your headset.
The handset remains active, but the handset earpiece and microphone are muted. If you hang up the handset, the call will end.
Mobile phone voicemail
If you have voicemail service active on your mobile phone, and you do not answer the incoming mobile call, the call will be answered by your mobile phone's voicemail. Contact your mobile phone service provider for more information about voicemail service.
Call timer
Your handset will automatically time the duration of all external calls. The handset display shows the call duration both during and for a few seconds after your call is terminated.
Out of range warning
When the handset goes out of range of the base, the line will hang up if you are on a call. When you move back within range, the handset will automatically reconnect to the base.
C. Using a Bluetooth headset
You can use a Bluetooth headset on home calls. However, you will need to stay within 30 feet (9 meters) from the telephone base to maintain the Bluetooth signal.
To answer a home call using a Bluetooth headset
Press the call key on your headset.
To end a home call you answered from a Bluetooth headset
Press the call key on your headset.
If you make or answer a home call on a handset, you can transfer the call to your headset. The handset remains active, but the handset earpiece and microphone are muted. If you hang up the handset, the call will end.
To transfer a call from a handset to a Bluetooth headset:
Press MENU/OK twice to select Use headset.
To transfer a call from the headset back to the handset:
Press MENU/OK twice to select Use handset.
To end a call that started at the handset:
Press OFF or put the handset in the telephone base or charger.
Note:
If you answer a call using a headset, and you lose the Bluetooth connection or the battery is depleted, the call will be lost.
If you are using a headset for a call which is transferred from TELEFUNKEN TX 1^** handset, and you lose the Bluetooth connection or the battery of the headset is depleted, the call will be transferred back to the originating handset.
Earpiece/ handsfree volume
Press UP/DOWN to adjust the listening volume of the earpiece or loudspeaker when during a call.
Note: The handset earpiece volume setting (1-5) and speakerphone volume setting (1-6) are independent.
When the volume reaches the minimum or maximum setting, you will hear two beeps.
D. Hold function
You can place a home or mobile call on hold.
You will hear an alert tone if you have not taken the call on hold after 14 minutes.
You will hear another alert tone 30 seconds later.
At 15 minutes on hold, the call on hold automatically disconnects.
To place a home call on hold:
Press HOLD. The handset displays Home call on hold and HOME flashes.
To resume a home call on hold:
Press HOME.
To place a mobile call on hold:
Press HOLD. The handset displays Mobile call on hold and MOBILE flashes.
To resume a mobile call on hold:
Press MOBILE
E. Mute function
Use the mute function to turn off the microphone. You can hear the caller, but the caller does not hear you.
To mute the call:
Press MUTE/REMOVE. hen mute is on, the handset screen shows Microphone off for a few seconds and the mute icon appears until you turn off the mute function.
To un-mute the call:
Press MUTE/REMOVE and resume speaking. When MUTE is OFF, Microphone on appears temporarily on the handset screen. MUTE is automatically canceled when you end the call.
F. Handsfree
Handsfree lets you talk to your caller without holding the handset to your ear. It also enables other people in the room to join in the conversation over the loudspeaker.
Make a handsfree call
- Dial the number then press SPEAKER on the handset.
is displayed. You will then
hear your call over the handset loudspeaker. Press SPEAKER to switch the call between the earpiece and the loudspeaker.
- Press TALK OFF/CLEAR to end the call.
Note: During a handsfree call, you can press UP/DOWN to adjust the volume.
Answer a call in handsfree mode
When the phone rings:
Press SPEAKER on the handset. The call is transferred to the handset loudspeaker.
Switch to handsfree mode during a call
When in a call, press SPEAKER on the handset to put the call on the loudspeaker. To switch handsfree off and return the call to the earpiece, press SPEAKER again.
G. Redial
Up to 20 of the last telephone numbers called are saved in the radial list. You can select any of the numbers to radial, save to phonebook or delete.
Redial a radial entry
- Press HOME or MOBILE, then REDIAL/PAUSE repeatedly or UP/DOWN to view the radial memory,
- Dial out the number displayed by pressing MENU/OK.
-OR
In standby mode, press REDIAL/PAUSE repeatedly or UP/DOWN to browse until the desired number displays. Press HOME or MOBILE
Save a radial entry to the phonebook
- In standby mode, press REDIAL/PAUSE.
- Press UP, DOWN or REDIAL/PAUSE repeatedly to select the desired radial entry.
- Press MENU/OK twice. The handset displays ENTER NUMBER.
Use the keypad to edit the number if necessary.
- Press MENU/OK then UP/DOWN to select one of the following types:
Home
- Mobile
- Work
- Other
- Press MENU/OK. The handset displays ENTER NAME. Use the keypad to enter the name. Press MENU/OK to confirm.
Delete a radial number
- In standby mode, press REDIAL/PAUSE.
- Press UP, DOWN or REDIAL/PAUSE to select the desired radial entry.
- Press MUTE/REMOVE to delete the selected entry.
Find handset (Paging)
You can ring a handset to help locate it.
- Press PAGE on the base. All idle handsets ring and display ** Paging **.
- Press PAGE on the base again to stop the paging, or press HOME, SPEAKER, MOBILE on any dial pad key (0-9, *, or #) on any handset.
H. Ringers
Temporary ringer silencing
When the telephone is ringing, you can temporarily silence the ringer of the handset or telephone base without disconnecting the call. The next call rings normally at the preset volume.
To silence the handset ringer:
Press OFF or MUTE/REMOVE on the handset and Ringer muted appears.
To silence the base ringer:
Press VOLUME- on the telephone base until L0 displayed in base LED.
Note: Each handset will ring when there is an incoming call unless the ringer volume is turned off. Pressing OFF or MUTE/REMOVE on one handset will only silence the ringer of that particular handset.
I. Chain dialing
This feature allows you to initiate a dialing sequence from numbers stored in the phonebook, call list history or redial list while you are on a call.
Chain dialing can be useful if you wish to access numbers other than phone numbers (such as bank account information or access codes) from the phonebook, call list history or redial list.
To access a number in the phonebook while on a call:
- Press MENU/OK then select Phonebook.
- Select Home phonebook.
- Scroll to the desired entry or perform an alphabetical search
- Press MENU/OK to dial the displayed number.
To access a number in the call log while on a call:
-
Select Call log.
-
Select the desired call list entry.
- Press MENU/OK to dial the displayed number.
To access the radial list while on a call:
- Press REDIAI/PAUSE.
- Press UP, DOWN or REDIAI/PAUSE until the desired number displays.
- Press MENU/OK. If you do not press MENU/OK within two seconds, the number displayed is dialed automatically.
Note: You can only view the numbers in the phonebook, call log or radial list while on a call and cannot edit, delete or save entries.
Press and hold TALK OFF/CLEAR to exit radial list, phonebook or call log while on a call.
5 PHONEBOOK
Your phone phonebook consists of a home phonebook and up to four downloaded phonebooks. The home phonebook stores up to 200 entries with up to 30 digits for each phone number and 15 characters for each name. Each of the downloaded phonebook stores up to 1,500 entries with up to 30 digits for each phone number and 15 characters for each name.
A. Store a number entry in the home phonebook
- In standby mode, press MENU/OK and select Phonebook.
- Select Home.
- Choose Add contact.
- The display shows ENTER NUMBER.
- Use the keypad to enter a telephone number.
OR Copy a number from the radial list.
Press REDIAL/PAUSE then UP/DOWN to browse and select a number.
Press MENU/OK to copy the displayed number.
- Press MENU/OK then UP/DOWN to select one of the following types:
Home
- Mobile
- Work
- Other
- Press MENU/OK. The display shows ENTER NAME.
- Use the keypad to enter the name.
- Press MENU/OK to save the entry.
Note: You cannot create new entries in your downloaded phonebooks from your TX 1** handsets. Entries must be downloaded from your mobile phone
Entering names
Use the keypad letters to enter names, e.g. to store Tom:
Press < 8> once to enter T.
Press < 6> three times to enter o.
Press < 6> once to enter m.
Writing tips
Press MUTE/REMOVE to delete the last character or digit.
Press and hold MUTE/REMOVE to delete all characters or digits.
Press UP/DOWN to move backward or forward through the characters/digits.
Press and hold REDIAL/PAUSE to insert a dialing pause (a P appears).
Press HOME to insert a flash ("R")
B. Review a phonebook entry
- In standby mode, press UP to access phonebook.
- Select Home phonebook or downloaded phonebook
- Press MENU/OK then UP/DOWN to review.
Note: You will be requested to enter the PIN code to access the PIN-protected downloaded phonebook.
C. Dial an entry
You can dial a phonebook entry on either a home or mobile line.
- In standby mode, press UP to access the phonebook, Choose between Home phonebook and downloaded phonebook.
- Select the entry you want, or search alphabetically using the alphanumeric keypad (see the tip below).
- Press HOME or SPEAKER to use the home line, or MOBILE to use the mobile line.
To search alphabetically
Press the relevant keypad button, e.g. for the entries beginning with T press < 8> once then press UP/DOWN to scroll through the entries.
D. Edit a phonebook entry
You may edit any phonebook entry. However, be aware that if you download from a mobile phone again, the phonebook is erased and replaced with the current mobile phone phonebook. If you have edited the downloaded entries on TELEFUNKEN TX 1^** , those changes are lost. To avoid losing changes made to the downloaded phonebook, we suggest you edit the number in your mobile phone, then download the phonebook.
- In standby mode, press UP to access the phonebook.
- Select Home phonebook or downloaded phonebook.
- Select the entry you want, or search alphabetically using the alphanumeric keypad (see the tip below).
- Press MENU/OK and use the keypad to edit the number,
- Select one of the following types:
Home
Mobile
Work - Other
- The screen displays EDIT NAME. Use the keypad to enter the name
- Press MENU/OK to save.
Edit the type of a phonebook entry
If you only want to edit the type of a phonebook entry, please follow steps below
- In standby mode, press UP to access the phonebook.
- Select Home phonebook or downloaded phonebook.
- Browse and select the desired phonebook entry.
- When the phonebook is displayed. Enter the corresponding keys shown below to change the type accordingly. The selected type will appear between the name and number.
| Type: | Press |
| HOME | * 1 |
| MOBILE | * 2 |
| Work | * 3 |
| Other | * 4 |
E. Delete a phonebook entry
- In standby mode, press UP to access the phonebook.
- Select Home phonebook or downloaded phonebook.
- Browse and select the entry you want to delete.
- Press MUTE/REMOVE, The display show Delete contact? Press Menu/ OK to confirm
- The selected entry is deleted.
Note: Once a phonebook entry is deleted, it cannot be retrieved.
F. Remove a downloaded phonebook (downloaded phonebooks only)
- In standby mode, press MENU/OK then select Phonebook
- Select the desired downloaded phonebook.
- Select Remove PB.
- Press MENU/OK. The display shows Phonebook Mobile Phone A will be erased.
- Press MENU/OK to confirm.
Note: You will be requested to enter the PIN code to access the PIN-protected downloaded phonebook.
G. Set the country code for home & downloaded phonebook
This feature makes it easy for you to place a call from the caller ID log.
Also, if you have downloaded a phonebook from your mobile phone, you may need to set the mobile country code in order to dial a number from the downloaded phonebook correctly.
- In standby mode, press MENU/OK then select Settings.
- Select Country code.
- Press MENU/OK then use the keypad to enter the desired area code.
- Press MENU/OK to confirm.
H. Security PIN for downloaded phonebook
This feature allows you to set your security PIN to protect your downloaded phonebooks, if you set the Security ON, you must enter the correct 4-difit PIN when you want to access your downloaded phonebooks.
- In standby mode, press MENU/OK then select Phonebook.
- Select a downloaded phonebook.
- Select Security.
- Select On.
- Press MENU/OK then use the keypad to enter 4-digit PIN
- Repeat step 5 to enter the 4-digit PIN again.
- Press MENU/OK to confirm.
Note: Each mobile downloaded phonebook can be protected by a separate PIN. After setting the security PIN, you will be requested to enter the correct PIN to access the protected downloaded phonebook again.
I. Set up PABX
Thanks to this function you can to set up automatically a prefix and make some external call with a PABX.
Once the prefix set up, it will be automatically dialed for the home line's calls
Note : a “Pause” must be dialed after PABX Prefix
- Press MENU/OK and select Settings
- Choose PABX
- Enter the code and confirm by MENU/OK.
To delete or switch off this feature, just delete PABX code using MUTE/REMOVE key.
6 SETTINGS
A. Handset settings
Handset ringer volume
Using this menu, you can set the ringer volume level (1-6), or turn the ringer off. When the ringer is turned off, the
- Press MENU/OK then select Audio.
- Select Ringer volume.
- Choose Home, Mobile 1, Mobile 2 or All home & mobile
- Browse each volume level. A sample of each ringer volume plays as you scroll through the choices.
- Level 1 to 6 and Ringer off are available.
- Press MENU/OK to save.
Ringer tone
You can select different ringer tones for home and mobile calls.
- Press MENU/OK then select Audio.
- Select Ringer tone.
- Choose Home, Mobile 1, or Mobile 2.
- Browse each ringer tone. A sample of each ringer tone plays as you scroll through the choices.
- Press MENU/OK to save.
Note: If you turn OFF the ringer volume, you do not hear ringer tone samples.
Alert tones (Key tone, Low battery and No coverage)
You can turn on or OFF the alert tones of key press, battery low and out of range.
- In standby mode, press MENU/OK then select Audio.
- Select Key tone, low battery or No coverage.
- Select On or Off.
- Press MENU/OK to confirm.
Set date and time
If you have subscribed to Caller ID service, the date and time is set automatically for all handsets when you receive your first call. The date and time is recorded with each answering machine message you receive. If you have not subscribed to Caller ID service, you can set the date and time manually.
Date format
- In standby mode, press MENU/OK then select Settings.
- Select Date format.
- Select date format DD/MM/YY or MM/DD/YY.
- Press MENU/OK to save your choice.
Time format
- In standby mode, press MENU/OK then select Settings.
- Select Time format.
- Select date format 12 - Hour or 24 - Hour.
- Press MENU/OK to save.
Set date and time manually
- In standby mode, press MENU/OK then select Settings.
- Select Set date/time.
- Use the keypad to enter the date according to DD-MM-YY or MM-DD-YY format.
- Press MENU/OK then use the keypad to enter the time according to 12-Hour or 24-Hour format.
- Press MENU/OK to save the settings.
Auto answer
- In standby mode, press MENU/OK then select Settings.
- Select Auto answer.
- Select On or Off.
- Press MENU/OK to confirm.
Note: As long as you have auto answer set to ON you can answer a call by lifting the handset OFF the base.
If you have switched auto answer OFF, you will need to press HOME when you lift up the handset. The default setting of Auto Answer is ON.
Handset reset
- In standby mode, press MENU/OK then select Settings.
- Select Reset.
- Use the keypad to enter 4-digit PIN (default 4-digit PIN is 0000).
- Confirm by MENU/OK. The display shows Reset to default settings?
- Press again MENU/OK to confirm.
B. Base settings
Set dial mode
The default dialing mode is suitable for your country and network operator. It is unlikely that you should need to change this setting unless advised to do so.
- In standby mode, press MENU/OK then select Settings.
- Select Dial mode.
- Select the dial mode from Tone and Pulse.
- Press MENU/OK to confirm.
Set the flash time
The default flash time is suitable for your country and network operator. It is unlikely that you should need to change this setting unless advised to do so.
- In standby mode, press MENU/OK then select Settings.
- Select Flash time.
- Select the flash time from 80ms, 100 ms, 120 ms, 180 ms, 200 ms, 250 ms, 300 ms and 600 ms.
- Press MENU/OK to save.
Change system PIN
- In standby mode, press MENU/OK then select Settings.
- Select System PIN.
-
Use the keypad to enter old 4-digit PIN (default 4-digit PIN is 0000).
-
Press MENU/OK then enter new 4-digit PIN.
- Repeat step 4 to confirm your new PIN.
- Press MENU/OK to confirm.
C. Caller ID
This product supports caller ID services provided by most telephone service providers. Depending on your service subscription, you may see the caller's number, or the caller's name and number from the telephone service provider after the first or second ring. Caller ID from the HOME line allows you to see the name, number, date and time of the incoming calls. However, caller ID from the MOBILE line only shows the number of the incoming caller; date and time of the call is not shown. The caller ID may appear differently if the caller is matched to a phonebook entry.
Missed calls are marked with xx Missed call(s). Each time you review a call list entry marked with
The call list information might not be available for every incoming call. The callers might intentionally block their names and/or telephone numbers.
Call list display screen messages
| Private | The caller is blocking the telephone number. |
| Unavailable | This caller's number is unavailable. |
When the list is full, and a new call is received, the oldest entry will be deleted automatically.
IMPORTANT
To use caller ID feature you must first subscribe to the service from Telephone Services providers. For more information please contact your providers. To ensure the caller's name is displayed, make sure you have stored the full telephone number, including the area code, in the phonebook.
D. View call details
Review the caller ID history to find out who called, to easily return a call, or to copy the caller's name and number into your phonebook. Call log empty appears if there are no records in the call log.
- Press UP to access the call list. OR
- In standby mode, press MENU/OK then UP/DOWN to select Call log.
- Press MENU/OK then UP/DOWN to browse the call list with name, type of entry and number if it matches an phonebook entry.
Note: The name (if available), telephone number, date and time of all incoming calls are shown on the screen. You hear a double beep when the list reaches the beginning or end of the call list.
Dial from the Call list
- When in the call list, press UP/DOWN to select the desired number.
- Press HOME or SPEAKER to dial out the entry through the home line.
Or MOBILE to dial out through the mobile line.
Save a call list entry to the phonebook
- When in the call list, press UP/DOWN to select the desired call list entry.
- Press MENU/OK. The display shows EDIT NUMBER.
- Use the keypad to edit the number
- Press UP/DOWN to select one of the following types:
Home
- Mobile
- Work
- Other
- Press MENU/OK. The screen displays EDIT NAME.
- Use the keypad to edit the name
- Press MENU/OK to confirm.
Delete an Entry in the Call list
- When in the call list, press UP/DOWN to select the entry you want to delete.
- Press MUTE/REMOVE to delete the selected entry.
Delete the Entire Call list
- In standby mode, press MENU/OK to Select Call log.
- Press MENU/OK then UP/DOWN to Del all calls,
- Press MENU/OK. The display shows Del all calls? Press OK to confirm.
- Press MENU/OK to confirm.
E. Provider services
Clear voicemail
If you subscribe to voicemail service offered by your telephone service provider, New voicemail appears on the handsets when you have new voicemail messages. Contact your telephone service provider for more information and assistance about using your voicemail service. This feature only works on the voicemail associated with your home line, not the mobile line.
After you have listened to all new voicemail messages, the indicators on the handsets turn off automatically.
Use the clear voicemail feature when the telephone indicates that there is new voicemail but there is none (for example, when you have accessed your voicemail while away from home). Clearing the voicemail waiting indicator only turns off the indicators; it does not delete your voicemail messages. As long as you have new voicemail messages, your telephone service provider continues to send the signal that turns on the indicators.
Clear flashing message indication
New voicemail will appear on the handset when you have new flashing messages.
After you have listened to all new flashing messages, the indicator on the handset turns off automatically.
Use the clear voicemail feature when the telephone indicates that there is new voicemail but actually there is none (for example, when you have accessed your voicemail while away from home). Clearing the flashing message indication only turns off the indicators, it does not delete your messages. As long as you have new flashing messages, service provider will continue to send the signal to turn on the indicators.
To manually turn off the new voicemail indicator:
- In standby mode, press MENU/OK then UP/DOWN to select Settings.
- Press MENU/OK then UP/DOWN to select Clr voicemail
- Press MENU/OK. The display shows Turn off indicator? Press OK to confirm.
- Press MENU/OK to confirm. Or press OFF to cancel the procedure.
Note:
Your telephone service provider may alert you to new messages with a stutter (broken) dial tone.
Contact your service provider for details.
Call Waiting
Call Waiting tells you if a new caller is trying to contact you when you are already on the phone. A network tone alerts you to the new caller, so you can answer your second incoming home call by putting the first home caller on hold.
Call waiting on the home line
If you subscribe to call waiting service with your telephone service provider, you hear a beep if someone calls while you are already on a call.
- Press HOME on the handset to put your current call on hold and take the new call.
- Press HOME on the handset at any time to switch back and forth between calls.
Call waiting on the mobile line
If you subscribe to call waiting service with your mobile phone service provider, you hear a beep if someone calls while you are already on a call.
- Press MOBILE on the handset to put your current call on hold and take the new call.
- Press MOBILE on the handset at any time to switch back and forth between calls.
7 ANSWERING MACHINE
The answering machine records unanswered calls when it is activated. It can store up to 99 messages within the maximum recording time of 14 minutes. Total recording time includes all voice prompts, outgoing messages and incoming call messages. English & French voice prompt can be supported.
A. Using the Answering machine from the handset
Switch the answering machine on/ off
The answering system must be turned on to answer and record messages.
When the answering system is turned on, the
- In standby mode, press MENU/OK then UP/DOWN to select Answering sys.
- Press MENU/OK then UP/DOWN to select Answer ON/OFF.
- Press MENU/OK then UP/DOWN to select On or Off.
- Press MENU/OK to confirm.
Play Messages
- In standby mode, press MENU/OK then UP/DOWN to select Play messages.
-
Press MENU/OK to play messages. If new and old messages exist in answering machine, system will play new messages first and then old messages. Options below during playback.
-
Press UP/DOWN to adjust the speaker volume.
- Press 6 to skip to the next message.
- Press 4 to repeat the message currently playing.
-
Press 4 twice to listen to the previous message.
-
Press 5 to delete the current message. The system advances to the next message.
-
Press 2 to stop and revert to the previous level.
Delete all old messages
- In standby mode, press MENU/OK then UP/DOWN to select Answering sys.
- Press MENU/OK then UP/DOWN to select Delete all old.
- Press MENU/OK. The display shows Delete all old messages? Press OK to confirm.
- Press MENU/OK to confirm.
Note: You can only delete old messages, which are messages you have played.
Record and play memos
Memos are your own recorded messages used as reminders for yourself or others using the same answering system. You can record your own memos using a system handset. Playback and delete them in the same way as incoming messages.
To record a memo
- In standby mode, press MENU/OK then UP/DOWN to select Answering sys.
- Press MENU/OK then UP/DOWN to select Record memo.
- Press MENU/OK to start recording after the system announcement and a "beep" sound is heard.
- Press KEY2 when you finish recording. The recorded memo plays automatically, and then handset returns to the previous screen
To play memo
Play memos the same way as messages. See Play messages in the previous paragraph.
B. Announcement
The announcement is the message a caller first hears when the answering machine answers their call. There are two pre-recorded announcement messages to choose from or you can record your own.
Record your own announcement
- In standby mode, press MENU/OK and then UP/DOWN to select Answering sys.
- Press MENU/OK and then UP/DOWN to select Announcement.
- Press MENU/OK then UP/DOWN to select Record.
- Press MENU/OK then UP/DOWN to select Answer & Record or Answer Only.
- Press MENU/OK to record your announcement message.
- Press KEY 2 to save your recorded message and play automatically.
Play your announcement
- In standby mode, MENU/OK then UP/DOWN to select Answering sys.
- Press MENU/OK and then UP/DOWN to select Announcement.
- Press MENU/OK then UP/DOWN to select Play.
- Press MENU/OK then UP/DOWN to select Answer & Record or Answer Only
- Press MENU/OK. The recorded announcement message is playing.
C. Answer machine settings
Set the answer mode
You can set answer mode to choose which outgoing message you want played to callers.
Answer and Record --The pre-set Answer & Record outgoing message, which allows your caller to leave a message,
Answer Only--The pre-set Answer Only outgoing message, where callers hear an announcement but cannot leave a message,
- In standby mode, press MENU/OK and then UP/DOWN to select Answering sys.
- Press MENU/OK then UP/DOWN to select Ans sys setup.
- Press MENU/OK then UP/DOWN to select Answer mode.
- Press MENU/OK then UP/DOWN to select Answer & record or Answer only.
- Press MENU/OK to confirm
Set the answer delay
- In standby mode, press MENU/OK and then UP/DOWN to select Answering sys.
- Press MENU/OK then UP/DOWN to select Ans sys setup.
- Press MENU/OK then UP/DOWN to select # of rings.
- Press MENU/OK then UP/DOWN to select from 2 rings, 4 rings, 6 rings, 8 rings or Time saver.
- Press MENU/OK to confirm.
Note: If Time saver setting is selected, the answering machine will pick up after two rings if there are new messages and after six rings if there are no messages.
Set recording time of incoming message
- In standby mode, press MENU/OK and then UP/DOWN to select Answering sys.
- Press MENU/OK then UP/DOWN to select Ans sys setup.
- Press MENU/OK then UP/DOWN to select Recording time.
- Press MENU/OK then UP/DOWN to select recording time from 30 seconds, 60 seconds, 120 seconds and unlimited.
- Press MENU/OK to confirm.
Set voice language
You can select English or French language for telephone voice prompts.
- In standby mode, press MENU/OK and then UP/DOWN to select Answering sys.
- Press MENU/OK then UP/DOWN to select Ans sys setup.
- Press MENU/OK then UP/DOWN to select Voice language.
- Press MENU/OK then UP/DOWN to select English or French.
- Press MENU/OK to confirm.
Call screening
The call screening feature lets you listen at the telephone base to a caller leaving a message. While monitoring an incoming message, you can answer the call by pressing HOME or SPEAKER on the handset.
To change the settings
- In standby mode, press MENU/OK then UP/DOWN to select Answering sys.
- Press MENU/OK then UP/DOWN to select Ans sys setup.
- Press MENU/OK then UP/DOWN to select Call screening.
- Press MENU/OK then UP/DOWN to select On or Off.
- Press MENU/OK to confirm.
Turn the message alert on/off
When the message alert tone is set to On, the telephone base beeps every 10 seconds to alert you of new messages. The tone stops when all new messages have been reviewed.
- In standby mode, MENU/OK then UP/DOWN to select Answering sys.
- Press MENU/OK then UP/DOWN to select Ans sys setup.
- Press MENU/OK then UP/DOWN to select Msg alert tone.
- Press MENU/OK then UP/DOWN to select On or Off.
- Press MENU/OK to confirm.
D. Remote access
Remote access allows you to operate your answering machine and listen to your messages by calling your phone from another phone.
To set the remote access /change remote access code
- In standby mode, MENU/OK then UP/DOWN to select Answering sys.
- Press MENU/OK then UP/DOWN to select Ans sys setup.
- Press MENU/OK then UP/DOWN to select Remote access.
- Press MENU/OK then UP/DOWN to select On or Off.
- Press MENU/OK to confirm.
If you set the remote access ON:
- Press MENU/OK. Use the keypad to enter the old 4-digit PIN (default 4-digit PIN is 0000).
- Press MENU/OK. Use the keypad to enter the new 4-digit PIN.
- Press MENU/OK to enter the new 4-digit PIN again.
- Press MENU/OK to confirm.
To remotely access your answering system
- Dial your phone number, when you hear your outgoing message, press * and then enter your 4-digit Remote Access PIN when outgoing message is still playing.
- If you enter the incorrect PIN code for 3 times, your phone will hang up automatically.
- When you have accessed your phone, you can use the keypad to operate your answering machine.
- Press the keys below to perform the following functions:
| Keys | Description | |
| During Message Playback | Message is not playing | |
| 1 | Play the remote access menu | |
| 2 | Stop playing messages | Play messages |
| 4 | Press once to repeat playing the current message from the beginning. Press twice to skip backward to the previous message. | |
| 5 | Delete the current message | |
| 6 | Skip forward | |
| 7 | Turn on the answering machine. | |
| 9 | Turn off the answering machine. | |
E. Using the answering machine at the base
Switch on/off
Press ANSWER ON to turn the answering system on or off. The light behind the key will be on when answering system is turned on.
Call screening
You can listen at the telephone base to a caller leaving a message. If you want to turn off the call screening feature, set the telephone base volume to zero. Remember to raise the volume in order to hear your messages during playback.
Play Messages
If you have new messages, the telephone plays only the new messages (oldest first). If there are no new messages, the telephone plays back all messages (oldest first).
- Press PLAY/STOP.
- During message playback, press below keys to perform the following functions:
PLAY/STOP: Press to stop playing messages or resume playback.
SKIP BACKWARD: Press once to replay current message from the beginning.
Press twice to playback the previous message.
SKIP FORWARD: Skip to play the next message.
DELETE Delete the current message.
VOLUME UP: Increase the loudspeaker volume by one level (1 to 6).
VOLUME DOWN: Decrease the loudspeaker volume by one level (1 to 6).
Delete all old messages
In idle mode, press DELETE twice continuously, all previously heard messages will be erased.
8 ADDITIONAL HANDSETS (MULTI HANDSET PACKS ONLY)
If you have purchased a multi handset pack, you are able to make internal calls, transfer external calls from one handset to another and use the conference option.
A. Call another handset
You can make internal calls between two handsets.
- Press MENU/OK then UP/DOWN to select Intercom.
- Press MENU/OK. If you have only one other handset, it will ring.
- If you have extra handsets, your handset displays Intercom to: and a list of registered handsets. Press UP/DOWN to select the handset you want to call. Press MENU/OK to call your selected handset.
- Press HOME on the called handset.
- Press OFF on the calling handset to transfer external call to called handset. OR press MENU/OK then UP/DOWN on the calling handset to select Transfer. Press MENU/OK to confirm.
Answer an incoming call (Home and Mobile) during an intercom call
When you receive an incoming home or mobile call during an intercom call, there is an alert tone and Incoming call appears on screens. The telephone base and all other handsets ring.
- Press HOME to answer the home call. Or press MOBILE to answer the mobile cal and the intercom call ends automatically.
- Press OFF to end the intercom call without answering the incoming home or mobile call. The telephone continues to ring.
Transfer a home or mobile call
During external home or mobile call, you can transfer the external home or mobile call to another handset or headset registered to the base.
- Press MENU/OK then UP/DOWN to select Intercom.
- Press MENU/OK. If you have only one other handset, it will ring. If you have extra handsets, your handset displays Intercom to: and a list of registered handsets. Press UP/DOWN to select the
handset you want to call. Press MENU/OK to call your selected handset.
- Press HOME on the called handset.
- Press OFF on the calling handset to transfer external call to called handset. OR press
MENU/OK
then UP/DOWN on the calling handset to select Transfer. Press MENU/OK to transfer.
B. 3-Way conference home or mobile call
You can hold a 3-way conference home or mobile call between 2 internal callers and 1 external caller.
No subscription is required.
- Follow steps 1 to 3 in section Transfer a home call
- Press MENU/OK then UP/DOWN on the calling handset to select Share call.
- Press MENU/OK to setup conference call.
Conference home and mobile calls
When you have calls established on the home and mobile lines, you can create a 3-way conference.
To conference both home and mobile calls:
- Press MENU/OK.
- Press UP/DOWN to select Conf. home/Conf. mobile (whichever is applicable).
- Press MENU/OK.
To select an option while on a conference call:
- Press MENU/OK.
-
Press UP/DOWN to select one of the following options:
-
End home call
-
End mobile call
-
Press MENU/OK.
To end a conference call:
Press OFF or put the handset back in the telephone base or charger
Using the home and mobile lines together
- You can be on two different calls using the mobile line and home line at the same time using two handsets.
You cannot be on a call using the mobile line and a Bluetooth headset via the home line at the same time. These are both Bluetooth devices and only one can be used at a time.
If you are on a call using the mobile line, you cannot join the call using your paired mobile phone. However, you can join the call using another 9850BT handset. Your mobile phone is being used for the phone call so only features that are normally available during a call can be used.
C. Register an additional handset
Your additional handset(s) will come pre-registered but should you need to register a handset, follow these steps.
- In standby mode, press MENU/OK then UP/DOWN to select Settings.
- Press MENU/OK then UP/DOWN to select Register.
- Press MENU/OK then enter the system PIN. (Default is 0000.)
-
Press MENU/OK. Then the display will show Press and hold PAGE button.
-
Press and HOLD PAGE on the base. The handset display will show Registering.... The handset will return to standby mode if registration is successful.
Note:
If the base is found and the PIN is correct, an unused handset number will be assigned automatically.
If the PIN is incorrect, “INCORRECT PIN!” will display with an error tone, you will need to re-enter the correct PIN. If the base is not found, “NO BASE FOUND” will display.
De-register a handset
- In standby mode, press MENU/OK then UP/DOWN to select Settings.
- Press MENU/OK then UP/DOWN to select De-register.
- Press MENU/OK then enter the system PIN. (Default is 0000.)
- Press MENU/OK then UP/DOWN to select the desired handset.
- Press MENU/OK. The display will show De-register?
- Press MENU/OK to confirm. Display will show De-registered if it is successful.
Note: You cannot de-register the handset currently use in your hand.
You cannot de-register a handset if any other system handset is in use.
9 HELP
I cannot pair my mobile phone to the telephone base
- Make sure the Bluetooth function of your Bluetooth enabled mobile phone is turned on.
- See your mobile phone User's Manual for more information.
- Make sure the cordless handset, corded base and mobile phone are located near each other.
- Remove the TELEFUNKEN TX 1^** from your mobile phone's Bluetooth device history list (see your mobile phone User's Manual for more information).
- Carefully follow the pairing instructions in the User's Guide, making sure that your mobile phone is not connected to any other Bluetooth device(s).
- Turn off your mobile phone, and then turn it on again.
- Reset the telephone base. Unplug the unit's electrical power. Wait for approximately 15 seconds, and then plug it back in. Repeat the above suggestions
Phone does not work
- Have you installed the battery pack correctly?
- Check that the mains power is correctly connected.
No dial tone
- Is the telephone cord of the base plugged into the phone socket?
- Check that the mains power is switched on at the power point.
- Only use the telephone cord supplied with the phone.
- The telephone line cord might be malfunctioning. Install a new telephone line cord.
- Move the handset closer to the telephone base. It might be out of range.
- Disconnect the telephone base from the telephone wall socket and connect a different telephone. If there is no dial tone on this telephone either, the problem is in your wiring or local service. Contact your local telephone company.
Cannot dial out or receive calls
- Check that the mains power is correctly connected.
- The battery may need recharging.
- Has there been a power cut? If so, place the handset back on the base for 10 seconds and try again. If it still does not work disconnect the battery pack and mains power for 10 minutes, then reconnect and try again.
You have a dial tone, but the phone will not dial out
- If you are connected to a PABX, check whether you need to dial an access code.
Handset does not ring
- The ringer volume may be switched off...
- Check that the mains power is correctly connected.
- Make sure the handset is registered to the base.
No display
- The battery pack may be flat, dead or incorrectly inserted.
- Recharge or replace the battery pack
Battery icon does not appear to be filling
- Try cleaning the charging contacts.
- Check that the mains power is correctly connected.
- If the above measures do not correct the problem, replace the battery pack.
You hear the busy tone when you press HOME
- Make sure the handset is in range of the base.
- Another handset registered to your TELEFUNKEN TX 1^** base may be on the line.
Answering machine does not record any messages
- Make sure the answering machine is switched on.
- The memory may be full, please delete some old messages to free up space.
- Make sure answering machine is set to ANSWER & RECORD mode.
Answering machine messages have the wrong date and time
- Have you manually set the date and time?
Cannot access your messages from another phone
- Have you changed the remote access security PIN code?. Always keep a note of the new PIN code in a safe place.
- Has remote access been disabled?
- Make sure you are calling from a touch-tone telephone. When dialing a number, there should be tones. If there are clicks, then it is not a touch-tone telephone and cannot activate the answering machine.
- The answering machine might not detect the remote access code when your announcement is playing. Wait until the announcement is over before entering the code.
- There might be interference on the telephone line you are using. Press the dial pad keys firmly when dialing.
No Caller number/name displayed
- Have you subscribed to Caller ID service?
- The caller may have blocked their number.
- An exact name/number match was not found in your phonebook. Check that you have stored the complete number including area code.
- The caller might not be calling from an area which supports Caller ID.
- Both you and the caller's telephone companies must use equipment compatible with the Caller ID service.
- The Caller ID information shows after the first or second ring.
Base unit does not ring, but the lights are on
- Have you connected the telephone line correctly?
Is the base ringer set to off? - You may have a faulty line or socket. Try using another socket.
Buzzing noise on my phone or on other electrical equipment nearby
- Sometimes your TELEFUNKEN TX 1^ can interfere with other electrical equipment if it is placed too close. It is recommended that you place your TELEFUNKEN TX 1^ at least one metre away from electrical appliances or metal obstructions to avoid any risk of interference.
- If you have an ADSL internet service ensure correct filters are installed to prevent interference.
10 WARRANTY
The warranty concerns the telephone and does not include the accessories.
The following are considered accessories:
- rechargeable batteries
- power supply unit
- telephone cord
However, these accessories may be ordered from our technical division:
+33(0)545 608 251.
Warranty period
This telephone comes with a warranty period of 12 months. The warranty begins on the date the telephone is purchased.
The warranty must be proven by presenting the original invoice or receipt showing the date and the model purchased.
- Coverage
A defective telephone must be returned complete to your distributor with an explanation.
If this telephone presents a defect during the warranty period, the authorised After-Sales Service will repair any defective component or manufacturing defect. The After-Sales Service will unilaterally decide whether to repair or replace part or all of the telephone.
The initial purchase date will determine the starting date for the warranty period. If the telephone is repaired or exchanged by our After-Sales Service, the warranty period is not extended.
- Exclusions
Damage or defects caused by the improper use or handling of the telephone, or by the use of accessories that are not original or not recommended in these instructions, are not covered by the warranty.
The warranty does not cover damage caused by outside elements, like lightning, water or fire, or any other damage caused during transport.
No warranty coverage may be claimed if the telephone serial number has been modified, removed, erased or made illegible.
No warranty coverage may be claimed if the telephone has been repaired, altered or modified by the buyer or any repair personnel not officially qualified and authorised.
- Compliance with current regulations:

This telephone complies with the EC standards in force:
RECYCLING OF ELECTRICAL AND ELECTRONIC EQUIPMENT AT THE END OF ITS LIFE CYCLE
Used electrical and electronic devices must not be discarded with ordinary household refuse. The
presence of the symbol on the product or its packaging serves as a reminder of this.
Some materials constituting this product may be recycled if you take them to an appropriate recycling centre. By reusing the components and raw materials of old devices, you contribute significantly to protecting the environment.
For further information on collection sites of used equipment, you can enquire at your city hall, the waste treatment department or in the shop where you purchased the product.
- TELEFUNKEN TX 100 Bluetooth
- TELEFUNKEN TX100 Bluetooth® Series
- IMPORTANT
- Hearing aid?
- Got everything?
- TABLE OF CONTENTS
- IMPORTANT SAFETY INSTRUCTIONS 43
- GETTING STARTED 43
- GETTING TO KNOW YOUR PHONE 46
- BLUETOOTH 49
- USING THE PHONE 55
- IMPORTANT SAFETY INSTRUCTIONS
- GETTING STARTED
- Location
- Setting up
- Wall mounting
- WARNING
- Setting up for multiple packs
- For each additional handset and charger
- Using your TELEFUNKEN TX1** phone on a Broadband ADSL line?
- GETTING TO KNOW YOUR PHONE
- Handset
- Display icons
- Answering system
- LED Display
- Navigating the menus
- BLUETOOTH®
- Introducing Bluetooth®
- IMPORTANT INFORMATION
- Glossary of terms
- Active devices
- Bluetooth mobile phone
- Mobile line
- Connected
- Disconnected
- Discoverable mode
- Home line
- Paired devices
- Pairing
- PIN
- Bluetooth setup
- Pairing and connecting a mobile phone
- Auto connection
- Pairing and connecting a headset
- Paired devices
- Rename a paired device
- Remove a paired device
- Active devices
- Review the active devices list
- Connect/disconnect an active device
- Replace an active device
- Add an active device
- Remove an active device
- Change PIN
- Download phonebook
- To download a mobile phone phonebook
- Note:
- Interruption of phonebook download
- USING THE PHONE
- Make, answer or end a home call
- To make a home call:
- To answer a home call:
- To end a home call
- Make, answer or end a mobile call
- To make a mobile call:
- To answer a mobile call:
- To end a mobile call:
- Answer a mobile call while on a home call
- To answer the incoming mobile call:
- To end the mobile call:
- To resume the home call on hold:
- Answer a home call while on a mobile call
- To end the home call:
- To resume the mobile call on hold:
- Mobile phone voicemail
- Call timer
- Out of range warning
- Using a Bluetooth headset
- To answer a home call using a Bluetooth headset
- To end a home call you answered from a Bluetooth headset
- To transfer a call from a handset to a Bluetooth headset:
- To transfer a call from the headset back to the handset:
- To end a call that started at the handset:
- Earpiece/ handsfree volume
- Hold function
- To place a home call on hold:
- To resume a home call on hold:
- Mute function
- To mute the call:
- To un-mute the call:
- Handsfree
- Make a handsfree call
- Answer a call in handsfree mode
- Switch to handsfree mode during a call
- Redial
- Redial a radial entry
- Save a radial entry to the phonebook
- Delete a radial number
- Find handset (Paging)
- Ringers
- Temporary ringer silencing
- To silence the handset ringer:
- To silence the base ringer:
- Chain dialing
- To access a number in the phonebook while on a call:
- To access a number in the call log while on a call:
- To access the radial list while on a call:
- PHONEBOOK
- Store a number entry in the home phonebook
- Review a phonebook entry
- Dial an entry
- To search alphabetically
- Edit a phonebook entry
- Edit the type of a phonebook entry
- Delete a phonebook entry
- Remove a downloaded phonebook (downloaded phonebooks only)
- Set the country code for home & downloaded phonebook
- Security PIN for downloaded phonebook
- Set up PABX
- SETTINGS
- Handset settings
- Handset ringer volume
- Ringer tone
- Alert tones (Key tone, Low battery and No coverage)
- Set date and time
- Date format
- Time format
- Set date and time manually
- Auto answer
- Handset reset
- Base settings
- Set dial mode
- Set the flash time
- Change system PIN
- Caller ID
- Call list display screen messages
- View call details
- Dial from the Call list
- Save a call list entry to the phonebook
- Delete an Entry in the Call list
- Delete the Entire Call list
- Provider services
- Clear voicemail
- Clear flashing message indication
- To manually turn off the new voicemail indicator:
- Call Waiting
- Call waiting on the home line
- Call waiting on the mobile line
- ANSWERING MACHINE
- Using the Answering machine from the handset
- Switch the answering machine on/ off
- Play Messages
- Delete all old messages
- Record and play memos
- To record a memo
- To play memo
- Announcement
- Record your own announcement
- Play your announcement
- Answer machine settings
- Set the answer mode
- Set the answer delay
- Set recording time of incoming message
- Set voice language
- Call screening
- To change the settings
- Turn the message alert on/off
- Remote access
- To set the remote access /change remote access code
- To remotely access your answering system
- Using the answering machine at the base
- Switch on/off
- ADDITIONAL HANDSETS (MULTI HANDSET PACKS ONLY)
- Call another handset
- Answer an incoming call (Home and Mobile) during an intercom call
- Transfer a home or mobile call
- MENU/OK
- 3-Way conference home or mobile call
- Conference home and mobile calls
- To conference both home and mobile calls:
- To select an option while on a conference call:
- To end a conference call:
- Using the home and mobile lines together
- Register an additional handset
- De-register a handset
- HELP
- I cannot pair my mobile phone to the telephone base
- Phone does not work
- No dial tone
- Cannot dial out or receive calls
- You have a dial tone, but the phone will not dial out
- Handset does not ring
- No display
- Battery icon does not appear to be filling
- You hear the busy tone when you press HOME
- Answering machine does not record any messages
- Answering machine messages have the wrong date and time
- Cannot access your messages from another phone
- No Caller number/name displayed
- Base unit does not ring, but the lights are on
- Buzzing noise on my phone or on other electrical equipment nearby
- WARRANTY
- RECYCLING OF ELECTRICAL AND ELECTRONIC EQUIPMENT AT THE END OF ITS LIFE CYCLE
Brand : TELEFUNKEN
Model : TX 103
Category : Cordless phone