MY4109 - Kitchen appliance Myria - Free user manual and instructions
Find the device manual for free MY4109 Myria in PDF.

User questions about MY4109 Myria
0 question about this device. Answer the ones you know or ask your own.
Ask a new question about this device
Download the instructions for your Kitchen appliance in PDF format for free! Find your manual MY4109 - Myria and take your electronic device back in hand. On this page are published all the documents necessary for the use of your device. MY4109 by Myria.
USER MANUAL MY4109 Myria
natural_image
Line drawing of a kitchen blender with handle and side panel (no text or symbols)natural_image
Circular mechanical component diagram with concentric rings and central hub (no text or symbols)lamă
capac orificiu

orificiu

capac
natural_image
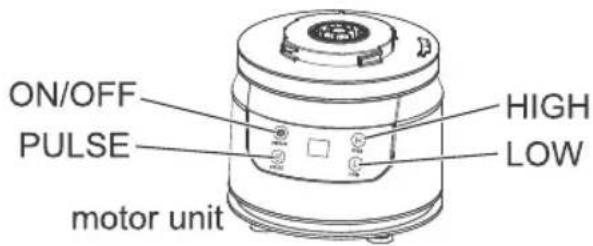
Line drawing of a cylindrical appliance with a lid and control panel (no text or symbols)Ridicat
Redus
Date tehnice
USER MANUAL FOOD PROCESSOR
MY4109
natural_image
Line drawing of a kitchen blender with handle and side panel (no text or symbols)Please read the manual carefully before operating your product. Retain it for future reference.
Important safeguards
Read the instructions, keep them safe, pass them on if you pass the appliance on. Remove all packaging before use.
Follow basic safety precautions, including:
-
Don't put the motor unit in liquid, don't use it in a bathroom, near water, or outdoors.
-
Unplug before fitting or removing an attachment.
-
Switch off(0) before fitting the jug to the motor unit.
-
Switch off(0) and wait till the blades come to a complete stop before removing the lid from the jug.
-
Keep your hands away from the blades – they're sharp.
-
Don't use the appliance unless the lid is in place.
-
Don't fill with anything hotter than you can comfortably handle (i.e. below 40°C).
-
Don't put spoons, spatulas, or any other object into the jug while the appliance is plugged in.
-
Don't leave the appliance unattended while plugged in.
-
Sit the motor unit on a dry, firm, level surface.
-
Route the cable so it doesn't overhang, and can't be tripped over or caught.
-
Don't let the jug overflow. If liquid gets under the motor unit, it may be sucked into the motor, damaging it.
-
Don't fill the jug above the max mark – if you do, the contents may force the lid open when you start the motor.
-
You may use the processor and disc for cutting/grating for up to 2 minutes. Any other use should be restricted to 1 12 minutes. After this, let the motor rest for 2 minutes.
-
Don't use the appliance for any purpose other than those described in these instructions.
-
Don't use the appliance if it's damaged or malfunctions.
-
If the cable is damaged, return the appliance, to avoid hazard.
-
When the machine has overload protection, do not touch the machine, to stay in continue to use when machine is back to normal.
-
This appliance can be used by children aged from 8 years and above and persons with reduced physical, sensory or mental capabilities or lack of experience and knowledge if they have been given supervision or instruction concerning use of the appliance in a safe way and understand the hazards involved.

- Children shall not play with the appliance. Cleaning and user maintenance shall not be made by children without supervision.
- This appliance is not intended for use by persons (including children) with reduced physical, sensory or mental capabilities, or lack of experience and knowledge, unless they have been given supervision or instruction concerning use of the appliance by a person responsible for their safety.
- Children should be supervised to ensure that they do not play with the appliance.
- If the supply cord is damaged, it must be replaced by the manufacturer, its service agent or similarly qualified persons in order to avoid a hazard.
24.Household use only - Switch off the appliance and disconnect from supply before changing accessories or approaching parts that move in use.
Be careful when handling the sharp cutting blades, emptying the bowl and during cleaning the appliances.
Be careful if hot liquid is poured into the food processor or blender as it can be ejected out of the appliance due to a sudden steaming
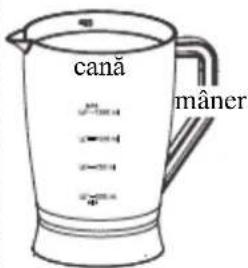
General Description
blender

natural_image
Circular diagram with concentric rings and radial lines, labeled 'underside' at top (no other text or symbols)blade unit


seal

blade
unit

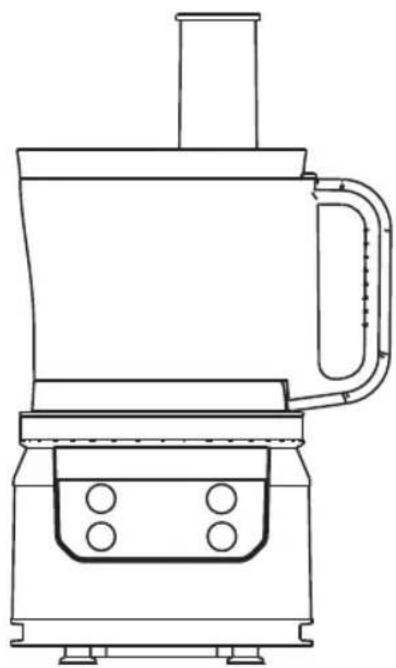
food processor


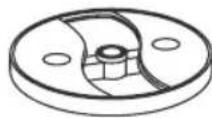
disc


Technical Data
| Product name | Model | Voltage | Frequency | Power | Capacity |
| Food Processor | MY4109 | 220-240V~ | 50/60Hz | 800W | 1500ml |
In Brief
- Sit the motor unit on a dry, firm, level surface.
- Route the cable so it doesn't overhang, and won't trip or catch.
- Lower the jug on to the motor unit, then turn the jug clockwise, to lock it in place.
- Remove the lid.
- Put the ingredients into the jug – don't fill past the max mark.
- Put the lid on the jug.
Power Up
- Check that the speed control is set to 0.
- Put the plug into the power socket (switch it on, if it's switchable).
Speed Control
-
Press the speed control button for low speed, high speed. Then press the on/off button.
-
Press the on/off button, then the motor off.
-
Use low speed (1) for lighter applications, using mainly liquid ingredients, and high speed (2) for heavier applications, using mainly solid ingredients.
-
Press the pulse button will give you a short burst at high speed, for more precise control. In this direction, the control is spring-loaded. When you let go, it'll return to 0.
Using The Blender
- Lower the jug on to the motor unit, then turn the jug clockwise, to lock it in place.
- Pull the lid up and off the jug - it's stiff, because of the seal.
- Put the ingredients into the jug - don't fill past the max mark.
- Put the lid on the jug, and push it down to seal it.
- Align the pips on the cap with the slots in the hole, fit the cap in the hole, and turn clockwise. Don't rut the blender without the cap.
- To add ingredients while the motor is running:
a) turn the cap clockwise to unlock it, and lift it off b) add the ingredients via the hole c) replace the cap and turn it anti-clockwise to lock it - Turn the jug anti-clockwise to unlock, and lift it off the motor unit.
Crushing Ice
- Start with half to three quarters of a cup of ice, or 4 to 6 cubes, and add 15ml (1 tbsp) of water.
- Put the lid on the blender, then turn the speed control to P for a second or so, check the state of the ice, and repeat till the ice is the consistency that you need.
Care and Maintenance
- Switch off (0) and unplug before cleaning.
23.Wipe the outside of the motor unit with a clean damp cloth. - Handwash the removable parts.
- If you use a dishwasher, the harsh environment inside the dishwasher will affect the surface finishes.
- The damage should be cosmetic only, and should not affect the operation of the appliance.
Blade Unit
- You may remove the blade unit for cleaning.
- This is best done with the jug upside down.
29.Grip the jug handle with one hand.
30.Grip the bottom of the blade unit with the other hand.
31.Turn the blade unit clockwise till it comes loose from the jug base. - Carefully, pull it up and out of the bottom of the jug.
33.Wash the seal and blade unit in warm soapy water, rinse, and air dry. - Take great care with the blades – don't handle them directly, use a nylon washing-up brush.
- Replace the seal round the blade unit.
- Turn the blade unit upside down, and replace it in the bottom of the jug base.
37.Turn the blade unit anti-clockwise to tighten it.

Recipes
coriander pesto (dip, topping or sauce)
4 handfuls fresh leaf coriander
4 cloves fresh garlic
120g pine nuts
250ml olive oil
120g freshly grated Parmesan
salt and pepper
Put the coriander, garlic, pine nuts, and a bit more than half the oil into the jug. Fit the lid, and process at moderate speed till it looks smooth.
To adjust the thickness, add a little oil, give it a short burst, and repeat till it's right. Transfer to a bowl, stir in the Parmesan, taste, and adjust the seasoning. Serve as a dip (fairly thick), as a topping for soup (not too thick, but not runny), or tossed through warm pasta (fairly runny).
Using the Processor
- Unplug the appliance.
39.Fit the spindle to the top of the motor unit. - Lower the jug on to the motor unit, then turn the jug clockwise, to lock it in place.
41.Choose the attachment you need.
With the Support
- Use the chopper for pulverizing ingredients.
- Use the mixer to mix ingredients together.
- Use the creamer to thicken cream, to beat eggs, and to cream eggs and sugar together.
45.Fit the attachment over the support, and slide it to the bottom. - Lower the support into the centre of the jug, over the spindle.
- Put the ingredients into the jug - don't fill it past the max mark.
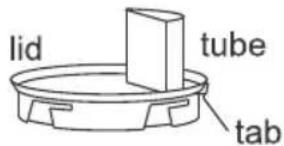
- Hold the lid with the tube slightly behind the jug handle, set it on the jug, then turn it clockwise, to lock the tab into the top of the handle.
- To add ingredients while the motor is running:
a) lift the pushed out of the tube
b)add the ingredients via the tube
c)replace the pusher
- To remove the lid, turn it anti-clockwise to unlock it, then lift it off.
With the Disc
- Fit the slicer or one of the graters into the disc.
- Lower the disc over the top of the spindle.
- Hold the lid with the tube slightly behind the jug handle, set it on the jug, then turn it clockwise, to lock the tab into the top of the handle.
- Remove the pusher, and drop the ingredients down the tube.
- Replace the pusher, and use it to push the ingredients gently down the tube.
Don't use fingers or cutlery to push food down the tube - only the pusher.
- The blade(s) on top of the disc will slice or grate the food into the bowl.
- Don't let the bowl gets more than about half full.
58.To remove the lid, turn it anti-clockwise to unlock it, then lift it off. - Turn the disc over, and press one of the metal ends in and down, to remove the slicer/grater.

Care and Maintenance
- Switch off(0) and unplug before cleaning.
- Wipe the outside of the motor unit with a clean damp cloth.
- Handwash the removable parts.
- If you use a dishwasher, the harsh environment inside the dishwasher will affect the surface finishes. Don't put any part of the appliance in a dishwasher.
- The damage should be cosmetic only, and should not affect the operation of the appliance.
Using the mill
- Unplug the appliance.
- Turn the mill upside down.
- Turn the mill base clockwise, to release it, and lift it out of the mill.
- Put the goods to be ground into the bowl. Dry goods only. For best results, don't fill it more than one third full.
- Replace the mill base, inside the mill, and turn it anti-clockwise, to lock it in place.
- Turn the mill right way up.
- Lower the mill onto the motor unit, then turn it clockwise, to lock it in place.
- Turn the speed control to P in short bursts till you achieve the size of grind you want.
- Let the speed control return to 0, and wait till the blades stop moving.
- Turn the mill anti-clockwise to unlock it, and lift it off the motor unit.
- Turn the mill upside down.
- Tap the mill a couple of times to move all the grounds into the bowl.
- Turn the mill base clockwise, to release it, and lift it out of the mill.
- Empty the bowl.
Care and Maintenance
- Switch off (0) and unplug before cleaning.
- Wipe the outside of the motor unit and the mill base with a damp cloth.
- Handwash the bowl and seal.
- If you use a dishwasher, the harsh environment inside the dishwasher will affect the surface finishes. Don't put any part of the appliance in a dishwasher.
- The damage should be cosmetic only, and should not affect the operation of the appliance.
RECYCLING

Correct disposal of this Product
(Waste Electrical & Electronic Equipment (WEEE)
Your product is designed and manufactured with high quality materials and components which can be recycled and reused.
This symbol means that electrical and electronic equipment, at their end of-life should be disposed of separately from your household waste.
Please dispose of this equipment at your local community waste
collection/recycling center.

This product complies with European safety and electrical interference directives

This product does not contain environmentally hazardous materials (lead, mercury, cadmium, hexavalent chromium and brominated flammable agents: PBB and PBDE).