
IH6210RF - Oven Cylinda - Free user manual and instructions
Find the device manual for free IH6210RF Cylinda in PDF.


| Product Type | Built-in Electric Oven |
| Model | IH6210RF |
| Brand | Cylinda |
| Dimensions (H x W x D) | 595 x 595 x 550 mm |
| Weight | Approximately 35 kg |
| Power Supply | 230 V ~ 50 Hz |
| Total Power | 3.0 kW |
| Energy Efficiency Class | A+ |
| Oven Capacity | 71 L |
| Temperature Range | 50°C - 275°C |
| Heating Methods | Conventional, Convection, Grill, Fan Grilled |
| Cleaning Type | Pyrolytic Self-Cleaning |
| Safety Features | Child Lock, Automatic Shut-off, Cool Front Door |
| Control Type | Touch Control and Knobs |
| Display | Digital LED |
| Number of Oven Functions | 9 |
| Spare Parts Availability | Available from authorized service centers |
| Repairability Index | 8.5/10 (estimated) |
| Included Accessories | 1 Baking Tray, 1 Wire Rack |
Frequently Asked Questions - IH6210RF Cylinda
User questions about IH6210RF Cylinda
0 question about this device. Answer the ones you know or ask your own.
Ask a new question about this device
Download the instructions for your Oven in PDF format for free! Find your manual IH6210RF - Cylinda and take your electronic device back in hand. On this page are published all the documents necessary for the use of your device. IH6210RF by Cylinda.
USER MANUAL IH6210RF Cylinda
IH6210RF


Inkoppling till elsystem

Varning!
Kokgrytans storlek
The plate is exceptionally easy to use and extremely efficient. After reading the instruction manual, operating the cooker will be easy.
Before being packaged and leaving the manufacturer, the plate was thoroughly checked with regard to safety and functionality.
Before using the appliance, please read the instruction manual carefully.
By following these instructions carefully you will be able to avoid any problems in using the appliance.
It is important to keep the instruction manual and store it in a safe place so that it can be consulted at any time.
It is necessary to follow the instructions in the manual carefully in order to avoid possible accidents.
Caution!
Operate the appliance only after reading / understanding this Manual.
The appliance has been designed only for cooking. Any other use (for example for heating) does not comply with its operating profile and may cause danger.
The producer reserves a right to implement changes having no impact on the operation of the appliance.
TABLE OF CONTENTS
Basic information....25
Safety instructions....27
Saving energy....31
Description of the appliance....32
Installation....33
Operation....38
Cleaning and routine maintenance....45
Emergency procedure....47
Technical data....49
Warranty....49
Warning: The appliance and its accessible parts become hot during use. Care should be taken to avoid touching heating elements. Children less than 8 years of age shall be kept away unless continuously supervised.
This appliance can be used by children aged from 8 years and above and persons with reduced physical, sensory or mental capabilities or lack of experience and knowledge if they have been given supervision or instruction concerning use of the appliance in a safe way and understand the hazards involved. Children shall not play with the appliance. Cleaning and user maintenance shall not be made by children without supervision.
Warning: Unattended cooking on a hob with fat or oil can be dangerous and may result in fire.
NEVER try to extinguish a fire with water, but switch off the appliance and then cover flame e.g. with a lid or a fire blanket.
Warning: Danger of fire: do not store items on the cooking surfaces.
SAFETY INSTRUCTIONS
Warning: If the surface is cracked, switch off the appliance to avoid the possibility of electric shock.
The appliance is not intended to be operated by means of an external timer or separate remote-control system.
You should not use steam cleaning devices to clean the appliance.
- Before using the ceramic plate for the first time read the Operating Manual carefully as thus you can ensure safe operation and avoid damage to the plate.
- If the ceramic plate is operated near a radio, TV set or other emitting device, please check whether the touch panel works correctly.
- The ceramic plate should be installed by a qualified electrician.
- Do not install the plate near refrigerating devices.
- The furniture the plate is fitted in should be resistant to temperatures up to 100°C. The requirement applies to the veneers, edges, plastic surfaces, glues and varnishes.
- The plate can be used only after it has been fitted into furniture, as only thus you will be protected from accidental contact with live components.
- Electric appliances can be repaired only by qualified specialists. Unprofessional repairs may compromise the safety of the appliance.
- The appliance is disconnected from the mains only when the mains plug is pulled out from the socket or when the fuse has been switched off.
- Never allow children to remain unattended near the cooktop nor to play with the control panel.
- When switched on the hotplates quickly become hot. To avoid unnecessary power consumption, switch them on only after putting a cooking pot.
- Residual temperature indicator built-in into the electronic system tells you whether the hotplate is still switched on and whether it is still hot.
- Should there be a power failure, all the settings and indications will be cancelled. Please be careful when the power supply is restored as hotplates which have been hot before power failure will no longer be controlled by the indicator.
- If there is a mains socket located near the hotplate, please make sure that the supply cord does not touch the hot places.
- Do not leave the plate unattended when cooking on fats and oils as they create fire hazard.
- Do not use plastic pots or containers made from aluminium foil as they melt in high temperatures and may damage the ceramic plate.
- Sugar, citric acid, salt etc., both in liquid and solid state, as well as plastic should not get into contact with a hot hotplate.
- If through carelessness, sugar or plastic gets on a hot hotplate, you may not switch off the plate but scrape away sugar or plastic using a sharp scraper. Protect hands from burns.
- Use only flat-bottom pots and saucepans on your ceramic plate, without sharp edges or burrs as otherwise the plate may get permanently damaged.
SAFETY INSTRUCTIONS
- The heating surface of the ceramic plate is resistant to thermal shock. It is neither hot nor cold-sensitive.
- Avoid dropping objects on the plate. A point hit, for example a falling bottle with spices, may in unfavourable circumstances lead to cracks and splits appearing on your ceramic plate.
- Boiled over residuals of food may penetrate damaged places and get to the live components of the ceramic plate
- Should cracks or splits appear on the surface of your ceramic plate immediately disconnect it from the mains. In order to do so, switch off the fuse or pull out the mains plug from the socket. Call the Customer Service
- Please observe the maintenance and cleaning guidelines. Should you fail to proceed in compliance with the provided guidelines, you will lose your warranty rights

Everybody who properly uses energy not only saves money but also consciously acts in aid of the natural environment. So let's save electric energy by:
• Using proper cookware
Pots and pans with flat and thick bottom help to save up to one-third of electric energy. Remember about the lid as otherwise the consumption of energy quadruples!
- Matching cookware to the size of the hotplate
A cooking pot should neither be smaller nor bigger than the used hotplate.
- Maintaining hotplates and pot bottoms clean
Dirt obstructs the transfer of heat – heavily burnt food residuals often can be cleaned only with chemicals harmful to the environment.
- Avoiding necessary “peeping into pots”.
- Not using the plate near refrigerators / freezers
As the consumption of energy unnecessary rises.

The appliance is protected from damage during transportation by its packaging. After unpacking please dispose of the packing materials in a manner creating no risk to the
environment.
All materials used for packing are harmless to the natural environment, can be recycled in 100% and have been identified with appropriate symbol.
Caution! Packing materials (polyethylene bags, pieces of polystyrene etc.) should be kept away from children during unpacking.
DISPOSING OF THE DE VICE

When disposing of the de vice, do not bring it to regular mu nicipal waste containers. Instead, bring it to electrical and electronic waste re cy cling and re use center. A relevant label has been put on the device, its in structions
manual, or on the package.
The device has been manufactured of recyclable materials. By bringing old device to recycling collection center, you show that you care about nature.
Ask your local environmental care authority for information on location of such facilities.

Description of hob


Control Panel
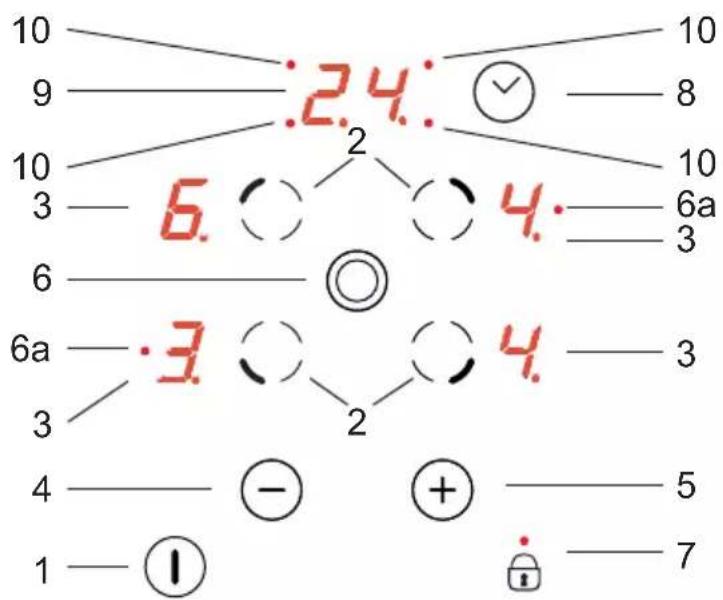
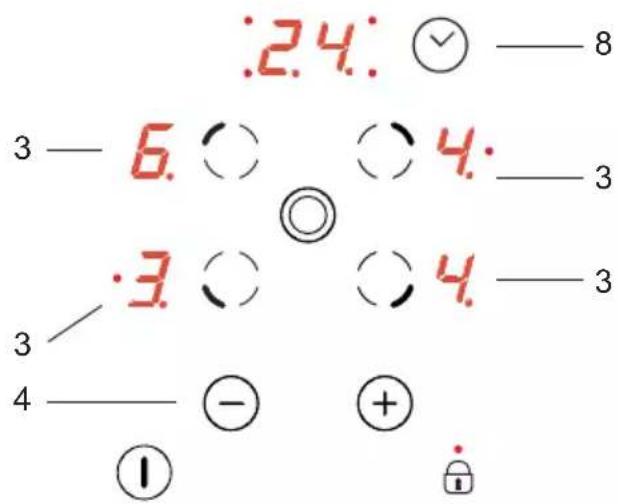
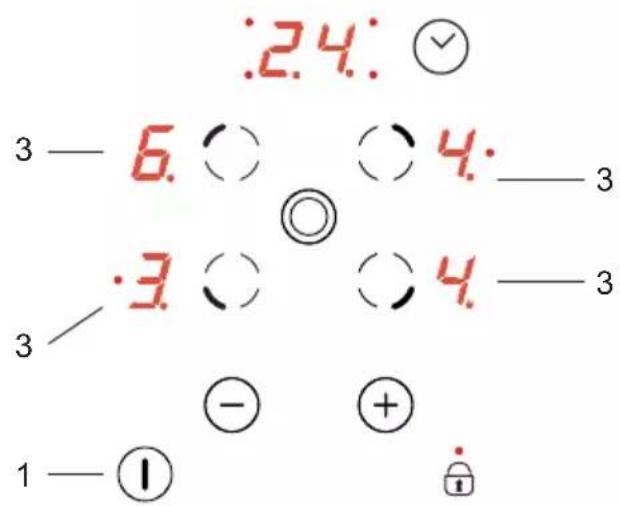
- On/off sensor
- Cooking zone selection sensor,
- Cooking zone displays,
- Lower heat setting selector,
- Higher heat setting selector,
- Double ring cooking zone selection sensor
6a. Double ring LED indicator light
- Child lock sensor with LED indicator light,
- Timer sensor,
- Timer display,
- LED indicator light indicating timer operation for a given cooking zone,
Making the worktop recess
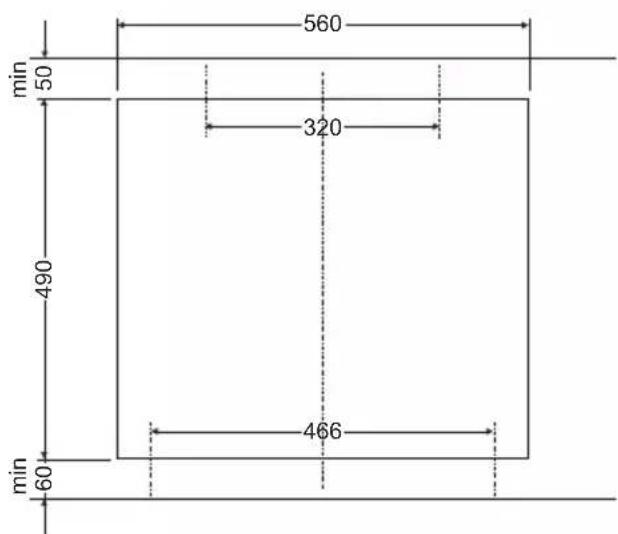
- Worktop thickness should be 28 - 40 mm, while its width at least 600 mm. The worktop must be flat and level. Edge of the worktop near the wall must be sealed to prevent ingress of water or other liquids.
- There should be sufficient spacing around the opening, in particular, at least 50 mm distance to the wall and 60 mm distance to the front edge of worktop.
- The distance between the edge of the opening and the side wall of the furniture should be at least 55 mm.
- Worktop must be made of materials, including veneer and adhesives, resistant to a temperature of 100°C. Otherwise, veneer could come off or surface of the worktop become deformed.
- Edge of the opening should be sealed with suitable materials to prevent ingress of water.
• Worktop opening must cut to dimensions as shown on figure 1. - Ensure minimum clearance of 25 mm below the hob to allow proper air circulation and prevent overheating.
1

(*) 560 mm for hob 600 mm
Note. When installing the hob in the kitchen worktop, install a partition panel, as shown on the picture. If the hob is to be installed above a built-in oven, installation of the partition panel is not required.
If the hob was installed in the kitchen worktop above the drawer, the bottom cover of the hob must be covered with a wooden panel or protective board for ceramic hobs.
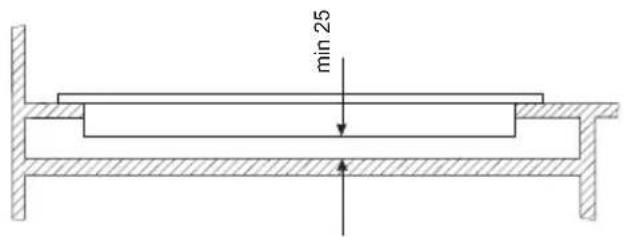
Installing hob in kitchen cabinet worktop.
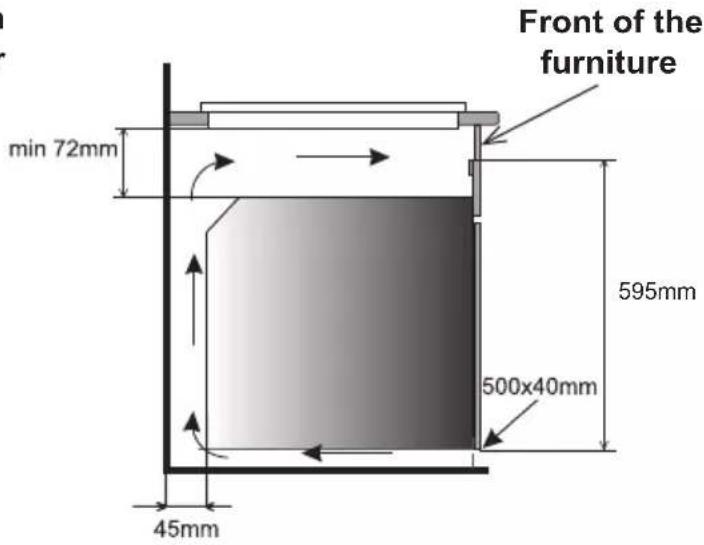
Installing hob in kitchen cabinet worktop above oven.
Do not install the hob above the oven without ventilation.
! Route electrical lead so that it does not touch the lower guard.
Installing hob - bracket*
- Use four “A” brackets for 38 mm thick worktops. Fit the hob into worktop opening as shown on figure2 and 3. To properly secure hob in 28 mm thick worktop, use four 15x15x50 mm wooden blocks in addition to “A” brackets. Fit the hob into worktop opening as shown on figure 4 and 5.
- Check if adhesive seal is properly applied to the hob's flange. Loosely attach fixing brackets to the bottom of the hob
- Remove dust from the worktop, insert hob into the opening and press in firmly,
- Position fixing brackets perpendicularly to the hob's edge and tighten firmly.
②

- worktop
- screw
- fixing bracket
- hob
- seal
4

- worktop
- screw
- fixing bracket
- hob
- seal
- wooden block
③
*On selected models
5

Assembly of the gasket
Depending on the model, the seal is already installed at the factory (fig.1)
If the seal has not been fitted at the factory, proceed as follows:
Before installing the hob in the cut-out worktop, the gasket is to be attached to the back of the hob (pic. 2)
To do this, first peel off the protective film from the self-adhesive seal and glue the gasket as close as possible to the outer edge of the hob (fig. 3,4).


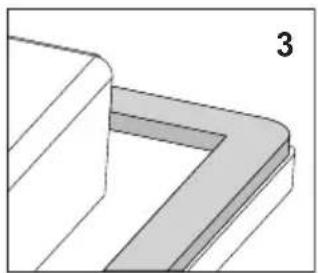


Do not install the appliance without the foam gasket.
Then turn the hob over insert it into the cut-out of the furniture. Align the positioning symmetrically so that the distances between the hob and the countertop is the same on all sides. (fig. 5)

Connecting to electrical system
Warning!
The device can be connected to the electrical system by an authorized electrician only. Do not make any alterations or changes in the electrical system.
Instructions for the installer
The electrical cable must be placed far from direct source of heat. It shall not be exposed to temperatures over 50° C above the ambient temperature.
This device complies with the requirements of the following ECC directives:
2006/95/EC Low voltage directive
2004/108/EC EMC directive
93/68/EEC CE Marking directive
Before connecting the plate to power, read the information provided on the viewer and wiring diagram.
Note
The installer is obliged to provide the user with "Certificate for connecting the plate" (enclosed with the service card). Connection methods other than shown on the above mentioned diagram may damage the ceramic hob.
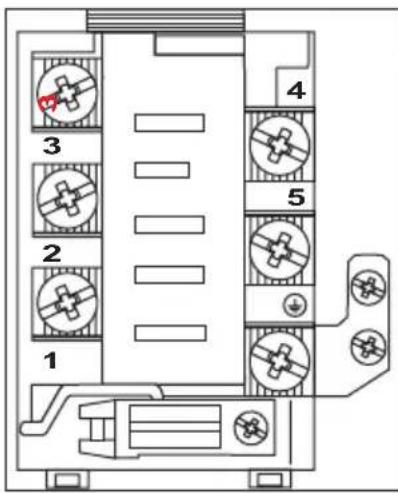
WIRING DIAGRAM
Important! Heating elements operate at 230V
Important! For each connection the protective conductor must be connected to the terminal marked
| 1 | 230 V single phase connection with a neutral lead, terminals 1-2-3 and 4-5 are bridged, protective conductor to [IMAGE] | 1N~ | 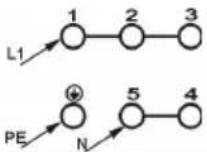 | H05VV-FG 3 × 4 mm2 | ||
| 2 | 400/230 V two phase connection with a neutral lead, terminals 2-3 and 4-5 are bridged, protective conductor to [IMAGE] | 2N~ |  | H05VV-FG 4 × 2,5 mm2 | ||
| 3 | 400/230 V three phase connection with a neutral lead, terminals 4-5 are bridged, individual phases are connected to terminals 1, 2, 3 respectively, neutral lead to bridged terminals 4-5, and the protective conductor to [IMAGE] | 3N~ |  | H05VV-FG 5 × 1,5 mm2 | ||
| 4 | Perilex plug and cord supplied with the product. Terminals 4-5 are bridged. | 3N~ | 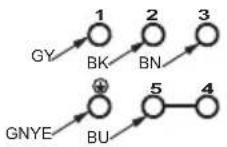 | H05VV-FG 5 × 1,5 mm2 |
Phase conductors - L1=R, L2=S, L3=T, N- neutral lead; protective earth GY- Gray, BK- Black, BN- Brown, BU- Blue, GNYE- Yellow-Green,
Before using the appliance for the first time
- Thoroughly clean your ceramic hob first. The ceramic hob should be treated with the same care as a glass surface.
- Switch on the ventilation in the room or open a window, as the appliance could emit an unpleasant smell during first use.
- Operate the appliance while observing all safety guidelines.
The ceramic hob is equipped with electronic touch control sensor fields, which are operated by touching the marked area with a finger.
Each time a sensor field is touched, an acoustic signal can be heard.
When changing the heat setting, attention should be paid that only one sensor field at a time is touched. When two or more sensor fields are touched at the same time (except when a cooking zone is switched off), the appliance ignores the control signals and may trigger a fault indication if sensor fields are touched for a long time.
Choice of cookware
There is specially tested cookware available for cooking and baking in cookers with ceramic hob. Follow the instructions of their manufacturer.
Cookware with aluminium or copper base can leave stains, which very difficult to remove. Particular caution is advised in the case of enamel-painted cookware, which could cause irreparable damage when contents off accidentally. To achieve optimal energy use, the optimal cooking times and to prevent seething food from getting burned on the hob, please follow these guidelines.
Cookware base:
Cookware should have always a stable, flat base. Base with sharp edges, burrs and the charred remains of food may scratch the ceramic hob!

Cookware size:
Cookware diameter should correspond as closely as possible the diameter of the hob cooking zone.
Cookware lid:
Lid prevents heat from escaping and thus reduces heating time and lowers energy consumption.
Control Panel
When you connect the appliance to power, Child Lock indicator (7) will be on. Touch and hold the Child Lock sensor (7) until the indicator is off. Now you can use the appliance.

No objects should be placed on the sensors (this could cause an error). Touch sensors should be always kept clean.

Switch on the appliance
When the appliance is switched off then all the cooking zones are disconnected and the indicators are off.
Touch the on/off sensor field (1) to turn on the appliance. "0" will appear on all cooking zone displays (3) for 10 seconds. After selecting a desired cooking zone by touching the cooking zone selection sensor field (2) (see "Set the heating power"), now the desired heat setting can be selected using the (+)(5) or (-)(4) sensor fields


If none of the sensors is touched within 10 seconds, the appliance switches itself off.
If child lock function is activated, the appliance cannot be switched on (see "Release the child lock").
Switch on the cooking zone
After switching on the appliance using the on/off sensor field (1) cooking zones can be operated as follows:
- Select the desired cooking zone using the cooking zone selection sensor field (2) (Sensor field layout reflects the layout of individual cooking zones),
- Set the desired heat setting using the (+) (5) or (-)(4) sensor fields,
- To change the heat setting again as described in point 1, select the desired cooking zone using the cooking zone selection sensor field (2), and then set the desired heat setting using the (+)(5) or (-)(4) sensor fields.


If none of the sensor fields is touched within 10 seconds, the cooking zone switches off.
A cooking zone is active when corresponding digit “☐” is blinking. This indicates a cooking zone is ready for the heat setting to be set or changed.
Using double ring cooking zone.
Double ring cooking zone can be activated by touching the (6) sensor field. Operation of the double ring cooking zone is indicated by a red LED indicator light (6a).
To deactivate the double ring cooking zone touch the (6) sensor field again.

Double ring cooking zone can only be activated when the main cooking zone operates.
Set the heating power
In order to set the heat setting, first select the desired cooking zone using the cooking zone selection sensor (2). Then, when the cooking zone display (3) shows “☐start setting the desired heat setting using the (+)(5) or (-)(4) sensor field.
To use the automatic warm-up function set the heat setting of "9" and then touch (+) (5) again, so that "A" is displayed and then use (-)(4) to set the desired heat setting. (see "Automatic warm-up function").

Automatic warm-up function
Each cooking zone is equipped with an automatic warm-up function. When this is activated, then the given cooking zone is switched on at full power for a time depending on the heat setting selected, and is then switched back to the heat setting originally set.
Activate the automatic warm-up function by setting the required heat setting by touching the (-) (4) sensor first. Then the heat setting "9" is displayed intermittently on the cooking zone display (3) with the letter "A" for around 10 seconds.
If you start to select the heat setting within 10 seconds by touching the (-)(4) sensor field, then the automatic warm-up function is activated and the letter "A" is displayed intermittently with the cooking zone's heat setting selected for as long as the function is activated.
The cooking heat setting can be now changed at any moment using the method described above in the "Set the heating power" section".
If you do not start to select the heat setting within 10 seconds, then the letter "A" turns off and the automatic warm-up function is inactive.

If you do not wish the automatic warm-up function to operate, touch (+)(5) sensor to select the heat setting.
Switch off selected cooking zone
Selected cooking zone may be switched off in the following way:
- Select the desired cooking zone using the cooking zone selection sensor field (2).
- Then simultaneously touch (+)(5) and (-)(4) or use (-)(4) sensor field to lower the setting to "0".
The letter "H" appears on the display symbolising residual heat.

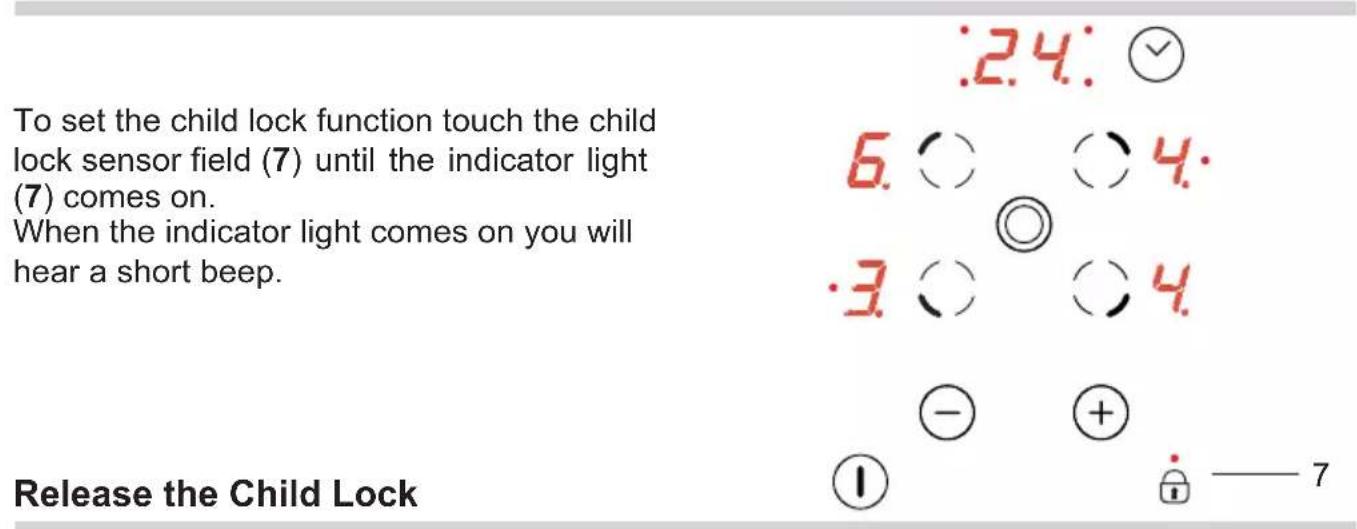
The child lock function, which is activated by touching the child lock sensor (7) protects the appliance from being unintentionally operated or switched on by children or pets.
Setting the child lock function when all cooking zones are switched off ("0" is displayed on all cooking zone displays) or when the hob is turned off, protects the hob from inadvertent operation. You can operate the appliance once the child lock function is released.
During a power outage or when the appliance is disconnected from power, the child lock function is automatically activated.
Set the child lock
To release the child lock function touch the child lock sensor field (7) until the indicator light (7) goes out. When the indicator light goes out you will hear a short beep.
The residual heat indicator
Once a hot cooking zone is switched off, "H" is displayed on the relevant cooking zone display to warn that the "cooking zone is still hot!"

Do not touch the cooking zone at this time owing to the risk of burns from residual heat, and do not place on it any objects sensitive to heat!
When the residual heat indicator goes out, cooking zone can be touched, however keep in mind that it may still be warmer than ambient temperature.


The "H" residual heat indicator is not displayed during a power outage. However, cooking zones may still be hot!
Limit the operating time
In order to increase efficiency, the hob is fitted with a operating time limiter for each of the cooking zones. The maximum operating time is set according to the last heat setting selected.
If you do not change the heat setting for a long time (see table) then the associated cooking zone is automatically switched off and the residual heat indicator is activated. However, you can switch on and operate individual cooking zones at any time in accordance with the operating instructions.
| Cooking heat setting | Maximum operating time (hours) |
| 1 | 10 |
| 2 | 5 |
| 3 5 | |
| 4 | 4 |
| 5 3 | |
| 6 | 2 |
| 7 | 2 |
| 8 | 2 |
| 9 | 1 |
Timer
If the appliance is equipped with a timer marked with T^* , it can be used to set the operating time of any cooking zone. First touch (2) to select the desired cooking
zone and then touch Timer sensor (8) hen, while the indicator light (10) is flashing touch (+)(5) or (-)(4) sensor fields to set the desired operating time for the selected cooking zone. Timer will only start counting down when timer display (9) shows a value higher than zero.


When the set time has elapsed, a brief acoustic signal is sounded repeatedly. The relevant cooking zone display (3) will show "0" indicating the zone is switched off and timer display (9) will show "00".
To change the heat setting of a cooking zone with an activated timer, select the desired cooking zone using the cooking zone selection sensor field (2) and then set the desired heat setting using (+)(5) or (-)(4) sensor fields.
Turn off the appliance
The appliance operates when at least one cooking zone is on. Pressing the on/off sensor field (1) switches off the appliance, and the letter ("H") for residual heat appears on the cooking zone display 3.
*On selected models
CLEANING AND ROUTINE MAINTENANCE
Daily cleaning and proper maintenance have crucial impact on the durability of your ceramic plate.

Clean the ceramic plate observing the same rules as for glass. Never use abrasive or aggressive cleaning agents, scrubbing powders or scratching sponges.

Cleaning the plate after every use
- Wipe off slight, not-burnt patches of dirt using damp cloth without cleaning agent. Washing liquid can cause blue di sco lo ra tion to appear on the plate. The stub born stains often cannot be re mo-ved after first cleaning, even if special cleaning agents are used.
- Remove larger patches of dirt, strongly sticking to the plate using sharp scrap per and wipe off the sur face with a damp cloth.
Removal of stains
- Light pearly stains (aluminium re si du-es) can be removed from cooled plate using special cleaning agents. Cal ca-reousresidues(i.e.boiledoverwater) can be re mo ved with vinegar or spe cial cleaningagents.
- Do not switch off the hotplate when re moving sugar, sugar-containing food, plastic or aluminium foil! Immediately scrape off the residuals (when still hot) from the hotplate using a sharp scrap per. When the dirt is removed you can switch off the plate and clean it again after cooling down using special cleaning agents.

Cleaning scraper
Special cleaning agents can be bought in supermarkets, special electromechanical shops, drugstores and shops with kitchen appliances. Sharp scrappers can be bought in DIY shops, shops with building tools and painting accessories.
Never apply cleaning agent on a hot hotplate. Leave the cleaning agent to dry and then wipe it off with a wet cloth. Any residuals of cleaning agents should be wiped off with a damp cloth before heating the plate for the next time, as otherwise they can have caustic effect.
Failure to observe the ceramic plate maintenance instructions can result in losing your warranty rights!
Caution!
If from any reason you are not able to control the switched on plate, switch off the main switch or screw out the fuse and call the Customer Service.
Caution!
Should cracks or splits appear on the surface of your ceramic plate, immediately disconnect the plate from the mains (by switching off the fuse or unplugging the plug) and call the Customer Service.
Periodic inspections
In addition to current maintenance and care, the following shall be arranged for:
- Periodic inspections of control elements and units of the cooktop. Upon expiration of the warranty, service department shall be ordered technical inspections of the appliance at least once every two years.
- All operation faults must be repaired.
- Cooktop units shall be maintained according to the maintenance schedule.
Note!
Installation work and repairs should only be performed by a service department or a qualified technician in accordance with all applicable codes and standards.
Every time when emergency situation occurs you should:
- switch off the working assemblies of the plate
- disconnect power supply
- call in the service
- as some minor faults can be removed by the user in accordance with the be low specified instructions, before calling the Customer Service please go through the Table checking every point.
| PROBLEM CAUSE ACTION | ||
| 1.The appliance is not working | -power supply failure -check | the in-house electric sys tem fuse, replace if necessary |
| 2. The appliance does not respond to the entered settings | -control panel has not been switched on | -switch it on |
| -sensors have been to uched for less than one se cond | -touch the sensors for a bit longer | |
| -several sensors have been to uched at the same time | -always touch only one sen-sor (except when switching off a hotplate) | |
| 3.The appliance does not re spond and emits a short signal | - children lock has been activated | -switch off the children lock |
| 4.The appliance does not respond and emits a long signal | -improperoperation(improper sen sors have been to uched or pro per sensors have been touched for too short time | - again activate the plate |
| -covered or dirty sensor (sensors) | -uncover or clean the sen sors | |
| 5.The whole appliance switches off | -no settings have been en-te red within 10 seconds from swit ching the plate on | - again switch on the control panel and immediately enter the settings |
| -covered or dirty sensor (sensors) | -uncover or clean the sen-sors | |
| 6. One heating zone switches off, and "H" is on the display. | -limited time of operation | - again switch on the hot pla te |
| -covered or dirty sensor (sensors) | -uncover or clean the sen-sors | |
| 7.Residual temperature in di-ca tor is not lighted although the hot pla tes are still hot | - power supply fa ilu re, the appliancehasbeendiscon-nec ted from the mains | e-the residual temperature in-di ca tor will work again after swit ching the control panel on and off. |
| 8. Crack in the ceramic plate | Danger! Immediately disconnect the ceramic plate  from the mains (fuse) and call the nearest Cus-tomer Service Centre. from the mains (fuse) and call the nearest Cus-tomer Service Centre. | |
| 9. If the fault still remains Dis | connect the ceramic plate from the mains (fuse) and call the nearest Customer Service Centre. Important!You are the person responsible for proper condition and operation of the appliance in your household. If you call the Service for a fault which resulted from improper operation, you will be charged with the costs of the visit even during the period of warranty. We shall not be held liable for damages caused by a failure to observe this Manual. | |
Rated voltage: 230/400V 3N\~50 Hz
Model: IH6210RF
Rated power: 6,3 kW
- hotplate: 2 x ∅ 145 mm 1,2 W
- hotplate: 1 x ∅ 180/120 mm 1,7 W
- hotplate: 1 x ∅ 210/120 mm 2,2 W
Dimensions: 592 x 522 x 48;
Weight: ca. 8,1 kg;
Service
Vi har service i hela Sverige / Nationwide service in Sweden
Besök www.cylinda.se / Visit www.cylinda.se
Ring 0771-25 25 00 (endast lokaltaxa) / Call 0771-25 25 00
Uppge / Declare
Maskintyp / Model code
Serienummer / Serial number
Inköpsdatum / Purchase date
Problembeskrivning / Problem description


- INKOPPLING TILL ELSYSTEM
- VARNING
- KOKGRYTANS STORLEK
- CAUTION
- TABLE OF CONTENTS
- SAFETY INSTRUCTIONS
- USING PROPER COOKWARE
- MATCHING COOKWARE TO THE SIZE OF THE HOTPLATE
- MAINTAINING HOTPLATES AND POT BOTTOMS CLEAN
- AVOIDING NECESSARY “PEEPING INTO POTS
- NOT USING THE PLATE NEAR REFRIGERATORS / FREEZERS
- DISPOSING OF THE DE VICE
- DESCRIPTION OF HOB
- CONTROL PANEL
- MAKING THE WORKTOP RECESS
- INSTALLING HOB - BRACKET
- ASSEMBLY OF THE GASKET
- DO NOT INSTALL THE APPLIANCE WITHOUT THE FOAM GASKET
- CONNECTING TO ELECTRICAL SYSTEM
- WARNING
- INSTRUCTIONS FOR THE INSTALLER
- NOTE
- WIRING DIAGRAM
- BEFORE USING THE APPLIANCE FOR THE FIRST TIME
- CHOICE OF COOKWARE
- COOKWARE BASE
- COOKWARE SIZE
- COOKWARE LID
- SWITCH ON THE APPLIANCE
- SWITCH ON THE COOKING ZONE
- USING DOUBLE RING COOKING ZONE
- SET THE HEATING POWER
- AUTOMATIC WARM-UP FUNCTION
- SWITCH OFF SELECTED COOKING ZONE
- SET THE CHILD LOCK
- THE RESIDUAL HEAT INDICATOR
- LIMIT THE OPERATING TIME
- TIMER
- TURN OFF THE APPLIANCE
- CLEANING AND ROUTINE MAINTENANCE
- CLEANING THE PLATE AFTER EVERY USE
- REMOVAL OF STAINS
- PERIODIC INSPECTIONS
- SERVICE
- UPPGE / DECLARE
Brand : Cylinda
Model : IH6210RF
Category : Oven