
CLG64SPN - Hob CANDY - Free user manual and instructions
Find the device manual for free CLG64SPN CANDY in PDF.
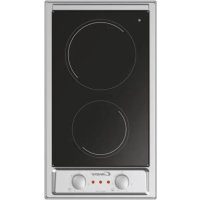
| Product type | Gas and electric hob |
| Brand | CANDY |
| Model | CLG64SPN |
| Dimensions (W x D) | 585 x 510 mm |
| Total gas power | 7.1 kW |
| Electric power | 1500 W |
| Power supply | 220-240 V / 50-60 Hz |
| Gas type | G20 (methane) or G30 (butane/propane) depending on adjustment |
| Gas burners | 1 auxiliary (Ø 50 mm), 2 semi-rapid (Ø 75 mm), 1 rapid (Ø 100 mm) |
| Electric plate | 1 plancha approx. 14 cm diameter (1500 W) |
| Gas safety | Safety thermocouple (automatic shut-off in case of flame extinction) |
| Ignition | Integrated electronic (spark) |
| Installation class | 3 |
| Maintenance and cleaning | Clean with soapy water or non-corrosive detergent. Do not use steam cleaners, abrasive or acidic products. Dry after cleaning. |
| Main spare parts | Injectors for different gas types, seals, fixing brackets, control knobs |
| Repairability | Intervention by a qualified technician for cable replacement, injectors, or lubrication of taps |
| General information | Domestic use only. Complies with WEEE and safety directives. Approximate weight: 12 kg. |
Frequently Asked Questions - CLG64SPN CANDY
User questions about CLG64SPN CANDY
0 question about this device. Answer the ones you know or ask your own.
Ask a new question about this device
Download the instructions for your Hob in PDF format for free! Find your manual CLG64SPN - CANDY and take your electronic device back in hand. On this page are published all the documents necessary for the use of your device. CLG64SPN by CANDY.
USER MANUAL CLG64SPN CANDY
BAPOUHbIE IOBEPXHOCTN
HCHTPYKlIy IOnb3OBATEJI R
NAVODILA ZA UPORABO
VGRADNJO IN PRIKLJUČITEV SL
PIANI COTTURA
ISTRUZIONI PER L'USO IT
PLACAS
INSTRUÇÉS DE UTILIZAZão PT
TÜZHELYLAPOK
- Instructions For The Installer 05
1.1. Building In .05
1.2. Suitable Location 05 - Electrical Connection (For U.K. Only) .05
2.1. Electrical Connection .05
2.2. Gas Connection (For U.K. Only) 05
2.3. Adapting The Hob To Different Types Of Gas 06
2.4.Regulating The Minimum Flame. 06
3.Use Of Hob-User Instructions .06
3.1. Using The Gas Burner 06
3.2.Use Of Cooktop Electrical Plates .06 - Maintenance and Cleaning .07
- Aftercare 07
- Protection Of The Environment 07
OBSAH
CZ
The hob may be installed in any worktop which is heat resistant to a temperature of 100^ , and has a thickness of 25-45 mm. The dimensions of the insert to be cut out of the worktop are in shown in Figure 2.
If the Hob is fitted next to a cabinet on either side, the distance between the Hob and the cabinet must be at least 15 cm (see Figure 4); while the distance between the hob and the rear wall must be at least 5,5 cm.
The distance between the hob and any other unit or appliance above it (e.g. An extractor hood) must be no less than 70 cm (Figure 4).
When there is an accessible space between the built-in hob and the cavity below, a dividing wall made of insulating material should be inserted (wood or a similar material) (Figure 3).
Important - The diagram in figure 1 shows how the sealant should be applied.
The Hob unit is fitted by attaching the Fixing Clamps supplied, using the holes at the base of the unit.
If a hob of 60~cm is fitted above an oven which is not equipped with fan cooling system it is recommended that openings are created within the built in furniture to ensure correct air circulation.
The size of these openings must be at least 300cm^2 and placed as shown in Figure 5.
1.2. SUITABLE LOCATION
This appliance must be installed in accordance with applicable regulations and should only be used in well-ventilated locations. Before using this appliance carefully study the instruction book.
2. ELECTRICAL CONNECTION (FOR U.K. ONLY)
Warning - this appliance must be earthed
This appliance is designed for domestic use only. Connection to the main supply must be made by a competent electrician, ensuring that all current regulations concerning such installations are observed.
The appliance must only be connected to a suitably rated spur point, a 3 pin 13 amp plug/socket is not suitable. A double pole switch must be provided and the circuit must have appropriate fuse protection. Further details of the power requirement of the individual product will be found in the users' instruction and on the appliance rating plate. In the case of built-in product you are advised, should you wish to use a longer cable than the one supplied, that a suitably rated heat resistant type must be used.
The wiring must be connected to the mains supply as follows:
CONNECT
Green & Yellow Wire
Blue Wire
Brown Wire
TO SPUR TERMINAL
Earth Connection
Neutral Connection
Live Connection
Note: We do not advocate the use of earth leakage devices with electric cooking appliances installed to spur points because of the «nuisance tripping» which may occur. You are again reminded that the appliance must be correctly earthed, the manufacturer declines any responsibility for any event occurring as a result of incorrect electrical installation.
2.1. ELECTRICAL CONNECTION
Check the data on the rating plate, located on the outside of the unit, to ensure that the supply and input voltage are suitable.
Before connection, check the earthing system.
By Law, this appliance must be earthed. If this regulation is not complied with, the Manufacturer will not be responsible for any damage caused to persons or property. If a plug is not already attached, fit a plug appropriate to the load indicated on the rating plate.
The earth wire is coloured yellow/green. The plug should always be accessible.
Where the Hob is connected direct to the electricity supply, a circuit breaker must be fitted.
If the power supply cord is damaged this is to be replaced by a qualified engineer so as to prevent any potential risk.
The earth wire ( green and yellow coloured ) must be at least 10 mm longer than the live and neutral wires.
The section of the cable used must be of the correct size in relation to the absorbed power of the hob.
Please check rating plate for the power details and ensure that the power supply cord is of the type H05RR-F, H05VV-F, H05V2V2-F.

2.2. GAS CONNECTION
These instructions are for qualified personnel, installation of equipment must be in line with the relevant national standard. (For U.K. only: by law the gas installation\commissioning must be carried out by a "Gas Safe" installer)
All work must be carried out with the electricity supply disconnected.
The rating plate on the hob shows the type of gas with which it is designed to be used. Connection to the mains gas supply or gas cylinder should be carried out after having checked that it is regulated for the type of gas with which it will be supplied. If it is not correctly regulated see the instructions in the following paragraphs to change gas setting
For liquid gas (cylinder gas) use pressure regulators which comply with the relevant national standards.
Use only pipes, washers and sealing washers which comply with the relevant national standards.
For some models a conic link is furnished to outfit for the installation in the countries where this type of link is obligatory; in picture 8 it is pointed out how to recognize the different types of links (CY = cylindrical, CO = conic). In every case the cylindrical part of the link has to be connected to the hob.
When connecting the hob to the gas supply via use offlexible hoses please ensure that the maximum distance covered by the hose does not exceed 2 metres.
To prevent any potential damage to the hob please carry out the installation following this sequence (picture 6):
1)As illustrated, assemble parts in sequence:
A: 1/2 Male Adaptor Cylindrical
B:1/2 Seal
C: 1/2 Female Gas Adaptor Conical-Cylindrical or
Cylindrical-Cylindrical
2) Tighten the joints with the spanner, remembering to twist the pipes into position.
3)Attach fitting C to mains gas supply using rigid copper pipe or flexible steel pipe.
IMPORTANT: carry out a final check for leaks on the pipe connections using a soapy solution. NEVER USE A FLAME. Also, make sure that the flexible pipe cannot come into contact with a moving part of the cabinet (eg.adrawer) and that it is not situated where it could be damaged.
Warning: If gas can be smelt in the vicinity of this appliance turn off the gas supply to the appliance and call the engineer directly. Do not search for a leak with a naked flame.
2.3. ADAPTING THE HOB TO DIFFERENT TYPES OF GAS
To adapt the Hob for use with different types of gas, carry out the following instructions:
-
remove the grids and burners
-
insert on hexagonal spanner (7 mm) into the burner support (Figure 7)
-
Unscrew the injector and replace it with one suitable for the gas to be used (see gas type table)
2.4. REGULATING THE MINIMUM FLAME
After lighting the burners, turn the control knob to the minimum setting and then remove the knob (this can easily be removed by applying gentle pressure).
Using a small «Terminal» type screwdriver the regulating screw can be adjusted as in Figure 9. Turning the screw clockwise reduces the gas flow, whilst turning it anticlockwise increases the flow – Use this adjustment to obtain a flame of approximately 3 to 4 mm in length and then replace the control knob.
When the gas supply available is LPG - the screw to set the idle flame must be turned (clockwise) to the end stop.
When you have carried out the new gas regulation, replace the old gas rating plate on your appliance with one (supplied with hob) suitable for the type of gas for which it has been regulated.
3. USE OF HOB - USER INSTRUCTIONS
This appliance must only be used for the purpose for which it is intended, domestic cooking, and any other use will be considered improper and could therefore be dangerous. The Manufacturer will not be responsible for any damage or loss resulting from improper use.
This appliance is not intended for use by persons (including children) with reduced physical, sensory or mental capabilities, or lack of experience and knowledge, unless they have been given supervision or instruction concerning use of the appliance by a person responsible for their safety.
Children should be supervised to ensure that they do not play with the appliance.
To ignite the burners, place a lighted taper close to the burner, press in and turn the control knob anti-clockwise.
If the burners have not been used for a couple of days, wait for a few seconds before lighting the burner, this will allow any air present in the pipes to escape.
For appliances fitted with electronic ignition carry out the following:
-
push in and turn the knob anticlockwise to the ignition symbol.
-
ignite the burner by pressing the sparker button.
For hobs fitted with automatic ignition simply push in and turn the knob to the ignition symbol.
The ignition system will continue to generate sparks as long as the control knob is being pressed.
If the burner has not ignited within 5 seconds, turn the knob to the 0 position and repeat the operation.
For models fitted with a safety tap (which cuts-off the flow of gas if the flame is accidentally extinguished) the burners are ignited and described above, but care must be taken.
Prior to switching on the gas hob ensure that the burners and burner caps are correctly placed within their position.
GENERAL ADVISE
For best results, use cooking vessels with a flat surface. The size of the surface should match the gas burner side as follows. Table A.
Table A
| Burner Type | Ø pan / pot (cm) | |
| AUX | Auxiliary Burner | 12 - 18 |
| SR | Semi Rapid Burner | 18 - 24 |
| R | Rapid Burner | 24 - 26 |
For smaller containers the gas burner should be regulated so that the flame does not overlap the base of the pan. Vessels with a concave or convex base should not be used.
WARNING: If a flame is accidentally extinguished, turn the knob to the off position and do not attempt to re-ignite if for at least 1 minute.
If over the years the gas taps become stiff to turn it is necessary to lubricate them.
Such operation must be carried out only by qualified Service Engineers.
3.2. USE OF COOKTOP ELECTRICAL PLATES
Turn the knob to the position for the required temperature of the hot plate. The indicator light of the hot plate will come on and the hot plate will start to heat.
When cooking is completed, turn the knob to the "O" position. (Figure 10). Do not leave the hot plate turned on without a pan on it. The diameter and the base of the pan you use is critical. The maximum diameter of the pan base is 14cm and the base should be flat.
Leave the hot plate to heat up for 5 minutes before placing a pan on it the first time you use it. This will allow the heat resistant coating of the plate to harden due to burning.
Use a wet cloth and detergent for cleaning the hot plates. Do not remove food residues from the hot plates with a knife or any other hard, sharp object.
Turn on the hot plate for a few moments to dry it after cleaning. However, it must never be left on for more than a few moments without a pan on top.
| Position | Power (Watt) | Power (Watt) | Explanation |
| 0 | 0 | 0 | Off |
| 1 | 100 W | 135 W | Heating |
| 2 | 180 W | 220 W | Cooking at low temperature |
| 3 | 250 W | 300 W | Cooking at low temperature |
| 4 | 500 W | 850 W | Cooking, Roasting, Boiling |
| 5 | 750 W | 1150 W | Cooking, Roasting, Boiling |
| 6 | 1000 W | 1500 W | Cooking, Roasting, Boiling |
Suitability of Cooking Pans (Figure 11)
Keep in mind that larger pans have larger heating surfaces.
This will help them to cook the food faster than pans with smaller heating surfaces.
Always use pan sizes proportionate to the amount of the food to be cooked. In order to prevent splashing, do not use very small pans, especially for foods with excess liquid. If you use excessively large pans for quick cooked foods, sausages and liquids will stick and residues will remain attached to the pan after being emptied.
Closed pans and baking trays or moulds are suggested for cooking sweets. Splashed sugar and juices from an open pan may stick to the cooker surface and will be difficult to remove.
This is especially important for pans used for roasting or pressurized cooking at high temperature.
Do not leave burners unattended without a pan or with an empty pan on top.
Check the suitability of cooking pans with respect to the following criteria;
They should be heavy.
They should completely cover the burner surface; they may be a little bigger but no smaller.
Base surfaces should be completely flat and fit well on the cooking surface.
- For the best use of the electric hotplates and to minimize energy consumption, only pans with smooth flat bases should be used. The size of the pan should be as close as possible to the diameter of the hotplate, and never smaller. The base of the pan should be dry and spillage should be avoided. Empty pans must not be left on the plates, and the plates should not be left switched on without a pan.
4. MAINTENANCE AND CLEANING
Before cleaning the hob, ensure the appliance has cooled down. Remove the plug from the socket or (if connected directly) switch off the electricity supply.
Never use abrasives, corrosive detergents, bleaching agents or acids. Avoid any acid or alkaline substances (lemon, juice, vinegar etc.) on the enamelled, varnished or stainless steel sections.
"WARNING" - Do not use a steam cleaner to clean the hob.
When cleaning the enamelled, varnished or chrome sections, use warm soapy water or a non caustic detergent. For stainless steel use an appropriate cleaning solution.
The burners can be cleaned with soapy water. To restore their original shine, use a household stainless steel cleaner. After cleaning, dry the burners and replace.
It is important the Burners are replaced correctly.
5. AFTERCARE
Before calling out a Service Engineer please check the following:
- that the plug is correctly inserted and fused;
- that the gas supply is not faulty.
If the fault cannot be detected:
Switch off the appliance and call the After Service Centre. DO NOT TAMPER WITH THE APPLIANCE.
6. PROTECTION OF THE ENVIRONMENT
This appliance is marked according to the European directive 2002/96/EC on Waste Electrical and Electronic Equipment (WEEE).
By ensuring this product is disposed of correctly, you will help prevent potential negative consequences for the environment and human health, which could otherwise be caused by inappropriate waste handling of this product.
The symbol on the product indicates that this product may not be treated as household waste. Instead it shall be handed over to the applicable collection point for the recycling of electrical and electronic equipment.
Disposal must be carried out in accordance with local environmental regulations for waste disposal.
For more detailed information about treatment, recovery and recycling of this product, please contact your local city office, your household waste disposal service or the shop where you purchased the product.
Declaration of compliance: This equipment, in the parts intended to come into contact with food, complies with the regulations laid down in EEC directives 89/109.
CE Appliance complies with European Directives 73/23/EEC and 89/336/EEC, replaced by 2006/95/EC and 2004/108/EC, and subsequent amendments.
The Manufacturer will not be responsible for any inaccuracy resulting from printing or transcript errors contained in this brochure. We reserve the right to carry out modifications to products as required, including the interests of consumption, without prejudice to the characteristics relating to safety or function.
Table 1
| BUILT IN HOBS | ||
| Burner | 1 | 2 |
| 4 gas R /2SR / AUX | 3 gas R / SR / AUX / E | |
| Type / reference | S60 / HBGS | S60 / HBGS |
| Flame failure device | YES | YES |
| Auxiliary burner (AUX Ø 50 mm) | 1 | 1 |
| Electric Plate | - | 1 |
| Semirapid burner (SR Ø 75 mm) | 2 | 1 |
| Rapid burner (R Ø 100 mm) | 1 | 1 |
| Installed Gas Type / Power: | ||
| Gas Power | 7.1 kW | 5.4 kW |
| G 20/20 mbar (methane) | 676 l/h | 514 l/h |
| G 30/28-30 mbar (LPG) | 516 g/h | 393 g/h |
| Installation Class | 3 | 3 |
| Voltage / Frequency V / Hz | 220-240 V / 50-60 Hz | 220-240 V / 50-60 Hz |
| Electrical input power | 15 W | 1500 W |
| Electric ignition | YES | YES |
| Product dimension | 585 x 510 | 585 x 510 |
This appliance has been designed for non-professional, i.e. domestic, use.
LAMISEENPLACEFONCTIONNELLEDESAPPAREILSMÉNAGERSDANSLEURENVINRONNEMENTESTUNEOPÉRATIONDÉLICATEQUI,SIELLE N'ESTPASCORRECTEMENTEFFECTUEE,PEUTAVOIR DEGRAVESCONSEQUENCESSURLASECURITÉDESCONSOMMATEURS.DANSCES CONDITIONS,IL EST IMPERATIF DE CONFIER CETTE TACHE À UN PROFESSIONNEL qui LA RÉALISERA CONFORMÉMENT AUX NORMES TECHNIQUES EN VIGUEUR.SIMALGRÉ CÉTTE RECOMMANDATION,LE CONSOMMATEUR RÉALISAIT LUI-MÈME L'INSTALLATION,LE CONSTRUCTEUR DÉCLINERAIT TOUTE RESPONSABILITÉ EN CAS DE DÉFAILLANCE TECHNIQUE DU PRODUIT ENTRAINANT OU NON DES DOMMAGESAUXBIENSET/OUAUXPERSONNES.
1.1. ENCASTREMENT
EcnB BapouHna NOBepXHOCTb NOKJIIOUaTcK 3NeKTPoCeTn HAnpMyI,TO DOnJIKeH 6bITb YCTaHOBJHEABOTOMATNUeCKN BbIKHOuAteJIb.
Длп р dedOTbpaueHnnaOanchoTei 3aMeHa NOBpeXdeHOrO Ka6eI NaTAnHn DOLJHNa BByIOJIHrTaC8 TOnbKO KBaIIINΦuIPoBaHbIM CneUNaJIcTOM.
PpOBoD 3a3eMJIeHnIy (XeJITo-3eJIeHbI) DoJIxKeH 6blT bpN6IIN3ntEJIbHO Ha 10 MM dIIHHee ppoBOJOB faa3bl HneITpaII.
Ceyehne npoBODHnKOB Ka6eI NITaHIN D0JXHO COOTBETCTByET MOUHOCTN, nOTpeBJeMoB BApOCHN IOBepxHOCTbIO.
Bce pa60tbI dOJXHb I BInOJIHrTbC cOTcOeINHeHHbIM 3NeKtpOnITaHnEM.
B 3akpenenHHoHa BapOHOH NOBepxHOCTn NacnpTHO TabnueKye yka3aH TIN ra3a, Ha KOTOPOM DOnkHa pa6Otatb BapOuHaa NOBepxHOCTb. Ipepe nIOkIIOeHmE BapOHOH NOBepxHOCTK JIMHN RaOChA6KeHn IIn K RA3OBOMy 6aJIIOHy Heo6XODIMO npOBepNTb, YTO BApOuaHaa NOBepxHOCTb OTperynipoBaHa Ha ToT TnI r3a, KOTOpbI bSyTe B Hee NpOdaTbcS. Ecnn BApOuaHaa NOBepxHOCTb He OTperynipoBaHa Ha HJXhBn TIN ra3a, OpaTnTEcb K INCHtpyKzIaM, PnVBeDeHHbIM B NocJeDyUoIux Naparpaqax, rge OnilcaHo, KA kN3MeHnTb perynipOBkM.
Ppna paobote Ha cKxkeHHom ra3e (ra3 B 6aIIOHe) cIeJyET nonb3OBAtbc8 peryIaTOpOM daBJeHnI, OTBeHaIoIero Tpe6oBaHnI M hauNoHaJIbHbIX CTaNdApTOB.
Tpy6b, 7aai6b y npnOHTeINbHbIe npokn DOJXHb COOTBeCTBOBaT b TpeoBaHm HauIOHaBbIX CTaHdpTOB.
HekotopbIe moJIn nocTabJIaTcTc c KOJIeHOM (nepexoHNKOM), IMeIOUIM KOHueckyo pe3b6y. B HeKOTOpbIX cTpaHax IcNOnb3ObaHnE TaKnx nepexoDNKOB JABLIeTcO 6B3aTeNbHbIM. Ha pnc.8 noka3aHO, KaK OTNIuHTb nepeoDnIK C zUNIHDPnuECKo pe3b60n ot nepexoDnHaC KOnHuecko pe3b60i CY =zUNIHDPnuEckA, CO = KOHueckA). B IIO6om Cnyuae ZUNIHDPnuEcka pe3b6a DOJXHa 6bITb
B liobom cnyae, KOHeu nepexoDnHa c ZunHndpuYecko pe3b6oIdoJxeh IOdoCoEduHrTbcra K BapOchno NobePxoHCTN.
Ecni NIOKJIIOHHe BAPOHOI NOBEPXHOCTN K IINHH RA3OCHA6JEHN OCyUeCTBIAETC NOMOHTBO H6KO TShaHRA, pOBepbTe, UTO DNHa H6KOHO ShaHaTne HpeBbIaeaT 2 M.
YtobHe NoBpeDnTb BapOChHyo NOBepXHocTb, BblOnJIHnTe ee yctaHOky, KaK OINcAHO (cm. pnc. 6).
1)ПодсоeинHTeДeТAN,КakпokаЗанHa pИсунke:
A)Переконксаружноцлиндрочьpeьбо1/2dioMa
B)Прokладka 1/2юма
C) Fa3OBbI nepeXoDnK C BHyTpEnHne pe3b601 1/2 IIOMa, KOHNuecka IINHDPNUeCKa,IIN ZUNIHDPNUeCKa IINHDPNUeCKa.
2) 3aTaNHe CoeINHeHne c NOMOsbI raeHbIX KInoueI. IpeE TEM KAK 3aTaNt b CoeINHeHne yCTaHOBnTe Tpy6bl H NyXHoe NOLOKeHne.
3)ПодсоeДиНTe KОлно CКЛINин ПОаду RA3a C NOMOьIO JxecTKoI MeДнOH Tpy6bl ИлгбкОТаJIbHOr Tpy6bl.
BAXHOE 3AMEUAHNE: Nocne noDcoeHHe BApOuHn NOBepXHOCTN Knnn ra3oCha6xHn npOBepTe Ha OTCyTCTBue yTeueK ra3a BCE Tpy6bHe coeHHe n cNoMoCbIbMbIbHoro paCTbOpa. HNKOrDA HE IcNOJb3YITE IJI pOBEPKn YTEYEK rA3A IINAMr. IpOBepTe TaKke, YTO rRbKm ShaHaR He conpHKacaetc C DBrKyuMncs qactMa KxOHnHO Me6eHN (HaNPmEp, BblDbHXHO aMn) n He npOXoDNT B TaKOM MeCe, rDe OH MoKeT 6bIT NobpeXdH.
IpeynpexdeHne: Ecnn B6n3n Bapouhno nobepxhoCTn bbl noyBCTByeTe 3anax r3a, nepekoite npaulyra3a na Bapouhyo nobepxhoCTb N bbl3OBITE cneuaJIncTa. He nuiTE MeCTo yTeKn ra3a C NOMOJbO ktpbIToro pIameHn.
2.3.AДАПТАЦЯ BAPOЧНО ПОВЕРХHOCTNHA ДPyгпЕ TИПь I A3A
Дяаадantaци варочиоворхонсдяразбогьсдугим ra3amBbINOJIHNTe ONICAHHbIe HIXe INHCTpyKUIN:
CHIMMTEpeWETKN KOHOPKIN
BCTaBbTe WcETnrgpAHbIKJIOU(7MM)BOCHOBAHNE KOHΦOPKN(puC.7)
- BbIeRnHte fOpcyHky u 3aMeHnte ee fOpCyHko, COOTBeTCTByIOue TOMy TIny ra3a, KOtOpBiy 6ydt NcNoJb3ObaTbcra (cm. ma6nuy munoe 2a3a).
2.4. PEGYUNPOBKA MHHIMAJbHOrO PJIAMEH
Iocne 3axnraHnKoHOpKn yctaHOBnTe pykny perynlTopa BbICOTbl pIamEn H NIOXKeHHe, COOTBeCTByOuEe MHNImaJIbHOMy PJIaMeHn, a 3aTeM CHmInTe pykny perynlTopa, npINoxKnB He6oNbUoe ycInne.
Perynipobka MInHmAlbHoro IIaMaEHn BbIOnHReTcC NOMOuBbU BNHTa maneHkoN TBepKu, KaK NOKa3aHO Ha puc. 9. NOBopOT BnHTa No Yacoboi CTpeJIke yMeHbShaet NOTOK r3a, a NOBopOT BnHTa npOTNB Yacoboi CTpeKNyBeINuBaET NOTOK r3a. C NOMOuTo h Toi peYunOpBKn IONyUte IpMa BbICOTOn 3-4 MM, a 3aTeM yCTaHOBnTe Ha MeTO pykU perynlTopa.
Ecnn nCnoJIb3yeTc CxKxJehHb HneftaHoi Ra3 (CHΓ), NOBepHnte BnHT do ynpa no YacobOy cTpeIke.
Iocne BbInonHeHnpeRyHnpOBOK dJa aAdanTaunn BapOHyOn NOBepxHOCTn Ha Dpyro TnT ra3a 3aMeHNte CTapyo TabNuyK, 3aKpEnJHnyHO Ha BAPOHyON NOBepxHOCTn, B KOTOpO yKa3aH TnT ra3a, H a HOby (NoCTabJIeTcB KOMnIeKeTc C BAPOHyON NOBepxHOCTbO), B KOTOpO yKa3aH TnT ra3a, Ha KOTOpB I nepeBeDeHa BapOUny NOBepxHOCTb.
3. INHCTPYKUINIPO 3KCNJYATAUINBAPOUHOI NOBEPXHOCTN
DAnHbI 3NeKtpOnpB6Op npEHa3HaueH ToNbKO IaI NcNoJb3OBAHnI NO erO npRmOMy Ha3HaueHnIO, To eCTb, IJIa PnIROTOBHe HnIu B Domaunx YcNoBnx. JIo6oe Dpyroe PnpMeHeHne BapOHOI NOBepXHOCTn CHTaETcHnPaBnHBiM, I NoTOMy MoKet 6blb ONaCHbIM. Ipn3BOJntEnb He HecET OTBeTCTBeHOCHTn 3a NOBpeJdEHnI n IOTePn, AByJIouOHeCSc CJeDTBnEM HnPaBnIbHOrO NCNoJb3OBAHnI BApOHOI NOBepXHOCTn.
DAnHbI 3eKtpn6bOp He npEHa3HaueH IJIg NcNoB3OBAHnI JIOBmC OrpaHneHHbIMn FIn3HecKIMN INI yMCTBeHHbIMn CnOCo6HOCTaMn, IIObMbN, He ObIaDaIOUIMN DOCTaTOOHbIM ONbITOM N 3HaHMyM, a TAKKe DII NaONIOB3OBAHnI DeTbMbN, ECNI OHN HE HaxOJrTcN IOd Ha6NIODeHNEMIua, OTBeHauOuEero 3a IN 6e3OJaNACoHcTb, INI Hne NOnyHINOT HeOcoTBETCTByUOxIN IHCTpykui.
He pa3pe7aIte TETM mIgpaTb c 3eKtpoPnp6opom.
3.1. INCPIOJIb3OBAHHe rA3OBOI KOHΦOPKn
YTo6bI 3aKeey KOHΦopKy, NOHecnTe K Hei 3aXKeHHyO CnHyK, HAKMITE Ha pyuKy peyJInpOBKn BbICOTbl PnAmEHN, INOBepHNTe ee npOTNB YacOBOI CTpeKN.
EcnKoHΦopKn He nCnOJIb3OBaIIncB TeueHne DByX IIN 60Jee EHe, To npexJe yem 3aJxey KoHΦopKy IOIOxJNTe HeCKOJIbKO CekyHdIg TORO, YTO6bl N3 Tpy6OK BblweJ BO3dyX.
YTo6bI 3aJxuey KOHΦOpky BApOuHoN IOBepxHocTn, CHa6xHeHHyo YcTpoiCTBOM 3JIeKTPoONoJXnra, BbIIOHNTE cNeDyUOJIne ONEpaCIN:
- HaxMMTE Ha puKy peRyIuPobKn BbICOTbl PIIaMeHn N IOBepHNTe ee npOTNB YacOBoi CTpeIKN B NOJIOKeHne, O6O3HaueHHeoNDKira.
3aXnTe KOHOpKcY C NOMOuHO HaKaTna KHOKN 3JIeKtPOnOJxNra.
EcnB Bapouhna NOBepxHocTb Cha6KeHa ABTOMaTHueCKM 3JIeKTPoNODJNIGOM, nPoCTO HaxMNte Ha pyUkpeRyIINPOBKN BBICOTbl PnAmEHn UyCTAHOBNTe ee B NIOJoxHeNe, Obo3NaueHHoe 3NauchOM POnJNIGra. CnCTema 3JIeKTPoNODJNIGra 6yDet NocToHHO reHepinPOBaT NCKpbl, Do Tex nop, NOKa pyUka peRyIINPOBKN PnAmEHn 6yDet HAXODITBCsB HAnKaTOM NIOJoxHeHn.
Ecnn KOHopka He 3aropaetc B Teeyne 5 ckyH, yctahOBnte pyky perynpobkn B noIoxeHne O, n nobTopnte onncanHybIwe onepaunio.
B MoJeJx, Cha6XeHHbIX 3aUHTbIM KJanaHOM, KOtOpbI ABTomAtuYeCKn NepeKpbIbAet NODauy Ra3a B CJIyae BHe3aHOrO IORacAHNr PIIaMeHN, KOHΦopKN 3aJNRaIOTc, KaK OINCAHO BbIe, HO npn 3TOM NocLe 3aJNRaHnR KOHΦopKn Heo6XoDmO Co6NIOdaTb OCTOpOKHoCTb.
IpepeBkIIOeHHeMra3OBoB BApOHyoN IOBepXHOCTn npOBepbTe, YTO KOHOpKIn KpbIuKn KOHΦopOK npaBnIbHO yCTaHOBJeHbHa BApOHyIO NOBepXHOCTb.
IIOJE3HbIE COBETbl
IcnoIb3yIte BnaKHyTO TkaHb I MOUe ee CpeCTBO nIpy OChTkn NOBepxHocTn 3NeKTPoPnITbl. He IcnoIb3yIte HOxN IIN dpYrne ocTpbl E TBePdIe npEdMeTb dIyDAnEHHOCTaTKOB NIIu c NOBepxHOCTn 3NeKTPoPnITbl.
Iocne ouNCTKIOBepxHOCHTN,BKNIOHNTe 3NEKTPoPnITy Ha HeCKOJIbKO cekyHd Do NONHO BbICbIXAHNA KOHΦopOK. OHaKo,He CNeJdyET OCTaBnTb NyctyU 3NEKTPoPnITy BkJIQUeHHOH60nee Yem Ha HeCKOJIbKO cekyHd.
EcnBbI He MoXeTe cAmOCToTeJIbHO ONpeJeINrB npuHny HeNCnpaBHOCTn:
BbiknouhTe Bapouhyo nobepxHoctb n o6paTntecb B ceHTp nocnenpoadaJxHorO 06cnyxuBaHHa. HE PbItAITECb OTPEMOHTNPOBATb 3JEKTPONPUNBOP CAMOCTOTIELHO.
6. 3AUHTA OKPYKAIOUCEI CPEIbI
13/14
Даньнй зелкгпорпбор помаркирован B COOTBETCTBUN C Tpe6obahnmaN, ИЗПОжЕНьIMN B DИректNBe 2002/96/EC OTHOCHTeJIbH OYTNIN3aunn 3лжкгпческогои зелкгронного obopydobahnna (WEEE).
Правиьно Вьлоняутпиизацию Данlorо Издения, Bblnomoxte npedotbparntb 3агрзhevпoke Okчkaюшe Cpeын haheceHneВрda 3dopobbylo JIOdei.
3TOT CnMBOJ yka3bIbaeT Ha To, YTO DaHHOe N3dJIne He DoJXHO bbl6paCbIbTaCb, KAK ObUHbI KbIbTOB MyCop. BmecTo 3TOO OHO DOnJXHO bbltOpNpaBHeNo HnyKt c6Opa OTCnyKbWero CBoi Cpok 3NeKtpnckcKO r 3NeKtpoHORo OBopyDoHAnr IyBaIOJIHeHEnr E0 nocJeHyOuEYtINnHaunnAunn INOBTOPHOrO INCnIb3OBAHN MaTePnAnOB.
YtJIN3aIgN DaHHOrO I3dEInrI DOnJHb BbIIOJIHrTbcR B COOTBETCTBm C MeCThblIMN 3aKOHAMn IO OXpAne OkpykaIoUe cipebl.
Дя поунецьболjee noДрбови Информачи OTHOCHTьнбОвботк, BOCCTaHOBЛeгени И NOВТOPHORO IСПONь3OBАнь MATEрпаловДаHHORO N3ДeПЯ, CBJXNTecb C opraHamM MeCTHoi BnactN, CnyЖБОВ bIbO3a 6bITOBbIX OTxODOB, INI TOpROBОprAHN3aCneB, B KOTopoB BblпpoBpePEN DAHHoe N3ДeПЕ.
Декларачи COOTBeTCTBnA: Данhoe оборуобане, ДеталкотopoRo BCTynaIb T KOHTaKT C Пишe, OTBeuayet Tpe6obAHnM EbponeiCKoДиpeKTHBbl 89/109/EEC.
CE 3TOT 3JIeKtPOnpN6Op COOTBcETCTByet Tpe6ObaHnIe Ebponecknx DnpeKTHB 73/23/EEC n 89/336/EEC, KoToPbIe 6blIi 3aMeHeHb DnpeKTHBaMn 2006/95/EC n 2004/108/EC, n NocIeDyUoXn NOnpaBOK KHM.
Ppou3eodumen He Hecem OmeemcmeHHocmu 3a oneamku u HemoHocmu, KomopbIe Moay Ecmpeummbc8 e daHou uHcmpykuu. Mbl ocmaBnrrn 3a cboB npao EhcOumB u3MeHnue kOHcmpkyuO bInyckaembix Hamu u3denu C ueBIO ynuueHua KauecmeBa bInyckaeMOn ppoDykuu. Ppu tOM mOchOBHe dyHKuU u3denu u e2o Be3onacHocmb Bydyum ocmabamcbr Heu3MeHHbIMU.
Ta6nla 1
The manufacturer will not be responsible for any inaccuracy resulting from printing or transcript errors contained in this brochure. We reserve the right to carry out modifications to products as required, including the interests of con sumption, without prejudice to the characteri stics relating to safety or function.
FR
- BAPOUHbIE IOBEPXHOCTN
- NAVODILA ZA UPORABO
- PIANI COTTURA
- PLACAS
- TÜZHELYLAPOK
- OBSAH
- CZ
- SUITABLE LOCATION
- ELECTRICAL CONNECTION (FOR U.K. ONLY)
- Warning - this appliance must be earthed
- CONNECT
- TO SPUR TERMINAL
- ELECTRICAL CONNECTION
- GAS CONNECTION
- ADAPTING THE HOB TO DIFFERENT TYPES OF GAS
- REGULATING THE MINIMUM FLAME
- USE OF HOB - USER INSTRUCTIONS
- GENERAL ADVISE
- USE OF COOKTOP ELECTRICAL PLATES
- Suitability of Cooking Pans (Figure 11)
- MAINTENANCE AND CLEANING
- AFTERCARE
- PROTECTION OF THE ENVIRONMENT
- ENCASTREMENT
- 1)ПодсоeинHTeДeТAN,КakпokаЗанHa pИсунke:
- 2.3.AДАПТАЦЯ BAPOЧНО ПОВЕРХHOCTNHA ДPyгпЕ TИПь I A3A
- PEGYUNPOBKA MHHIMAJbHOrO PJIAMEH
- INHCTPYKUINIPO 3KCNJYATAUINBAPOUHOI NOBEPXHOCTN
- INCPIOJIb3OBAHHe rA3OBOI KOHΦOPKn
- IIOJE3HbIE COBETbl
- 3AUHTA OKPYKAIOUCEI CPEIbI
- FR
Brand : CANDY
Model : CLG64SPN
Category : Hob