
AMMB20E5SGV - Microwave AMICA - Free user manual and instructions
Find the device manual for free AMMB20E5SGV AMICA in PDF.


| Product type | Microwave with grill and combination mode |
| Brand | Amica |
| Model | AMMB20E5SGV |
| Capacity | 20 liters |
| Microwave power | 800 W (estimated) |
| Grill power | 1000 W (estimated) |
| Power supply | 230 V / 50 Hz |
| Microwave power levels | P100, P80, P50, P30, P10 |
| Cooking modes | Microwave, Grill, Combination cooking (C-1, C-2), Defrost (weight and time) |
| Timer | Up to 95 minutes |
| Auto programs | Pizza, Meat, Vegetables, Pasta, Potatoes, Fish, Beverage, Popcorn |
| Quick cook | 30 seconds at 100%, extendable in 30-second increments |
| Multi-stage cooking | Up to 2 stages (defrost possible as first stage) |
| Child lock | Yes (start lock) |
| Display | Digital LED |
| Interior light | Yes |
| Turntable | Yes, glass, standard diameter |
| Included accessories | Turntable, turntable carriage, grill rack (depending on model) |
| Door opening | By button (models with sensor) / emergency opening with suction cup |
| Compatible materials | Heat-resistant glass, ceramic, microwave-safe plastics, paper, plastic wrap |
| Cleaning | Damp cloth, lemon + water for interior cavity, no abrasive cleaners |
| Safety | Safety lock system, mandatory grounding, microwave protection |
| Warranty | According to warranty card (legal minimum) |
| Country of origin | Manufactured by Amica (Poland/EU) |
Frequently Asked Questions - AMMB20E5SGV AMICA
User questions about AMMB20E5SGV AMICA
0 question about this device. Answer the ones you know or ask your own.
Ask a new question about this device
Download the instructions for your Microwave in PDF format for free! Find your manual AMMB20E5SGV - AMICA and take your electronic device back in hand. On this page are published all the documents necessary for the use of your device. AMMB20E5SGV by AMICA.
USER MANUAL AMMB20E5SGV AMICA
SAFETY INSTRUCTIONS FOR USE 11
INSTALLING THE PROTECTIVE CIRCUIT 15
COOKWARE 16
WARNING 16
MATERIALS THAT CANNOT BE USED IN A MICROWAVE OVEN 16
MATERIALS THAT CAN BE USED IN A MICROWAVE OVEN 17
SETTING UP YOUR 18
MICROWAVE OVEN 18
MICROWAVE OVEN ACCESSORIES 18
TURNTABLE INSTALLATION 18
UNPACKING 19
DISPOSAL OF OLD APPLIANCE 19
INSTALLING THE APPLIANCE 20
OPERATION 21
TROUBLESHOOTING 25
CLEANING 25
WARRANTY AND AFTER SALES SERVICE 26
WARRANTY 26
GARANTIE, NACHVERKAUF-SERVICE 46
GARANTIE 46
FR - SOMMAIRE
MESURES DE PRUDENCE 48
INDICATIONS CONCERNANT LA SÉCURITÉ D'UTILISATION 49 INSTALLATION D'UN CIRCUIT DE PROTECTION 55
RECIPIENTS 56
MISE EN GARDE 56
MATÉRIAUX QU'IL NE FAUT PAS UTILISER DANS UN FOUR À MICRO-ONDES 56
MATÉRIAUX QUI PEUVENT ÊTRE UTILISÉS DANS UN FOUR À MICRO-ONDES 57
REGLAGE DU FOUR 58
NOMS DES ÉLÉMENTS D'ÉQUIPEMENT DU FOUR 58
INSTALLATION DU PLATEAU ROTATIF 58
DÉBALLAGE 59
MISE HORS SERVICE 59
INSTALLATION DE L'APPAREIL 60
EXPLOITATION 61
ELIMINATION DES PANNES 66
NETTOYAGE 66
GARANTIE, SERVICE APRÈS-VENTE 67
GARANTIE 67
NL - INHOUDSOPGAVE
VOORZORGSMAATREGELEN 69
INSTALLATIE VAN HET APPARAAT 79
BEDIENING 80
From now on, your daily housework will be easier than ever before. Your appliance Amica is exceptionally easy to use and extremely efficient. After reading these Operating Instructions, operating the appliance will be easy.
Before being packaged and leaving the manufacturer, the appliance was thoroughly checked with regard to safety and functionality.
Before using the appliance, please carefully read these Operating Instructions. By following these instructions carefully you will be able to avoid any problems in using the appliance. It is important to keep these Operating Instructions and store them in a safe place so that they can be consulted at any time.
Follow these instructions carefully in order to avoid possible accidents.
Sincerely,
Amica
PRECAUTIONS
• TO AVOID POSSIBLE OVER-EXPOSURE TO MICROWAVE ENERGY
- Do not attempt to operate the oven with the door open, because it may cause harmful exposure to microwave energy. Do not disable the safety interlocks, or attempt to circumvent them.
- Do not place anything between the front surface of the oven and the door or allow dirt or detergent residue to gather on sealing surfaces.
- Do not operate the oven if it is damaged. It is particularly important that the oven door is properly closed and that there is no damage to:
-
Doór (dents, cracks)
-
Hinges and locks (broken, cracked or loose)
-
Door seals and sealing surfaces
- Any adjustments, maintenance or repairs should only be entrusted to the manufacturer's properly qualified service personnel. In particular, the work associated with removing the cover that protects the user against microwave radiation.
- Keep the appliance and its power cord away from children under 8 years old.
- Microwave oven should not be placed in a cabinet*
- WARNING: The appliance and its accessible parts become hot during use. Avoid contact with hot parts. Children under the age of 8, should be kept away from the appliance, unless supervised by an adult person;
- Do not clean the appliance with steam
- Surfaces of the cabinet may become hot when the oven is operating;
SAFETY INSTRUCTIONS FOR USE
- READ CAREFULLY AND KEEP FOR FUTURE REFERENCE
- To reduce the risk of fire, injury to people or exposure to excessive microwave energy when using the appliance, please observe the following basic safety rules:
- Read the Operating Instructions before using the appliance.
- Close supervision is needed to reduce the risk of fire inside the oven chamber.
- Use this appliance only for its intended purpose as described in the manual. Do not use corrosive chemicals in the appliance. Oven is specifically designed for heating or cooking food. It is not intended for industrial or laboratory use.
- WARNING: When the appliance is used in a combined mode, children can use the microwave oven only under adult supervision due to the high temperatures generated;
- WARNING: Liquids and other foodstuffs may not be heated in sealed containers as the containers could explode;
- WARNING: This appliance can be used by children aged 8 years and older or by persons with physical, mental or sensory handicaps, or by those who are inexperienced or unfamiliar with the appliance, provided they are supervised or have been instructed how to safely use the appliance and are familiar with risks associated with the use of the appliance. Ensure that children do not play with the appliance. Cleaning and maintenance of the appliance should not be performed by children unless they are 8 years or older and are supervised by a competent person.
- Use only cookware that is suitable for use in microwave ovens;
-
When heating food in plastic or paper containers, pay special attention to the microwave oven as containers may ignite;
-
If you see smoke or fire, turn off the appliance or unplug it from power and keep the door closed until the flames are smothered;
- Microwave heating of beverages can cause delayed boiling, therefore care should be taken when handling the container;
- Cleaning instructions for door seals and adjacent parts may be found in an appropriate section of this operating instructions.
- The oven must be cleaned regularly. Remove any deposits of food and leftovers
- Neglecting to keep the oven clean can damage the surface, which may adversely affect the durability of the appliance and cause dangerous situations
- Important! If the power cord is damaged, it should be replaced by the manufacturer or specialist repair centre or a qualified person in order to avoid danger.
- Before using the oven, test heat the grill heater (smoke can be given off through ventilation grid):
- switch on the ventilation in the room or open a window,
- set the oven to heat the grill heater only for about 3 minutes without heating food.
- Oven must be placed on flat a surface.
- Turntable and rotating trolley unit should be in the oven during cooking. Carefully put cooked food on the turntable, and handle it carefully to avoid any breakage.
- Improper use of the browning plate may cause cracking of the turntable due to the high temperature.
- Only use bags for cooking in microwave ovens, which are correct size.
- Microwave oven has several in-built circuit breakers to prevent emission of radiation, while the door is open. Do not tamper with these circuit breakers.
- Do not operate the oven when empty. Operating the oven without food or dish with very low water content may result in fire, carbonization, arcing and damage to the internal chamber shell.
- Do not cook food directly on the turntable. Excessive local heating of turntable may cause its rupture.
- Do not heat baby bottles or baby food in the microwave. Uneven heating may occur and cause physical injury.
Please read the provisions of warranty
- Do not use narrow-necked containers such as bottles for syrups.
- Do not fry in deep fat in the microwave.
- Do not do home canning in a microwave oven because not always the entire contents of pot reaches boiling point.
- Do not use microwave oven for commercial purposes. This appliance is intended for use at home or in facilities, such as*: kitchen for employees; in shops, offices and other working environments, use by the customers of hotels, motels and other residential facilities, in rural residential buildings, in the accommodation facilities*;
- In order to avoid delayed boiling of hot liquids and beverages and the risk of burns, stir the liquid before placing the container in the oven and again in the middle of cooking time. Then leave the container in the oven for a short time and stir again before removing from oven chamber.
- Do not forget that there is a dish in the microwave oven to avoid burning due to excessive cooking.
- When the appliance is used in a combined mode, children can use the microwave oven only under adult supervision the high temperatures generated;
- This appliance is not intended for use by persons (including children) with physical, mental or sensory handicaps, or by persons inexperienced or unfamiliar with the appliance, unless under supervision or in accordance with the instructions as communicated to them by persons responsible for their safety. Children shall not play with the appliance.
- Do not overcook dishes
- Do not use the oven for storage. Do not store flammable objects inside the microwave oven, such as bread, cookies, paper products, etc. If lightning hits the power line, the oven may switch on automatically.
- Remove the wire clamps and metal fixtures from containers / paper or plastic bags before placing them in the oven.
-
Microwave oven must be grounded. Only connect to a wall socket with the proper protective conductor. See "Installing the protective circuit."
-
Some products, such as whole eggs (boiled or fresh), water, oil or grease, sealed containers and closed glass jars may explode and therefore should not be heated in the oven.
- Operating the microwave oven should be done with adult supervision at all times. Do not allow children to play with the appliance or have access to the controls.
- Do not operate the oven when its terminal strip or plug is damaged, it is not working properly, or if it has been damaged or dropped.
- Do not cover or block the air vents on the oven.
- Do not store or use the oven outdoors.
- Do not use the microwave oven near water, near the kitchen sink, in a damp room or near a swimming pool.
- Do not immerse the power cord or plug in water.
- Keep cord away from heated surfaces.
- Do not allow the connection cord hanging over the edge of a table or counter.
- The appliance must be used with mounted decorative frame*
- The inner cavity surface is hot after use of the microwave oven.
- Regularly check the oven and its power cord for damage. If there is any damage, do not use the oven
- Metallic containers for food and beverages are not allowed during microwave cooking
- Care should be taken not to displace the turntable when removing containers from the appliance
INSTALLING THE PROTECTIVE CIRCUIT
DANGER
Danger of electric shock when touched, some internal components may cause serious injury or death. Do not disassemble this appliance.
WARNING
Electric shock hazard. Improper use of earthing can cause electric shock. Do not insert the plug into the socket before the appliance is properly installed and grounded.

natural_image
Line drawing of a hexagonal electrical plug with two leads (no text or symbols)This appliance must be grounded. In the event of a short-circuit, earthing reduces the risk of electric shock. The appliance is equipped with earthing wire with an appropriate plug. The plug should be inserted into a properly installed and grounded outlet.
If you do not completely understand earthing instruction or you are unsure whether the appliance is properly grounded, please contact a qualified electrician or service technician.
f you must use an extension cord, use only a three-wire extension with an earthing connector.
The manufacturer shall not be liable for damage or injury resulting from connecting the microwave oven to a power source without a protective circuit or with a malfunctioning protection circuit.
A short power cord is provided to reduce the risk resulting from becoming entangled or tripping over a long cord.
If you use the extension cord:
- Éxtension cord must be capable of withstanding nominal current required by the appliance.
- Extension cord must be 3-wire with earthing,
- Extension cord should be so arranged as not to be hung by the table top where it could be pulled by children, or caught inadvertently.
COOKWARE
WARNING

Risk of injury. Tightly closed containers may explode. Closed containers must be opened and plastic bags pierced before cooking.
Materials that can be used and materials to be avoided in the microwave oven.
The use of some non-metallic cookware may not be safe in the microwave oven. If in doubt, you can check the cookware following this procedure.
Checking the cookware:
1 Fill the microwave-safe cookware with 1 cup of cold water (250 ml), and do the same with the test cookware.
2 Operate the oven with the maximum power for 1 minute.
3 Carefully touch the test cookware. If the test cookware is hot, do not use it in the microwave oven.
4 Do not exceed 1 minute cooking time.
Materials that cannot be used in a microwave oven
Type of cookware Comments
| Aluminium tray | May cause an electric arc. Transfer food to microwave-safe cookware. |
| Cardboard box with metal handle | May cause an electric arc. Transfer food to microwave-safe cookware. |
| Metal or cookware with metal frame | Metal shields the food from microwave energy. Metal frame can cause an electric arc. |
| Metal closure - tightened May cause an electric arc and fire in the oven. | |
| Paper bags May cause a fire in the oven. | |
| Plastic foam | Plastic foam may melt or contaminate the liquid in it when exposed to high temperatures. |
| Wood | Wood dries out when it is heated in the microwave oven and can crack or break. |
Materials that can be used in a microwave oven
Type of cookware Comments
| Browning plate Observe the manufacturer's instructions. The bottom of the browning plate must be at least 5 mm above the turntable. Improper use may cause cracking of the turntable. | |
| Dinner dishes Suitable for microwave ovens only. Observe the manufacturer's instructions.Do not use cracked or chipped cookware. | |
| Glass jars Always remove the lid. Use only for heating food to a suitable temperature. Most glass jars are not heat resistant and may explode. | |
| Glassware Use only heat-resistant glassware in the microwave oven. Make sure that there are no metal frames. Do not use cracked or chipped cookware. | |
| Bags for microwave cooking | Observe the manufacturer's instructions. Do not seal with metal clamps. |
| Paper plates and cups Cut through to allow the steam to escape. Use only for short cooking / heating. Do not leave the oven unattended while cooking. | |
| Paper towels Use to cover food to be heated to absorb fat.Use only for short cooking under constant surveillance. | |
| Parchment paper Use as a cover to prevent splashing or as a container for evaporation. | |
| Plastics Suitable for microwave ovens only. Should be labelled "for use in microwave ovens." Some plastic containers soften when the content is warmed up. Bags for microwave cooking and sealed plastic bags must be pierced or incised, or vented according to the directions on the package. | |
| Plastic packaging Suitable for microwave ovens only. Use to cover food during cooking in order to maintain moisture. Do not let plastic packing touch the food. | |
| Thermometers Suitable for microwave ovens only. (Temperature probes for meat and sugar). | |
| Wax paper Used as a covering to prevent splashing and to keep moisture. | |
| Cookware material Microwave | Barbecue grill | Combi Mode | |
| Heat-resistant glass YES | YES | YES | |
| Regular glass | NO NO NO | ||
| Heat-resistant ceramics | YES | NO NO | |
| Microwave-safe plastic utensils | YES | NO NO | |
| Kitchen paper | YES | NO NO | |
| Metal container | NO | YES | NO |
| Metal rack (provided for the oven)* | NO | YES | NO |
| Aluminium foil and foil containers | NO | YES | NO |
Microwave oven accessories
Remove all packaging, both inside and outside the oven, before using the oven. The oven comes with the following accessories:
Turntable
1
Rotating trolley 1
Operating Instructions 1
Grilling rack 1*
A) Control Panel
B) System security lock - disconnects power to the oven when the door is opened during operation.
C) Rotating trolley
D) Turntable
E) Door inner protecting shield
F) Door

TURNTABLE INSTALLATION
- Never compress or place the turntable upside down.*
- When cooking, always use turntable and rotating
- trolley.
- For cooking or heating always put the food on the turntable.
Individual fittings:
- Grilling rack*
- Turntable
- Rotating trolley

* Available on selected models Note: The grilling rack supplied with the appliance should only be used when the appliance is set to „GRILL”. Place the rack on the turntable.
** Trolley is available in selected models in two versions, depending on the model. These are not interchangeable.
*** Turnable existing according to the model. In this case, put food on Your own plate and put into the microwave oven.
UNPACKING

natural_image
Recycling symbol composed of three chasing arrows forming a triangle (no text or labels)During transportation, protective packaging was used to protect the appliance against any damage. After unpacking, please dispose of all elements of packaging in a way that will not cause damage to the environment.
All materials used for packaging the appli- ance are environmentally friendly; they are
100% recyclable and are marked with the appropriate symbol.
Important! Packaging materials (bags, polyethylene, polystyrene, etc.) should be kept away from children during unpacking.
DISPOSAL OF OLD APPLIANCE
natural_image
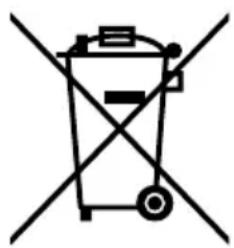
Simple line drawing of a trash bin with two crossed lines indicating no waste or prohibition (no text or symbols)In accordance with European Directive 2012/19/EU and local legislation regarding used electrical and electronic goods, this appliance is marked with the symbol of the crossed-out waste container. This marking indicates that the appliance must not be disposed of together with other household waste after it has been used.
The user is obliged to hand it over to waste collection centre collecting used electrical and electronic goods. The collectors, including local collection points, shops and local authority departments provide recycling schemes.
Proper handling of 'used electrical' and electronic goods helps avoid environmental and health hazards resulting from the presence of dangerous components and the inappropriate storage and processing of such goods.
INSTALLING THE APPLIANCE
- Remove all packaging materials and components.
- Check the oven for damage such as dents or door misalignment or breakage.
- Remove any protective film from the surface of the cabinet.
- Do not install the oven if it is damaged.

Do not remove the light brown mica cover bolted into the recess in order to shield the microwave magnetron.
Installing
- The appliance is designed for household use only.
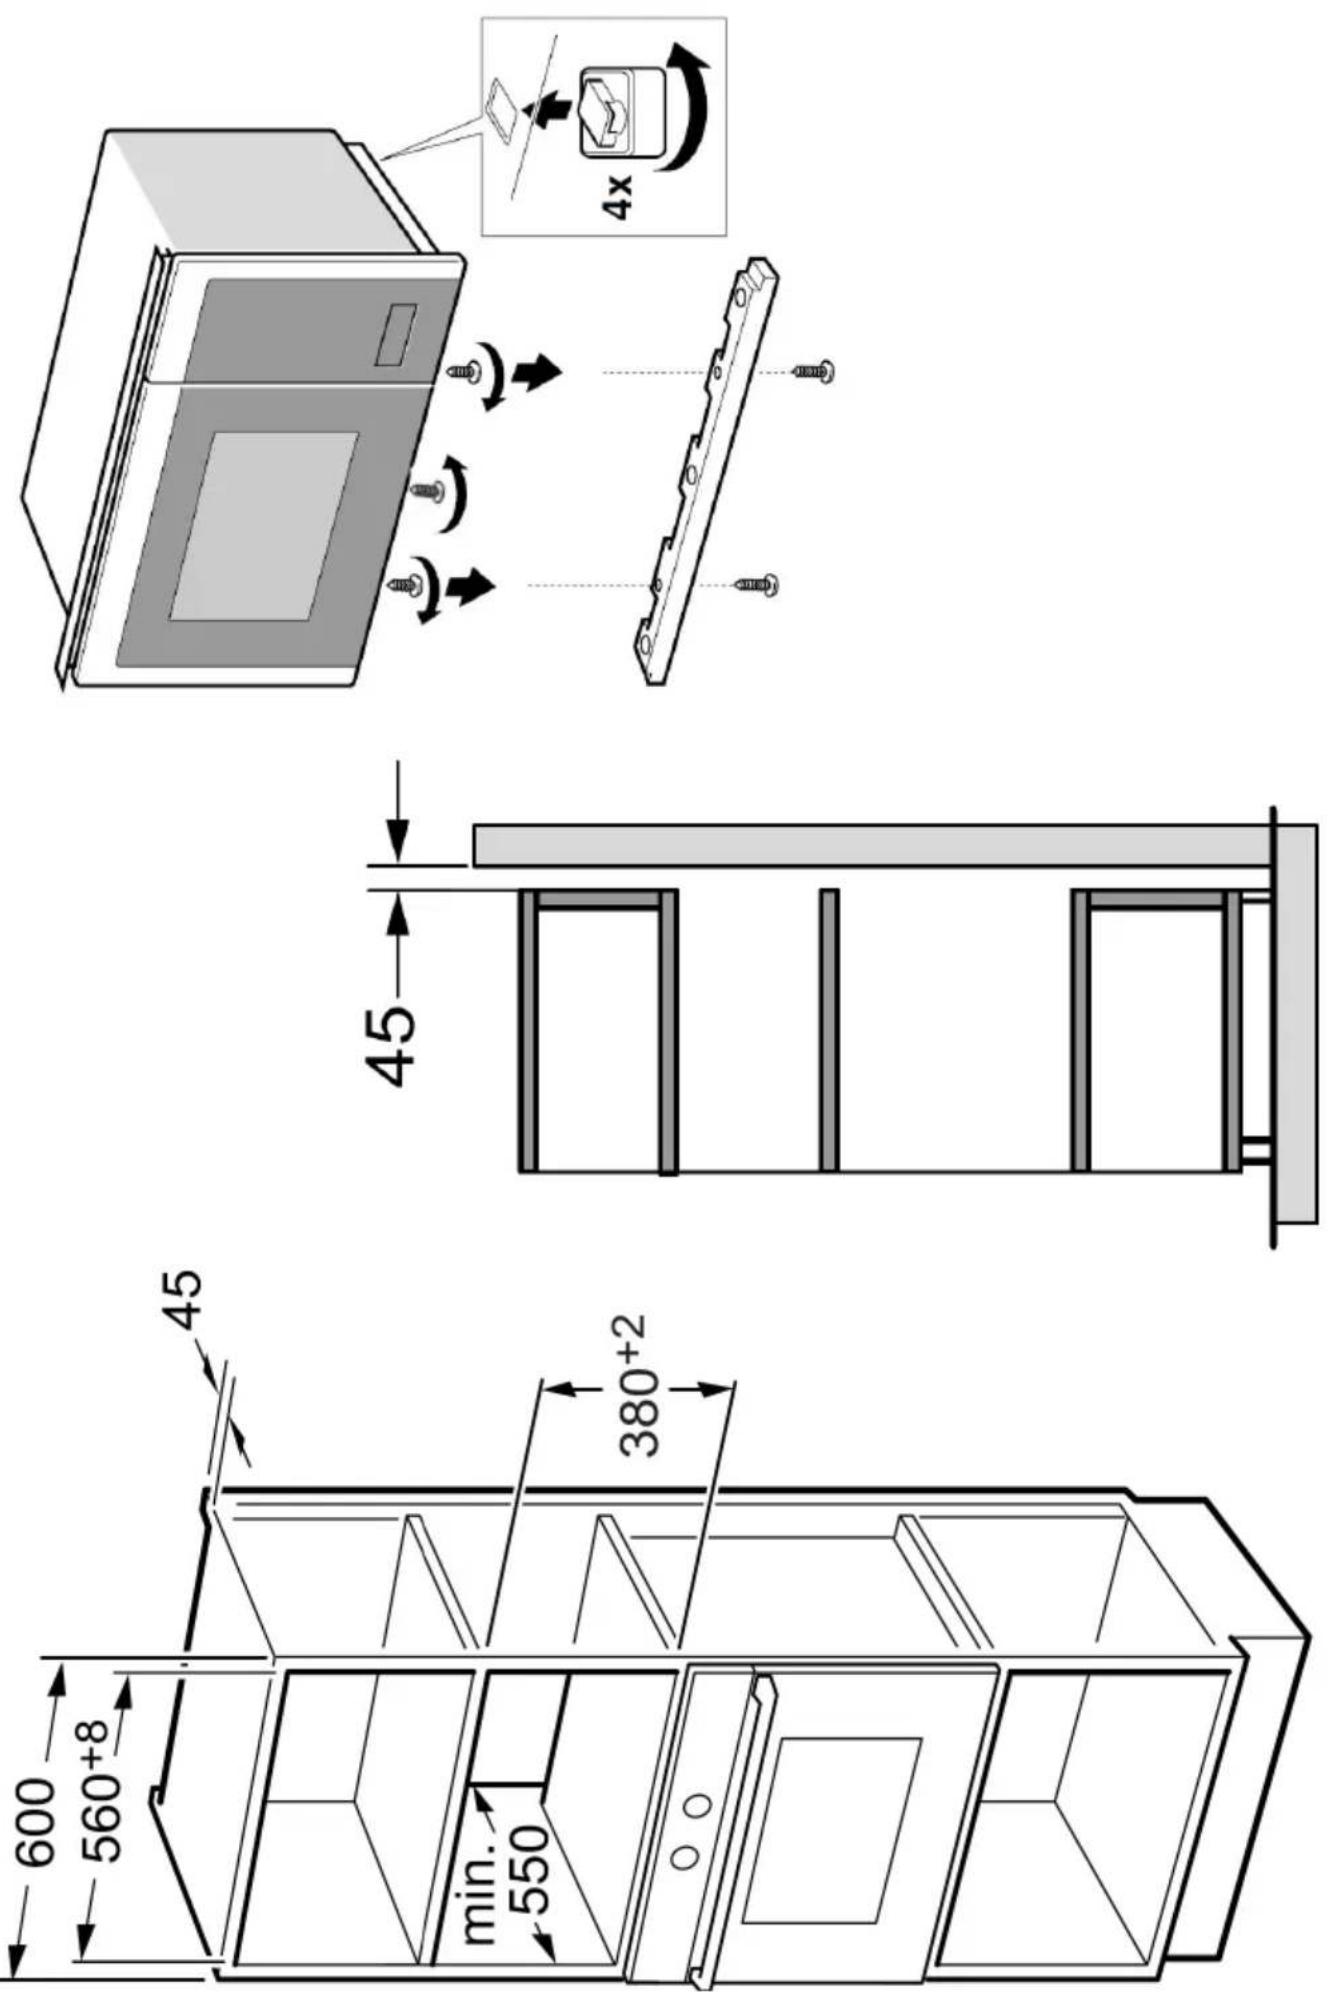
- The appliance can be used only after fitting in kitchen furniture.
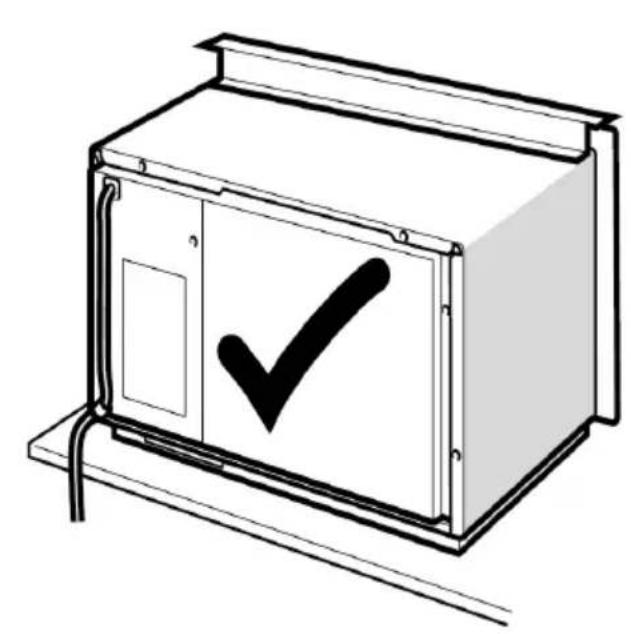
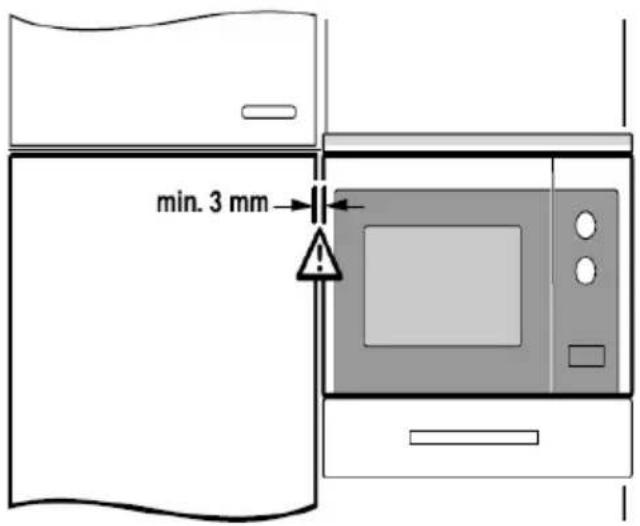
- For fitting instructions, please refer to "Installation guide"*.
- Microwave oven should be installed in a cabinet with a width of 60 cm and a height of 85 cm from the kitchen floor*.
- Assembly drawings at the end of the manual.
Do not remove the legs located in the bottom of the appliance*.
Blocking the inlet and outlet openings may damage the microwave oven.
Place the oven as far away from radio and television as possible. Operating microwave oven may cause interference to radio and television reception.
- Insert the oven power plug into a standard household wall socket. Make sure beforehand whether voltage and frequency are the same as on the oven's rating plate.
WARNING: Do not install the oven on the gas hob or other heat producing appliance. In the event of such installation, the oven may be damaged and void the warranty.
OPERATION
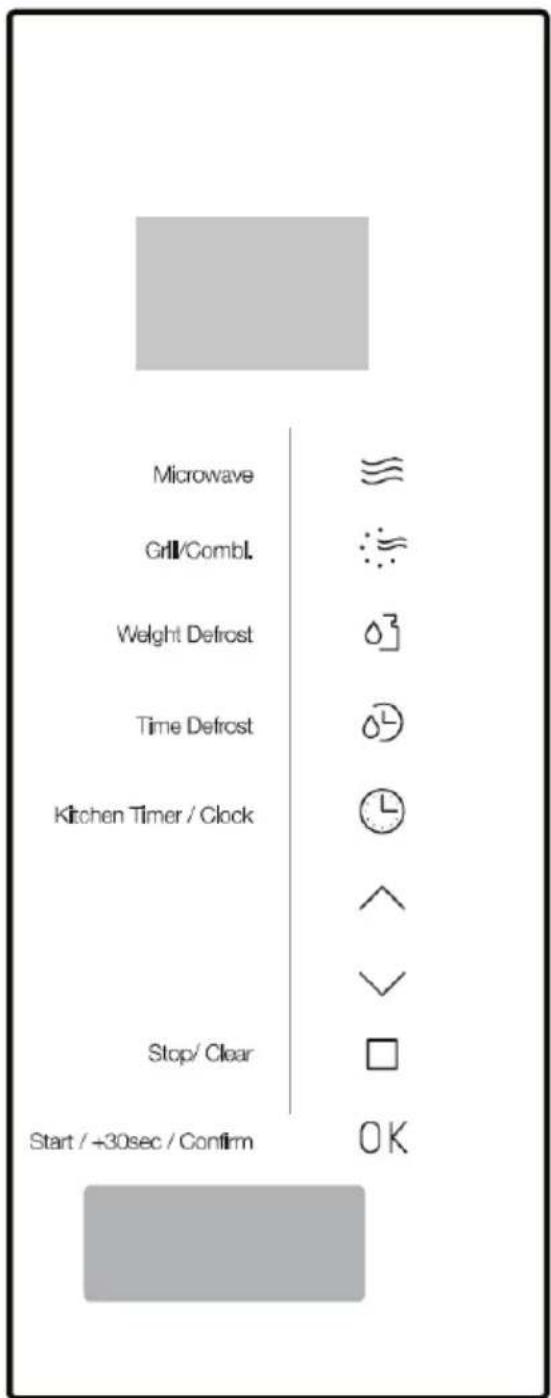
1. Clock Setting
When the microwave oven is electrified, the oven will display "WELCOME", buzzer will ring once. The oven will enter to waiting state.
- Press twice, the hour figures will flash;
- Press on to adjust the hour figures, the input time should be within 0--23.
- Press to confirm, the minute figures will flash.
- Press or to adjust the minute figures, the input time should be within 0--59.
- Press or to finish clock setting. “:” will flash. The current time will display.
Note: If the clock is not set, it would not function when powered.
2. Microwave Cooking
- Press the key once, and "P100" will display.
- Press repeatedly or press or ∨ to select the microwave power. “P100”, “P80”, “P50”, “P30”, “P10” will display in order.
- Press or to adjust the cooking time. (The maximum cooking time is 95 min).
- Press to start cooking.
NOTE: the step quantities for the adjustment time of the coding switch are as follow:
0-1min : 5 seconds
1-5min : 10 seconds
5-10min :30 seconds
10-30min : 1 minute
30-95min : 5 minutes
Microwave Power Chart
| Microwave Power | High Med. High Med. Low Low | ||||
| Display P100 P80 | P50 P30 P10 | ||||
3. Grill or Combi
Cooking
- Press ✉ once, the screen will display "G", and press ✉ repeatedly or press ∧ or ∨ to choose the power you want, and "G", "C-1" or "C-2" will display.
- Press or to set cooking time. (The maximum cooking time is 95 minutes)
- Press again to start cooking.
Example: If you want to use 55% microwave power and 45% grill power (C-1) to cook for 10 minutes, you can operate the oven as the following steps.
- Press once, the screen displays "G".
- Continue to press until the screen displays "C-1".
- Press or to adjust the cooking time until the oven displays "10:00".
- Press to start cooking.
Combination Power
| Program Display | Microwave power | Grill power | |
| Grill | G | 0% | 100% |
| Combi.1 | C-1 | 55% | 45% |
| Combi.2 | C-2 | 36% | 64% |
Note: If half the grill time passes, the oven sounds twice, and this is normal. In order to have a better effect of grilling food, you should turn the food over, close the door, and then press OK to continue cooking. If no operation, the oven will continue working.
4. Defrost By Weight
- Press once, the screen will display "100".
- Press or to select the food weight. The range of weight is 100-2000g.
- Press key to start defrosting.
5. Defrost By Time
- Press once, the screen will display "00:00".
- Press or to select the cooking time. The maximum time is 95 minutes.
- Press key to start defrosting.
Note: If half the defrost time passes, the oven sounds twice, and this is normal. In order to have a better effect of defrosting, you should turn the food over, close the door, and then press O'ven will continue working.
6. Multi-Stage Cooking
Can be set max two stages. If one stages is defrosting, it should be put in the first stage automatically. The buzzer will ring once after each stage and the next stage will begin.
Note: Auto menu and speedy cooking cannot be set as one of the multi-stage.
Example: if you want to defrost the food for 5 minutes, then to cook with 80% microwave power for 7 minutes. The steps are as following:
- Press once, the screen will display "00:00".
- Press or to adjust the defrost time of 5 minutes;
- Press once, the screen will display "P100".
- Press repeatedly to choose microwave power till "P80" displays;
- Press or to adjust the cooking time of 7 minutes;
- Press to start cooking.
7. Kitchen Timer
- Press once, the screen will display "KT 00:00".
- Press or to enter the correct timer. (The maximum cooking time is 95 min.)
- Press or to confirm setting.
- When the kitchen time is reached, the buzzer will ring 5 times.
If the clock has been set(24-hour system), the screen will display the current time.
Note: The kitchen Time is different from 24-hour system. Kitchen Timer is a timer.
8. Auto Menu
- In waiting state, press repeatedly to choose the menu.
- Press to confirm the menu you choose.
- Press or to choose the food weight.
- Press to start cooking.
Auto-menu chart
| Menu Weight Power | ||
| Pizza | 200 g | 100%(Mic.) |
| 400 g | ||
| Meat | 250 g | 100%(Mic.)350 g |
| 450 g | ||
| Vegetable | 200 g | 100%(Mic.)300 g |
| 400 g | ||
| Pasta | 50g(with 450g cold water) | 80%(Mic.) |
| 100g(with 800g cold water) | ||
| Potato | 200 g | 100%(Mic.)400 g |
| 600 g | ||
| Fish | 250 g | 80%(Mic.)350 g |
| 450 g | ||
| Beverage | 1cup (about 120ml) | 100%(Mic.)2cups (abc) |
| 3cups (about 360ml) | ||
| Popcorn | 50 g | 100%(Mic.) |
| 100 g | ||
9. Speedy Cooking
- In waiting state, press key to cook with 100% power level for 30 seconds. Each press on the same key can increase 30 seconds. The maximum cooking time is 95 minutes.
- During the microwave, grill, combination cooking and the defrost by time process, press to increase the cooking time.
- Under the states of auto menu and defrost by weight, cooking time cannot be increased by pressing OK
- In waiting state, press to choose the cooking time. After adjusting the cooking time, press to start microwave cooking with 100% power lever.
10. Lock Function for Children
Lock: In waiting state, press ☐ for 3 seconds to enter the children-lock state and the current time will display if the time has been set, otherwise, the screen will display. Lock quitting: In locked state, press ☐ for 3 seconds, the lock is released.
11. Inquiring Function
-
In cooking states of microwave or grill and combination. Press ≡ or ≡, the current power will be displayed for 3 seconds.
-
If the clock has been set, during cooking state, press to check the current time. It will be displayed for 3 seconds.
12. Specyfication
- If the door is opened in the process of cooking, close the door and then press to continue cooking.
- Once the cooking programme has been set, is not pressed in 5 minutes. The current time will be displayed. The setting will be cancelled.
- The buzzer sounds once by efficient press, inefficient press will be no response.
13. Opening the oven door\*
Press button, the oven door will open.
Note: Emergency opening of the door if no power*: Use suction handle added into the accessory bag. Stick it on the doors and pull it.
*Only appliances with a sensor for door opening
natural_image
Simple 3D-rendered gray pushpin icon with a circular head and base (no text or symbols)TROUBLESHOOTING
| Microwave oven interferes with the TV reception | Television and radio reception may be disrupted when the microwave oven is operating. The same applies to small household appliances such as a blender, vacuum cleaner and electric fan. This is normal. |
| Dimmed oven lighting. | When cooking with low microwave power, oven light may be dimmer. This is normal. |
| Condensation forms on the door, hot air comes out through vents. | When cooking, steam can be released from food. Most of the steam escapes through the vents.However some steam can collect in the form of condensation on cooler parts, such as oven door. This is normal. |
Fault Possible cause How to correct
| Oven does not start. | Power cord unplugged or not plugged properly into the socket. | Pull the plug and put it back in after 10 seconds. |
| Blown fuse or tripped circuit breaker. | Replace the fuse or turn on the circuit breaker (any repairs by producers service only). | |
| Problem with the power outlet. | Check the outlet by plugging in other appliance. | |
| The oven does not heat. | The door is not closed properly. | Close the door fully. |
| Turntable makes noise when oven operates. | Rotating ring or bottom of the oven dirty. | See "Microwave oven maintenance". |
CLEANING
Before cleaning, make sure the oven is disconnected from the power source.
a) After use, clean the inside of the microwave oven with a damp cloth.
b) Clean the accessories in the normal way in soapy water.
c) Dirty door frame, seal and adjacent elements should be cleaned gently with a damp cloth. When cleaning the surface of the oven door, use only mild soap or detergent applied with a sponge or soft cloth.
When cleaning glass door, do not use any abrasive cleaners or sharp metal washers, as this may cause scratches on the surface and damage the glass.
In order to clean the inner cavity: put half a lemon in a bowl, add 300 ml of water and turn on the microwave oven at 100% power for 10 minutes. After cleaning, disconnect the microwave oven from the power and wipe the inside with a soft, dry cloth.
WARRANTY AND AFTER SALES SERVICE
Warranty
The manufacturer shall not be held liable for any damage caused by improper use of the product.
Service
- The manufacturer recommends that all repairs and adjustments be carried out by the Factory Service Technician or the Manufacturer's Authorized Service Point. For safety reasons, repairs should be referred to professionals.
- Repairs carried out by unqualified persons may seriously endanger the appliance user.
- The minimum warranty period for the appliance offered by the manufacturer, importer or authorized representative is given in the warranty card.
- The warranty shall be void if you make any independent adaptations or alterations, tamper with seals or other appliance safety devices or its parts or interfere with the appliance contrary to operating instructions.
In the event of appliance malfunction, request assistance or repair.
If your appliance needs repair, please contact the service centre. Please see website for address and contact details of our service centre. Before contacting us, please have ready the appliance serial number, which can be found on the identification sticker: For your convenience, please write it down below:
Certifi cate of compliance CE and UKCA
The Manufacturer hereby declares that this product complies with the general requirements pursuant to the following European Directives and analogous UK requirements:
- The Low Voltage Directive 2014/35/EC / Electrical Equipment (Safety) Regulations 2016.
• Electromagnetic Compatibility Directive 2014/30/EC / Electromagnetic Compatibility Regulations 2016. - ErP Directive 2009/125/EC / The Ecodesign for Energy-related Products Regulations 2010 (as amended) for the applicable implementing measures which apply in Great Britain and Northern Ireland, respectively.
and therefore the product has been marked with C€ and UK symbols and the Declaration of Conformity, the Manufacturer has drawn up the declaration and is available to the competent authorities regulating the market.
INSTALLATION DES SCHUTZKREISES
GEFAHR
natural_image
Line drawing of a plug with two tubes and a central socket (no text or symbols)natural_image
Recycling symbol composed of three chasing arrows forming a triangle (no text or labels)natural_image
Symbol of a trash bin crossed with two crossed lines and a black rectangle below (no text or labels)natural_image
Simple 3D-rendered gray sphere with a rounded base, resembling a stylized letter or icon (no text or symbols)GARANTIE, NACHVERKAUFSERVICE
Garantie
INSTALLATION D'UN CIRCUIT DE PROTECTION
DANGER
natural_image
Line drawing of a hexagonal electrical outlet plug with two leads (no text or symbols)natural_image
Simple line drawing of a three chasing recycling symbol (no text or labels)natural_image
Simple line drawing of a trash bin with two crossed lines indicating no waste or prohibition (no text or symbols)
natural_image
Simple 3D-rendered gray sphere with a circular base, no text or symbols presentINSTALLATION D'UN CIRCUIT DE PROTECTION
GEVAAR
natural_image
Line drawing of a plug with two leads (no text or symbols)INSTALLATIE DRAAIPLATEAU
natural_image
Recycling symbol composed of three chasing arrows forming a triangle (no text or labels)natural_image
Simple line drawing of a trash bin with crossed lines indicating no waste or discharge (no text or symbols)INSTALLATIE VAN HET APPARAAT
natural_image
Simple 3D-rendered gray sphere with a rounded base, no text or symbols presentnatural_image
Line drawing of a plug with two pins and a side socket (no text or symbols)natural_image
Recycling symbol composed of three chasing arrows forming a triangle (no text or labels)natural_image
Symbol of a trash bin crossed out by two diagonal lines (no text or labels)1. Nastavení hodin
natural_image
Simple 3D-rendered gray sphere with a rounded base, resembling a stylized letter or icon (no text or symbols)ODSTRAŇOVÁNÍ PORUCH
natural_image
Warning symbol of steam inside a triangle (no text or numbers)INŠTALÁCIA OCHRANNÉHO VODIČA
NEBEZPEČENSTVO
natural_image
Line drawing of a plug with two leads and a socket (no text or symbols)natural_image
Recycling symbol composed of three chasing arrows forming a triangle (no text or labels)natural_image
Simple line drawing of a trash bin with two crossed lines indicating no waste or prohibition (no text or symbols)1. Nastavenie hodín
natural_image
Simple 3D-rendered gray icon of a pushpin or connector (no text or symbols)ODSTRAŇOVANIE PORÚCH
natural_image
Warning symbol of a steam inside a triangle (no text or numbers)INSTALACJA OBWODU OCHRONNEGO
NIEBEZPIECZEŃSTWO
natural_image
Line drawing of a hexagonal electrical plug with two leads (no text or symbols)natural_image
Recycling symbol composed of three chasing arrows forming a triangle (no text or labels)natural_image
Symbol of a trash bin crossed with a diagonal line and a horizontal bar below (no text or labels)natural_image
Simple 3D-rendered icon of a pushpin or connector (no text or symbols)USUWANIE USTEREK
natural_image
Technical illustration of a mechanical bracket assembly with four mounting blocks and two screws (no text or symbols)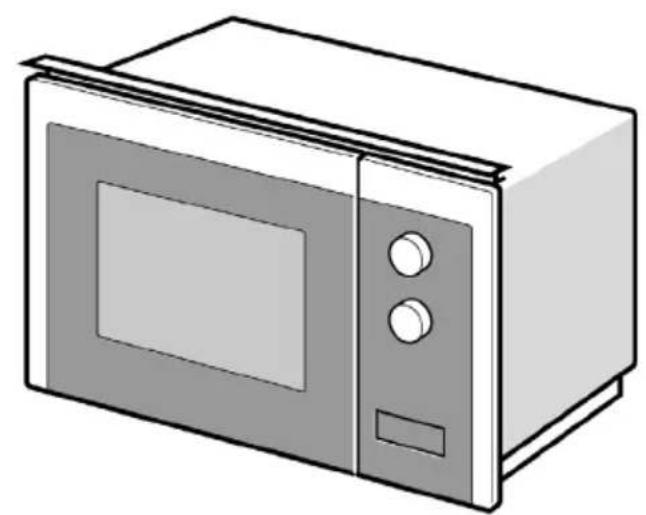
natural_image
Line drawing of a microwave oven with control panel and door (no text or symbols)
natural_image
Line drawing of a cabinet with a black checkmark on the door (no text or symbols)
natural_image
Line drawing of a cabinet with an X-shaped warning sign and wiring, no text or symbols present

Amica S.A.
ul . Mickiewicza 52 / 64-510 Wronkitel. 67 25 46 100 / fax 67 25 40 320
www.amica.pl
Amica International GmbH
Lüdinghauser Str. 52
D-59387 Ascheberg
Tel: 0 25 93 - 95 67-0
www.amica-group.de


- FR - SOMMAIRE
- MESURES DE PRUDENCE 48
- INDICATIONS CONCERNANT LA SÉCURITÉ D'UTILISATION 49 INSTALLATION D'UN CIRCUIT DE PROTECTION 55
- RECIPIENTS 56
- REGLAGE DU FOUR 58
- INSTALLATION DU PLATEAU ROTATIF 58
- DÉBALLAGE 59
- MISE HORS SERVICE 59
- INSTALLATION DE L'APPAREIL 60
- EXPLOITATION 61
- ELIMINATION DES PANNES 66
- NETTOYAGE 66
- GARANTIE, SERVICE APRÈS-VENTE 67
- NL - INHOUDSOPGAVE
- VOORZORGSMAATREGELEN 69
- INSTALLATIE VAN HET APPARAAT 79
- BEDIENING 80
- Amica
- PRECAUTIONS
- SAFETY INSTRUCTIONS FOR USE
- INSTALLING THE PROTECTIVE CIRCUIT
- COOKWARE
- WARNING
- Checking the cookware:
- Materials that cannot be used in a microwave oven
- Materials that can be used in a microwave oven
- Microwave oven accessories
- TURNTABLE INSTALLATION
- UNPACKING
- DISPOSAL OF OLD APPLIANCE
- INSTALLING THE APPLIANCE
- Installing
- OPERATION
- Clock Setting
- Microwave Cooking
- Grill or Combi
- Cooking
- Defrost By Weight
- Defrost By Time
- Multi-Stage Cooking
- Kitchen Timer
- Auto Menu
- Speedy Cooking
- Lock Function for Children
- Inquiring Function
- Specyfication
- Opening the oven door\*
- TROUBLESHOOTING
- CLEANING
- WARRANTY AND AFTER SALES SERVICE
- Warranty
- Service
- Certifi cate of compliance CE and UKCA
- INSTALLATION DES SCHUTZKREISES
- GARANTIE, NACHVERKAUFSERVICE
- Garantie
- INSTALLATION D'UN CIRCUIT DE PROTECTION
- INSTALLATIE DRAAIPLATEAU
- INSTALLATIE VAN HET APPARAAT
- Nastavení hodin
- ODSTRAŇOVÁNÍ PORUCH
- INŠTALÁCIA OCHRANNÉHO VODIČA
- Nastavenie hodín
- ODSTRAŇOVANIE PORÚCH
- INSTALACJA OBWODU OCHRONNEGO
- USUWANIE USTEREK
Brand : AMICA
Model : AMMB20E5SGV
Category : Microwave