
CHS-520 - Musical instrument YAMAHA - Free user manual and instructions
Find the device manual for free CHS-520 YAMAHA in PDF.


| Brand | Yamaha |
| Model | CHS-520 |
| Product Type | Acoustic Guitar |
| Body Shape | Dreadnought |
| Top Wood | Spruce |
| Back & Sides Wood | Meranti or Nato |
| Neck Material | Nato |
| Fingerboard Material | Rosewood or Sonokeling |
| Number of Frets | 20 |
| Scale Length | 634 mm (25 in) |
| Overall Length | Approx. 1025 mm (40.4 in) |
| Body Width | Approx. 385 mm (15.2 in) |
| Body Depth | Approx. 100-118 mm (3.9-4.6 in) |
| Weight | Approx. 1.8 kg (4.0 lbs) |
| Finish | Gloss |
| Strings | Steel, light gauge |
| Recommended Accessories | Gig bag, tuner, picks, spare strings |
| Care & Maintenance | Clean with a soft cloth; avoid extreme humidity; store in a case when not in use |
| Safety Precautions | Keep away from fire; do not insert objects into sound hole; supervise children |
| Spare Parts Availability | Contact Yamaha authorized service centers for replacement parts |
Frequently Asked Questions - CHS-520 YAMAHA
User questions about CHS-520 YAMAHA
0 question about this device. Answer the ones you know or ask your own.
Ask a new question about this device
Download the instructions for your Musical instrument in PDF format for free! Find your manual CHS-520 - YAMAHA and take your electronic device back in hand. On this page are published all the documents necessary for the use of your device. CHS-520 by YAMAHA.
USER MANUAL CHS-520 YAMAHA
Make sure to read the "PRECAUTIONS" on page 6 and the "Before you use" on page 7.
CHS-506
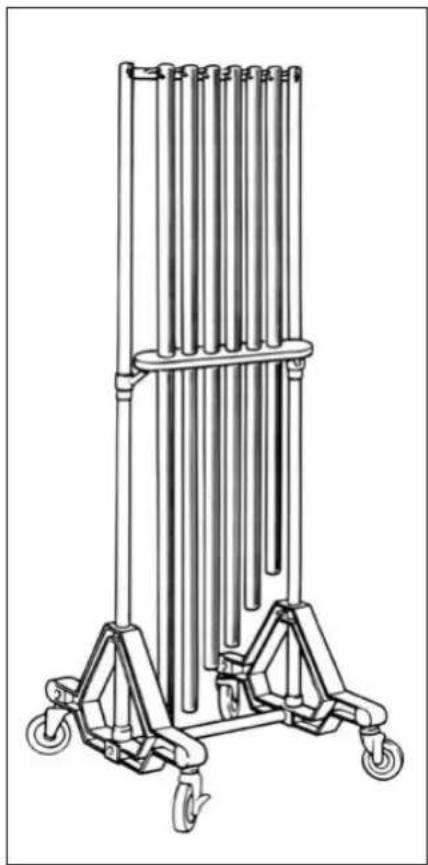
* 別売サウンドコラム取り付け時
* Shown with the sound columns (sold separately) attached.
* Показана с прикрепленными звуковыми колоннами (продаются отдельно).
* 图中音柱为选购产品。
*사운드 컬럼(별매)이 부착된 상태.
安全へのこころがけ
注意

Using the Chimes Safely
The chimes are a large and heavy instrument that gets used in various places by persons of all ages, so please obey the following instructions regarding their regular care and placement.
Especially in the case of children, a responsible adult should provide proper instruction on how to use and treat the chimes before use.
Preventing Injuries —Make sure that all precautions described below are obeyed—
About the Icons
Icons are used in this section to promote the safe use of this product, and to prevent you and others from harm and property damage. Please fully understand the meaning of the icons before reading the manual.

This icon urges you to pay caution (includes dangers and warnings).

This icon indicates actions that are prohibited.

For example: Do not disassemble.

This icon indicates special instructions that should be strictly followed.

Warning
Disregard of the warnings with this mark or misuse may result in death or personal injury.

Before you use the chime, carefully read the instructions listed below and the owner's manual.
Cautions when setting the instrument.

Never place the instrument on an sloping, unstable, etc., platform. The instrument may fall or overturn and result in injury.
Cautions for treatment of the instrument.
Never lean on or climb onto the instrument. The instrument may fall and result in injury.

Do not play or roughhouse around the instrument. Bumping into the instrument may result in injury. It may also cause the instrument to fall over. Keep children away from the instrument.

If an earthquake occurs, strong shocks caused by the earthquake may overturn the instrument or cause it to move about. Stay away from the instrument during earthquakes.
Cautions when moving the instrument.
When transporting the chimes, make sure that the damper is engaged and all caster locks are released.
The chimes can overturn if moved with the caster locks engaged.
- The chimes should only be moved across smooth, flat surfaces when using the casters. Never move the chimes on a sloped, unstable, or gravel surface. Doing so can cause the chimes to overturn or run out of control resulting in serious injury.
Always move the chimes slowly, with two persons supporting the side columns as shown in the illustration on the right. Never run. Doing so can result in the chimes running out of control and hitting an obstacle or wall causing serious injury.
- The weight of the CH-500 is approximately 84kg. If the chimes must be lifted when being moved, lift them carefully, using as many persons as possible to avoid injury. At this time, lift the chimes by holding the base section and supporting the side column making sure that the hanger section (from which the sound columns hang) remains in an upright position. Never lift the base section higher than the hanger section. Doing so can result in the sound columns coming off the hanger.
- Moving the instrument up or down stairs should never be done with the instrument assembled. Doing so is a danger as parts can fall off, or you can loose balance causing the instrument to fall over. Only move the instrument after it has been disassembled.
When using the casters

When lifting


Caution
Injury or handicaps to persons caused by the disregard of warnings with this mark or, misuse of the instrument, may result in the loss of personal property.

When assembling or disassembling the instrument, be careful around the sides or ends of metal parts so as to prevent injury to fingers, etc.

Do not use the hammer for anything other than playing the instrument. It may be the cause of injury or accidents. Do not let children strike other, etc., with the hammer. Do not allow such dangerous behavior to take place.

If the instrument is often moved, bolts, parts, etc., may become loose. After moving the instrument, check and make sure all bolts, parts, etc., are firmly fastened. Firmly tighten all loose items.
Thank you for selecting the YAMAHA chimes.
Please read this owner's manual carefully, and truly enjoy this instrument for years to come.
Before you use
1 Never use a metal type hammer or mallets to strike the sound column with. The sound column will break.
2 Always use the instrument on a flat, level surface. The instrument will not function properly on a sloped surface.
3 When assembling the stand, make sure each part is firmly attached, and there is no twisting or disfigurement in the frame. Also, make sure that all wing nuts are firmly tightened.
4 Use your toes to operate the damper pedal. Do not stand on or put your weight on the pedal. Doing so may cause the pedal to break.
5 Do not touch the damper adjuster. The adjuster has been adjusted at the factory. Moving the adjuster may result in the damper not functioning properly.

6 When playing the chime, make sure the caster brakes are firmly set and the chime stand does not move about.
7 Hit the Head Plug when playing the chime. Never hit the sound column (pipe) with the hammer.

8 Do not keep the chime in a place where high temperatures and high humidity are present. Doing so will result in the shortening of the instruments life.
9 For regular cleaning, wipe with a soft, dry cloth. Never wipe with thinner, or polishing preparations.
Be careful when transporting
1 When transporting or moving the instrument, do not subject it to strong shocks.
2 The sound column's pitch and/or tone may change if the columns are scratched or bent. Be careful.
3 When the instrument is to be transported over long distances, especially by vehicle, do so with the sound columns removed from the stand. The shape of the stand may change and the column's wire/strings may be cut if the columns are not removed.
4 When attaching or removing the sound columns, do so in a place where there is sufficient room so that the columns do not come into contact with other objects.
5 After the sound columns are removed, wrap them in a soft cloth, etc., to prevent scratching, and then transport.
1 Insert the side columns into the base. At this time, make sure that the damper rest, attached at the center of the column, and the short section of the column is positioned upright.

2 Fit the damper onto the side columns and lower the damper onto the damper rest. Next, secure the damper in its position with the damper fixing bolts. At this time, tighten the fixing bolts that secure the side column to the base as well.
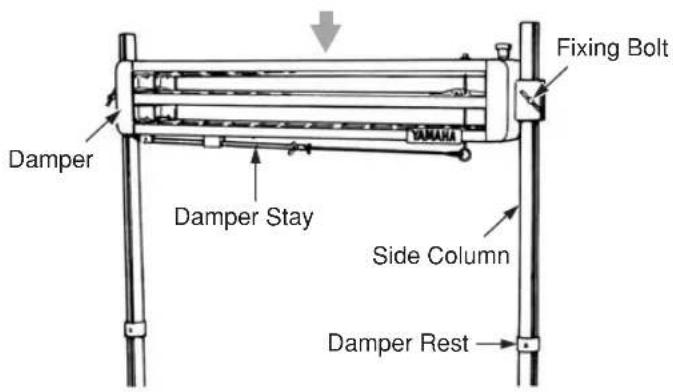
3 Remove the damper stay, attached to the bottom of the damper, loosen the wing bolt on the damper stay, and attach the stay to the pedal hook. The pedal's position can be controlled by adjusting the length of the pedal stay with its two wing bolts. At this time, tighten the upper wing bolt first, then go on to tighten the lower bolt.
Adjust the pedal position so that the pedal stops slightly above the floor when fully depressed.

4 Slide the hanger onto the side columns.

5 To activate the damper stopper, depress the pedal and press the stopper. When the pedal is released, the stopper will hold the damper in place.


Before hanging the sound columns on the hanger, activate the damper stopper.
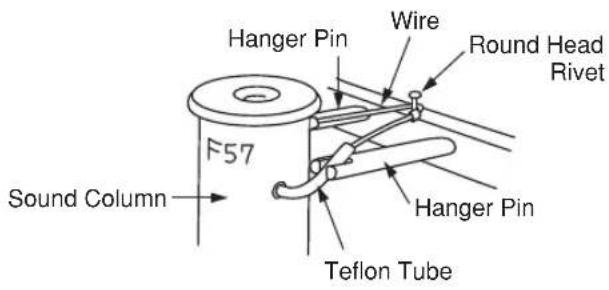
Position the sound column with its pitch inscription facing forward, place one side of the wire into the slot of the hanger pin. Next, hook the wire on the round head rivet, finally place the wire into the slot of the remaining hanger pin.
When hanging the sound columns, it is easier to hang the accidental tones (C#53-F#70) first, then hang the natural tones (C52-G71).
CH-500
CHS-506
ASSEMBLY PROCEDURE

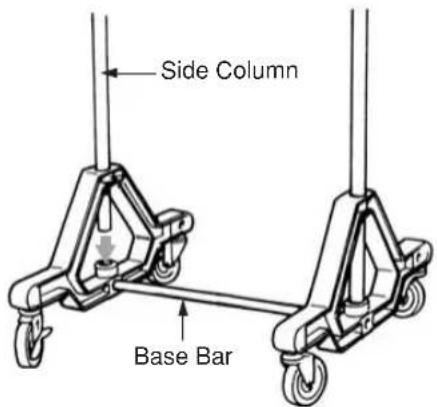
With the fixing hole on the base bar aligned with the bolt hole in the base, connect the base bar to the base. Tighten the block bolt to secure the base bar to the base. (The upper end of the side column acts as tool to tighten the block bolt. Insert the upper end of the column and tighten the block bolt by rotating the side column.)


After tightening the block bolt, re-insert the side column into the base with making sure that the side column's hanger attachment positioned upright.

Fit the guide board onto the side columns and lower the guide board until it rests on the board rest.


Attach the hanger bar on the top of the side columns and secure with the wing bolts. At this time, also tighten the wing bolts on the side column and base.
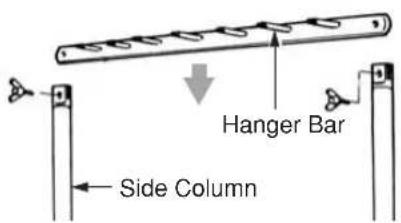

Position the sound column with its pitch inscription facing forward, and attach the sound column to the hanger bar.

注意

들어올리는
경우

! 주의

- 安全へのこころがけ
- 注意
- USING THE CHIMES SAFELY
- PREVENTING INJURIES —MAKE SURE THAT ALL PRECAUTIONS DESCRIBED BELOW ARE OBEYED
- ABOUT THE ICONS
- WARNING
- CAUTIONS WHEN SETTING THE INSTRUMENT
- CAUTIONS FOR TREATMENT OF THE INSTRUMENT
- CAUTIONS WHEN MOVING THE INSTRUMENT
- CAUTION
- BEFORE YOU USE
- BE CAREFUL WHEN TRANSPORTING
- CHS-506
- ASSEMBLY PROCEDURE
- 주의
Brand : YAMAHA
Model : CHS-520
Category : Musical instrument