802-337 - Steam cleaner Jula - Free user manual and instructions
Find the device manual for free 802-337 Jula in PDF.


| Product Type | Steam Cleaner |
| Brand | Jula |
| Model | 802-337 |
| Power Supply | 220-240V, 50/60Hz, 1500W |
| Water Tank Capacity | 1.2 L |
| Steam Pressure | 3.5 bar |
| Heat-up Time | 3 minutes |
| Dimensions (LxWxH) | 30 x 25 x 20 cm |
| Weight | 3 kg |
| Cable Length | 5 m |
| Noise Level | 75 dB(A) |
| Safety Features | Auto shut-off, overheat protection, child lock |
| Maintenance | Regular descaling; wipe exterior with damp cloth |
| Included Accessories | Floor mop, detail brush, extension hose, measuring cup |
| Water Type | Distilled or demineralized water recommended |
Frequently Asked Questions - 802-337 Jula
User questions about 802-337 Jula
0 question about this device. Answer the ones you know or ask your own.
Ask a new question about this device
Download the instructions for your Steam cleaner in PDF format for free! Find your manual 802-337 - Jula and take your electronic device back in hand. On this page are published all the documents necessary for the use of your device. 802-337 by Jula.
USER MANUAL 802-337 Jula
Installation Instructions for Steam Cleaner
802-337

SV Bruksanvisning i original
NO Bruksanvisning i original
EN Installation instructions in original
SVENSKA 4
SÄKERHETSANVISNINGAR 4
SAFETY INSTRUCTIONS....38
Operation 38
Maintenance and cleaning 38
TECHNICAL DATA....39
DESCRIPTION 39
OPERATION 40
Description 40
Unpacking 40
Fitting accessories 40
Steam hose 40
Extension tube 41
Floor nozzle 41
Accessory adapter 42
Small nozzle....43
Jet nozzle 43
Brush nozzles 43
Two-piece window nozzle 44
Filling with water 44
Before use....45
Mains supply 45
Use....46
Filling with water 46
After use....47
MAINTENANCE 47
TROUBLESHOOTING 47
SÄKERHETSANVISNINGAR

Tillbehörsadapter
Forlengelsesrør


Gulvmunnstykke

Tilbehørsadapter


- Kontrolka uruchomienia
- Kontrolka podgrzewan
Read these instructions carefully before use!
- Check that the data specified on the appliance type plate corresponds to the mains supply voltage at the point of use.
- Only connect to an earthed mains supply.
- The plug must fit properly into the power outlet. Never modify the plug in any way. Never use adapter plugs with earthed appliances. Unmodified plugs and matching outlets reduce the risk of electric shock.
- We recommend connecting the appliance to a power outlet with a residual current device. Contact an authorised electrician where necessary.
- Do not touch the plug with wet hands or other body parts.
- Do not pull the power cord to disconnect the plug from the mains socket.
- A damaged power cord may only be replaced by a cord with identical data. Any repairs must be carried out by an authorised service centre.
- If an extension cord is used, the cross-section of the conductors must be sufficient for the appliance's power supply. Contact your dealer if you have any questions.
- Run the power cord so that there is no risk of tripping over it. The cord must not be bent, folded, crushed or run over.
Operation
- Be careful when using the appliance near children or disabled people.
• Never leave the appliance unattended if children or people with disabilities are in the same room. - Keep the appliance out of the reach of children.
- Do not let children play with the packaging material (plastic film).
- Check the appliance, power cord and accessories regularly for damage.
- Do not use the appliance or accessories if they are damaged.
- Never point the appliance at people, animals or plants – risk of burns/scalds. Never point the appliance at the electrical system or wiring.
- Never leave the appliance unsupervised. Always turn off the appliance and unplug the power cord if you leave the work area.
- The appliance has a thermostat and overheat protection.
• The accessories will get hot during use. Let the accessories cool before replacing them.
• Never remove the filler cap during use. The tank is pressurised. - The appliance must not be tilted more than 45° during use.
- Never immerse the appliance in water or any other liquids.
• Never expose the machine to rain or damp conditions. Do not use the appliance outdoors.
• Do not use the appliance in a tank/pool etc., containing water or any other liquid. - Do not use the appliance with an empty water tank.
• Always refill with water in good time. - Drain the water tank when the appliance is not in use.
- Never pour anything other than clean water in the water tank. Never use any additives (such as perfumes, dry cleaning fluid or alcohol products) in the water. This could damage the appliance or pose a risk of injury or damage to property.
• Always unplug the power cord and allow the appliance to cool completely before filling with water. - Do not overfill the tank with water. Do not fill the tank above the maximum mark. Use the measuring jug and funnel supplied with the appliance.
• Make sure the filler cap is properly closed before use.
• Always carry the appliance by the handle. - Do not touch the hot surfaces of the appliance. It is normal that the appliance heats up during use.
Maintenance and cleaning
- Never use the appliance to clean clothes that someone is wearing.
• Water can drip from the nozzle. This is condensate and is quite normal. -
Steam pressure and temperature may damage some materials. Always check if the surface or material can withstand the steam cleaner by testing on a small and concealed surface.
• If you pass this appliance on to someone else, you must also give them these instructions. -
Only use original accessories supplied with the appliance.
- Never try to repair the appliance. Repairs must only be carried out by an authorised service centre or other qualified personnel using identical spare parts.
- Turn the appliance off, unplug the power cord and allow the appliance to cool before cleaning or maintenance.
TECHNICAL DATA
| Rated voltage | 220–240 VAC ~ 50/60 Hz |
| Output | 1500 W |
| Steam pressure | Max. 4 bar |
| Water tank volume | Max. 1.4 l |
| Steam capacity | Max. 40 min/tank |
| Heat up time | Approx. 10 min |
| Steam production | Max. 40 g/min |
| Dimensions | 360 x 240 x 250 mm (l x w x h) |
| Weight | 6.3 kg |
DESCRIPTION
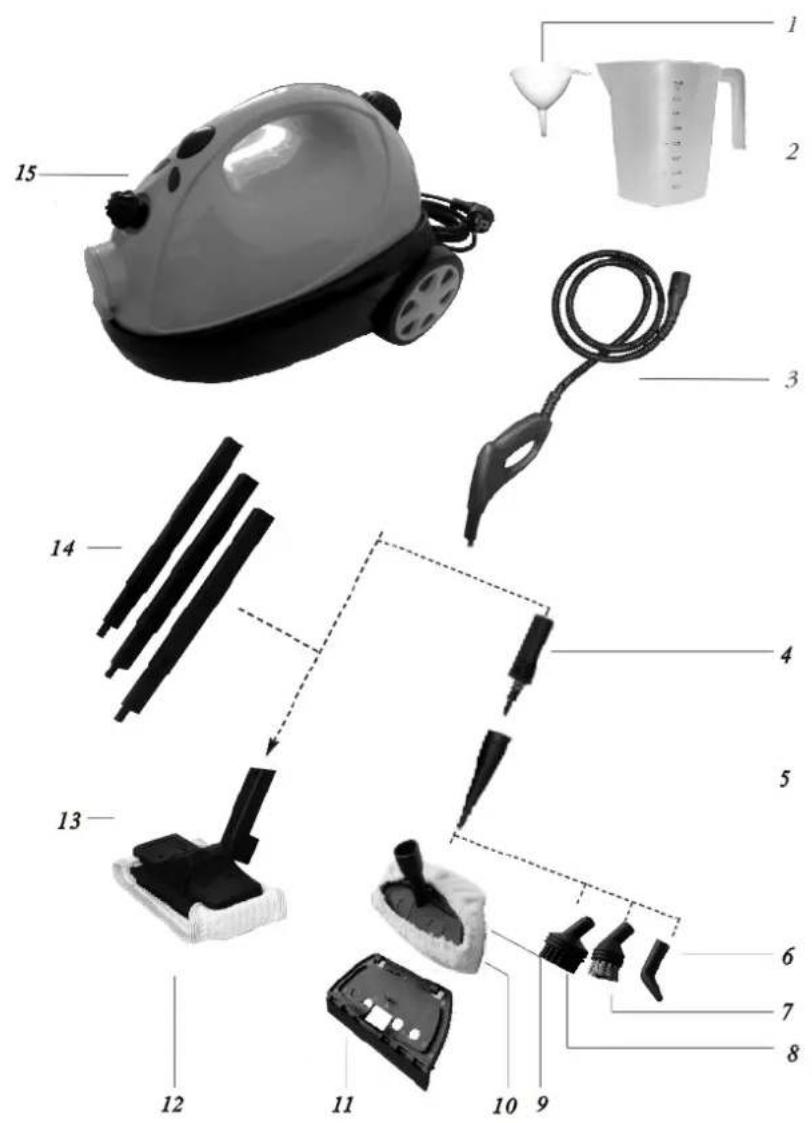
- Funnel
- Measuring jug
- Steam gun with steam hose and connection
- Accessory adapter
- Small nozzle
- Jet nozzle
- Metal brush
-
Nylon brush
-
Two-piece accessory, window nozzle
-
Cotton cloth
- Two-piece accessory, window scraper
- Large cleaning cloth
- Floor nozzle
- 3 extension tubes
- Steam cleaner with power cord and plug
OPERATION
Description
The steam cleaner is a versatile cleaning tool. With the help of hot steam, you can easily remove stubborn stains from smooth surfaces, kitchen appliances, windows and mirrors and kill harmful bacteria. This is an environmentally friendly method of removing stubborn stains, mould, grease, soap scum and dirt without chemicals.
Unpacking
Unpack the steam cleaner and all accessories. Make sure everything is included. Be sure to save the box and packaging material for possible future transportation. Contact your dealer immediately if you discover any transit damage. Do not use the appliance if it is damaged.
WARNING! Make sure the packaging material (plastic film) is out of the reach of children. Risk of suffocation!
Fitting accessories

Connect the steam hose and steam gun to the appliance and fit the accessory required before using the appliance. The steam cleaner has an accessory tray that holds the small nozzle, two brushes, jet nozzle and both pieces of the window nozzle. Open the accessory tray by pressing the yellow button at the rear by the wheels and lift off the top using the handle.
Steam hose

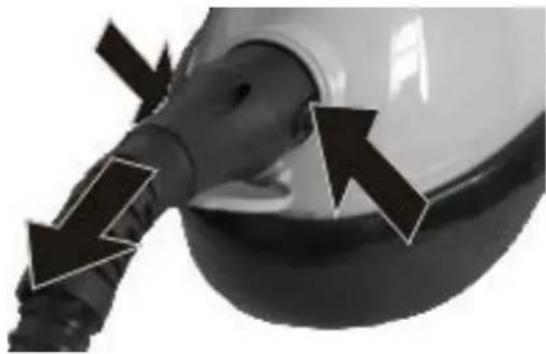
Take out the accessory required and replace the top. Press down the top so that it snaps in place. Connect the steam hose to the socket at the very front of the steam cleaner. Remove the black protective tab and press the steam hose into the socket so that it snaps in place.
Extension tube
Floor nozzle

Disconnect the steam hose by pressing the release buttons to the right and left of the connection and pull the hose from the socket.
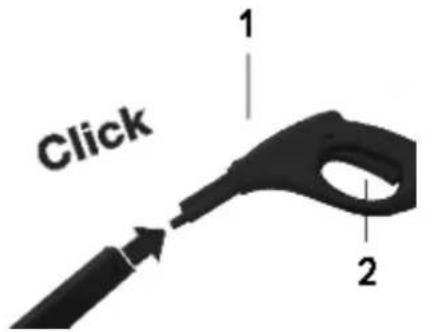
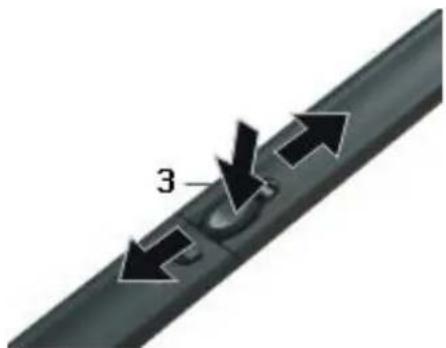
Use the extension tubes if you plan to use the appliance for cleaning floors or in confined spaces. Thread the tube's open end on the steam gun until it snaps in place.
- Release button
- Sleam button
Use one, two or three tubes according to need. Press the release button to take the extension tubes apart. Then pull off the tube.
- Release button
Attach the floor nozzle at the bottom of the extension tube. Make sure the nozzle snaps properly into place. You can also use the floor nozzle with or without a cleaning cloth, on washable walls and floor coverings. We recommend that you use the cleaning cloth to protect sensitive surfaces like wood and linoleum.
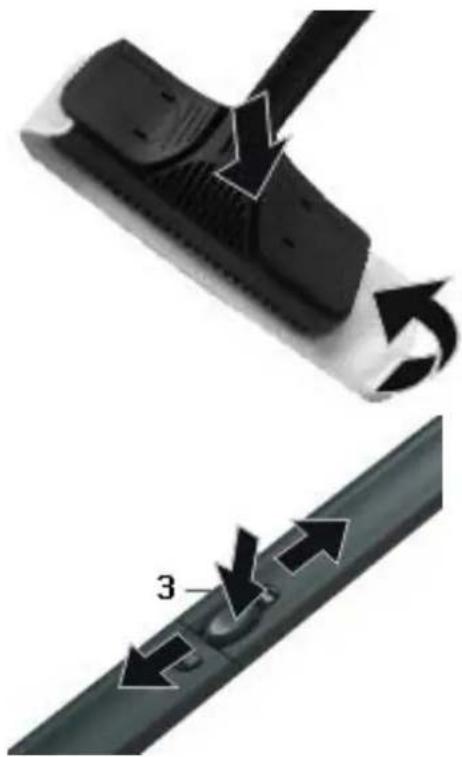
Place the floor nozzle on the cleaning cloth and attach the cloth with the clips. Press on the inside of the yellow holder, open the clips and attach the cleaning cloth.
Remove the floor nozzle by pressing the release button and pull off the nozzle.
NOTE!
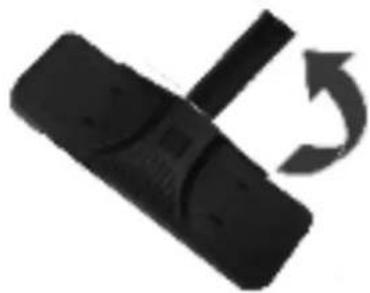
The floor nozzle is delivered with a separate connector for packaging reasons Assemble the connector as illustrated.


Accessory adapter
The steam cleaner has a range of nozzles for effective cleaning of different kinds of surfaces. Fit the accessory adapter on the hose and connect the accessories to the adapter. The accessory adapter can be attached directly to the steam gun or to an extension tube.

Press the accessory adapter until it snaps into place. Remove the accessory adapter by pressing the release button and pull off the adapter.
Small nozzle
You can use the small nozzle alone or in combination with one of the brush nozzles, jet nozzle or window nozzle. The small nozzle is attached with a bayonet fitting. Press the small nozzle on the accessory adapter and turn it a quarter turn in the direction that the arrow on the nozzle shows.

- 2-in1 nozzle
- Jet nozzle
- Metal brush
- Nylon brush
- Detail nozzle
- Accessory adapter
Jet nozzle

Do the opposite to detach the nozzle: turn the nozzle a quarter turn in the opposite direction and pull it off. Press the jet nozzle on the accessory adapter. This nozzle allows you to easily clean hard to reach surfaces (corners, joints and toilets). Simply remove the jet nozzle by pulling it off.
Brush nozzles
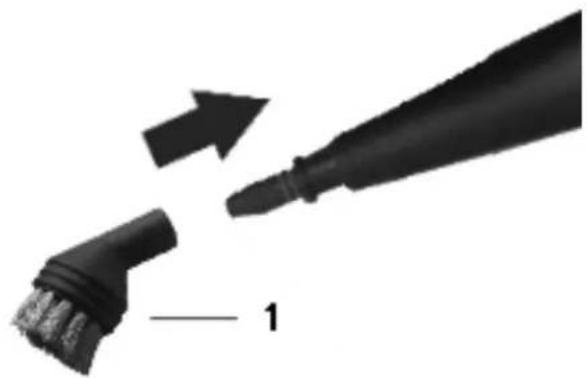
Press the two brush nozzles onto the small nozzle in the same way as the jet nozzle.
Stubborn dirt, e.g. on blinds, radiators and valves, can also be removed using the small metal brush.
- Metal brush

The large nylon brush is suitable for stubborn stains on less sensitive material such as stainless steel or stone. Simply remove the brush nozzles by pulling them off.
- Nylon brush
Two-piece window nozzle

The two-piece window nozzle consists of an angled steam nozzle that you can attach to a window cleaning section. Press the angled steam nozzle firmly on the accessory adapter. Thread the cotton cloth over the nozzle for more thorough cleaning.
- Steam attachment
- Cotton cover
- Window cleaning attachment
The cotton cloth also protects the surface being cleaned. Attach the window cleaning section with the rubber scraper on the steam nozzle if you want to clean windows, mirrors or tiled surfaces.
IMPORTANT!
Glass may crack if suddenly exposed to strong heat. Heat glass surfaces prior to steam cleaning by first spraying steam from a distance of 20-25 cm. Then decrease the distance to 10-15 cm in order to heat the glass surface further.
Filling with water

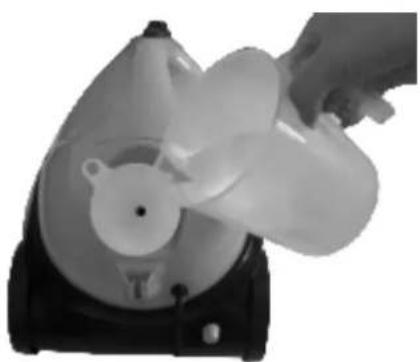
The built-in water tank holds 1.4 litres. Turn off the appliance and unplug the power cord before topping up the water. Loosen the filler cap by pressing it down and turning it anti-clockwise.
Fill with water using the funnel and measuring jug.
Before use
IMPORTANT!
Always check if the surface or material can withstand the steam cleaner by testing on a small and concealed surface.
- Steam can fade painted or varnished wood surfaces.
- Steam can discolour shiny plastic surfaces.
• Acrylic, velvet and linen are heat-sensitive materials that rarely withstand steam cleaning. - Do not use the steam cleaner on acrylic material without having first tested on a concealed area. The manufacturer is not liable for any damage to objects, materials or plants or injury to people or animals resulting from the improper use of hot steam or misuse of the appliance.
Never use any additives (such as perfumes, dry cleaning fluid or alcohol products) in the water. This could damage the appliance or pose a risk of injury or damage to property. We recommend the use of distilled water to prevent lime deposits, especially if the water is very hard (above 21° dH). Otherwise you can use boiled water to extend the life of the appliance.
IMPORTANT!
Never fill with more than 1.4 litres of water.
Replace the filler cap by pressing it and turning it clockwise.
TIPS!
The time for heating is reduced if you fill the tank with warm water.
Mains supply

Connect the power cord to a suitable power outlet that is properly installed and earthed in accordance with regulations in force.

Press the power switch to turn on the appliance. The green indicator light for operation and red for heating (fig. 20) come on. The operation indicator light is always lit when the appliance is switched on. The indicator light for heating is lit when heating is in progress. It takes about 11 minutes for the appliance to reach operating temperature. The red indicator light for heating goes out and the appliance is ready for use.
- Operating pilot lamp
- Heating pilot lamp
Use
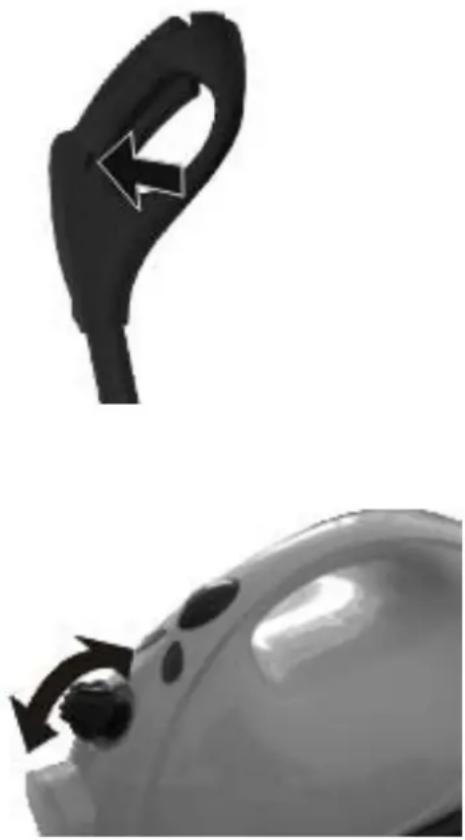
Unlock the safety latch by pressing the yellow pin on the right side of the steam gun to the left. Hot steam will shoot out when the steam control is pressed in. First hold the steam gun over a cloth to soak up the water that comes in the beginning. Turn the steam switch until there is a steady flow of steam. You can now start to clean.
Do not hold the steam nozzle too far from the surface to be cleaned. Loosen up the dirt by moving the nozzle back and forth. The amount of steam is controlled by the steam button and can be adjusted according to how dirty it is. Turn the steam button clockwise for less steam and anticlockwise for more steam.
The appliance must not be tilted more than 45° during use. Always stand the appliance on a firm surface. A full tank lasts about 50 minutes. Never leave the appliance unsupervised when switched on. Lock the steam control with the safety latch, if necessary. Lock the safety latch by pressing the yellow pin on the left side of the steam gun to the right.
WARNING!
The casing and accessories become very hot during use. Let the appliance cool before changing accessories. The tank is pressurised. Never open the filler cap while the appliance is switched on.
WARNING!
Never direct the jet of steam at people, animals, plants or electrical systems – risk of accidents.
NOTE!
Residual steam may continue to seep out for a few seconds after turning the steam function off.
NOTE!
The appliance has overheat protection which automatically shuts it off when it reaches 180° C. Unplug the power cord. Leave to cool for 30 minutes before using it again.
Filling with water
Fill the water tank if the steam starts to abate. Stop the machine using the ON/OFF switch. The green operation indicator light goes out. Press the steam control until steam no longer comes out and then lock the control. Unplug the power cord and allow the appliance to cool. Carefully open the filler cap by pressing it down and turning it anti-clockwise.
WARNING!
Hot steam may escape when opening the cap. You can burn yourself on the cap threads and the tank. Top up with water using the measuring jug and funnel (see Filling with water) and then replace the filler cap. Plug in the power cord and turn on the appliance again. The appliance is ready for use when the indicator lamp for heating goes out.
After use
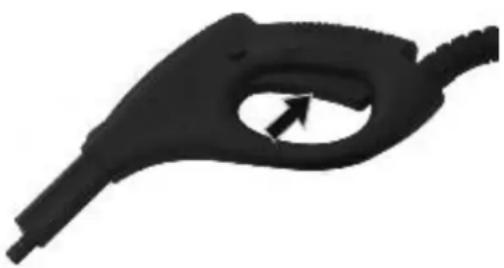
Switch off the appliance. The green operation indicator light goes out. Press the steam control until steam no longer comes out. Lock the safety latch by pressing the yellow pin on the left side of the steam gun to the right. Unplug the power cord and allow the appliance to cool.

Drain the water tank to prevent formation of deposits.
Do not refit the filler cap until the tank is completely dry. Make sure the appliance has cooled down completely before putting it away. Keep the appliance out of the reach of children. Extension tubes with fitted floor nozzle can be attached in the holder at the rear of the appliance for storage and breaks during work.
MAINTENANCE
WARNING!
Always turn off the appliance and unplug the power cord before cleaning or maintenance.
Clean the appliance by wiping it with a slightly damp cloth. Never use detergents, abrasive cleaners or alcohol as these can damage the casing.
We recommend rinsing out the tank after five refills, particularly if the water is hard (over 10\ °dH ). Ask the water supplier about the hardness of local water. Fill the tank with water and shake well to loosen the lime deposits from the tank. Pour out the water. Let the tank dry before refitting the filler cap. Clean the water tank with lime remover every six months to extend the life of the appliance. Mix the lime remover as directed on the packet in 1 litre of warm water ( 50\ °C ) and pour the solution into the water tank. Leave the solution to stand for about 30 minutes and pour out the water and dissolved deposits. Repeat if necessary and then rinse the tank with clean water.
TROUBLESHOOTING
First see if you can fix any faults on your own. Read through the following list before you send the appliance to an approved service representative for repair.
| Problem | Possible cause | Action |
| The green operation indicator light does not come on. | The power cord is not plugged into the power outlet or the appliance is not switched on.No power from the power outlet.The power cord is damaged. | Plug into a power outlet and switch the appliance on.Check the power outlet with another appliance.Send the appliance to an authorised service centre to replace the power cord. |
| There is no steam when the steam control is pressed. | The safety latch is locked.The water tank is empty. | Press the yellow pin on the right side of the steam gun to the left.Fill with water. |
| There is very little steam. The | steam switch is set to MIN. | Turn the steam switch anti-clockwise until there is enough steam. |
| It takes a very long time before the appliance is heated. | Lime deposits in the water tank. | Descale the water tank. |
Subject to printing errors and design changes over which we have no control. In the event of problems, please contact our service department.
www.jula.com
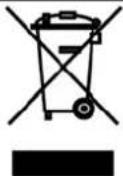
Care for the environment!
Must not be discarded with household waste!
This product contains electrical or electronic components that should be recycled.
Leave the product for recycling at the designated station e.g. the local authority's recycling station.
CE
EC DECLARATION OF CONFORMITY
EG FÖRSÄKRAN OM ÖVERENSSTÄMMELSE
EF SAMSVARSERKLÆRING
DEKLARACJA ZGODNOŚCI WE

Jula AB, Box 363, SE-532 24 SKARA, SWEDEN
certify that the design and manufacturing of this product
Low Voltage Directive 2006/95/EC
EN 60335-1:2002+A1+A11+A12+A2+A13
EN 60335-2-54:2008, EN 62233:2008
Electromagnetic Compatibility 2004/108/EC
EN 55014-1:2006, EN 55014-2:1997+A1
EN 61000-3-2:2006, EN 61000-3-3:2008
ERP Implementing Measure Regulation (EC) No 1275/2008
This product was CE marked in year -10
Skara 2011-02-08

- INSTALLATION INSTRUCTIONS FOR STEAM CLEANER
- SVENSKA 4
- SÄKERHETSANVISNINGAR 4
- SÄKERHETSANVISNINGAR
- TILLBEHÖRSADAPTER
- TILBEHØRSADAPTER
- READ THESE INSTRUCTIONS CAREFULLY BEFORE USE
- OPERATION
- MAINTENANCE AND CLEANING
- DESCRIPTION
- UNPACKING
- FITTING ACCESSORIES
- STEAM HOSE
- NOTE
- ACCESSORY ADAPTER
- SMALL NOZZLE
- JET NOZZLE
- BRUSH NOZZLES
- TWO-PIECE WINDOW NOZZLE
- IMPORTANT
- FILLING WITH WATER
- BEFORE USE
- TIPS
- MAINS SUPPLY
- USE
- WARNING
- AFTER USE
- MAINTENANCE
- TROUBLESHOOTING
- CARE FOR THE ENVIRONMENT
- CE
- EC DECLARATION OF CONFORMITY
- EG FÖRSÄKRAN OM ÖVERENSSTÄMMELSE
- EF SAMSVARSERKLÆRING
- DEKLARACJA ZGODNOŚCI WE
Brand : Jula
Model : 802-337
Category : Steam cleaner