
DPF-7003MR - Digital photo frame SALORA - Free user manual and instructions
Find the device manual for free DPF-7003MR SALORA in PDF.


| Product Type | Digital Photo Frame |
| Brand | Salora |
| Model | DPF-7003MR |
| Display Size | 7 inches |
| Display Type | TFT LCD |
| Resolution | 800 x 480 pixels |
| Aspect Ratio | 16:9 |
| Supported Image Formats | JPEG, BMP, PNG |
| Supported Video Formats | MP4, AVI |
| Supported Audio Formats | MP3 |
| Memory Card Slots | SD/MMC, USB Host |
| Built-in Speaker | Yes (2 x 1W) |
| Remote Control | Included (IR) |
| Additional Features | Clock, Calendar, Slideshow with transitions |
| Power Supply | 5V DC, 1.5A (included adapter) |
| Power Consumption | 5W (max) |
| Dimensions (W x H x D) | 190 x 140 x 30 mm |
| Weight | 300 g |
| Mounting Options | Desktop stand, wall mountable (VESA 75x75) |
| Maintenance & Cleaning | Wipe with a soft, dry cloth. Do not use liquid cleaners. |
| Safety Precautions | Do not expose to moisture or extreme temperatures. Use only the provided power adapter. |
| Spare Parts & Repairability | Contact Salora service center for spare parts. Device is not user-serviceable. |
| General Information | Supports up to 32GB SD cards. Auto-play upon power on. Adjustable brightness and slideshow interval. |
Frequently Asked Questions - DPF-7003MR SALORA
User questions about DPF-7003MR SALORA
0 question about this device. Answer the ones you know or ask your own.
Ask a new question about this device
Download the instructions for your Digital photo frame in PDF format for free! Find your manual DPF-7003MR - SALORA and take your electronic device back in hand. On this page are published all the documents necessary for the use of your device. DPF-7003MR by SALORA.
USER MANUAL DPF-7003MR SALORA
natural_image
Close-up of purple hyacinth flowers with green leaves, displayed on a tablet screen (no text or symbols visible)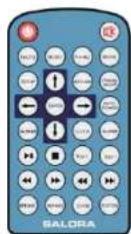
Model: DPF-7003MR
- 7" TFT LCD SCHERM
© GESCHIKT VOOR VOLGENDE FORMATEN: JPG, MP2, MP3, WMA, DAT, MPG, VOB, MP4, AVI
Created by PDF Generator (http://www.alientools.com/), to remove this mark, please buy the software.
INHOUD
- BELANGRIJKE INSTRUCTIES....1
2 EIGENSCHAPPEN 2
3 TOESTEL 3-4 - AFSTANDSBEDIENING 5-6
5.BASISAANSLUITINGEN 7 - BASISBEDIENING 8-15
7 SPECIFICATIONS 16
8 ACCESSOIRES 16
9.HULP BIJ PROBLEMEN 17
HULP BIJ PROBLEMEN
Created by PDF Generator (http://www.alientools.com/), to remove this mark, please buy the software.
EIGENSCHAPPEN
DANK U VOOR DE AANKOOP VAN DIT DIGITAAL FOTOSCHERM. LEES DEZE GEBRUIKSAANWIJZING OM MAXIMAAL VAN HET TOESTEL TE KUNNEN GENIETEN. U KAN FOTO'S INBRENGEN VIA VERSCHILLENDE GEHEUGENKAARTEN ZONDER HET GEBRUIK VAN EEN COMPUTER. DIT DIGITAAL FOTOSCHERM IS GESCHIKT VOOR USB, SECURE DIGITAL (SD), MULTI MEDIA CARD (MMC), EN MEMORY STICK (MS).
natural_image
Four-panel image showing a car on a dirt path with a person standing nearby, all without any visible text or symbols.Druk

natural_image
Two outdoor scenes showing a vehicle on a road with a large vehicle in the sky (no visible text or symbols)
natural_image
Two outdoor scenes: a person hanging near a wall and another white car parked in front of a house (no visible text or symbols)2
15
Created by PDF Generator (http://www.alientools.com/), to remove this mark, please buy the software.
10. EDIT
natural_image
Two side-by-side photos showing a white SUV parked in front of a house, with no visible text or symbols.14
TOESTEL
VOORAANZICHT

natural_image
Diagram of a device interior with labeled components and no readable text or symbols<1>

natural_image
Simple line drawing of a frame with arrows indicating direction (no text or symbols)<2>
natural_image
Illustration of two hands inserting a rectangular frame into a larger screen (no text or symbols)3
Created by PDF Generator (http://www.alientools.com/), to remove this mark, please buy the software.
BOVENAANZICHT

Created by PDF Generator (http://www.alientools.com/), to remove this mark, please buy the software.
Created by PDF Generator (http://www.alientools.com/), to remove this mark, please buy the software.
Created by PDF Generator (http://www.alientools.com/), to remove this mark, please buy the software.
2. FOTO
natural_image
Simple line drawing of a device with earphones and a monitor (no text or symbols)Created by PDF Generator (http://www.alientools.com/), to remove this mark, please buy the software.
BASISBEDIENING
Created by PDF Generator (http://www.alientools.com/), to remove this mark, please buy the software.
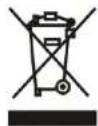
This symbol on the product or in the instructions means that your electrical and electronic equipment should be disposed at the end of its life separately from your household waste. There are separate collection systems for recycling in the EU.
For more information, please contact the local authority or your retailer where you purchased the product.
Instruction Manual
DIGITAL PHOTO FRAME
SALORA

natural_image
Close-up of purple hyacinth flowers with green leaves, displayed on a tablet screen (no text or symbols visible)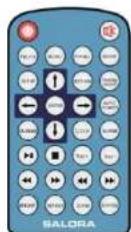
MODEL NO:DPF-7003MR
- 7" TFT LCD SCREEN
- SUPPORT PLAY FORMAT: JPG、MP2、MP3、WMA、DAT、MPG、VOB、MP4、AVI.
Created by PDF Generator (http://www.alientools.com/), to remove this mark, please buy the software.
TABLE OF CONTENTS
- IMPORTANT INSTRUCTIONS....1
- FEATURES....2
- MAIN UNIT....3-4
- REMOTE CONTROL....5-6
- BASIC CONNECTION....7
- BASIC OPERATION....8-15
- SPECIFICATIONS....16
- ACCESSORIES....16
- TROUBLESHOOTING....17
TROUBLESHOOTING
Before requesting service for this player, check the chart below for a possible cause of the problem you are experiencing. Some simple checks or an adjustment on your part may eliminate the problem and restore proper operation.
| SYMPTOM | REMEDY |
| No power | Insert the AC adaptor securely into the power outlet |
| The player is automatically set to the standby mode | Disconnect the power source and connect them again. |
| No picture | Ensure that the equipment is connected properly. |
| No soundDistorted sound | Ensure that the equipment is connected properly.Ensure that the input setting for the TV and stereo system are correct.Adjust the master volume to a suitable volume by pressing vol button |
| Picture is distorted during rapid advance or rapid reverse | The picture will be somewhat distorted at times.This is normal. |
| No operations can be performed with the remote control unit | Check the battery is installed with the correct polarities. If the battery is exhausted, replace it with a new one. Point remote control at the remote control sensor and operate. Operate the remote control unit at a distance of not more than 2m from the remote control sensor. Remove the obstacles between the remote control and remote control sensor. |
| No key operation (by the main unit and/or the remote control unit) is effective | Press standby to set the player to the standby mode and then back to on. Alternatively, press standby to set the player to the standby mode, disconnect the power adaptor and then reconnect it. (The player may not be operating properly due to lightning, static electricity or some other external factor). |
SPECIFICATIONS
Display Device:7 INCH COLOUR TFT LCD
Power Source: AC Adaptor
Power Input: AC 100-240V 50Hz/60Hz DC 12V 1000mA
System:Support NTSC/PAL/AUTO
Resolution: 480 (H) *234 (V)
Speaker:1W*2
Video Output Level:1 V _P-P
Audio Output Level: 1.8V
Earphone Output Level: 1KH_2 ,0dB,25mW
Operation Temperature:-5--40°C
Measurement:224(L)*155(W)*40(D) MM
Weight:425g
Specifications are subject to change without notice
ACCESSORIES
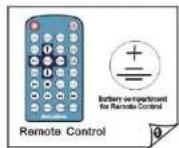


16
IMPORTANT INSTRUCTIONS


CAUTION: TO REDUCE THE RISK OF ELECTRIC SHOCK.
DO NOT REMOVE COVER (OR BACK)
NO USER SERVICEABLE PARTS INSIDE
USE THE RECOMMENDED ACCESSORIES ONLY.
REFER SERVICING TO QUALIFIED SERVICE PERSONNEL.
THIS APPLIANCE TO RAIN OR MOISTURE.
-DO NOT BLOCK THE VENTILATION HOLES ON THE BACK OF THE UNIT
AT ANYTIME
-KEEP THE PRODUCT OUT OF STRONG SUNLIGHT. DIRECT SUNLIGHT
MAY CAUSE DAMAGE
-DO NOT OPEN THE COVER OF THE DIGITAL PHOTO FRAME. THERE
ARE NO USER SERVICEABLE PARTS INSIDE.
-UNPLUG AC CABLE FROM POWER SOCKET IF NOT USE THE UNIT
FOR LONG TIME.
MAINTENANCE:
-TOUCH THE SCREEN GENTLY. THE SCREEN IN THE DIGITAL PHOTO FRAME IS
MADE OF GLASS AND IS EASILY SCRATCHED OR BROKEN.
-BE SURE DISCONNECT THE AC ADAPTOR BEFORE MAINTAINING THE PLAYER.
-WIPE THE PLAYER WITH A DRY, SOFT CLOTH.
-IF THE SURFACES ARE EXTREMELY DIRTY, WIPE CLEAN WITH A CLOTH WHICH
HAS BEEN DIPPED IN A WEAK SOAP-AND-WATER SOLUTION AND WRUNG OUT
THOROUGHLY, AND THEN WIPE AGAIN WITH A DRY CLOTH.
-NEVER USE ALCOHOL, BENZINE, THINNER, CLEANING FLUID OR OTHER CHEMICALS.
AND DO NOT USE COMPRESSED AIR TO REMOVE DUST.
1
Created by PDF Generator (http://www.alientools.com/), to remove this mark, please buy the software.
FEATURES
THANK YOU FOR PURCHASING DIGITAL PHOTO FRAME. WITH THOSE INSTRUCTIONS YOU CAN MAKE THE BEST OF THE PLAYER. YOU CAN ENTER THE PHOTO TO FILES TO VIEW DIFFERENT TYPES OF MEMORY CARDS WITHOUT COMPUTER EQUIPMENT. THIS DIGITAL PHOTO FRAME SUPPORT USB, SECURE DIGITAL (SD), MULTI MEDIA CARD (MMC), MEMORY STICK (MS) CARD.
-7 inch colour TFT LCD.
-OTG, Can connect to computer as card reader.
-Build-in 8M flash,can copy or delete photos.
-Display the digital photo taken by most digital cameras without a computer.
-Support HOST USB/SD/MMC/MS .System detect USB first,If USB device and card all in system,system read USB device.
-View individual pictures(JPEG)and slide shows with Mp3 music on the background, supported video MPEG1,MPEG2 and MPEG4(Divx)files.
-Photo supported JPG, music supported MP2/MP3/WMA, movie supported DAT/MPG/VOB/MP4/AVI.
-USB interface connect to computer.
-Scrolls through your media card photos at user selected intervals. Automatic slide show with multiple transition effects.
-Directly insert a compatible memory card into the digital photo frame to show photos, play MP3 music and supported video files.
-Video and audio output jacks, display photos and slide show on most televisions.
-AC power, no batteries required.
-Remote Control:Key press control.
-OSD Language: English, French, German, Italia, Spanish, Portuguese, Dutch, Polish.
-Other Function: Slideshow automatically.
Press ←

natural_image
Two cropped images of a car with visible wheels and roof, showing no text or symbols.
natural_image
Two outdoor scenes: a person standing near a stone wall and a white car parked in front of a brick building (no visible text or symbols)Press →

natural_image
Two vintage car crash photos showing a person on the left and a vehicle on the right (no visible text or symbols)
natural_image
Two outdoor scenes: a person hanging near a wall and a white SUV parked in front of a house (no visible text or symbols)Created by PDF Generator (http://www.alientools.com/), to remove this mark, please buy the software.
10. EDIT
-In MENU, select edit menu and press ENTER or PLAY key. In this mode, user can copy photo from media to build in flash, or delete photo files from build in flash.
- 1 Copy: The item can copy photo files from media to flash.
- press up, down key to select the picture you want, then press "play" key, the selected items will be shown in red outline, press "play" key once again, the red outline will be cancelled. press left, right key to select "SAVE" item.
10.2 Delete: The item can Delete photo files from flash.
Copy mode
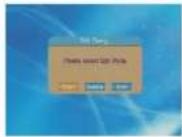

Delete mode


10.3 Exit: The item exit the edit setup menu, or press RETURN key return to MENU.
11. ROTATE
-This mode can only be used in photo mode. press up, down, left, right key to rotate photo.

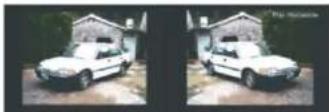


14
MAIN UNIT
FRONT VIEW

BACK VIEW
Note: Replace the changeable frame
- Press the beetling plastic knob on the back cabinet(see picture 1) to pull out the changeable frame(see picture 2).

natural_image
Diagram of a device interior with a hand holding a barcode and a stylus, no readable text or symbols present.<1>

natural_image
Line drawing of a window frame with an arrow indicating direction (no text or symbols)<2>
- Install the desired frame to replace the original one (see picture 3).

natural_image
Illustration of two hands inserting a rectangular frame into a larger screen (no text or symbols)3
Created by PDF Generator (http://www.alientools.com/), to remove this mark, please buy the software.
TOP VIEW

- To insert USB card
- Slot for insert cards - insert the card along the arrowheads direction.
- VOL- button-to adjust volume lower
- VOL+ button-to adjust volume higher
- Right button-to move right
- Left button-to move left
- Down button-to move down
- Up button-to move up
- Exit、play/pause、OK button-Return to main menu、press this button to start or pause playing the file, to confirm a selection
- Power on/off
NOTE: Please insert the card into correct position!
BASE VIEW
- 12V DC power source input jack

SIDE VIEW
- Connect to earphone
- Connect to AV output equipment
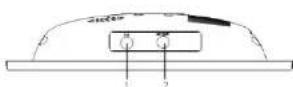

7.3 Exit: The item exit the clock setup menu, or press RETURN key return to MENU.
8. ALARM
-In MENU, select alarm menu and press ENTER or PLAY key, system will enter alarm setup.
8.1 Enable: Enable or disable alarm
8.2 Set time: Set alarm time
- If user would like to change time, press left, right key to hour or minute that you want to change press up, down key change the hour or minute.
-Alarm time arrive: Press any key to stop the alarm.
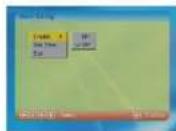


8.3 Exit: The item exit the alarm setup menu, or press RETURN key return to MENU.
9. AUTO-POWER
- In MENU, select auto-power menu and press ENTER or PLAY key, system will enter auto-power on/off setup.
9.1 Power on enable: The item enable or disable power on.
9.2 Power off enable: The item enable or disable power off
9.3 Set time: The item set power on time or power off time
-If user would like to change time, press left, right key to hour or minute that you want to change, press up, down key change the hour or minute.


9.4 Exit: The item exit the auto-power on/off setup menu, or press RETURN key return to MENU.
4
13
Created by PDF Generator (http://www.alientools.com/), to remove this mark, please buy the software.
6.1 Display menu, press RETURN exit.

6.2 Set Date:
-If user would like to change calendar, press left, right key to year or date that you want to change, press up, down key change the year or date.

6.3 Exit: The item exit the calendar setup menu, or press RETURN key return to MENU.
- CLOCK
-In MENU, select clock menu and press ENTER or PLAY key, system will enter clock setup.

7.1 Display menu, press RETURN exit. Clock

Clock&Calendar

7.2 Set Time:
-If user would like to change time, press left, right key to hour or minute that you want to change, press up, down key change the hour or minute.
12
REMOTE CONTROL

- Power button-power on/off
- Music button-to display all music files in current card
- Photo button-to display all photo files in current card
- Up button-to move up
- Setup button-to enter initial settings menu
- Enter button-to confirm a selection
- Left button-to move left
- Down button-to move down
- Calendar button-enter Calendar setup mode
- Stop button-to stop playing
- Play/pause button-press this button to start or pause playing the file
- FF button-to play the file forward at speeds: x2, x4, x8, x16, x32 (except photo file)
- FR button-to play the file backward at speeds: x2, x4, x8, x16, x32 (except photo file)
- Repeat button-to repeat a section or a theme. You can choose Off, One, Folder and ALL.
- Bright button-to display brighter
- Mute button-to make it silent
- Photo+Music button-to display all music and photo files in current card
- Movie button-to display all movie files in current card
- Return button-to return to previous screen
- Display on/off button - to select the screen display on or off
5
Created by PDF Generator (http://www.alientools.com/), to remove this mark, please buy the software.
-
Right button-to move right
-
Auto power-enter Auto-power on/off setup mode
-
Clock button-enter Clock setup mode
-
Alarm button--enter Alarm setup mode
-
Volume+ button-to adjust volume louder
-
Volume- button-to adjust volume lower
-
Prev button-to play the previous file
-
Next button-to play the next file
-
Zoom button-to enlarge picture size, max. to 150%, 200% or to shrink picture size, min. to 25%, 50%, 100% when playing photo; to enlarge picture size, max. to 2X, 4X when playing movie.
-
System button-NTSC/PAL/AUTO
Note:
- Remote control preparation
1). Remove the protective plastic tab before operating the remote control.
2). Point the remote control from no more than 2m from the player and within about 40° of the front of the player (see the picture 1-1).
3). The operating distance may vary according to the brightness of the room.
4). Do not point bright lights at remote control sensor.
5). Do not place objects between the remote control and the remote control sensor.
6). Do not use this remote control while simultaneously operating the remote control of any other equipment.
2.Battery installation

Insert the battery according to the pictures at top while observing the correct(+) and (-) polarities
1).Service life of batteries:
— The batteries normally last for about one year although this depends on how often the remote control is used.
- If the remote control fails to work even when it is operated near the player, replace the batteries.
- Use one size cr2025 type battery only.
2).Battery usage and handling:
- Do not use rechargeable (ni-cd) batteries
- Do not attempt to recharge
— Do not place the battery near to heat or expose to sunshine, and never throw the battery into the fire
— Do not drop, step on or otherwise impact this may damage the parts or lead to malfunction
- Keep battery away from children and pets.
- Remove the battery when the remote control is not in using period.
6
4. PHOTO+MUSIC
-In MENU, select photo+music menu and press ENTER or PLAY key, system will auto load USB media or card media. If no media connect to the system, return to MENU. -If media connect to system successfully, enter slide show and play music.

-Press RETURN key exit photo+music menu, return to MENU.
5. MOVIE
- In MENU, select movie menu and press ENTER or PLAY key, system will auto load USB media or card media. If no media connect to the system, return to MENU.
-If media connect to system successfully, enter media manage.

-If user select Auto-play ON system enter auto paly movie.

-Press RETURN key exit movie menu, return to MENU.
6. CALENDAR
-In MENU, select calendar menu and press ENTER or PLAY key, system will enter calendar setup.

11
Created by PDF Generator (http://www.alientools.com/), to remove this mark, please buy the software.
2. PHOTO
-In MENU, select photo menu and press ENTER or PLAY key, system will auto load USB media or card media. If no media connect to the system, return to MENU.
-If media connect to system successfully, enter media manage.
Thumbnail mode
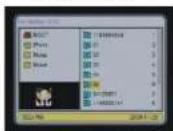
File manager

-If user select Auto-play ON system enter auto paly photo.

-Press RETURN key exit photo menu, return to MENU.
3. MUSIC
-In MENU, select music menu and press ENTER or PLAY key, system will auto load USB media or card media. If no media connect to the system, return to MENU.
-If media connect to system successfully, enter media manage.

-If user select Auto-play ON system enter auto paly music.

-Press RETURN key exit music menu, return to MENU.
BASIC CONNECTION
- Ensure all the cables are disconnected from the main unit before connecting to AC power source by AC power adaptor.
- Read through the instructions before connecting other equipment.
CONNECTING TO POWER SOURCE
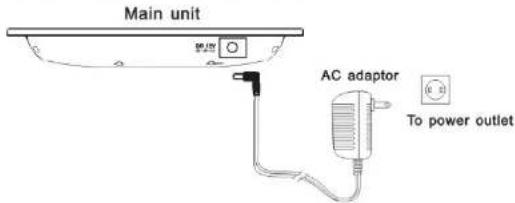
CONNECTING TO TV SET

- It is recommended to connect TV.
— Ensure that this player and other equipment to be connected are set to the standby
mode or off and disconnect the AC adaptor before commencing connection.
— Do not block ventilation holes of equipment and arrange then so that air can circulate
freely. - Read through the instructions before connecting other equipment.
- Ensure that you observe the colour coding when connecting audio and video cables.
To video input/output connector(yellow)
To audio input/output connectors(red & white) - Use the digital photo frame as a signal source
CONNECTING TO EARPHONE

natural_image
Simple line drawing of a device with earphones and a monitor, no text or symbols presentConnect the headphone to "☐" for private listening.
Caution: Listening to high power for a long moment could damage user ears.
Created by PDF Generator (http://www.alientools.com/), to remove this mark, please buy the software.
BASIC OPERATION
User can user up, down, left, right navigation button move cursor to function, then press ENTER or PLAY key, enter function mode.
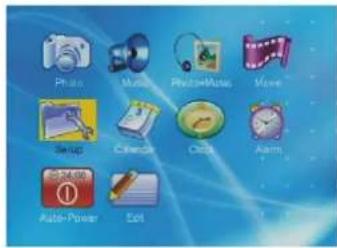
1. SETUP
Select setup in MENU, Press ENTER key enter setup menu.

1.1 Photo setting
-Interval time: The item can set play photo time 5 Sec, 10 Sec, 15 Sec, 30 Sec, 1 Min, 3 Min can be selected.
- Transition Effect: The item can select Transition Effect.
Browse: The item can set browse mode in photo mode. Thumbnail and File Manager can be selected.

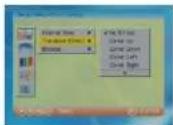
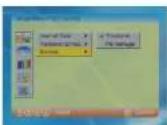
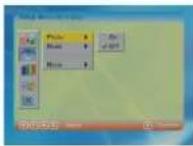
1.2 Auto-play
- Photo: The item can set Photo function Auto-play on or off. If select off, enter Thumbnail or File Manager browse photo.
-Music: The item can set Music function Auto-paly on or off. If select off, user must select music, and press ENTER or PLAY key to play.
8
-Movie: The item can set Movie function Auto-paly on or off. If select off, user must select movie, and press ENTER or PLAY key to play.


1.3 Display setup
-TV Standard: The item can select TV system NTSC, PAL and AUTO
-Brightness: The item can set Brightness mode: Normal, Bright and Soft can be selected.
-Contrast: The item can set Conrast mode: -4/-3/-2/-1/0/1/2/3/4 can be selected.


1.4 Custom Setup
- OSD Language: The item can set OSD Language. You can choose English, French, German, Italia, Spanish, Portuguese, Dutch, Polish.
- Encoding: Western European or central European.
-Style: The item provide 4 Styles.
-Repeat Mode: The item can set Repeat Mode. You can choose Off, One, Folder and ALL.
Off: Cancel Repeat Mode
One: Repeat play the playing one
Folder: Repeat play all files in current folder
ALL: Repeat play all files in media
Default: The item can recover all set to factory setting.


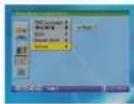
1.5 Exit: The item exit the setup menu, or press setup key.
9
Created by PDF Generator (http://www.alientools.com/), to remove this mark, please buy the software.

natural_image
Close-up of purple hyacinth flowers with green leaves, displayed on a tablet screen (no text or symbols visible)
Modèle: DPF-7003MR
- ECRAN 7" TFT LCD
- SUPPORTE LES FORMATS: JPG, MP2, MP3, WMA, DAT, MPG, VOB, MP4, AVI
Created by PDF Generator (http://www.alientools.com/), to remove this mark, please buy the software.
SOMMAIRE
- INSTRUCTIONS IMPORTANTES .... 1
- CARACTERISTIQUES 2
- APPAREIL 3-4
- TELECOMMANDE 5-6
- CONNEXIONS DE BASE 7
- OPERATION DE BASE 8-15
- SPECIFICATIONS 16
- ACCESSOIRES 16
- EN CAS DE PROBLEMES 17
EN CAS DE PROBLEMES
Created by PDF Generator (http://www.alientools.com/), to remove this mark, please buy the software.
CARACTERISTIQUES
MERCID'AVOIR ACHETE CET APPAREIL. LISEZ CE MANUEL D'UTILISATION POUR PROFITER AU MAXIMUM DES POSSIBILITES DU LECTEUR. VOUS POUVEZ REGARDER DES PHOTOS A PARTIR DES CARTES DE MEMOIRE SANS AVOIR BESOIN D'UN ORDINATEUR. CET APPAREIL SUPPORTE USB, SECURE DIGITAL (SD), MULTI MEDIA CARD (MMC) ET MEMORY STICK (MS).
natural_image
Four-panel image showing a car on a roadside, with no visible text or symbols.Poussez

natural_image
Two cropped photos showing a vehicle with a large body and a smaller body, both suspended in the sky (no visible text or symbols)
natural_image
Two outdoor scenes: a white car parked near a house and a wall-mounted device (no visible text or symbols)2
15
Created by PDF Generator (http://www.alientools.com/), to remove this mark, please buy the software.
10. EDIT
natural_image
Two side-by-side photos of a white car parked outdoors, with no visible text or symbols.14
APPAREIL
VUE FRONTALE

natural_image
Diagram of a device interior with labeled components and no readable text or symbols<1>

natural_image
Simple line drawing of a frame with arrows indicating direction (no text or symbols)<2>
natural_image
Illustration of two hands inserting a rectangular frame into a larger screen (no text or symbols)3
Created by PDF Generator (http://www.alientools.com/), to remove this mark, please buy the software.
VUE SUPERIEURE

Created by PDF Generator (http://www.alientools.com/), to remove this mark, please buy the software.
Created by PDF Generator (http://www.alientools.com/), to remove this mark, please buy the software.
Created by PDF Generator (http://www.alientools.com/), to remove this mark, please buy the software.
2. PHOTO
natural_image
Simple line drawing of a device with a base, connectors, and a screen (no text or symbols)Created by PDF Generator (http://www.alientools.com/), to remove this mark, please buy the software.
OPERATION DE BASE
Created by PDF Generator (http://www.alientools.com/), to remove this mark, please buy the software.
- INHOUD
- HULP BIJ PROBLEMEN
- EIGENSCHAPPEN
- EDIT
- TOESTEL
- BOVENAANZICHT
- FOTO
- BASISBEDIENING
- Instruction Manual
- SALORA
- TABLE OF CONTENTS
- TROUBLESHOOTING
- SPECIFICATIONS
- ACCESSORIES
- IMPORTANT INSTRUCTIONS
- FEATURES
- ROTATE
- MAIN UNIT
- TOP VIEW
- BASE VIEW
- SIDE VIEW
- ALARM
- AUTO-POWER
- PHOTO+MUSIC
- MOVIE
- CALENDAR
- PHOTO
- MUSIC
- BASIC CONNECTION
- BASIC OPERATION
- SETUP
- Photo setting
- Auto-play
- Display setup
- Custom Setup
- SOMMAIRE
- EN CAS DE PROBLEMES
- CARACTERISTIQUES
- APPAREIL
- VUE SUPERIEURE
- OPERATION DE BASE
Brand : SALORA
Model : DPF-7003MR
Category : Digital photo frame