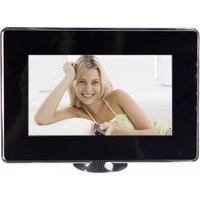
DPF 7125 DIG - Digital photo frame SALORA - Free user manual and instructions
Find the device manual for free DPF 7125 DIG SALORA in PDF.


| Product Type | Digital Photo Frame |
| Brand | Salora |
| Model | DPF 7125 DIG |
| Display Size | 7 inches |
| Resolution | 800 x 480 pixels |
| Supported Image Formats | JPEG |
| Supported Audio Formats | MP3 |
| Supported Video Formats | MPEG, AVI (bit rate < 2.5 Mb/s) |
| Memory Card Slots | SD/MMC/MS |
| USB Ports | 1x Mini USB, 1x USB (USB 1.1) |
| Internal Memory | Nand flash |
| Max External Memory | 2 GB (card and USB) |
| Power Supply | DC 5V (AC adapter included) |
| Power Consumption | < 10W |
| Weight | 0.357 kg |
| Dimensions (W x D x H) | 210 x 144 x 37 mm |
| Languages | English, French, German, Italian |
| Remote Control | Yes (with battery) |
| Package Contents | Main unit, manual, remote, AC adapter, USB cable |
| Safety Instructions | Read manual, avoid moisture/heat, unplug during storms, professional servicing only |
| Cleaning | Unplug and use damp cloth, no liquid detergents |
| Operating Temperature | 5-40 °C |
| Frequency Response | 20 Hz - 20 KHz |
| Audio Output | 1.4 Vrms/10K Ohm |
| Audio S/N Ratio | > 80 dB |
Frequently Asked Questions - DPF 7125 DIG SALORA
User questions about DPF 7125 DIG SALORA
0 question about this device. Answer the ones you know or ask your own.
Ask a new question about this device
Download the instructions for your Digital photo frame in PDF format for free! Find your manual DPF 7125 DIG - SALORA and take your electronic device back in hand. On this page are published all the documents necessary for the use of your device. DPF 7125 DIG by SALORA.
USER MANUAL DPF 7125 DIG SALORA
Warning: To alert the user to dangerous voltage inside the unit
Warning: To reduce the risk of fire or electric shock, do not expose this apparatus to rain or moisture.
1) Please read the instruction manual carefully and follow all the requirements of safe operation to operate the device.
2) Do not use this unit near water. Do not place over the unit any container with liquid inside.
3) Do not install near any heat sources such as radiators, heat registers, stoves, or other apparatus (including amplifiers) that produce heat.
4) Unplug this unit during lightning, storms or when not use for long.
5) About Cleaning: Unplug the system, use only wet cloth to clean. Do not use liquid detergent or aerosol.
6) Only use accessories specified by the manufacturer.
7) Refer all servicing to qualified service personnel, servicing is required when the unit has been damaged in any way, such as power supply cord or plug is damaged. liquid has been spilled or objects have fallen into the unit, exposed to moisture, does not operate normally. Don't try to repair the machine by yourself because of the danger of high voltage and electric shock.
Main Features
Support SD/MMC/MS card and USB device. Internal Nand flash.
Able to read MP3, JPEG, MPEG, AVI files(Bit rate under 2.5 Mb/s).
Main Unit Controls


- DC in 5V
- SD card slot
- Mini USB port
- USB port
- Power : turn on and turn off the unit
- Menu: Press this button to return menu root from play mode, when it's time display mode, press this key to return menu root; When playing video, press it to enter folder list;
- ▲▼ : Use this button to move cursor up and down when at menu, setting menu, play list interface When playing video or JPEG files, press it to play next/prev video file or JPEG file. When the picture is enlarged, press it to move the picture up or down.
- Enter : Press this button to enter the submenu step when at menu root and setting menu; when at play list, press this button to play and pause; when displaying pictures, press this button for delete or copy function. when at time set mode, press this button to switch from year, month, day, hour, minute, a.m.p.m;
- Mode: When automatic playing photo, press this button to switch automatic play mode(Photo single view, Photo slide show, multi image view, calendar + picture, timer + picture); when at music or video play mode, press this button to forward to volume adjusting, press it twice to go fast forward or backward, press it third to return to play mode.
- Base
Package
| Main unit | 1 PC |
| Instruction manual | 1 PC |
| Remote control with battery | 1 PC |
| AC/DC power adapter | 1 PC |
| USB cable | 1 PC |
System Connection
Power connection

Plug one end of the supplied AC/DC power adaptor into the DC input jack of the machine, then plug the other end into the AC power receptacle. Please refer to the illustration above.
Using your SD card
Upon using an SD card, insert it to the corresponding slot flatly with the label side backward until you hear a click.
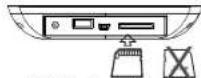
Note: Please do not disconnect USB device or plug out SD/MMC/MS card while they are working with the unit. Functional failure may occur in case of wrong operations.
Remote Control
- REPEAT
When playing Music or video files, press "REPEAT" button to repeat playback of track/All.
2.ZOOM
While play photo, press this key to zoom in or out.
- ◀▶ Button
When playing video file, press this button to fast forward or back forward. When viewing picture, press it to rotate the picture clockwise or counter-clockwise. When zooming in the picture, press it to move the picture left or right.
- MENU
Press this button to return menu root from play mode, when it's time display mode, press this key to return menu root. When playing video, press it to enter folder list:
- MODE
When automatic playing photo, press this button to switch automatic play mode(Photo single play, Photo slide show, multi image view, calendar + picture, timer +picture); when at music or video play mode, press this button to forward to volume adjusting, press it twice to go fast forward or backward, press it third to return to play mode.
- SETUP
Press this key to enter into setup menu.
- OK
To confirm when selecting an option on the menu. During playback, press it to start to play; press it again to pause. When at time set mode, press this button to switch from year, month, day, hour, minute, a.m.p.m; when displaying pictures, press this button for delete or copy function.
- ▲▼ button
When playing video or JPEG files, press it to play next/prev video file or JPEG file. When the picture is enlarged, press it to move the picture up or down.

Auto Playing file
- After connecting power to the unit, turn on the unit with the POWER button.
-
Insert USB device or SD/MMC/MS card.
-
The unit will automatically play image when turn on. Then you can press MODE button to select display
Mode circularly, as photo single play/photo slide show/multi image view/clock and photo view/calendar and photo view.
Custom playing
- After connecting power to the unit, turn on the unit with the POWER button.
-
Insert USB device or SD/MMC/ MS card.
-
Press MENU button to enter the main menu. Use "▲▼" button to select the option, press ▶/OK" or "ENTER" button to confirm.
Notice: When selecting an option and press "OK" or "ENTER" button to play, the unit will automatically check whether USB device or other card has been connected to the unit. If both USB device and card are inserted, USB device will be read only. To select the media source, press MENU button to access the Setup-Media.
Playing JPEG file(photos)
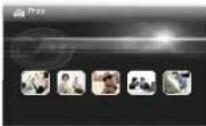
Select "Photo" option on main menu, press "OK" or "ENTER" button to play. Under this mode, only JPEG file is available to play. The unit will automatically play JPEG when entering this mode.
Playing music files
Select "MUSIC" option on main menu, press "■/OK" or "ENTER" button to enter the menu. Under this mode, only Music file(MP3 file) is available to play. The unit will automatically list all music files when entering this mode.
Playing video file
Select "MOVIE" option on main menu, press "OK" or "ENTER" button to enter the menu. Under this mode, only video file of DAT, MPG and AVI is available to play.
Calendar and clock display
- After connecting power to the unit, turn on the unit with the "POWER" button.
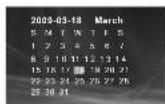
- Press "MENU" button to enter the main menu. Use * ▲▼ "button to select the "CLOCK" option. Press" ▶/OK" or "ENTER" button to confirm. Use "MODE " button to select the calendar and clock display mode.





System Setup
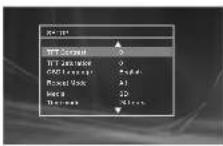
Select "SETUP" on main menu and press "▶/OK" or "ENTER" button to enter setup menu. In setup menu, user can press "▲/▼" button to select below item, and press "▶/OK" or "ENTER" button to confirm.
-
"Format" press "▶ / OK" or "ENTER" button to option. Press "▲/▼" to format Nand flash.
-
"Interval Time" of picture display (5Sec., 10Sec., 15Sec., 30Sec.,
1Min.,3Min.,Off).
Press * ▲ / ▼ to choose the item you desire, and press
* ▶ / OK" or "ENTER" button to exit
- "Transition Effect" of picture display (No Effect, Rombus,
Rectspread. Blind Vertical, Blind Horizontal, Random).
Press "▲/▼to choose the item you desire, and press " ▶/
OK" or "ENTER" button to exit.
4."Show Type" of screen (Full, Screen, Fit Screen).
Press * ▲ /▼ to choose the item you desire, and
press " ▶ / OK" or "ENTER" button to exit.
- "TFT Brightness" of screen -8 -2 -1 0 +1 +2 +3 . ,
Press *▲/▼"to choose the item you desire, and
press " ▶" OK or "ENTER" button to exit.
- "TFT Contrast" of screen -3-2,-1 0+1,+2+3,
Press *▲/▼* to choose the item you desire, and
press " ▶/OK" or "ENTER" button to exit.
TFT Saturation* of screen -8 -2 -1 0 +1 +2 +3 . ,
Press *▲/▼ to choose the item you desire, and
press " ▶ /OK" or "ENTER" button to exit.
8."OSD Language" (English, French, German, Italian).
Press "▲/▼" to choose the item you desire, and press
OK" or "ENTER" button to exit.
- "Repeat Mode" of play music and video (All, One, Off).
Press * ▲ / ▼" to choose the item you desire.
and press " ▶/OK" or "ENTER" button to exit.
10."Media" of auto-play (SD/MMC/MS,USB,Nand). After inserting USB or SD/MMC/MS card,
Press "▲/▼" to choose the item you desire, and press
▶ OK" or "ENTER" button to exit.

-
"Time mode" Move the cursor to "Time mode", press * ▲/▼" to choose 24H or 12H and press * ▶/OK" or "ENTER" to exit.
-
"Set Time" Move the cursor to Set Time, and press * ▶ OK" or "ENTER" to start the time setting, and change the setting for Hour, Minute and Second, press*▲/▼ to change the number and then press * ▶ OK" or "ENTER" to exit. When clock shown as 12-hour system, the user have to choose AM or PM.
-
"Set Date" Move the cursor to Set Date, and press "OK" or "ENTER" to start the date setting, and change the setting for Year, Month and Day, press "▲/▼" to change the number and then press "OK" or "ENTER" to exit.
-
"Alarm Setting" Move the cursor to Set Alarm, and press "OK" or "ENTER" to start the alarm setting, and change the setting for Hour, Minute and On or Off, press "▲/▼ to change the number and On or Off, then press" ▶/OK" or "ENTER" to exit.
-
"Default" Move the cursor to "Default", press " ▶/ OK" or "ENTER" to enter the item, and press " ▲/▼" to return to the original factory setting.

EDIT FILE
When no device is connected, the unit will play the audio/video files stored in Nand Flash; When no playable file in Nand Flash, the unit will go to Clock interface.
Press "MENU" button to enter the main menu. Use "▲▼" button to select the "EDIT FILE" option. Press "▼/OK" or "ENTER" button to confirm.
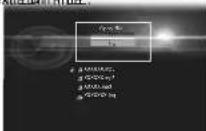
When no device is connected, it is used to delete the pictures, music and video files stored in Nand Flash. It includes \$selectEDT FILEfile. No

When device connected, it is used to copy the pictures, music and video files from device to Nand Flash. It includes Select FFT Fill File. No

After choosing select delete or copy, choose the file you want to delete or copy, then press MENU, select YES or NO, then exit EDIT FILE.
Specification
Compatibility: JPG/MP3/XVID/MPEG
Panel size: 7 inch
Panel Resolution: 800 (RGB) X 480
Frequency response: 20 Hz to 20KHz
Audio output: 1.4 Vrms/10K Ohm
Audio S/N: Better than 80 dB
Dynamic range: Better than 85 dB
USB: Support USB 1.1 (USB2.0 can be recognized but will read as per version 1.1)
Maximum pixel: 7 million
USB maximum handling capacity: 2 GB
Card maximum handling capacity: 2 GB
Power source: DC 5 V
Power consumption:<10W
Operating temperature: 5-40 °C
Weight: 0.357 kgs
Dimension (W x D x H): 210 x 144 x 37 mm
Mini USB : Support copying files from computer to Nand flash
Troubleshooting
| PROBLEM | SOLUTION |
| No sound or distorted sound | Make sure the unit is connected properly. Make sure all cables are securely inserted into the appropriate jacks. |
| Can not advance through a movie | You can not advance through the opening credits and warning information that appears at the beginning of movies because the file is programmed to prohibit that action |
| The icon appears on screen | The feature or action cannot be completed at this time because:1. The file's software restricts it.2. The file's software doesn't support the feature .3. The feature is not available at the moment. |
| Picture is distorted | The file might be damaged. Try another file;It is normal for some distortion to appear during forward or reverse scan. |
| Can not copy files from device to Nand flash | The file might be damaged. Try another file or format the Nand flash in Setup-Media |

If at any time in the future you should need to dispose of this product please note that
waste electrical products should not be disposed of with household waste. Please
Recycle where facilities exist. Check with your Local Authority of Retailer for recycling advice (Waste Electrical and Electronic equipment, Directive).
Owing to continuous improvement, no prior notice will be given regarding changes on above
feature and spec.

Brand : SALORA
Model : DPF 7125 DIG
Category : Digital photo frame