
Moderro NMP012 - Media player VIEWSONIC - Free user manual and instructions
Find the device manual for free Moderro NMP012 VIEWSONIC in PDF.


| Product Type | Media Player |
| Brand | Viewsonic |
| Model | Moderro NMP012 |
| Dimensions (W x D x H) | 120 x 80 x 25 mm |
| Weight | 200 g |
| Power Supply | 5V DC, 2A via Micro USB |
| Video Output | HDMI 2.0, up to 4K@60Hz |
| Audio Output | HDMI, Optical S/PDIF, 3.5mm Jack |
| Connectivity | WiFi 802.11 b/g/n/ac, Bluetooth 4.2, Ethernet 10/100 |
| USB Ports | 2x USB 2.0, 1x USB 3.0 |
| Storage Expansion | MicroSD card up to 128GB |
| Supported Video Formats | MP4, AVI, MKV, MOV, WMV, MPEG, H.264, H.265 |
| Supported Audio Formats | MP3, WAV, WMA, AAC, FLAC |
| Supported Image Formats | JPEG, PNG, BMP, GIF |
| Operating System | Android TV 10 |
| Remote Control | Infrared, included |
| Maintenance | Clean with a soft, dry cloth. Do not use liquids. |
| Safety Instructions | Keep away from water and heat sources. Do not disassemble. |
| Spare Parts | Remote control, power adapter (5V/2A) available separately. |
| Repairability | Refer to authorized service center. User replaceable: remote batteries. |
| General Information | Designed for streaming and local media playback. Manufactured by Viewsonic. |
Frequently Asked Questions - Moderro NMP012 VIEWSONIC
User questions about Moderro NMP012 VIEWSONIC
0 question about this device. Answer the ones you know or ask your own.
Ask a new question about this device
Download the instructions for your Media player in PDF format for free! Find your manual Moderro NMP012 - VIEWSONIC and take your electronic device back in hand. On this page are published all the documents necessary for the use of your device. Moderro NMP012 by VIEWSONIC.
USER MANUAL Moderro NMP012 VIEWSONIC
Thank you for choosing ViewSonic
As a world leading provider of visual solutions, ViewSonic is dedicated to exceeding the world's expectations for technological evolution, innovation, and simplicity. At ViewSonic, we believe that our products have the potential to make a positive impact in the world, and we are confident that the ViewSonic product you have chosen will serve you well.
Once again, thank you for choosing ViewSonic !
ViewSonic®

Contents
1. Introduction
1.1 Scope 1
1.2 Terminology .... 1
1.3 Overview of Moderro VideoWall Solution 1
1.4 Workflow....3
2. Setting Up the Video Wall
2.1 Connecting the Hardware....4
2.2 Downloading, Installing and Launching the VideoWall Application on Windows 4
2.2.1 Create an Account on Cloud Portal 4
2.2.2 Log in and Download the VideoWall Application from the Cloud ....5
2.2.3 Install and launch the VideoWall Application....6
2.3 Creating Video Wall and Adding Devices 7
2.4 Discovering and Adding Device....8
2.5 Adding Device Manually 9
3. Configuring Device
3.1 Identify Device.... 10
3.2 Rename Device.... 11
3.3 Manage Storage 11
3.4 Unregister Device 12
3.5 Reset to Defaults 12
3.6 Reboot Device 12
3.7 Manage Network and Time....13 3.7.1 NTP (Network Time Protocol)....14 3.7.2 PTP (Precision Time Protocol)....15 3.7.3 Time zone....1
3.8 AV Output .... 16 3.8.1 Brightness, Contrast, Saturation .... 16 3.8.2 Volume .... 16 3.8.3 Audio Output .... 16
3.9 Manage Display....17 3.9.1 HDMI Connection....18 3.9.2 EDID (Extended Display Identification Data)....18 3.9.3 CEC....18 3.9.4 RS-232....18
3.10 Upgrade Device Individually 19
4 Configuring Video Wall
4.1 Identify All Devices in Video Wall....20
4.2 Reboot All Devices in Video Wall....20
4.3 Delete Video Wall 21
4.4 Upgrade All Devices in the Wall at Once 21
5 Video Wall Composition
5.1 Change the Measurement Units....22
5.2 Display Profiles....22
5.3 Grid Layout Mode 23
5.4 Artistic Layout Mode 26
6 Selecting and Configuring Content
6.1 Video File....29
6.2 Slideshow 30
6.2.1 Slideshow Parameters 31
6.3 YouTube and Vimeo 33
7 Configuring and Building Compatible Video
7.1 Transcoder Settings....36
7.1.1 Video Scaling 36
7.1.2 Media Compatibility Mode....36
7.1.3 Transcoding Mode 38
7.2 Save Built Content to Local Storage....39
8 Publishing Generated Video to Device
9 Playing Back Video
9.1 Play Published Content 42
9.1.1 Start Video at Specified Time 42
9.2 Delete Asset from All Devices in the Wall 43
9.3 Play Multicast Stream 43
9.4 Wall View and Proof of Play 44
10 Monitoring and Controlling from the Cloud Portal
10.1 Moving Video Wall to Cloud Portal 45
10.2 Monitoring from Cloud 45
10.3 Controlling from Cloud....45
11 Device and Video Wall Status
12 Preferences
13 Upgrading VideoWall Manager
14. Other Information
Customer Support 50
1. Introduction
This chapter explains the scope of the user guide and provides an overview of the Moderro VideoWall solution.
1.1 Scope
The document describes how to install, configure and operate Moderro VideoWall Manager 2.0.24 with the Moderro Xpack Media Player and covers the basics of VideoWall Management Service on the cloud.
1.2 Terminology
The following terms are used interchangeably in this user guide. They all refer to Moderro video wall controller.
• Moderro Xpack Media Player
- Device
Player
The following terms are used interchangeably in this user guide.
- Display
- Screen
1.3 Overview of Moderro VideoWall Solution
The Moderro VideoWall solution allows any organization to create stunning video walls simply and affordably. Driven by Moderro Xpack Media Player and managed by Moderro VideoWall Manager, the Moderro VideoWall solution delivers high-impact digital messaging in almost any imaginable layout.
Infinitely Scalable
As this solution supports a virtually unlimited number of displays and Xpack Media Players, there's no limitation in the size of the video wall. Video can be played in HD quality across multiple displays, while maintaining the video aspect ratio, or stretched to fit the video wall. Each display can play a video up to HD resolution. As more displays are added, the total display resolution increases indefinitely.
Extremely Flexible
You can mix and match any brand, physical size, resolution or aspect ratio of displays in the video wall. You can move and place each display at any position at any angle. The video wall accepts almost any video and image file type and resolution, including YouTube and Vimeo videos, as input sources and transcodes them to a compatible format, if necessary, before publishing them to the players. Real time feed is supported via UDP multicast stream.
Highly-Efficient Cloud Based Service
Xpack Media Players and video walls can be monitored and managed with our cloud-based service from a computer, anywhere, at any time. You can see the content being played on each video wall by checking the screenshots sent from each player. Status reports and detailed information about the player and video wall are available for better monitoring.
Simple and Easy Installation and Operation
The setup of the Moderro VideoWall solution is easy. Utilizing existing LAN infrastructure, without a dedicated central server, simply connect all system components as shown below. Each Xpack media player is attached to a display via HDMI cables and to a PoE network switch via an Ethernet cable. Then install and launch Moderro VideoWall Manager on the PC in the same subnet as the video wall players.
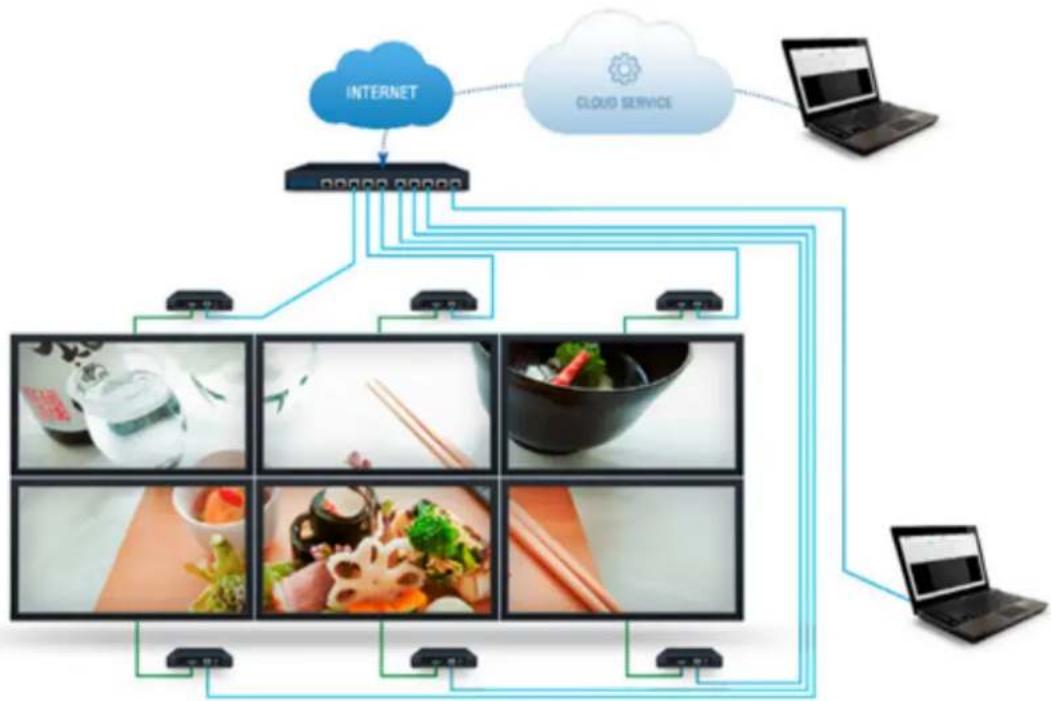
flowchart
graph TD
    A["INTERNET"] --> B["CLOUD SERVICE"]
    B --> C["Laptop"]
    B --> D["Video Content 1"]
    B --> E["Video Content 2"]
    B --> F["Video Content 3"]
    B --> G["Video Content 4"]
    B --> H["Video Content 5"]
    B --> I["Video Content 6"]
    B --> J["Video Content 7"]
    B --> K["Video Content 8"]
    B --> L["Video Content 9"]
    B --> M["Video Content 10"]
    B --> N["Video Content 11"]
    B --> O["Video Content 12"]
    B --> P["Video Content 13"]
    B --> Q["Video Content 14"]
    B --> R["Video Content 15"]
    B --> S["Video Content 16"]
    B --> T["Video Content 17"]
    B --> U["Video Content 18"]
    B --> V["Video Content 19"]
    B --> W["Video Content 20"]
1.4 Workflow
Here is the workflow that describes the most common steps you would take to play video on your video wall.
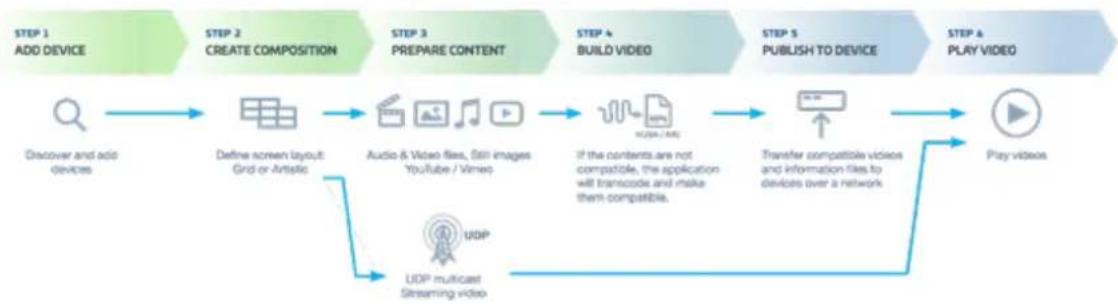
flowchart
graph LR
    A["STEP 1 ADD DEVICE"] --> B["STEP 2 CREATE COMPOSITION"]
    B --> C["STEP 3 PREPARE CONTENT"]
    C --> D["STEP 4 BUILD VIDEO"]
    D --> E["STEP 5 PUBLISH TO DEVICE"]
    E --> F["STEP 4 PLAY VIDEO"]

    A --> G["Discover and add devices"]
    B --> H["Define screen layout Grid or Artistic"]
    C --> I["Audio & Video files, Still images YouTube / Viswo"]
    D --> J["If the contents are not compatible, the application will transcode and make them compatible."]
    E --> K["Transfer compatible videos and information files to devices over a network"]
    F --> L["Play videos"]
    G --> M["UDP multicast Streaming video"]
    H --> M
    I --> M
    J --> M
    K --> M
Video File
- If the video stream is not compatible, the VideoWall Manager will split and separately re-encode streams, and then transfer the cropped portions of the video to each device.
- If the video stream is compatible and the Media Compatibility Mode in the Build section is set to "Faster build", the VideoWall Manager will transfer the entire video without re-encode to every device on the video wall and then have each device output only the appropriate cropped portion of the content.
Multicast
- All devices receive the entire image, and then each device outputs only the appropriate cropped portion of the content.
2. Setting Up the Video Wall
This chapter explains how to set up the equipment and start the video wall application.
2.1 Connecting the Hardware
Refer to the Quick User Guide for the Moderro Xpack Media Player for easy hardware installation instructions.
2.2 Downloading, Installing and Launching the VideoWall Application on Windows
Refer to the Quick User Guide for the Moderro Xpack Media Player for easy hardware ins
2.2.1 Create an Account on Cloud Portal
- On your computer, open a browser and go to https://videowall.moderro.com. If you receive a security warning, click to proceed to the website.
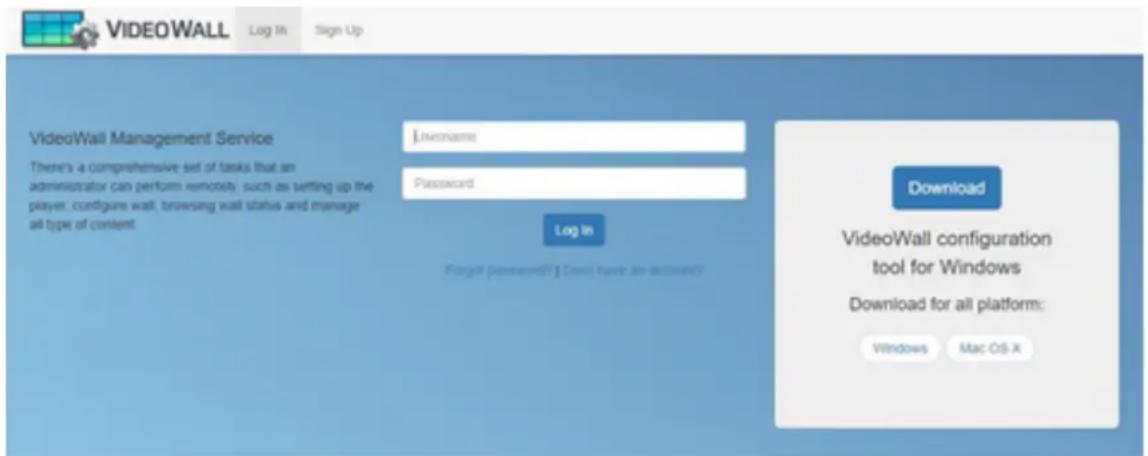
- Click Sign Up on the top menu.
- Enter your email address, username, and password.
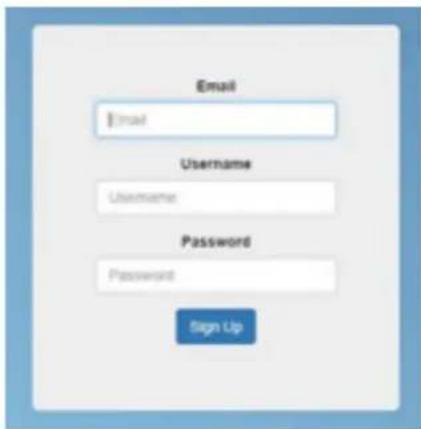
-
Click Sign Up.
-
A verification email will be sent to your email address.
-
Click the link in the email to activate your account.
2.2.2 Log in and Download the VideoWall Application from the Cloud
You must first login to download the VideoWall Manager.
- Navigate to https://videowall.moderro.com.
- Click Log In on the top menu.
- Enter your username and password and click Log In.
- Click Windows to download the Windows version of the VideoWall application.
- Depending on your browser and download settings, the browser may prompt you to save the downloaded file.
- To save the file for later installation, click Save. Choose the folder location and save the file to your local system.
2.2.3 Install and launch the VideoWall Application
- Double click on the saved *.exe file to start the installation process.
- When Open File – Security Warning appears, click the Run button to run the software.
- When the warning Do you want to allow this app from an unknown publisher to make changes to your device pops up, click Yes.
- Select the language to use during the installation. Click OK.
- Select Destination Location and click Next.
- Select Start Menu Folder.
- Check or uncheck Don't create a Start Menu folder option. Click Next.
- Select Additional Tasks. Check or uncheck Create a desktop shortcut option. Click Next.
- Click Install to start installing the VideoWall application. If C++ runtime package is not installed, Visual C++ 2013 64-Bit Redistributable will be listed for Download and Install dependencies.
- If C++ runtime package is not installed, the dialog box appears. Click Yes to download and install C++ runtime package.
- Click Finish to exit the installer. If Launch VideoWall option is checked, the application launches.
2.3 Creating Video Wall and Adding Devices
- Click New VideoWall button on the bottom of the Walls and Devices pane.
-
Enter the name of the wall.
-
Click Add.
-
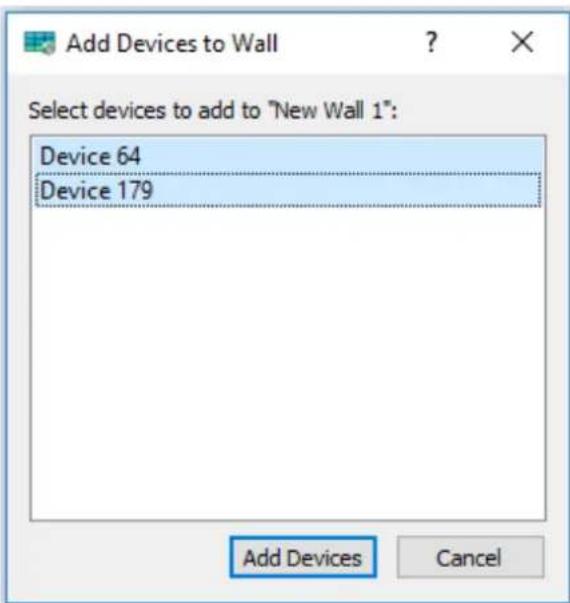
Add Devices to Wall window appears.
If there are no unmanaged devices in the application:
- Click Discover... button in the Add Devices to Wall window.
- Discovered devices are listed under Discovered Devices. The grayed-out devices are the devices managed by the cloud and can't be added.
- Select the devices you want to add from the Discovered Devices list and click Add Selected Devices.
- Added devices appear under Walls and Devices pane and Add Devices to Wall window.
Select the devices you want to add to the wall from the Add Devices to Wall window and click Add Devices.
2.4 Discovering and Adding Device
Devices can be discovered and added to the application first, and then add them to the videowall later.
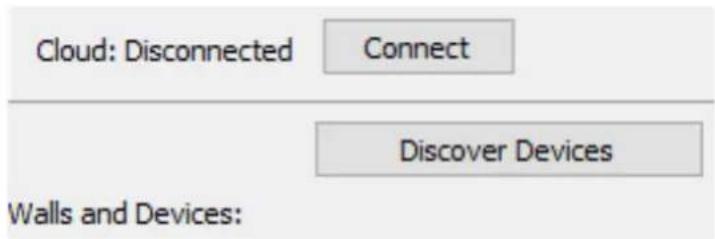
- Click Discover Devices button on the top of the Walls and Devices pane to discover all devices in the same network. The grayed-out devices are the devices managed by the cloud and can't be added.
- Select the devices you want to add from the Discovered Devices list and click Add Selected Devices.
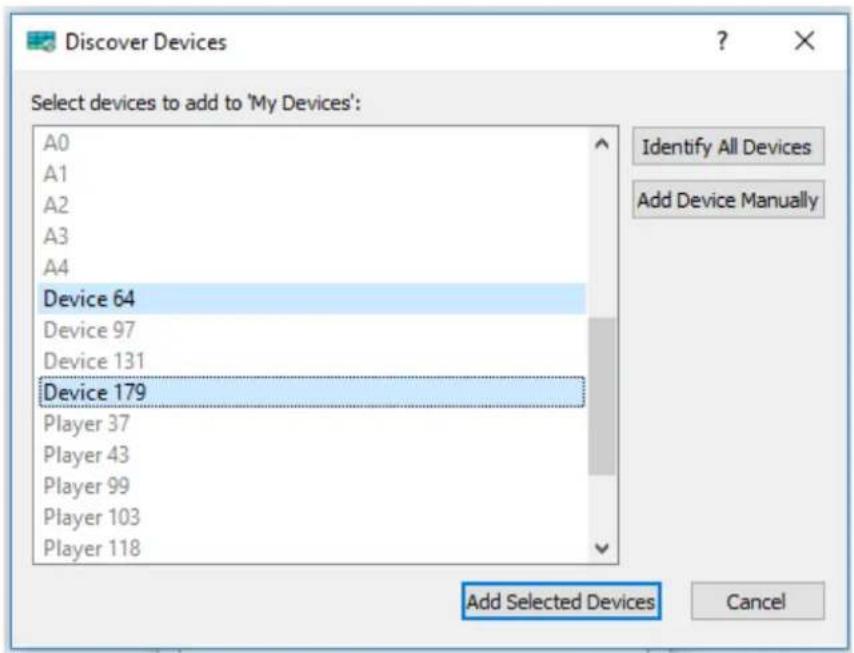
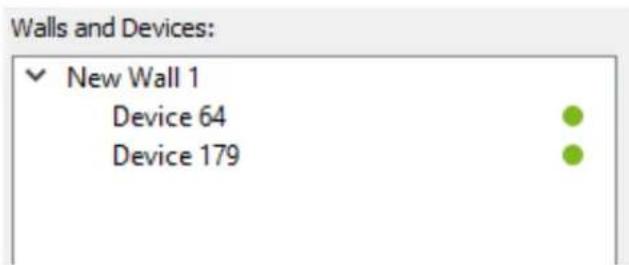
- Added devices appear in Walls and Devices pane.
2.5 Adding Device Manually
- Click Discover Devices button to discover all devices in the same network.
- Click Add Device Manually.
- Enter IP address and give a name to the device.
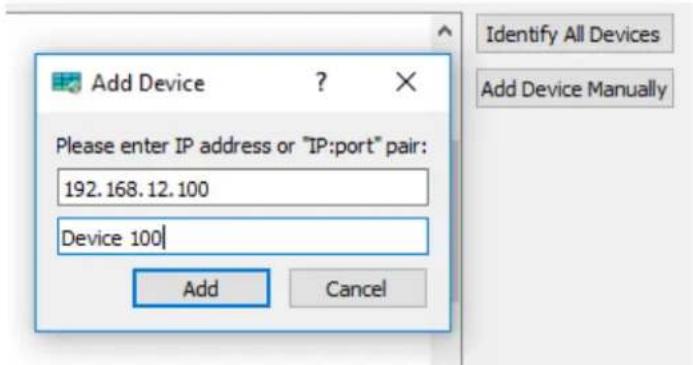
- Click Add.
- Added device appears under Walls and Devices.
- To close the Discover Devices window, click Cancel.
3. Configuring Device
This chapter explains how to configure the Xpack Media Player settings.
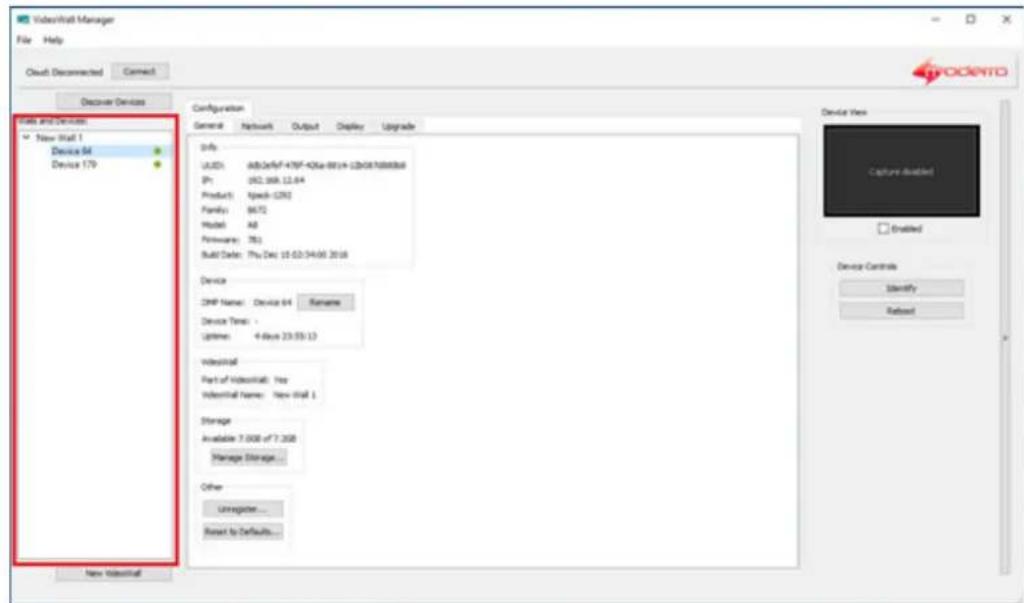
The area surrounded by a red box is called the Walls and Devices pane.
3.1 Identify Device
-
Select the device from the Walls and Devices pane.
-
Click the Identify button from the Device Control pane to display the following information about the device on the screen.
-
Date
- Name
• IP - Uptime
- Product
- Version
- Build
• NTP - PTP Mode/Source
3.2 Rename Device
- To rename the device, select the device from the Walls and Devices pane.
- Click Rename button in the General tab.
- Enter a new device name and click OK.
Note: The name of the device should not exceed 30 characters and only allows alphanumeric characters and spaces.
3.3 Manage Storage
This section describes how to delete assets from each device. An asset is a collection of video files and can be thought of as a playlist. To delete the same asset from all devices in the same video wall, refer to section 9.2 “Delete Asset from All Devices in the Wall”.
To delete specific assets from device storage:
- Select the device from the Walls and Devices pane.
- Click Manage Storage... button in General tab.
- Select assets you want to delete from device storage.
- Click Delete Selected. A confirmation dialog appears.
- Click OK.
Note: Delete is unrecoverable.
To erase all assets from device storage:
- Select the device from the Walls and Devices pane.
- Click Manage Storage... button in General tab.
- Click Erase All Data. A confirmation dialog appears.
- Click OK.
To format the disk storage:
- Select the device from the Walls and Devices pane.
- Click Manage Storage... button in the General tab.
- Click Format Storage to delete all data from storage and format the disk with ext3 file system. A confirmation dialog appears.
- Click OK.
- All buttons except Reload and Close become inactive. A message which shows format in progress (Formatting) is displayed. Formatting will continue in background when you click Close while the formatting is in progress.
- When the format is complete, all buttons except Delete Selected become active again.
3.4 Unregister Device
When the device in the video wall is unregistered, any active playback on the device will be stopped. When a device that's managed by the Cloud is unregistered, any active playback on the device will be stopped and the device's cloud-enable property becomes false.
There are two ways to unregister a device from the application.
Method 1:
- Select the device from the Walls and Devices pane.
- Click Unregister button in the General tab. A confirmation dialog appears.
- Click Unregister.
Method 2:
-
- Right click on the device in Walls and Devices pane.
-
- Click Unregister. A confirmation dialog appears.
-
- Click Unregister.
3.5 Reset to Defaults
The device properties can be reset to defaults at any time. All device properties will be reset to defaults. Only the device properties get reset.
- Select the device from the Walls and Devices pane.
- Click the General tab.
- Click Reset to Defaults. A confirmation dialog appears.
- Click OK.
3.6 Reboot Device
To reboot a device, follow these steps.
- Select the device from the Walls and Devices pane.
- Click Reboot from the Device Control pane. A confirmation dialog appears.
- Click Reboot.
- Click OK to close the information dialog that states The device will now reboot.
3.7 Manage Network and Time
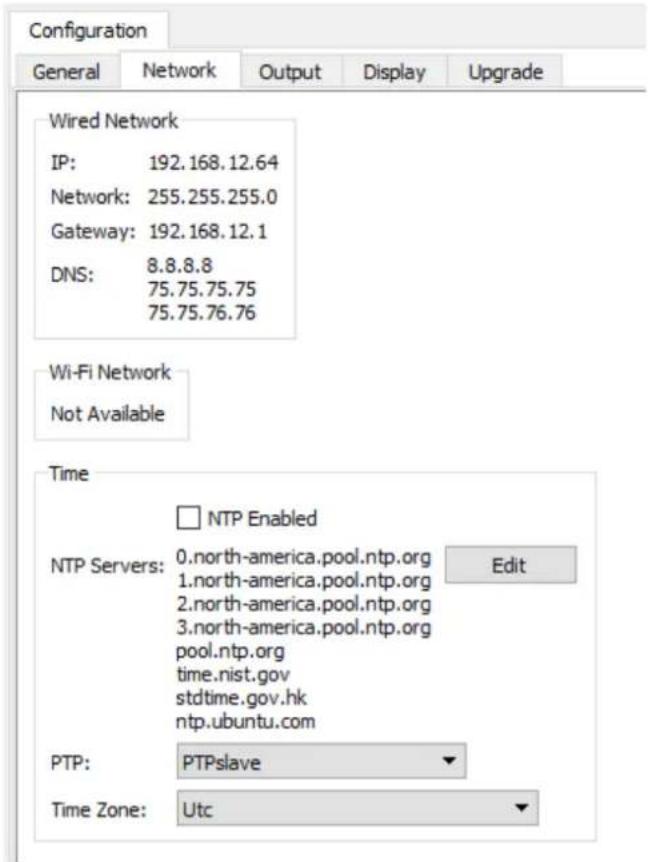
Since the device doesn't have a real-time clock that keeps track of the current time, it needs to get current time from an external source.
The Network Time Protocol (NTP) is used to synchronize the time of a device to NTP server time.
The Precision Time Protocol (PTP) is a protocol used to synchronize slave clocks to a master clock to ensure that event timestamps in all devices use the same time base.
We recommend users setup devices as follows.
- Set NTP Enable on one device and set it as a PTP master.
- Set all other devices in the same network as PTP slave and disable NTP.
Note: If NTP is enabled in the device, but the NTP server is not reachable, the time will failover to Jan 01, 2000 (UTC).
Note: If the device could not get time during boot up, the device sets the time to Jan 01, 1970 (UTC).
By synchronizing the time accurately between devices, we can synchronize the video playback.
3.7.1 NTP (Network Time Protocol)
Enable NTP:
When NTP is enabled, the device will get time from the NTP server. Every 5 minutes, the device synchronizes with the server. When a change in the configuration is made, it requires a reboot to take effect.
- Select the device from the Walls and Devices pane.
- Click the Network tab.
- Check NTP Enabled to enable NTP.
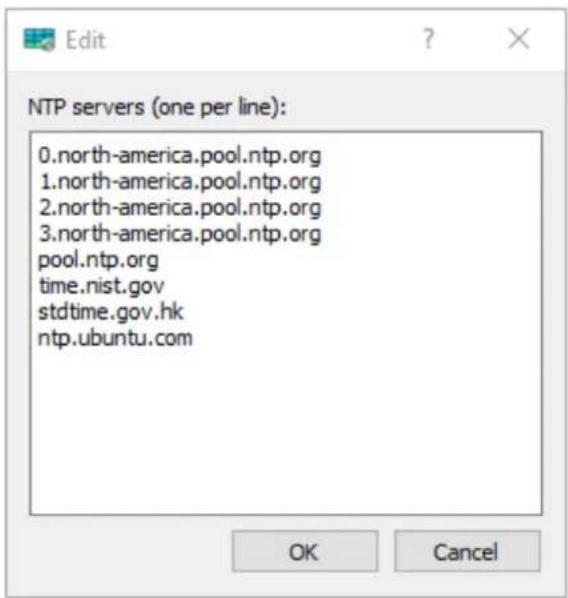
Configure NTP Server:
- Select the device from the Walls and Devices pane.
- Click the Network tab.
- Click Edit. Edit window appears.
- Enter NTP server per line and click OK.
Disable NTP:
By default, NTP is disabled.
- Select the device from the Walls and Devices pane.
- Click the Network tab.
- Uncheck NTP Enabled to disable NTP.
3.7.2 PTP (Precision Time Protocol)
After a configuration change, reboot the player to take effect.
-
Select the device from the Walls and Devices pane.
-
Click the Network tab.
-
Click on the PTP drop down list and select the mode.
PTP Master: Device will act as PTP master. Make sure only one PTP master exists in the same subnet. If there are more than one PTP master running in the same subnet, PTP slave devices may not synchronize correctly.
PTP Slave: Device will act as PTP slave and synchronize time to PTP master.
PTP Disable: Default value. Does not use PTP.
3.7.3 Time zone
The default time zone of the device is UTC (Coordinated Universal Time). If you want to change that, follow the steps below.
-
Select the device from the Walls and Devices pane.
-
Click the Network tab.
-
Click on the Time Zone drop down list.
-
Choose a city that's in the same time zone as the device.
3.8 AV Output
3.8.1 Brightness, Contrast, Saturation
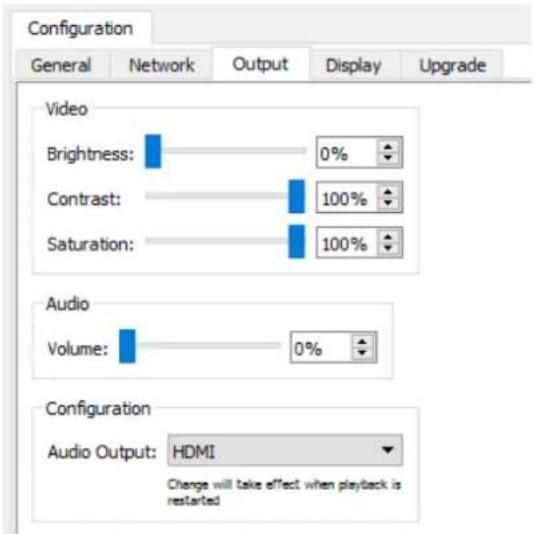
The brightness, contrast, and saturation of the video output are configurable. By default, brightness is 0%, contrast and saturation is 100%.
- Select the device from the Walls and Devices pane.
- Click the Output tab.
- In the Video section, change the values as desired. The changes will take effect immediately.
3.8.2 Volume
By default, the value of audio is 0% so you can't hear audio. The volume of device audio can be adjusted by:
- Select the device from the Walls and Devices pane.
- Click the Output tab.
- Change the Audio volume value. The change will take effect immediately.
3.8.3 Audio Output
User can select either HDMI or Analog as audio output. By default, it uses HDMI. To use analog audio output, connect a 3.5 mm mini-jack audio cable to the AV interface of the device.
- Select the device from the Walls and Devices pane.
- Click the Output tab.
- In the Configuration section, click Audio Output drop down list and select the audio output mode. The change will take effect when playback is restarted.
3.9 Manage Display
3.9.1 HDMI Connection
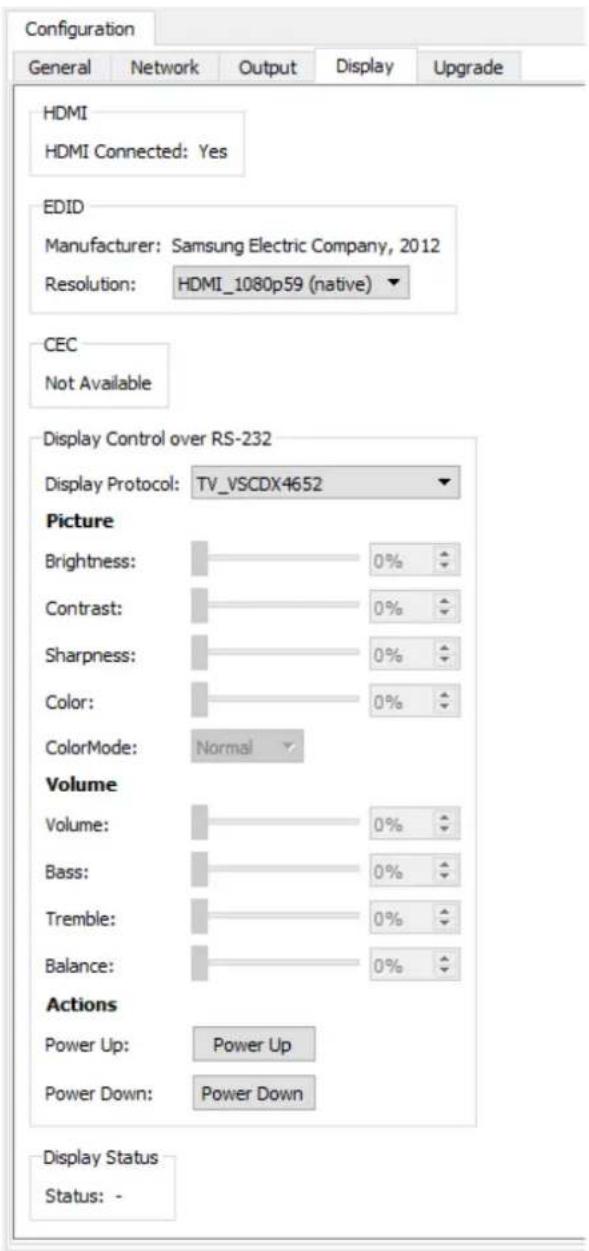
User can select either HDMI or Analog as audio output. By default, it uses HDMI. To use analog audio output, connect a 3.5 mm mini-jack audio cable to the AV interface of the device.
- Select the device from the Walls and Devices pane.
- Click the Display tab.
- Check for HDMI Connected.
If it shows No, it might be due to one of the following:
- Display is off
• HDMI cable is not connected
• Video adapter is used
3.9.2 EDID (Extended Display Identification Data)
EDID is a data structure provided by a digital display to describe its capabilities to a video source.
The video output resolution and refresh rate can be changed by:
- Select the device from the Walls and Devices pane.
- Click the Display tab.
- Click the Resolution drop down list. It lists all settings available on the display.
- Select one from the list. The change will take effect immediately.
3.9.3 CEC
The feature is not available at this time.
3.9.4 RS-232
When the display connects to the device by RS-232 communication, the display can be controlled with RS-232 commands from the device. Only ViewSonic CDX 4652 is supported at this time.
A USB to Serial adapter is required to use this feature. Plug the USB connector into your device's USB port.
3.10 Upgrade Device Individually
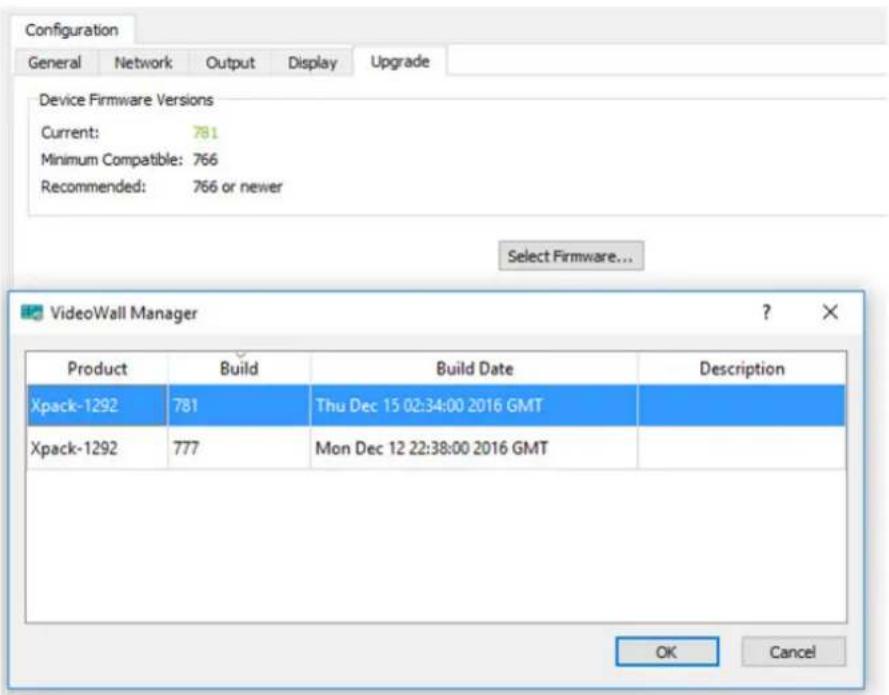
Follow the procedure below to upgrade a device individually.
- Select the device from the Walls and Devices pane.
- Click the Upgrade tab.
- Click Select Firmware. It will list all available firmware.
- Select one from the list and click OK. A confirmation dialog appears.
- Check or uncheck the Reboot after upgrade checkbox.
- Click Upgrade. Check the progress bar to monitor the upgrade progress.
- Once the upgrade is completed, you will see "Done" in the Progress column.
4 Configuring Video Wall
This chapter explains how to configure the video wall.
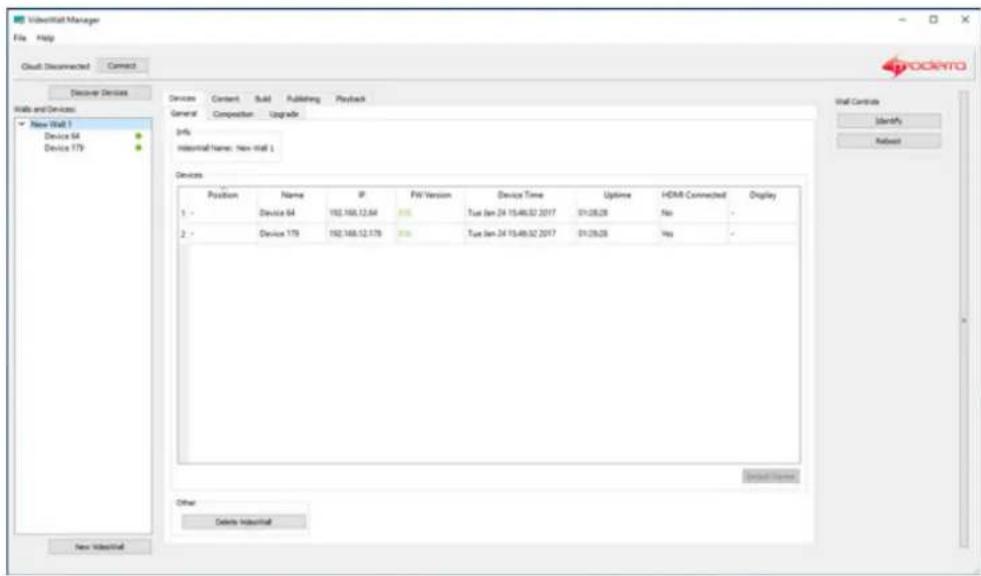
4.1 Identify All Devices in Video Wall
- Select the wall from the Walls and Devices pane.
-
Click Identify from the Wall Control pane to learn the following information about the devices which will be displayed on each screen.
-
Date
- Name
• IP - Uptime
- Product
- Version
- Build
• NTP - PTP Mode/Source
4.2 Reboot All Devices in Video Wall
You can reboot all devices in the video wall at once.
- Select the wall from the Walls and Devices pane.
- Click Reboot from the Wall Control pane. A confirmation dialog appears.
- Click Reboot.
4.3 Delete Video Wall
When a video wall is deleted, wall composition will be lost and any active playback will be stopped. Devices in the video wall will remain listed in the Walls and Devices pane as unassigned devices.
When a video wall that's being managed by the Cloud is deleted, the video wall will be removed from both Cloud and VideoWall Manager.
There are two ways to delete a video wall:
Method 1:
- Select the wall from the Walls and Devices pane.
- Click Delete VideoWall button in the Devices > General tab. A confirmation dialog appears.
- Click Delete.
Method 2:
- Right click on the wall in Walls and Devices pane.
- Click Delete. A confirmation dialog appears.
- Click Delete.
4.4 Upgrade All Devices in the Wall at Once
| Devices | Content | Build | Publishing | Playback | ||||
| General | Composition | Upgrade | ||||||
| Device Firmware Versions | ||||||||
| Minimum Compatible 766 Recommended 766 All devices are up to date. | ||||||||
| Select Firmware... | ||||||||
| Position | Name | IP Address | Current FW | Upgrading to FW | Upgrade Stage | Progress | ||
| - | Device 64 | 192.168.12.64 | 816 | - | - | - | ||
| - | Device 179 | 192.168.12.179 | 816 | - | - | - | ||
You can upgrade all devices in the video wall at once.
- Select the wall from the Walls and Devices pane.
- Click the Upgrade tab under the Devices tab.
- Click Select Firmware button. It will list all available firmware.
- Select one from the list and click OK. The confirmation dialog appears.
- Check or uncheck the Reboot after upgrade checkbox.
- Click Upgrade. Upgrade progress can be monitored in Upgrade Stage and Progress columns.
- Once the upgrade is completed, you will see "Upgrade succeeded" message.
5 Video Wall Composition
This chapter explains how to create a video wall composition.
5.1 Change the Measurement Units
By default, the VideoWall Manager uses inches as its unit of measurement used in composition and display profiles. You can change the measurement units to centimeters.
- Go to File > Preferences.
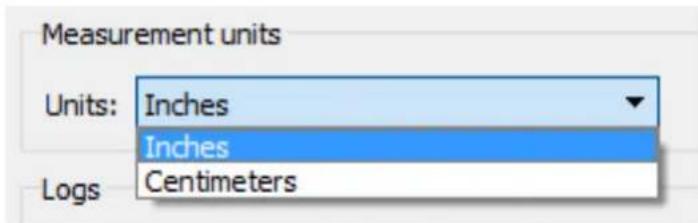
- Click on the drop down list next to Units in the Measurement units section.
- Select Centimeters or Inches.
- Click Close to close the window.
5.2 Display Profiles
The display profile includes name, diagonal length, aspect ratio, width, height, top bezel, right bezel, bottom bezel, and left bezel.
There are 2 types of display profile, user-defined and default.
User Defined Profiles: Display profiles defined by the user can be created in two ways.
- Click Add Profile in Display Profile, enter the profile name, set attributes, and click Save Changes.
- Or select default profile, click Copy Selected Profile, give the profile name, edit attributes, and click Save Changes.
Default profiles: Pre-defined in the application. Bezel sizes may not be 100% accurate.
5.3 Grid Layout Mode
The grid Layout Mode allows users to configure the video wall in a traditional grid or matrix pattern using identical displays with uniform spacing. This mode allows users to adjust the video wall size (number and size of displays), device assignment, bezels of display, spacing between displays and video wall rotation.
Follow the procedures below to configure a video wall composition in Grid mode.
- Select the wall from the Walls and Devices pane.
- Click the Composition tab under the Devices tab.
- Click the drop-down list of Mode options and then select Grid.
By default, the video wall has a composition of 2x2 (2 displays wide by 2 displays high). Use Add/Remove Column/Row buttons to adjust the size of the video wall.
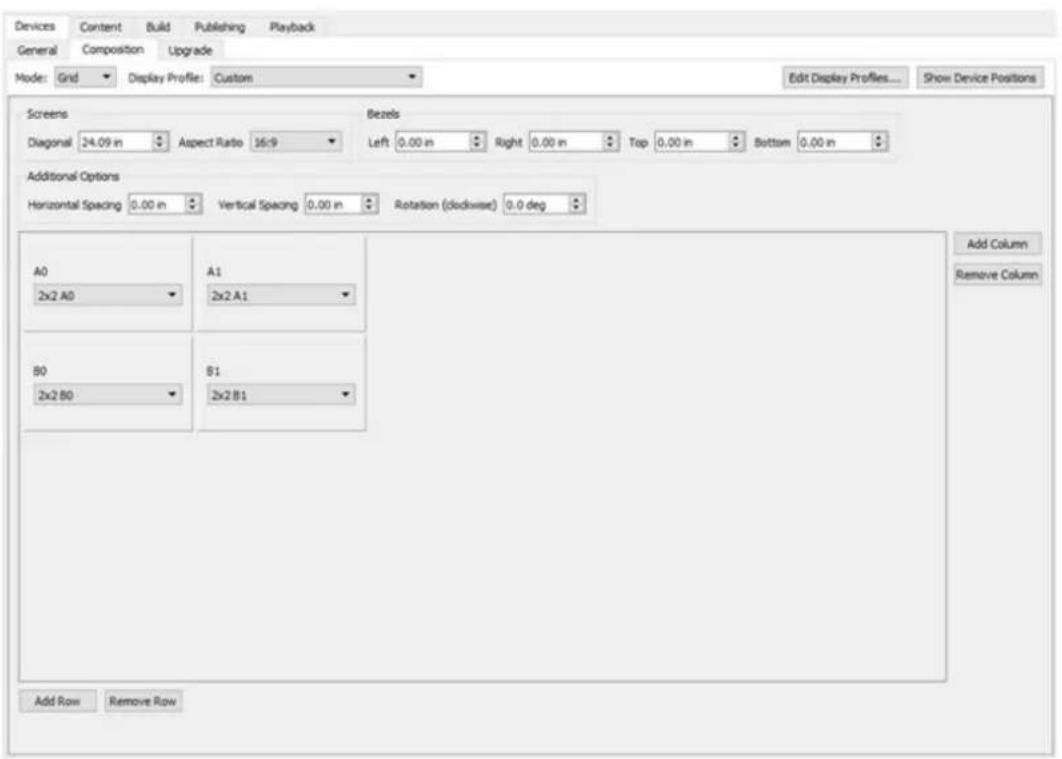
To assign devices on displays, click the drop-down list in the display position box and then select the name of the device that will be assigned to that position of the video wall. To remove the device from the display, select the blank entry at the top of the selection list. The device name in the drop-down list is grayed out if it's already assigned to another display.
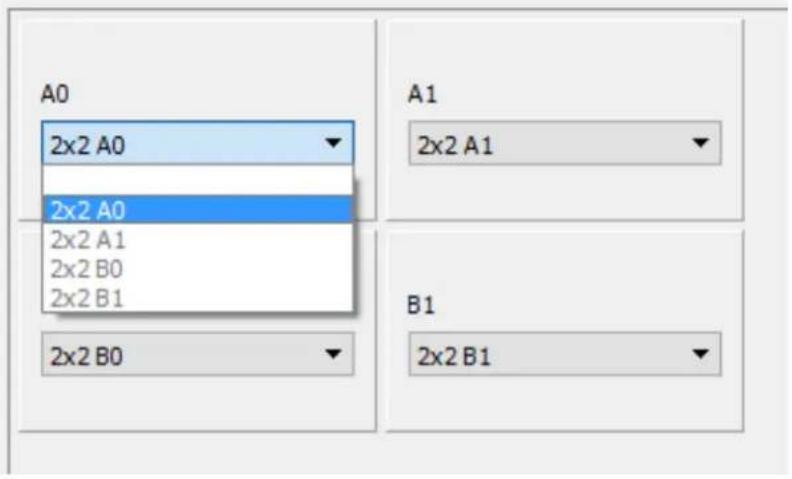
Use the Show Device Positions button to display the position names (e.g. A0, A1, B0, etc) on the physical displays.
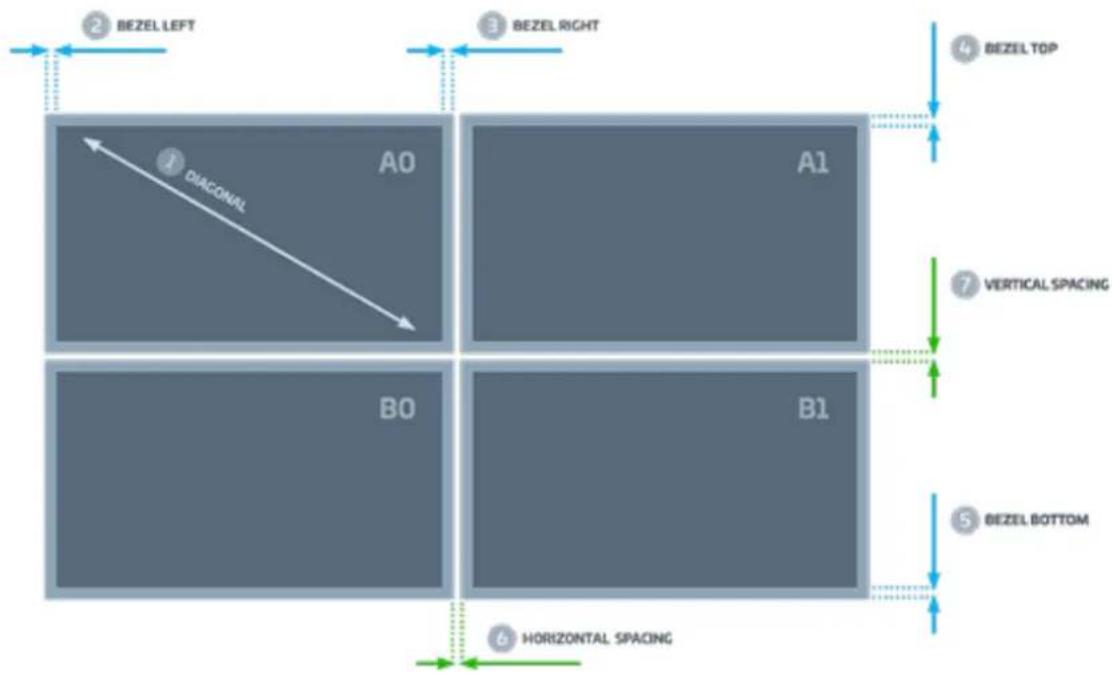
There are 2 ways to configure display settings, custom settings or defined display profiles. Click the drop-down list of Display Profile option and then select custom or defined profile.
- Custom setting allows user to manually define display's diagonal length, aspect ratio, and bezel widths.
- Defined display profile automatically sets display's diagonal length, aspect ratio and bezel widths.
Diagonal – Specifies the physical distance between opposite corners of the viewable area.
Aspect ratio – Specifies the display's aspect ratio. Aspect ratio is the proportional relationship between its width and its height.
Bezels – Specifies the distance between the visible portion and the outer edge of the display.
Horizontal and vertical spacing - Specifies the space between screens.
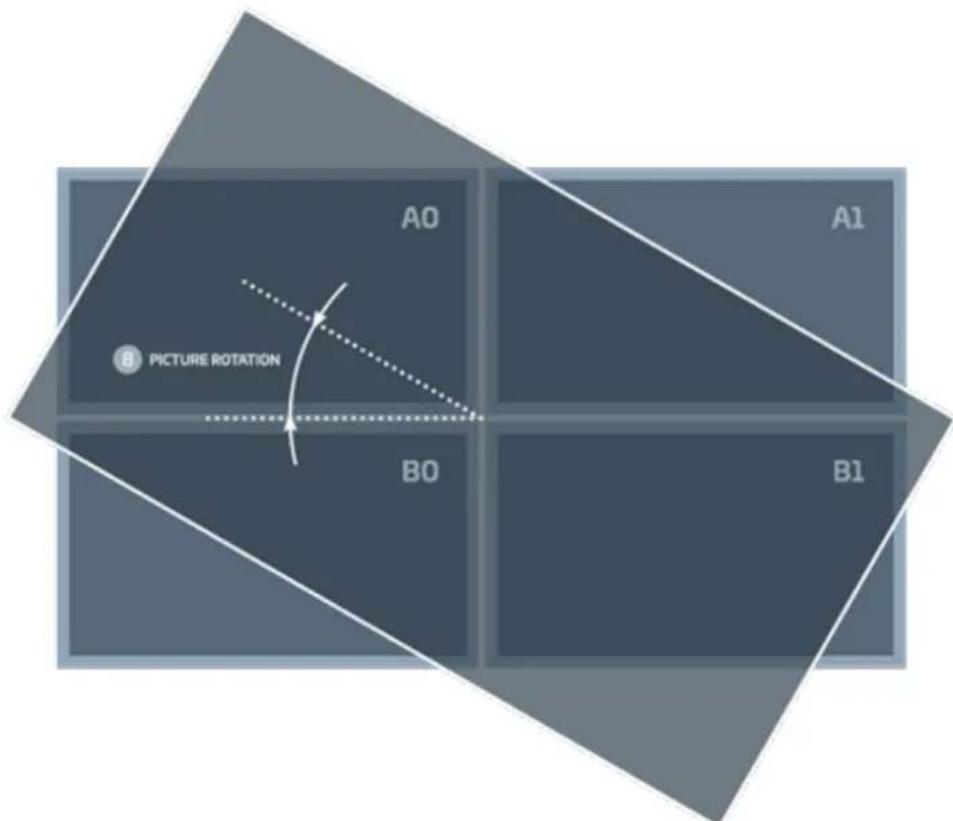
Rotation – The video wall will be rotated to the given angle.
5.4 Artistic Layout Mode
Artistic layout mode allows users to configure the video wall in free layout and create more visually appealing arrangements of the displays.
Artistic mode allows you to:
- Use a mix of different displays. Users can mix and match displays of different brand, sizes and aspect ratio.
- Move each display to a desired position.
- Rotate the selected display at any angle.
- Specify the display panel size.
Follow the procedures below to configure a video wall composition in Artistic mode.
- Select the wall from the Walls and Devices pane.
- Click the Composition tab under the Devices tab.
- Click the drop-down list of Mode option and then select Artistic.
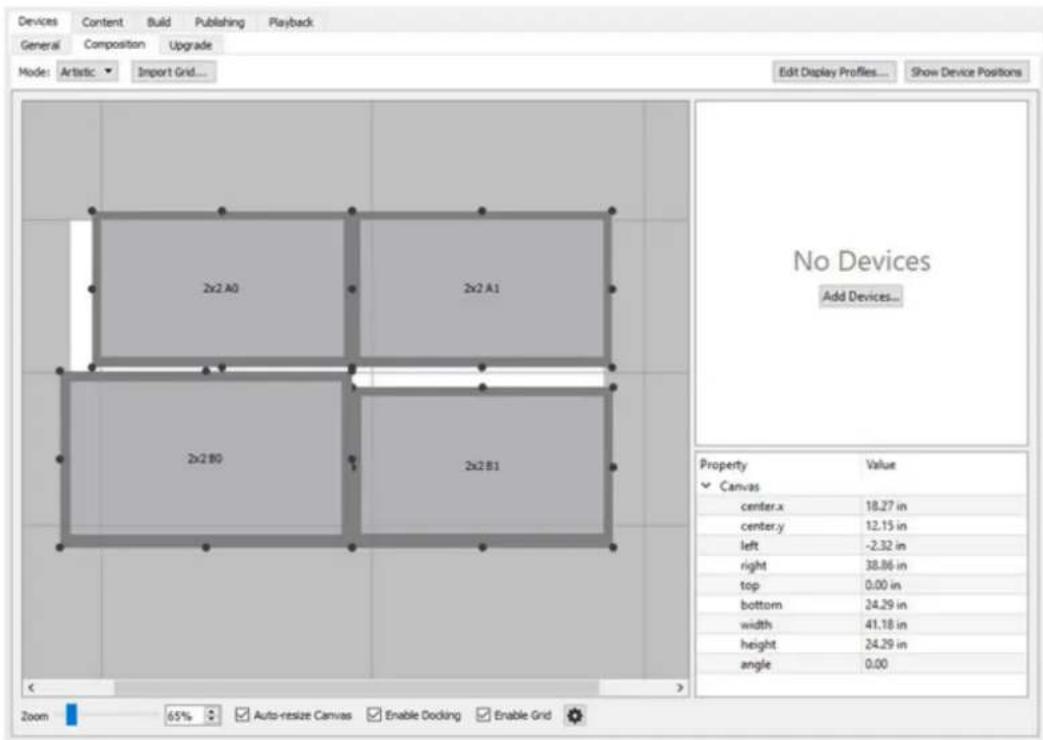
By default, there's only a canvas and, no display is positioned in the video wall composition. The canvas is represented by a white rectangle in the composition view. To add a display to the composition, drag and drop a device from the device list to the composition view. In artistic mode, each device contains information about display size, position, and angle.
To change the parameters of the display, click on the display object, and then change the values in device properties pane that appears on the lower right side of the composition view. By applying a defined display profile in the device's profile property, display size and bezel width will automatically be set.
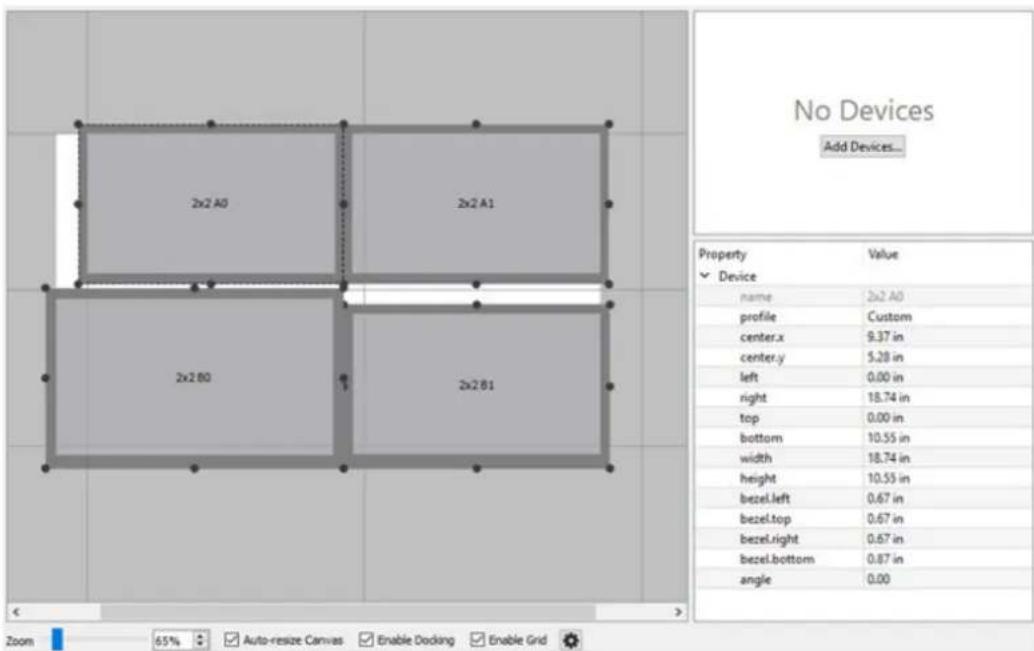
Canvas size and position get dynamically adjusted when the device is moved or the size/angle of display is changed, if the Auto-resize Canvas option is enabled.
The canvas size/position/angle can also be manually adjusted by disabling the Auto-resize Canvas option and changing the size/position/angle parameters.
Use the Show Device Positions button to display the device names on the physical displays.
Import Grid – When the Import Grid button is clicked, the grid composition will be imported into artistic composition and will overwrite the artistic composition.
Note: Currently, there is no option in artistic mode to remove a device from the composition view once it's placed. To redo the composition in artistic mode, follow the steps below.
- Switch the composition mode to Grid.
- Make sure no device is assigned to display. If it is, un-assign device from display.
- Switch the composition mode to Artistic.
- Click Import Grid. A confirmation dialog appears.
- Click Overwrite.
Options in the Composition Work Area
Zoom – Specifies zoom level.
Auto-resize Canvas – When checked, canvas size and position automatically get optimized when the display position, size, or angle is changed.
Enable Docking – When checked, the display object will snap to the nearest intersection in the grid (if the grid is visible) or snap to another display object.
Enable Grid – When checked, the grid becomes visible.
Grid Setting – Clicking the wheel button displays the grid setting box. Set the size and spacing of the grid here. To set the grid to have the same size as the selected display, select a display object in the composition view and click Setup from Selected Display.
6 Selecting and Configuring Content
This chapter explains how to locate and add video and still image files as the source contents.
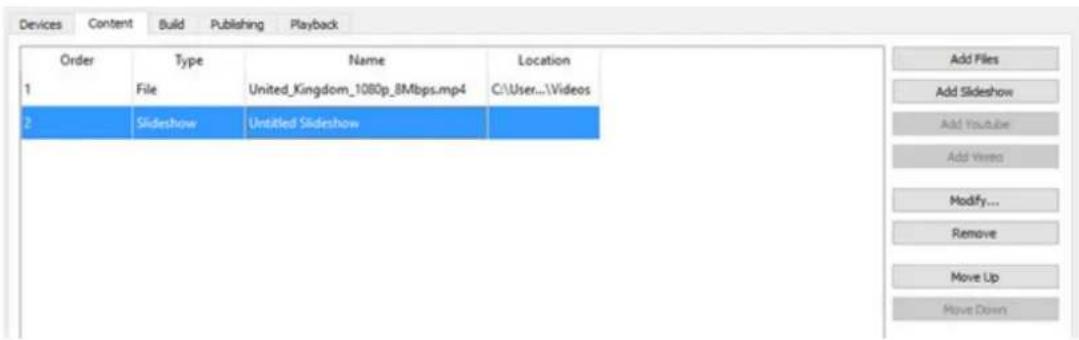
6.1 Video File
This section describes how to add a video file, such as mp4, mkv, and ts, to the content. Audio only files, such as mp2, mp3, and aac can also be added.
- Select the wall from the Walls and Devices pane.
- Click the Content tab.
- Click Add Files. Add File dialog appears.
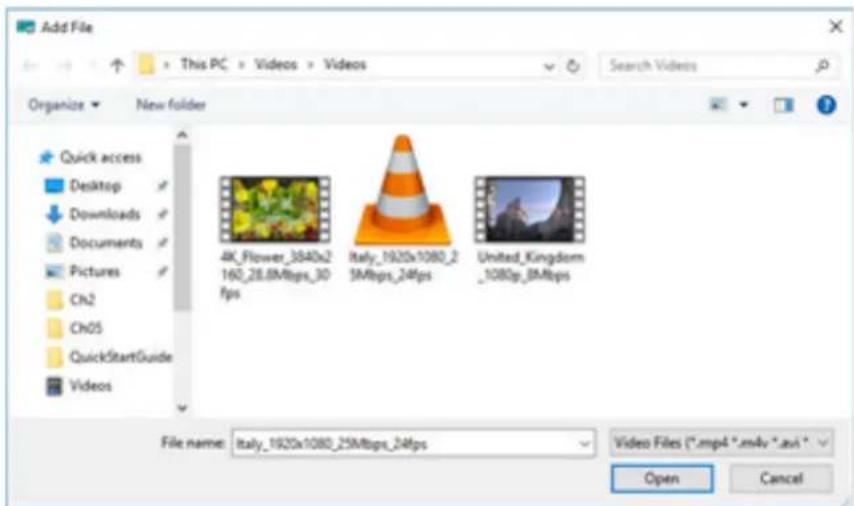
- Select a video file and click Open.
6.2 Slideshow
This section describes how to create a video slideshow from still images, such as jpeg, png, and bmp.
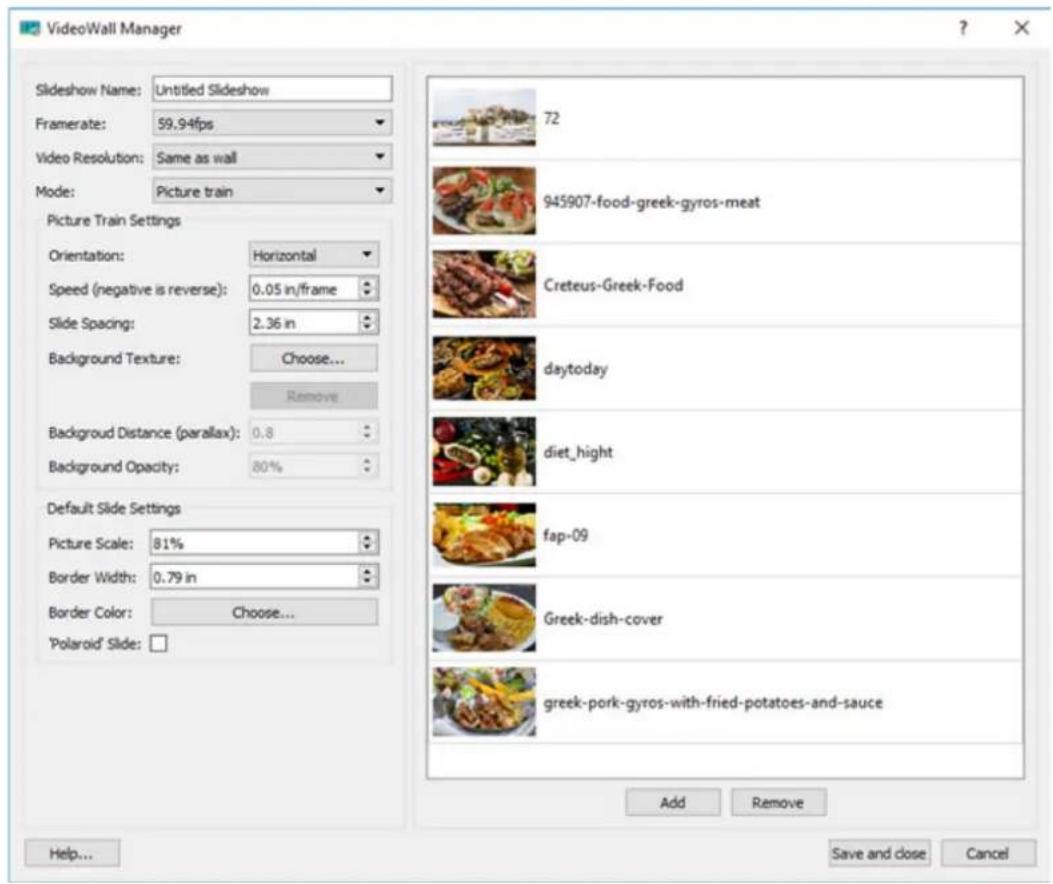
Follow these steps to create a video slideshow.
- Select the wall from the Walls and Devices pane.
- Click the Content tab.
- Click Add Slideshow. Add File dialog appears.
-
Click Save and close.
-
Select still images and click Open. Slideshow configuration window opens.
-
Configure the slideshow. The slideshow parameters are explained in the section 6.2.1.
6.2.1 Slideshow Parameters
Slideshow Name - Short name of the slideshow to display in content lists.
Framerate – The number of frames for each second of video generated. The tool will generate video at the framerate selected. 29.97fps & 59.94fps are recommended if you are using common 60Hz displays.
Video resolution - Clarity and sharpness of the output video. You can either render the slideshow at full resolution ('Same as wall', 1080p for each display) or at a reduced resolution to speed up encoding and optimize data size.
Mode - General slideshow visualization style.
In normal mode each slide is displayed on the whole videowall for some time, just like most classic slideshows.
In picture train, slides are combined into a stripe of images and that stripe is scrolled over the wall.
Normal mode slide settings
Showtime (sec) - The amount of time each slide will be displayed till the next transition start.
Animation - The way to animate each slide. Only Pan & Zoom (also known as Ken Burns) animation is available now.
Transition - The way to visualize slide change. Only Fade (Crossfade) is available now.
Transition time (sec) - Transition (slide change) duration in seconds.
Scaling mode - How to treat the picture's aspect ratio while scaling into the wall canvas. Available only for non-animated slides.
Picture train settings
Orientation - Choose to build either a vertical or a horizontal stripe of pictures.
Speed - The stripe of pictures will be shifted by this length each frame. Use positive values to scroll right-to-left/up-to-down and negative for the opposite direction.
Slide spacing - The spacing between slides.
Background texture – The background texture to use. The texture will scroll along with slide stripe.
Background distance (parallax) – The background scrolling speed settings. Use 0 to scroll background at the same speed as slides. Use positive values to scroll background slower and create parallax effect (distant background), values around 1.0 are good. Use negative values to scroll background faster.
Background opacity - Use 100% to render the background as is. Values between 0% and 100% will cause the background to be partially faded to black (useful when using parallax). 0% will cause background to disappear completely.
Picture train slide settings
Picture scale – The size of each picture relative to the stripe width. With 100%, image will be scaled to take the whole stripe (no side borders will be left). With 50%, image will take only half of stripe width, etc.
Border width - Creates a border around the images with this width.
Border color – Sets the color of the border around images.
'Polaroid' slide - Slide will look like a photo card, slightly bent, rotated by little random angle and drawn with shadow.
6.3 YouTube and Vimeo
This section explains how to add YouTube and Vimeo videos as the source content.
Note: Add YouTube and Add Vimeo buttons become active only when you are connected to the Cloud.
In VideoWall Manager 2.0.24, there are some limitations in downloading YouTube and Vimeo videos:
-
You may not be able to download the best quality video from YouTube. YouTube often provides multiple streams for each file in several formats. There are streams which contain both audio and video and streams which contain only one of the two. In the current implementation, the Manager doesn't take audio only/video only streams and takes the best audio+video stream available.
-
It can't download high resolution video (e.g. 2K and 4K) from Vimeo.
Follow these steps to add YouTube/Vimeo video to the content:
-
Select the wall from the Walls and Devices pane.
-
Click the Content tab.
-
Click Add Youtube or Add Vimeo button.
-
Enter the URL of the Youtube/Vimeo video you want to add. If the URL is valid, it will show a preview of the video in the Preview area.
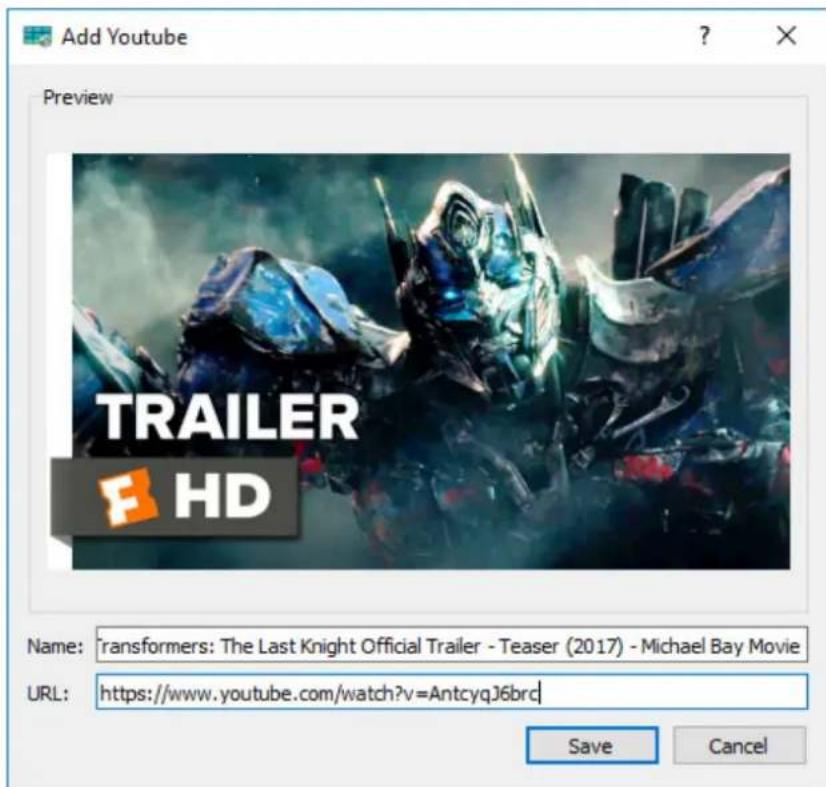
- Click Save.
7 Configuring and Building Compatible Video
This chapter explains how to configure and build compatible videos. Before building videos from video files and still images, make sure the video wall composition is configured and the source contents are added.
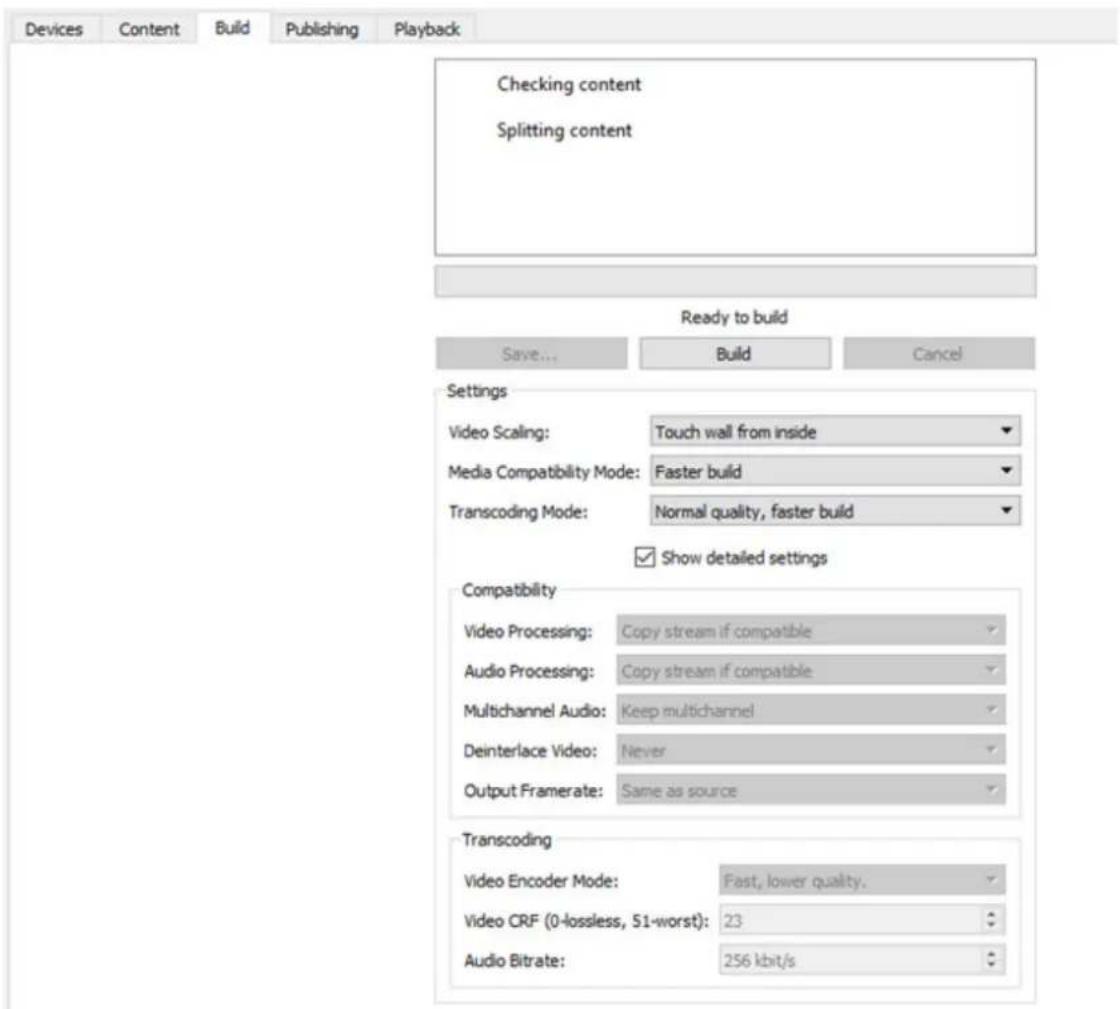
Follow the steps below to build videos.
- Select the wall from the Walls and Devices pane.
- Click the Build tab.
- Configure Settings. Details of the settings are described in the section 7.1.
- Click the Build button to start building video. Estimated encoding time is shown. If the contents are modified from the previous build, the button to start build is renamed to Rebuild.
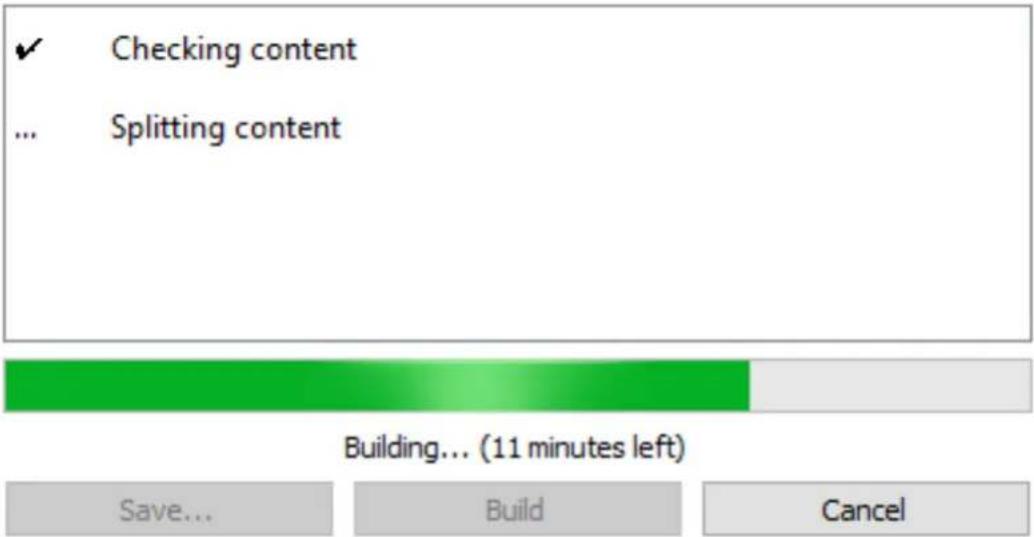
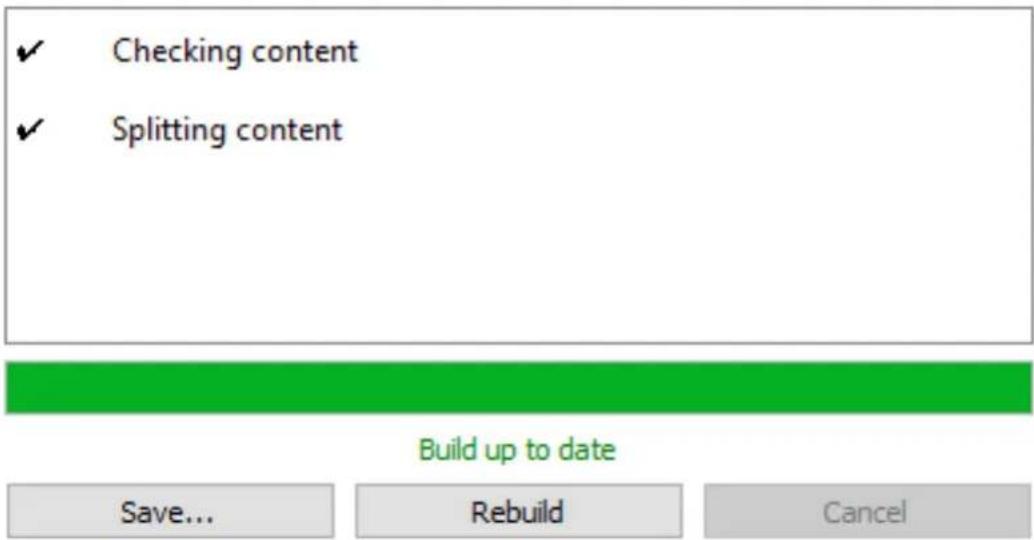
- When successfully completed, it shows the message Build up to date.
7.1 Transcoder Settings
Transcoding is the process of converting one digital format to another.
7.1.1 Video Scaling
The video scaling option allows you to determine how videos will be scaled to fit in a video wall. This option has no effect if the video and the video wall have the same aspect ratio. Also, this option has no effect on the video slideshow.
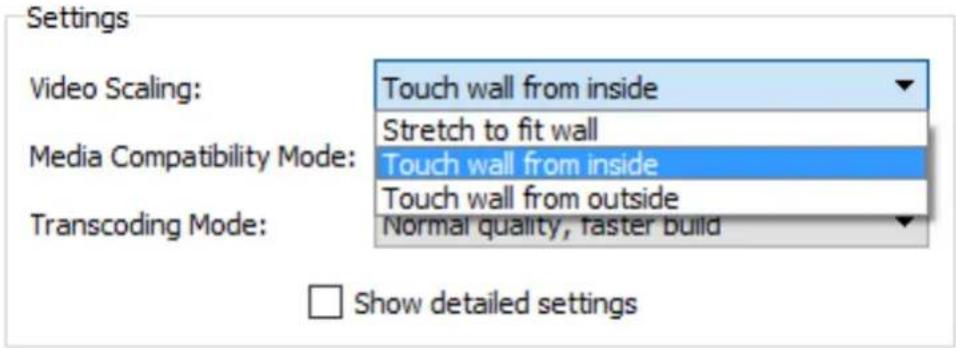
Stretch to fit wall: Scales the video to fill the video wall. If the aspect ratio of the video wall does not match the aspect ratio of the video content, the video will appear stretched or distorted.
Touch wall from inside: Centers the video and adds a black border on the sides (top and bottom, or left and right). The aspect ratio is maintained.
Touch wall from outside: Centers the video and fills the video wall. The aspect ratio is maintained, so the video will be cropped if the aspect ratio of the video wall does not match the ratio of the video.
7.1.2 Media Compatibility Mode
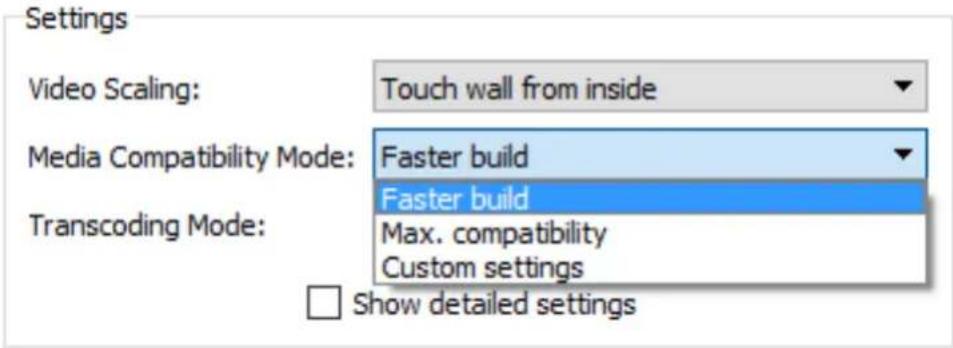
Faster build: Copy audio and video streams to an output file without splitting and re-encoding if the streams are compatible. If the streams are not compatible, VideoWall Manager will re-encode streams with the same resolution and frame rate as the source.
Rules that determine video stream compatibility are:
- None of the output streams (and canvas) requires rotation.
• Video codec is h264 (AVC).
• Video width is not greater than 1920px AND video height is not greater than 1080px.
• H264 profile level is not greater than 4.2.
• Frame rate is not greater than 60.0fps.
If all criteria are met, the video is treated as a compatible video.
Max. Compatibility: Always re-encode video and audio streams to guarantee maximum compatibility.
Custom Settings: Give users more advanced control over compatibility settings.
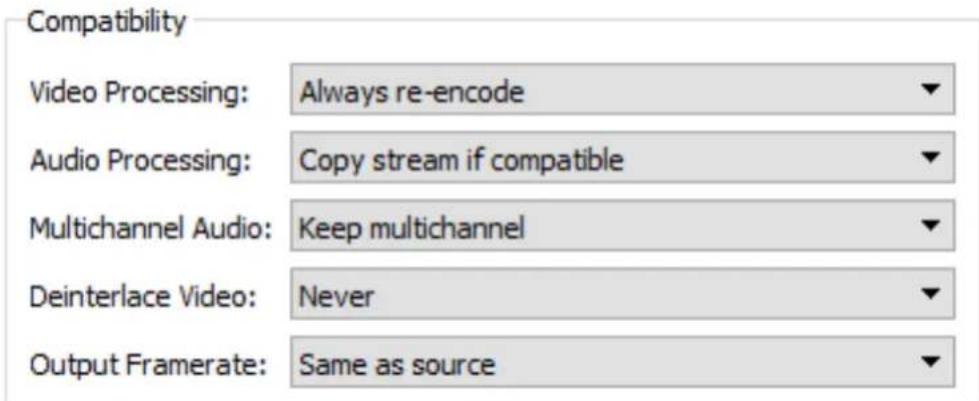
Video Processing: Available settings are: Copy stream if compatible / Always re-encode.
Audio Processing: Available settings are: Copy stream if compatible / Always re-encode.
Multichannel Audio: Available settings are: Convert to stereo / Keep multichannel.
Deinterlace Video:
Interlaced video is that with a doubling of the perceived frame rate of a video display to reduce consumption of extra bandwidth. Interlaced video can produce horizontal patterns when viewed on a progressive monitor. Deinterlace is the process of converting interlaced video into progressive video.
Never: Never deinterlace.
Auto: Deinterlace only if the source video is interlaced.
Output Framerate: Determines the output frame rate. Available settings are: same as source / 23.98 / 25 / 29.97 / 50 / 59.94 fps.
7.1.3 Transcoding Mode
Sets the transcoding mode. Increasing the picture quality level leads to a more precise analysis of the original picture, and makes the encoding engine's internal settings finer.
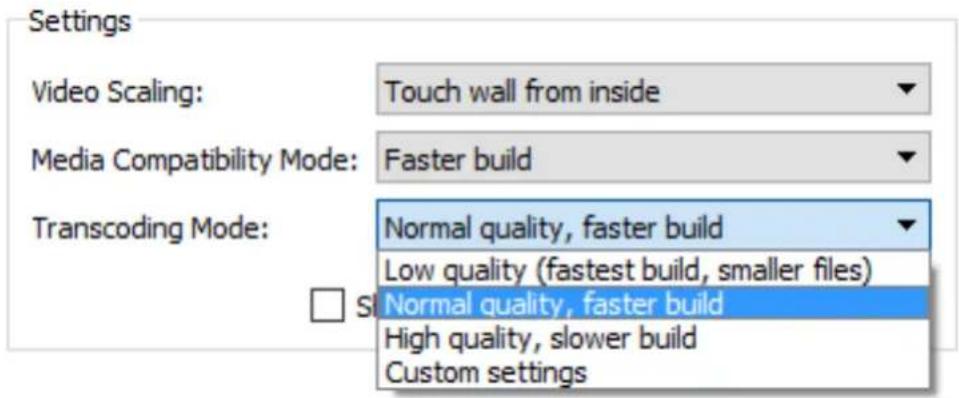
Custom Settings: Give users more control over compatibility settings.
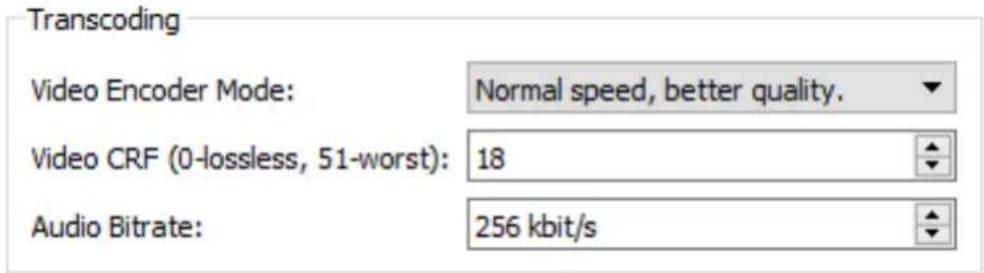
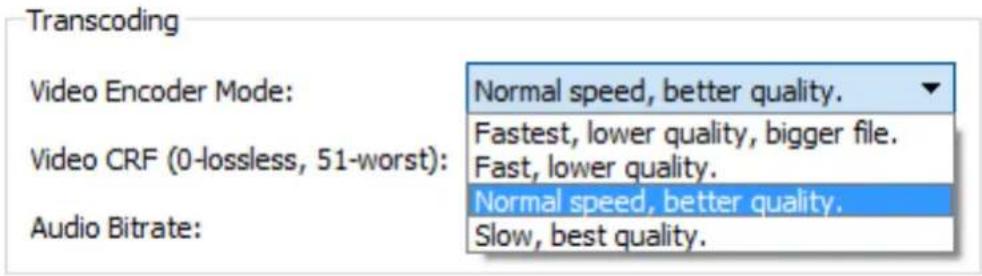
Video Encoder Mode: Sets the transcoding mode. As the precision of picture analysis and quality of picture increases, the output speed decreases.
Available settings are: Fastest, lower quality, bigger file / Fast, lower quality / Normal speed, better quality / Slow, best quality.
Video CRF: The Constant Rate Factor. You can set the values between 0 and 51, where lower values would result in better quality. Reasonable values are between 18 and 28. The lower the value, the bigger the file size.
Audio Bitrate: Specifies the quantity of audio data per second.
7.2 Save Built Content to Local Storage
VideoWall Manager allows you to save the generated video to your computer to use it in the future.
- When the video is built successfully, Click Save. A window appears.
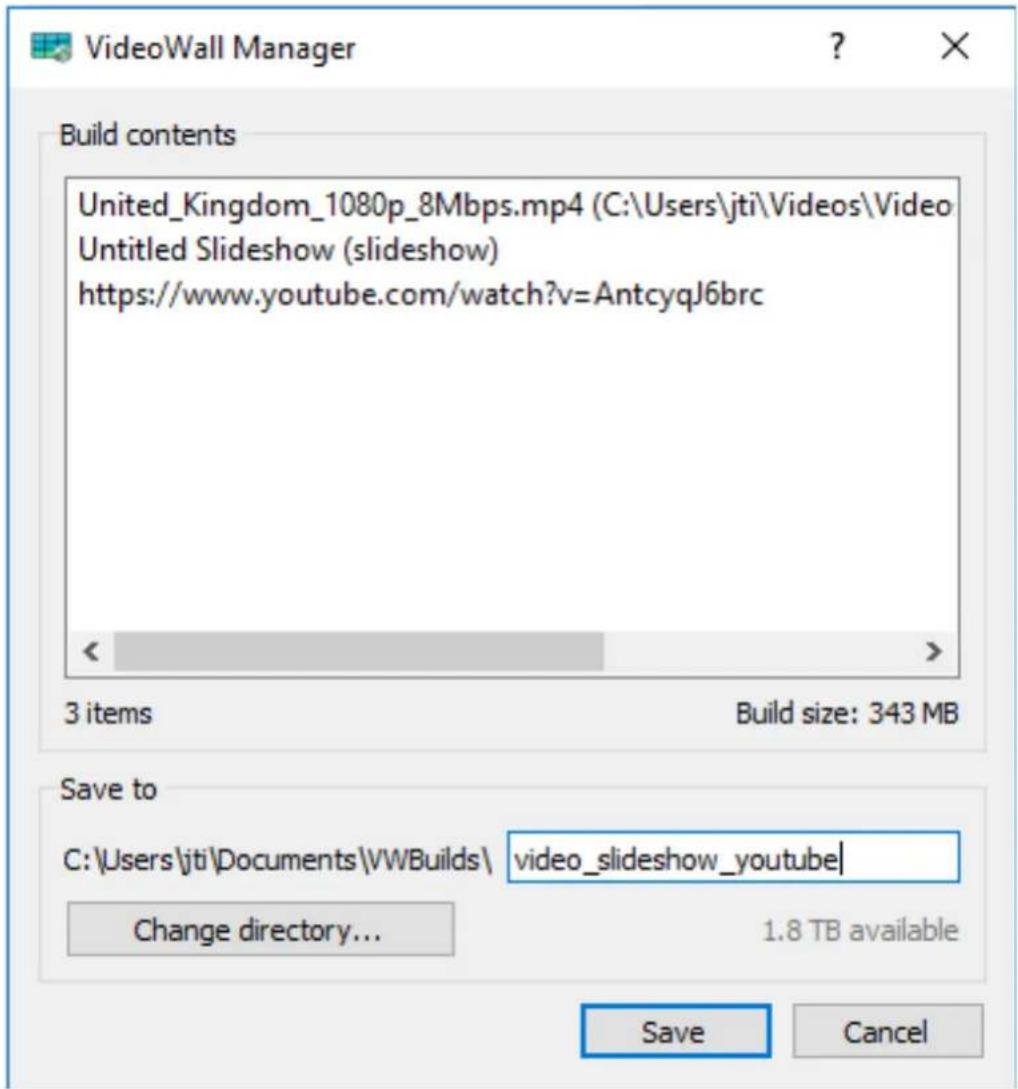
- Specify the location to save the contents, enter folder name and click Save.
- When saved successfully, Save complete message appears under the progress bar.
8 Publishing Generated Video to Device
Once the videos are built successfully, transfer them to the devices to play them locally.
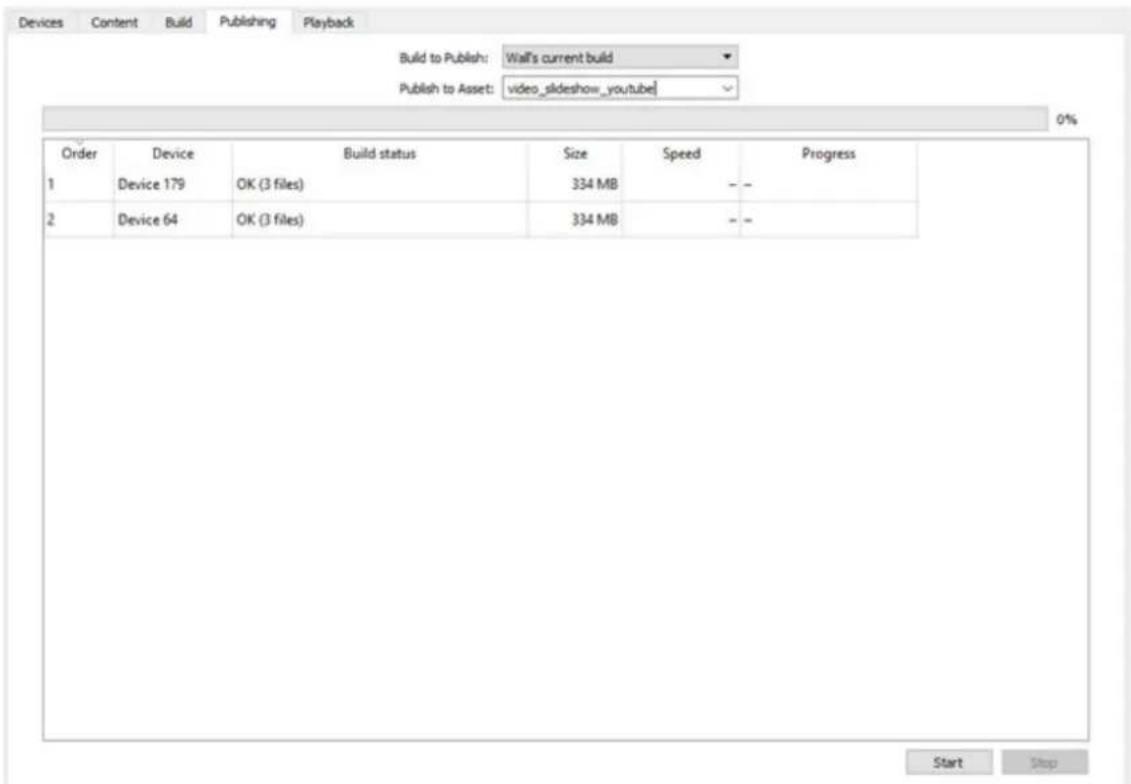
- Select the wall from the Walls and Devices pane.
- Click the Publishing tab.
-
Set Build to Publish. Specify the location of videos that will be transferred to the devices.
-
Wall's current build: Set to this if you want to choose the videos that you just built.
- Browse: Find saved videos in your local storage.
-
Recently saved videos: List of recently saved videos.
-
Set Publish to Asset - Asset is a collection of video files and can be thought of as a playlist.
-
Name new asset: Create a new asset name.
-
Select existing asset: Overwrite existing videos in the asset.
-
Click Start. A confirmation dialog appears.
-
Click OK to start transferring videos. Videos will be transferred to the devices and stored under the asset name specified in the step 4. Any devices that are playing the asset will be stopped.
-
When the transfer is done successfully, it shows Done in the Progress column.
| Build to Publish: Wall's current build | |||||
| Publish to Asset: video_slideshow_youtube | |||||
| 100% | |||||
| Order | Device | Build status | Size | Speed | Progress |
| 1 | Device 179 | OK (3 files) | 334 MB | - Done | |
| 2 | Device 64 | OK (3 files) | 334 MB | - Done | |
9 Playing Back Video
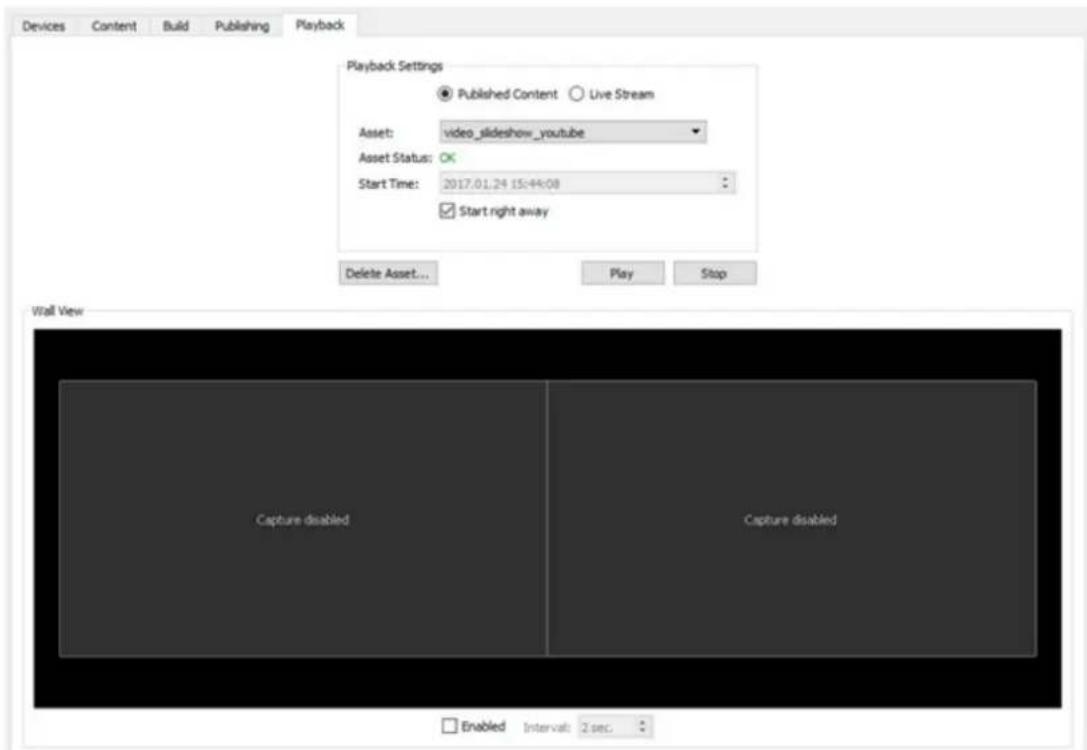
9.1 Play Published Content
Videos will play continuously until you stop the playback or delete the wall/device. If the device is rebooted while playing the video, it will automatically start playing the video by calculating the start time and current time.
- Select the wall from the Walls and Devices pane.
- Click the Playback tab.
- Click on the Asset drop down list.
- Select the asset you want to play. Asset Status gets updated and informs the user if it's valid.
- Click Play.
9.1.1 Start Video at Specified Time
To start playing the video at specified time:
- Uncheck the Start right away checkbox.
- Set the Start Time. Use your local time even if the devices are in the different time zone.
9.2 Delete Asset from All Devices in the Wall
- Select the wall from the Walls and Devices pane.
- Click the Playback tab.
- Click on the Asset drop down list.
- Select the asset you want to delete.
- Click Delete Asset. If the selected asset name exists in the device, it will be deleted from the storage of each device.
9.3 Play Multicast Stream
Playback of UDP multicast is supported with some limitations.
- Composition should not contain rotation in display or canvas. Stream will not be displayed as intended.
- Video up to 1080p.
To play UDP multicast stream, follow the steps below:
- Select the wall from the Walls and Devices pane.
- Click the Playback tab.
- Select Live Stream in the Playback Settings.
- Configure the settings.
Protocol: Currently, only UDP is supported.
Address and Port: IP address and port of the stream.
Stream Aspect Ratio: Aspect ratio of the stream.
Video Scaling: How to treat picture's aspect ratio while scaling into the wall canvas.
- Click Play.
9.4 Wall View and Proof of Play
The wall view starts to show snapshots of the video that's currently playing on the video wall when the capture feature is enabled.
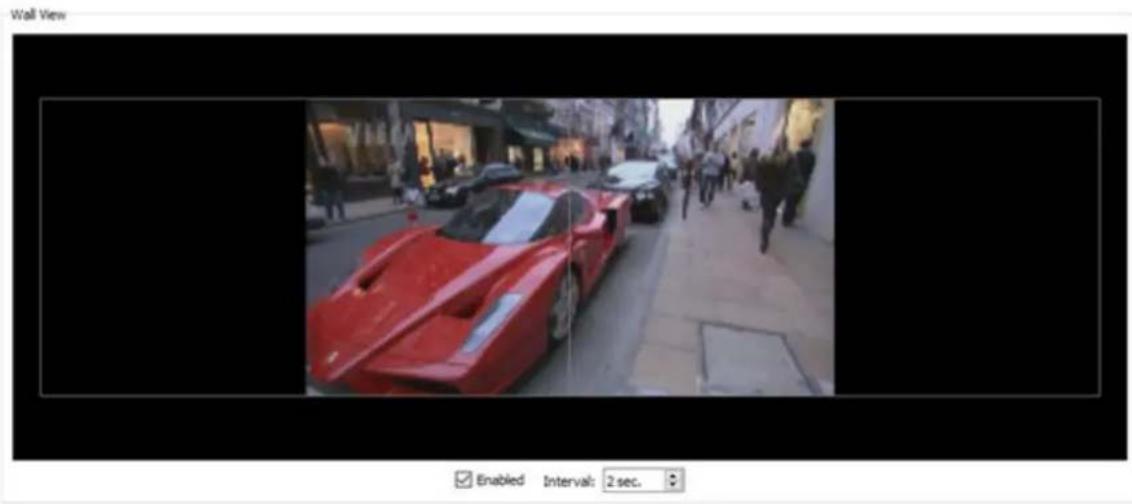

Note: This feature becomes unavailable when you connect to the Cloud.
To enable the capture, follow these steps:
- Select the wall from the Walls and Devices pane.
- Click the Playback tab.
- Select the asset you want to play and click Play.
- Check the Enabled checkbox and set the snapshot update Interval in sec.
To see what each device is currently playing:
- Select the device from the Walls and Devices pane.
- Click the General tab.
- Check the Enabled checkbox on the right pane.
10 Monitoring and Controlling from the Cloud Portal
Moderro VideoWall Management Service on the Cloud has not been completely implemented, however basic features such as status monitoring and rebooting devices are available.
If you haven't created an account on Moderro VideoWall Management Service on Cloud, refer to section 2.2.1 and create an account.
10.1 Moving Video Wall to Cloud Portal
- Click Connect on Cloud option. A login dialog appears.
- Enter username (or email) and password and click Connect.
- Video walls and devices that are managed in the cloud account will be shown in the Walls and Devices pane. Cloud icons on the right of walls and devices indicate that they are managed in cloud.
- Right click on the wall that you want to move to the cloud in the Walls and Devices pane and click Move to Cloud. Once the wall and the devices are successfully uploaded, the cloud icons appear next to them.
10.2 Monitoring from Cloud
- On your computer, open a browser and navigate to https://videowall.moderro.com.
- Click Log In on the top menu.
- Enter your username and password and click Log In.
- A simple overview of walls and devices status is shown in doughnut charts.
- Click Walls on the top menu. All walls under your account are displayed. Snapshots on each wall get automatically updated. Detailed information about each device can be viewed by selecting a device and toggling Advanced option.
10.3 Controlling from Cloud
Available actions as of now are:
Video Wall – Restart, Upgrade, Report
Device – Details, Upgrade, Restart, Report
11 Device and Video Wall Status
| Status Device/Wall Description | |||
| Green dot Device | Network connection between the device and VideoWall Manager is good. | ||
| Red dot Device | No network connection between the device and VideoWall Manager. | ||
| White cloud | Wall The wall is managed by cloud without issue. | ||
| Device The device is managed by cloud without issue. | |||
| Red cloud with exclamation mark | Wall | ||
| Device | The device is managed by cloud, but does not belong to a wall that is managed by the cloud. This could happen when the same device is added to 2 applications on different computers and the wall with the device gets moved to cloud from 1 application. Then the device in the other application shows this icon. | ||
| Red Exclamation mark | Wall | ||
| Device | The device belongs to a wall that is managed by cloud, but the device is not managed by cloud. This could happen when you perform reset to default while it's being managed by cloud. | ||
12 Preferences
The Settings pane manages the VideoWall Manager preferences settings.
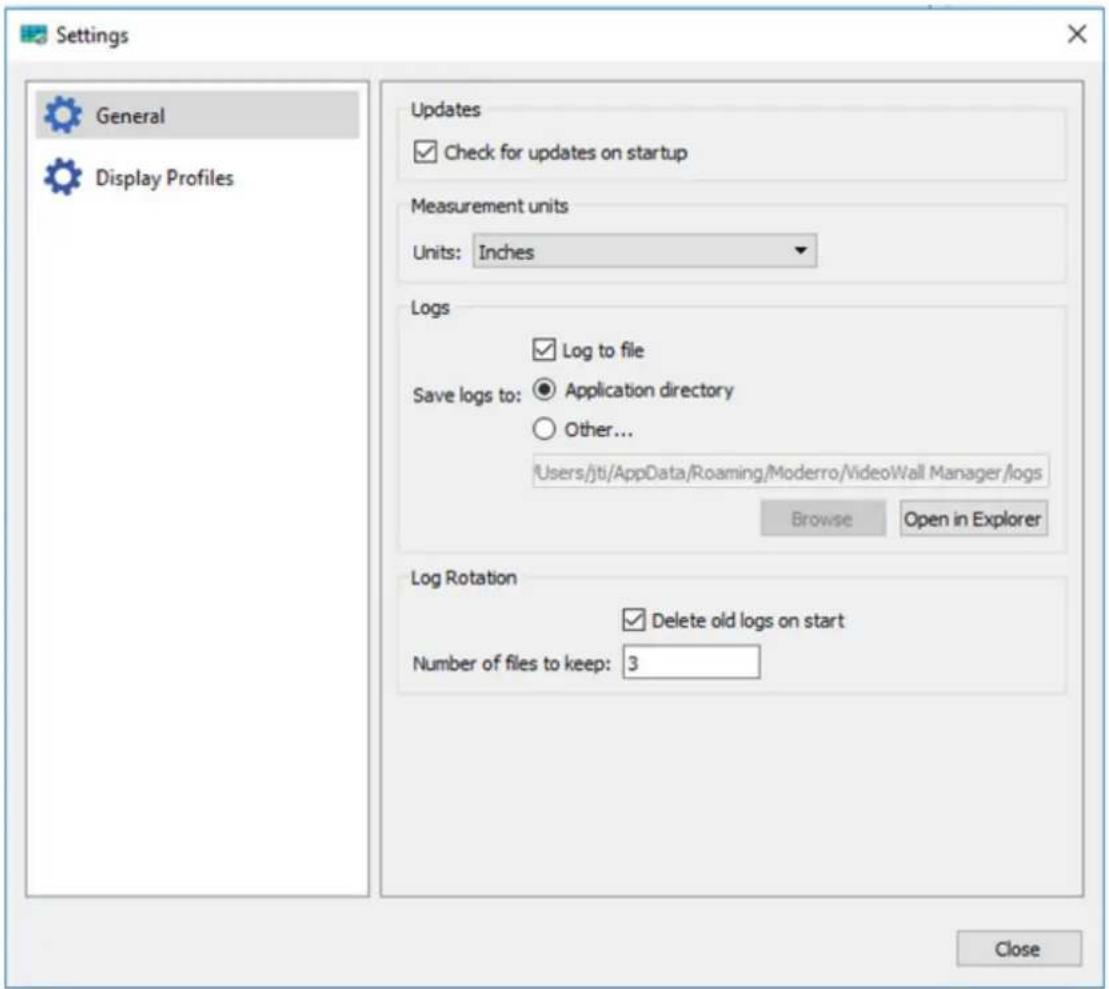
General
Check for updates on startup – If checked, every time the application is launched, it will access the server and check for any updates. If unchecked, the application will not access the server for updates.
Measurement Units - By default, VideoWall Manager uses inches as its unit of measurement used in composition and display profiles. You can change measurement units to centimeters.
Logs:
Creates a new log file every time the application starts.
Log to file – If checked, log will be filed to the location specified by Save logs to. If unchecked, no log will be filed.
Save logs to – Specifies the location to save logs.
Delete old logs on start – If checked, old logs will be deleted.
Number of files to keep – Specifies the number of log files to keep.
Display Profiles – Refer to section 5.2 for details.
Close – Closes the preferences settings window.
13 Upgrading VideoWall Manager
This chapter explains how to upgrade VideoWall Manager.
The application will check the server every time it's launched and notify user when a new update is available.
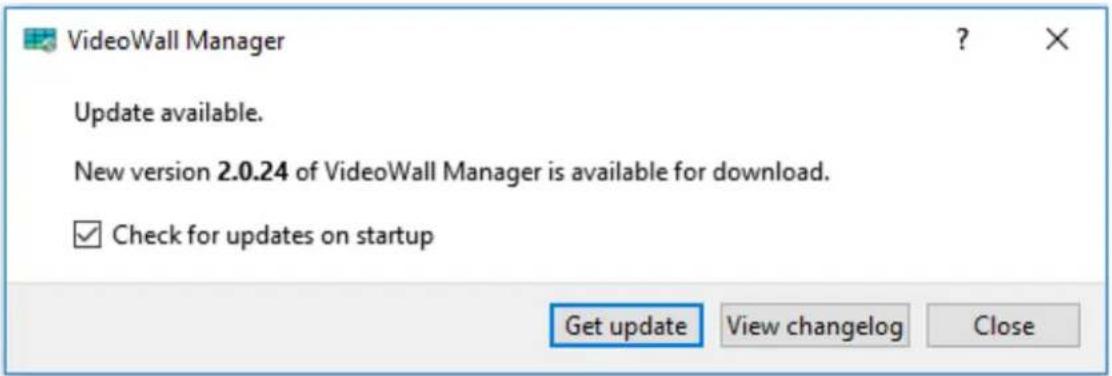
Check for updates on startup – Uncheck the box to disable application from automatically looking for updates on startup. You can enable it again by selecting Check for updates on startup in File > General.
Get Update – Downloads the latest version of VideoWall Manager. Refer to section 2.2.3 for installation.
View changelog – Changelog covers records of all notable changes such as bug fixes, new features, etc.
Close – Closes the update dialog.
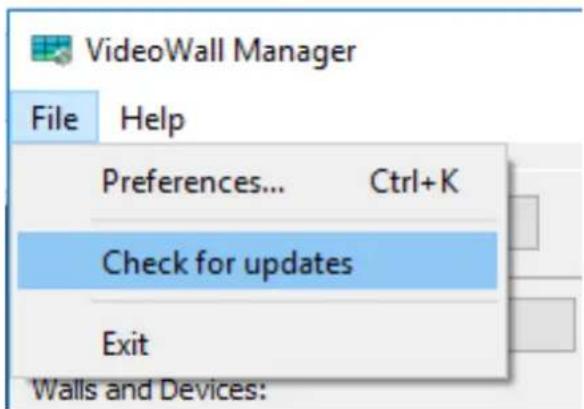
To manually check for updates, go to File and click Check for updates.
14. Other Information
Customer Support
For technical support or product service, see the table below or contact your reseller.
NOTE: You will need to provide the product serial number.
| Country/Region | Website | T= TelephoneC = CHAT ONLINE | |
| AustraliaNew Zealand | www.viewsonic.com.au | AUS= 1800 880 818NZ= 0800 008 822 | service@au.viewsonic.com |
| Canada www.viewsonic.com T= 1-866-463-477 | 5 service.ca@viewsonic.com | ||
| Europe www.viewsoniceurope.com http://www.viewsoniceurope.com/eu/support/call-desk/ | |||
| Hong Kong www.hk.viewsonic.com T= 852 310 | 2 2900 service@hk.viewsonic.com | ||
| India www.in.viewsonic.com T= 1800 419 0959 | service@in.viewsonic.com | ||
| Korea ap.viewsonic.com/kr/ T= 080 333 2131 | service@kr.viewsonic.com | ||
| Latin America(Argentina) | www.viewsonic.com/la/ | C= http://www.viewsonic.com/la/soporte/servicio-tecnico | soporte@viewsonic.com |
| Latin America(Chile) | www.viewsonic.com/la/ | C= http://www.viewsonic.com/la/soporte/servicio-tecnico | soporte@viewsonic.com |
| Latin America(Columbia) | www.viewsonic.com/la/ | C= http://www.viewsonic.com/la/soporte/servicio-tecnico | soporte@viewsonic.com |
| Latin America(Mexico) | www.viewsonic.com/la/ | C= http://www.viewsonic.com/la/soporte/servicio-tecnico | soporte@viewsonic.com |
| Nexus Hightech Solutions, Cincinnati #40 Desp. 1 Col. De los Deportes Mexico D.F.Tel: 55) 6547-6454 55)6547-6484Other places please refer to http://www.viewsonic.com/la/soporte/servicio-tecnico#mexico | |||
| Latin America(Peru) | www.viewsonic.com/la/ | C= http://www.viewsonic.com/la/soporte/servicio-tecnico | soporte@viewsonic.com |
| Macau | www.hk.viewsonic.com T= 853 2870 0303 service@hk.viewsonic.com | ||
| Middle East | ap.viewsonic.com/me/ | Contact your reseller | service@ap.viewsonic.com |
| Puerto Rico &Virgin Islands | www.viewsonic.com | T= 1-800-688-6688 (English)C = http://www.viewsonic.com/la/soporte/servicio-tecnico | service.us@viewsonic.comsoporte@viewsonic.com |
| Singapore/Malaysia/Thailand | www.ap.viewsonic.com | T= 65 6461 6044 | service@sg.viewsonic.com |
| South Africa | ap.viewsonic.com/za/ | Contact your reseller | service@ap.viewsonic.com |
| United States | www.viewsonic.com T= 1-800-688-6688 service.us@viewsonic.com | ||

natural_image
Three colorful bird figurines perched on a green branch against a red background (no text or symbols)ViewSonic®
- Thank you for choosing ViewSonic
- Contents
- Introduction
- Setting Up the Video Wall
- Configuring Device
- Configuring Video Wall
- Video Wall Composition
- Selecting and Configuring Content
- Configuring and Building Compatible Video
- Publishing Generated Video to Device
- Playing Back Video
- Monitoring and Controlling from the Cloud Portal
- Device and Video Wall Status
- Preferences
- Upgrading VideoWall Manager
- Other Information
- Scope
- Terminology
- Overview of Moderro VideoWall Solution
- Infinitely Scalable
- Extremely Flexible
- Highly-Efficient Cloud Based Service
- Simple and Easy Installation and Operation
- Workflow
- Video File
- Multicast
- Connecting the Hardware
- Downloading, Installing and Launching the VideoWall Application on Windows
- Create an Account on Cloud Portal
- Log in and Download the VideoWall Application from the Cloud
- Install and launch the VideoWall Application
- Creating Video Wall and Adding Devices
- If there are no unmanaged devices in the application:
- Discovering and Adding Device
- Adding Device Manually
- Identify Device
- Rename Device
- Manage Storage
- To delete specific assets from device storage:
- To erase all assets from device storage:
- To format the disk storage:
- Unregister Device
- Method 1:
- Method 2:
- Reset to Defaults
- Reboot Device
- Manage Network and Time
- NTP (Network Time Protocol)
- Enable NTP:
- Configure NTP Server:
- Disable NTP:
- PTP (Precision Time Protocol)
- Time zone
- AV Output
- Brightness, Contrast, Saturation
- Volume
- Audio Output
- Manage Display
- HDMI Connection
- EDID (Extended Display Identification Data)
- The video output resolution and refresh rate can be changed by:
- CEC
- RS-232
- Upgrade Device Individually
- Identify All Devices in Video Wall
- Reboot All Devices in Video Wall
- Delete Video Wall
- There are two ways to delete a video wall:
- Upgrade All Devices in the Wall at Once
- You can upgrade all devices in the video wall at once.
- Change the Measurement Units
- Display Profiles
- Grid Layout Mode
- Artistic Layout Mode
- Artistic mode allows you to:
- Options in the Composition Work Area
- Video File
- Slideshow
- Follow these steps to create a video slideshow.
- Slideshow Parameters
- Normal mode slide settings
- Picture train settings
- Picture train slide settings
- YouTube and Vimeo
- Follow the steps below to build videos.
- Transcoder Settings
- Video Scaling
- Media Compatibility Mode
- Rules that determine video stream compatibility are:
- Deinterlace Video:
- Transcoding Mode
- Save Built Content to Local Storage
- Play Published Content
- Start Video at Specified Time
- Delete Asset from All Devices in the Wall
- Play Multicast Stream
- To play UDP multicast stream, follow the steps below:
- Wall View and Proof of Play
- To enable the capture, follow these steps:
- To see what each device is currently playing:
- Moving Video Wall to Cloud Portal
- Monitoring from Cloud
- Controlling from Cloud
- General
- Logs:
- Customer Support
Brand : VIEWSONIC
Model : Moderro NMP012
Category : Media player