
SW-091 - Media player VIEWSONIC - Free user manual and instructions
Find the device manual for free SW-091 VIEWSONIC in PDF.


| Product Type | Media Player |
| Brand | Viewsonic |
| Model | SW-091 |
| Dimensions (approx) | 120 mm x 80 mm x 20 mm |
| Weight (approx) | 200 g |
| Power Supply | DC 5V, 2A |
| Video Output | HDMI 1.4, Composite AV |
| Audio Output | HDMI, Stereo RCA |
| Supported Video Formats | MPEG, AVI, MKV, MOV, MP4 up to 1080p |
| Supported Audio Formats | MP3, WMA, AAC, FLAC |
| Supported Image Formats | JPEG, BMP, PNG |
| Input Ports | USB 2.0 (x2), SD/MMC card slot |
| Networking | Ethernet 10/100 |
| Remote Control | Infrared remote included |
| Cleaning | Wipe with a soft, dry cloth |
| Safety | Keep away from liquids and heat sources |
| Spare Parts | Remote control, power adapter, AV cable |
| Repairability | No user-serviceable parts inside |
Frequently Asked Questions - SW-091 VIEWSONIC
User questions about SW-091 VIEWSONIC
0 question about this device. Answer the ones you know or ask your own.
Ask a new question about this device
Download the instructions for your Media player in PDF format for free! Find your manual SW-091 - VIEWSONIC and take your electronic device back in hand. On this page are published all the documents necessary for the use of your device. SW-091 by VIEWSONIC.
USER MANUAL SW-091 VIEWSONIC
Updated on October 2, 2017
Player App Installation

natural_image
Simple red 'R' symbol on a yellow circular background (no text or symbols)If the hardware you are using did not come pre-installed with the Revel Player app you will need to install this first. Windows hardware utilizes a different app than Android hardware.

Windows Hardware
1. Install the Revel Digital Player app
Open the Windows Store app on the player PC and search for "Revel Digital" or use this link. Once installed, start the Revel Digital app to get your registration code.

Android Hardware
1. Install the Revel Digital Player app
Open the Google Play app on your Android device, or browse to the Google Play Store. Then search for "RevelDigital" or use this link. Once installed, start the Revel Digital app to get your registration code.
Device Registration
Registering a device makes it available in your Revel Digital account for management. Each player in your network will need to registered. It is possible the device was pre-registered before being shipped in which case no code will be presented and will start straight into scheduled content.
Registration Code
The first time the player app is started it will present a registration code similar to the following:
Revel digital
RSNHUO
-
Create an account at http://www.reveldigital.com
-
Select the devices tab
- Click the Register button and enter this code
Login to Revel Digital
Access your Revel Digital account at http://as1.reveldigital.com. If you don't already have an account you'll need to create one now.
Register New Device
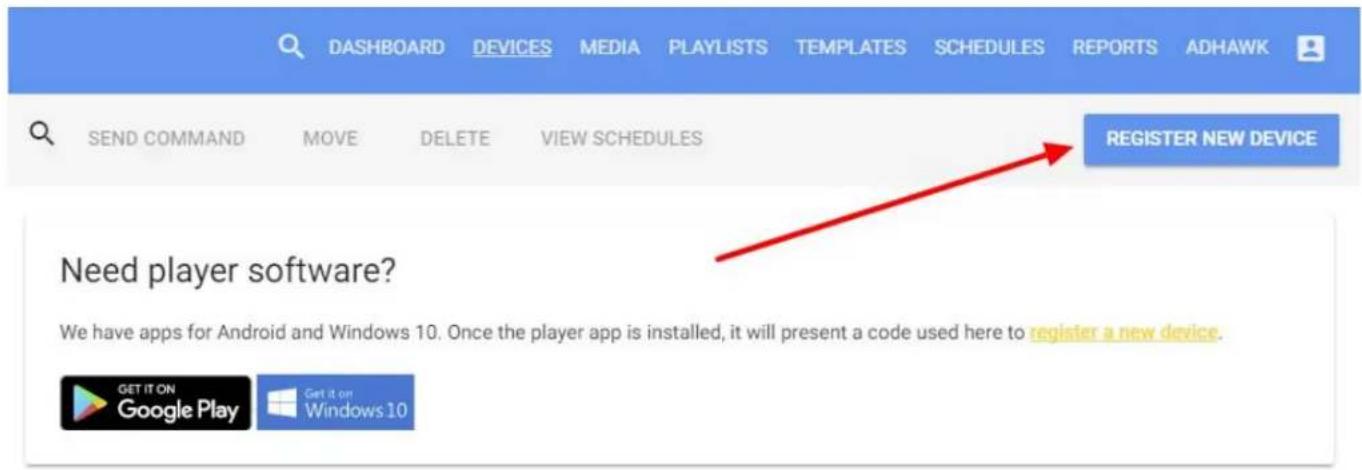
Once logged in, click Devices, then click Register New Device.
Enter Registration Code
Enter the code from your player into the highlighted field.
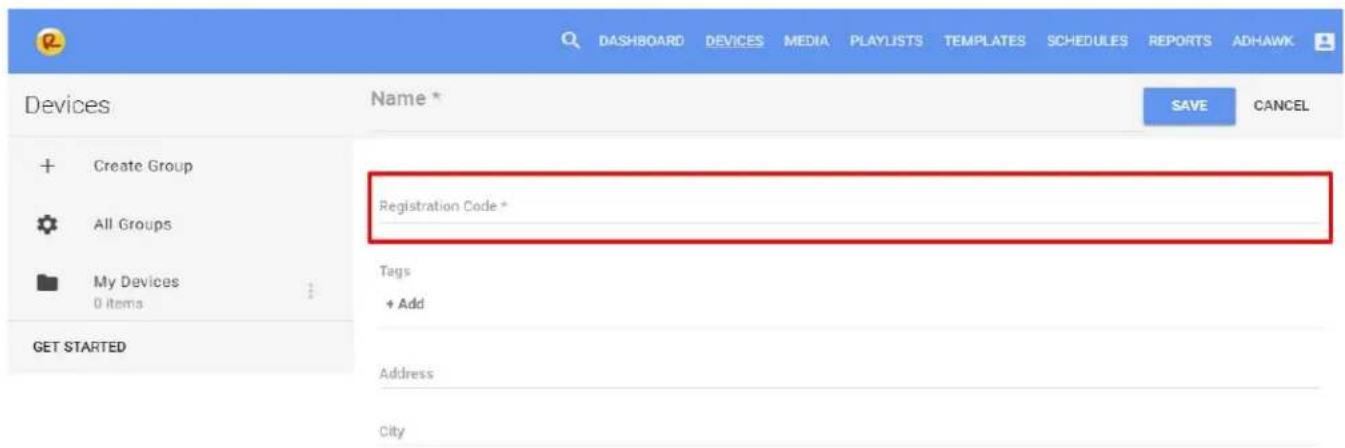
Also take some time to accurately fill in the other fields including Timezone and Location. These fields can be important to certain types of content.
When finished, click the Save button.
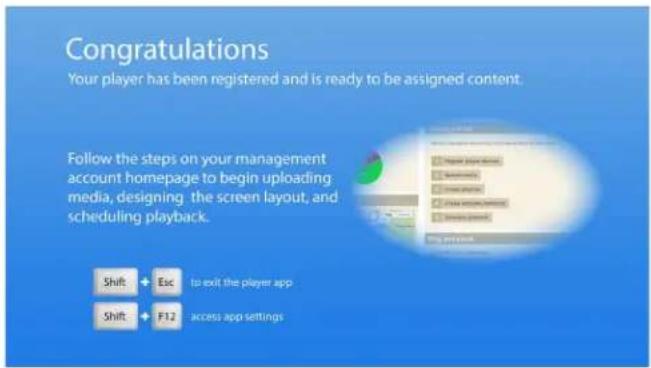
Congratulations
Your device should now be registered. Successful registration will display the Congratulation screen on your display.
If the code does not work please contact support and we will step you through generating a new code.
Media Management
With your device up and running it's now time to upload some media to play. The Revel Digital player is capable of playing almost any media type including images, videos, PowerPoint, PDF, and more. Media only needs to be uploaded once after which it can be scheduled to play on any device in your account.
Uploading
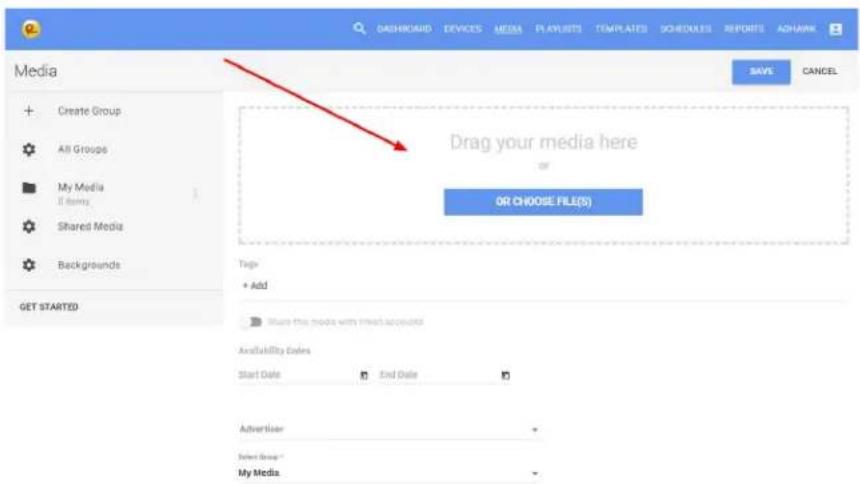
Click the Media tab, then click Upload New Media.
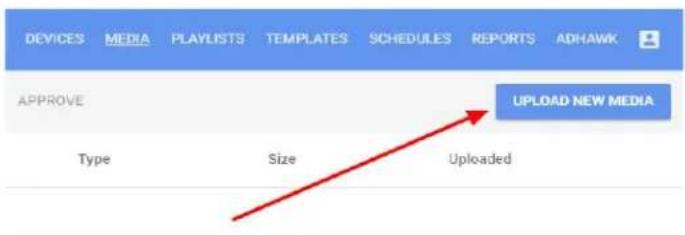
You can then either drag-and-drop media onto the upload button, or click the button to select a file from your local PC. Once upload is complete, click the Save button. Click the Media tab again to verify the file has been uploaded to account.
Playlists
A playlist is a collection of media or other content that plays in a loop. In most cases it's necessary to add your media to playlist in order for it to be scheduled to play.
Create a Playlist
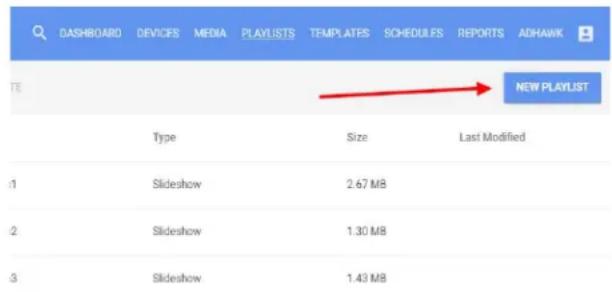
Click the Playlist tab, then hover your mouse over the Create New Playlist button. Four types of playlists are available to select from:
•Multimedia Playlist
This is most versatile playlist type in that it supports all content types including media, web pages, Adobe Flash, audio, and more
- Slideshow Playlist
Supports only image type media but can be used in certain applications where Multimedia cannot such as gesture (swipe) enabled image galleries.
• Marquee Playlist
Specifically for the Marquee template zone. Supports adding text only content from RSS, Twitter, and other text sources.
- Template Playlist
A playlist comprised of individual templates. Templates are customized layouts with various zones of content and are covered later in this guide.
Add a Source
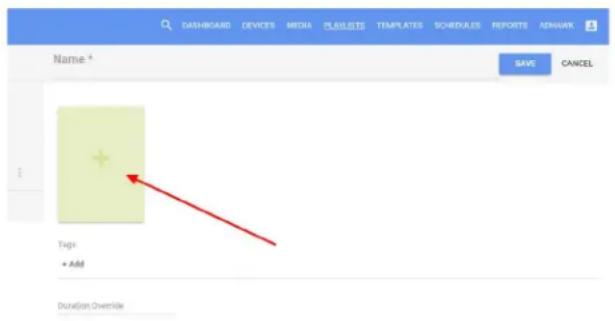
Click the Green box to begin adding content to your new playlist. This will open a source selection window with sources specific to the type of playlist.
Multimedia & Slideshow Source Types
The following sources types are available for a Multimedia Playlist:
•Media
Any media you have uploaded to your account will show in this list. Supported media types include images, video, PowerPoint, PDF, Flash, and audio.
- YouTube
Video from YouTube. You will need to YouTube video ID.
Note: some videos are protected by YouTube and may not play correctly.
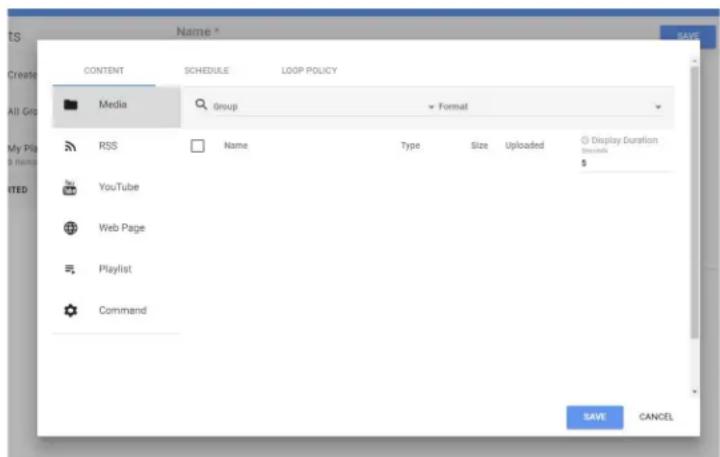
•RSS
Media RSS is a special type of RSS feed which includes media type content (images, videos, flash, etc). Adding an RSS feed to your playlist will automatically import all the media from the feed into your playlist.
Website
Adding a website to the playlist will load the website inline with your playlist. In the case of a Multimedia playlist the website will be the actual LIVE site and not a screenshot.
- Playlist
Nesting a playlist will include all the sources from another playlist inline with this playlist. This makes it easy to create ‘sub-playlists’ which contain sets of content to be included in other ‘master’ playlists.
- Command
An advanced source which allows command to be injected inline with a playlist. Commands can be used to do custom actions such as triggering content on other screens.
Marquee Source Types
The following sources are available for the Marquee playlist type:
- Text Message
Can be any message supplied by you.
•RSS Feed
Pulls text from an RSS feed. Stock RSS feeds are available from CNN.
Pulls the text from the tweets of a specific Twitter user.
- Playlist
Nested playlist. Will inject text from another marquee playlist inline with this playlist
- Command
An advanced source which allows command to be injected inline with a playlist. Commands can be used to do custom actions such as triggering content on other screens.
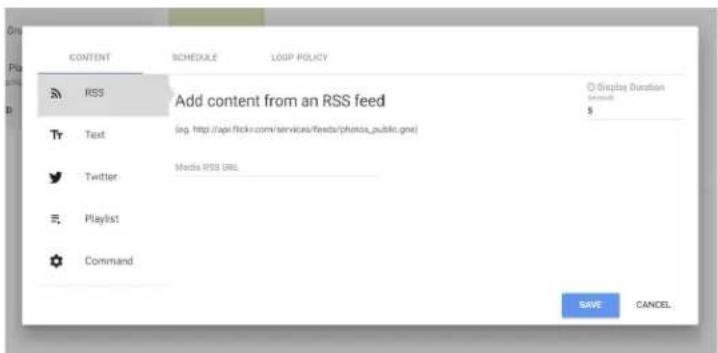
Play Order
Click and drag individual sources to position them in the playlist order. Double-click on a source item to edit the source. Click the red (X) in the corner to remove the source altogether.
![Copy of combos1 [food images]MB image.png 00:00:10 [food images] hotdog image.png 00:00:10 [food images] burger image.png 00:00:10 [food images] soup image.png 00:00:10 1 2 3 4 Playlist is 00:00:40.257 MB Tags + Add](/content/2026/05/1058306/images/bc7ec1b7ceaa29c586d3d3d01aae3e13314c6daa61387640e535740ebce465c5.jpg)
Advanced Playlist Topics
Each source can have it's own Schedule and Loop Policy. Scheduling allows for limiting the play of this source to a specific set of conditions. Loop policy is used to create dynamic playlists. Both topics are outside the scope of this document and will be covered in advanced documentation available separately.
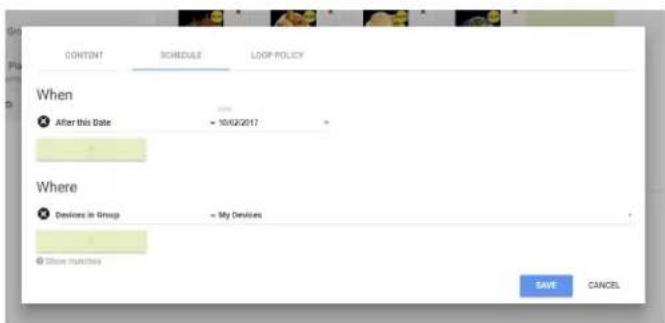
Schedules
Scheduling determines what to play, when to play it, and where to play it. Two types of schedules are available including Basic and Smart. Basic schedules are great for very simple scheduling based on a certain date/time range, day of week, and fixed set of players. Smart scheduling is much more dynamic allowing for much more complex campaigns based
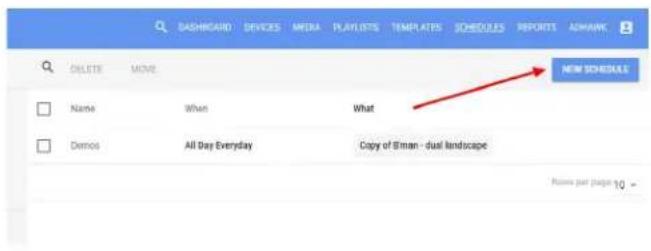
on a set of logical conditions. A schedule requires either a playlist or template along with a set of devices. Multiple schedules can be assigned to the same player with various levels of priority.
Basic Scheduling
A basic schedule consists of a time range, a date range, selected days of the week, a playlist or template, and a selected list of devices.
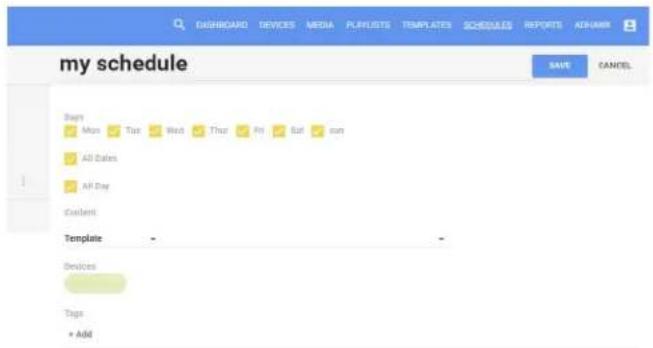
Smart Scheduling
Smart schedules provide a more dynamic mechanism for scheduling based on a set of rules or conditions for determining what to play, when to play it, and where to play it. The full set of conditions is beyond the
scope of this document, however the image to the right demonstrates an example smart schedule for a bakery. This schedule will play the Bakery template, only on weekdays and in the month of October, and only on devices containing the tag 'Display Case'. As you can see Smart Scheduling provides much more flexibility in scheduling but may or may be necessary depending on your use case.
![DASHBOARD DFVICES MEDIA PLAYLATS TEMPLATS SCHEDULES REPORTS ADAMARK my schedule SAVE CANCEL What Specific Playlist + [My Playlists] Copy of Meeting list Show matches When After this Date 10/02/2017 Where Devices in Group + My Devices Show matches Tags + Add](/content/2026/05/1058306/images/d00694206af97fd05b740f019ffff501dc8aa22d66be6d40ac2ec68579da5576.jpg)
Templates
A template is a collection of content 'zones' which can be positioned and sized independently of each other. Templates provide unlimited creative freedom in designing the look of your digital signage or kiosk.
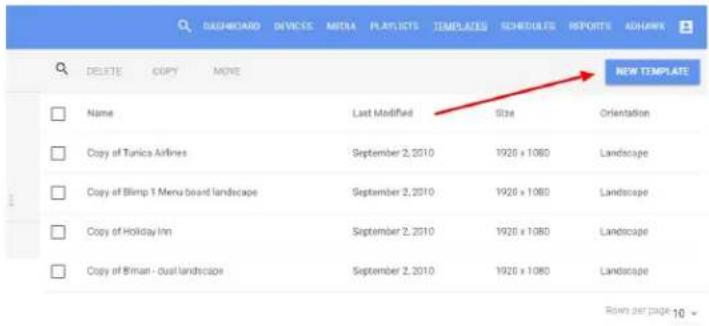
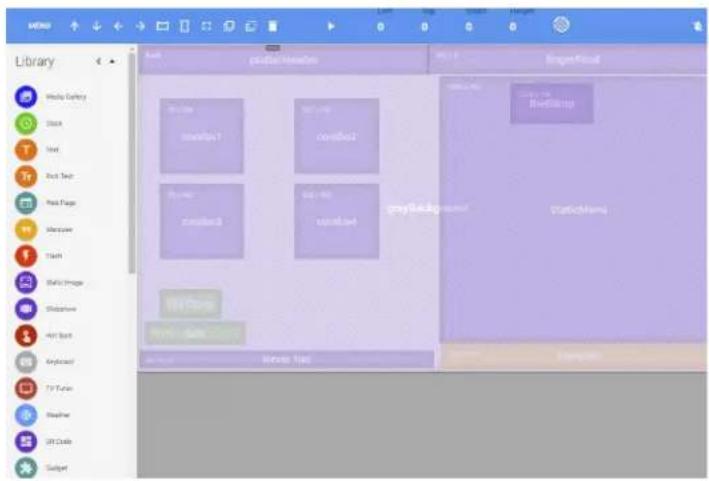
Design Mode
After creating a template click the 'Design' button to enter design mode. The template designer is used to configure and position the zones of content.
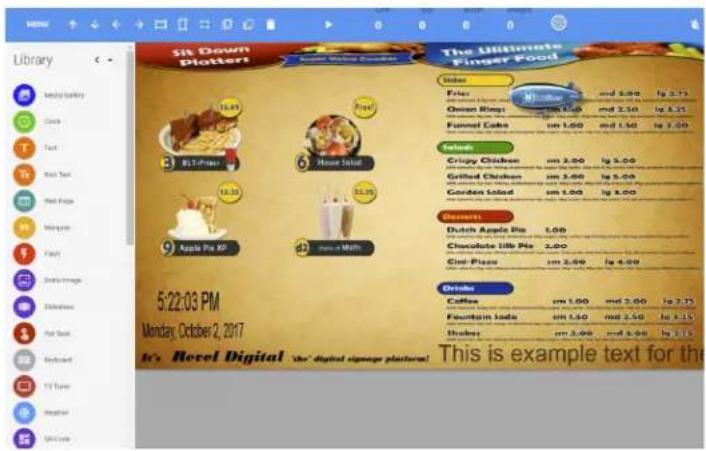
Preview Mode
Clicking the green Play button will enable Preview mode which gives a pixel accurate preview of what your template will appear like when playing on the actual player device.
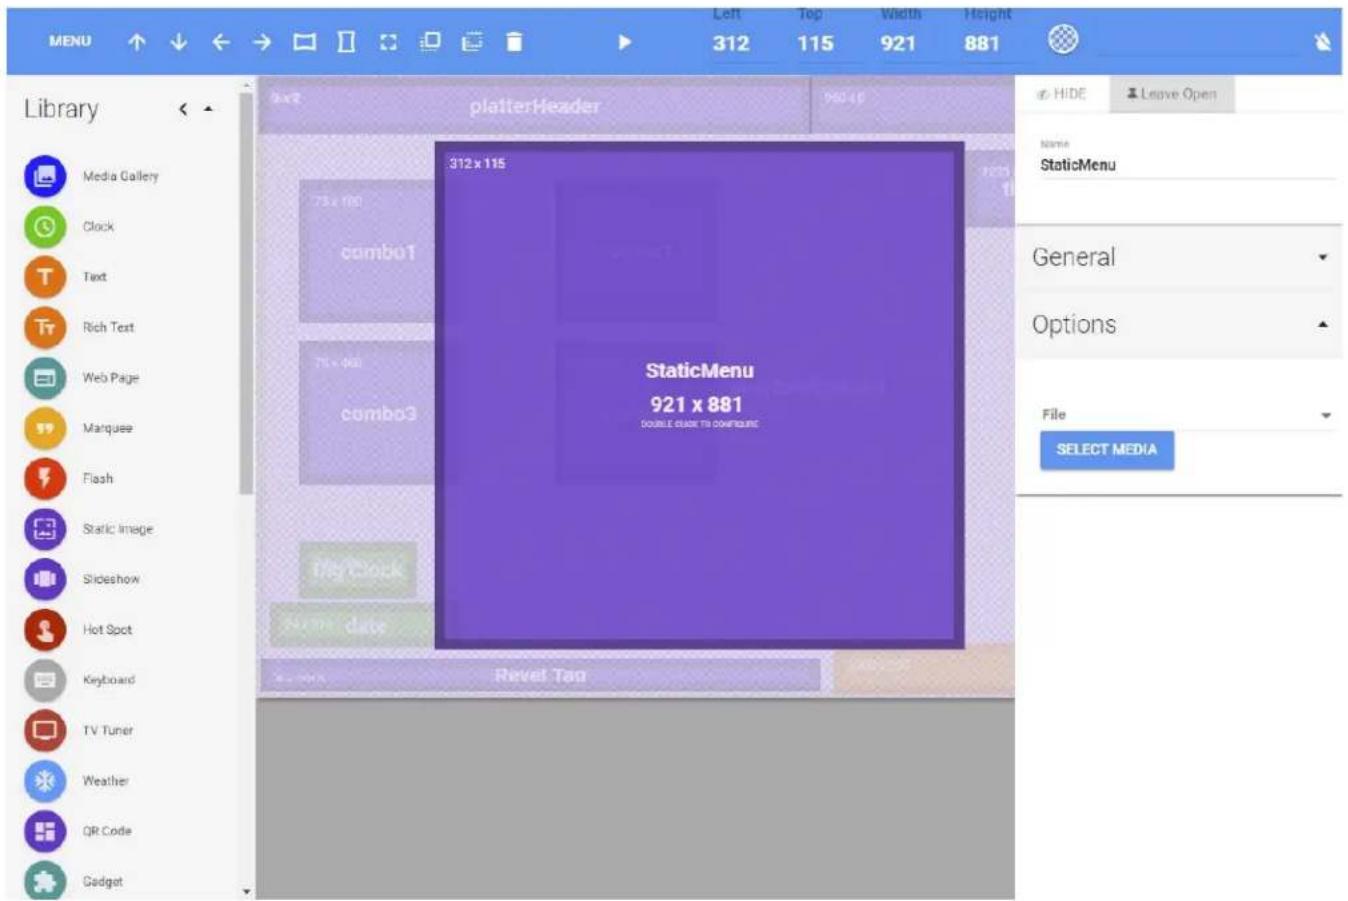
Template Zones
A template consists of any number of content zones which can be positioned and layered independent of one another. Combined with transparency and even animation, the design possibilities are virtually unlimited.
The following zone types are available:
•Media Gallery
Plays any Multimedia Playlist.
- Clock
Shows date/time in various digital formats as well as a classic analog style.
•Text
Simple text zone with various style options.
- Rich Text
More advanced text zone with HTML like formatting options.
- Web Page
Embeds a live web page.
•Marquee
Scrolling text supporting left-to-right or right-to-left. Must be assigned a Marquee playlist.
-Flash
Embeds any Adobe Flash SWF content.
- Static Image
Plain old image. Supports most any image format including JPG, PNG, GIF.
- Slideshow
Plays any Slideshow playlist. Supports transitions and touch (swipe) scrolling.
- Hot Spot
Only used on interactive templates to provide a touch point.
- Keyboard
Only used on interactive templates to provide an on-screen keyboard.
•TV Tuner
Allows embedding of live TV from any IPTV source.
- Weather
Basic weather zone supporting metric/US units. Most advanced weather is available in Gadgets.
•QR Code
Generates a QR code based on a text string scannable by most smartphones.
11
•Gadget
Gadgets are dynamic elements used to embed a large variety of content from advanced weather, to Google Spreadsheets, Google Calendars, Facebook, Twitter, Instagram, and much more.
Adding a Zone
Just click on any zone type in the Library pane, then move the zone and resize as necessary.
Double click on the zone to edit the zone properties.
Recap
To recap the steps necessary to get your digital signage up-and-running for the first time:
- Register your Device
- Upload your Media
- Create a Playlist
- Optionally create a Template
- Schedule your Content
Once scheduled, your device will automatically determine if there is new content to play, then download the new package of content.
Updating Player Content
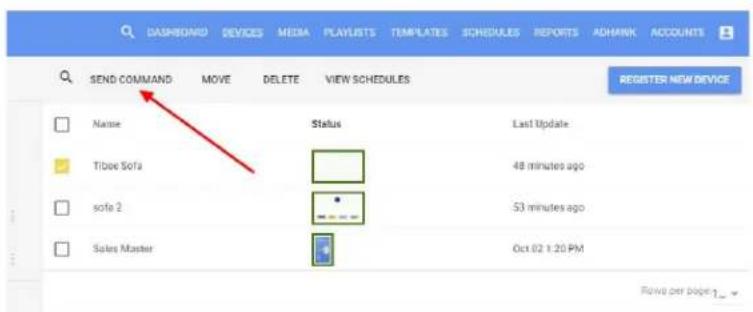
Players will automatically check for new content every 30 minutes, but if you wish to push an immediate change to your player(s) just check the box adjacent to the player you wish to update, then click the Update Content button under Send Command.
Advanced Topics
Of course there is much more to the Revel Digital platform including reporting, audience analytics, beacons, real-world sensor integrations, interactivity, and more. Please check our support site at
http://support.reveldigital.com for advanced Knowledge Base articles on some of these topics, or contact us directly at 855-738-3534.
Thanks for using Revel Digital!
- Player App Installation
- Windows Hardware
- Install the Revel Digital Player app
- Android Hardware
- Device Registration
- Registration Code
- RSNHUO
- Login to Revel Digital
- Register New Device
- Enter Registration Code
- Congratulations
- Media Management
- Uploading
- Items
- Playlists
- Create a Playlist
- •Multimedia Playlist
- - Slideshow Playlist
- • Marquee Playlist
- - Template Playlist
- Add a Source
- Multimedia & Slideshow Source Types
- •Media
- - YouTube
- •RSS
- Website
- - Playlist
- - Command
- Marquee Source Types
- - Text Message
- •RSS Feed
- Play Order
- Advanced Playlist Topics
- Schedules
- Basic Scheduling
- Smart Scheduling
- Templates
- Design Mode
- Preview Mode
- Template Zones
- •Gadget
- Adding a Zone
- Recap
- Updating Player Content
- Advanced Topics
Brand : VIEWSONIC
Model : SW-091
Category : Media player