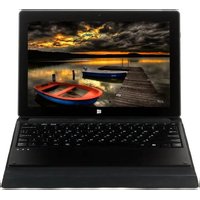
Ursus 8W - Tablet DEXP - Free user manual and instructions
Find the device manual for free Ursus 8W DEXP in PDF.


| Product Type | Tablet |
| Model | Ursus 8W |
| Brand | DEXP |
| Operating System | Windows 8.1 |
| Display Size | 8 inches (approx.) |
| Processor | Intel Atom (estimated) |
| RAM | 2 GB (estimated) |
| Storage | 32 GB (estimated) |
| Expandable Storage | Micro SD card slot |
| SIM Card Support | Yes (1 SIM slot) |
| Connectivity | Wi-Fi, Bluetooth (estimated), 3G (via dongle) |
| Ports | Micro USB, HDMI, Headphone jack |
| Cameras | Front webcam |
| Audio | Built-in speaker |
| Dimensions (approximate) | 200 x 120 x 10 mm |
| Weight (approximate) | 300 g |
| Power Supply | 5V AC adapter (included) |
| Battery Type | Li-Ion (non-removable) |
| Battery Capacity (estimated) | 4000 mAh |
| Special Features | Multi-touch, dual-screen apps, Charm menu, Windows key |
| Cleaning | Dry soft cloth only; no liquids or detergents |
| Operating Environment | Temperature 0°C - 35°C; humidity normal |
| Safety Notes | Do not disassemble; avoid impacts; keep away from water and heat |
| Spare Parts / Repairability | Battery replaceable by authorized service; other parts not user-serviceable |
Frequently Asked Questions - Ursus 8W DEXP
User questions about Ursus 8W DEXP
0 question about this device. Answer the ones you know or ask your own.
Ask a new question about this device
Download the instructions for your Tablet in PDF format for free! Find your manual Ursus 8W - DEXP and take your electronic device back in hand. On this page are published all the documents necessary for the use of your device. Ursus 8W by DEXP.
USER MANUAL Ursus 8W DEXP
natural_image
Illustration of a hand interacting with a tablet displaying multiple app icons (no text or symbols visible)
natural_image
Hand interacting with a tablet displaying a grid of app icons (no text or symbols visible)natural_image
Illustration of a hand interacting with a tablet displaying colorful app icons (no text or symbols)Увеличение

Проведите в стороны

natural_image
Colorful abstract swirl pattern with no text or symbols

natural_image
Close-up of purple flowers with green leaves, no visible text or symbolsWe would like to thank you for choosing a DEXP product. It is our pleasure to offer you the solutions engineered and produced to match the high quality, functionality and design standards. Please, read this user manual carefully before starting to use your new device, for it contains important information concerning your personal safety, and hints on correct usage and taking care of the device. You are encouraged to keep this user manual for further reference, should the need arise.
Safety precautions
Battery care tips
1. Use only the bundled charger.
The charging / discharging ability of a battery is determined by its built-in controller. Using forced express charging mode is not recommended.
Li-Ion batteries do not have the so-called "memory effect". You can start charging/discharging the battery regardless of its current charge level. Most devices have a charge/discharge limitation – controller may not let the battery charge if it possesses a certain charge level (e.g. 90%). Also it will not let it get totally discharged, preventing elements from breaking down.
Even if functioning of the device (laptop, tablet PC, smartphone, so on) is carried out by the mains – a Li-Ion battery should go through a full charge/discharge cycle (until the “low battery” message appears) at least every month. A battery should not get fully discharged very often. Li-Ion batteries degrade fast enough, when stored with no charge in them, even separately from the device or with the device switched off.
Self-discharge of a battery makes up to 5% per month. Li-Ion batteries are short-lived by structure. It is recommended that the charge of a battery is kept at about 40-50% when the device is not used. If a battery is left discharged for 2 weeks or more, an irreversible process of losing capacity in the battery cells takes place, resulting in a failure of the battery itself.
2. Respect the temperature limits.
Batteries should be stored charged, with temperature from +15°C to +35°C, and at normal humidity. Batteries are not likely to tolerate long-term operation at very high (above 50) and very low (below -20) environment temperature. Do not expose battery to direct sunlight or keep it close to any intense heat sources.
3. Do not disassemble, burn, or use damaged batteries.
In any case it is unacceptable to disassemble batteries and charge their elements. If necessary, contact an authorized service center. Puncturing or creasing of batteries can lead to an internal short circuit, followed by fire and explosion. Melting of lithium from heat can also lead to an explosion. If depressurization occurs, water may get inside the element, or the atmospheric moisture may condense, which may lead to a reaction, causing hydrogen to excrete and ignite.
Usually devices have a battery charge meter, which will show you the current charge level at any
time. If it indicates a fault for about 5 minutes, being plugged into a power supply, this means the battery is defective. Immediately unplug the charger from the supply and extract the battery (if extractable). Be careful: hazardous emissions may be released.
If the battery is nonremovable (is an integral part of the device), it is necessary to contact an authorized service center at once.
ATTENTION: Battery performance depends on network configuration (Wi-Fi, 3G, LTE) and many other factors (load on the CPU, hard drive, LCD brightness, etc.); Actual performance may not match the specified. The battery has a limited number of charge cycles and may eventually require replacement (For terms of limited warranty on the battery, refer to the warranty card).
- This product is suitable for use in non-tropical areas, at altitudes below 2.000 meters, which is
indicated by the following mark:

-
Prevent the device from falling on the ground or any strong physical impact.
-
Do not use it for a long time in a too humid or dusty environment, or at excessively hot temperature (<35°C).
Do not expose the device to direct sunlight.
-
Avoid using the device in the strong magnetic and static environment as much as possible.
-
Once the device has happened to have direct contact with water or any liquid, turn it off immediately and do not use it until it dries out. If any flaws are found in the device afterwards, consult an authorized service center right away.
-
Do not clean the device with any detergent or other liquid to avoid causing damage by corrosion. It is acceptable to use a dry soft cloth or tissue paper.
-
Some software found in the Internet may be malicious, and cause harm to your device. In case of damaging the device due to installation of such apps, or any other incorrect usage, the warranty is considered nullified.
-
Please back up your personal data periodically to avoid loss in case of emergency.
-
Please do not disassemble the device by yourself, in this case the warranty will be considered nullified.
-
This product supports the overwhelming majority of mainstream brands of 3G dongle network cards. Still, some of them may be incompatible with the device for a variety of reasons. It is suggested, that you test the dongle with the device directly to make sure it is works prior to buying it.
-
The device firmware shall have updates coming out from time to time. You will receive
notifications each time, and be able to perform the updates directly from the device, provided it is connected to a high-speed Internet access point.
- Replacement with incorrect type of batteries may cause explosion. Make sure the service personnel use original batteries for replacement.
Device scheme
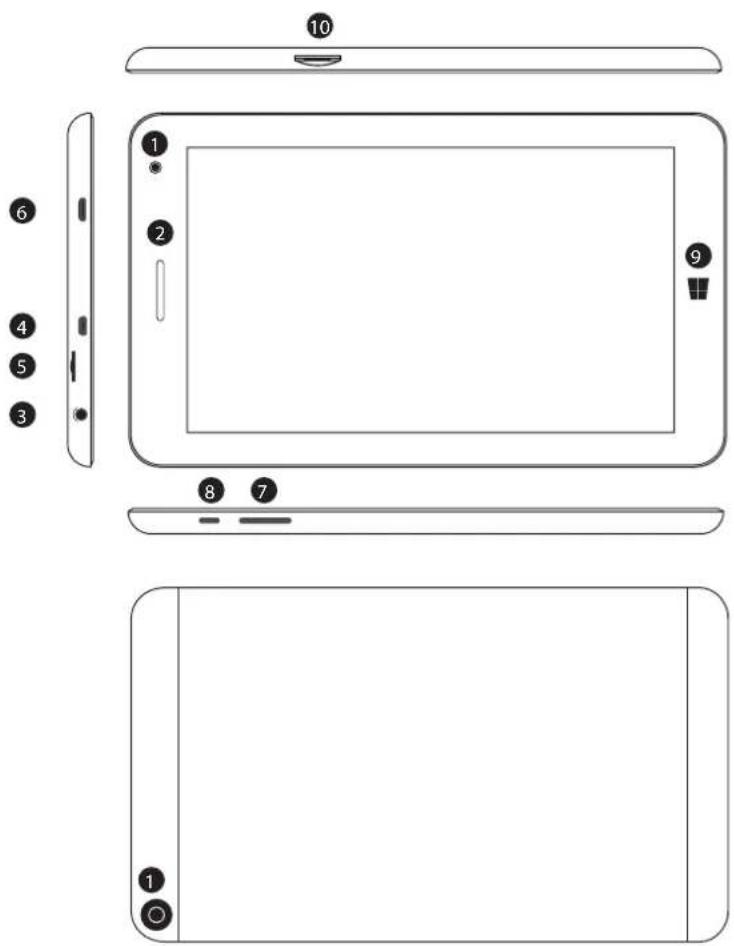
1 Webcam
2 Speaker
3 Headphone
4 HDMI port
5 Micro SD card reader
6 Micro USB
7 Volume +/-
8 Power on/off
9 Windows key
10 SIM card slot
Box content:
Device, USB cable, charger, user manual.
SIM and Micro SD card installation scheme
Isntall the SIM and SD cards exactly the way it is illustrated below:

Desktop
- Windows 8.1 Start screen: On the start screen you can see many apps. They are shown as magnets of a kind. Click on any of them to open it.
You will need to log in to your Microsoft account to use all the device functions fully.

2. Additional application menus
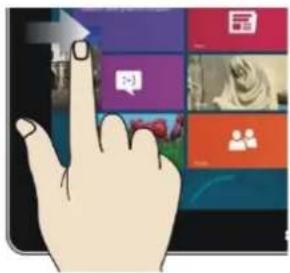
Slide to the right
natural_image
Hand interacting with a tablet displaying a grid of app icons (no readable text or symbols)Slide to the left

natural_image
Hand interacting with a touchscreen device displaying various app icons (no text or symbols visible)- Slide to the right from the left side of the screen to see the apps currently running.
- Slide to the left from the right side of the screen to open the Charm menu.
Zoom out Zoom in

natural_image
Illustration of a hand interacting with a tablet displaying a grid of app icons (no text or symbols visible)
natural_image
Illustration of a hand interacting with a tablet displaying a virtual app interface (no text or symbols visible)- On the touch screen, draw the two fingers close to each other to zoom out.
• On the touch screen, separate the two fingers from each other to zoom in.
Slide down

Slide sideways

- On the start screen, slide down from the top of the screen to view all the installed apps.
- On the start screen, move the finger sideways to drag the picture in the corresponding direction.
Slide up

On the start screen, slide upward from the bottom of the screen to see the additional actions panel.
3. Installed apps
Besides the apps already fixed on the start screen, you can also launch other apps from the "Apps" screen.

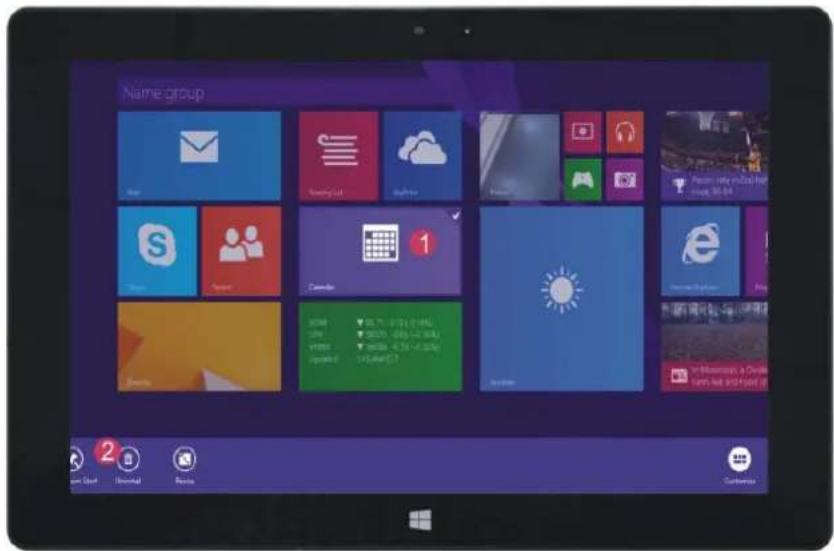
If you want to fix more apps on the start interface, see the figure below (1). Slightly touch and hold the application program magnet for about one second, then let go, and select (2) to fix to the start screen.
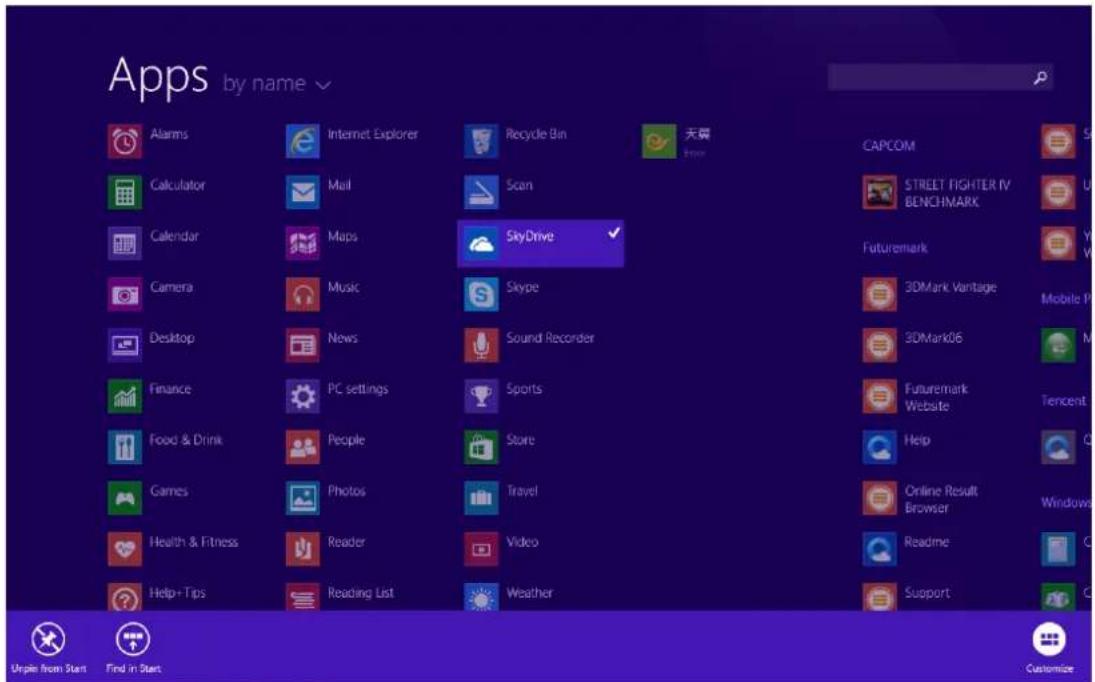
Conversely, if you want to cancel or delete a certain app on the start screen, slightly touch and
hold the app magnet for about one second, then let it go and then select the action on the appeared panel (2), such as fixation and deletion, and it will be completed.
4. Charm menu
Slide it to the left from the right side of the screen to start Charm menu column, including: Search, Share, Start, Devices and Settings.

Lets you search the files and apps in the device.

Lets you share the apps through social networks or e-mail.

Return to the start screen. From there, you can also use this function to return to the most recently opened app.

Lets you read, write and share files, connect external screen or printer, etc. to the device.

Lets you adjust the general settings of the device.
5. Dual-screen apps
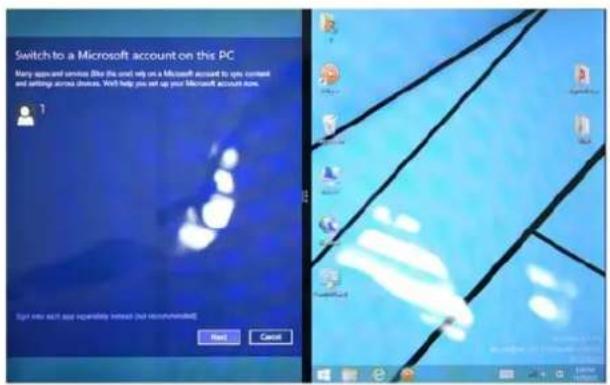
Slide your finger as shown on the picture below (Fig. 1), then hold it. Let go when you see the second screens appear.
Press the partition button between the two screens and drag right or left to adjust the display proportions (Fig.2).

natural_image
Computer desktop with open screen, hand gesture overlay, and landscape photo showing a bare tree in a field under cloudy sky (no text or symbols)(Figure 1)
(Figure 2)
Basic operations
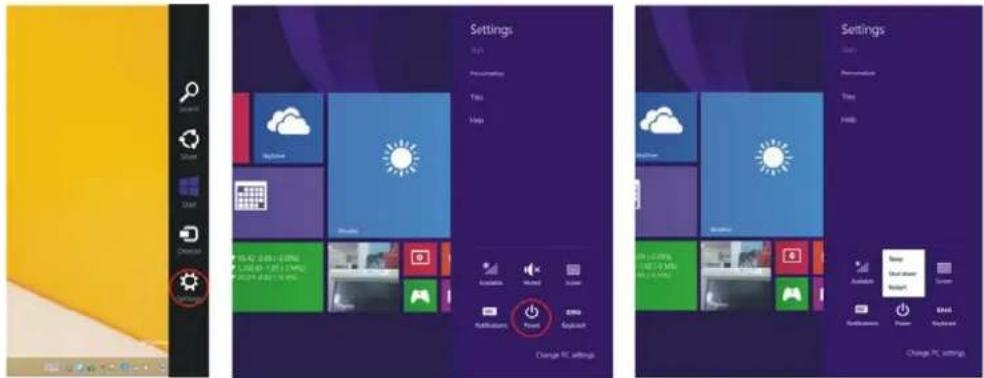
- Press the buttons circled on the picture below, to make the device enter sleep mode, restart, or switch it off.
2. Privacy protection
Select "Settings" in the Charm menu, then "Change PC Settings". Select "Accounts" on the left panel, and after that press the "Create a new account" button. After having filled in the Windows Live ID blank with your personal data, enter the user name and password you have created. You will be logged in to your account at once.

Additional information
Manufacturer: Point of View B.V.
Address : Achtsweg Noord 9-11, 5651GG, Eindhoven, Netherlands.
Importer: Soprano, LLC.
150 V Svetlanskaya St., Vladivostok, Primorsky region, Russian Federation.
A notification is available for this product.
All the specifications and product information are subject to change without notifying users.
Actual interface of the device may differ from what is shown in this user manual.

bar
| Category | Value | | -------- | ----- | | Category1 | 0.00% | | Category2 | 0.00% | | Category3 | 0.00% | | Category4 | 0.00% | | Category5 | 0.00% | | Category6 | 0.00% | | Category7 | 0.00% | | Category8 | 0.00% | | Category9 | 0.00% | | Category10 | 0.00% | | Category11 | 0.00% | | Category12 | 0.00% | | Category13 | 0.00% | | Category14 | 0.00% | | Category15 | 0.00% | | Category16 | 0.00% | | Category17 | 0.00% | | Category18 | 0.00% | | Category19 | 0.00% | | Category20 | 0.00% | | Category21 | 0.00% | | Category22 | 0.00% | | Category23 | 0.00% | | Category24 | 0.00% | | Category25 | 0.00% | | Category26 | 0.00% | | Category27 | 0.00% | | Category28 | 0.00% | | Category29 | 0.00% | | Category30 | 0.00% | | Category31 | 0.00% | | Category32 | 0.00% | | Category33 | 0.00% | | Category34 | 0.00% | | Category35 | 0.00% | | Category36 | 0.00% | | Category37 | 0.00% | | Category38 | 0.00% | | Category39 | 0.00% | | Category40 | 0.00% | | Category41 | 0.00% | | Category42 | 0.00% | | Category43 | 0.00% | | Category44 | 0.00% | | Category45 | 0.00% | | Category46 | 0.00% | | Category47 | 0.00% | | Category48 | 0.00% | | Category49 | 0.00% | | Category50 | 0.00% | | Category51 | 0.00% | | Category52 | 0.00% | | Category53 | 0.00% | | Category54 | 0.00% | | Category55 | 0.00% | | Category56 | 0.00% | | Category57 | 0.00% | | Category58 | 0.00% | | Category59 | 0.00% | | Category60 | 0.00% | | Category61 | 0.00% | | Category62 | 0.00% | | Category63 | 0.00% | | Category64 | 0.00% | | Category65 | 0.00% | | Category66 | 0.00% | | Category67 | 0.00% | | Category68 | 0.00% | | Category69 | 0.00% | | Category70 | 0.00% | | Category71 | 0.01% | | Category72 | 1.59% | | Category73 | 1.59% | | Category74 | 1.59% | | Category75 | 1.59% | | Category76 | 1.59% | | Category77 | 1.59% | | Category78 | 1.59% | | Category79 | 1.59% | | Category80 | 1.59% | | Category81 | 1.59% | | Category82 | 1.59% | | Category83 | 1.59% | | Category84 | 1.59% | | Category85 | 1.59% | | Category86 | 1.59% | | Category87 | 1.59% | | Category88 | 1.59% | | Category89 | 1.59% | | Category9
- Safety precautions
- Battery care tips
- Use only the bundled charger.
- Respect the temperature limits.
- Do not disassemble, burn, or use damaged batteries.
- Device scheme
- Box content:
- SIM and Micro SD card installation scheme
- Desktop
- Additional application menus
- Installed apps
- Charm menu
- Dual-screen apps
- Basic operations
- Privacy protection
- Additional information
Brand : DEXP
Model : Ursus 8W
Category : Tablet