SPM3500 - Media player Sveon - Free user manual and instructions
Find the device manual for free SPM3500 Sveon in PDF.


| Product Type | Media Player |
| Model | SPM3500 |
| Brand | Sveon |
| Video Formats Supported | MPEG-4, XVID, AVC/VC-1, RM, TS, MOV, AVI, VOB, DAT, MPG, MP4, XVID-HD, M2TS, WMV9, MKV, H264 |
| Audio Formats Supported | MP3, WMA, AAC, WAV, OGG, LPCM, FLAC, AC3 |
| Picture Formats Supported | JPEG, BMP, GIF, TIFF, PNG |
| Subtitle Formats | SSA, SMI, SRT, SUB |
| Internal Hard Disk | SATA II, up to 2TB |
| File Systems | NTFS, FAT32 |
| Video Output | HDMI (v1.3), Composite AV |
| Audio Output | HDMI, Coaxial, Optical (SPDIF) |
| Connections | USB 2.0 Device port, USB Host, Ethernet RJ45, SD/MMC card reader |
| Network | Wired LAN (Ethernet), Optional WiFi via USB adaptor |
| Maximum Resolution | 1080p (Full HD) |
| Power Supply | 12V DC, 3A adaptor included |
| Remote Control | Included with batteries (AAA x2) |
| Display | Frontal LCD showing file info and connection status |
| Dimensions (Approx.) | 200 x 150 x 50 mm (estimated) |
| Weight (Approx.) | 0.8 kg (estimated) |
| Maintenance | Clean with a soft dry cloth. Do not use solvents. |
| Safety | Do not cover; ensure good ventilation. Avoid placing on soft surfaces. |
Frequently Asked Questions - SPM3500 Sveon
User questions about SPM3500 Sveon
0 question about this device. Answer the ones you know or ask your own.
Ask a new question about this device
Download the instructions for your Media player in PDF format for free! Find your manual SPM3500 - Sveon and take your electronic device back in hand. On this page are published all the documents necessary for the use of your device. SPM3500 by Sveon.
USER MANUAL SPM3500 Sveon
natural_image
Modern TV set with a person lying on the back and a small device on the wall (no visible text or symbols)SPM3500
SPremiere series
MKV Full HD 1080p media player with HDMI, LAN and WiFi optional
10.5 Ajustes
Hydrogen 6 quinor acetate as usual
-
Welcome
-
Features
-
System requirements
-
Content
-
Hardware
-
Remote control
6.1 Batteries installation
-
PC or laptop connection
-
TV Connections
8.1 AV Connection
8.2 HDMI Connection
- First time usage
9.1 Hard disk formatting
9.2 Main screen
- Main Menu
10.1 Videos
10.2 Music
10.3 Pictures
10.4 Copy
10.5 Settings
- Basic operations
11.1 Music playback
11.2 Pictures playback
11.3 Video files playback
11.4 Files
11.5 Changing output resolution
- Network functions
12.1 Wired LAN connectionada
12.2 Wireless LAN connection
- Files sharing
13.1 Sharing files: Windows XP
13.2 Sharing files: Windows Vista
13.3 Sharing files: Windows 7
- Files access through a network
14.1 My Shortcuts
-
Firmware upgrading
-
FAQs
1. Welcome
Thanks for choosing the device SPM3500, a full HD media player which will allow you to play your favourite multimedia files in high resolution directly on your TV screen from its hard disk or from external devices like USB storage units or memory cards. Includes also network functions to share and play files through a wired or a wireless network (wireless option is only available using a compliant network adaptor).
Through this user guide we will show you how to connect and use the device to get the maximum performance.
2. Features
- Films and video playback. The device supports the most common formats: MPEG-4, XVID, AVC/VC-1, RM, TS, MOV, AVI, VOB, DAT, MPG, MP4, XVID-HD, M2TS, WMV9, MKV, H264.
- Audio files playback. Audio codecs supported: MP3, WMA, AAC, WAV, OGG, LPCM, FLAC, AC3.
- Picture files supported JPEG, BMP, GIF, TIFF, PNG.
- Subtitles. SSA, SMI, SRT, SUB
- USB 2.0 connection (compliant 1.1) to a computer.
- USB Host. The device includes an USB Host port to connect an external storage device or to connect a WiFi compliant adaptor which allows the usage of the unit in a wireless mode.
- Includes a card reader compliant with SD and MMC cards format. Also compliant with SDHC units.
- Coaxial and digital audio outputs to connect the device to a speaker system and enjoy the real surround sound.
- DTS inner decoder to play DTS audio files through HDMI cable.
- Network functions. Streaming playback through Ethernet and WLAN* (using a compliant WiFi adaptor).
- HDMI. The device is compliant with HDMI high definition video output (V1.3). This video output includes high digital video and audio quality through a only cable.
- NTFS and FAT32 file system supported in multimedia playback.
- SATA hard disk supported (SATA II) up to 2TB.
- The device includes a frontal display which shows the type, lenght and repeat mode of the file and also the way of connection of the player.
*Streaming video files playback through LAN and WLAN options depends on the bitrate and format of the file.
3. System requirements
-Computer or laptop with an available USB 2.0 port compliant with 1.1.
-Windows Me/2000/XP/VISTA/W7
4. Content
- Multimedia player
- Power adaptor 12V/3A
- USB 2.0 cable
- HDMI cable
- AV cable
- Coaxial cable
- Remote control
- Batteries for remote control (x2)
- Quick Installation Guide
- CD Driver (includes digital user guide)
5. Hardware
Frontal panel
- LED STANDBY: This LED lights in red when the unit is Standby mode and lights in green when the device is turned on.
- Display
- Infrared receiver
- PLAY: Press to play a file
- Arrow buttons: Left, right, up and down buttons to move the highlight in the menus creens.
- OK: Confirm the selection in a menu.
- Stop. Stop a playback
- On/Off

SPM3500 User guide
Index
-
Welcome
-
Features
-
System requirements
-
Content
-
Hardware
-
Remote control
6.2 Batteries installation
-
PC or laptop connection
-
TV Connections
8.1 AV Connection
8.2 HDMI Connection
- First time usage
9.2 Hard disk formatting
9.2 Main screen
- Main Menu
10.1 Videos
10.2 Music
10.3 Pictures
10.4 Copy
10.5 Settings
- Basic operations
11.1 Music playback
11.2 Pictures playback
11.3 Video files playback
11.4 Files
22.5 Changing output resolution
- Network functions
12.1 Wired LAN connectionada
12.2 Wireless LAN connection
- Files sharing
13.1 Sharing files: Windows XP
13.2 Sharing files: Windows Vista
13.3 Sharing files: Windows 7
- Files access through a network
24.1 My Shortcuts
-
Firmware upgrading
-
FAQs
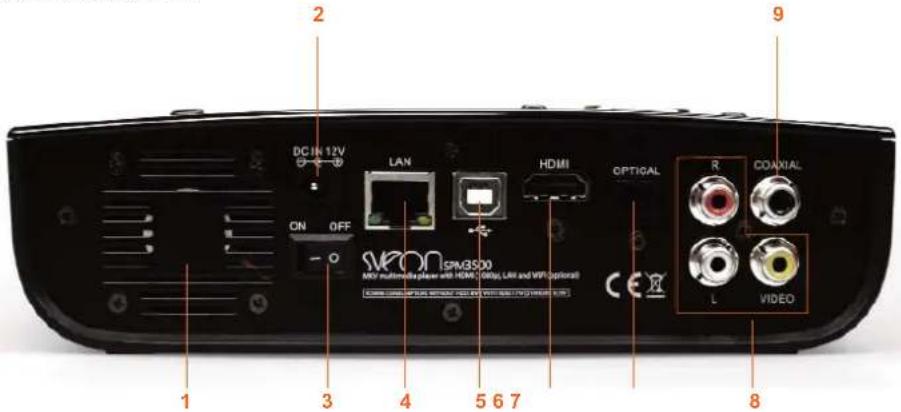
Rear panel
1.Fan
2. POWER INPUT 12V
3. On/Off switch
4.LAN: Wired network connection
5.USB DEVICE: USB port for PC or laptop connection
6.HDMI: HDMI digital video and audio outputs
7.OPTICAL AUDIO OUTPUT
8.COMPOSITE VIDEO AND ANALOG AUDIO OUTPUT
9.COAXIAL AUDIO OUTPUT
Side panel
1 SD/MMC Card Reader
2 USB HOST: USB Host to connect external storage devices like a pen drive or to connect a wireless USB compliant adaptor.

6. Remote control
Important. You can manage the files playback through the remote control or through the device buttons. Nevertheless, there are functions which are only available through the remote control.
- POWER: Press to turn the device on/off (standby mode)
- TV-SYS: Changes the output resolution between: NTSC, PAL, 480p, 576p, 720p 50HZ, 720p 60HZ, 1080i 50HZ, 1080i 60HZ, 1080p 50 HZ, 1080p 60HZ.
- AUDIO: Press to change between the different audio channels (if the file includes them).
- 0-9: Numeric keypad.
- SELECT: Press to select the file or folder which you want to add to the playlist. Then, press OK button to add the file or folder to the list.
- GUIDE: Press to go to the Main Menu.
- VOL+: Press to increase the volume / VOL-; Press to decrease the volume.
- PLAY ▶: Press to play a file.
- PAUSE/STEP: Press once to pause a playback. Press twice to go forward step by step.
- FB: Fast backward with different speeds: 1, 1.5, 2, 4, 8, 16, 32.
- FF: Fast forward with different speeds 1, 1.5, 2, 4, 8, 16, 32.
- SLOW: Press to play a video file in slow motion: (3/4x. 1/2x,
1/4x, 1/8x, 1/16x, 1x). Press play button to resume the normal play-back. - ZOOM: Press during video or pictures playback to enlarge the image up to:2x, 3x, 4x, 8x, 0.9x, 1x.
- MEDIA: Displays the video files list.
- MUSIC: Displays the music files list
- MUTE: Enables or disables audio signal.
- GOTO: Searching by time.
- SUB-T: Enables or disables subtitles menu.
- CONFIRM: Press to confirm a selection.

SPM3500 User guide
Index
-
Welcome
-
Features
-
System requirements
-
Content
-
Hardware
6. Remote control
6.2 Batteries installation
7. PC or laptop connection
8. TV Connections
8.1 AV Connection
8.2 HDMI Connection
9. First time usage
9.2 Hard disk formatting
9.2 Main screen
10. Main Menu
10.1 Videos
10.2 Music
10.3 Pictures
10.4 Copy
10.5 Settings
11. Basic operations
11.1 Music playback
11.2 Pictures playback
11.3 Video files playback
11.4 Files
11.5 Changing output resolution
12. Network functions
12.1 Wired LAN connectionada
12.2 Wireless LAN connection
13. Files sharing
13.1 Sharing files: Windows XP
13.2 Sharing files: Windows Vista
13.3 Sharing files: Windows 7
14. Files access through a network
14.1 My Shortcuts
15. Firmware upgrading
16. FAQs
- RETURN: Press to go to the previous action.
- LEFT/RIGHT: Right and left arrows to move the highlight in the menu screens.
- OK: Press to confirm a selection.
- UP/DOWN: Press to move through the menu screens.
- PREV/NEXT: Press to go to the previous track. Press Next to go to the next track.
- INFO: Displays the information about the current file.
- EDIT: Select a file and press this button to rename or delete it.
- STOP: Stop a playback.
- CM+: Press to go forward 30 sec.
- CM-: Press to go backward 30 sec.
- A-B: Select two points to repeat the interval of time between them.
- REPEAT: Press to repeat the current file or all the files.
- SETUP: Press to go to Setup menu.
- PHOTO: Press to display photo file list.
Note: The availability of different audio channels or subtitles depends on the features of the file.
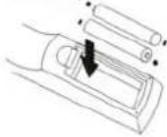
6.1 Batteries installation
- Open the lid, install the AAA batteries in its correct position (+/-) and close the lid.
• The next picture shows the correct way to install the batteries.
I. Abrir la tapa

-
Instalar pilas
-
Cerrar la tapa

-
To use the remote control, please point it to the front panel of the device (where is located the infrared receiver).
• The remote control has a 5 meters of coverage from the receptor and must be pointed in up to 60 degrees of angle.
7. PC or laptop connection
To connect the device to a laptop or computer to copy files please use the USB cable provided. Then connect the power adaptor to the power outlet and the system will recognize automatically the new storage device connected. To access to its hard disk go to "My Computer" menu and select the unit SPM3500 which may appear like a USB mass storage external device.
Now, the device is ready to copy files. Please follow these indications:
- Do not disconnect the device during the copy or read of files.
- Do not disconnect the device if, once connected to the computer or laptop, the system doesn't recognize the unit. If it happens, please wait 20 seconds because if possible the system is running more programs at the same time.
8. TV Connections
The device integrates different audio and video outputs, including composite analog video output (AV) and HDMI digital output. Select the output you want to use accordingly with your needings and note each signal output has its own resolution. If you want to enjoy high resolution signal (1080p), please connect the device to your TV through HDMI.
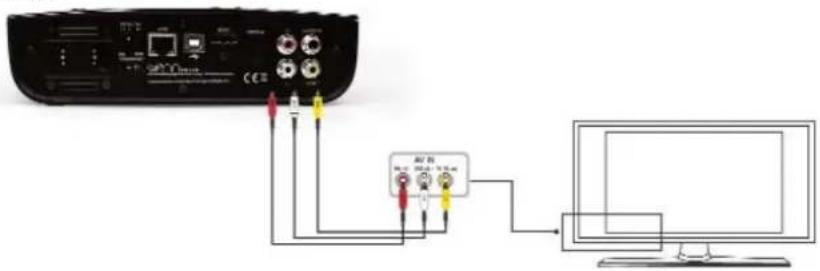
8.1 AV Connection
Please arrange video connections as shown in the picture. Then, connect the power adaptor to the power outlet, select AV output on your TV and wait during the system loading process.
If you want to enjoy multichannel audio signal, connect the device to a speakers system through coaxial output using the provided cable.
8.2 HDMI Connection
Connect the device as shown in the picture. The HDMI output includes digital output (audio and video) in only one cable. Connect the power adaptor to the power outlet, select the HDMI output in your TV and wait during the system loading process..

SPM3500 User guide
Index
- Welcome
- Features
- System requirements
- Content
- Hardware
- Remote control
5.1 Batteries installation
-
PC or laptop connection
-
TV Connections
8.1 AV Connection
8.2 HDMI Connection
- First time usage
9.2 Hard disk formatting
9.2 Main screen
- Main Menu
10.1 Videos
10.2 Music
10.3 Pictures
10.4 Copy
10.5 Settings
- Basic operations
11.1 Music playback
11.2 Pictures playback
11.3 Video files playback
11.4 Files
12.5 Changing output resolution
- Network functions
12.1 Wired LAN connectionada
12.2 Wireless LAN connection
- Files sharing
13.1 Sharing files: Windows XP
13.2 Sharing files: Windows Vista
13.3 Sharing files: Windows 7 - Files access through a network
24.1 My Shortcuts - Firmware upgrading
- FAQs
9. First time usage
Before using the device please read carefully these indications:
- Install the batteries inside the remote control.
- Connect the device to the TV (read the section 7 of this user guide).
- Connect the power adaptor to the power outlet.
- Put the power switch in ON position.
The frontal panel of the device includes buttons to manage basic operations and play your multimedia files:
- Press ▲▼ buttons to move up and down the highlight.
- Press ◀▶ buttons to access or exit from folders.
- Press OK button to confirm file or folder.
- Press STOP button to stop the playback.
- Press SETUP button to access to setup menu.
9.1 Hard disk formatting
The device hard disk is formatted by default. If you want to format it again please follow these steps:
-
Press "Setup" button of the remote control and in the option "System" choose "Format HDD".
-
Once the unit is selected, the next screen will appear (this screen also appears when the inner hard disk is not formatted). Please note the format process will delete all the files saved in the hard disk.
Use arrow buttons of the remote control to select "Accept" and then press "OK" button to confirm.

- Select "Format" option and press "OK" to confirm. Wait until the formatting process finishes.
Important: Do not disconnect the device during this process. It may cause serious damages in the device.
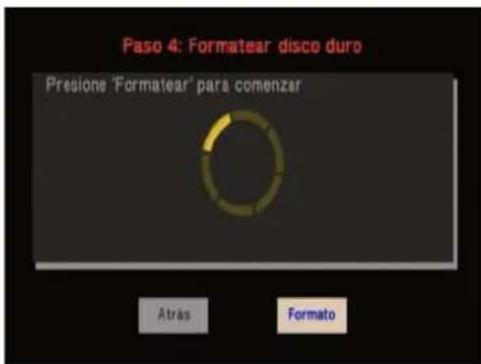
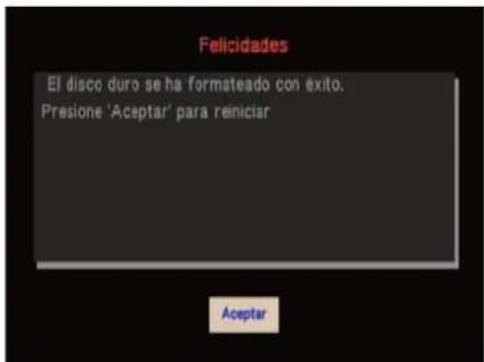
- When the formatting process finishes the next window appears. Press "Ok" button of the remote control.
The device is restarted automatically and then it is ready to use.
First time you use the device the following window appears to setup different values of the device:
- OSD Language: Select the OSD language by default and press "OK" button to confirm.
- Time: Enter the time.
- Wired LAN setup: Setup the network parameters if the device is connected through a network using a LAN cable. Select "IP DHCP Auto" option to setup the DHCP. Press "Cancel" if the device is not connected to a network.

SPM3500 User guide
Index
-
Welcome
-
Features
-
System requirements
-
Content
-
Hardware
-
Remote control
6.2 Batteries installation
-
PC or laptop connection
-
TV Connections
8.1 AV Connection
8.2 HDMI Connection
- First time usage
9.1 Hard disk formatting
9.2 Main screen
- Main Menu
10.1 Videos
10.2 Music
10.3 Pictures
10.4 Copy
10.5 Settings
- Basic operations
11.1 Music playback
11.2 Pictures playback
11.3 Video files playback
11.4 Files
21.5 Changing output resolution
- Network functions
12.1 Wired LAN connectionada
12.2 Wireless LAN connection
- Files sharing
13.1 Sharing files: Windows XP
13.2 Sharing files: Windows Vista
13.3 Sharing files: Windows 7 - Files access through a network
14.1 My Shortcuts - Firmware upgrading
- FAQs
Then, the main menu appears on TV screen:
- Videos: Direct access to the video files saved on the storage units connected to the device.
- Music: Direct access to the audio files saved on the storage units connected to the device.
- Pictures: Direct access to the picture files saved on the storage units connected to the device.
- Copy: Direct access to the copy menu.
- Settings: Direct access to the setting options.

Important
- Do not cover the unit, even if it is not on usage.
- Do not use the device in surfaces like a sofa, a bed or similar because the airflow couldn't be enough.
- Place the device in a good ventilated location.
- The power adaptor gets hot during the usage of the unit around 30 or 40 degrees.
10. Main Menu
10.1 Videos
Access to this option if you want to play the available video files (saved in the hard disk of the unit, on a device connected to the USB Host port, shared through a network or saved in a memory card).
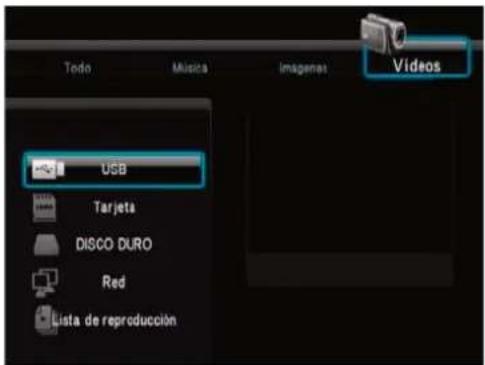
This menu allows you to select video files from different storage units:
USB: Select this option if you want to play video files saved in an external storage device connected through the USB Host port of the unit.
Card: Select this option if you want to play video files saved in a memory card inserted in the device slot.
Hard disk: Select this option if you want to play video files saved in the inner hard disk of the device.
Network: Select this option if you want to play video files shared through a wired or wireless network. For further information about how to access to a shared files through a network please read carefully the section number 14 of this user guide.
Playlist: The device allows you to add files to a list to make easier the playback of files.
If you want to add a file to the playlist, go to the hard disk, select the file and press "Select" button of the remote control. A green mark appears close the name of the file. Then press "Confirm" button and a confirmation message is shown: the file has been added to the playlist.
- You can change the format of the files shown by pressing right and left buttons and choose between: Videos, pictures, music or All.

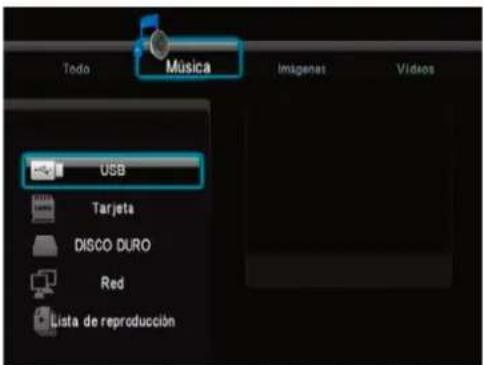
Select this option if you want to play music files saved in the device.
-
Welcome
-
Features
-
System requirements
-
Content
-
Hardware
-
Remote control
6.2 Batteries installation
-
PC or laptop connection
-
TV Connections
8.1 AV Connection
8.2 HDMI Connection
- First time usage
9.2 Hard disk formatting
9.2 Main screen
10. Main Menu
10.1 Videos
10.2 Music
10.3 Pictures
10.4 Copy
10.5 Settings
- Basic operations
11.1 Music playback
11.2 Pictures playback
11.3 Video files playback
12.4 Files
12.5 Changing output resolution
- Network functions
12.1 Wired LAN connectionada
12.2 Wireless LAN connection
- Files sharing
13.1 Sharing files: Windows XP
13.2 Sharing files: Windows Vista
13.3 Sharing files: Windows 7
- Files access through a network
14.1 My Shortcuts
-
Firmware upgrading
-
FAQs
10.3 Pictures
Select this option if you want to play pictures files saved on the unit.

Select this function to copy files between the different storage available devices.

10.5 Settings
This section allows you to setup the preferences of the unit. Press "Ok" button of the remote control to choose between the different options. Press "Return" button to go to the previous options.

Setting menu includes the following options:
Audio
- Night mode: Decrease the volume of the playback automatically.
- Digital output: Select the digital audio output (HDMI LPCM, Multichannel, RAW or SPDIF LPC RAW). The option selected by default is HDMI LPCM MULTI CH.
Video
- Aspect ratio: Choose between different aspect modes:
Explor.screen.4:3: Select this option to play files in a 4:3 screen.
Cinema format 4:3: Select this option to adjust a wide format file to a 4:3 screen.
16/9. Select this option to play files in a16:9 wide screen.
16:10, Select this option to play files in a 16:10 screen.
- Zoom Out: This option allows you to adjust the zoom option.
- Brightness: Select to adjust the brightness level.
- Contrast: Select to adjust the contrast level.
- HUE: Select to adjust the hue of the image.
- Saturation: Select to setup the saturation of the image.
- DNR (Digital Noise Reduction): Enables or disables the noise reduction.
- Video systems: Choose the output resolution between: Auto HDMI, NTSC, PAL,480p, 576p, 720p 50HZ, 720p 60 Hz,
1080i 50Hz, 1080i 60Hz, 1080p 50Hz, 1080p 60Hz.
- SD Video System: Select between PAL and NTSC.
- 1080p 24HZ: 1080p mode 24Hz for TV screens which support 1080p 24Hz
*If you are going to choose HDMI output please make sure the HDMI cable is connected before selecting the output resolution.
Network
In this section you can setup the wired or wireless network connection; Wireless option is only available using a WiFi compliant adaptor.
For further information about network options please read carefully the section number 12 of this user guide.
SPM3500 User guide
Index
-
Welcome
-
Features
-
System requirements
-
Content
-
Hardware
-
Remote control
6.1 Batteries installation
-
PC or laptop connection
-
TV Connections
8.1 AV Connection
8.2 HDMI Connection
- First time usage
9.2 Hard disk formatting
9.2 Main screen
- Main Menu
10.1 Videos
10.2 Music
10.3 Pictures
10.4 Copy
10.5 Settings
- Basic operations
11.1 Music playback
11.2 Pictures playback
11.3 Video files playback
12.4 Files
12.5 Changing output resolution
- Network functions
12.1 Wired LAN connectionada
12.2 Wireless LAN connection
- Files sharing
13.1 Sharing files: Windows XP
13.2 Sharing files: Windows Vista
13.3 Sharing files: Windows 7
- Files access through a network
14.1 My Shortcuts
-
Firmware upgrading
-
FAQs
System
- OSD language: Select the default language for firmware menus. You can choose between: English, Chinese, ESpanish, French, German, Italian, Dutch, Portuguese and Russian.
- Text codification: Choose the compliant modes for the text files reading in subtitles: Unicode UTF8, Occidental, Turkish, Middle Europe, Greek, Cyrillic, Hebrew, South Europe.
- System upgrading: This option allows you to upgrade the firmware of the device. Please follow the steps indicated in the section number 15 of this user guide.
- HDD Format: This option allows you to format the inner hard disk of the unit (all the files are deleted when the hard disk is formatted).
- Restore default values: Select this option to restore the values of the unit by default.
MISC
- Resume: This option allows you to resume a playback in the point in it was stopped.
- Interval time: Select the time between pictures during slide show function (Off, 2 sec, 5 sec, 10 sec, 30 sec, 1 min, 2 min).
- Transition effects: Select to choose between the different transitio effects during slide show function (Off, crossed, left to right, up to down, waterfall, snake,dissolve, left down lines, mix all the effects).
- Ken Burns: Select to choose between different moving effects during pictures playback.
- Seamless Playback: Select to go to a point of a video playback without delays neither stop the playback.
- Background music: During a playback, select "Disable", "Folder" if you want to play a music file saved inside the picture folder you are playing or "Playlist" if you want to play your music files saved in your playlist.
11. Basic operations
11.1 Music playback
Select the music file you want to play using up and down arrow buttons and press "Ok" to confirm. If you want to play another file, press again up and down arrow buttons to select the new file.
11.2 Pictures playback
Select the folder where are saved the picture files you want to play in full screen mode and press "Ok" button of the remote control or "Play" button of the unit. If you have enabled the "Slideshow time" option in "Misc" menu, all the pictures are going to be played in slide show mode automatically. If this option is not enabled, press again "Play" button to go to the next picture.
You can use right and left arrow buttons to rotate the pictures.
11.3 Video playback
Select the video file you want to play, wait during the preview loading (if this option is enabled) and press "Ok" or "Play" of the remote control or of the unit to play the file.
If you want to search a point of the playback press "GOTO" button in the remote control and select "Title", "Chapter" and "Time" (in "Time" field you have to enter the time when you want to start the playback".
Press "Audio" button to choose between the different audio channels (subject to video file availability).
Press "Subtitle" button to enable and/or choose between the different subtitle options (subject to video file availability). Press also to disable this option.
The device includes also Zoom option to enlarge the video image just by pressing the "Zoom" button of the remote control. Use the arrow buttons to move the picture. Press several time "Zoom" button to choose between the different available options.
11.4 Files
Explore folder: This option allows you to access to the hard disk to display all the folders and files saved. Use the arrow buttons to select the folder you want to explore and press "Ok" button to open it and check its content.
Files playback: Use the arrow buttons (remote control or frontal panel of the device) to select the file you want to play. Once selected, press "OK" or "Play" button to play.
Rename files: Look for the file you want to rename and select it using the arrow buttons. Then press "Edit" button of the remote control and select the option "Rename"; a virtual keyboard should appear. Enter the new name using the arrow buttons and OK button to confirm and press "OK" to confirm the new filename.
Delete files: Look for the file you want to delete and select it using the arrow buttons. Press "Edit" button and then select "Delete" option. The system will ask for your confirmation about this operation, press "Ok" to confirm or "Back" if you want to cancel it.
Important: Once you delete a file, the content can not be restored.
Copy files: This function allows you to copy files between the different storage units available (inner or external units) and also through a network. If you want to copy files through a network please setup the network options in advance. Please follow these steps to copy files:
- Select "Copy" option in the Main Menu.
- In "Source" section (located in the left side of the screen) select the source of the file you want to play and then select the storage unit where you want to copy it. Press "OK" to confirm.
- When you are going to copy a file from one storage unit to another one, all the files saved on these units appears onscreen. Select the file on "Source" list by selecting the file and pressing "Select "button; the file is going to be marked with the symbol "\v". Then, use the right arrow button (▶) and select the device where you want to copy the file.
SPM3500 User guide
Index
-
Welcome
-
Features
-
System requirements
-
Content
-
Hardware
-
Remote control
6.1 Batteries installation
-
PC or laptop connection
-
TV Connections
8.1 AV Connection
8.2 HDMI Connection
- First time usage
9.2 Hard disk formatting
9.2 Main screen
- Main Menu
10.1 Videos
10.2 Music
10.3 Pictures
10.4 Copy
10.5 Settings
- Basic operations
11.1 Music playback
11.2 Pictures playback
11.3 Video files playback
11.4 Files
12.5 Changing output resolution
- Network functions
12.1 Wired LAN connectionada
12.2 Wireless LAN connection
- Files sharing
13.1 Sharing files: Windows XP
13.2 Sharing files: Windows Vista
13.3 Sharing files: Windows 7
- Files access through a network
14.1 My Shortcuts
-
Firmware upgrading
-
FAQs
-
When the folder where you want to copy the file or folder is already selected, press again the right arrow button (▶) and three options will appear: "Copy" if you want to create a copy of the file or folder; "Move" if you want to move the original file or folder and "Cancel" if you want to stop this process. Wait until the process finishes.
-
If you have selected a file to be copied and you want to cancel the selection, select again the file and press "Select" button. The mark "√" will disappear.
-
If you want to copy the file in a new folder, select "New directory" and press "Enter" button to create a new folder. Use the virtual keyboard to write the folder name and then select the new folder to copy the selected file.
Return: To access to the previous menu or to exit a folder, press "Return" button of the remote control or "Guide" button to go directly to the device Main menu.
11.5 Change output resolution
Press "TV-SYS" button of the remote control several times to choose the output resolution.
12. Network functions
12.1 Wired LAN Connection
The device has Ethernet (RJ45) connection which allows you to play files saved on your PC or laptop through a network using a cable.
For network connections please connect a RJ45 cable between the device and your router as shown in the picture. If the cable is correctly connected, a green and an orange leds should light in the RJ45 connector of the device.

12.1.1 IP Setting
Complete the network connections and then assign an IP to your device. You can do it in a manual mode or in a automatic way. Go to "Setting" section, select "Network" option and in "Wired LAN Setup" choose "IP DHCP (Auto)" if you want your router assigns an IP to your multimedia player or "Fixed IP (Manual)" if you want to enter the IP information manually.
Auto IP Setup
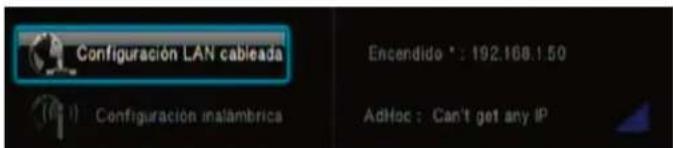
When the device is connected through a network using a router and select the option "IP DHCP (Auto)", the router assigns automatically an IP as shown in the picture (192.168.1.101). The IP range depends on the router setup and model.

Select "Fixed IP (Manual)" to setup a fixed IP as shown in the picture.
Then enter the information in all the required fields and note the last IP numbers group can not match with the IP of the devices connected through the local network.
Example: If the computer IP is 192.162.1.100, you can assign a new IP to your device changing the last two numbers (192.168.1.50). Please note you only can change the last two numbers of the IP.

You must enter in "Subnet mask", "Gateway" and "DNS server" fields the same information which appear in your computer. To get the IP information of your computer please read carefully the sections 12.1.2 and 12.1.3 in this user guide.
Press "Enter" to confirm and apply the changes.
SPM3500 User guide
Index
-
Welcome
-
Features
-
System requirements
-
Content
-
Hardware
-
Remote control
6.1 Batteries installation
-
PC or laptop connection
-
TV Connections
8.1 AV Connection
8.2 HDMI Connection
- First time usage
9.2 Hard disk formatting
9.2 Main screen
- Main Menu
10.1 Videos
10.2 Music
10.3 Pictures
10.4 Copy
10.5 Settings
- Basic operations
11.1 Music playback
11.2 Pictures playback
11.3 Video files playback
11.4 Files
11.5 Changing output resolution
12. Network functions
12.1 Wired LAN connectionada
12.2 Wireless LAN connection
- Files sharing
13.1 Sharing files: Windows XP
13.2 Sharing files: Windows Vista
13.3 Sharing files: Windows 7
- Files access through a network
14.1 My Shortcuts
-
Firmware upgrading
-
FAQs
Note:
DHCP means Dynamic Host Configuration Protocol. This is a protocol which allows a computer connected through a network to get its configuration (mainly, its network setup) in a dynamic mode (automatically).
A router is a networking device whose software and hardware are usually tailored to the tasks of routing and forwarding information.
12.1.2 How to get the IP information of your PC under Windows XP
Follow these steps to check the needed information under Windows XP OS:
- Click on "Start"
- Right click on "My networks"
- Select "Properties"

- Right click over "Local connection" and select "Status".
- Select "Support" and "Details".

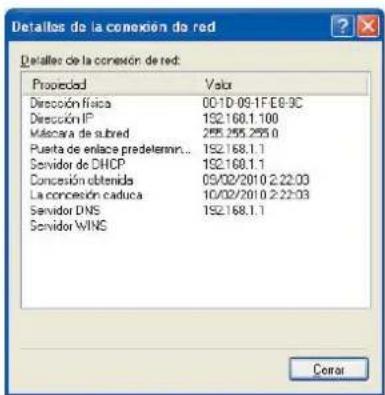
- The following window appears. This window includes all the needed information to setup the network options on the device.
-
Welcome
-
Features
-
System requirements
-
Content
-
Hardware
-
Remote control
6.1 Batteries installation
-
PC or laptop connection
-
TV Connections
8.1 AV Connection
8.2 HDMI Connection
- First time usage
9.2 Hard disk formatting
9.2 Main screen
- Main Menu
10.1 Videos
10.2 Music
10.3 Pictures
10.4 Copy
10.5 Settings
- Basic operations
11.1 Music playback
11.2 Pictures playback
11.3 Video files playback
11.4 Files
22.5 Changing output resolution
- Network functions
12.1 Wired LAN connectionada
12.2 Wireless LAN connection
- Files sharing
13.1 Sharing files: Windows XP
13.2 Sharing files: Windows Vista
13.3 Sharing files: Windows 7
- Files access through a network
14.1 My Shortcuts
-
Firmware upgrading
-
FAQs
12.1.3 How to get the IP information of your PC under Windows Vista
Follow these steps to check the needed information under Windows Vista OS:
Step 1: Click on "Start" and select "Control Panel", "Status and network tasks".
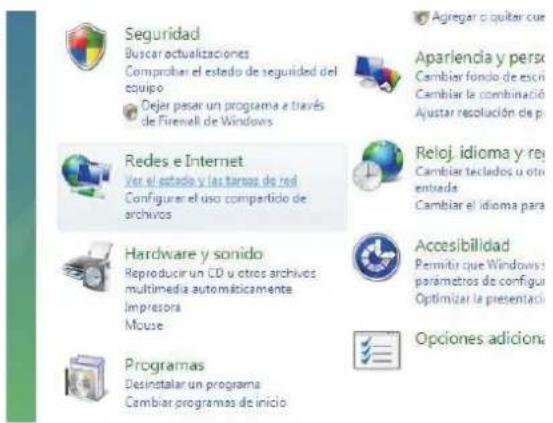
Step 3. Select "Details" in the pop up window.

Step 4. The values you need for network setup are:
IPv4 IP Address IPv4 Subnet mask IPv4 Gateway IPv4 DNS Server

-
Welcome
-
Features
-
System requirements
-
Content
-
Hardware
-
Remote control
6.1 Batteries installation
-
PC or laptop connection
-
TV Connections
8.1 AV Connection
8.2 HDMI Connection
- First time usage
9.2 Hard disk formatting
9.2 Main screen
- Main Menu
10.1 Videos
10.2 Music
10.3 Pictures
10.4 Copy
10.5 Settings
- Basic operations
11.1 Music playback
11.2 Pictures playback
11.3 Video files playback
11.4 Files
22.5 Changing output resolution
- Network functions
12.1 Wired LAN connectionada
12.2 Wireless LAN connection
- Files sharing
13.1 Sharing files: Windows XP
13.2 Sharing files: Windows Vista
13.3 Sharing files: Windows 7
- Files access through a network
14.1 My Shortcuts
-
Firmware upgrading
-
FAQs
12.1.4 How to get IP information of your PC under Windows 7
Follow these steps to check the needed information under Windows 7 OS:
Step 1. Click on "Start" and select "Control panel", "Status and network tasks".

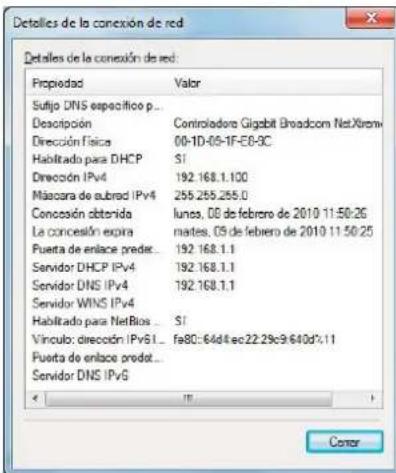
Step 3. Select "Details" in the pop up window.

Step 4. These are the needed values for the network setup:
IPv4 IP Address
IPv4 Subnet mask
IPv4 Gateway
IPv4 DNS server
-
Welcome
-
Features
-
System requirements
-
Content
-
Hardware
-
Remote control
6.2 Batteries installation
-
PC or laptop connection
-
TV Connections
8.1 AV Connection
8.2 HDMI Connection
- First time usage
9.2 Hard disk formatting
9.2 Main screen
- Main Menu
10.1 Videos
10.2 Music
10.3 Pictures
10.4 Copy
10.5 Settings
- Basic operations
11.1 Music playback
11.2 Pictures playback
11.3 Video files playback
11.4 Files
22.5 Changing output resolution
- Network functions
12.1 Wired LAN connectionada
12.2 Wireless LAN connection
- Files sharing
13.1 Sharing files: Windows XP
13.2 Sharing files: Windows Vista
13.3 Sharing files: Windows 7
- Files access through a network
14.1 My Shortcuts
-
Firmware upgrading
-
FAQs
12.2 Wireless LAN Connection
To connect the media player to a wireless network you must have a compliant USB wireless LAN adaptor* (not included). Connect the adaptor to the USB Host port of the device and follow these steps to setup the wireless connection.
* For further information about compliant WiFi adaptors please visit our official website www.sveon.com
Go to "Setting" menu, select "Network" option and "Wireless setup", you may have different connection profiles. Select one of them and choose between the "Infrastructure (AP)" connection or "Point to Point (Ad Hoc)" connection.
12.2.1 Infrastructure (AP)
-
Once selected a connection profile, select the mode "Infrastructure (AP)".
-
The device will scan all the available networks.

- Select the network and include the password (WEP or WPA) using the virtual keyboard.
![Audio Video Red Sistema MISC Clave WPA 1 2 3 4 5 OK 6 7 8 9 0 q w e r t CAPS y u i o p a s d f g <- h j k l - z x c v b -> n m / \ _ = [ ] ? shift : - - -](/content/2026/05/1120825/images/7a2252af341d1d8b4f6416a86a6cc4a41c04f2e221345d2442bf69e0015cc32a.jpg)
SPM3500 User guide
Index
-
Welcome
-
Features
-
System requirements
-
Content
-
Hardware
-
Remote control
6.1 Batteries installation
-
PC or laptop connection
-
TV Connections
8.1 AV Connection
8.2 HDMI Connection
- First time usage
9.2 Hard disk formatting
9.2 Main screen
- Main Menu
10.1 Videos
10.2 Music
10.3 Pictures
10.4 Copy
10.5 Settings
- Basic operations
11.1 Music playback
11.2 Pictures playback
11.3 Video files playback
11.4 Files
22.5 Changing output resolution
- Network functions
12.1 Wired LAN connectionada
12.2 Wireless LAN connection
- Files sharing
13.1 Sharing files: Windows XP
13.2 Sharing files: Windows Vista
13.3 Sharing files: Windows 7
- Files access through a network
14.1 My Shortcuts
-
Firmware upgrading
-
FAQs
-
Once the network password is written, the next window will appear.
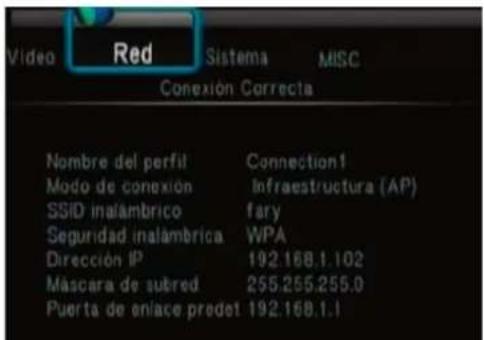
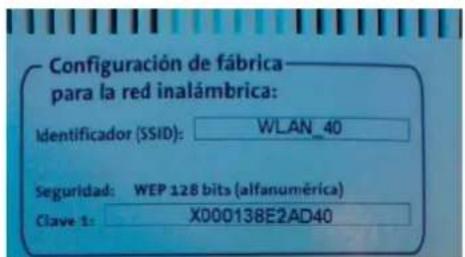
If you have a WEP password please note the device only supports Hex code. Ex: if your password is "X000138E2AD40" in ASCII code, in Hex the password would be 58303030313338453241443430. You can find a Hex to ASCII conversor in the CD Driver of the device.
Example of WEP password SSID WLAN_40 with password X000138E2AD40:
- Enter the password in the ASCII conversor for WEP passwords and clic on "Convert" to know the password in Hex code. The WEP code in Hex format is: "58303030313338453241443430". This is the value you have to enter in your Sveon device to connect it to the network.
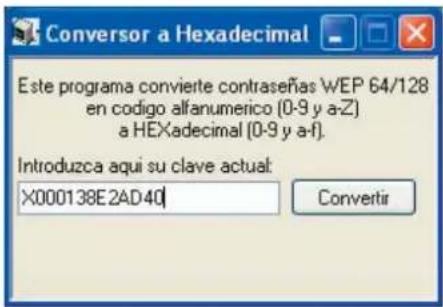
- Enter the ASCII code, keeping uppercase and lowercase letters.


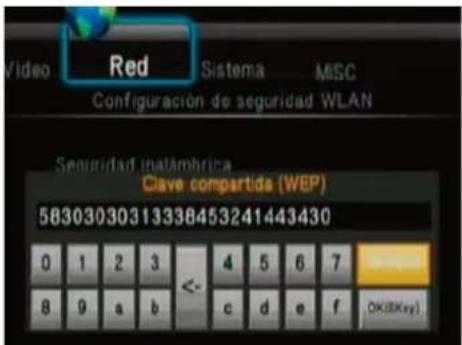
- Enter WEP password as shown in the picture. The password "58303030313338453241443430" is the result of conver the router password "X000138E2AD40" from ASCII to Hex using the converter application included in the CD Driver of the device.
SPM3500 User guide
Index
-
Welcome
-
Features
-
System requirements
-
Content
-
Hardware
-
Remote control
6.1 Batteries installation
-
PC or laptop connection
-
TV Connections
8.1 AV Connection
8.2 HDMI Connection
- First time usage
9.2 Hard disk formatting
9.2 Main screen
- Main Menu
10.1 Videos
10.2 Music
10.3 Pictures
10.4 Copy
10.5 Settings
- Basic operations
11.1 Music playback
11.2 Pictures playback
11.3 Video files playback
12.4 Files
11.5 Changing output resolution
- Network functions
12.1 Wired LAN connectionada
12.2 Wireless LAN connection
- Files sharing
13.1 Sharing files: Windows XP
13.2 Sharing files: Windows Vista
13.3 Sharing files: Windows 7
- Files access through a network
14.1 My Shortcuts
-
Firmware upgrading
-
FAQs
-
Wait while the device is connected to the selected network.

12.2.2 Point to Point (Ad Hoc)
The Point to Point connection (Ad Hoc) is used to connect two devices through a wireless network without the usage of a router which distributes the signal; it means the device works as a WiFi router. Follow these steps to complete the connection in Point to Point mode.
- Select a connection profile and select the option "Point to Point (Ad Hoc)".
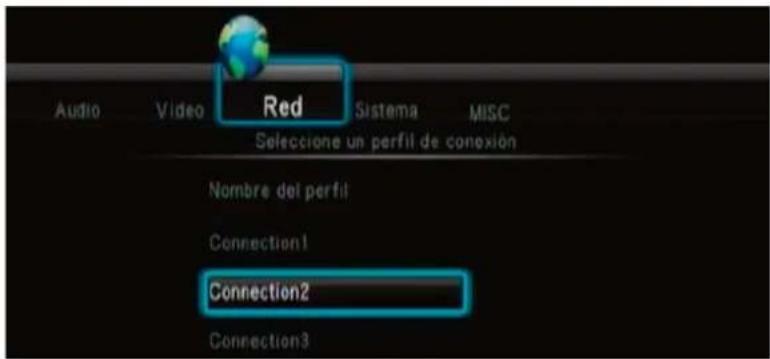
- The device assigns a name to a WiFi network but it doesn't assign a password.
- You can choose the network name: select "Wireless SSID" and press "OK", enter the new network name using the virtual keyboard and then confirm it.

-
Welcome
-
Features
-
System requirements
-
Content
-
Hardware
-
Remote control
6.1 Batteries installation
-
PC or laptop connection
-
TV Connections
8.1 AV Connection
8.2 HDMI Connection
- First time usage
9.2 Hard disk formatting
9.2 Main screen
- Main Menu
10.1 Videos
10.2 Music
10.3 Pictures
10.4 Copy
10.5 Settings
- Basic operations
11.1 Music playback
11.2 Pictures playback
11.3 Video files playback
11.4 Files
12.5 Changing output resolution
12. Network functions
12.1 Wired LAN connectionada
12.2 Wireless LAN connection
13. Files sharing
13.1 Sharing files: Windows XP
13.2 Sharing files: Windows Vista
13.3 Sharing files: Windows 7
14. Files access through a network
14.1 My Shortcuts
15. Firmware upgrading
16. FAQs
- In addition, you can assign a WEP password to the network. Select the field "Shared password (WEP)" and press "Ok". Then, enter the password using the virtual keyboard and press "OK (Open)" and "Play" button to exit.

- The IP assigned under Ad Hoc mode is automatically shown onscreen.

- When the device connection is configured, you need to use a Wireless LAN compliant adaptor to connect it though a wireless network. Connect the adaptor to the USB Host port of the unit and you will be able to connect from the device to your computer without the usage of a Modem or a WiFi Router.

- Go to the wireless available networks menu in your PC where the network called "Sveon" is shown (this is the network previously configured). Press twice over the network and enter the password (1234567890) to connect.
SPM3500 User guide
Index
-
Welcome
-
Features
-
System requirements
-
Content
-
Hardware
-
Remote control
6.1 Batteries installation
-
PC or laptop connection
-
TV Connections
8.1 AV Connection
8.2 HDMI Connection
- First time usage
9.2 Hard disk formatting
9.2 Main screen
- Main Menu
10.1 Videos
10.2 Music
10.3 Pictures
10.4 Copy
10.5 Settings
- Basic operations
11.1 Music playback
11.2 Pictures playback
11.3 Video files playback
11.4 Files
22.5 Changing output resolution
- Network functions
12.1 Wired LAN connectionada
12.2 Wireless LAN connection
- Files sharing
13.1 Sharing files: Windows XP
13.2 Sharing files: Windows Vista
13.3 Sharing files: Windows 7
- Files access through a network
14.1 My Shortcuts
-
Firmware upgrading
-
FAQs
13. Files sharing
Please read carefully the following indications to share files between the device and your computer or laptop:
- The computer must be powered on and connected to the network.
- The folder which contents the files must be shared through the network.
- We recommend to use a fixed IP in the unit.
- The computer and the device must have the same Gateway and Subnet mask.
13.1 Files sharing through a network: Windows XP
Step 1. Right click over the folder you want to share. Select the option "Share and security".
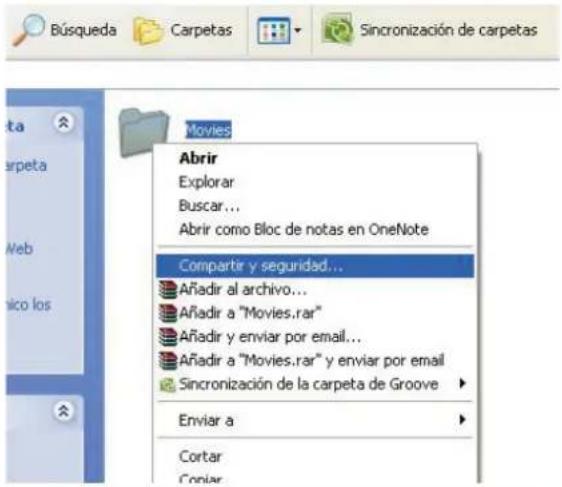
Step 2. Select "Share this folder through the network" and click on "Ok".

13.2 Files sharing through a network: Windows Vista
Important. Before setting the network under Windows Vista, note you must do the changes as system administrator.
There are different ways to share files under Windows Vista OS:
13.2.1 Files sharing under Windows Vista. Mode 1.
Follow these steps to share files through a network under Windows Vista operating system:
- Click on Start> Setup> Control Panel> User accounts.
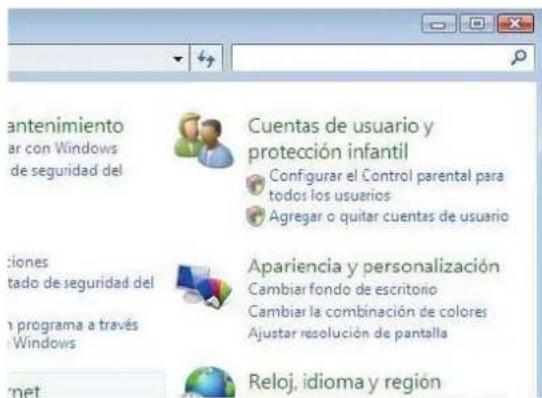
-
Welcome
-
Features
-
System requirements
-
Content
-
Hardware
-
Remote control
6.1 Batteries installation
-
PC or laptop connection
-
TV Connections
8.1 AV Connection
8.2 HDMI Connection
- First time usage
9.2 Hard disk formatting
9.2 Main screen
- Main Menu
10.1 Videos
10.2 Music
10.3 Pictures
10.4 Copy
10.5 Settings
- Basic operations
11.1 Music playback
11.2 Pictures playback
11.3 Video files playback
11.4 Files
21.5 Changing output resolution
- Network functions
12.1 Wired LAN connectionada
12.2 Wireless LAN connection
13. Files sharing
13.1 Sharing files: Windows XP
13.2 Sharing files: Windows Vista
13.3 Sharing files: Windows 7
- Files access through a network
14.1 My Shortcuts
-
Firmware upgrading
-
FAQs
-
Click on "Create a new account".
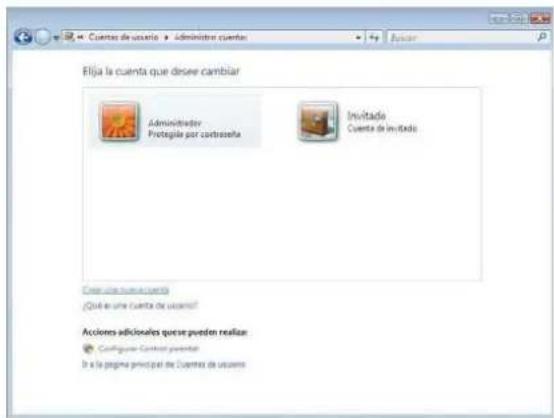
- Create a new user called "Guest" and select the option "Standard user". Click on "Create account".

- Go to the new user profile and choose the option "Create a password".

- Enter the password and click on "Create password".
- Go to "My Comptuer" and select the folder you want to share by right clicking over the folder and selecting "Share".

- Select the user called "Guest" as allowed user and click on "Share".

-
Welcome
-
Features
-
System requirements
-
Content
-
Hardware
-
Remote control
6.2 Batteries installation
-
PC or laptop connection
-
TV Connections
8.1 AV Connection
8.2 HDMI Connection
- First time usage
9.2 Hard disk formatting
9.2 Main screen
- Main Menu
10.1 Videos
10.2 Music
10.3 Pictures
10.4 Copy
10.5 Settings
- Basic operations
11.1 Music playback
11.2 Pictures playback
11.3 Video files playback
11.4 Files
22.5 Changing output resolution
- Network functions
12.1 Wired LAN connectionada
12.2 Wireless LAN connection
- Files sharing
13.1 Sharing files: Windows XP
13.2 Sharing files: Windows Vista
13.3 Sharing files: Windows 7
- Files access through a network
24.1 My Shortcuts
-
Firmware upgrading
-
FAQs
13.2.1 Files sharing under Windows Vista. Mode 2.
There are a different way to share files under Windows Vista OS. Please follow these steps:
- Click on Start and Control Panel.
- Select "Networks and Internet" > "Shared resources".
- Setup the options "Share" and "Detect" as shown in the picture.

Network detection: Enabled
Shared files usage; Enabled
Public Access folder shared usage: Enabled (read only)
Shared usage protected with password: Disabled
When the configuration is finished, all the files saved in the folder "Public Access" will be available to be shared through the network.

13.3 Files sharing through a network: Windows 7.
Follow these steps to share files through a network under Windows 7 operating system.
- Press Start > Control panel.

- Select "Network and Internet" and "Status and network tasks".

Seguridad
Hydrogen 6 quinor acetate as usual
-
Welcome
-
Features
-
System requirements
-
Content
-
Hardware
-
Remote control
6.1 Batteries installation
-
PC or laptop connection
-
TV Connections
8.1 AV Connection
8.2 HDMI Connection
- First time usage
9.2 Hard disk formatting
9.2 Main screen
- Main Menu
10.1 Videos
10.2 Music
10.3 Pictures
10.4 Copy
10.5 Settings
- Basic operations
11.1 Music playback
11.2 Pictures playback
11.3 Video files playback
11.4 Files
22.5 Changing output resolution
- Network functions
12.1 Wired LAN connectionada
12.2 Wireless LAN connection
- Files sharing
13.1 Sharing files: Windows XP
13.2 Sharing files: Windows Vista
13.3 Sharing files: Windows 7
- Files access through a network
14.1 My Shortcuts
-
Firmware upgrading
-
FAQs
-
Press over the left menu "Change advanced shared usage configuration"

- Change the field "Enable the shared usage with password protection" and disable this option. Then click on "Save changes".
- Search the folder you want to share, right clicking over it and select "Properties".
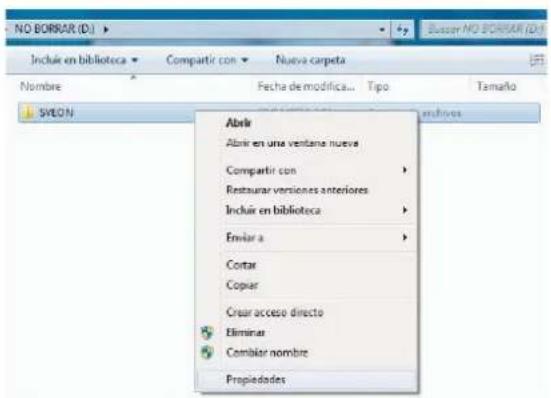
- Select "Share" and "Advanced shared usage".

- Select the option "Share this folder" and press on "Apply".
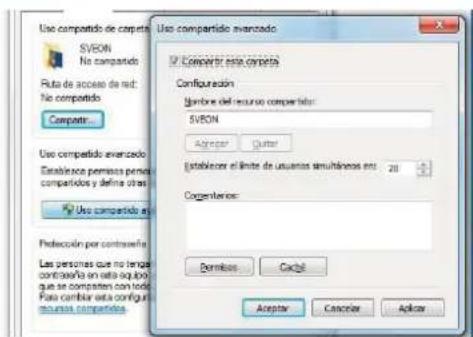
- Access to "Network" menu in the SPM3500 device to access to the computer shared files.
SPM3500 User guide
Index
-
Welcome
-
Features
-
System requirements
-
Content
-
Hardware
-
Remote control
6.1 Batteries installation
-
PC or laptop connection
-
TV Connections
8.1 AV Connection
8.2 HDMI Connection
- First time usage
9.2 Hard disk formatting
9.2 Main screen
- Main Menu
10.1 Videos
10.2 Music
10.3 Pictures
10.4 Copy
10.5 Settings
- Basic operations
11.1 Music playback
11.2 Pictures playback
11.3 Video files playback
11.4 Files
22.5 Changing output resolution
- Network functions
12.1 Wired LAN connectionada
12.2 Wireless LAN connection
- Files sharing
13.1 Sharing files: Windows XP
13.2 Sharing files: Windows Vista
13.3 Sharing files: Windows 7
- Files access through a network
14.1 My Shortcuts
-
Firmware upgrading
-
FAQs
14. File access through a network
To access to the shared files through a network go to "Network" menu, after finished the network configuration. You can connect it in wired or wireless mode. You can access to the shared files through "My Shortcuts" or through the Workgroup.
14.1 My Shortcuts
You can access to the shared files through the network by selecting the PC name from the Net menu or indicating a file server IP:
- Go to "Net", "My Shortcuts" and press "Edit" button of the remote control.

- Select "Add" option and press "OK" button of the remote control.

- Enter all the required information: Profile user name (Ex: Guest), Password (Ex: Guest) and the server IP (IP of the computer which contents the files you want to share).
After entering all the required information click on "Accept" and if all the information is correct, a message will appear onscreen.
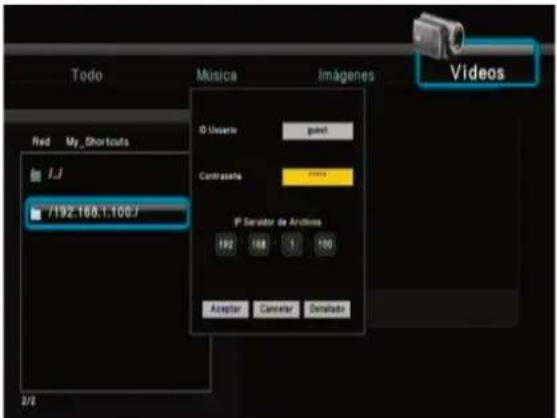
- When you have accessed to the computer through the network, you can see and explore the shared folders and play them in streaming mode without the needing to copy them previously in the hard disk of the device.
If the folders are not shown, select again "My Short-cuts" menu by entering the IP of the files server.

SPM3500 User guide
Index
-
Welcome
-
Features
-
System requirements
-
Content
-
Hardware
-
Remote control
6.2 Batteries installation
-
PC or laptop connection
-
TV Connections
8.1 AV Connection
8.2 HDMI Connection
- First time usage
9.2 Hard disk formatting
9.2 Main screen
- Main Menu
10.1 Videos
10.2 Music
10.3 Pictures
10.4 Copy
10.5 Settings
- Basic operations
11.1 Music playback
11.2 Pictures playback
11.3 Video files playback
11.4 Files
22.5 Changing output resolution
- Network functions
12.1 Wired LAN connectionada
12.2 Wireless LAN connection
- Files sharing
13.1 Sharing files: Windows XP
13.2 Sharing files: Windows Vista
13.3 Sharing files: Windows 7
- Files access through a network
14.1 My Shortcuts
-
Firmware upgrading
-
FAQs
15. Firmware upgrading
The firmware of the device can be upgraded to improve its usage. All the firmware upgrades of the device are available in our official website www.sveon.com; you can also ask for them to our Technical Support department.
If you want to upgrade the firmware of your unit, please follow these steps:
- Copy the upgrade file in an USB storage unit (like a pen drive).
- Connect the USB storage device to the unit through its USB Host port.
- Go to the "Main Menu", press "Settings" > "System" and "System upgrade".
- Wait during some seconds. The unit will be restarted and will show the following picture:

- Do not press any button during the upgrade process. Besides, make sure the device is not unplug while it is being upgraded because it may damage the device.

-
When the process finishes, the device is restarted automatically.
-
Disconnect the USB device from the USB Host port.
If you have any doubt, please contact with our Technical Assistant Department.
16. FAQs
May I format the hard disk in my computer?
Yes, we recommend you to format it in NTFS.
The remote control keys don't work but the device buttons work...
Please check if the batteries of the remote control are correctly installed and if they are charged.
The TV doesn't show signal.
Please check if the signal input selected in the TV screen matches with the connection between the TV and the device. Press TV System button several times to choose between the different video modes.
Network section doesn't show any IP.
Check if the network cable is connected or, if you are using WLAN connection, if the WiFi adaptor is connected. Check also if the router assigns an IP automatically or if the manual IP has been entered correctly.
Doesn't appear any shared files in network section.
Please check if the folder is shared in your computer and if you are connected through a network.
I can not connect to my router through WLAN.
Please check if your SSID (WiFi name) is correct and if it is enabled.
If you are using WEP password and you have converted the password, please check if the password is correct.
Check also if you receive WiFi signal enough to have an optimal connection.
SPM3500 User guide
Index
-
Welcome
-
Features
-
System requirements
-
Content
-
Hardware
-
Remote control
6.1 Batteries installation
-
PC or laptop connection
-
TV Connections
8.1 AV Connection
8.2 HDMI Connection
- First time usage
9.2 Hard disk formatting
9.2 Main screen
- Main Menu
10.1 Videos
10.2 Music
10.3 Pictures
10.4 Copy
10.5 Settings
- Basic operations
11.1 Music playback
11.2 Pictures playback
11.3 Video files playback
11.4 Files
22.5 Changing output resolution
- Network functions
12.1 Wired LAN connectionada
12.2 Wireless LAN connection
- Files sharing
13.1 Sharing files: Windows XP
13.2 Sharing files: Windows Vista
13.3 Sharing files: Windows 7
- Files access through a network
14.1 My Shortcuts
-
Firmware upgrading
-
FAQs

- Ajustes
- Welcome
- Features
- System requirements
- Content
- Hardware
- Frontal panel
- SPM3500 User guide
- Index
- Rear panel
- Side panel
- Remote control
- Batteries installation
- PC or laptop connection
- TV Connections
- AV Connection
- HDMI Connection
- First time usage
- Hard disk formatting
- Important
- Main Menu
- Videos
- Pictures
- Settings
- Audio
- Video
- Network
- System
- MISC
- Basic operations
- Music playback
- Pictures playback
- Video playback
- Files
- Change output resolution
- Network functions
- Wired LAN Connection
- IP Setting
- Auto IP Setup
- Note:
- How to get the IP information of your PC under Windows XP
- How to get the IP information of your PC under Windows Vista
- How to get IP information of your PC under Windows 7
- Wireless LAN Connection
- Infrastructure (AP)
- Point to Point (Ad Hoc)
- Files sharing
- Files sharing through a network: Windows XP
- Files sharing through a network: Windows Vista
- Files sharing under Windows Vista. Mode 1.
- Files sharing under Windows Vista. Mode 2.
- Files sharing through a network: Windows 7.
- File access through a network
- My Shortcuts
- Firmware upgrading
- FAQs
Brand : Sveon
Model : SPM3500
Category : Media player